Setting up value choices
If you select the Single Select option for a Field Type for the recipient to choose a single value from a picklist in a Form, then you have to create a list of Value Choices to populate the picklist. This applies both to events. For example, to choose a City or Session for an event from a list, or to select how long the recipient has been a customer from a list of time range.
Example: To set up a list of value choices for a new custom field:
-
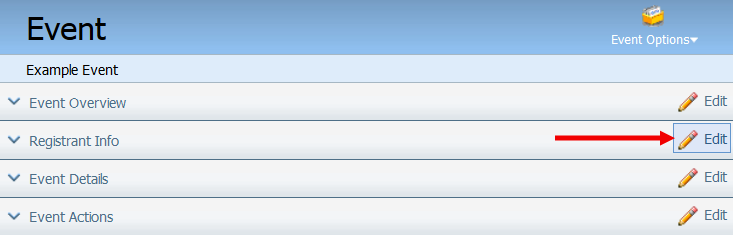
Navigate to Orchestration
 > Tools, then click Events.
 - Open an existing event, or create a new one.
-
Click Edit next to the Registrant Info heading.

The Registrant Info configuration window opens.
-
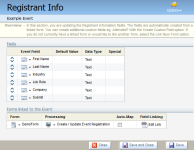
Under the Fields section, click the drop-down arrow next to the desired field in the Event Field column, then click Edit Custom Object Record Field.
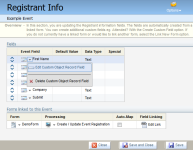
The Custom Object Record Field configuration window opens.
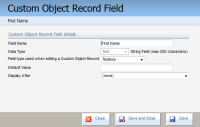
- From the Custom Object Record Field configuration window, because you are defining the parameters for a custom object record field in an event, chose Single Select from the Field Type... picklist. The dialog box expands to show the Picklist Value Choices picklist and associated buttons (Edit and New).
-
If the value choices already exist, you can select them from the picklist. Or, you can select an existing list from the picklist, then click Edit to modify it.
Or
To create a new value choices list, click New.
Example: The following steps follow from clicking New.
- If you click New in the Picklist Value Choices dialog box, fill in Picklist Name and click Save to create the list. The dialog box expands to let you add individual value choices.
-
For the first value in the list, under Add Value Choice, enter an Option Value (the value resulting from selecting this item in the list) and the Display Name (the name for this item displayed in the picklist) and click Add.
Note: Nothing is shown in the Full Editor or List Preview areas until you add the first value choice, but once you click Add, the added item is shown under both.
- Add additional value choices as required. With each additional item, you can select where to place it in the picklist by selecting Add After and choosing the item you want to place it after in the list. The cumulative results as they will appear in the final picklist are shown in the List Preview area.
- Click Save and Close when you are finished.