Assigning security labels to contacts using the program builder
Note: The program builder is an application separate from the Program Canvas. Program Canvas is an easy to use, drag-and-drop whiteboard that allows you to transform data within Oracle Eloqua in real-time.
This topic runs through an example of setting up a program, in the program builder, to assign security labels to your contacts. This method is an alternative to the more streamlined process in the label assignment workflow canvas.
Note: The steps below provide a very basic outline for building a label assignment program. Your own program designs will inevitably vary, depending the logic you set up using program steps, decisions, and actions.
Tip: If you do not have much experience using the program builder, you can consult the various program builder topics for more information. However, we generally recommend the label assignment workflow canvas, as it supports a faster setup process, faster routing, and a faster integration logic for CRMs.
While there is a range of flexibility for your program design, there are a few general steps to follow in building a program:
- Creating the program entry point
- Add contacts to the program entry point
- Decision rule: does the contact already have a label?
- Assign labels to contacts
- Remove labels from contacts
Creating the program entry point
Every program requires an entry point through which selected contacts enter the program workflow. When you create the program, you need to configure the first step as an entry point.
To create the program entry point:
-
Navigate to Orchestration
 > Tools, then click Program Builder.
 -
Create a new program.
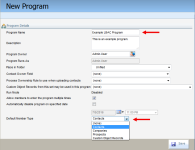
- Type a name into the Program Name field. For example, "Label Assignment."
- Select Contacts from the Default Member Type drop-down list.
- Click Save.
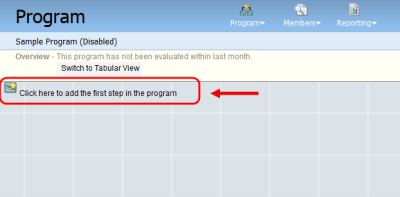
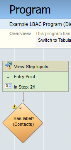
- Click Edit Program Flow. The program flowchart then opens in the diagram view.
-
Click on the first step, where indicated, in order to configure it.
-
Configure the Program Step Details.
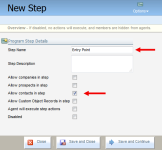
- Type a name into the Step Name field. For example, "Entry" or "Entry Point."
- Select the Allow contacts in step check box.
- Click Save and Continue.
-
Configure the Edit Action window for this step.
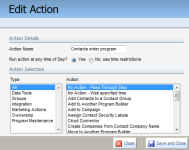
- (Optional) Type a name into the Action Name field. For example, "Contacts enter program."
- Select the Run action at any time of Day? option.
- Select All in the Type field.
- Select No Action - Pass Through Step in the Action field.
- Click Save and Close. The window then closes, and are you are returned to the program flowchart.


The first program step is configured for entry; you now need to add contacts to the step.
Add contacts to the program entry point
Use a program feeder to add contacts to the program entry point.
To add contacts to the program entry point:
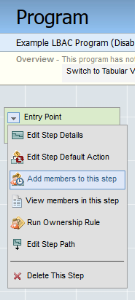
-
Click the drop-down arrow on the first step, then click Add members to this step.
-
Create a program feeder to automatically feed contacts into the program.
-
Click New.
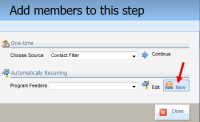
- Type a name into the Program Feeder Name field. For example, "LBAC - All North American Contacts."
-
Select the source of contacts from the Source of program members drop-down list. Your options are:
- Contacts in Filter: Pulls contacts from your database using a contact filter.
- Contacts in Group: Pulls contacts from a contact group.
- Contacts in Group and Filter Overlap: Pulls members that are both in a selected contact group and a selected contact filter
Note: For the purposes of this program example, this topic follows selecting Contacts in Filter.
- Click the Contact Filter
 search icon.
 -
Search for and select a contact filter, then click OK.

-
Select frequency from the Evaluate drop-down list. This is the frequency at which the program feeder will look for contacts, and then pull contacts that meet the filter criteria into the program entry point.
The shortest interval that you can select is once every hour; the longest interval is once every year.Tip: One of the advantages of using the label assignment workflow canvas, as opposed to the program builder, is that the workflow canvas can listen for contact creation in your database in realtime and add them to your label assignment program immediately (as opposed to waiting for a scheduled evaluation).
- Click Save and Close.
The window then closes, and are you are returned to the program flowchart. The entry step will pull contacts into the workflow, and send them to the subsequent steps, once the program is active.
You must now create the rest of the program workflow.Note: This is the point at which program designs can vary, depending on your business needs and planned label structure. The remaining steps in this topic serve to show your options in evaluating contacts for any currently applied labels, applying labels to contacts, and removing labels from contacts.
Decision rule: does the contact already have a label?
Use a decision rule to filter for contacts who already have a label assigned to them, before routing contacts on a "Yes" or "No" path. This decision is useful in scenarios where default labels have been assigned to contacts, and those default labels need to be removed before further label assignment.
To add and configure the decision rule:
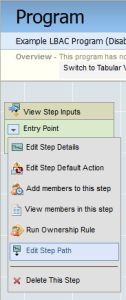
-
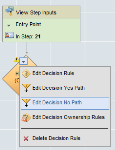
Click the drop-down arrow on the first step, then click Edit Step Path.
-
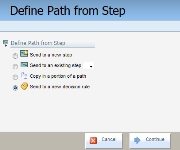
Select the Send to a new decision rule option, then click Continue.
-
Configure the Decision Rule Details to determine if an incoming contact already has a label assigned to it.
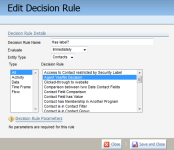
- Type a name into the name field. For example, "Has Label?"
- Select Immediately from the Evaluate drop-down list.
- Select Contacts from the Entity Type drop-down list.
- Select All from the Type field.
-
Select Access to Contact restricted by Security Label from the Decision Rule field.
Additional options then appear under the Decision Rule Parameters area.

-
Select one of the following options:
- Access to contact is restricted by any Security Label: The decision will be based on whether or not a contact has any security label.
- Access to contact is restricted by a Security Label in a specific category: The decision will be based on if a contact has a label in a specified category. Click the adjacent
 icon to search for and select a category.
 - Access to contact is restricted by a specified Security Label: The decision will be based on whether or not a contact has a specified label. Click the adjacent icon to search for and select a label.
- Click Save and Close. The window then closes, and are you are returned to the program flowchart.
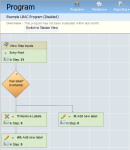
The decision rule is added to the flowchart. However, the decision rule is incomplete until the "Yes" and "No" paths are defined. This is indicated by the yellow caution symbol that appears on the decision rule.
Assign labels to contacts
Configure a step action to assign a specific label to a contact that passes through the step.
Note: For the purposes of the example outlined in the sections above, the following steps involve routing contacts who do not have a security label through the "No" path of a decision, and onward to a step where the label is assigned. The scenario in which you use this step action will vary, depending on your program design.
To assign labels to contacts:
-
Click the drop-down arrow on the decision rule, then click Edit Decision No Path.
- Select Send to a new step, then click Continue.
-
Configure the Program Step Details. The only required fields are:
- Type a name into the Step Name field. For example, "No" or "No label."
- Select the Allow contacts in step check box.
- Click Save and Continue.
-
Configure the Edit Action window for this step.

- (Optional) Type a name into the Action Name field. For example, "Add Label."
- Select the Run action at any time of Day? option.
- Select Ownership in the Type field.
-
Select Assign Contact Security Labels in the Action field.
The Select Label field appears in the Action Parameters section below.
-
Select the desired label from the Select Label drop-down list.
Important: If you do not see the desired label in the drop-down, then the label has not been assigned to your user security group. Even administrators will need to have labels assigned to their security group before they can configure this step.
- Click Save and Close.
The "No" path, and the subsequent program step, are configured. Contacts routed along the "No" path will be assigned the selected label once the program is activated. You can add subsequent steps along this path as needed.
Remove labels from contacts
Configure a step action to remove all labels from a contacts that passes through the step.
Note: For the purposes of the example outlined in the sections above, the following steps involve routing contacts who have a security label through the "Yes" path of a decision, and onward to a step where the label is removed. The scenario in which you use this step will vary, depending on your program design.
To remove labels from contacts:
-
Click the drop-down arrow on the decision rule, then click Edit Decision Yes Path.

- Select Send to a new step, then click Continue.
-
Configure the Program Step Details. The only required fields are:
- Type a name into the Step Name field. For example, "Yes" or "Has a label."
- Select the Allow contacts in step check box.
- Click Save and Continue.
-
Configure the Edit Action window for this step:
- (Optional) Type a name into the Action Name field. For example, "Remove labels."
- Select the Run action at any time of Day? option.
- Select Ownership in the Type field.
- Select Remove Contact Security Labels in the Action field.
- Click Save and Close.
The "Yes" path, and the subsequent program step, are configured. Contacts routed along the "Yes" path will have their labels removed once the program is activated. You can add subsequent steps along this path as needed.
The example program is configured, and can be activated at any time. Your own program designs may vary.
See creating programs for more information on creating, editing, and activating programs in general.
-


