Assigning business units to security groups
As an administrator, you can assign a business unit label to multiple security groups at once. When users are a part of a business unit, they have access to all of the assets and data within those business units.
To assign a business unit label to a security group:
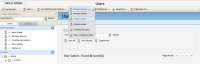
- Click Settings
 .
. - Click Users in the Users and Security area.
- Click Contact Security, then click Assign Labels.
- Click a business unit label contained by the business unit category.
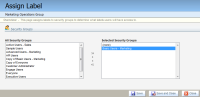
Example: In the following image, the business unit category is Marketing, and the two labels under this category are the Marketing Automation Group and the Marketing Operations Group.
The Assign Label window opens.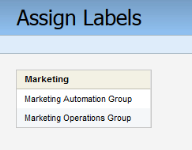
For the purposes of this example, we will click Marketing Operations Group, the label to which the selected security groups will have access.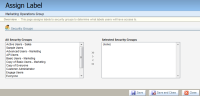
- In the left All Security Groups field, click the name of the security group you to which you want to assign the label.
- Click the > button. The security group is assigned the label, and the name of the group appears in the right Selected Security Groups field.
Note: You can also double-click a group in the left field to add the label to that group. Additionally, clicking the double arrow >> button will add the label to all groups, and all groups will appear in the right Selected Security Groups field.
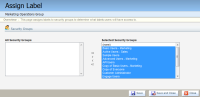
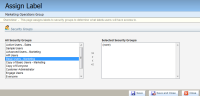
To remove a label from a group, select the group in the right Selected Security Groups column and click the < button. The label is removed from the group, and the name of the group reappears in the left All Security Groups field. Clicking the double arrow << button will remove the label from all security groups, and all groups will appear in the left All Security Groups field. - Click Save and Close. A confirmation dialog will appear.
- Click OK.


The security groups are assigned to the selected business unit.