 |
Knowledge Base/Visual SML/Visual SML Documentation
Step 1: Visual SML Set-Up Guide! (Start here)
This guide is for customers who have purchased Visual SML and are just getting started. Once you complete going through the set-up steps you are ready to use the tool and move ahead to the basic tab construction.
If you are interested in our Visual SML offering but have not purchased it, please contact your Involver Sales Director or Account Manager. Or, if you are not an Involver customer just yet, please visit our website and click on Contact Us. One of our representatives will be reaching out shortly. Thank you!
Step 1: Add your Fan Page to the Social Apps tab of your AMP account (If you have already done this, skip down to Step 2: Add New Tab.)
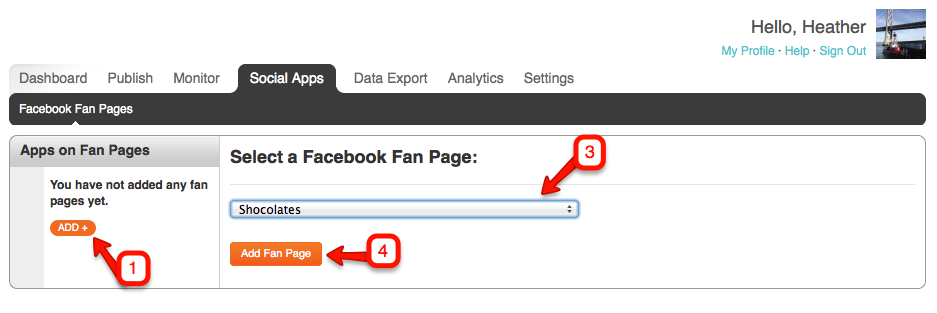
Log into your AMP account and go to the Social Apps tab:
- Click on the orange Add+ button to the left*
- When prompted, allow access to your pages to authorize the platform
- Select your page from the drop-down menu that appears
- Click on Add Fan Page.
You have successfully added your page to your account so that you can manage your Involver applications on that page AND add Visual SML tabs as well.
*Note: Page limit is set based on Contract. If you would like to purchase more page licenses, please contact your Sales Director or Account Manager.
Step 2: Add New Tab - Create and install a new Visual SML tab to your page directly from within AMP, without contacting Involver Support or your Account Manager.
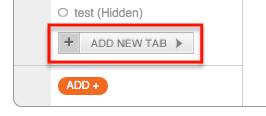
Start in the Social Apps tab of your AMP account:
- Click on the ADD NEW TAB button underneath the page name of the page for which you wish to add a new VSML tab.
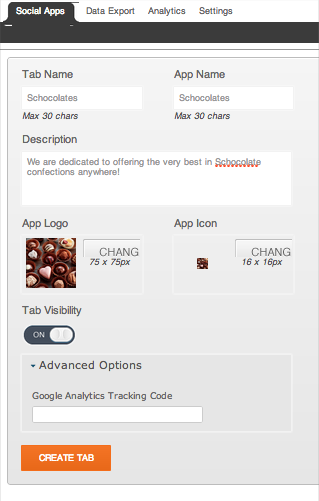
- Tab Name (Required): Enter in your desired Tab Name in the field provided. Note: This will be the name used on the page itself, displayed underneath the App on your page to users.
- App Name (Required): Enter in your desired App Name in the field provided. Note: This will be reflected in the tab list to the left of the current screen in AMP, as well used for any App Authorization dialogs and when sharing from the App.
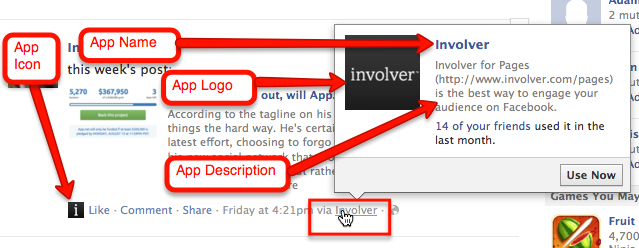
- Description (Required): Enter a sentence or two (140 characters MAX) informing users simply about your brand or more specifically about the app itself. Note: This can be seen in newsfeeds when a piece of content is shared from the app, the user can hover over the name of the app to view the App Name, Description of the app, and the App Logo (see next steps).
- App Logo: Click on the Change button to upload a 75x75px image. (Images larger or smaller than this will be re-sized to fit the 75x75 dimensions, so any square image will do but we recommend an image that is 75x75 or larger to avoid image distortion.) Note: This image will appear in the hover over state of the link for the app when content is shared from the app.
- App Icon: Click on the Change button to upload a 16x16px image. (Images larger or smaller than this will be re-sized to fit the 16x16 dimensions, so any square image will do but we recommend an image that is 16x16 or larger to avoid image distortion.) Note: This image will appear in the navigation menu on your page next to the Tab Name.
- Here is a screenshot of how the previous four items will display in a users newsfeed when content is shared from the app.
- Tab Visibility: Clicking on the ON/OFF switch will make the tab visible on the page or keep it hidden. When ON the tab will be live on the page. When OFF the tab is hidden from view on the page.
- When the tab is visible you will see a button to visit the application on your page. If it is hidden you will not see this button.
- Advanced Options: If you have a Google Analytics account, enter the tracking code here to track metrics related to the engagement and interaction on your tab. Click here for more information.
- Click on the CREATE TAB button to begin constructing your tab.
- Please note that your page must be pre-authorized by Involver before a new Visual SML tab can be successfully installed and configured on your page. If it is not pre-authorized, you will be prompted for a Developer Key. (DO NOT request a Developer Key as this will prevent your tab from ever being public.) Contact your Account Manager with your page URL and he or she will make sure that your page is authorized in our system.
Watch the Video here of this set up.
Tab Image: Please note that the image that displays on the page itself in your application options will default to the Logo that is uploaded through our platform, however the displayed image on the page is actually separate and can be edited on Facebook directly.
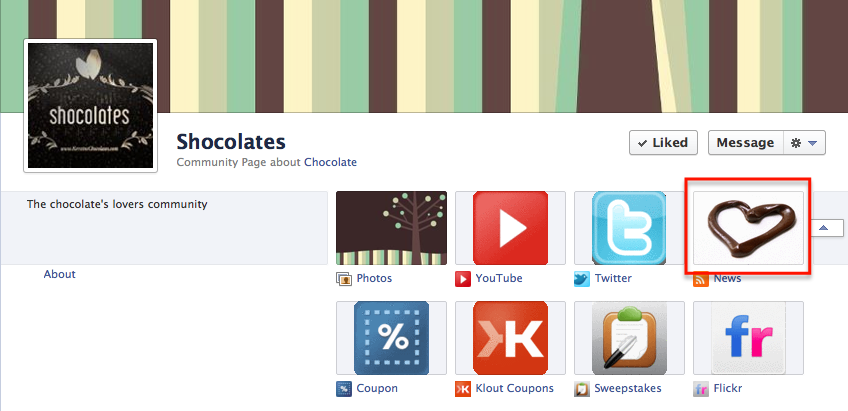
To do this:
- As an admin of the page click the arrow on the right to expand the apps
- Hover over the app for which you want to upload a new display image
- Click on the pencil that appears in the upper right corner of the app
- Click on Edit Settings in the menu that appears
- Next to Custom Tab Image, click on Change
- In the window that opens click on change again
- Browse your computer for your preferred 111x74px (3/2 ratio) image and upload
- Close that window and refresh your Facebook page to see the change
Skip to the next section for basic tab construction.