11 Customizing the User Interface
This chapter provides information on customizing the Oracle Communications Unified Inventory Management (UIM) user interface (UI), which is written using Oracle Application Development Framework (ADF) and Platform Common User Interface (CUI). The information in this chapter describes statically customizing the UI, which can result in backward compatibility issues. See "Backward Compatibility" for the implications regarding this type of extension.
UIM UI customizations are made in JDeveloper. After installing JDeveloper, you customize the UIM UI by importing the UIM_Home/app/inventory.ear file into JDeveloper and making the desired customizations. You then update the inventory.ear file with the customizations and redeploy it for testing.
Installing JDeveloper
Note:
Before installing JDeveloper, you must install the Java Development Kit (JDK). For information on installing JDK, see UIM Installation Guide.JDeveloper is included in the Unified Inventory Management software distribution on the Oracle Software Delivery Cloud. To install JDeveloper, contact your system administrator for the location of downloaded the JDeveloper JAR file.
-
Copy the JDeveloper JAR file named jdev_suite_version.jar to a local directory, such as JDev_Home where version is a version number in the filename.
-
From a command line, navigate to JDev_Home and run the following command:
java -jar jdev_suite_version.jarThis initiates the JDeveloper installer.
-
On the Welcome window, click Next.
The Choose Middleware Home Directory window appears.
-
Select Create a new Middleware Home, enter a middleware home directory name, and click Next.
Note:
The remainder of this chapter refers to the middleware home directory you entered as JDev_Home.The Choose Install Type window appears.
-
Select Complete and click Next.
The JDK Selection window appears.
-
Click Browse and navigate to your local installation of the JDK, and click Next.
The Confirm Product Installation Directories appears.
-
Take the defaults and click Next.
The Choose Shortcut Location window appears.
-
Take the defaults and click Next.
The Installation Summary window appears.
-
Take the defaults and click Next.
The installation begins.
-
When the installation completes, click Done.
Extracting the inventory.ear File into JDeveloper
To extract the inventory.ear file into JDeveloper:
-
Create a local directory, such as tempEar_Home.
-
Copy the UIM_Home/app/inventory.ear file to tempEar_Home.
-
Double-click the JDev_Home/jdeveloper/jdeveloper.exe file.
-
Set the role to Studio Developer by doing one of the following:
-
If the Select Role window appears when you launch JDeveloper:
Select Studio Developer (All Features) and click OK.
-
If the Select Role window does not appear when you launch JDeveloper:
From the JDeveloper menu, select Tools, then select Switch Roles, then select Studio Developer (All Features).
-
-
From the JDeveloper menu, select File, then select New, then select From Gallery.
The New Gallery window appears.
-
Under Categories, expand General, and select Applications.
-
Under Items, select Application from EAR File, and click OK.
The Create Application from EAR File window appears. This window has three parts: Location, Ear Modules, and Finish. Location appears first.
-
Next to the EAR File field, click Browse and navigate to the tempEar_Home/inventory.ear file.
Selecting the inventory.ear file automatically populates the fields on this window as follows:
-
EAR File defaults to tempEar_Home/inventory.ear, based on the selected EAR file.
-
Application File defaults to inventory, based on the name of the selected EAR file.
-
Directory defaults to C:/JDeveloper/mywork/inventory. You can change the defaulted directory to any directory you prefer. The directory specified gets created by the process you are about to initiate.
-
Source Roots defaults to tempEar_Home.
-
-
Leave the Copy Files to Application check box deselected, and click Next.
Ear Modules appears.
-
Accept the default module names and project names, and click Next.
Finish appears, showing the inventory.ear file location, and the location of the projects that JDeveloper is about to build based on the modules in the inventory.ear file.
-
Click Finish.
JDeveloper does the following:
-
Creates a workspace. The workspace directory name and location are based on the directory name and location specified in the Directory field on the Location window.
-
Creates an application in the workspace. The application name (inventory) is based on the imported EAR file name.
-
Creates several projects within the inventory application, as shown in Figure 11-1. Each project name is based on a module name from the selected inventory.ear file.
Figure 11-1 Inventory Application Projects
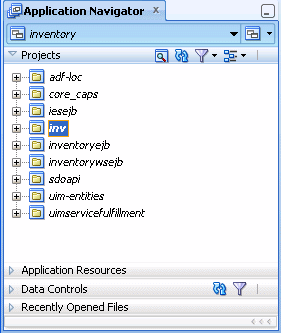
Description of ''Figure 11-1 Inventory Application Projects''
-
-
Delete all of the projects except the inv project by doing the following:
-
Select all of the projects except the inv project.
-
Right-click on the group of selected projects and select Delete Project.
The Confirm Delete Project window appears.
-
Select Remove projects from application, and click Yes.
-
Configuring the JDeveloper Project
You must configure the JDeveloper project to successfully compile the project.
To configure the JDeveloper project:
-
Outside of JDeveloper, copy the following JAR files from the UIM_Home/lib directory to a temporary directory used for the duration of extending the UI:
-
capacity_caps.jar
-
characteristic_caps.jar
-
comms-platform-ui.jar
The comms-platform-ui.jar file is located in the UIM_Home/lib/ comms-platform-webapp.war/WEB-INF/lib directory.
-
consumable_caps.jar
-
core_caps.jar
-
groupenabled-caps.jar
-
ies.jar
-
ojdbcversion.jar
-
poms.jar
-
sdoapi.jar
-
stringtemplate-version.jar
-
uim-api-framework.jar
-
uim-caps.jar
-
uim-entities.jar
-
uim-entity-xmlbean.jar
-
uim-managers.jar
-
uim-webservices-framework.jar
-
uim-webservices-framework-xsd.jar
where version is the version number in the filename.
-
-
In addition, copy the following JAR files from the cited directory to the same temporary directory:
-
adf_richclient-api-version.jar
The adf_richclient-api-version.jar file is located in the DOMAIN_NAME/servers/AdminServer/tmp/_WL_user/adf.oracle.domain.webapp/directory_name/WEB-INF/lib directory, where version is the version in the filename and directory_name is an auto-generated name that varies per installation.
-
platform-managers.jar
The platform-managers.jar file is located in the UIM_Home/app/version/uim_core_lib.ear/APP-INF/lib directory, where version is the UIM version number.
-
adfsharembean.jar
The adfsharembean.jar file is located in the Oracle_Home/oracle_common/modules/oracle.adf.share_version where version is the version number in the directory name.
-
-
In JDeveloper, select the inv project, right-click, and select Project Properties.
The Project Properties window appears.
-
In the navigation panel, click Libraries and Classpath.
The Project Properties Libraries and Classpath window appears.
-
Click Add JAR/Directory.
-
Navigate to the temporary directory that contains the copied JAR files.
-
Select all of the copied JAR files and click OK.
The JAR files are added to the Project Properties Libraries and Classpath window.
-
Click OK again to close the Project Properties window.
Customizing the User Interface
Customizations can be in the form of new files or additions to existing files. If you are deleting files or modifying existing files with changes or deletions, be aware of the errors this may cause. These types of errors are logged by Oracle WebLogic Server when you deploy the updated inventory.ear file.
Note:
You cannot customize the UIM home page.About the UI Files
UIM UI customizations involve several types of files, such as JSFF, XML, Java, and XLF files, as described in the following sections.
JSFF and XML Files
Each page in the UIM UI is defined by a JSFF and XML file. For example, the UIM Party Summary page is defined by the PartySummary.jsff and PartySummaryPageDef.xml, and the UIM Party Maintenance page is defined by the PartyEdit.jsff and PartyEditPageDef.xml files.
These files are located within the inventory application inv project, in the Web Content/oracle/communications/inventory/ui/functionalArea/page directory, where functionalArea is a UIM functional area such as equipment, number, service, and so forth.
Within each functionalArea/page directory, the JSFF and XML file names follow the naming convention shown in Figure 11-2. For example, each file name contains the entity name (Place, Party, and so forth), and the Web page (Search, List, Summary, Edit, and so forth). The XML page file names end with PageDef.
Figure 11-2 Page File Naming Conventions
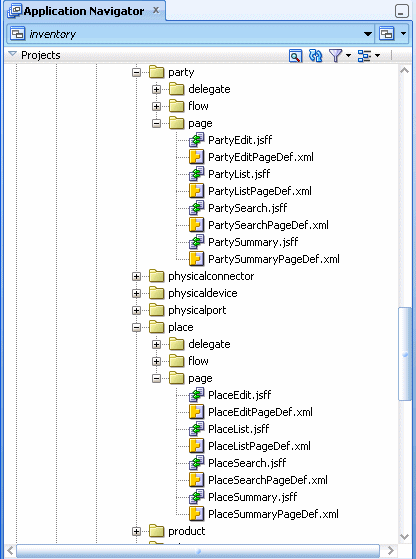
Description of ''Figure 11-2 Page File Naming Conventions''
XML Files
Each page in the UIM UI has a specific task flow defined by an XML file. For example, the UIM Party Summary page task flow is defined by the PartySummaryFlow.xml file, and the UIM Party Maintenance page task flow is defined by the PartyEditFlow.xml file.
These files are located within the inventory application inv project, in the Web Content/WEB-INF/oracle/communications/inventory/ui/functionalArea/flow directory, where functionalArea is a UIM functional area such as equipment, number, service, and so forth.
Within each functionalArea/flow directory, the XML file names follow the naming convention shown in Figure 11-3. For example, each file name contains the entity name (Place, Party, and so forth), and the Web page (Search, List, Summary, Edit, and so forth). The XML task flow file names end with Flow.
Figure 11-3 Task Flow File Naming Conventions
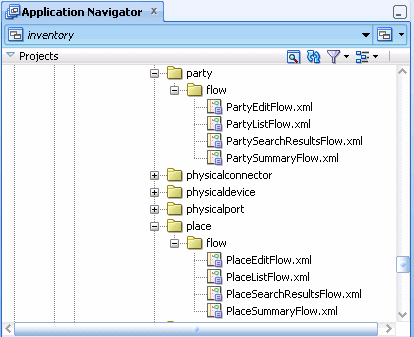
Description of ''Figure 11-3 Task Flow File Naming Conventions''
Java Files
The functionality of each page in the UIM UI is driven by logic in a Java source file that is compiled into a Java class file. For example, the UIM Equipment Summary page is driven by the EquipmentSummaryBean.class file, and the Equipment Maintenance page is driven by the EquipmentEditBean.class file.
These files are located within the inventory application inv project, in the Web Content/WEB-INF/classes/oracle/communications/inventory/ui/functionalArea /bean/page directory, where functionalArea is a UIM functional area such as equipment, number, service, and so forth.
Within each functionalArea/bean/page directory, the Java file names follow the naming convention shown in Figure 11-4. For example, each file name contains the entity name (Place, Party, and so forth), and the Web page (Search, List, Summary, Edit, and so forth). The Java file names end with Bean.
Figure 11-4 Java File Naming Conventions
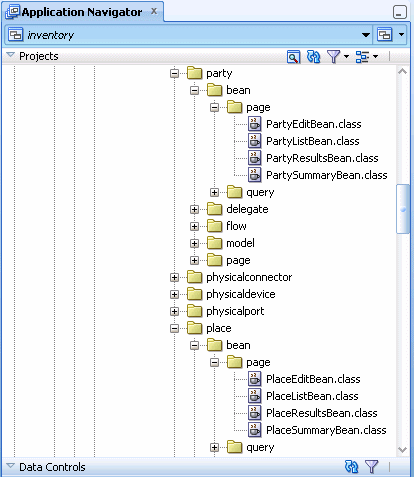
Description of ''Figure 11-4 Java File Naming Conventions''
XLF Files
XLF files define text values that display throughout the UIM UI. XLF files also define formats that are used to display the text values in a specific way.
The InventoryUIBundle.xlf file, which defines text values, is located within the inventory application inv project, in the Web Content/WEB-INF/classes/oracle/ communications/inventory/ui/common/bundle directory.
The Preferences.xlf file, which defines the DATE_FORMAT, is located within the inventory application inv project, in the Web Content/WEB-INF/classes/oracle/communications/platform/ui directory.
Note:
If you customize the DATE_FORMAT in the Preferences.xlf file, you must also change the system.dateFormat specified in the UIM_Home/config/resources/logging/system.properties file.When entity managers throw informational, warning, or error messages that contain a date, the message date is not formatted using the DATE_FORMAT specified in the XLF file. Rather, the message date is formatted using the system.dateFormat specified in the system.properties file. So, if you customize the date format, you must change it in both files.
DCX File
The DataControls.dcx file defines the registry for all the delegates, which are defined as data controls. If your customizations require a new delegate, this file needs to be updated to include the new delegate.
This file is located within the inventory application inv project, in the Web Content/oracle/communications/inventory/ui directory.
The following websites are useful when working with DCX files to customize the UIM UI:
-
The ADF Tasks virtual book provides ADF information and is available at:
http://www.oracle.com/pls/as111130/vbook_subject?subject=adf -
The Oracle Fusion Middleware Web User Interface with Oracle ADF Faces online documentation is available at:
http://docs.oracle.com/middleware/12212/adf/develop-faces/toc.htm -
Additional information can be found at:
Displaying Custom Attributes on a Web Page
Custom attributes are any attributes that you have added to an existing entity. You can display custom attributes by editing the JSFF files for the entity's functional area. For example, if you add the subscriberId attribute to the Service entity, you can display subscriberId on the UIM Service Summary page by editing the inv/oracle/ communications/inventory/ui/service/page/ServiceSummary.jsff file.
To display the value of the subscriberId attribute, add the following component to the JSFF file:
<af:outputText value="#{pageFlowScope.ServiceSummaryBean.entityObject.subscriberId}"/>
Adding Custom Input Fields to a Web Page
You can edit the value of custom attributes in the UIM UI by adding an input field to the JSFF file for the entity's maintenance page.
By convention, maintenance page file names end with Edit. For example, EquipmentEdit.jsff maintains an equipment entity, and ServiceEdit.jsff maintains a service entity. Maintenance pages operate in two modes:
-
New: For creating a new instance of the entity
-
Edit: For modifying an existing instance of the entity
A managed bean exists for every entity, and the bean contains all of the attributes defined for the entity. For example, for an equipment entity, the page is EquipmentEdit.jsff and the Java class is EquipmentEditBean.class. Similarly, for a service entity, the page is ServiceEdit.jsff and the Java class is ServiceEditBean.class.
If the type attribute is added to the Equipment entity, type can be displayed on the UIM Equipment Summary page and edited on the UIM Equipment Maintenance page.
To do this, edit the following files:
-
In the InventoryUIBundle.xlf file, add the following to define the text for the type attribute as it displays in the UI:
<trans-unit id="TYPE"> <source>Type</source> <target/> </trans-unit> -
In the EquipmentSummary.jsff file, add the following ADF component:
<af:panelLabelAndMessage label="#{inventoryUIBundle.Type}" id="plam2"> <af:outputText value="#{pageFlowScope.EquipmentSummaryBean.entityObject.type}" id="ot3"/> </af:panellabelAndMessage> -
In the EquipmentEdit.jsff file, add the following ADF component to edit the field:
<af:inputText value="#{pageFlowScope.EquipmentEditBean.entityObject.type}" label="#{inventoryUIBundle.Type}" id="it1"></af:inputText>
Adding Conditional Components to a Web Page
Components are Web page building blocks. For example, the OutputText component is used for displaying entity attribute values on a Web page, and the InputText component is used for editing entity attribute values on a Web page. Conditional components are components that may or may not be rendered on a Web page, depending upon the outcome of an expression that can be evaluated. You can make a component a conditional component with custom logic.
To make a component a conditional component, edit the JSFF page file and map the component to a Java method, which evaluates an expression. The expression can be implemented with a custom logic class that extends the original bean class. For example, to make the Activate/Deactivate check box attribute on the UIM Equipment Maintenance page conditional upon an active condition being true, make the following changes:
-
In the EquipmentEdit.jsff file:
<af:selectBooleanCheckbox value="#{pageFlowScope.EquipmentEditBean.active}" text="#{inventoryUIBundle.Active}" disabled="#{!(pageFlowScope.EquipmentEditBean.active)}" id="it7"> -
Create a new Java class that extends EquipmentEditBean.java, and have the class define the following method:
public boolean getActive()
{
    if(this.getEquipment() != null && this.getEquipment() instanceof Equipment)
    {
        Equipment equipment = (Equipment)this.getEquipment();
        InventoryState  inventoryState = equipment.getAdminState;
        return(inventoryState != null
        !InventoryState.equals(InventoryState.END_OF_LIFE):true);
    }
    return false;
}
Disabling an Input Field on a Web Page
You can disable InputText components based on a condition. For example, to make the type attribute on the UIM Equipment Maintenance page conditional upon an active condition being true, make the following changes to the EquipmentEdit.jsff page file:
<af:inputText value="#{pageFlowScope.EquipmentEditBean.entityObject.type}" label="#{inventoryUIBundle.Type}" id="it1" disabled="#{!(pageFlowScope.EquipmentEditBean.active)}">
</af:inputText>
Adding a Custom Action to a Web Page
You can add a custom action to a Web page by editing the JSFF page file to include a link or a button to call a custom listener method on the page. For example, to add a button to the UIM Service Summary page, which calls the generateReport() method, make the following changes to the ServiceSummary.jsff file:
<af:commandButton actionListener=#{pageFlowScope.ServiceSummary.generateReport}">
    <af:outputTextvalue="Text value of the link"/>
</af:commandButton>
A custom class needs to implement this method, and the custom class needs to run in place of the original. This is done using rulesets and extension points. For information on rulesets and extension points, see Chapter 8, "Extending UIM Through Rulesets".
If the custom class is com.foo.ServiceSummary.class, the ServiceSummary.java source file would reside in the inv/Web Content/WEB-INF/src/com/foo directory and would contain the following:
package com.foo;
public abstract class ServiceSummary
extends oracle.communications.inventory.ui.service.bean.page.ServiceSummaryBean
{
    public void generatReport(ActionEvent event)
    {
        // perfrom the custom logic here
        System.out.println(getService().toString());
    }
}
Next, the inv/Web Content/WEB-INF/oracle/communications/inventory/ui/ service/flow/ServiceSummaryFlow.xml task flow must be edited to add the new com.foo.ServiceSummary.class to the pageFlowScope.
Adding a Custom Search Field
You can add a custom search field to existing search criteria. For example, you can add the Grade field to the Telephone Number Search criteria. To do this, you must extend the API that the UI calls, as well as the UI.
Extending the API
To add a custom search field to existing search criteria and extend the API to take this new field into account:
-
Write a ruleset to extend the TelehoneNumberManager.findTelephoneNumber() method. Set the rule to have placement before the findTelephoneNumber() method.
-
In the extension code, add your business-specific code to include new search criteria to restrict the result set. In the extension, you set the custom query with the setCustomJPQL() method on the existing UIM search criteria class. You also need to set the attributes and values for the criteria with the setCustomParameters() method.
See Chapter 8, "Extending UIM Through Rulesets" for information on how to write a ruleset.
Example 11-1 is an example code section of a business interaction query and using the setCustomJPQL() and setCustomParameters() methods.
Example 11-1 Using the setCustomJPQL() and setCustomParameters() Methods
BusinessInteractionSearchCriteria criteria =
        biMgr.makeBusinessInteractionSearchCriteria();

criteria.setCustomJPQL(" AND o.id LIKE :id AND o.name LIKE :name");

String[] attributes = {"id", "name"};
Object[] values = new Object[] {"225005", "CREATE SERVICE" };

criteria.setCustomParameters(attributes, values);

Collection<BusinessInteraction> bis = biMgr.findBusinessInteraction(criteria);
See Chapter 8, "Extending UIM Through Rulesets" for information on how to write a ruleset.
Extending the UI
TelephoneNumberSearch.jsff renders InventoryQuery.jsff to build the query criteria on the page. To add the Grade field:
-
Create a new custom class, such as TNQueryBean.java, that extends the oracle.communications.inventory.ui.number.bean.query.TelephoneNumberQueryBean class. To add a new field, the getAttributeDescriptors() method needs to be overridden.
-
Your custom class, TNQueryBean.java, needs to have something as shown in the following example. (In the getAttributeDescriptors() method, the fields in the queryAttributes String Array are rendered on the UI as search fields.)
package oracle.communications.inventory.ui.number.bean.query; import java.util.List; import oracle.adf.view.rich.model.AttributeDescriptor; import oracle.communications.platform.ui.bean.query.AttributeDescriptorImpl; import oracle.communications.inventory.ui.common.utils.Constants; import oracle.adf.view.rich.model.AttributeDescriptor.ComponentType; public class TNQueryBean extends TelephoneNumberQueryBean { public static final String GRADE = "GRADE"; public TNQueryBean() { super(); } protected List<AttributeDescriptor> getAttributeDescriptors() { List<AttributeDescriptor> attributeDescriptors = super.getAttributeDescriptors(); AttributeDescriptorImpl attributeDescriptor = null; attributeDescriptor = this.createAttributeDescriptorImpl ("GRADE", "GRADE", Constants.STRING_TYPE,null, ComponentType.inputText); attributeDescriptors.add(attributeDescriptor); String[] queryAttributes = {TELEPHONE_NUMBER, RANGE_FROM, Constants.SPECIFICATION, RANGE_TO, SERVICE_SPECIFICATION, INVENTORY_GROUP, Constants.INVENTORY_STATUS, CONDITION_TYPE, Constants.RESOURCE_ASSIGNMENT_STATUS, GRADE}; this.setQueryAttributes(queryAttributes); return attributeDescriptors; } } -
Change the TelephoneNumberSearchResultsFlow.xml file to add your custom class (TNQueryBean) in pageFlowScope, as shown below:
<managed-bean> <managed-bean-name>InventoryQueryBean</managed-bean-name> <managed-bean-class> oracle.communications.inventory.ui.number.bean.query.TNQueryBean </managed-bean-class> <managed-bean-scope>pageFlow</managed-bean-scope> <managed-property> <property-name>beanClass</property-name> <property-class>java.lang.String</property-class> <value> oracle.communications.inventory.api.entity.TelephoneNumber </value> </managed-property> <managed-property> <property-name>searchName</property-name> <property-class>java.lang.String</property-class> <value>Telephone Number Search</value> </managed-property> </managed-bean> -
Create a new custom class, such as TNDelegate.java, that extends the TelephoneNumberDelegate class. In the custom class, override the getSearchCriteria() method to pass the Grade field to API. On the API side, extend oracle.communications.inventory.api.number.TelephoneNumberSearchCriteriaImpl, and define the Grade field as a member. This is shown in the following example:
import oracle.communications.inventory.ui.common.utils.CriteriaContainer; import oracle.communications.inventory.api.number.TelephoneNumberSearchCriteria; public class TNDelegate extends TelephoneNumberDelegate { public TNDelegate() { super(); } protected CriteriaContainer getSearchCriteria() { CriteriaContainer container = super.getSearchCriteria(); /* Get the criteria from the container and cast it to the CustomTNSearchCriteriaImpl custom telephone number search criteria */ CustomTNSearchCriteriaImpl criteriaTNObj = (CustomTNSearchCriteriaImpl)container.getCriteria(); /* Create a CriteriaItem for the newly added Grade field and set the item in the criteriaTNObj custom telephone number search criteria */ if (searchFieldDefs.containsKey("GRADE") && criteriaTNObj != null) { CriteriaItem item = searchFieldDefs.get("GRADE"); item.setValue((item.getValue().toString())); criteriaTNObj.setGrade(item);} /* Pass criteriaTNObj to the finder method and return the container */ container = new CriteriaContainer(tnManager, "findTelephoneNumbers", criteriaTNObj); return container; } } -
Update the DataControls.dcx file to include the new TNDelegate, as shown below:
<AdapterDataControl id="TelephoneNumberDelegate"
FactoryClass="oracle.communications.inventory.ui.framework.datacontrol.InventoryDataControlFactoryImpl"
ImplDef="oracle.adf.model.adapter.beanBeanDefinition"
SupportTransactions="false"
SupportsSortCollection="true"
SupportsResetState="false"
SupportsRangesize="false"
SupportsFindMode="false
SupportsUpdates="true"
Definition="oracle.communications.inventory.ui.number.delegate.TNDelegate"
BeanClass="oracle.communications.inventory.ui.number.delegate.TNDelegate"
xmlns="http://xmlns.oracle.com/adfm/datacontrol">
-
Copy TelephoneNumberDelegate.xml, paste it in the same directory, and rename it TNDelegate.xml. Afterward, open TNDelegate.xml and change all occurrences of TelephoneNumberDelegate to TNDelegate.
Deploying User Interface Customizations
To deploy your UIM UI customizations:
-
In JDeveloper, create the inv.war file:
-
In the Application Navigator, right-click on the inv project, select Deploy, then select inv.
The Deploy inv window appears. This window has two parts: Deployment Action, and Summary. Deployment Action appears first.
-
Select Deploy to WAR and click Next.
Summary appears, showing the location of inv.war file after JDeveloper builds it.
-
Click Finish.
Note:
Neither the created inv.war file nor the created deploy directory in which inv.war resides displays in JDeveloper, even after a refresh. To see the inv.war file, navigate to your JDeveloper workspace outside of the JDeveloper application. -
-
Update the inventory.ear file to include the updated version of the inv.war file you just created:
-
Outside of JDeveloper, navigate to tempEar_Home.
-
Open the inventory.ear file.
-
Add the inv.war file to the inventory.ear file, replacing the existing inv.war file with the inv.war file that contains your UI customizations.
-
Save and close the inventory.ear file.
-
Copy the updated inventory.ear file from tempEar_Home to the UIM_Home/app directory.
-
-
Deploy the updated inventory.ear file.
For instructions on how to deploy the inventory.ear file, see UIM System Administrator's Guide.
Customizing Logos
When customizing the UI, you can also customize logos. Customizing logos involves a different set of files, so there is a separate procedure for customizing them.
To customize logos:
-
Open the UIM_Home/lib/comms-platform-webapp.war file and extract the WEB-INF/lib/comms-platform-ui.jar file to a local directory, such as tempDir.
-
Open the tempDir/comms-platform-ui.jar/images directory and add your custom logo file.
Note:
Custom logo files are images, which are typically GIF, JPG, or PNG file types. -
Open the tempDir/comms-platform-ui.jar/oracle/communications/ platform/templates/CommsUIShell.jspx file, and modify the file as follows:
-
Locate the text:
<af:image id="oracleImage" source="/afr/logo-oracle-red.png" clientComponent="true" shortDesc="Oracle"/> -
Change the text that defines the source to:
<af:image id="oracleImage"
    source="/images/customLogoFileName"
    clientComponent="true" shortDesc="Oracle"/>
where customLogoFileName is the name of your custom logo file that you previously added to the tempDir/comms-platform-ui.jar/images directory. The customLogoFileName includes the file type extension, such as .gif, .jpg, or .png.
-
-
Save and close the tempDir/comms-platform-ui.jar file.
-
Repackage the WAR file by doing the following:
-
Open the UIM_Home/lib/comms-platform-webapp.war/WEB-INF/lib directory.
-
Replace the comms-platform-ui.jar file with the tempDir/comms-platform-ui.jar file that contains your customizations.
-
Save and close the UIM_Home/lib/comms-platform-webapp.war file.
-
-
Log in to the WebLogic Server Administration Console.
-
Stop the UIM application:
-
In the left panel, under Domain Structure, click the Deployments link.
The Summary of Deployments page appears.
-
Select the check box for oracle.communications.inventory, and click Stop.
-
Choose Force Stop Now, and click Yes.
The UIM application stops.
-
-
To delete the UI library, on the Summary of Deployments page, select the check box for oracle.communications.platform.cui.webapp, and click Delete.
The library is deleted.
-
Open a command line.
-
Navigate to the UIM_Home/servers/serverName/tmp/_WL_user directory:
cd UIM_Home/servers/serverName/tmp/_WL_user
-
Delete the oracle.communications.inventory directory.
rm -rf oracle.communications.inventory
Note:
If working in a clustered environment, delete the oracle.communications.inventory directory from the tmp/_WL_user directory for each of the servers. -
Close the command line and return to the WebLogic Server Administration Console, Summary of Deployments page.
-
To install the UI library, click Install, and select comms-platform-ui.jar located in UIM_Home/lib.
The library is installed.
-
Select the check box for oracle.communications.inventory, and click Update.
This redeploys the inventory.ear file and starts the UIM application.
Testing User Interface Customizations
You can test your UIM UI customizations by running UIM and navigating to the customized pages or new pages to validate that the customizations are working correctly. If customizations included changes or deletions to existing files, regression testing is required to ensure the customizations did not break existing UIM UI functionality.