2 Initial Configuration
This chapter guides you through the configuration steps required to get Oracle Communications Operations Monitor started. You must first install an instance of Operations Monitor, connect it to your network, and access the web interface via a web browser. See the referenced sections when changing settings for additional required information.
Note:
The web interface requires a browser with Javascript enabled. Refer to "Requirements" for the list of supported browsers. Allowing HTTP cookies is strongly recommended to enable several convenience features.Logging In
To login to the Operations Monitor:
-
Open the Operations Monitor URL in a browser. Contact your System Administrator for the website URL.
Point the browser to the configured IP address of the management interface to load the login screen.
-
Do one of the following:
-
If you are an admin, login to the preconfigured account with the username admin and password oracle. If you select Remember me checkbox, Operations Monitor remembers your login details for a week on your computer.
-
If you are a user, login with your user credentials. Contact your System Administrator for user credentials. If you select Remember me checkbox, Operations Monitor remembers your login details for a week on your computer.
Note:
Your account gets locked after three unsuccessful attempts and by default unlocks after 15 minutes. For more information, see "Password Settings". -
-
At your first login, you will be prompted to choose a unique password for your account. Choose the password.
The menu on the left provides general Operations Monitor functions and individual product features. The main features are described in "User Interface". In the top-right corner, the current logged-in user is displayed.
Viewing Last Login Information
To view the last login information for a user:
-
In the top-right corner of the Operations Monitor web interface, select admin and then select My Profile.
The Edit own user information dialog box opens, as shown in Figure 2-1.
-
The User Information page has two text boxes, General and Login Information as shown in Figure 2-1.
-
The Login Information text box displays user's last successful login date and time before the current session, date and time since the current session has been active, and the date and time when the current password is expired.
The value of the Current password expires is displayed as ”never, if the ”Force users to change their password regularly” is not selected in the Password settings. For more information, see "Password Settings".
Note:
The time zone displayed is the configured time zone for the server.
Changing the Default Administrator Password
To change the default administrator password:
-
In the top-right corner of the Operations Monitor web interface, select admin and then select My Profile.
The Edit own user information dialog box opens, as shown in Figure 2-1.
-
In the Set password field, enter a new password.
-
In the Repeat password field, re-enter the password used in the Set password field, which verifies that the password value was entered correctly.
-
Click Finish.
Important:
The default administrator password, which is provided in the documentation is not secure. Oracle strongly recommends that you change it to a secure password, especially before creating sub-users.Adjusting System Settings
Operations Monitor provides the ability to filter network traffic for relevant IP addresses and ports. By default, Operations Monitor filters SIP messages that use ports 5060 to 6000. If you have SIP messages that use other ports, or other protocols you want to analyze, you can change that in the Signaling Protocols section in the Platform Setup Application.
The Use User Domains setting allows you to customize how a subscriber is identified. By default, Operations Monitor identifies a subscriber by the user portion of SIP URI. If domain names are significant in your network for identifying the users, you should set this option to Enabled. For more information, see "Use User Domains".
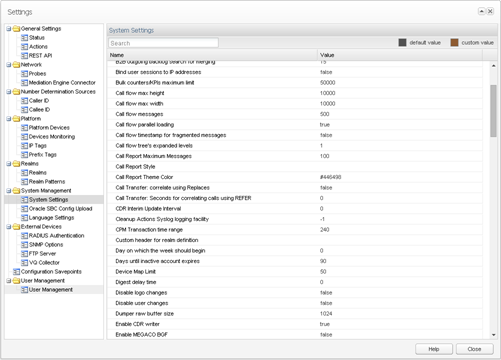
These options can be found in the System Settings menu entry from the Settings window. For more information, see "System Settings".
Figure 2-2 shows the Operations Monitor Settings page.
Adjusting Platform Settings and Defining the Network Topology
Operations Monitor can trace calls end-to-end while they traverse your network. This is also true for when SBC and B2BUA devices are in use. Operations Monitor shows comprehensive per-device statistics, including response and transit times. Operations Monitor can also monitor your SIP devices and raise alerts when a device is detected as non-responsive.
Figure 2-3 shows the Platform Devices Settings page.
In order to correlate sessions end-to-end correctly, you need to define your network topology by configuring the devices (network equipment) that process and relay the sessions and registrations in your network. For instructions on how to do this, see "Platform Devices".
Defining Web Interface Users
Operations Monitor offers a comprehensive system to manage user permissions that allow you to restrict certain views and functions for users.
Figure 2-4 shows the User Management page.
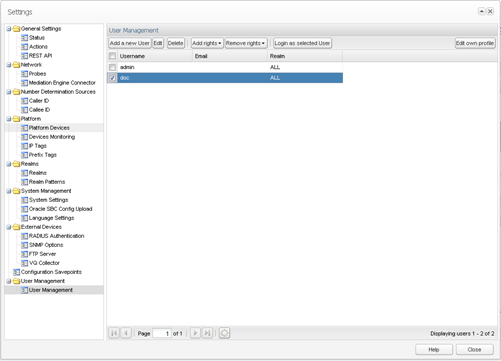
You can customize restrictions per user for certain pages, tabs, and product features. For example, you can restrict the ability to view raw SIP messages, change settings, and the option to create PDF reports (Figure 2-5 shows an example). For details about how to define users and assign rights, please refer to the "User Management" section of this manual. For more information on restrictions extended to single phone numbers/subscribers, see "Realms Definitions".
Figure 2-5 Restricted interface for a Sub-User
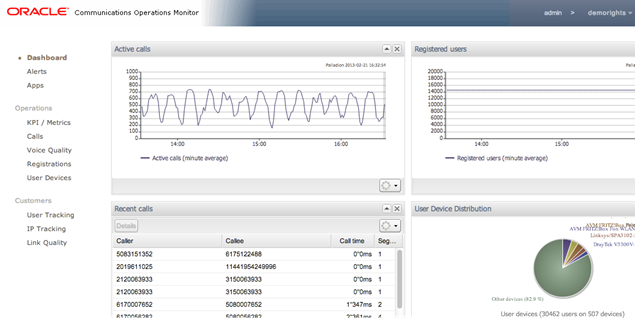
Description of ''Figure 2-5 Restricted interface for a Sub-User''