Quick Start
Oracle Content Management is an enterprise-grade content management system (CMS) and intelligent content platform that can serve a wide variety of content management and delivery needs. This includes headless environments, where it's leveraged primarily as a content server for consumption by other applications, including websites and other digital experiences.
In those scenarios, Oracle Content Management can support entire digital ecosystems with a single source of truth for content.
To accomplish this, Oracle Content Management offers a rich set of application programming interfaces (APIs) that allow arbitrary read and write queries of a variety of resources managed by the system.
It's easy to get started with Oracle Content Management as a headless CMS. This quick start tutorial is for developers who want to get up and running quickly and dive into the content delivery and management APIs provided by Oracle Content Management. It basically consists of these steps:
- Register for Oracle Cloud
- Provision an Instance of Oracle Content Management
- Add a content model, content, and a channel
- Configure Oracle Content Management as a headless CMS
- Issue your first request to Oracle Content Management
This will get you from zero to productivity in no time.
Register for Oracle Cloud
If you create an Oracle Cloud account, you can access the 30-day trial that Oracle Content Management offers to all new users. This free trial provides thirty days of free access and USD 300 in free credits (known in Oracle parlance as Universal Credits).
If you already have an Oracle Cloud account, you can skip this step and proceed to provision an instance of Oracle Content Management.
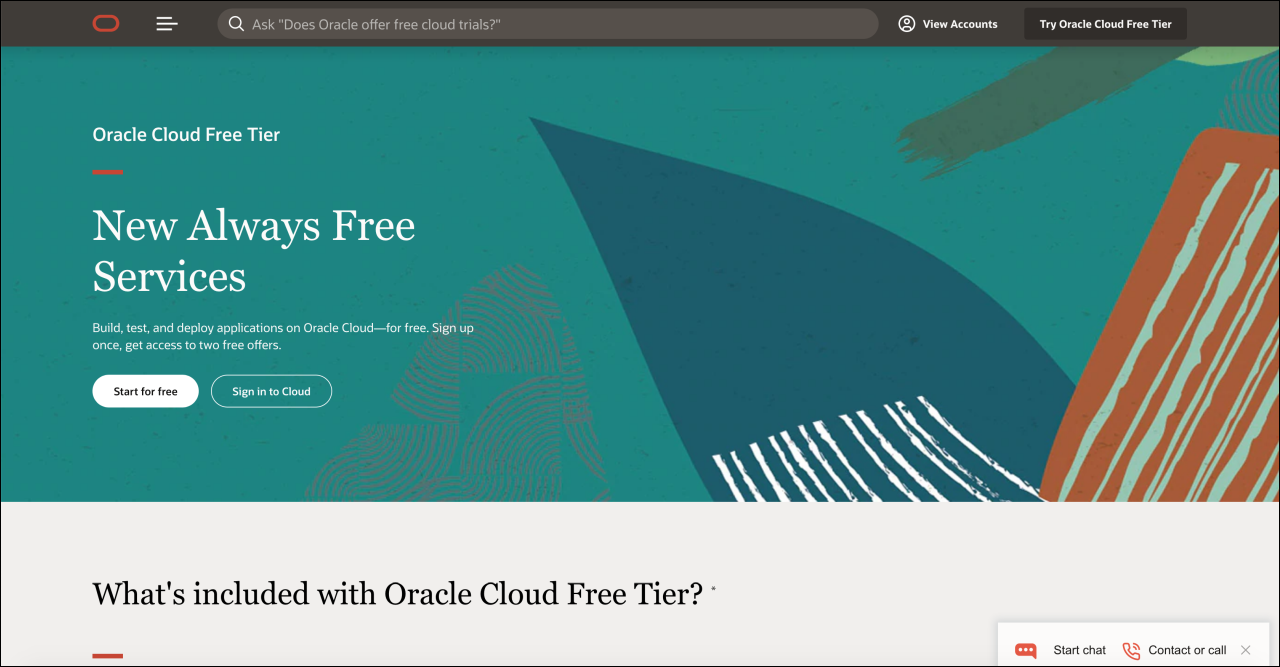
Description of the illustration 01-registering-oracle-cloud.png
Select an Account Name and Home Region
First, navigate to Oracle.com and click Try Oracle Cloud Free Tier, then click Start for free. Enter your email address and select your location, and click Next to proceed.
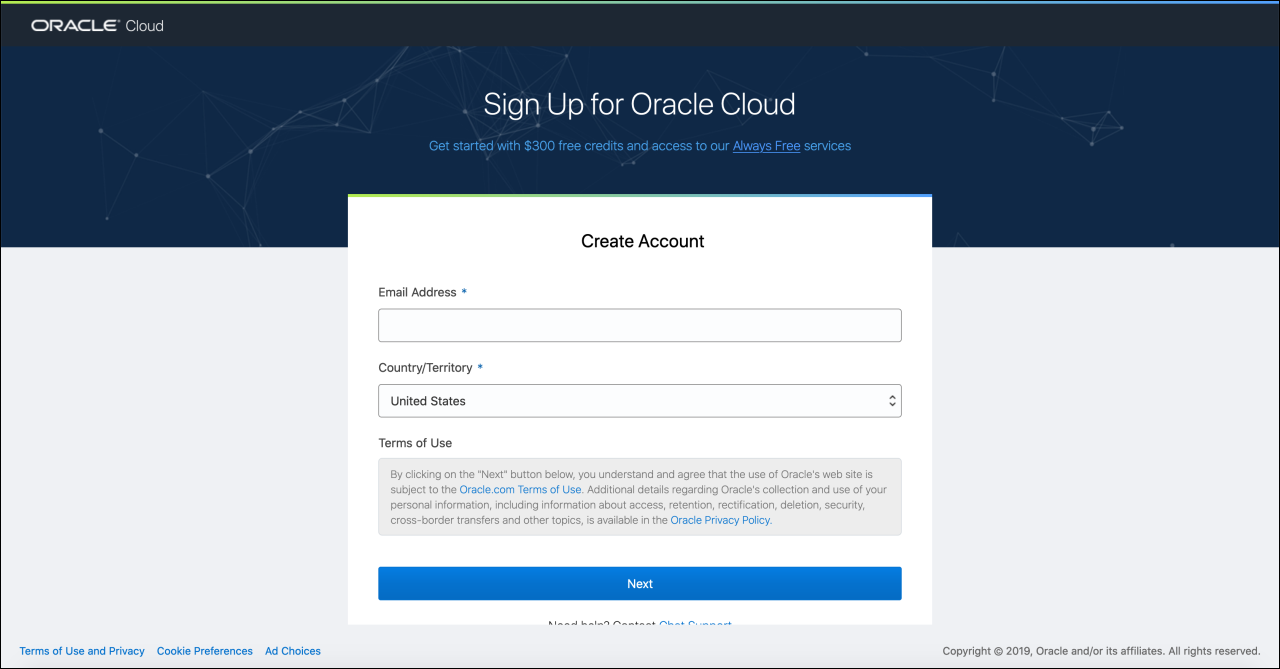
Description of the illustration 02-selecting-home-region.png
On the following screen, provide an account name, which you'll use to access your Oracle Cloud account, and a home region, which you select from a list of Oracle data regions. You'll then be asked to provide contact information, including your mobile phone number for account verification.
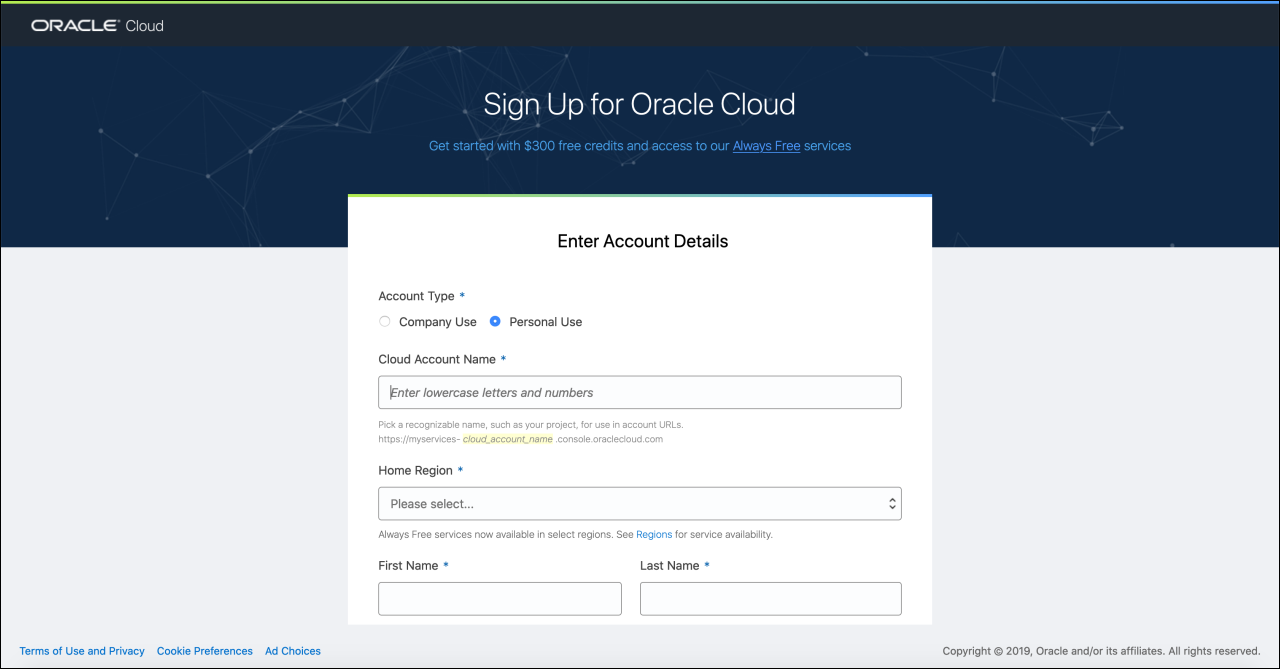
Description of the illustration 03-entering-account-name.png
Provide Payment Information
Oracle Cloud requires trial users to provide payment information such as credit card details, but you won't be charged unless you choose to upgrade the account to a paid subscription.
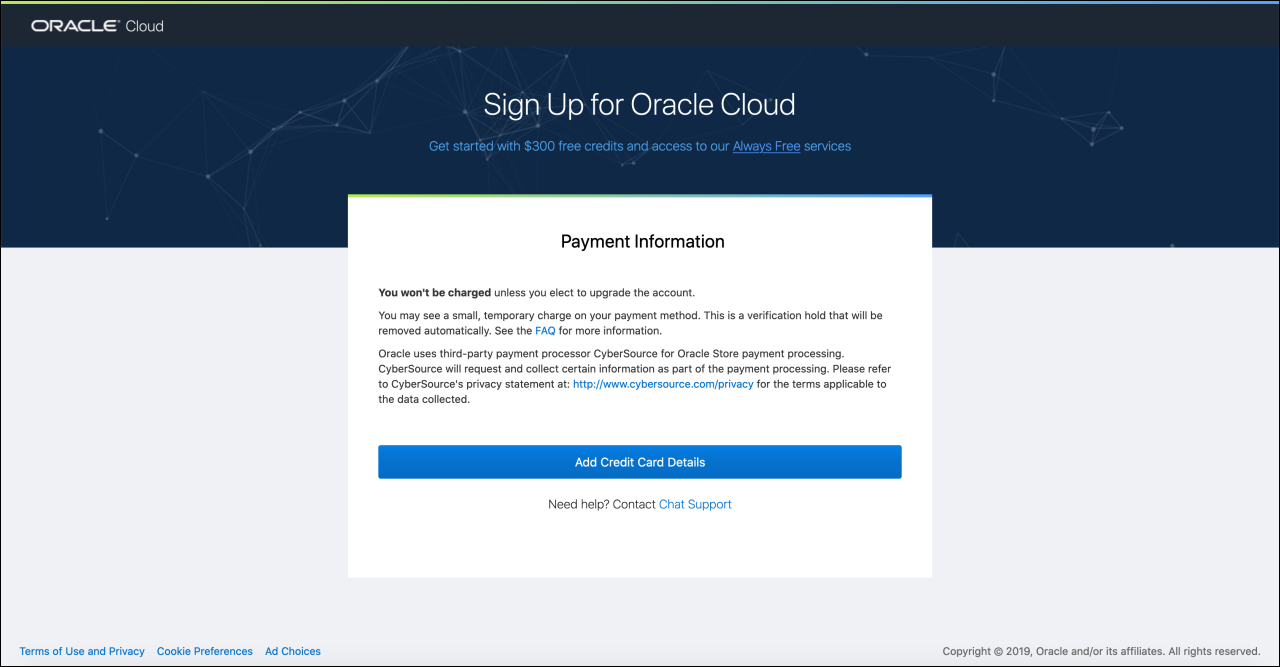
Description of the illustration 04-providing-payment-information.png
After providing payment information, you'll be asked to agree to the terms and conditions of the Oracle Cloud Services Agreement.
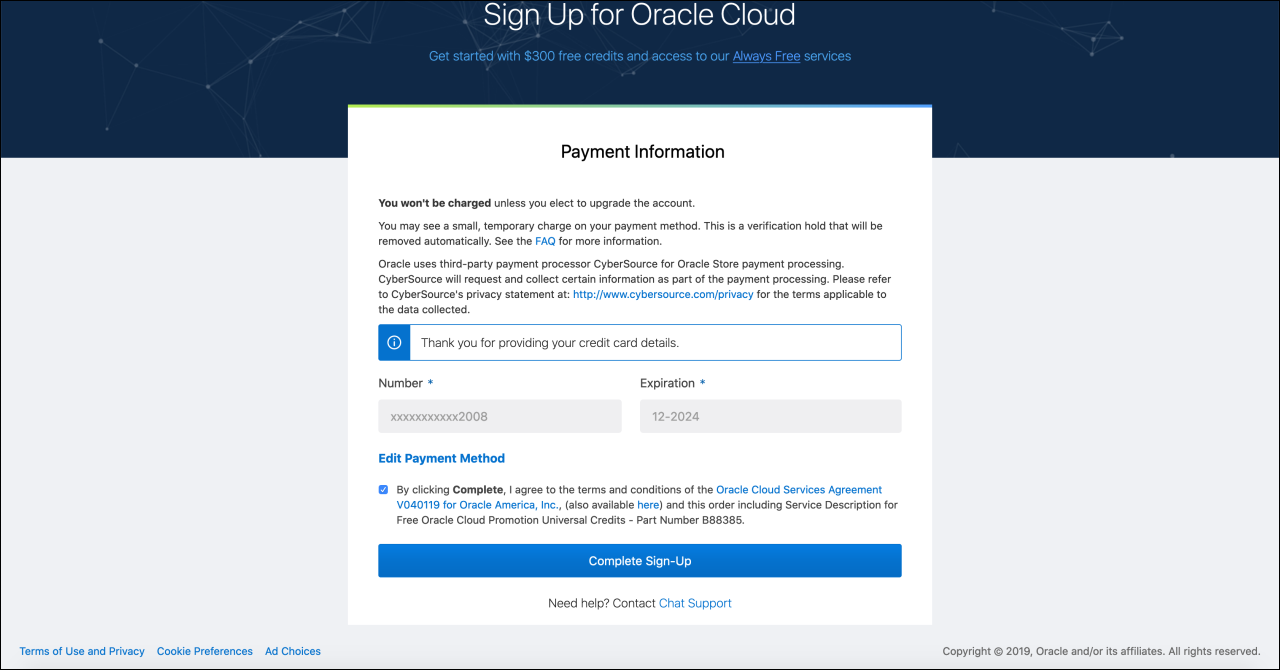
Description of the illustration 05-agreeing-terms-and-conditions.png
When you confirm to complete the sign-up, Oracle Cloud will proceed to create your account. This may take up to fifteen minutes, and you'll receive a confirmation at the email address you provided during the sign-up process.
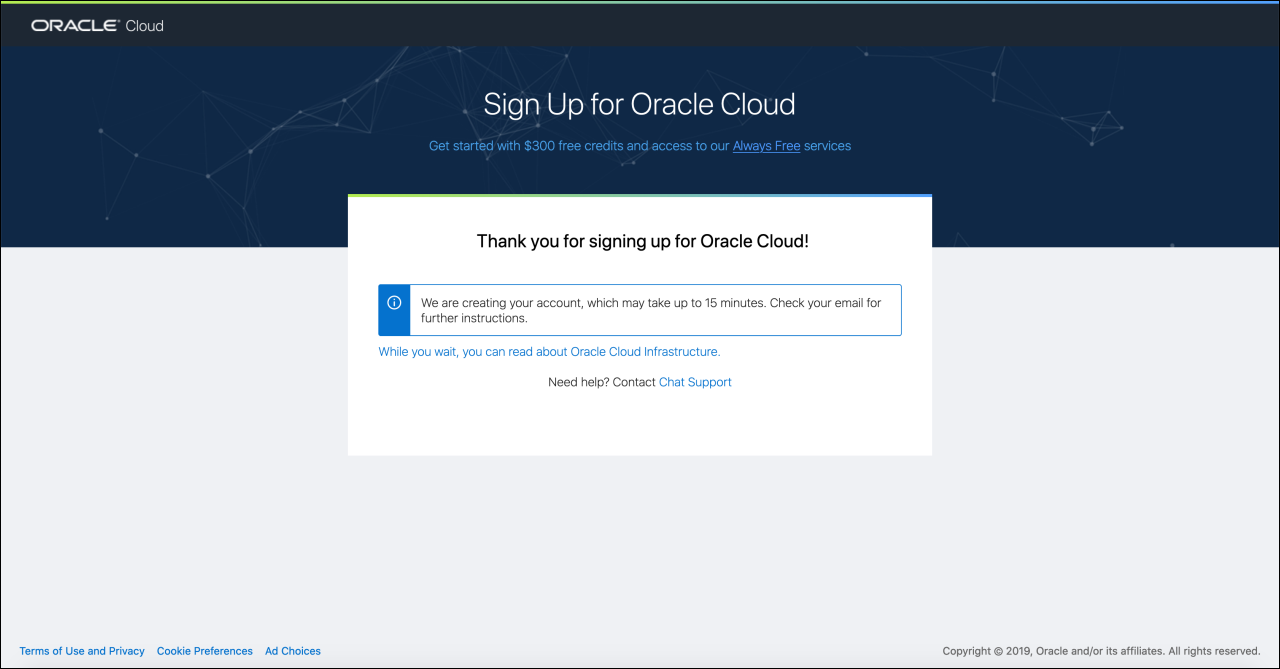
Description of the illustration 06-provisioning-account.png
Provision an Instance of Oracle Content Management
Next, you need to create an instance of Oracle Content Management. If you already have an Oracle Content Management instance, you can skip this step and proceed to add a content model, some content, and a channel.
Log in to your Oracle Cloud account. Note that your cloud account name is distinct from your user name and password. You can think of the cloud account name as representing your entire organization and your Oracle Cloud user name and password as representing you as an individual user. After logging in, you'll see your Infrastructure Dashboard.
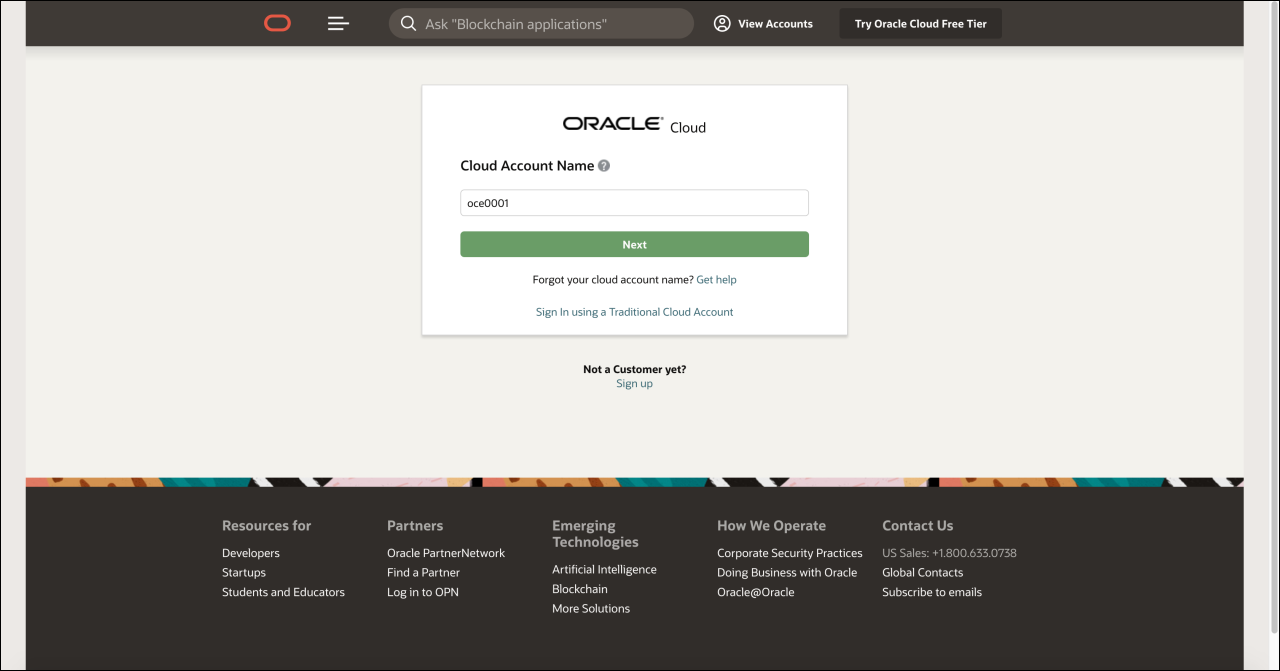
Description of the illustration 07-provisioning-instance.png
Open the hamburger menu in the upper left-hand corner (the three horizontal lines) and, under Solutions and Platform, hover over Application Integration and choose Content Management.
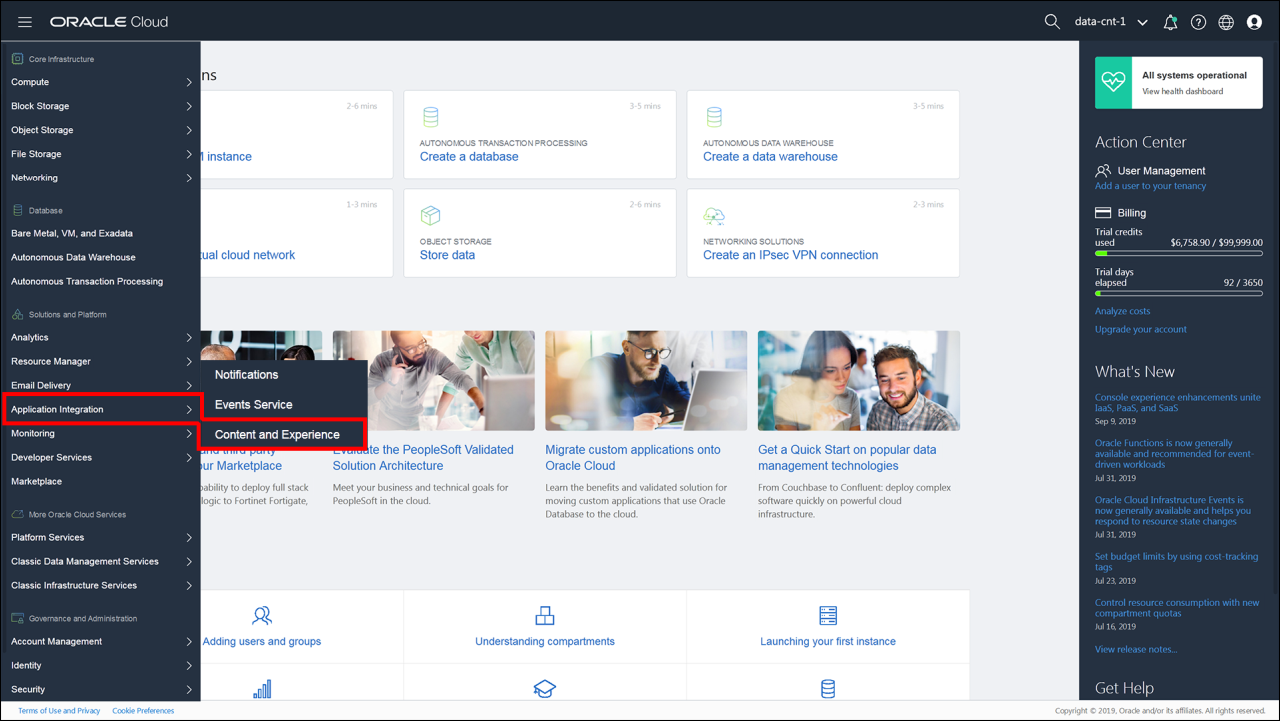
Description of the illustration 08-finding-oce-infrastructure-dashboard.png
Choose a Storage Compartment
In Oracle Cloud, compartments are used to organize cloud resources for a variety of purposes, including isolation, access, and billing. Due to security reasons, it is highly recommended to create and use a new storage compartment rather than using the existing root storage compartment.
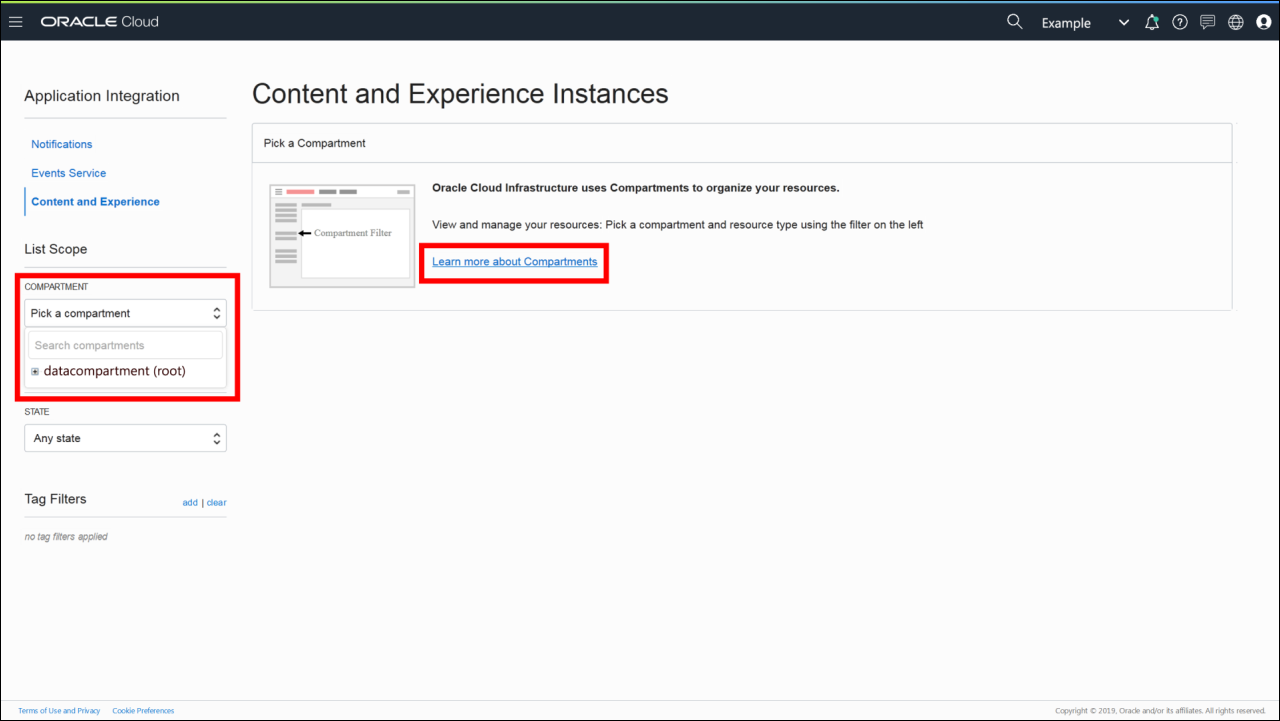
Description of the illustration 09-choosing-storage-compartment.png
Create Your Oracle Content Management Instance
Now, click Create Instance to create your new service instance of Oracle Content Management.
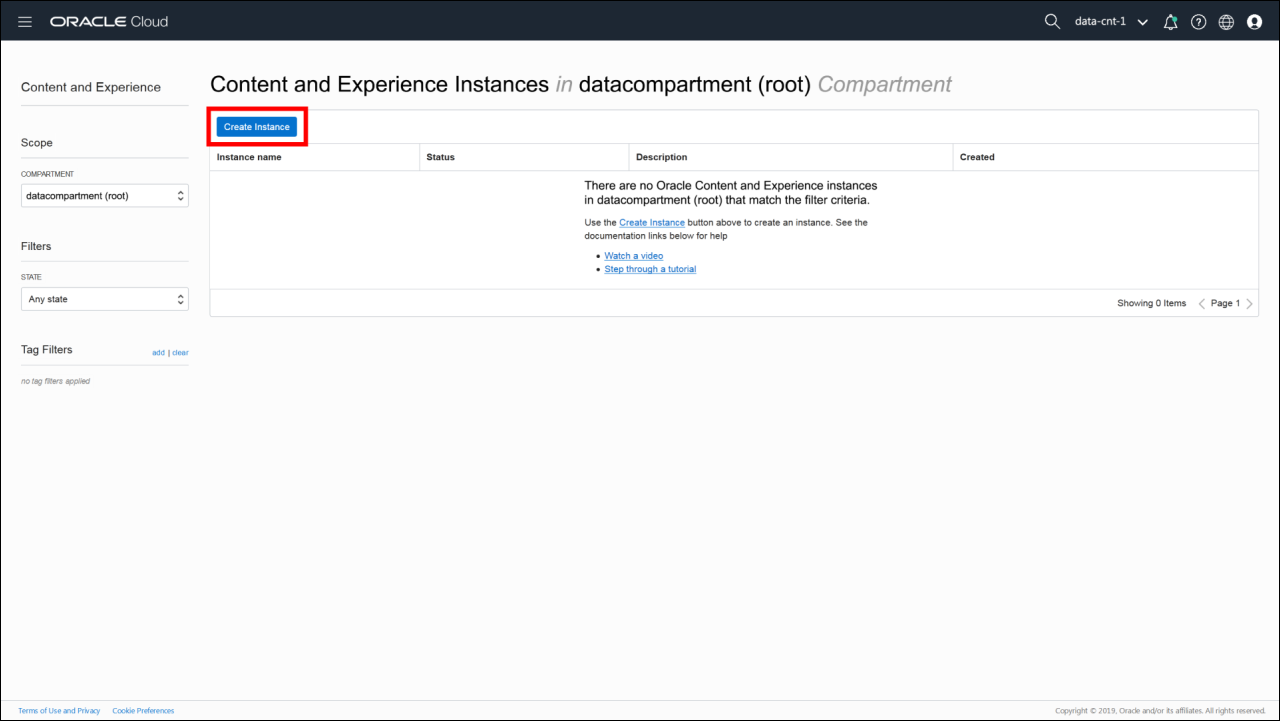
Description of the illustration 10-creating-your-oce-instance.png
Provide a name for the instance and an optional description, and then click Create.
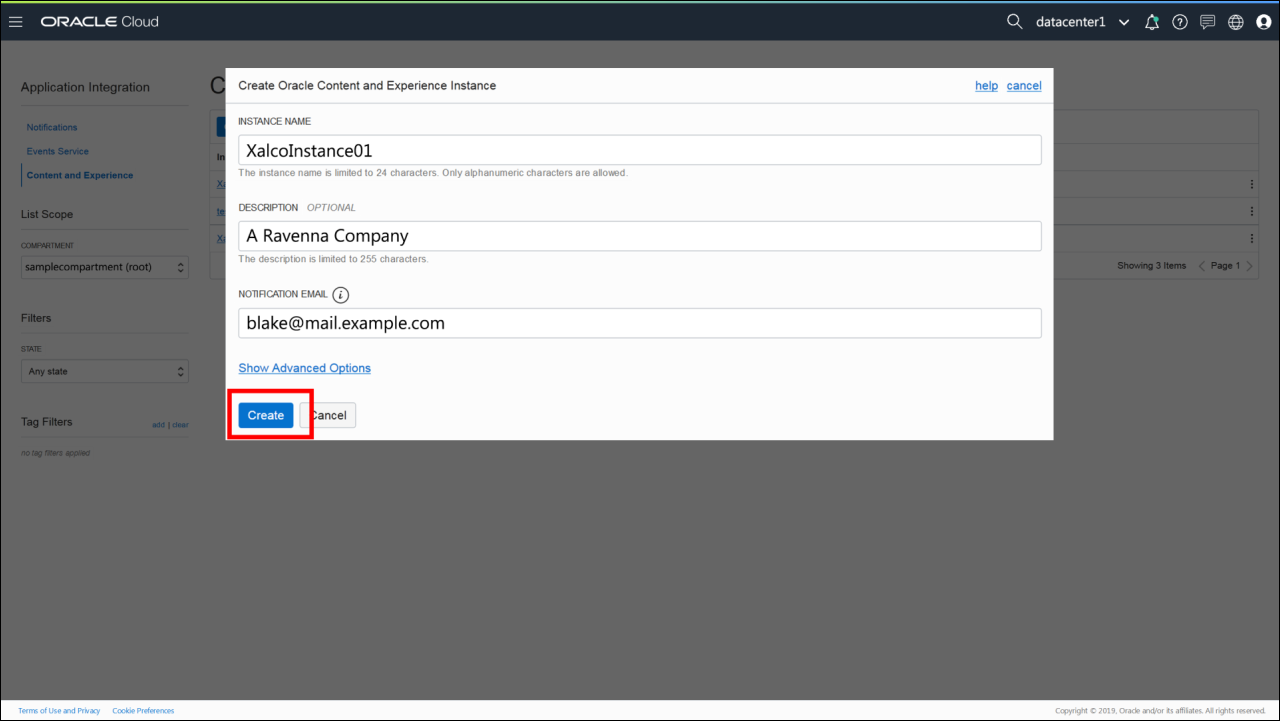
Description of the illustration 11-creating-service-instance.png
It will take some time for the instance to be created, but the instance list page refreshes automatically to keep you updated on the status of the creation process. Once provisioning has completed, you can click the instance name to access its details.
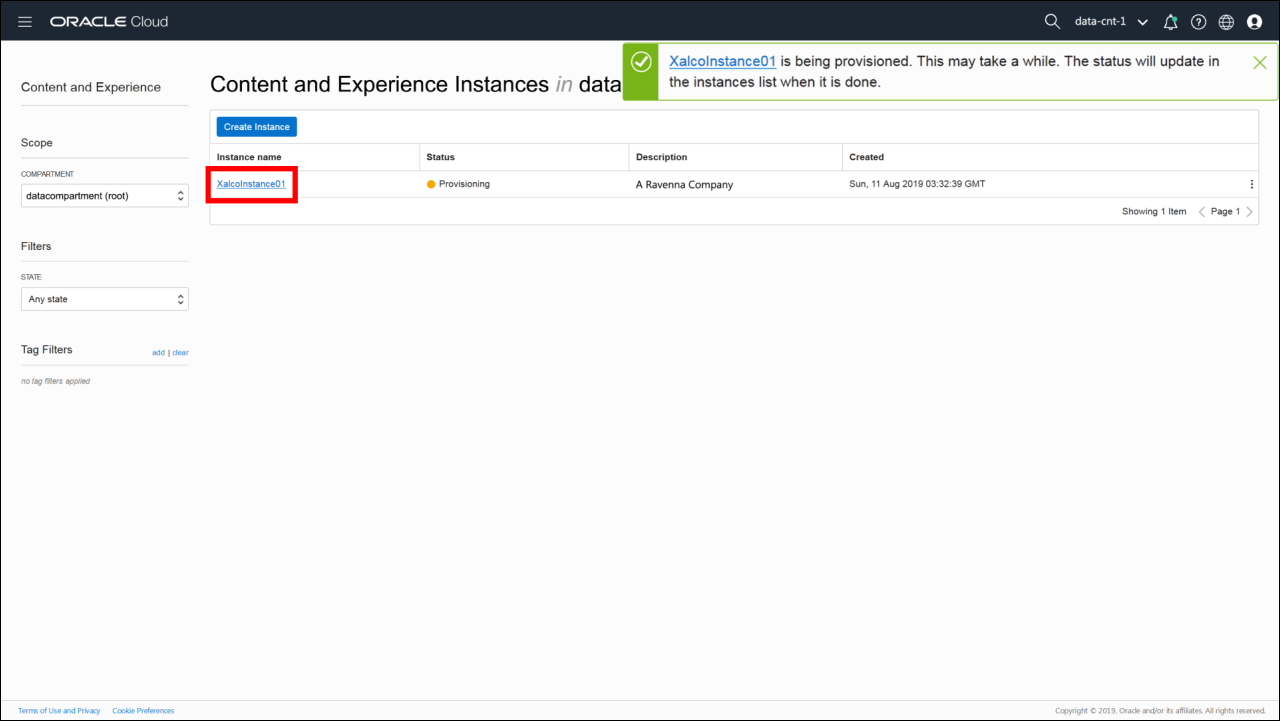
Description of the illustration 12-providing-name-instance.png
Finally, once the instance has been created, you can click Open Instance to navigate to the web interface of the provisioned instance. Now we're ready to do some content modeling, add some content, and publish it to a channel!
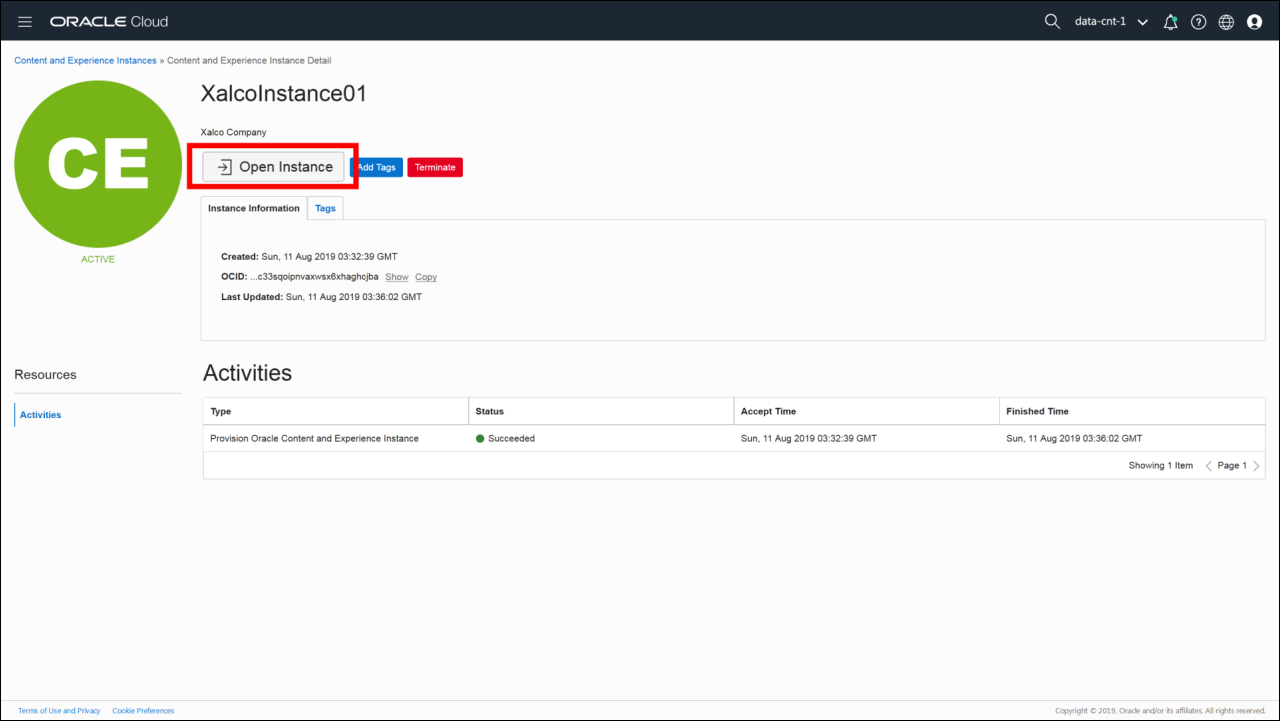
Description of the illustration 13-opening-instance.png
Add a Content Model, Some Content, and a Channel
By default, every new instance of Oracle Content Management comes empty, with an empty content model and no created content.
To use Oracle Content Management as a headless CMS, we need to supply a content model, create content, and publish it to a channel.
If you already have content published to a channel, you can skip this step and proceed to configure Oracle Content Management as a headless CMS.
Open your instance. Note that in previous screenshots the Oracle Content Management instance we created is named XalcoInstance01.
Create a Content Type
You can create a content model that contains particular content types and associated fields. Content authors choose a content type every time they want to create a new content item. Responses that developers ingest in their applications also adhere to the created content schema.
First, sign in to the Oracle Content Management web interface as an administrator. Click Content in the left sidebar and then choose Content Types from the selection list in the header.
Note:
If you don't see the Content option in the left sidebar, your user login doesn't have the required administrative privileges.
Next, click Create in the upper right corner. The Create Content Type dialog opens, where you can provide a name for your content type and an optional description.
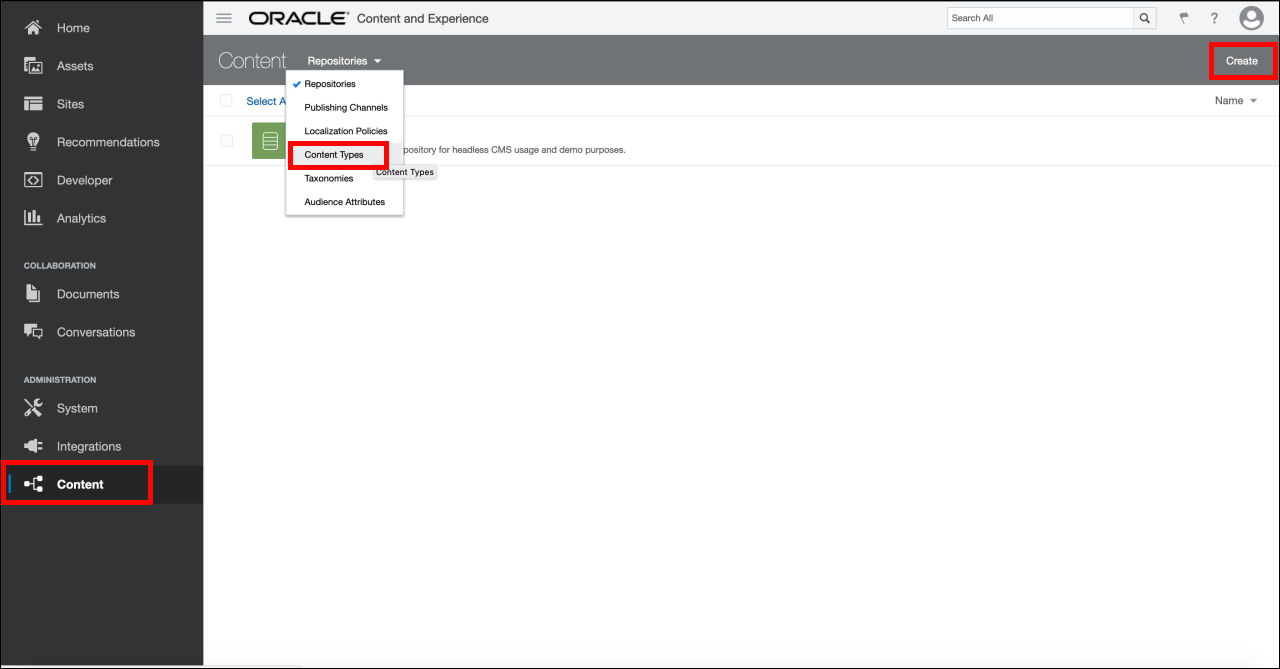
Description of the illustration 14-creating-content-model.png
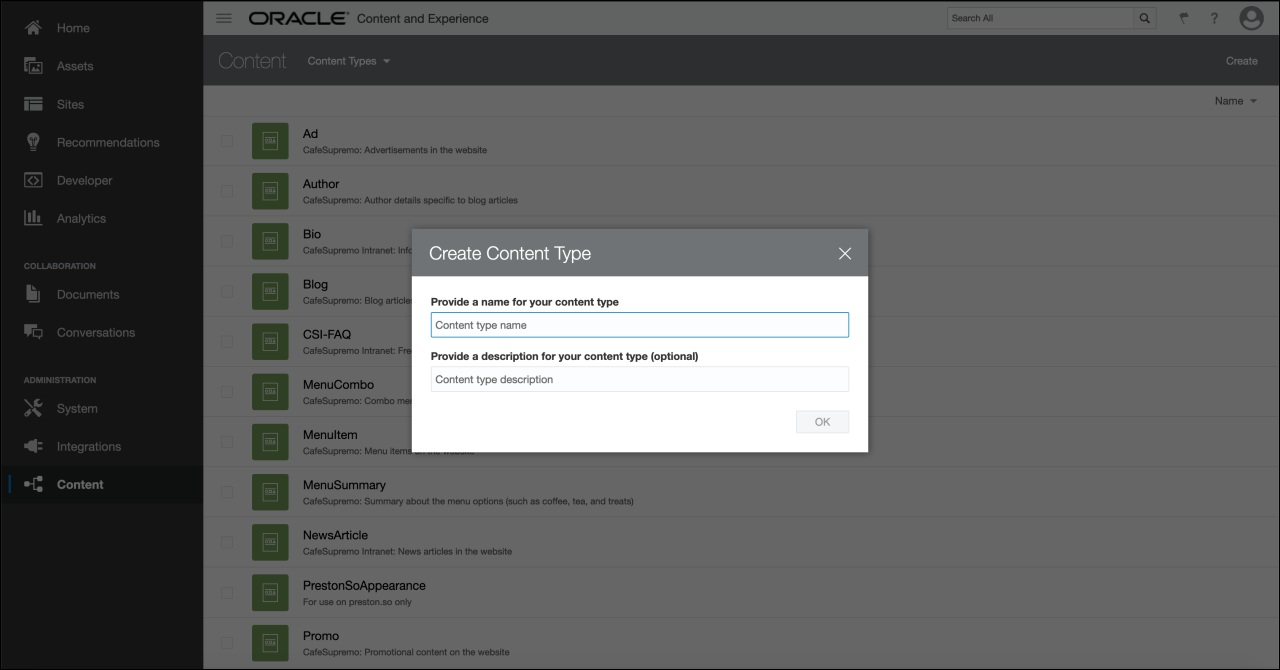
Description of the illustration 15-creating-content-type.png
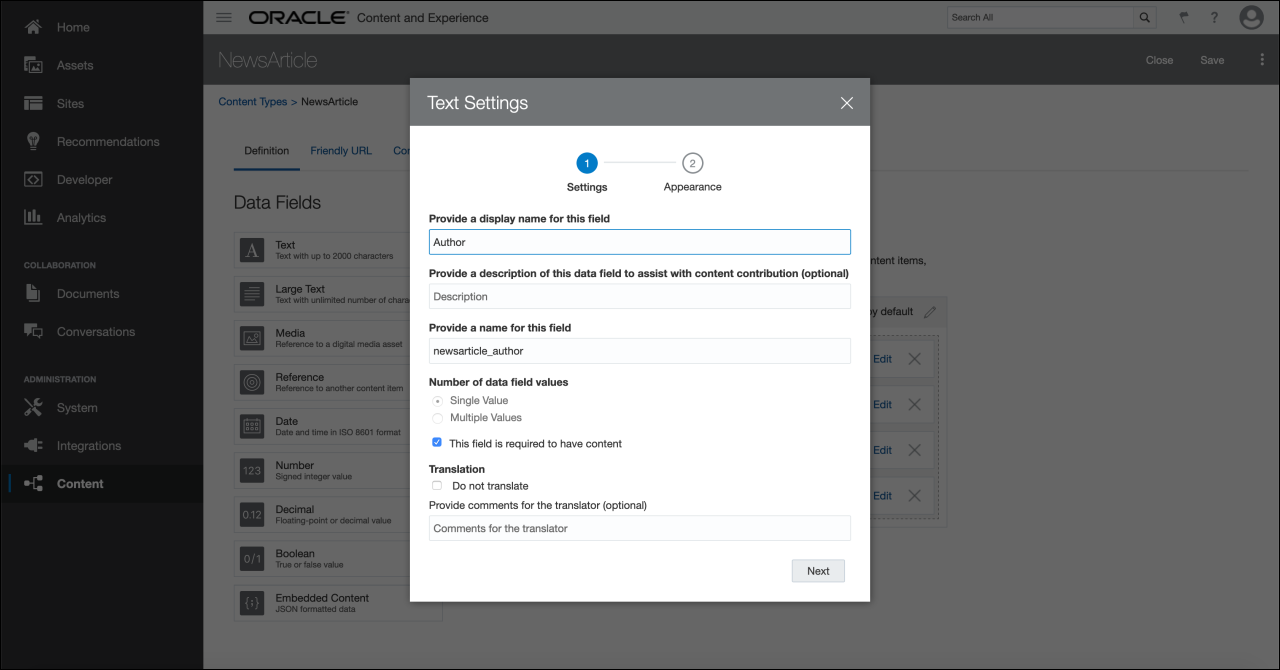
For the purposes of getting started quickly, we need only a simple content type. Let's call this content type NewsArticle. Give the NewsArticle content type four fields (each reflecting a distinct field type), with the following values filled in on the Settings step of the Text Settings dialog (we'll skip Appearance for now):
- The Author field is a required single-value Text field having the display name Author and the machine name newsarticle_author.
- The Date field is a required single-value Date field having the display name Date and the machine name newsarticle_date.
- The Content field is a required single-value Large Text field having the display name Content and the machine name newsarticle_content.
- The Image field is a required single-value Image field having the display name Image and the machine name newsarticle_image.
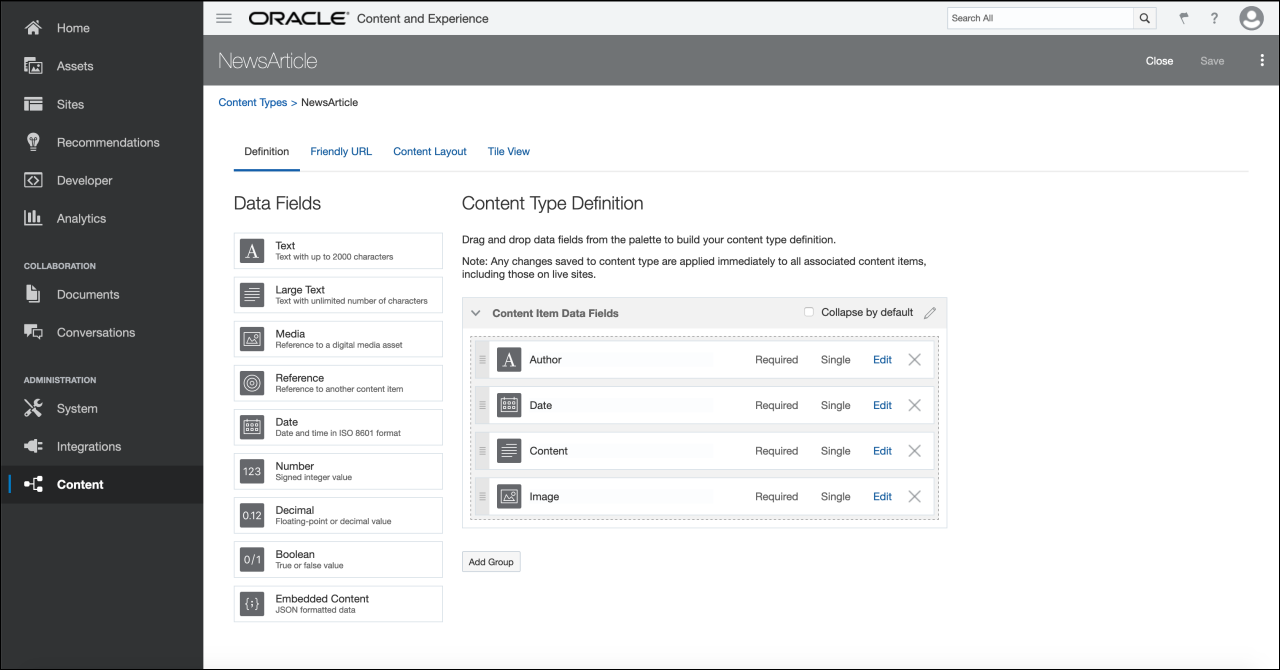
Description of the illustration 16-creating-fields-content-type.png
The following screenshot shows our settings for the Author field as an example. Depending on the field type, the structure of the form may be different.
Description of the illustration 17-field-settings.png
Now that we've created our content type, we can turn to creating a publishing channel and an asset repository, which will allow us to create content items.
Create a Publishing Channel
In Oracle Content Management, a publishing channel represents ranges of digital experiences that need to be served content by the headless CMS. You can also think of channels as containers for configuration and policies related to publishing content.
Though channels can be public or secure depending on requirements, we'll focus only on public channels here.
Suppose you have a React application that needs to consume content from Oracle Content Management. By creating a channel with a name like JavaScript, you can publish content to the JavaScript channel and make it available to any JavaScript application that may need to consume that content, including your React application. Instead of using channels to represent sets of digital experiences, you can also designate channels for individual experiences (for example, channels named AugmentedReality or DigitalSignage).
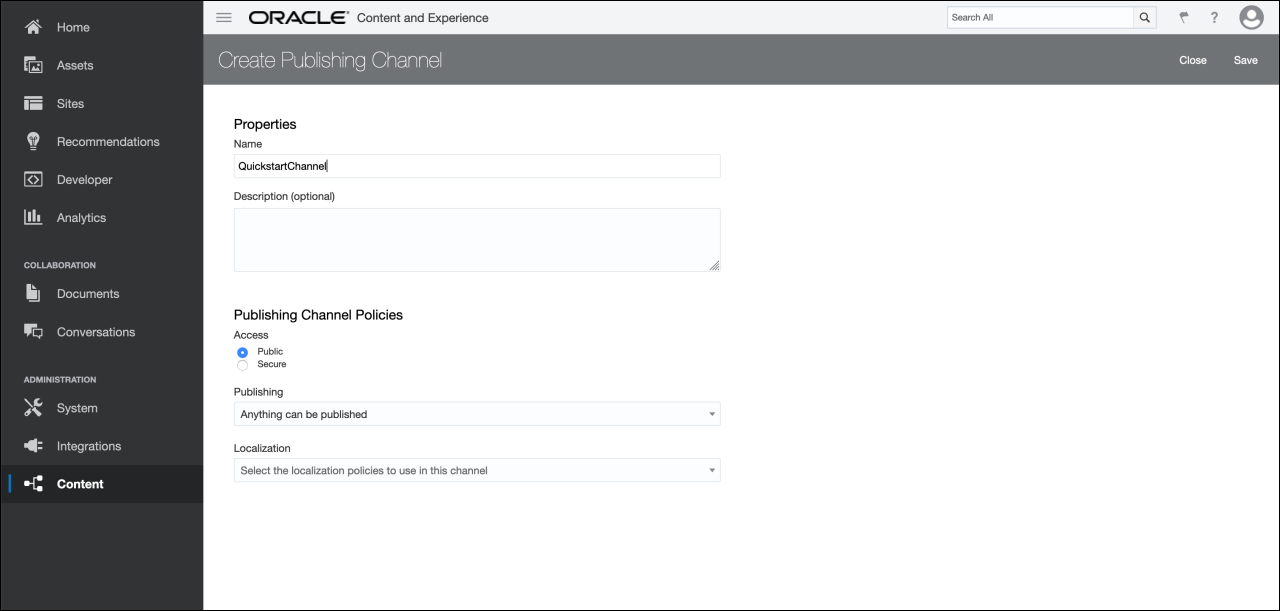
Click Content in the left sidebar and choose Publishing Channels from the selection list in the header. You'll see an empty list without any channels created. In the upper right corner, click Create to create a new channel. Give the channel the name QuickstartChannel for the purposes of this quick start tutorial and keep the access public. Click Save to create the channel.
Description of the illustration 18-creating-publishing-channel.png
Create an Asset Repository
In Oracle Content Management, an asset repository is essentially a large bucket that contains all the content items (known in Oracle Content Management as assets) an organization needs to work with.
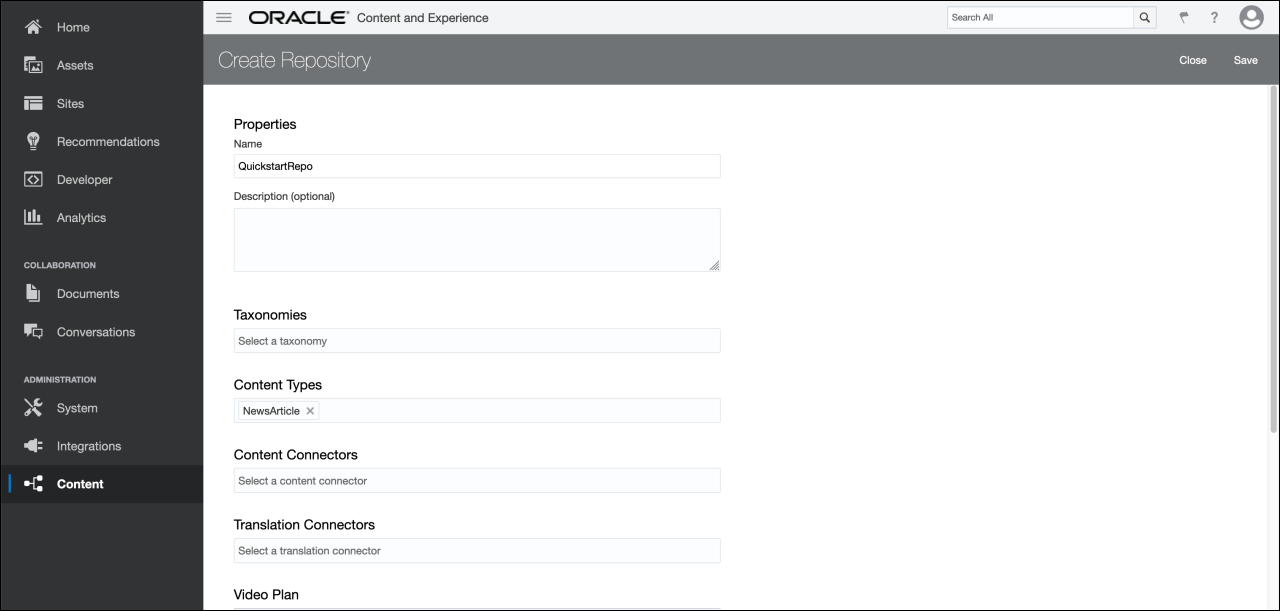
Click Content in the left sidebar and choose Repositories from the selection list in the header. You'll see an empty list without any asset repositories created. In the upper right corner, click Create to create a new asset repository. Give the asset repository the name QuickstartRepo for the purposes of this quick start tutorial.
Specify the NewsArticle content type under Content Types to indicate to Oracle Content Management that assets of the type NewsArticle can be created in the QuickstartRepo asset repository.
Description of the illustration 19-creating-asset-repository.png
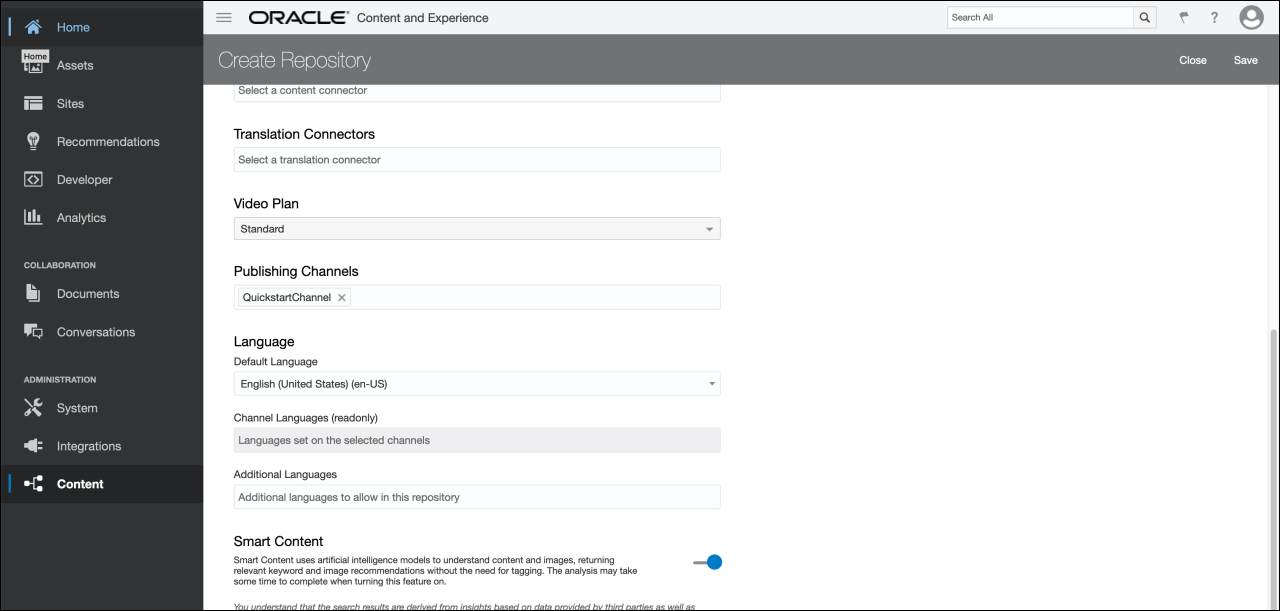
Finally, specify the QuickstartChannel channel under Publishing Channels to indicate to Oracle Content Management that content in the QuickstartRepo repository can be published to the QuickstartChannel channel.
Description of the illustration 20-choosing-channel-asset-repository.png
For now, you can leave everything else untouched and click Save to create the asset repository.
Create a Content Item (Asset)
In Oracle Content Management, an asset is the atomic unit of managed content and adheres to a particular content type. Each content item is an asset. For developers coming from other CMS ecosystems, assets in Oracle Content Management are most similar to what many CMSs call entities or records.
To create your first asset, click Assets in the left sidebar and click Create in the upper right corner. You'll see a selection list of available content types, including NewsArticle. Select this content type to continue.

Description of the illustration 21-creating-asset.png
In the Create Content Item form, enter "My First News Article" as the name under Content Item Properties and insert filler content under Content Item Data Fields, which contains the fields we defined for the NewsArticle content type. Then, in the Channels sidebar, click Add and select QuickstartChannel to identify it as the channel to which we'll be publishing.
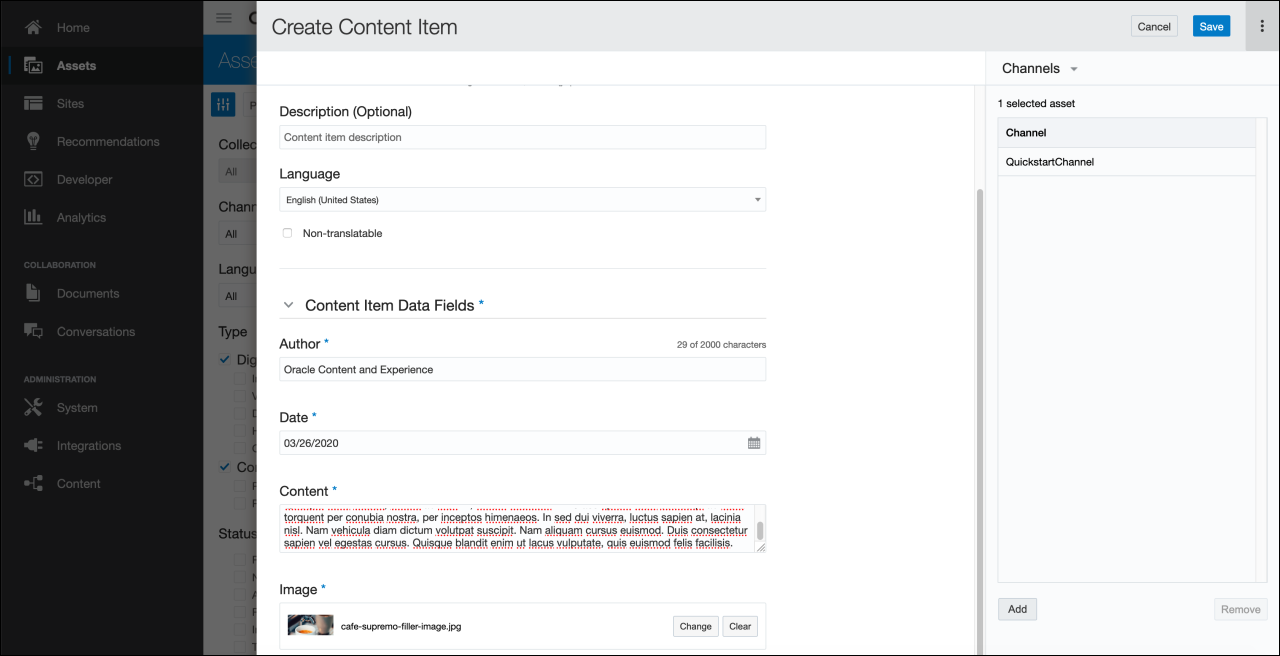
Description of the illustration 22-identifying-channel-asset.png
The image you choose to add will become an asset as well.
Publish Content Assets to a Channel
Now, to make the content we just created available to the QuickstartChannel channel, we need to publish both newly created assets to that channel, including the NewsArticle content item and the image associated with it.
Navigate to Assets in the left sidebar, where you'll find both of these assets available as unpublished assets. Select them both and click Publish in the action links that appear above the selected assets.
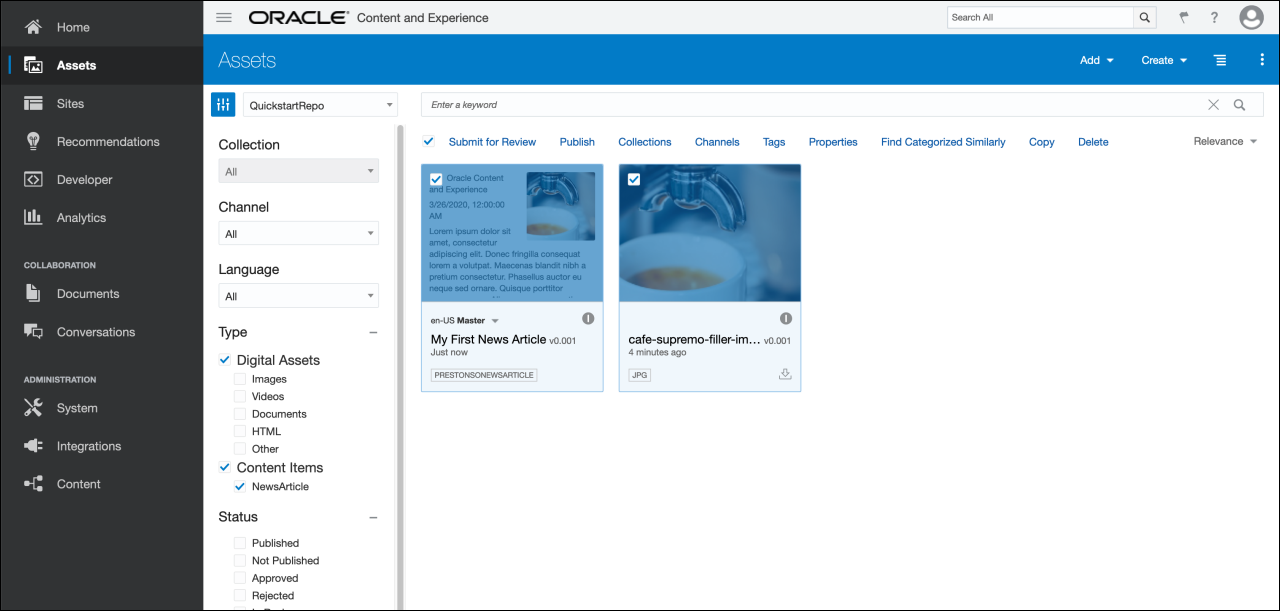
Description of the illustration 23-publishing-assets-channels.png
On the following Validation Results screen, verify that the assets you want to publish to the QuickstartChannel channel are represented. Click Publish in the upper right corner to verify. This will publish both assets to the channel, now making them available for public consumption.
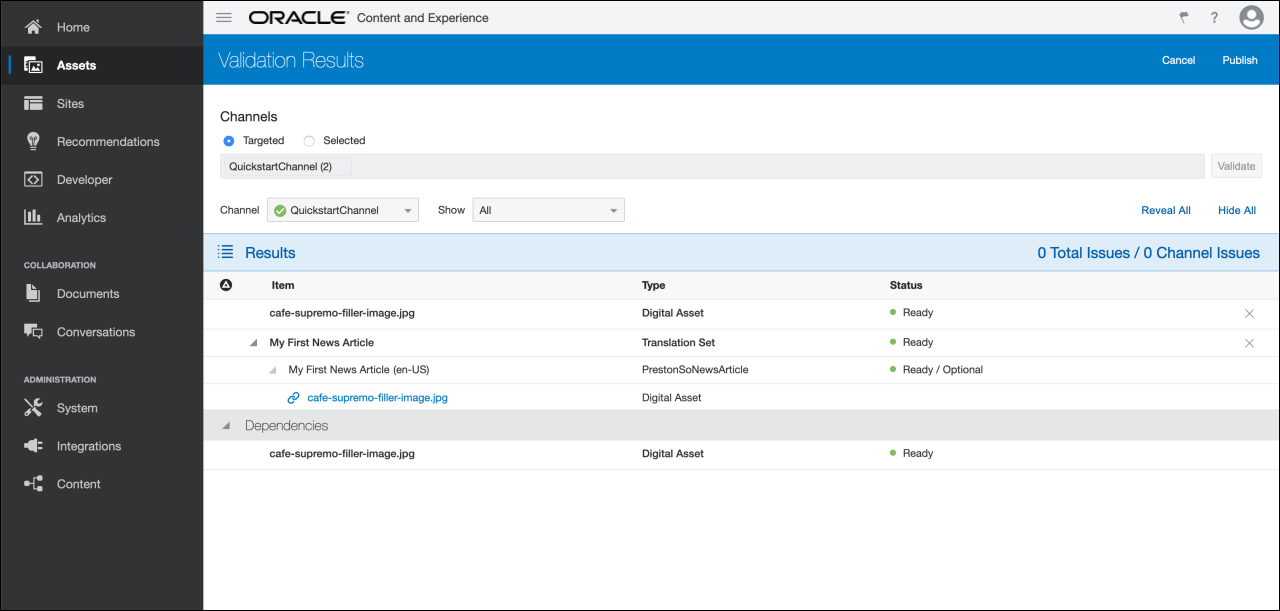
Description of the illustration 24-publishing-assets.png
Configure Oracle Content Management As a Headless CMS
To enable Oracle Content Management as a headless CMS, we need to configure cross-origin resource sharing (CORS) for security reasons and acquire an API access token for our publishing channel.
If you already have CORS configured and an API access token at hand, you can skip this step and proceed to configure Oracle Content Management as a headless CMS.
Note also that for the purposes of providing a base URL of your CMS
backend, the instance URL is the domain name in your URL bar that ends with
oraclecloud.com.
Configure Cross-Origin Resource Sharing (CORS)
Cross-origin resource sharing (CORS) prevents unauthorized requests from overloading your API and causing distributed denial-of-service (DDoS) attacks. To configure CORS, click System in the left sidebar and then choose Security in the selection list in the header.
If you already have domains ready for your consumer applications, you can insert them into the Front Channel CORS Origins field, which allows access to content through Oracle Content Management's REST APIs and embedded components.
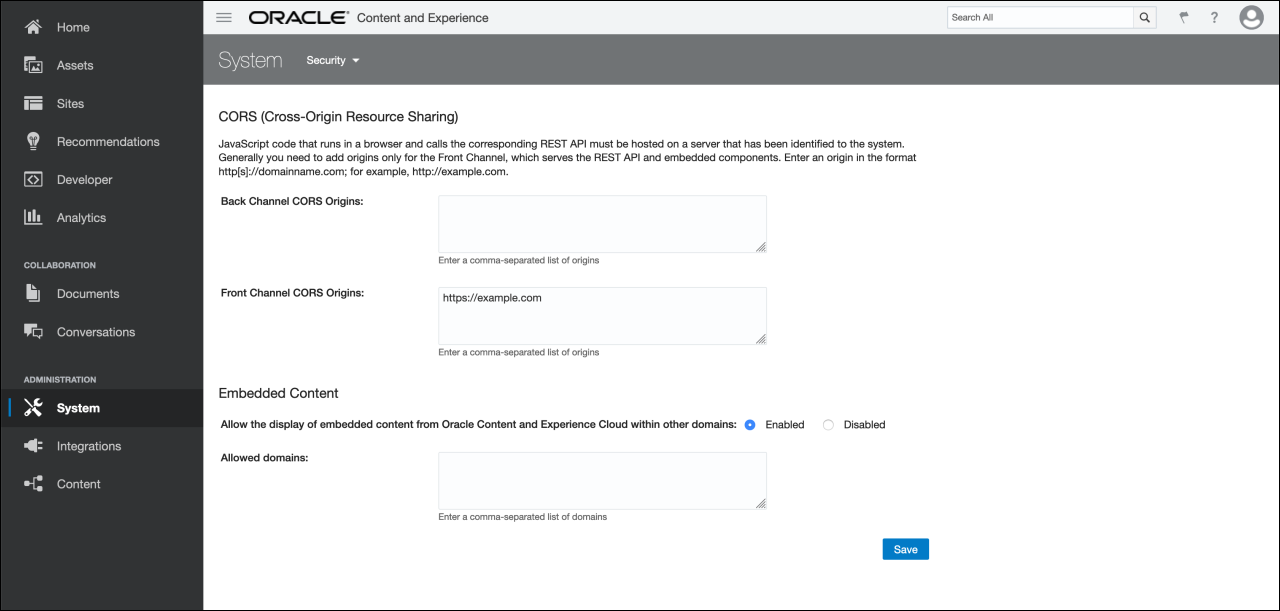
Description of the illustration 25-configuring-cors.png
As you can see in the preceding screenshot, we have configured CORS
to allow requests originating from the https://example.com
domain. To include additional domains that are allowed access to the Oracle
Content Management REST APIs, insert a comma-separated list of domains (no
quotation marks or other delimiters necessary). Any domains specified here
will be able to issue requests successfully to the APIs provided by Oracle
Content Management.
Acquire and Refresh API Access Tokens
As we saw earlier in this quick start tutorial, assets in Oracle Content Management must be published to a channel for that content to be available to other consumers, such as mobile or JavaScript applications.
Since channels can have differentiated sets of published assets, each channel provides its own unique API access token, which must be included in every request to target an individual channel.
Click Content in the left sidebar and choose Publishing Channels in the selection list in the header. Select the QuickstartChannel channel from the list of channels. Under the API Information header, you'll see two fields whose values can be copied to the clipboard: Channel ID and Channel Token. To refresh your channel's API access token, click Refresh to the right of the channel token.
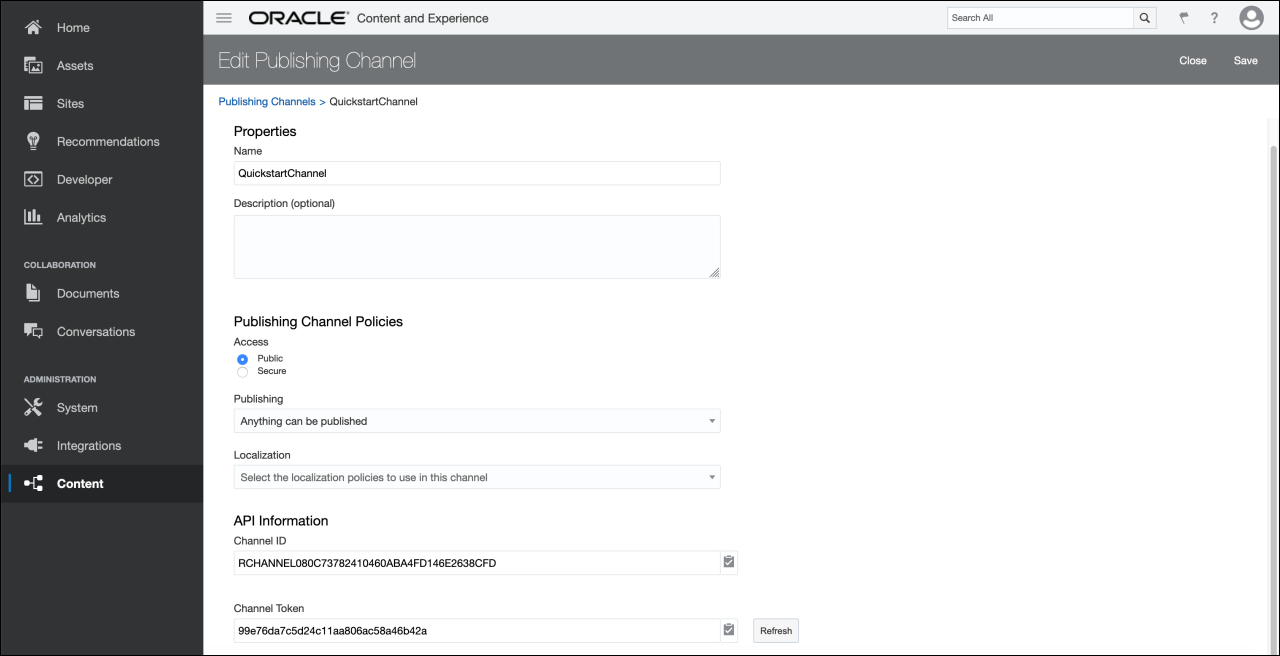
Description of the illustration 26-acquiring-api-access-tokens.png
Note:
You can also acquire your channel API access token programmatically by issuing a request to the REST API for Content Management provided by Oracle Content Management.Issue Your First Request to Oracle Content Management
Our next step is to issue our first request to Oracle Content Management to determine that our APIs are configured properly.
Recall that the instance URL is simply the domain at which your Oracle Content
Management instance resides, adhering to the following format, where
{instance_name} is the name of the instance and
{cloud_account_name} is the cloud account name tied
to your Oracle Cloud account:
https://{instance_name}-{cloud_account_name}.cec.ocp.oraclecloud.comCopy your instance URL and keep it handy, as this is the domain against which you'll be issuing every API request from your consumer applications. In the coming tests, we'll be retrieving the NewsArticle asset we created earlier and published to the QuickstartChannel channel.
If you want to retrieve an individual asset with a GET request,
you'll need to supply the identifier of that asset in your request. To
acquire the identifier of your NewsArticle asset,
click Assets in the left sidebar and select your
NewsArticle asset, as seen in the following
screenshot. In the URL, you'll see a path adhering to the following format,
where {asset_id} is the asset identifier:
https://{instance_name}-
{cloud_account_name}.cec.ocp.oraclecloud.com/documents/assets/view/{asset_id}
Copy this {asset_id} value and keep it handy for
our coming GET requests.
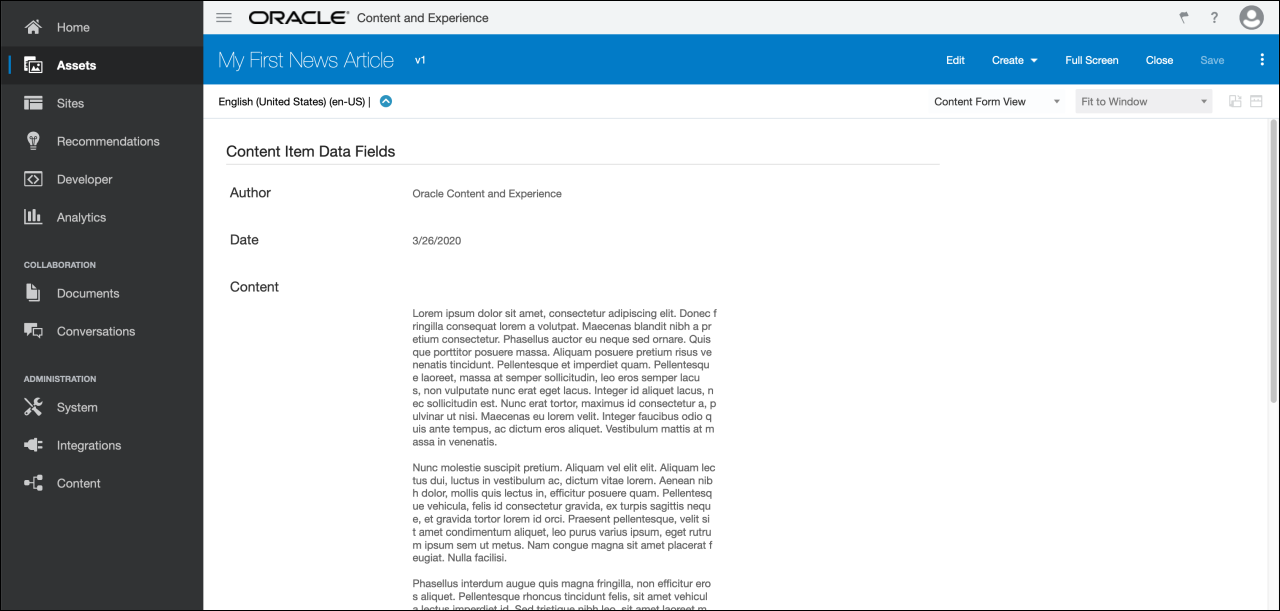
Description of the illustration 27-acquiring-asset-identifier.png
In the next three sections, we'll use three different approaches to
issue a request to retrieve a published item: Postman, cURL, and a typical
XMLHttpRequest. The resource path takes the following format, with the added
channelToken query parameter, whose value is
{channel_token}, the API access token we copied
earlier:
https://{instance_name}-
{cloud_account_name}.cec.ocp.oraclecloud.com/content/published/api/v1.1/items
/{asset_id}?channelToken={channel_token}
Without the channelToken query parameter included,
you'll receive a "403 Forbidden" error.
Retrieve Content Through Postman
One of the most ubiquitous developer tools for testing API requests is Postman, a free API client and desktop application. Postman provides a convenient user interface to form your request, including request headers and request body.
To test an API call from Postman, insert the following into the path for a new Postman GET request, supplying the channelToken query parameter under the Params tab:
https://{instance_name}-
{cloud_account_name}.cec.ocp.oraclecloud.com/content/published/api/v1.1/items
/{asset_id}?channelToken={channel_token}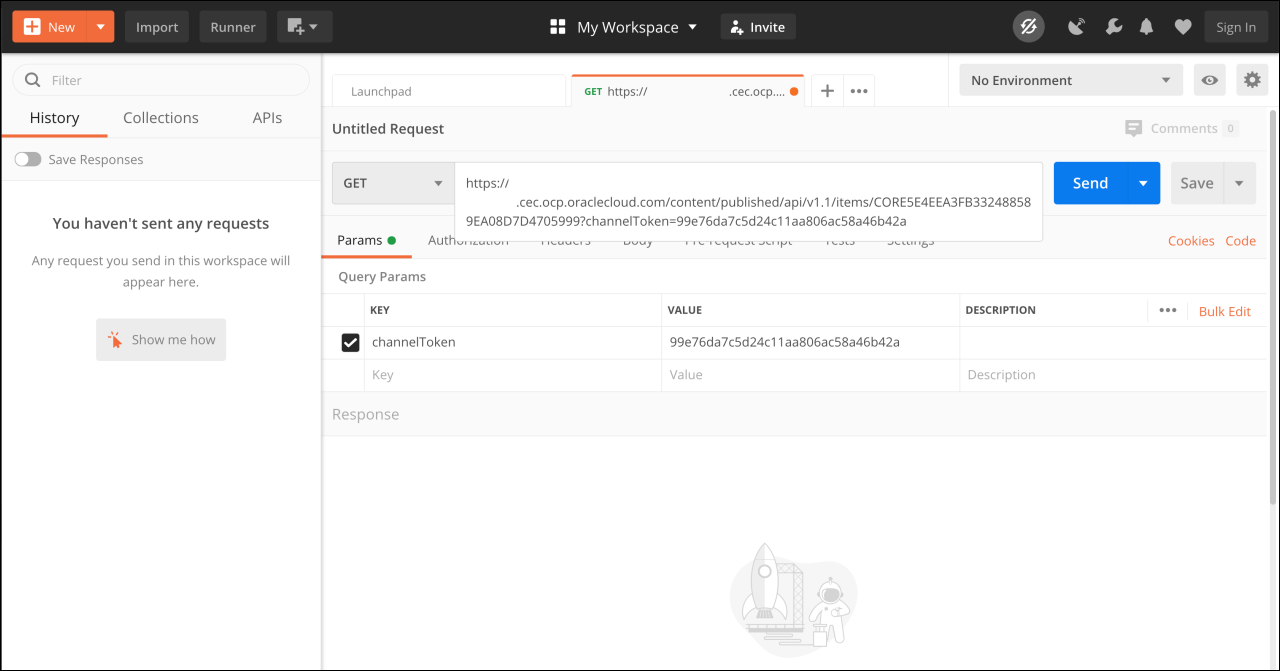
Description of the illustration 28-retrieving-content-postman.png
Upon issuing the GET request, you'll see a response with the code "200 OK," which begins with the following JSON:
{
    "id": "CORE5E4EEA3FB332488589EA08D7D4705999",
    "type": "NewsArticle",
    "name": "My First News Article",
    "description": "",
    "slug": "1481786211989-my-first-news-article",
    "language": "en-US",
    "translatable": true,
    "createdDate": {
        "value": "2020-03-26T19:15:55.710Z",
        "timezone": "UTC"
    },
[...]
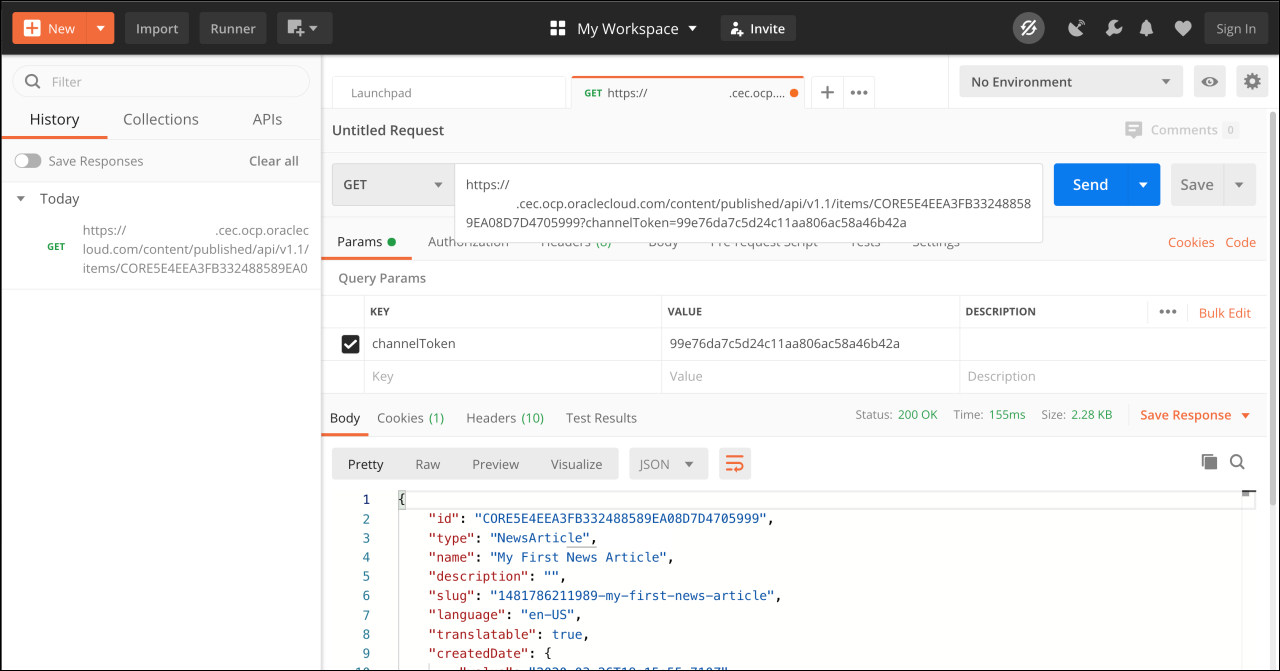
Description of the illustration 29-retrieving-content-postman-response.png
Note that in the preceding two screenshots, the instance name and cloud account name have been obfuscated and should be replaced with your own details.
Retrieve Content Through cURL
To retrieve our NewsArticle asset through the command line, we can use the command-line tool cURL.
The Oracle Content Management REST API documentation contains information about using cURL to access the REST API for Content Management, with useful initial steps for those unfamiliar with cURL.
To test an API call from cURL, issue the following command, where
{instance_name} and
{cloud_account_name} are your instance details:
curl -i -X GET https://{instance_name}-
{cloud_account_name}.cec.ocp.oraclecloud.com/content/published/api/v1.1/items
/CORE5E4EEA3FB332488589EA08D7D4705999\?channelToken\=99e76da7c5d24c11aa806ac5
8a46b42a
You'll receive a response that returns the JSON from the previous section, as seen in the following screenshot (note that the instance name and cloud account name have been obfuscated).

Description of the illustration 30-retrieving-content-curl.png
Retrieve Content Through an XMLHttp Request
Finally, we can also retrieve our NewsArticle asset from any JavaScript application or in the browser by employing the XMLHttpRequest API.
To test an API call using XMLHttpRequest, issue a request by constructing an
XMLHttpRequest and invoking the
send() method as follows, where
{instance_name} and
{cloud_account_name} are your
instance details:
var req = new XMLHttpRequest();
req.open("GET", "https://{instance_name}-
{cloud_account_name}.cec.ocp.oraclecloud.com/content/published/api/v1.1/items
/CORE5E4EEA3FB332488589EA08D7D4705999?channelToken=99e76da7c5d24c11aa806ac58a
46b42a");
req.send();
You'll receive a response that returns the JSON from
the previous section. Note that if you're issuing a
variety of GET requests with diverse query
parameters, you may want to employ a utility
function to handle arbitrary query parameters in
lieu of inserting them into your invocation of the
open() method directly.
Next Steps
To learn more about using Oracle Content Management as a headless content management system, see the documentation and sample websites.
You can browse the Headless CMS section of the Oracle Content Management documentation, where you can find information about the content delivery and content management APIs as well as software development kits that can aid your implementation.
In addition, you can download sample websites and learn about the open-source ecosystem surrounding Oracle Content Management on the downloads page.