7 Working with Custom Views
This section contains procedures for working with customer Monitor views. It contains these topics:
7.1 About Views
A view is a customized representation of any related or unrelated group of Oracle GoldenGate objects in your enterprise. By using different views of your Oracle GoldenGate environment, you can more easily monitor large installations that have multiple Oracle GoldenGate instances or complex process topologies. Views also can help you divide up the monitoring workload among the members of your team, each person being responsible only for those objects in his or her assigned view (or views).
Views are included as nodes in the Navigation Tree. Each view has one or more sub-nodes that represent the Oracle GoldenGate objects that the view contains. See About the Objects.
You can create any number of views. For example, there can be a view for each Oracle GoldenGate instance or each Oracle GoldenGate host. There can be views representing different data paths to different targets, and views representing different parallel process streams. You have control over the granularity of your views, from multiple solutions to a single object.
One advantage of using views is that you can configure status and lag alerts for them. You might, for example, create a view that focuses on a subset of objects that are prone to processing interruptions or anomalies (for example, network disruptions), and then configure alerts to help you monitor them. You can include any objects together in a view, even objects that have no relationship to one another. Objects need not even be within the same Oracle GoldenGate Instance or Solution.
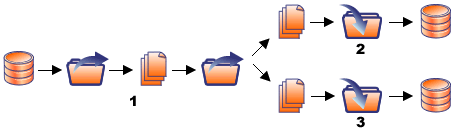
In the following example, each of the numbers (1, 2, and 3) represents an Oracle GoldenGate Instance. The following diagram shows the full Oracle GoldenGate solution, which consists of data paths to two targets:
-
System 1 to System 2
-
System 1 to System 3
Description of the illustration ''view_example.gif''
In this example, an administrator could create a view for each of the two replication data paths that originate from System 1.
"View One" would show end-to-end replication from System 1 to System 2:
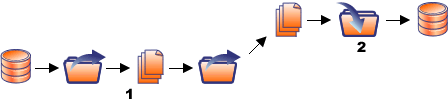
Description of the illustration ''view1.gif''
"View Two" would show end-to-end replication from System 1 (1 in diagram) to System 3:

Description of the illustration ''view2.gif''
As an alternative to (or in addition to) the two views in this example, there could be three views, each one representing one of the three Oracle GoldenGate instances.
7.2 Managing Views
Use the View Management tab to create custom views for monitoring any or all of the Oracle GoldenGate components in your enterprise. You can create any number of views containing any number of related or unrelated Oracle GoldenGate objects. See About Views.
Only Super Administrators, Administrators, and Power Operators can manage views.
On the View Management tab, you can take the following actions:
-
To create a view definition, click New View. See Adding, Changing, and Removing Views.
-
To edit a view, click its name in the Manage Views list to open the Edit View screen. See Adding, Changing, and Removing Views
-
To delete a view, select the check box next to its name in the list, and then click Remove View(s).
7.3 Adding, Changing, and Removing Views
An Oracle GoldenGate Monitor Administrator or Power Operator user can create, edit, and remove custom views of the Oracle GoldenGate components. This topic shows how:
-
On the View Management tab, click New View. The New View screen appears in the panel to the right of the Navigation Tree. For a description of the Objects section toolbar, see About the Objects.
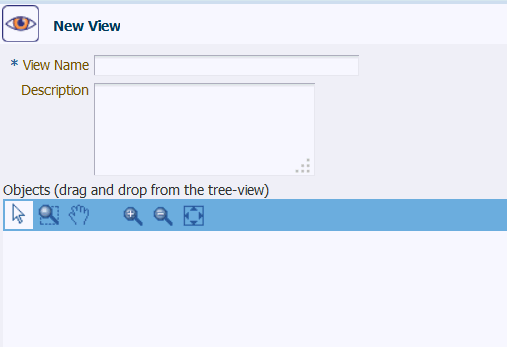
Description of the illustration ''nu_vu.gif''
-
For View Name, type a name for this view. You can use up to 30 characters, including numbers, uppercase and lowercase letters, underscores, and dashes.
-
(Optional) Supply a brief description of this view, using up to 255 characters.
-
(Optional) In the upper right corner of the New View screen, click the Table Data View icon (
 ) to change the workspace from diagram format (the default) to table format. The diagram format shows objects as a flow diagram (in their relationship to one another), whereas the table format shows them in list form. You can switch between diagram and table formats at any time. When using the diagram format, use the diagram toolbar as needed to move around the workspace. See About the Diagram View.
 -
From the Navigation Tree, drag objects to the New View workspace as needed. When dragging upper-level nodes from the tree (such as Host or Instance), you are prompted to include the child objects of that node as an option.
-
Review your view objects. To remove any object, select it in one of the following ways, and then click Remove Selected Object(s). You cannot undo this action.
-
To select within a diagram, click on the object. Press the Control key to select multiple objects.
-
To select within a table, select the check box next to each item that is to be removed.
-
-
Click Submit. The new view is displayed in the Manage Views list.
-
In the Manage Views list of the View Management tab, click the name of the view that you want to change. The Edit View screen appears.
-
Do one of the following:
-
Drag new objects from the Navigation Tree to the Objects workspace.
-
Select objects that you want to remove and click Remove Selected Object(s).
-
-
Click Submit.
-
In the Manage Views list of the View Management tab, select the check box next to the name of the view (or views) that you want to remove.
-
Click Remove View(s). You cannot undo this action.