| Oracle® Java Micro Edition Software Development Kit Developer's Guide Release 8 for Windows E50624-01 |
|
 Previous |
 Next |
| Oracle® Java Micro Edition Software Development Kit Developer's Guide Release 8 for Windows E50624-01 |
|
 Previous |
 Next |
This chapter describes NetBeans IDE 8.0 which provides a rich, visual environment for developing embedded applications and numerous tools to improve the programming process.
Oracle Java ME SDK 8 provides two plugins for working with NetBeans IDE 8.0:
Java ME SDK Tools plugin
Java ME SDK Demos plugin (optional)
To install the Java ME SDK plugins for NetBeans:
Download the ZIP archive with the plugins from http://www.oracle.com/technetwork/java/javame/javamobile/download/sdk
Extract the contents of the archive to a directory on your local machine.
Start NetBeans IDE, open the Tools menu, and then select Plugins to open the Plugins window.
Uninstall the previous Java ME SDK plugins:
On the Installed tab, select the Show Details check box, then select Java ME SDK Tools and Java ME SDK Demos, and click Uninstall.
On the Settings tab, ensure that Additional Development Plugins and Latest Development Build are deselected.
Click the Add button in the lower right of the Settings tab.
In the Update Center Customizer window, do the following:
In the Name field, enter Java ME SDK Update Center.
Select Check for updates automatically.
In the URL field, use the file command to point to the location where you extracted your plugins, for example:
file:/C:/My_Update_Center_Plugins/updates.xml
Click OK.
On the Settings tab, select the Java ME SDK Update Center that you just added.
On the Available Plugins tab, select Java ME SDK Tools and Java ME SDK Demos, and click Install.
Follow the steps in the NetBeans IDE Installer Wizard.
Accept the license terms.
If additional Validation screens appear, click Continue.
Click Finish to restart NetBeans IDE 8.0.
After NetBeans IDE 8.0 restarts, open the Tools menu and select Plugins to open the Plugins window.
On the Installed tab, click Category to sort the plugins. Ensure that Java ME SDK Tools and Java ME SDK Demos plugins are active (if they are not, then select them and click Activate).
When the Java ME SDK plugins are active, click Close.
This section describes how to create a sample IMlet file (IMletDemo.java) from the code provided in Example 2-1. This IMlet file is used in the next section, "Creating a New Project". To create a sample IMlet file:
Copy the code shown in Example 2-1 into a text file. Use Notepad rather than WordPad, to avoid any unnecessary extra characters.
Save the file with the following name: IMletDemo.java.
Example 2-1 Code for the Sample IMletDemo.java Project in NetBeans IDE
package imletdemo;
import javax.microedition.midlet.MIDlet;

public class IMletDemo extends MIDlet {

    boolean bFirst = false;

    public void startApp() {
        try {
            // Perform startup operations
        } catch (Exception ex) {
            ex.printStackTrace();
            return;
        }

        bFirst = true;
        System.out.println("IMlet Demo is already started...");
        // Start program here

    }

    public void pauseApp() {
         //  Pause the application
    }

    public void destroyApp(boolean unconditional) {
       // Close all resources that have been opened

    }


}
This section describes how to create a new embedded project using Oracle Java ME SDK 8 and NetBeans IDE 8.0.
Open the File menu and select New Project.
In the New Project window, select Java ME Embedded from the Categories list and Java ME Embedded Application from the Projects list. Click Next.
In the New Java ME Embedded Application window, specify IMletDemo in the Project Name field at the top, and imletdemo.Midlet in the Create Midlet field at the bottom. Click Finish.
Now you can update the generic project with the sample code that you created earlier in Creating a Sample IMlet File. To include sample IMlet code and run the project:
Right-click the Midlet.java file in the Projects window and select Properties.
In the Properties window, note the path to the imletdemo directory in the All Files field.
Copy the IMletDemo.java file you created in Creating a Sample IMlet File to the imletdemo directory.
Delete the file Midlet.java from the directory.
This changes the project tree: instead of Midlet.java, the project tree should contain IMletDemo.java.
Right-click the IMletDemo project in the Projects window and select Properties.
In the Application Descriptor category, open the MIDlets tab.
Select the IMletDemo row (where the imletdemo.Midlet class is flagged in red, because you removed the class file) and click Edit.
In the Edit MIDlet window, select the imletdemo.IMletDemo class from the MIDlet Class drop-down list. Click OK.
Click OK to close the Project Properties window.
Clean and build the IMletDemo project by selecting it in the Projects window and clicking on the hammer-and-broom icon in the NetBeans IDE 8.0 toolbar, or by selecting Clean and Build Project (IMletDemo) in the Run menu.
Run the IMletDemo project by selecting the green right-arrow icon in the NetBeans IDE 8.0 toolbar, or by selecting Run Project (IMletDemo) in the Run menu.
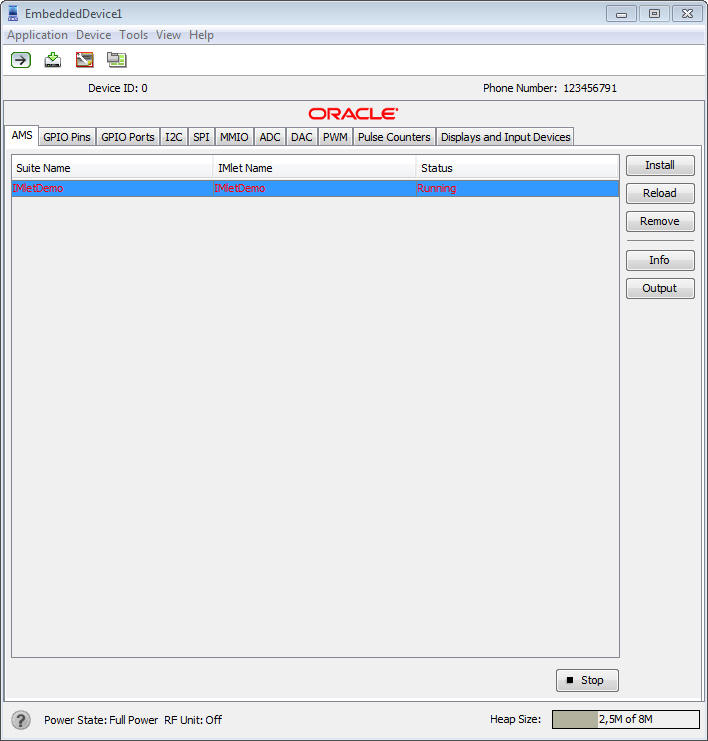
If successful, the EmbeddedDevice1 emulator starts with the IMletDemo suite running, as shown in Figure 2-1. For more information about the main window of the Java ME Embedded Emulator, see Understanding the Main Window.
Figure 2-1 The EmbeddedDevice1 Emulator Running IMletDemo
