| Oracle® Java ME Embedded Getting Started Guide for the Windows 32 Platform Release 3.2 E35132-01 |
|
 Previous |
 Next |
| Oracle® Java ME Embedded Getting Started Guide for the Windows 32 Platform Release 3.2 E35132-01 |
|
 Previous |
 Next |
This chapter discusses how to install the Oracle Java ME Embedded software for the Windows platform on the NetBeans Integrated Development Environment (IDE).
The examples below use NetBeans 7.1, although it works with NetBeans 7.0 as well. With the NetBeans integrated development environment, you can create and test mobile applications using a graphical development environment.
This section walks you through installing the Oracle Java ME Embedded software.
Start the NetBeans IDE and choose the Tools>Plugins menu item.
A dialog box appears, as shown in Figure 2-1:
Choose the Installed tab, and ensure that the Java ME plugin is activated.
If it is not, select Java ME from the list and press the Activate button. Activating the Java ME plugin requires installing the Java Profiler plugin as well.
Close the NetBeans Plugin dialog box when completed.
Install the Oracle Java ME Embedded platform in NetBeans.
Choose the Tools>Java Platforms menu item.
Add the new Oracle Java ME Embedded platform by pressing the “Add Platform...” button in the lower-left corner of the dialog.
This step shows the dialog in Figure 2-2:
Choose the second option, “Java ME MIDP Platform Emulator”, as the Oracle Java ME Embedded is a Java ME MIDP Platform Emulator, and press the Next button.
NetBeans lists all known Java ME MIDP platforms. If the Oracle Java ME Embedded is not shown, press the "Find More Java ME Platform Folders..." button near the bottom. Then, select the distribution folder and press the Open button.
NetBeans automatically detects the Oracle Java ME Embedded platform.
Press the Next button.
If successful, NetBeans presents a report of the detected platform.
Press the Finish button.
The platform is added to the Java Platform Manager.
Finally, close the Java Platform Manager dialog.
This section walks you through creating a new project using the Oracle Java ME Embedded platform.
Choose File>New Project. The New Project dialog appears, as shown inFigure 2-3:
Choose Java ME from the Categories list, and Mobile Application from the Projects list, then press the Next button.
The dialog shows the “Name and Location” panel.
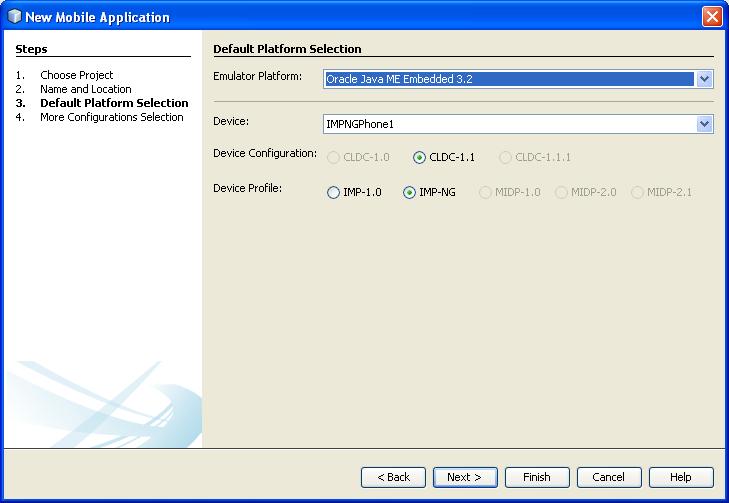
Choose an appropriate name and location for the project. Be sure to uncheck the "Create Hello MIDlet" option, as this may create a sample project that uses the mobile libraries, and then press Next to arrive at the panel shown in Figure 2-4:
Figure 2-4 New Embedded Application Dialog

Here, you can choose the desired platform for the Java Wireless Client project.
Choose “Oracle Java ME Embedded 3.2” in the drop-down selection at the top of the dialog.
Press Finish.
A new Oracle Java ME Embedded project is created. At this point, you can use the skeleton code shown in Example 2-1 to start building an embedded project.
Example 2-1 Skeleton Code for an Oracle Java ME Embedded Project
import com.oracle.deviceaccess.PeripheralTypeNotSupportedException;
import javax.microedition.midlet.MIDlet;

public class GPIODemo extends MIDlet {

    boolean bFirst = false;
    boolean loopFlag = true;


    public void startApp() {

        if (bFirst == false) {

            try {
                //  Perform startup operations
            } catch (PeripheralTypeNotSupportedException ex) {
                ex.printStackTrace();
                return;
            } catch (Exception ex) {
                ex.printStackTrace();
                return;
            }

            bFirst = true;
        } else {
            System.out.println("GPIO Demo is already started..");
        }

        //  Start program here, including accessing peripheral devices

    }

    public void pauseApp() {
        //  Pause the application
    }

    public void destroyApp(boolean unconditional) {
        bFirst = false;

        //  Close all resources that have been opened
    }


}
Note that in the _policy.txt file of the Oracle Java ME Embedded distribution (typically located in the runtimes/impng/lib directory), the developer must add the following entries to avoid security exceptions when running the example:
To both the domains:
domain: untrusted, unsecured
domain: unidentified_third_party, unsecured
Add the following entry:
allow: device_access
The final step involves modifying the project properties to include the desired Oracle Java ME Embedded class definitions. The following packages are available.
Application Management System (AMS) API
CLDC Logging API
File Connection and PIM Optional Packages 1.0
Location Based API
OMDA Access Point API
Security and Trust Services API for J2ME
Wireless Messaging API
Here are the steps to include optional packages.
Choose File>Project Properties for the project you just created.
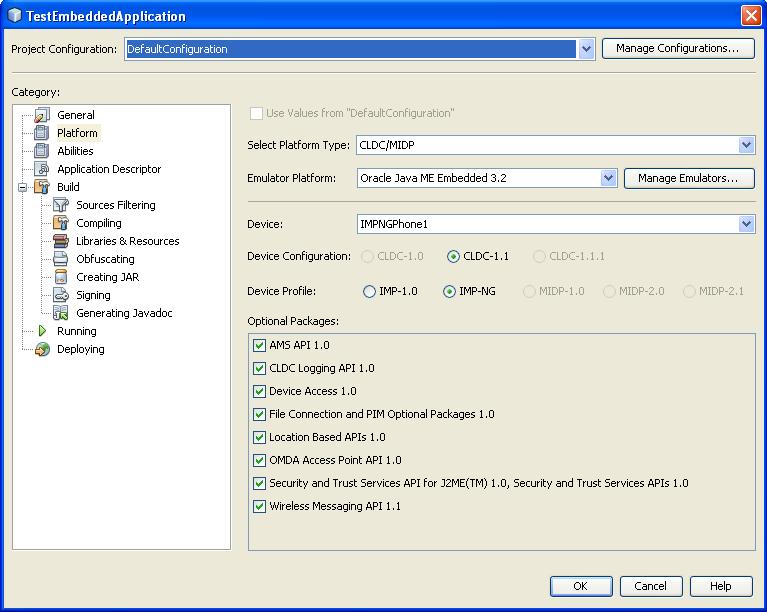
You should see a dialog similar to Figure 2-5:
Figure 2-5 Modifying the Project Properties

Select the Platform option from the list on the left side, and note the optional packages on the bottom right side of the dialog.
Ensure that any libraries used by the embedded application are checked.
Click OK to close the dialog.
At this point, you can compile and run the newly-created Oracle Java ME Embedded project. If it is successful, you should see the Oracle Java ME Embedded emulator.