| Oracle® Java Micro Edition Software Development Kit Developer's Guide Release 3.0.5 for Windows E24265-04 |
|
 Previous |
 Next |
| Oracle® Java Micro Edition Software Development Kit Developer's Guide Release 3.0.5 for Windows E24265-04 |
|
 Previous |
 Next |
JSR 229, the Payment API, enables applications to make payments on behalf of their users. The Payment API supports different payment mechanisms through payment adapters. A device that implements the Payment API has one or more adapters. MIDlet suites use descriptor attributes to specify what types of payment adapters they can use.
The Java ME SDK implements the Payment API with a sample payment adapter that simulates both Premium Priced SMS (PPSMS) and credit card payments. In addition, the SDK makes it easy to set the necessary attributes in the MIDlet's descriptor and JAR file manifest. Finally, a payment console enables you to easily track payments made or attempted by an application.
Because the Payment API is closely tied to provisioning and external device payment mechanisms, and because payments can only succeed in a trusted protection domain, always test and debug your Payment API applications using the Run via OTA feature.
The Payment Console is a simple monitoring tool that displays payment related transactions sent from a mobile application using the Payment API (JSR 229). The payment console monitors Payment Update File requests and Premium Priced SMS payments.
The Payment Console is implemented as an Http server running within the Device Manager process. The root for the Http server is installdir\apps.
|
Note: The Device Manager must be running before you launch the Payment Console. |
To launch the Payment Console in NetBeans, select Windows > Output > Payment Console. The console opens as a window at the bottom of the IDE.
The initial message is:
Payment Console is runningusing phone number 5550000listening on http://localhost:54465You can also launch the Payment console from the command line:
installdir\bin\payment-console.exe
To close the Payment Console launched from the command line, press Enter.
To change the Payment Console Phone number, go to the Device Selector and right-click the platform node (CDC or CLDC). Reset the Payment Console Phone Number property from the platform Properties window.
JBricks is a game that demonstrates the use of the JSR 229 Payment API. The game itself resembles Breakout or Arkanoid. In JBricks, you can buy another life or a new game level. Behind the scenes, the Payment API handles the details.
Right-click the JBricks project and select Properties from the context menu.
Select the Running Category and choose the Execute through OTA radio button. Click OK.
Run the JBricks demo. The first time you run the game it will be installed over the air. If the game is already installed, select JBricks from the AMS, and wait for the game home page to load (you see a list of actions where the first item is Start Game).
On the game home page, select the level if necessary, then select Start Game and click again to begin the round.
Use the left and right arrow keys to move the paddle to keep the bar from hitting a wall.
To see how JBricks uses the Payment API, choose either Buy Life or Buy Level from the game's main menu. Next, choose whether you want to buy a single life or three lives for a lower bulk price.
When you choose the Buy transaction you are asked to confirm the Premium Priced SMS carrier. The JBricks demo supports three different carriers. To change carriers, set the Payment properties for the device running the demo. In the Device Selector, right-click the device and select Properties. You can set the payment property values as follows to change the carrier:
SONERA: MCC=999, MNC=99
DNSDNA: MCC=380, MNC=77
RADIOG: MCC=747, MNC=88
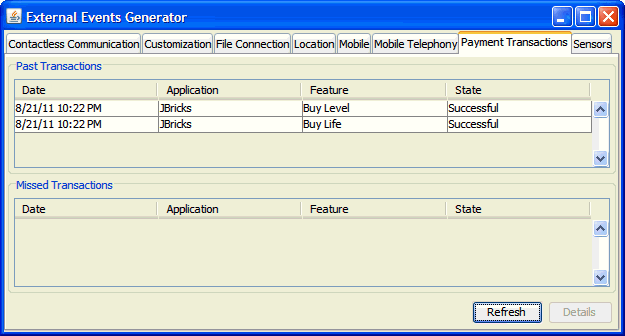
To view your transactions in the emulator, select Device > Payment Transactions tab. Transactions for this specific instance of the emulator are displayed.

In addition, you can view all transactions passing through the SDK's payment system. Choose Windows > Output > Payment Console. A transaction in the console looks something like the following:
PSP Console running, using phone number +5550001.
PSP Server running at https://localhost:-1
Received Payment Request from 127.0.0.1
   Credit card issued by: VISA
   Credit Card type: 0
   Credit Card Number: 4111111111111111
   Credit Card Holder: Jonathan Knudsen
   Feature ID: 3_lives
   Credit Card Verification Number (CCV): 123
   Payload: null
Response to 127.0.0.1
HTTP/1.1 200 OK
Content-Length: 0
Pay-Response: SUCCESSFUL
Pay-Timestamp: 1156282954734