| Oracle® Java Micro Edition Software Development Kit Developer's Guide Release 3.2 for Windows E24265-04 |
|
 Previous |
 Next |
| Oracle® Java Micro Edition Software Development Kit Developer's Guide Release 3.2 for Windows E24265-04 |
|
 Previous |
 Next |
The Oracle Java ME SDK emulator supports JSR 172, the J2ME Web Services Specification. JSR 172 provides APIs for accessing web services from mobile applications. It also includes an API for parsing XML documents.
The NetBeans IDE provides a stub generator that automates creating source code for accessing web services that conform to the J2ME Web Services Specification. You can add stubs to any MIDP application.
|
Note: If you are using NetBeans 7.1.2, or 7.2.1 or higher the "SOAP Web Services" plugin must be installed and activated. |
The following is a general procedure for adding stubs:
In the Projects window, expand the tree for a project.
Launch the Java ME Web Service Client wizard:
Right-click on the Source Packages node and select New > Java ME Web Service Client...
In the New Java ME Webservice Client page, you can either:
Click "Running Web Service and enter the URL for the WSDL", then click Retrieve WSDL.
Or,
Click "Specify the Local filename for the retrieved WSDL" and browse to a file on your system.
In either case, you must enter a Package name (if it is not supplied), then click Finish. The new package appears in the project and includes an interface file and a stub file.
You can now edit your source files to call the content the stub provides, then build and run.
See Section 20.2, "Creating a New Mobile Web Service Client" for a step by step process, or see Section 20.3, "Run JSR172Demo" and view the demo source files.
This sample procedure creates a new project and adds a web service client. However, you can add a web service client to any MIDP project, it does not have to be new.
If you are using a proxy server, you must configure the emulator's proxy server settings as described in Section 3.5, "Configuring the Web Browser and Proxy Settings".
Select File > New Project, choose the Java ME category, and the Mobile Application project type, and click Next.

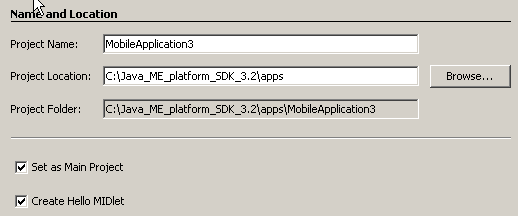
Name your project and ensure Create Hello MIDlet is checked. Click Next.

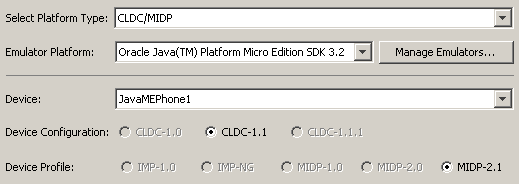
Ensure that SDK 3.2 is the platform and choose a device. Click Next.

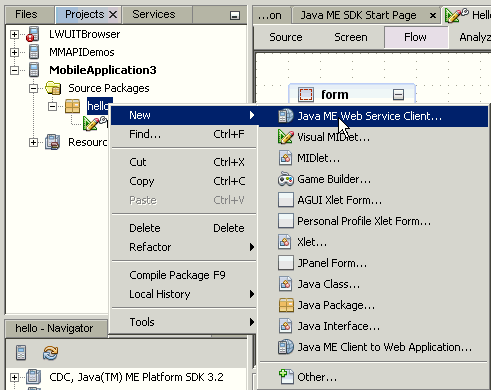
Right-click on the Source Packages node and select New > Java ME Web Service Client...

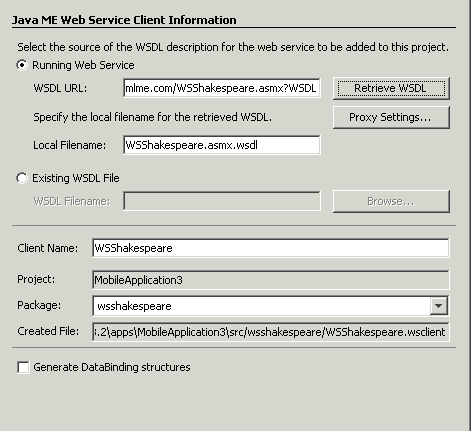
In the New Java ME Webservice Client page:
Click Running Web Service and in the WSDL URL field, enter:
http://www.xmlme.com/WSShakespeare.asmx?WSDL
Click Retrieve WSDL.
The Package name is wsshakespeare.
Click Finish.

The new package appears in the Source Packages tree and includes Shakespeare.java and Shakespeare_Stub.java.
Edit HelloMIDlet.java as follows:
At the beginning, replace the default import declarations with:
import javax.microedition.lcdui.*;
import javax.microedition.midlet.*;
import wsshakespeare.*;
Locate the startApp() method and replace its contents with the following code:
String text;Shakespeare s = new Shakespeare_Stub(); try { text = s.getSpeech("Romeo"); } catch (java.rmi.RemoteException rex) { text = "error"; System.out.println(rex.getMessage()); } TextBox t = new TextBox("Hello", text, 2048, 0); final Command exitCommand = new Command("Exit", Command.EXIT, 1); t.addCommand(exitCommand); t.setCommandListener(new CommandListener() { public void commandAction(Command c, Displayable d) { if (c == exitCommand) { notifyDestroyed(); } } }); Display.getDisplay(this).setCurrent(t);
Build and run the project. You see a quote from Shakespeare's Romeo and Juliet on the device screen.
You can vary the above procedure to use a local WSDL file. Open the following web page in a browser:
http://www.xmlme.com/WSShakespeare.asmx?WSDL
Save it to a local file. For example, C:\ws\WSShakespeare.wsdl. Follow the procedure above, except at Step 4, specify the local file name.
JSR172Demo shows how to access a web service from a MIDlet. The web service in this demo is running on an Internet server, and it conforms to the J2ME Web Services Specification. The client is the MIDlet running in the emulator
If you are using a proxy server, you must configure the emulator's proxy server settings as described in Section 3.5, "Configuring the Web Browser and Proxy Settings".
Set Up the GlassFish Server
This demo requires the Oracle GlassFish server.
If you installed a full version of NetBeans you probably have a GlassFish installation. Choose Tools > Servers and choose Glassfish to view the defaults.
If you do not have Glassfish, it can be downloaded from:
Set Up Environment Variables
Set the following environment variables:
JAVA_HOME=Java-installation-path
GLASSFISH_HOME=GlassFish-installation-path
Run the Demo Scripts
The scripts in the \server subdirectory assume that your server has a domain named "domain1" in which the service is automatically deployed. If you do not have a domain named domain1, set up this domain or edit run.bat and specify a domain you already have. Run the scripts:
demo_directory\JSR172Demo\server\build.bat
demo_directory\JSR172Demo\server\run.bat
Verify the Web Service
Start the Glassfish service.
In a browser, open the following URL:
http://localhost:8080/serverscript/serverscript
You see a page titled Web Services that displays information about the service including links to the WSDL file corresponding to the localhost url.
Run the MIDlet in the Emulator
JSR172Demo contains a single MIDlet named Server Script. Launch it and follow the prompts. You can browse through fictitious news headlines, all of which are retrieved from the web service.