| C H A P T E R 2 |
|
Installing and Launching the Tester Harness |
This chapter describes how to install and launch the tester harness. This chapter has the following sections:
Before you install the tester harness, have the following software already installed:
 ) software version 6 Update 3 (also known as 1.6.0_03) or greater
Sun recommends using the latest JRE software. JRE version 6 Update 3 is the officially supported version.
You can download the JRE software at http://java.sun.com/javase/downloads/index.jsp
You can download the Wireless Toolkit at http://java.sun.com/products/sjwtoolkit/download-2_5.html
In a default Solaris operating system installation, the command is /usr/xpg4/bin/df, and the installer looks for it there. If this directory does not exist or does not contain df, you must prepend the POSIX df command’s location to your PATH so the installer finds it before any other version of df. If necessary, you can obtain the POSIX df command from the Solaris installation CD or DVD.
Use the following guidelines for hardware requirements:
These instructions assume that the Relay and the Central Installation are already installed and that the Java Application Server is running. See the Java Device Test Suite Administration Guide for information on installing the application server.
| Note - Testers must install their own copy of the harness. Testers executing the harness must have write permission for the installed files. |
You can install the tester harness graphically or with a command line script.
|
To interactively install the tester harness with the graphical user interface, follow these steps:
1. Ensure that the Relay is running by entering http://relayHost:relayPort/appContext in a web browser.
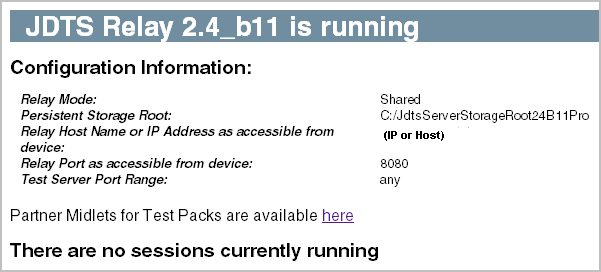
An administrator can give you the values of relayHost, relayPort, and appContext. If the Relay is running, the browser displays a page similar to FIGURE 2-1. The version number and other information might be different.
FIGURE 2-1 Relay is Running Web Page

2. Launch the Java Device Test Suite (tester) installer.
i. Make the installer file executable.
The installer file is jdts_tester-version-rr-build_solaris-date.bin.
ii. Run this command:
% sh jdts_tester-version-rr-build_solaris-date.bin
The value of version depends on the version of the installer. The value of build and date depend on when the software was built.
4. Accept the license agreement, then click Next.
5. Specify jdts_installDir as the Central Repository, then click Next.
6. Specify the installation directory of the Java Runtime Environment software, then click Next.
7. Specify the directory where you want to install the tester harness, then click Next.
For example, yourHomeDir/Test.
Do not specify any directory whose name contains a space (" ") character.
8. Select the location where you want to install the product icons (shortcuts), then click Next.
This screen only appears in the Windows installer. If you install two instances of the same version of the tester harness, the second instance’s shortcut replaces the first.
9. Review the installation summary information, then click Next to install the tester harness.
If any field contains the wrong value, click Previous to go back to the page and provide the correct information.
10. When the installation has finished, click Done to exit the installer.
After installation, open the harness’s index.html file (example: yourHomeDir/Test/index.html) in a web browser to see a linked overview of the Java Device Test Suite documentation.
| Note - Graphical user interface commands are described in the Java Device Test Suite online help. To learn about these commands, launch the harness as described in Launching in Graphical Mode, then choose Help > Online Help. |
|
You can automate the installation of a tester harness by writing a script that invokes the installer. Invocation examples (ignore line breaks):
> jdts_tester-version-rr-build_windows-date.exe -f tester.properties
% sh jdts_tester-version-rr-build_solaris-date.bin -f tester.properties
The value of version depends on the version of the installer. The value of build and date depend on when the software was built.
| Note - Command line installation does no error checking. A mistake can produce an aborted or incorrect installation. To minimize the chance for error, you can install with the graphical interface first (see Running the Graphical Installer), write down the property values that you enter, and verify the installation. |
Before installing, ensure that the Relay is running by entering http://relayHost:relayPort/appContext in a web browser. An administrator can give you the values of relayHost, relayPort, and appContext. If the Relay is running, the browser displays a page similar to FIGURE 2-1.
You create the text file tester.properties, which specifies where to install the harness, and so on. The file name can be anything.properties. This file has the general syntax of a Java programming language properties file. For a technical description of this syntax, see http://java.sun.com/j2se/1.5.0/docs/api/java/util/Properties.html#load(java.io.inputStream). Be sure that no line has a trailing space (blank) character. TABLE 2-1 defines the required properties.
|
Absolute path to the Central Installation, the shared directory created by an administrator that contains ReleaseNotes.html and other files. |
|
|
Absolute path to a Java Runtime Environment directory. See Installation Requirements for the required version. |
|
|
Absolute path to the directory that is to contain the tester harness. |
|
Here is an example tester.properties file for the Windows environment:
INSTALLER_UI=silent CENTRAL_REP=c\:\\JDTS-CI JDK_FOLDER=C\:\\Java\\jre1.6.0_03 USER_INSTALL_DIR=c\:\\JDTS_Tester INSTALL_DRIVE_ROOT=c\:\\ INSTALLER_JAVA_DOT_HOME=C\:\\Java\\jre1.6.0_03 |
Here is an example tester.properties file for the Solaris operating system:
| Note - If you uninstall a harness that was installed from the command line, the harness is uninstalled “silently,” that is, without a graphical user interface. |
A command line installation does not provide visual feedback, console messages, or an error code. You can monitor its progress with an operating system tool that shows the status of processes.
The installation is complete when the file USER_INSTALL_DIR/JDTSversion_ConsoleInstallLog.log has been created. Open this file with a text editor and search for messages containing the string “FATAL”. If there are no such messages, installation was successful. The “FATAL” messages describe the details of the problems encountered, if any.
You can install as many tester harnesses as you need on the same workstation. Ensure that each harness is installed in a different directory. For each instance of the harness, follow the procedures in Installing the Tester Harness. If you want shortcuts to multiple harnesses, direct the installer to create them in different folders.
You can launch the harness in graphical or batch mode. In the examples, assume that the tester harness is installed in yourHomeDir/Test/.
|
To start the tester harness, follow these steps:
In Windows, you can alternatively double-click yourHomeDir\Test\run.bat. or use a shortcut you specified in the installer.
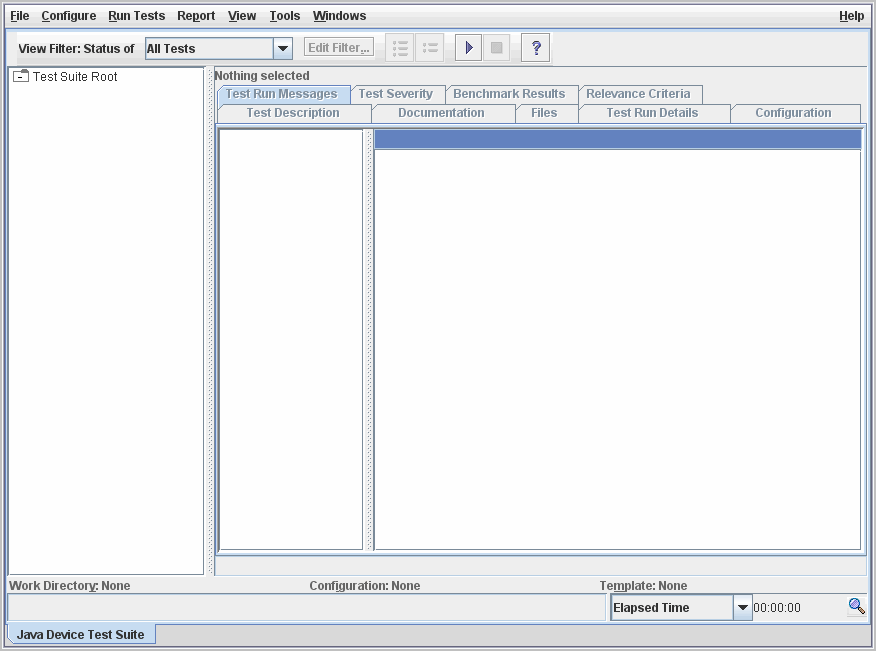
The Tester version of the harness graphical user interface appears:
FIGURE 2-2 Tester Harness Graphical User Interface

See the online help for a description of the graphical user interface.
|
To launch the tester harness in batch mode, follow one of these steps, depending on your operating system:
% sh yourHomeDir/Test/run.sh -batch [Set-up Commands] [Task Commands]
> yourHomeDir/Test/run.bat -batch [Set-up Commands] [Task Commands]
Set-up Commands and Task Commands are described in the JavaTest User’s Guide: Command Line Interface.