8 Configuring the OPSS Security Store
The OPSS security store is the repository of system and application-specific policies, credentials, keys, and audit metadata.
This chapter explains the features of the OPSS security store in the following sections:
For details about Java EE and WebLogic Security, see section Java EE and WebLogic Security in Understanding Security for Oracle WebLogic Server.
Note:
When a WebLogic domain is setup to use policies based on the OPSS security store, JACC policies and the Java Security Manager become unavailable on all managed servers in that domain.Important:
All permission classes used in policies in the OPSS security store must be included in the class path, so the policy provider can load them when a service instance is initialized.8.1 Introduction to the OPSS Security Store
The OPSS security store is the repository of system and application-specific policies, credentials, and keys. This centralization facilitates the administration and maintenance of policy, credential, and key data.
The OPSS security store can be file-, LDAP-, or DB-based depending on the choice of repository type, and it can be reassociated (that is, the repository type can be changed) from file-based to LDAP- or DB-based; from DB-based to LDAP- or DB-based; and from LDAP-based to LDAP- or DB-based. No other reassociation is supported. For details about the tools and procedures available to reassociate the OPSS security store, see sections Reassociating with Fusion Middleware Control and reassociateSecurityStore. Out-of-the-box, the OPSS security store is file-based.
The security data relevant to a Java EE application is typically packaged with the application and it can be migrated at deploy time to the OPSS security store. For details about the tools and procedures available to migrate to the OPSS security store, see sections Migrating with Fusion Middleware Control andMigrating with migrateSecurityStore.
8.1.1 Multi-Server Environments
Production WebLogic domains with several server instances (administration and managed servers) on the same host or distributed across multiple machines, must use an OID- or an Oracle RDBMS-based OPSS security store.
Note:
File-based providers are not supported in production environments.Important Note:
In a domain that has been created or expanded with the JRF template, all resources are targeted only to the administration server. If later on, a managed server is added to the domain, you must invoke the utilityapplyJRF so that resources are targeted to that manage server too. Therefore, in order for OPSS and audit data sources to be targeted to managed servers after domain reconfiguration, applyJRF needs to be run with the following format:
applyJRF('managedServer1', '<domain_dir>')
For details about the properties you can set on policies and credentials, see Appendix F, "OPSS System and Configuration Properties."
8.2 Recommendations
As mentioned before, the recommendation for production environments is to use a centralized OID- or DB-based store.
In environments with file-based security store, note the following points:
-
The repository files on the administration server (cwallet.sso, audit-store.xml, system-jazn-data.xml, keystores.xml) are the source of truth.
-
All changes to the store must be performed on the administration server, for consistency across the domain.
-
Replication of repository files from the administration server to manage servers occurs when the administration server is re-started or when the JMX framework detects changes at runtime.
-
OPSS requires the repository files to reside in file systems that support file locking. See Section K.4.4, "Server Fails to Start."
8.3 Using an LDAP-Based OPSS Security Store
An LDAP-based policy store is typically used in production environments. The only LDAP server supported in this release is the Oracle Internet Directory (release 10.1.4.3 or later).
Note:
Depending on the version, the following patches to Oracle Internet Directory are required:-
Patch to fix bug 9093298 in Oracle Internet Directory 10.1.4
-
Patch to fix bug 8736355 in Oracle Internet Directory 11.1.x
-
Patch to fix bug 8426457 in Oracle Internet Directory 11.1.x and 10.1.4.3
-
Patch to fix bug 8351672 in Oracle Internet Directory 10.1.4.3
-
Patch to fix bug 8417224 in Oracle Internet Directory 10.1.4.3
-
Patch to fix bug 13782459 in Oracle Internet Directory 11.1.1.6.0
To apply a patch, proceed as follows:
-
Visit Oracle Automated Release Updates.
-
Click the Patches tab.
-
Enter the bug number in the Request Number box, and click Search.
-
Apply the patch.
To use a domain LDAP-based OPSS security store the domain administrator must configure it, as appropriate, using Oracle Enterprise Manager Fusion Middleware Control or WLST commands.
Important:
OPSS does not support enabling referencial integrity on Oracle Internet Directory servers. The server will not work as expected if referencial integrity is enabled.To disable a server's referencial integrity, use Oracle Enterprise Manager Fusion Middleware Control as follows:
-
Select Administration, then Shared Properties from the Oracle Internet Directory menu, and then select General.
-
Select Disabled from the Enable referencial Integrity list.
For a list of properties that can be specified in a service instance, see Appendix F, "Common Properties."
8.3.1 Prerequisites to Using an LDAP-Based Security Store
The only supported LDAP-based OPSS security store is Oracle Internet Directory. In order to ensure the proper access to the Oracle Internet Directory, you must set a node in the server directory as explained below.
Fusion Middleware Control automatically provides bootstrap credentials in the file cwallet.sso when that tool is used to reassociate to an LDAP-based repository. To specify these required credentials manually, see section Section 23.5.7, "Specifying Bootstrap Credentials Manually."
Setting a Node in an Oracle Internet Directory Server
The following procedure is carried out by an Oracle Internet Directory administrator.
To set a node in an LDAP Oracle Internet Directory, proceed as follows:
-
Create an LDIF file (assumed
jpstestnode.ldif, for illustration purpose) specifying the following DN and CN entries:dn: cn=jpsroot cn: jpsroot objectclass: top objectclass: OrclContainer
The distinguished name of the root node (illustrated by the string jpsroot above) must be distinct from any other distinguished name. Some LDAP servers enforce case sensitivity by default. One root node can be shared by multiple WebLogic domains. It is not required that this node be created at the top level, as long as read and write access to the subtree is granted to the Oracle Internet Directory administrator.
-
Import this data into the LDAP server using the command
ldapadd, as illustrated in the following example (there should be no line break in the command invocation):>ldapadd -h ldap_host -p ldap_port -D cn=orcladmin -w password -v -f jpstestnode.ldif
-
Verify that the node has been successfully inserted using the command
ldapsearch, as illustrated in the following example (there should be no line break in the command invocation):>ldapsearch -h ldap_host -p ldap_port -D cn=orcladmin -w password -s base -b "cn=jpsroot" objectclass="orclContainer"
-
Run the utility
oidstats.sqlto generate database statistics for optimal database performance, as illustrated in the following example:>$ORACLE_HOME/ldap/admin/oidstats.sql
The above utility must be run just once after the initial provisioning. For details about this utility, consult the Oracle Fusion Middleware Reference for Oracle Identity Management.
To reassociate a policy store, see Reassociating the OPSS Security Store.
8.3.2 Setting Up a One- Way SSL Connection to the LDAP
This section describes how to set up a one-way SSL channel between Oracle WebLogic server or a Java SE application and the LDAP Oracle Internet Directory. Such connection may be required, for example, when reassociating to an LDAP-based target store.
Prerequisite: Configuring the Oracle Internet Directory Server
To configure the Oracle Internet Directory server to listen in one-way SSL mode, see section Enabling SSL on Oracle Internet Directory Listeners in Administering Oracle Fusion Middleware.
Exporting Oracle Internet Directory's Certificate Authority (CA)
The use of orapki to create a certificate is needed only if the CA is unknown to the Oracle WebLogic server.
The following sample illustrates the use of this command to create the certificate serverTrust.cert:
>orapki wallet export -wallet CA -dn "CN=myCA" -cert serverTrust.cert
The above invocation prompts the user to enter the keystore password.
Before configuring SSL, note that:
-
The following procedures are required if the type of SSL being established is server-auth, and they are not required in any other case (no-auth or client-auth).
-
If the flags specified in the procedures below are used in a multi-application environment, then the trust store must be shared by all those applications.
Setting Up the WebLogic Server in Case of a Java EE Application
The difference in the following procedures is because the identity store service and the policy store service use different socket factories.
To establish a one-way SSL connection between the server and the identity store, proceed as follows (if applicable, the trust CA is assumed exported):
-
If the CA is known to the Oracle WebLogic server, skip this step; otherwise, use the utility
keytoolto import the Oracle Internet Directory's CA into the WebLogic truststore.The following invocation, which outputs the file
myKeys.jks, illustrates the use of this command to import the fileserverTrust.cert:>keytool -import -v -trustcacerts -alias trust -file serverTrust.cert -keystore myKeys.jks -storepass keyStorePassword
-
Modify the script (typically startWebLogic.sh) that starts the server to include a line like the following, and then restart the server:
-Djavax.net.ssl.trustStore=<absolute path name to file myKeys.jks>
To establish a one-way SSL connection between the server and the policy store, proceed as follows (if applicable, the trust CA is assumed exported):
-
Use the utility
keytoolto import trust CA to the trust key store, as illustrated in the following invocation:>keytool -import -v -trustcacerts -alias trust -file serverTrust.cert -keystore myKeys.jks -storepass keyStorePassword
-
Modify the script (typically startWebLogic.sh) that starts the server to include a line like the following, and then restart the server:
-Dweblogic.security.SSL.trustedCAKeyStore=<absolute path name to file myKeys.jks>
-
If the OID server uses a wild card in the SSL certificate, then add the following line to the script that starts the WebLogic server:
-Dweblogic.security.SSL.ignoreHostnameVerification=true
Setting Up the WebLogic Server in Case of a Java SE Application
The setting up in the case of Java SE applications is the same for both the identity and the policy store services.
-
If the CA is known to the Oracle WebLogic server, skip this step; otherwise, use the utility
keytoolto import the Oracle Internet Directory's CA into the WebLogic truststore.The following invocation, which outputs the file
myKeys.jks, illustrates the use of this command to import the fileserverTrust.cert:>keytool -import -v -trustcacerts -alias trust -file serverTrust.cert -keystore myKeys.jks -storepass keyStorePassword
-
Modify the script that starts the JMV to include a line like the following:
-Djavax.net.ssl.trustStore=<absolute path name to file myKeys.jks>
8.4 Using a DB-Based OPSS Security Store
A DB-based security store is typically used in production environments. The only supported DB-based security store in production environments is Oracle RDBMS.
For versions supported see Oracle Fusion Middleware Supported System Configurations at http://www.oracle.com/technetwork/middleware/ias/downloads/fusion-certification-100350.html.
For certification information, see Certification Matrix at http://www.oracle.com/technetwork/middleware/downloads/fmw-11gr1certmatrix.xls.
Note:
In development environments only, the OPSS security store can be Oracle RDBMS Express, Oracle RDBMS Standard Edition, and Oracle RDBMS Standard Edition One.To use a DB-based OPSS security store the domain administrator must configure it, as appropriate, using Oracle Enterprise Manager Fusion Middleware Control or WLST commands. In case any checks are needed before the server completes its initialization, see Section K.4.6, "Permission Failure Before Server Starts." The OPSS and audit schemas both support Edition-Based Redefinition (EBR).
For a list of properties that can be configured, see Appendix F, "OPSS System and Configuration Properties."
This section contains the following topics:
8.4.1 Prerequisites to Using a DB-Based Security Store
To use a database repository for the OPSS security store, one must first use Oracle Fusion Middleware Repository Creation Utility (RCU) to create the required schema and to seed some initial data.
For details about this task, see appendix A, Understanding Repository Creation Utility Screens, in Creating Schemas with the Repository Creation Utility. To create the OPSS schema, select the following schemas:
-
<prefix>_OPSS
-
<prefix>_IAU
-
<prefix>_IAU_APPEND
-
<prefix>_IAU_VIEWER
8.4.2 Maintaining a DB-Based Security Store
This section describes a few tasks that an administrator can follow to maintain a DB-based security store.
A DB-based security store maintains a change log that should be periodically purged. To purge it, an administrator can use the provided SQL script opss_purge_changelog.sql, which will purge change logs older than 24 hours, or connect to the database and run SQL delete (with the appropriate arguments) as illustrated in the following lines:
SQL>delete from jps_changelog where createdate < (select(max(createdate) - 1) from jps_changelog);
SQL>Commit;
If the OPSS management API performs slowly while accessing the DB-based security store, run the DBMS_STATS package to gather statistics about the physical storage of a DB table, index, of cluster. This information is stored in the data dictionary and can be used to optimize the execution plan for SQL statements accessing analyzed objects.
When loading large amount of data into a DB-based security store, such as when creating thousands of new application roles, it is recommended that DBMS_STATS be run within short periods and concurrently with the loading activity. Otherwise, when the loading activity is small, DBMS_STATS needs to be run just once and according to your needs.
The following sample illustrates the use of DBMS_STATS:
EXEC DBMS_STATS.GATHER_SCHEMA_STATS('DEV_OPSS', DBMS_STATS.AUTO_SAMPLE_SIZE, no_invalidate=>FALSE);
where DEV_OPSS denotes the name of the DB schema created during the RCU setup. For details about the DBMS_STATS package, see the Oracle Database Administrator's Guide.
To run DBMS_STATS periodically, use a shell script or an SQL script, as described next.
The following sample script runs the command DBMS_STATS every 10 minutes:
#!/bin/sh
i=1
while [ $i -le 1000 ]
do
echo $i
sqlplus dev_opss/welcome1@inst1 @opssstats.sql
sleep 600
i=`expr $i + 1`
done
where opssstats.sql contains the following text:
EXEC DBMS_STATS.gather_schema_stats('DEV_OPSS',DBMS_STATS.AUTO_SAMPLE_SIZE, no_invalidate=>FALSE);
QUIT;
The following sample SQL script also runs the command DBMS_STATS every 10 minutes:
variable jobno number;
BEGIN
DBMS_JOB.submit
(job => :jobno,
what => 'DBMS_STATS.gather_schema_stats(''DEV_OPSS'',DBMS_STATS.AUTO_SAMPLE_SIZE,no_invalidate=>FALSE);',
interval => 'SYSDATE+(10/24/60)');
COMMIT;
END;
/
To stop the periodic invocation of DBMS_STATS by the above SQL script, first find out its job number by issuing the following commands:
sqlplus '/as sysdba'
SELECT job FROM dba_jobs WHERE schema_user = 'DEV_OPSS' AND what = 'DBMS_STATS.gather_schema_stats(''DEV_OPSS'',DBMS_STATS.AUTO_SAMPLE_SIZE, no_invalidate=>FALSE);';
Then issue a command like the following, in which it is assumed that the query above returned the job number 31:
EXEC DBMS_JOB.remove(31);
To reset the OPSS schema password, proceed as follows:
-
Use the DB command ALTER USER to reset the password in the DB. Remember the new password entered, as it will be used in the next two steps.
-
Using the Oracle WebLogic Administration Console, update the password that the data source the domain uses to connect to the OPSS schema with the new password. For details, see Oracle Fusion Middleware Configuring and Managing JDBC Data Sources for Oracle WebLogic Server.Oracle Fusion Middleware Configuring and Managing JDBC Data Sources for Oracle WebLogic Server
-
Using the WLST command
modifyBootStrapCredential, update the bootstrap wallet with the new password. For details, see Oracle Fusion Middleware Infrastructure Security WLST Command Reference.
8.4.3 Setting Up an SSL Connection to the DB
Establishing a one- or two-way SSL connection to a DB-Based OPSS security store is optional and explained in section Configuring SSL for the Database in Administering Oracle Fusion Middleware .
For additional information about SSL-related topics see the following document:
8.5 Configuring the OPSS Security Store
For examples of store configurations for Java SE applications, see Section 17.1, "Configuring Policy and Credential Stores in Java SE Applications."
For details about configuring other artifacts, see Configuring Services Providers with Fusion Middleware Control.
8.6 Reassociating the OPSS Security Store
Reassociating the OPSS security store consists in relocating the policy, credential, and key stores from one repository to another one. The source can be file-, LDAP-, or DB-based; the target can be LDAP- or DB-based. The only type of LDAP target supported is Oracle Internet Directory; the only type of DB target supported is DB_ORACLE.
Reassociation changes the repository preserving the integrity of the data stored. For each security artifact, reassociation searches the target store and, if it finds a match for it, it updates the matching artifact; otherwise, creates a new artifact.
Reassociation is typically performed, for example, when setting a domain to use an LDAP- or DB-based OPSS store instead of the out-of-the-box file-based store. This operation can take place at any time after the OPSS store has been configured and instantiated, and it is carried out using either Fusion Middleware Control or reassociateSecurityStore as explained in the following sections:
-
Reassociating with reassociateSecurityStore
8.6.1 Reassociating with Fusion Middleware Control
Reassociation migrates the OPSS policy store (policies, credentials, and keys) from one repository to another and reconfigures the appropriate security store providers. This section explains how to perform reassociation with Fusion Middleware Control pages.
For information about other uses of the Security Provider Configuration page, see Configuring Services Providers with Fusion Middleware Control.
-
Before reassociating to a target LDAP store, ensure that your setup satisfies the Prerequisites to Using an LDAP-Based Security Store.
-
Before reassociating to a target DB store, ensure that your setup satisfies the Prerequisites to Using a DB-Based Security Store.
-
If reassociation requires a one-way SSL to a target LDAP, follow the instructions in Setting Up a One- Way SSL Connection to the LDAP before reassociating.
-
After reassociating to an LDAP store, to secure access to the root node of the Oracle Internet Directory store, follow the instructions in Securing Access to Oracle Internet Directory Nodes.
-
The
jps-config.xmlfile produced by reassociation is good for only Java EE applications. In case of Java SE applications, edit the filejps-config-jse.xmlto match the one described in Section 17.1.3, "Configuring DB-Based OPSS Security Stores."
To reassociate the OPSS security store with Fusion Middleware Control, proceed as follows:
-
Log in to Fusion Middleware Control and navigate to Domain > Security > Security Provider Configuration (if connected to Oracle WebLogic Server) or to Cell > Security > Security Provider Configuration (if connected to WebSphere Application Server), to display the Security Provider Configuration page, partially illustrated in the following graphic:
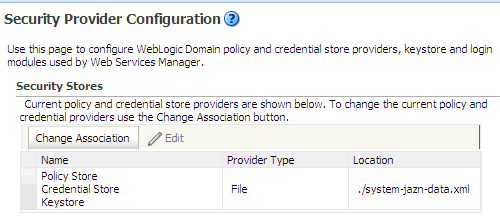
The table in the area Security Stores shows the characteristics of the current provider configured in the domain.
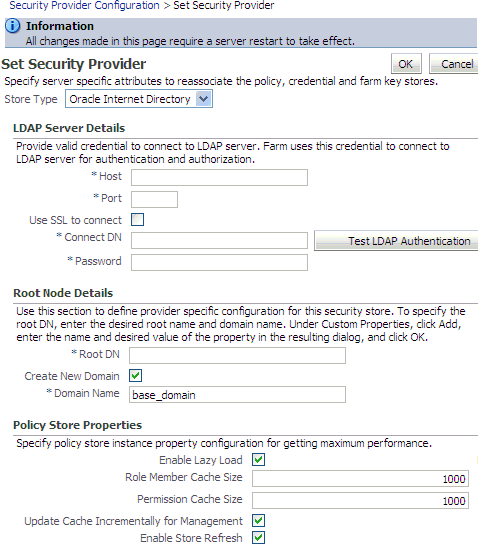
-
Click the button Change Association to display the Set Security Provider page, and choose the Store Type from the pull-down list. The text displayed on this page depends on the store type selected. The following graphic partially illustrates this page when Oracle Internet Directory is selected.
-
If you have selected Database, enter the name of the data source in the Datasource Name box. This should be the name of the JDBC data source entered when the data source was created. If needed, click Select to obtain a list of configured data source names.
-
If you have selected Oracle Internet Directory, in the LDAP Server Details area, specify details and connection information about the target LDAP server:
-
Enter the host name and port number of your target Oracle Internet Directory LDAP server.
-
Optionally, check the box Use SSL to Connect to establish an anonymous SSL transmission to the LDAP server.
When checking this box, keep in mind the following points:
The port of the target LDAP server must be configured to handle an anonymous SSL transmission; this port is distinct from the default (non-secure) LDAP server port.
If the reassociation is to use a one-way SSL to a target LDAP store, be sure to follow the instructions in Setting Up a One- Way SSL Connection to the LDAP before completing this step. Among other things, that setup identifies the port to support a one-way SSL channel, and it is that port that should be specified in this step. Reassociation through a two-way SSL channel is not supported in this release.
Fusion Middleware Control modifies the file
weblogic.policyby adding the necessary grant to support the anonymous SSL connection. -
In the text box Connect DN, enter the full distinguished name, a string containing between 1 and 256 characters. For example, cn=orcladmin,dc=us,dc=oracle,dc=com.
-
In the box Password, enter the user password, also a string containing between 1 and 256 characters.
-
To verify that the connection to the LDAP server using the entered data works, click the button Test LDAP Authentication. If you run into any connection problem, see Section K.6.5, "Failure to Establish an Anonymous SSL Connection."
-
-
In the Root Node Details area, enter the root DN in the box Root DN, which identifies the top of the tree that contains the data in the LDAP repository. The Domain Name defaults to the name of the selected domain.
To solve most common errors arising from the specifications in these two fields, see Section K.3.1, "Reassociation Failure."
-
Optionally, in the Policy Store Properties and Credential Store Properties areas, enter service instance properties, such as Enable Lazy Load and Role Member Cache Size.
To add a new property: click Add to display the Add New Property dialog; in this dialog, enter strings for Property Name and Value; click OK. The added property-value pair is displayed in the table Custom Properties.
These properties are typically used to initialize the instance when it is created.
A property-value pair you enter modifies the domain configuration file
jps-config.xmlby adding a<property>element in the configuration of the LDAP service instance.To illustrate how a service instance is modified, suppose you enter the property name
fooand valuebar; then the configuration for the LDAP service instance changes to contain a<property>element as illustrated in the following excerpt:<serviceInstance name="myNewLDAPprovider" provider="someProvider" ... <property name="foo" value="bar"/> ... </serviceInstance>
-
When finished entering your data, click OK to return to the Security Provider Configuration page. The system displays a dialog notifying the status of the reassociation. The table in the Security Stores area is modified to reflect the provider you have specified.
-
Restart the application server. Changes do not take effect until it has been restarted.
Reassociation modifies the domain configuration file $DOMAIN_HOME/config/fmwconfig/jps-config.xml: it deletes any configuration for the old store provider, inserts a configuration for the new store provider, and moves the policy and credential information from the source to the destination store.
If the destination store is LDAP-based, the information is stored under the domain DN according to the following format:
cn=<domain_name>,cn=JpsContext,<JPS ROOT DN>
As long as the configuration of the installation relies upon the above domain DN, that node should not be deleted from the LDAP Server.
8.6.1.1 Securing Access to Oracle Internet Directory Nodes
The procedure explained in this section is optional and performed only to enhance the security to access an Oracle Internet Directory.
An access control list (ACL) is a list that specifies who can access information and what operations are allowed on the Oracle Internet Directory directory objects. The control list is specified at a node, and its restrictions apply to all entries in the subtree under that node.
ACL can be used to control the access to policy and credential data stored in an LDAP Oracle Internet Directory repository, and it is, typically, specified at the top, root node of the store.
To specify an ACL at a node in an Oracle Internet Directory repository, proceed as follows:
-
Create an LDIF file with a content that specifies the ACL:
dn: <storeRootDN>
changetype: modify
add: orclACI
access to entry by dn="<userDN>" (browse,add,delete) by * (none)
access to attr=(*) by dn="<userDN>" (search,read,write,compare) by * (none)
where storeRootDN stands for a node (typically the root node of the store), and userDN stands for the DN of the administrator data (the same userDN that was entered to perform reassociation).
-
Use the Oracle Internet Directory utility
ldapmodifyto apply these specifications to the Oracle Internet Directory.
Here is an example of an LDIF file specifying an ACL:
dn: cn=jpsRootNode
changetype: modify
add: orclACI
access to entry by dn="cn=myAdmin,cn=users,dc=us,dc=oracle,dc=com" (browse,add,delete) by * ( none )
access to attr=(*) by dn="cn=myAdmin,cn=users,dc=us,dc=oracle,dc=com" (search,read,write,compare) by * (none)
For more information about access control lists and the command ldapmodify, see chapter 18 in Oracle Fusion Middleware Administrator's Guide for Oracle Internet Directory.
8.6.2 reassociateSecurityStore
The command reassociateSecurityStore migrates the OPSS security store from a source store to a target store and resets service configurations in the files jps-config.xml and jps-config-jse.xml to the target repository.
The source store can be a file-, OID-, or DB-based store. The target store can be a brand new store or an existing store in some other domain (see optional argument join below), and, in the case of an existing store, one can specify whether or not to append the source store data to the joined target store (see optional argument migrate below).
The version of the source store must be equal or later than the version of the target store. If the versions are unequal (that is, the version of the source is later than the version of the target), then the command runs a compatibility check between the source and the target security artifacts; if the check fails on some artifacts, the command allows for skipping the migration of incompatible artifacts by setting the argument skip to true; if this argument is not set to true and incompatible artifacts are detected, the command aborts.
The command resets the bootstrap credentials (see arguments admin and password below); for an alternate way to reset bootstrap credentials, see the WLST commands modifyBootStrapCredential and addBootStrapCredential.
For recommendations involving reassociation, see Important Points. This command is supported in only the interactive mode.
Note:
In a given domain and for a given major release (11g or 12c), the OPSS binaries version must be equal to or later than the OPSS security store version. See Section K.9.1, "Incompatible Versions of Binaries and Policy Store."The command syntax varies slightly according to the type of the target store. When the target is an OID-based store, use the following syntax (arguments are displayed in separate lines for clarity only):
reassociateSecurityStore(domain="domainName",
      servertype="OID",
      ldapurl="hostAndPort",
      jpsroot="cnSpecification",
      admin="cnSpecification",
      password="passWord",
      [join="trueOrfalse"] [,keyFilePath="dirLoc", keyFilePassword="password"]]
      [migrate="trueOrfalse"]
      [skip="trueOrfalse"]
      [force="trueOrfalse"])
When the target is a DB-based store, use the following syntax (arguments are displayed in separate lines for clarity only):
reassociateSecurityStore(domain="domainName",
       servertype="DB_ORACLE",
       datasourcename="datasourceName",
       jpsroot="jpsRoot",
       jdbcurl="jdbcURL",
       jdbcdriver="jdbcDriverClass",
       dbUser="dbUserName",
       dbPassword="dbPassword",
       [admin="adminAccnt", password="passWord",]
       [,join="trueOrfalse"
          [,keyFilePath="dirLoc", keyFilePassword="password"]                         [,migrate="trueOrfalse" [,skip="trueOrfalse"]]])
       [odbcdsn="odbcDsnSting"]
       [migrate="trueOrfalse"]
       [skip="trueOrfalse"]
       [force="trueOrfalse"])
The main points regarding the use of the arguments join, migate, and skip are next summarized:
-
The argument
migrateis relevant only whenjoinis set to true; otherwise it is ignored. This means that if migration is desired, then bothjoinandmigratemust be set to true. -
The arguments
keyFilePathandkeyFilePasswordare required whenjoinandmigrateare both set to true. -
When
joinandmigrateare both set to true then: ifskipis set to true, the migration of incompatible artifacts with the target store are skipped; ifskipis set to false (default value), then the command aborts if any incompatible artifacts are encountered. In this release, the skipping of only generic credentials is supported.
The meaning of the arguments is as follows:
-
domain: on WebLogic, specifies the domain name where the target store is located. Optional when server type is DB_ORACLE. -
adminspecifies, in case of an LDAP target, the administrator's user name on the target server, and the format iscn=usrName.In case of a DB target, it is required only when the DB has a protected data source (that is, protected with user/password); in this case, it specifies the user name that was set to protect the data source when the data source was created; that user and password must be present in the bootstrap credential store. If specified, then
passwordmust also be specified. -
passwordspecifies the password associated with the user specified for the argumentadmin. It is required in case of an OID target.In case of a DB target, it is required only when the DB has a protected data source; in this case, it specifies the password associated with the user specified in the argument
admin. If specified, thenadminmust also be specified. -
ldapurlspecifies the URI of the OID server. The format isldap//host:port, if you are using the default port, orldaps://host:port, if you are using an anonymous SSL or one-way SSL transmission. The secure port must be configured to handle the desired SSL connection mode, and must be distinct from the default (non-secure) port. -
servertypespecifies the kind of the target store. The only valid types areOIDorDB_ORACLE. -
jpsrootspecifies the root node in the target OID repository under which all data is migrated. The format iscn=nodeName. Optional when server type is DB_ORACLE. -
joinspecifies whether the target store is an existing store in some other domain. Optional. Set to true to share an existing target store in some other domain; set to false otherwise. If unspecified, it defaults to false. The use of this argument allows multiple WebLogic domains to point to the same logical OPSS security store.Note 1:
When an OPSS security store is reassociated to another one withjoinset to true, OPSS encryption keys must be exported from one domain and imported into the other domain.This note explains a way to accomplished this task; for an alternate way, see note in the description of argument
keyFilePath.Specifically, assume that Domain1 has a security store and Domain2 has reassociated to Domain1's security store using
joinset to true; then proceed as follows:-
Use the WLST command
exportEncryptionKeyto extract the key from Domain1 into the fileewallet.p12; note that the value of the argumentkeyFilePasswordpassed must be used later when importing that key into the second domain. -
Use the WLST command
importEncryptionKeyto import the extractedewallet.p12into Domain2; note that the value of the argumentkeyFilePasswordmust be identical to the one used when the fileewallet.p12was generated. -
Restart Domain2's server.
For details about the commands to import or export keys, see exportEncrytionKey and importEncryptionKey.
-
-
migrateis meaningful only ifjoinis set to true, otherwise ignored; specifies whether the data in the source store should be appended to the joined store; set to true to append source data to the target store; set to false to join to the target store without any appending source data. Optional. If unspecified, defaults to false. -
skipis meaningful only if bothjoinandmigrateare set to true, otherwise it is ignored; specificies whether the migration of incompatible artifacts should be skipped; set to true to skip appending incompatible artifacts to the target store and to not abort the command; set to false to abort the command upon encountering an incompatible artifact in the source store. Optional. If unspecified, it defaults to false. -
datasourcenamespecifies the JNDI name of the JDBC data source; this should be identical to the value of the JNDI name data source entered when the data source was created. -
keyFilePathspecifies the directory where the fileewallet.p12for the target domain is located; the content of this file is encrypted and secured by the value passed tokeyFilePassword. Required only ifjoinis set to true.Note 2:
When an OPSS security store is reassociated to another one withjoinset to true, OPSS encryption keys must be exported from one domain and imported into the other domain.This note explains a way to accomplished this task; for an alternate way, see note in the description of the argument
join.When using the arguments
keyFilePathandkeyFilePassword, the export-import of keys is automatically done by the commandreassociateSecurityStore.Specifically, assume that Domain1 has a security store and Domain2 is to reassociate to Domain1's security store using
joinset to true and the keyFile arguments; then proceed as follows:-
Run the command
reassociateSecurityStorewith the appropriate argument values. -
Restart Domain2's server.
-
-
keyFilePasswordspecifies the password to secure the fileewallet.p12. Required only ifjoinis set to true. -
jdbcurlspecifies the jdbc URL use by a Java SE application to connect to the database. Applies only to Java SE applications. Required. Must be used with argumentsjdbcdriver,dbUser, anddbPassword. -
jdbcdriverspecifies the class of the jdbc driver used to connect to the database. Required. Must be used with argumentjdbcurl. -
dbUserspecifies the database user in the credential store to be added to the bootstrap credentials. Required. Must be used with argumentjdbcurl. -
dbPasswordspecifies the password of the user specified bydbUser. Required. Must be used with argumentjdbcurl. -
odbcdsnspecifies the odbc DSN name used by the C CSF API. Applies only to C programs. -
forcespecifies whether the security store should be removed before data migration starts. Optional and false by default. If set to true, the existing security store and the data specified by the parametersjpsrootanddomainwill be removed first. It requires that the parameterjoinbe set to false; otherwise this argument is disregarded; whenjoinis set to false andforceis set to true, the command outputs messages specifying the start and end of the security store clean up.
Here is an example invocation to reassociate to a DB-based security store:
reassociateSecurityStore(domain="farm", servertype="DB_ORACLE",
jpsroot="cn=jpsroot", datasourcename="jdbc/opssds",
jdbcurl="jdbc:oracle:thin:@myhost.oracle.com:5555:testdb",
dbUser="test_opss", dbPassword="mypass",
jdbcdriver="oracle.jdbc.xa.client.OracleXADataSource",
force="true")
To share the OPSS security store in otherDomain without migrating the contents of the source security store, invoke the command as in the following sample:
reassociateSecurityStore(domain="otherDomain", servertype="DB_ORACLE",
jpsroot="cn=jpsroot", datasourcename="jdbc/opssds",
jdbcurl="jdbc:oracle:thin:@myhost.oracle.com:5555:testdb",dbUser="test_opss",
dbPassword="mypass", jdbcdriver="oracle.jdbc.xa.client.OracleXADataSource",
join="true", keyFilePath="/tmp/myFileDirectory", keyFilePassword="password")
To share the OPSS security store in otherDomain and to migrate the contents of the source security store to the target DB-based security store skipping over incompatible artifacts, invoke the command as in the following sample:
reassociateSecurityStore(domain="otherDomain", servertype="DB_ORACLE",
jpsroot="cn=jpsroot", datasourcename="jdbc/opssds",
jdbcurl="jdbc:oracle:thin:@myhost.oracle.com:5555:testdb",dbUser="test_opss",
dbPassword="mypass", jdbcdriver="oracle.jdbc.xa.client.OracleXADataSource",
join="true", migrate="true", skip="true",
keyFilePath="/tmp/myFileDirectory", keyFilePassword="password")
8.7 Migrating the OPSS Security Store
Applications can specify their own policies, and these are stored as application policies in the appropriate stripe in the policy store when the application is deployed to a server. All applications deployed or redeployed to a domain use a common policy store, the domain policy store. The policy store is logically partitioned in stripes, one for each application name specified in the file $DOMAIN_HOME/config/fmwconfig/system-jazn-data.xml under the element <applications>.
Migrating the security store is the process that relocates the policy, credential, and key stores from one repository to another one. The source can be file-, LDAP-, or DB-based; the target can be LDAP- or DB-based. The OPSS binaries and the target policy store must have compatible versions; for details, see Section K.9.1, "Incompatible Versions of Binaries and Policy Store."
During application development, an application specifies its own policies, and these can be migrated to the OPSS security store when the application is deployed with Fusion Middleware Control. Policies can also be migrated manually; in addition, each application component can specify the use of anonymous user and role, authenticated role, and JAAS mode.
The configuration of the OPSS security store is performed by an administrator.
These topics are explained in the following sections:
Note:
Use the system propertyjps.deployment.handler.disabled to disable the migration of application policies and credentials for applications deployed on a WebLogic Server.
When this system property is set to TRUE, the migration of policies and credentials at deployment is disabled for all applications regardless of the particular application settings in the application file weblogic-application.xml.
8.7.1 Migrating with Fusion Middleware Control
Application policies are specified in the application file jazn-data.xml and can be migrated to the policy store when the application is deployed to a server in the WebLogic environment with Fusion Middleware Control; they can also be removed from the policy store when the application is undeployed or be updated when the application is redeployed.
All three operations, the migration, the removal, and the updating of application policies, can take place regardless of the type of policy repository, but they do require particular configurations.
For details, see procedure in Section 6.6.2, "Migrating Policies and Credentials."
8.7.2 Migrating with migrateSecurityStore
Application-specific policies, system policies, and credentials can be migrated manually from a source repository to a target repository using the WLST command migrateSecurityStore.
This script is offline, that is, it does not require a connection to a running server to operate; therefore, the configuration file passed to the argument configFile need not be an actual domain configuration file, but it can be assembled just to specify the source and destination repositories of the migration.
Note:
Since the scriptmigrateSecurityStore recreates GUIDs and takes a long time to migrate large volume of data, you may want to consider migrating stores with an alternate procedure. For details, see Section G.3, "Backing Up and Recovering the OPSS Security Store."For platform-specific requirements to run a WLST command, see note in Section 9.4, "Managing Application Policies with WLST Commands." For usage details, see Examples of Use.
To migrate all policies (system and application-specific, for all applications) on WebLogic use the script (first) or interactive (second) syntax (arguments are written in separate lines for clarity):
migrateSecurityStore.py -type policyStore
                        -configFile jpsConfigFileLocation
                        -src srcJpsContext
                        -dst dstJpsContext
                        [-skip trueOrfalse]
                        [-overwrite trueOrfalse]
migrateSecurityStore(type="policyStore", configFile="jpsConfigFileLocation", src="srcJpsContext", dst="dstJpsContext" [,skip="trueOrfalse"] [,overwrite="trueOrfalse"])
The meanings of the arguments (all required) are as follows:
-
configFilespecifies the location of a configuration file relative to the directory where the script is run. This configuration file should be specially assembled and must contain the following elements:-
a context specifying the source store
-
a context specifying the destination store
-
a context specifying the bootstrap credentials
The bootstrap context refers to the location of a
cwallet.ssofile where the keys needed to access the source and destination stores, and to decrypt and encrypt security data in them are expected to be.For information about extracting keys used by a domain, see exportEncryptionKey; for information about storing a key into a wallet, see importEncryptionKey.
For information about creating a wallet, see section Common Wallet Operations in Administering Oracle Fusion Middleware.
-
-
srcspecifies the name of a jps-context in the configuration file passed to the argumentconfigFile. The case of the string passed must match the case of the context in the configuration file. -
dstspecifies the name of another jps-context in the configuration file passed to the argumentconfigFile. The case of the string passed must match the case of the context in the configuration file. -
skipspecifies whether the migration should skip migrating incompatible artifacts or to abort upon encountering an incompatible artifact in the source repository; set to true to skip migrating incompatible artifacts and not to abort; set to false to abort if an incompatible artifact is detected. Optional; if unpecified, it defaults to false. -
overwritespecifies whether to overwrite existing data in the destination store; set to true to overwrite existing destination data; set to false to not overwrite existing destination data. Optional; default is false.
The contexts passed in src and dst must be defined in the passed configuration file, must have distinct names, and the case of the passed contexts must match the case of the contexts in the configuration file. From these two contexts, the script determines the locations of the source and the target repositories involved in the migration.
To migrate just system policies on WebLogic, use the script (first) or interactive (second) syntaxes (arguments are written in separate lines for clarity):
migrateSecurityStore.py -type globalPolicies
                        -configFile jpsConfigFileLocation
                        -src srcJpsContext
                        -dst dstJpsContext
                        [-overwrite trueOrfalse]
migrateSecurityStore(type="globalPolicies", configFile="jpsConfigFileLocation", src="srcJpsContext", dst="dstJpsContext" [,overwrite="trueOrfalse"])
The meanings of the arguments (all required) are identical to the previous case.
To migrate just application-specific policies on WebLogic, for one application, use the script (first) or interactive (second) syntaxes (arguments are written in separate lines for clarity):
migrateSecurityStore.py -type appPolicies
                        -configFile jpsConfigFileLocation
                        -src srcJpsContext
                        -dst dstJpsContext
                        -srcApp srcAppName
                       [-dstApp dstAppName]
                       [-overWrite trueOrfalse]
                       [-migrateIdStoreMapping trueOrfalse]
                                       [-mode laxOrstrict]
                       [-skip trueOrfalse]
migrateSecurityStore(type="appPolicies", configFile="jpsConfigFileLocation", src="srcJpsContext", dst="dstJpsContext", srcApp="srcAppName", [dstApp="dstAppName"], [overWrite="trueOrfalse"], [migrateIdStoreMapping="trueOrfalse"], [mode="strict"], skip="trueOrfalse")
The meanings of the arguments configFile, src, dst and skip are identical to the previous cases. The meanings of other five arguments are as follows:
-
srcAppspecifies the name of the source application, that is, the application whose policies are being migrated. -
dstAppspecifies the name of the target application, that is, the application whose policies are being written. If unspecified, it defaults to the name of the source application. -
migrateIdStoreMappingspecifies whether enterprise policies should be migrated. The default value is True. To filter out enterprise policies from the migration, that is, to migrate just application policies, set it to False. -
overWritespecifies whether a target policy matching a source policy should be overwritten by or merged with the source policy. Set to true to overwrite the target policy; set to false to merge matching policies. Optional. If unspecified, defaults to false. -
modespecifies whether the migration should stop and signal an error upon encountering a duplicate principal or a duplicate permission in an application policy. Either do not specify or set to lax to allow the migration to continue upon encountering duplicate items, to migrate just one of the duplicated items, and to log a warning to this effect.
If the input does not follow the syntax requirements above, the script execution fails and returns an error. In particular, the input must satisfy the following requisites: (a) the file jps-config.xml is found in the passed location; (b) the file jps-config.xml includes the passed jps-contexts; and (c) the source and the destination context names are distinct.
To migrate all credentials use either of the script (first) or interactive (second) syntaxes (arguments are written in separate lines for clarity):
migrateSecurityStore.py -type credStore
                        -configFile jpsConfigFileLocation
                        -src srcJpsContext
                        -dst dstJpsContext
                        [-skip trueOrfalse]
                        [-overwrite trueOrfalse]

migrateSecurityStore(type="credStore", configFile="jpsConfigFileLocation", src="srcJpsContext", dst="dstJpsContext", [skip="trueOrfalse"], [overwrite="trueOrfalse"])
The meanings of the arguments configFile, src, dst, skip, and overwrite are identical to the previous case.
To migrate just one credential map, use either of the script (first) or interactive (second) syntaxes (arguments are written in separate lines for clarity):
migrateSecurityStore.py -type folderCred
                        -configFile jpsConfigFileLocation
                        -src srcJpsContext
                        -dst dstJpsContext
                        [-srcFolder map1]
                        [-dstFolder map2]
                        [-srcConfigFile alternConfigFileLocation]
                        [-overWrite trueOrFalse]
                        [-skip trueOrFalse]

migrateSecurityStore(type="folderCred", configFile="jpsConfigFileLocation", src="srcJpsContext", dst="dstJpsContext", [srcFolder="map1"],
[dstFolder="map2"], [srcConfigFile="alternConfigFileLocation"], [overWrite="trueOrFalse"], [skip="trueOrFalse"])
The meanings of the arguments configFile, src, dst and skip are identical to the previous case. The meanings of the last four arguments (all optional) are as follows:
-
srcFolderspecifies the name of the map containing the credentials to be migrated. Optional. If unspecified, the credential store is assumed to have only one map and the value of this argument defaults to the name of that map. -
dstFolderspecifies the map where the source credentials are migrated. Optional; if unspecified, it defaults to the map passed tosrcFolder. -
srcConfigFilespecifies the location of an alternate configuration file, and it is used in the special case in which credentials are not configured in the file passed toconfigFile. Optional; if unspecified, it defaults to the value passed toconfigFile; if specified, the value passed toconfigFileis ignored. -
overWritespecifies whether a target credential matching a source credential should be overwritten by or merged with the source credential. Set to true to overwrite target credentials; set to false to merge matching credentials. Optional. If not specified, defaults to false. When set to false, if a matching is detected, the source credential is disregarded and a warning is logged.
8.7.2.1 Migrating Audit Metadata
You can use the script migrateSecurityStore to migrate audit metadata into a domain security store, or migrate audit metadata into an XML file.
See Section 6.6.3 for details.
8.7.2.2 Examples of Use
For complete examples illustrating the use of this script, see the following sections:
8.8 Configuring Services Providers with Fusion Middleware Control
This section explains how to use Fusion Middleware Control to configure several service providers in the following sections:
Note:
The area of the Security Provider Configuration page labeled Web Services Manager Authentication Providers pertains to the configuration of Login Modules and the Keystore for Web Services Manager only and is not relevant to ADF or Java EE applications.For details about the login modules available, their parameters, and the keystore for those components, see chapter 9 in Oracle Fusion Middleware Security and Administrator's Guide for Oracle Web Services.
To configure policies, credentials, keys, and audit, see the following sections:
-
Section 9.3, "Managing Policies with Fusion Middleware Control"
-
Section 10.4, "Managing Credentials with Fusion Middleware Control"
-
Section 11.2, "Keystore Management with the Keystore Service"
8.8.1 Configuring the Identity Store Provider
To configure the parameters used by the User and Role API that interact with the identity store, proceed as follows:
-
Log in to Fusion Middleware Control and navigate to Domain > Security > Security Provider Configuration, or to Cell > Security > Security Provider Configuration to display the Security Provider Configuration page.
-
Expand, if necessary, the area Identity Store Provider, and click Configure to display the page Identity Store Configuration.
-
Manage custom properties, as appropriate, using the buttons Add and Delete.
-
When finished, click OK to save your settings and to return to the Security Provider Configuration page.
8.8.2 Configuring the Single Sign-On Provider
To configure the SSO provider used by a domain, proceed as follows:
-
Log in to Fusion Middleware Control and navigate to Domain > Security > Security Provider Configuration or Cell > Security > Security Provider Configuration to display the Security Provider Configuration page.
-
In that page, click the Configure in the Single Sign-On Provider area to display the Single Sign-On Provider page.
-
In that page, check the box Configure Single Sign-On, to allow entering data for the provider. All boxes are grayed out until this box is checked.
-
Select the Store Type from the pull-down list, and enter the corresponding data for the selected provider (the data required changes with the type selected).
-
Enter the Login URL, Autologin URL, and Logout URL in the text boxes.
-
Select the Authentication Level from the pull-down list.
-
Optionally, manage the provider Custom Properties using the buttons Add, Edit, and Delete, at the bottom of the page.
-
When finished, click OK to save the entered data.
8.8.3 Configuring the Trust Service Provider
To configure the trust service provider used by a domain, proceed as follows:
-
Log in to Fusion Middleware Control and navigate to Domain > Security > Security Provider Configuration or Cell > Security > Security Provider Configuration to display the Security Provider Configuration page.
-
In that page, the Trust Service Provider area shows whether the service is configured; to configure the service, click the Configure to display the Trust Service Provider page.
-
That page contains the following areas:
-
Provider, where the name of the chosen provider is displayed.
-
Trust Store, where you select a stripe and a trust store, from the available ones.
-
Keystore and Alias, where you select a certificate by picking a stripe and a keystore, and an alias from the list of available trust aliases. The read-only entries at the bottom of the area (Issuer Name and Expiration Date) give information about the certificate selected.
-
Trust Service Configuration, where you enter the following values:
-
Clock Skew, the number of seconds that the clocks of the two systems (involved in the use of the trust service) may differ; the default is 60.
-
Token Validity Period, the number of seconds that the token is valid; the default is 1800.
-
Include Certificate, a boolean stating whether the certificate should be included in the token.
-
-
Codesource Permission, specifying the URL of the client code (that will access the trust store); no default value provided; this information translates into a codesource permission granted to the specified code.
-
-
Click OK to save the entered data and to return to the Security Provider Configuration page; the values you entered are saved in the file
$DOMAIN_HOME/config/fmwconfig/jps-config.xml.
8.8.4 Configuring Properties and Property Sets
A property set is collection of properties typically used to define the properties of a service instance or generic properties of the domain.
For a list of OPSS configuration properties, see Appendix F, "OPSS System and Configuration Properties."
The elements <property> and <properySet> in the file $DOMAIN_HOME/config/fmwconfig/jps-config.xml are used to define property and property sets. Property sets can be referenced by the element <propertySetRef>.
To define a property or a property set, proceed as follows:
-
Log in to Fusion Middleware Control and navigate to Domain > Security > Security Provider Configuration, or to Cell > Security > Security Provider Configuration to display the Security Provider Configuration page.
-
Expand, if necessary, the area Advanced Properties, and click Configure to display the Advanced Properties page.
-
To enter a property, click Add in the Properties area to display the dialog Add New Property, and enter a property name and value. When finished, click OK. The entered property appears on the Properties table.
-
To enter a property set, click Add Property Set in the Property Sets area to display the dialog Add Property Set, and enter the property set name.
-
To enter a property in a property set, select a property set from the existing ones, then click Add Property to display the dialog Add New Property, and then enter a property name and value. The entered property is added to the list of properties in the selected property set.
-
Use the button Delete to remove a selected item from any table. When finished entering or editing properties and property sets, click OK.
-
Restart the Oracle WebLogic Server. Changes do not take effect until the server has been restarted.
The addition or deletion of property sets modifies the domain configuration file $DOMAIN_HOME/config/fmwconfig/jps-config.xml; the changes do not take effect until the server is restarted.
The elements <property> and <propertySet> added by the previous procedure are inserted directly under the element <jpsConfig>.