I Migrating a Portal Framework Application to WebCenter Portal
This appendix describes how to migrate a Portal Framework application as a portal to WebCenter Portal.
This appendix includes the following sections:
-
About Migrating a Portal Framework Application to WebCenter Portal
-
Troubleshooting Portal Framework Application Migration Issues
I.1 About Migrating a Portal Framework Application to WebCenter Portal
Oracle WebCenter Portal supports the Portal Framework technology for creating and deploying Portal Framework applications in JDeveloper. Though the Portal Framework technology is still available in the product and remains fully supported in the 11g R1 product line, it has been in the maintenance mode since Oracle WebCenter Portal release 11.1.1.7.0. This means that Oracle has stopped adding new features to Portal Framework applications. For example, features like Portal Builder and mobile web support added to the WebCenter Portal application (the out-of-the-box enterprise-ready customizable application) in release 11.1.1.8.0 are not available in Portal Framework applications.
The WebCenter Portal Framework technology will not be available in Oracle WebCenter Portal 12c R2 release. Oracle recommends that if you are running a Portal Framework application and want to benefit from new features and capabilities, consider migrating your Portal Framework application as a portal to WebCenter Portal.
The following conditions are involved in migration of a Portal Framework application to WebCenter Portal:
-
A Portal Framework application is migrated as a portal in the WebCenter Portal application.
-
Only a Portal Framework application from release 11.1.1.6.0, 11.1.1.7.0, 11.1.1.8.x, and 11.1.1.9.x can be migrated to the latest release of WebCenter Portal 11.1.1.9.0.
-
Only a single Portal Framework application can be migrated to the WebCenter Portal managed server (also known as the portal server), which hosts the WebCenter Portal application. You cannot migrate multiple Portal Framework applications to the same portal server. Further, a Portal Framework application can be migrated only as a single portal. You cannot migrate it as multiple portals on the portal server.
-
If there are multiple Portal Framework applications ready for migration, move each application as a portal to a different portal server. Then, you can import the various portals to bring them all on a single portal server. Ensure that you keep the connection names the same as this is a requirement for export and import lifecycle operations.
-
The portal server and the server on which a Portal Framework application is deployed must be in the same domain.
-
The portal server on which you want to migrate your Portal Framework application must not contain any data. That is, it must be like a fresh installation without any existing portals, activities, and so on.
I.2 Migration Roadmap
Figure I-1 and Table I-1 provide an overview of the steps required to migrate a Portal Framework application to WebCenter Portal.
Figure I-1 Migrating a Portal Framework Application to WebCenter Portal
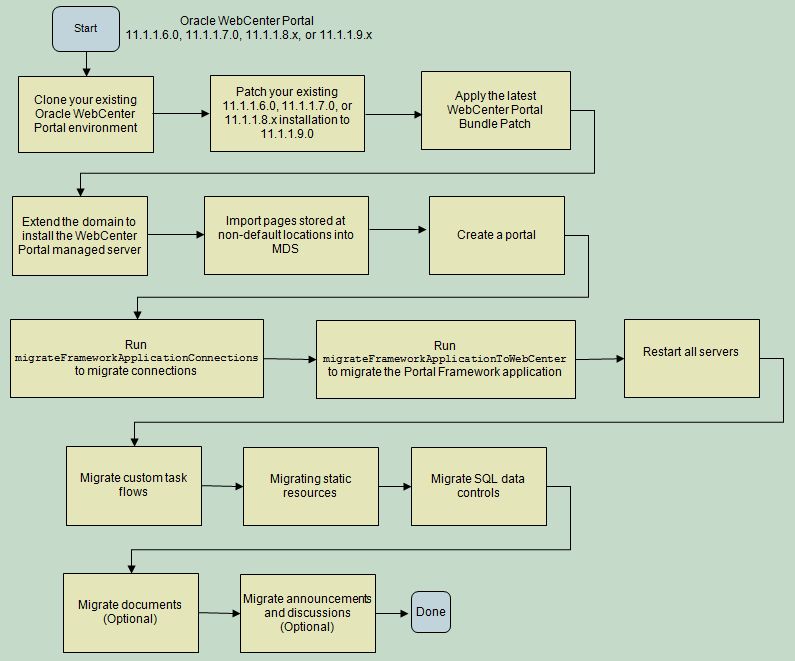
Description of ''Figure I-1 Migrating a Portal Framework Application to WebCenter Portal''
Table I-1 Migrating a Portal Framework Application to WebCenter Portal
| Task | Description | Documentation Link |
|---|---|---|
|
Clone your existing Oracle WebCenter Portal environment |
Create a new Oracle WebCenter Portal environment based on the existing one. You will migrate your Portal Framework application using the cloned instance. Note: You must not attempt to migrate a Portal Framework application in your running production environment. Always perform migration in an environment separate from your production environment. |
See "Moving Oracle WebCenter Portal to a Target Environment" in Administrator's Guide |
|
Patch your existing 11.1.1.6.0, 11.1.1.7.0, or 11.1.1.8.x installation to 11.1.1.9.0 |
Patch your existing Oracle WebCenter Portal 11.1.1.6.0, 11.1.1.7.0, or 11.1.1.8.x installation to 11.1.1.9.0. If you are already on WebCenter Portal release 11.1.1.9.x, skip this step to apply the latest bundle patch. Note: While patching your environment, you do not need to perform any post-patching tasks listed for WebCenter Portal in the Patching Guide. The post-patching tasks are applicable only for the WebCenter Portal application and not for a Portal Framework application. |
See the following links in Patching Guide:
|
|
Apply the latest WebCenter Portal Bundle Patch |
Apply the latest WebCenter Portal Bundle Patch. Download the patch from My Oracle Support at |
Follow the READ ME file available with the patch. |
|
Extend the domain to install the WebCenter Portal managed server |
Extend your existing Oracle WebCenter Portal domain to install the WebCenter Portal managed server ( Note: If the target portal server already exists, ensure that it does not contain any data, that is, it is like a new instance. Note: Ensure that the portal server and the server on which the Portal Framework application is deployed are in the same domain. |
See "Extending a Domain to Install Oracle WebCenter Portal Products" in Installation Guide for Oracle WebCenter Portal |
|
Import pages stored at non-default locations into MDS |
If your pages are stored at any path other than package them into metadata store (MDS) so that they are considered for migration. |
Section I.2.1, "Importing Pages from Non-Default Locations into MDS" |
|
Create a portal |
Log on to WebCenter Portal and create a portal. Choose your portal name after due consideration as this is the target portal where your current Portal Framework application would be moved. |
See "Creating and Building a New Portal" in Building Portals with Oracle WebCenter Portal |
|
Run |
Run the |
Section I.2.2, "Running migrateFrameworkApplicationConnections to Migrate Connections" |
|
Run |
Run the This command is rerunnable. Before you run this command, you can choose to read Section I.3, "Portal Framework Application Migration Details"to understand how migration of artifacts such as pages, assets, and lists, is handled in the background when you migrate a Portal Framework application to WebCenter Portal. |
|
|
Restart all servers |
Restart the Node Manager and all servers. |
See "Starting the Servers" in Installation Guide for Oracle WebCenter Portal |
|
Migrate custom task flows |
Deploy custom task flows as a shared library on WebCenter Portal. |
|
|
Migrate static resources |
Migrate static resources such as images, style sheets, and JavaScript code by deploying them as a shared library on WebCenter Portal. |
|
|
Migrate SQL data controls |
Deploy the data sources used by SQL data controls to the WebCenter Portal managed server, |
|
|
Migrate documents |
Optional, but highly recommended. Move Portal Framework application documents to the folder provisioned for the target portal on Content Server. Then run |
|
|
Migrate announcements and discussions |
Optional, but highly recommended. Move the announcements and discussion topics from the forums and categories used by the Portal Framework application to the forums or category provisioned for the target portal. Then run |
I.2.1 Importing Pages from Non-Default Locations into MDS
In a Portal Framework application, pages created at design time are stored, by default, at the path oracle/webcenter/portapp. You can choose to store your pages at any other location. However, during migration only the pages stored at the default location are considered for migration. To ensure that pages stored at a non-default location also get migrated, you need to import such pages into the metadata store (MDS).
To import pages from non-default locations into MDS:
-
Open your Portal Framework application.
-
Locate the pages stored at non-default locations and their corresponding page definition files and place them into a temporary location.
For example, suppose your pages are located under
com/hr/pages. Find the following sample.jspxfiles and the corresponding page definition files from either your workpace or WAR:-
/com/hr/pages/Training.jspx -
/com/hr/pages/TrainingPageDef.xml -
/com/hr/pages/Employees.jspx -
/com/hr/pages/EmployeesPageDef.xml
Move these files into a temporary directory such as
/tmp/mds.In the WAR, your
PageDef.xmlmight be located underWEB-INF/classes. Copy only the PageDef path given in your workspace. In this example, you need to copy it from /com/hr/pages. -
-
Navigate to your Oracle home directory and invoke the WLST script:
-
(UNIX)
ORACLE_HOME/common/bin/wlst.sh -
(Windows)
ORACLE_HOME\common\bin\wlst.cmd
-
-
At the WLST command prompt, enter the following command to connect to the Administration Server for Oracle WebCenter Portal:
wls:/offline>connect('user_name','password', 'protocol(optional):host_name:port_number')For example:
connect(username='weblogic', password='mypassword', url='myhost.example.com:7001')
For help with this command, type
help('connect')at the WLST command prompt. For information about how to run WLST commands, see Section 1.13.3.1, "Running Oracle WebLogic Scripting Tool (WLST) Commands." -
Run the
importMetadataWLST command to import the metadata for your application into MDS.importMetadata(application, server, fromLocation, [docs, restrictCustTo, excludeAllCust, excludeBaseDocs, excludeExtendedMetadata, excludeUnmodifiedDocs, cancelOnException, applicationVersion, remote, tenantName])
For information about the command syntax, see "importMetadata" in WebLogic Scripting Tool Command Reference.
For example, running the following command will copy all the pages and page definitions stored in the temporary directory
/tmp/mdsinto the MDS repository:importMetadata(appName='webcenter', server='WC_Spaces', fromLocation='/tmp/mds', docs='/**')
When you migrate your Portal Framework application later by running the migrateFrameworkApplication WLST command, remember to set the pagePath argument to /com/hr/pages so that these pages can be considered for migration.
I.2.2 Running migrateFrameworkApplicationConnections to Migrate Connections
Before migrating your Portal Framework application, migrate all its connections to the portal server using the migrateFrameworkApplicationConnections WLST command.
To migrate connections of a Portal Framework application to the portal server:
-
Navigate to your Oracle home directory and invoke the WLST script:
-
(UNIX)
ORACLE_HOME/common/bin/wlst.sh -
(Windows)
ORACLE_HOME\common\bin\wlst.cmd
-
-
At the WLST command prompt, enter the following command to connect to the Administration Server for Oracle WebCenter Portal:
wls:/offline>connect('user_name','password', 'protocol(optional):host_name:port_number')For example:
connect(username='weblogic', password='mypassword', url='myhost.example.com:7001')
For help with this command, type
help('connect')at the WLST command prompt. For information about how to run WLST commands, see Section 1.13.3.1, "Running Oracle WebLogic Scripting Tool (WLST) Commands." -
Run the
listJCRContentServerConnectionsWLST command to obtain the name of the Content Server connection in your Portal Framework application that will be set as the default connection in WebCenter Portal, and obtain the Content Server repository administrator name. From the output returned by the command, note down the following values:-
Connection Name: You will need to pass the connection name as the value for the
primaryConnectionNameparameter while running themigrateFrameworkApplicationConnectionsWLST command in the next step. -
Admin User Name: You will need to pass the administrator name as the value for the
adminUserNameparameter while running themigrateFrameworkApplicationConnectionsWLST command in the next step. If no value retuned as Admin User Name, usesysadminas the value foradminUserName.
For information about the command syntax, see "listJCRContentServerConnections" in WebLogic Scripting Tool Command Reference.
-
-
Run the
migrateFrameworkApplicationConnectionsWLST command:migrateFrameworkApplicationConnections(appName, fwkAppName, server, fwkAppServer, migrationDirectory, [spacesRoot, securityGroup, primaryConnectionName, adminUserName, applicationVersion])
For information about the command syntax, see "migrateFrameworkApplicationConnections" in WebLogic Scripting Tool Command Reference.
The following example migrates connections from the Portal Framework application
HRApplicationdeployed onWC_CustomPortalto the WebCenter Portal application deployed onWC_Spaces. After connections are migrated,ucm-conn(the name of the Content Server connection in the Portal Framework application) is set as the default Content Server connection for WebCenter Portal. Migration logs are stored under the folder/scratch/migrate.wls:/weblogic/serverConfig>migrateFrameworkApplicationConnections(appName='webcenter',fwkAppName='HRApplication',server='WC_Spaces',fwkAppServer='WC_CustomPortal',migrationDirectory='/scratch/migrate',spacesRoot='/WebCenter',securityGroup='webcenter',primaryConnectionName='ucm-conn',adminUserName='weblogic')
Note:
If the Node Manager is configured, theWC_Spacesmanaged server is restarted automatically after you run themigrateFrameworkApplicationConnectionsWLST command. If the Node Manager is not set up, restartWC_Spacesmanually. -
Verify that all the connections from your Portal Framework application are present on the portal server. For example, if your Portal Framework application contains a Content Server connection, Use the
listJCRContentServerConnectionsWLST command to verify that the connection is present on the portal server too. For information about WLST commands, see "WebCenter Portal Custom WLST Commands" in WebLogic Scripting Tool Command Reference. -
Review all connections and ensure that default connections are marked correctly for WebCenter Portal.
When you migrate connections of a Portal Framework application, connection configuration is carried over to the target portal on the portal server. Typically, default connections are retained on the portal server. If only one connection of a type is being migrated, whether or not it is specified as the default connection, after migration it is retained as the default connection on the portal server. For example, if your application contains a single discussions server connection and it is not marked as the default connection, after migration this connection will be set as the default connection on the portal server. If more than one connection of a type are migrated and none is set as the default connection, then after migration no connection of that type is marked as default on the portal server. For example, if your application contains two discussions server connections and neither is set as the default connection, then after migration no discussion server connection is marked as default. On portal server, any one connection must be marked as default for a service to be available. Therefore, you must set default connections manually if required. Note that while running
migrateFrameworkApplicationConnections, you can use theprimaryConnectionNameparameter to specify the default Content Server connection.
I.2.2.1 Output Generated by migrateFrameworkApplicationConnections
When you run the migrateFrameworkApplicationConnections WLST command, the FwkAppConnectionMigrationDiagnostic.log file gets generated in the logs directory under the directory specified in the migrationDirectory parameter. The FwkAppConnectionMigrationDiagnostic.log contains the default connection details of WebCenter Portal before and after migration of a Portal Framework application.
The following is the sample output of a FwkAppConnectionMigrationDiagnostic.log file:
------------------------------------------------
Default connections in webcenter portal prior to migration
------------------------------------------------
Discussion Forum connection:Default Connection not specified.
IMP connection:Default Connection not specified.
Mail connection:Default Connection not specified.
JCR Content Server connection:WebCenterSpaces-ucm
SES connection:
Personal Event connection:Default Connection not specified.


Setting default connection in webcenter portal
----------------------------
Setting default discussion forum connection: collab-conn
IMP connection: Either no connection exists or multiple connections exist, hence not setting default connection.
Mail connection: Either no connection exists or multiple connections exist, hence not setting default connection.
SES connection: Either no connection exists or multiple connections exist, hence not setting default connection.
Personal Event connection: Either no connection exists or multiple connections exist, hence not setting default connection.
Setting default JCR Content Server connection: UCM
Parameters specified are: spacesRoot=/webcenter, securityGroup=webcenter

------------------------------------------------
Default connections in webcenter portal after the migration
------------------------------------------------
Discussion Forum connection:collab-conn
IMP connection:Default Connection not specified.
Mail connection:Default Connection not specified.
JCR Content Server connection:UCM
SES connection:
Personal Event connection:Default Connection not specified.
The migrateFrameworkApplicationConnections WLST command generates two more files that are used internally, connections.properties and migrate_connections.log. The connections.properties file contains details of connections exported from the Portal Framework application, and the migrate_connections.log file contains logs of the connection import operation in WebCenter Portal.
I.2.3 Running migrateFrameworkApplicationToWebCenter to Migrate a Portal Framework Application
After migrating connections, migrate your Portal Framework application to WebCenter Portal by using the migrateFrameworkApplicationToWebCenter WLST command:
migrateFrameworkApplicationToWebCenter(appName, fwkAppName, server, fwkAppServer,adminUrl, adminUser, targetPortal, migrationDirectory, [pagePath, navigationFile, properties, applicationVersion])
For information about the command syntax, see "migrateFrameworkApplicationToWebCenter" in WebLogic Scripting Tool Command Reference. For information about how to run WLST commands, see Section 1.13.3.1, "Running Oracle WebLogic Scripting Tool (WLST) Commands."
The following example migrates the Portal Framework application FinanceApplication to the portal FinancePortal in the WebCenter Portal application deployed on the WC_Spaces managed server. During migration, the navigation file custom-navigation-model.xml is used to build the navigation for FinancePortal. Migration logs are stored under the folder /scratch/migrate.
wls:/weblogic/serverConfig>migrateFrameworkApplicationToWebCenter(appName='webcenter',fwkAppName='FinanceApplication',server='WC_Spaces',fwkAppServer='WC_CustomPortal',adminUrl='t3://wcphost.example.com:adminport',adminUser='weblogic',targetPortal='FinancePortal',migrationDirectory='/scratch/migrate',navigationFile='/oracle/webcenter/portalapp/navigations/custom-navigation-model.xml')
The migrateFrameworkApplicationToWebCenter WLST command is rerunnable. On each subsequent run, the following apply:
-
An attempt is made to migrate the artifacts that had failed or were not migrated previously.
-
Results of each run are appended in the log files.
-
You must specify the same target portal name in the
targetPortalparameter that you specified in the previous runs of the command. -
You must specify the same migration directory in the
migrationDirectoryparameter that you used in the previous runs of the command.
Updating the Paths for Static Resources While Running migrateFrameworkApplicationToWebCenter
If your Portal Framework application contains static resources such as CSS, static images, and JavaScript, running the migrateFrameworkApplicationToWebCenter WLST command does not migrate them to the portal server. You need to manually deploy the static resources as a shared library on the portal server after migrating your application. This typically retains the same path as that used in your Portal Framework application. However if your resources are already accessible to the portal server through a different path or if you choose to move the resources to a different path, then you can provide a mapping of the old and the new resource paths that will get updated during migration. To do this, before running migrateFrameworkApplicationToWebCenter, create a file named migratedResources.properties and add the list of mappings of the existing and the new location of the static resources used in your application. For example, the following entry specifies that the existing path for all occurrences of swooshy.png needs to be replaced with the new path /adf/webcenter/swooshy.png.
/image/swooshy.png=/adf/webcenter/swooshy.png
Note:
Ensure that the paths you specify inmigratedResources.properties are correct. The migrateFrameworkApplicationToWebCenter WLST command does not validate the paths. Incorrect paths can break the migration of your Portal Framework application.You need to place the migratedResources.properties file under the resources folder in the location specified in the migrationDirectory argument of the migrateFrameworkApplicationToWebCenter WLST command. For example, suppose your migrationDirectory is /tmp/migrate. You need to place migratedResources.properties under /tmp/migrate/resources. When you run the command, migratedResources.properties is read and appropriate path changes for static resources are made on the portal server.
I.2.3.1 Output Generated by migrateFrameworkApplicationToWebCenter
When you run the migrateFrameworkApplicationToWebCenter WLST command, the following directories and artifacts are generated under the directory specified in the migrationDirectory parameter:
-
assets: Stores the export and import archives of the assets used in the Portal Framework application. It also contains themigratedAssets.propertiesfile that includes mappings of the old and new paths for assets. For more information about assets, see Section I.3.2, "Assets." -
logs: Contains the following log files:-
FwkAppMigrationReport.logthat contains high-level migration details such as the number of artifacts successfully migrated and those that failed to be migrated. -
FwkAppMigrationDiagnostic.logthat includes detailed information about the migration process. For example, it contains details of the handlers invoked to migrate various assets, mapping of pages in the source application and the target portal, and details of why certain pages could not be migrated, if any.
-
-
mds-cust: Contains customization documents of the Portal Framework application. -
mds-export: Contains the MDS documents exported from the Portal Framework application. -
mds-import: Contains the MDS documents to be imported into WebCenter Portal. -
pages: Contains themigratedPages.propertiesfile that includes a mapping of the pages migrated from the Portal Framework application to the target portal. It also contains themigratedPagesWithOverridePolicy.propertiesfile that includes the list of migrated pages that override portal security. For more information about these files and page migration, see Section I.3.1, "Pages." -
portal-data: Contains MDS documents of the portal server after migration. This is used to fix any paths such as migration paths, document paths, and discussion IDs. -
portlet: Contains the MDS documents of portlets to be imported into WebCenter Portal.
The directory specified in the migrationDirectory parameter might also contain the resources folder if you created this folder to store the migratedResources.properties file for migrating static resources.
I.2.4 Migrating Custom Task Flows
If your Portal Framework application included custom task flows, then after migrating the application you must migrate the custom task flows to WebCenter Portal. Migration of a custom task flow involves all the following tasks:
-
Section I.2.4.1, "Deploying the Custom Task Flow as an ADF Library JAR File"
-
Section I.2.4.2, "Packaging and Deploying the Task Flow JAR as a Shared Library WAR File"
-
Section I.2.4.3, "Accessing Shared Library WAR Using WebCenter Portal Server Extension"
I.2.4.1 Deploying the Custom Task Flow as an ADF Library JAR File
A custom task flow used in a Portal Framework application needs to be packaged as a JAR file, which is then packaged as a WAR file and deployed as a shared library on the portal server.
A custom task flow used in your Portal Framework application must have been developed either as a separate Fusion Web Application (ADF) application or added within your Portal Framework application.
To deploy a custom task flow developed within your Portal Framework application as an ADF Library JAR file:
Note:
The steps for deploying a custom task flow developed as a separate Fusion Web Application (ADF) application are same as that for deploying a custom task flow developed within a Portal Framework application. Instead of the Portal project, you need to perform the steps on the ViewController project. The JAR is written to theViewController/deploy location.-
In JDeveloper 11.1.1.9.0, open your Portal Framework application that contains the custom task flow.
-
Delete the existing WAR deployment profile:
-
In the Application Navigator, right-click the Portal project and select Project Properties.
-
In the Project Properties dialog, click Deployment.
-
Select the Portal WAR File deployment profile, click Delete, and then click OK.
-
-
Create a new ADF Library JAR file deployment profile for the Portal project:
-
Right-click the Portal project, select New.
-
In the New Gallery, expand General, select Deployment Profiles, then ADF Library JAR File, and click OK.
-
In the Create Deployment Profile dialog, in the Deployment Profile Name field, specify the name of the deployment profile and click OK.
-
In the Edit ADF Library JAR File Deployment Profiles Properties dialog, delete any dependencies listed, and click OK.
-
In the Project Properties dialog, click OK.
-
-
Deploy the Portal project to the ADF Library JAR file:
-
Right-click the Portal project, select Deploy, and then select the deployment profile you created in the previous step.
-
In the Deploy dialog, select Deploy to ADF Library JAR File to specify that you want to deploy the project as an ADF Library JAR file.
-
Click Next.
-
Click Finish.
The JAR is written to the
Portal/deploylocation.
-
I.2.4.2 Packaging and Deploying the Task Flow JAR as a Shared Library WAR File
To create a shared library WAR file for your custom task flow's JAR file:
-
In Oracle JDeveloper, create an ADF fusion application using the Fusion Web Application (ADF) template.
-
In the application, create a new project.
-
From the Application menu, select New Project.
-
Ensure that under Projects, Generic Project is selected.
-
Click OK.
-
Specify the project name and other details, and then click Finish.
-
-
Create a WAR deployment profile for the newly created project:
-
In the Application Navigator, right-click the newly created project, and choose New.
-
In the New Gallery dialog, expand General, select Deployment Profiles, then WAR File, and click OK.
-
In the Create Deployment Profile - WAR File dialog, enter a name for your deployment profile and click OK.
-
In the Edit WAR Deployment Profile Properties dialog, select Specify Java EE Web Context Root, enter a context root, and then click OK.
-
In the Project Properties dialog, under Deployment Profiles, select the WAR file you just created and click OK.
-
-
Add the task flow JAR file to the WAR deployment profile:
-
Right-click your project, and select Project Properties.
-
Under Library and Classpath, click Add JAR/directory.
-
In the Add Archive or Directory dialog, browse to the ADF Library JAR file you created for the Portal project.
-
-
Navigate to the
web.xmlfile of your project and remove all the entries, except the following entries.<?xml version = '1.0' encoding = 'UTF-8'?> <web-app xmlns:xsi="http://www.w3.org/2001/XMLSchema-instance" xsi:schemaLocation="http://java.sun.com/xml/ns/javaee http://java.sun.com/xml/ns/javaee/web-app_2_5.xsd" version="2.5" xmlns="http://java.sun.com/xml/ns/javaee"> </web-app>You can find
web.xmlin your project'sWeb Content/WEB-INFfolder in Application Navigator.
I.2.4.3 Accessing Shared Library WAR Using WebCenter Portal Server Extension
WebCenter Portal provides a JDeveloper template called WebCenter Portal Server Extension that enables you to deploy custom shared libraries you want to use with WebCenter Portal.
To access your custom task flow as a Shared Library WAR file on WebCenter Portal:
-
Create a WebCenter Portal Server Extension workspace in JDeveloper. For information, see "Creating a WebCenter Portal Server Extension Workspace" in Developing Portals with Oracle WebCenter Portal and Oracle JDeveloper.
-
If the deployment descriptor
weblogic.xmldoes not exist underPortalSharedLibrary\Web Content\WEB-INF, create the deployment descriptor. For information, see "Registering Additional Shared Libraries With WebCenter Portal" in Developing Portals with Oracle WebCenter Portal and Oracle JDeveloper. -
Deploy extensions to the WebCenter Portal shared library. For information, see "Deploying Extensions to the WebCenter Portal Shared Library (extend.spaces.webapp.war)" in Developing Portals with Oracle WebCenter Portal and Oracle JDeveloper.
After the custom task flow is deployed as a shared library on WebCenter Portal, the custom task flow becomes available in the portal where your migrated your Portal Framework application.
Note:
In WebCenter Portal, you can optionally register your custom task flow in a new resource catalog and make the catalog available for use in the target portal. For information, see "Creating a Resource Catalog" in Building Portals with Oracle WebCenter Portal.Once a custom task flow is available in a resource catalog, users can add the task flow to portal pages. For information, see "Adding a Component to a Page" in Building Portals with Oracle WebCenter Portal.
I.2.5 Migrating Static Resources
A Portal Framework application contains the Portal project and a static application resources project called PortalWebAssets. Static resources such as images, style sheets, and HTML can be placed under the Web Content folder of the Portal project or under the PortalWebAssets project. You can also place static files under the Shared folder. Static resources are typically bundled and deployed with the application.
-
Shared folder: You can place static resources in the base path folder
/oracle/webcenter/portalapp/sharedas shown in Figure I-2. When you deploy your application, these files are packaged as a.marfile and get imported into the MDS. When you migrate your Portal Framework application using themigrateFrameworkApplicationToWebCenterWLST command, the shared static resources are copied to the target MDS on the portal server. You do not need to migrate them manually.Figure I-2 Static Resources in the Shared Folder
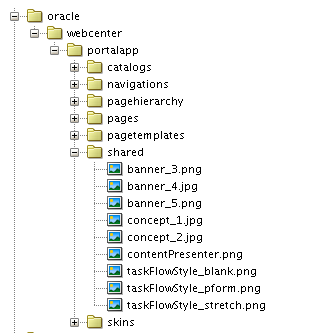
Description of ''Figure I-2 Static Resources in the Shared Folder''
-
Web Content folder: You can place static resources in the
PortalWebAssetsproject or in theWeb Contentfolder of thePortalproject (as shown in Figure I-3). These static resources are packaged into a.warfile, which is deployed to the target server when you deploy your application. When you migrate your Portal Framework application, these static resources are not migrated. You need to manually package them as a shared library and deploy on the WebCenter Portal managed server.Figure I-3 Static Resources in the Web Content Folder
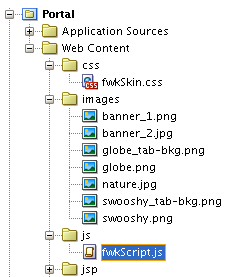
Description of ''Figure I-3 Static Resources in the Web Content Folder''
To deploy the static resources stored in the Web Content folder of the Portal project or in the PortalWebAssets project as a shared library:
-
Create an application based on the Fusion Web Application (ADF) application template.
This creates the Model and ViewController projects in the application.
-
Copy all the static content stored under the
PortalWebAssetsandPortalprojects of your Portal Framework application to theViewController/public_html/folder, in the newly created application, keeping the folder structure intact. For example:-
On the file system, copy
Portal/public_html/images/banner_2.jpgto/ViewController/public_html/images/banner_2.jpg. -
Copy
Portal/public_html/css/sample.cssto/ViewController/public_html/css/sample.css.
-
-
Deploy the Fusion Web Application (ADF) application as a shared library. This involves the following steps:
-
Deploying the application as an ADF library JAR file.
-
Packaging and deploying the JAR as a shared library WAR file.
-
Accessing the shared library WAR file using WebCenter Portal Server Extension.
For information about these steps, see Section I.2.4, "Migrating Custom Task Flows." The steps to migrate static resources are same as that for migrating custom task flows.
-
After the static resources are accessible as a shared library on WebCenter Portal, the static images, CSS, and HTML become available in the target portal where you migrated your Portal Framework application.
Note:
Instead of deploying your static resources as a shared library on the WebCenter Portal managed server, for better performance you can place the files on the Oracle HTTP Server (OHS) in a production environment. For this, you need to copy the entire folder structure of thePortalWebAssets or the Portal projects or the MDS Shared folder path to the document root of the OHS.I.2.6 Migrating SQL Data Controls
While creating SQL data controls in a Portal Framework application, you can use any data source targeted to the custom portal server where the application is deployed. After migrating your Portal Framework application, for a SQL data control to work you must target its data source to WC_Spaces, the managed server where WebCenter Portal is deployed. Further, you must update data source details in the migrated SQL data control in WebCenter Portal.
To migrate SQL data controls:
-
Target all the data sources used by SQL data controls to
WC_Spaces.-
In the Oracle WebLogic Server Console, go to Services > Data Source.
-
Click the data source used by your SQL data control to view its settings.
-
Open the Targets tab.
-
Select the check box next to the
WC_Spacesmanaged server to target the data source to this server. -
Click Save.
-
-
Edit the SQL data control to update data source details:
-
Log on to WebCenter Portal and navigate to Portal Administration.
-
Click the Shared Assets tab to display the Shared Assets page.
-
On the sidebar, under Integration, click Data Controls.
-
Click the Edit quick link for the data control that you want to edit.
-
From the Data Source drop-down list, select the data source you want to use for your SQL data control. Note that this data source must be the one targeted to
WC_Spaces. -
In the Password field, enter the password used to connect to the data source.
-
Click Save and Close.
For more information about editing a data control, see "Editing Data Controls" in Building Portals with Oracle WebCenter Portal.
-
I.2.7 Migrating Documents
This section includes the following topics:
I.2.7.1 About Migration of Documents
After you migrate a Portal Framework application as a portal in WebCenter Portal, document task flows on the migrated pages continue to access documents from the old location on Content Server. However, any new documents added to the target portal are stored in the folder provisioned for the portal. It is highly recommended that you move your Portal Framework application's content to the folder provisioned for the target portal on Content Server. This ensures that all your documents are stored at the same location and use the same security group. If you do not migrate the content, and later export or import portals along with content, such content will not be carried over. Additionally, security set on the content will not mirror the portal-level security.
When you manually move documents to the folder provisioned for the target portal, folder paths on Content Server change. However, as the target portal still references the old folder paths, documents will not show up correctly on portal pages. To update folder path references and documents metadata, you need to create a mapping CSV file containing the mapping of the old and new folder path references. Then you need to run the migrateFrameworkApplicationDocumentsToWebCenter WLST command and pass the .csv file as a parameter to update folder path references.
Oracle WebCenter Content offers two folder solutions: Folders_g and FrameworkFolders. Both Folders_g and FrameworkFolders provide a hierarchical folder interface, however, the way content is organized differs across the two setups. Based on the folder solution configured on Content Server, you need to move your documents to the appropriate folders.
Documents in the Folders_g Setup
In a WebCenter Portal environment where Content Server is configured to use Folders_g, when you enable the documents service on the target portal where you migrated your Portal Framework application, a folder is created for the portal under the WebCenter Portal root directory. You must move your documents to this folder.
For example, suppose you migrated a Portal Framework application named hrapp to a portal named HR Portal. Further, documents for hrapp are stored under the top-level folder Contribution Folders/hrapp, in the subfolders Blogs, Documents, and Training, as shown in Figure I-4.
When you enable the documents service for HR Portal, the following folder is created on Content Server:
/webcenter/HR Portal
Where, webcenter is the value of the spacesRoot parameter that you provided while running the migrateFrameworkApplicationConnections command. You need to migrate your application's documents to the HR Portal folder using the Content Server UI. Figure I-4 shows the sample how you can move each subfolder of hrapp to HR Portal, which is the folder provisioned for the target portal on Content Server.
Figure I-4 Folders_g Setup: Folder Structure Before and After Migration
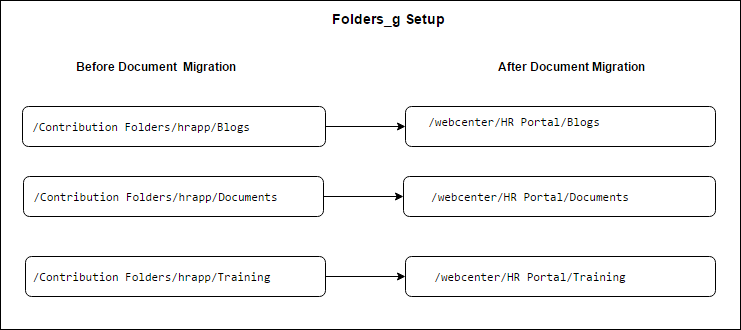
Description of ''Figure I-4 Folders_g Setup: Folder Structure Before and After Migration''
To update the folder path references and documents metadata, suppose you create a mapping file named MigrationMappingFile.csv. To update the folder structure displayed in Figure I-4, your mapping file must contain the following entries:
 #old path, new path
  /Contribution Folders/hrapp/Blogs,/webcenter/HR Portal/Blogs
  /Contribution Folders/hrapp/Documents,/webcenter/HR Portal/Documents
  /Contribution Folders/hrapp/Training,/webcenter/HR Portal/Training
While running the migrateFrameworkApplicationDocumentsToWebCenter WLST command if you specify the mapping file's name in the migrationFolderMappingFile argument, the document paths and metadata will get updated and the documents will show up correctly on the migrated pages.
Documents in the FrameworkFolders Setup
If WebCenter Portal is configured to use the FrameworkFolders component on Content Server, portal folders are treated as enterprise libraries and are stored under the path /Enterprise Libraries. Documents exposed in a portal are stored under the path /Enterprise Libraries/portal_name.
For example, suppose you migrated the Portal Framework application named hrapp to a portal named HR Portal. Further, documents for hrapp are stored under the top-level folder Enterprise Libraries/hrapp, in subfolders Blogs, Documents, and Training. After migration, the migrated pages continue to access existing documents from the Enterprise Libraries/hrapp location.
When you enable the documents service for HR Portal, the following folder is created on Content Server:
/Enterprise Libraries/HR Portal
Any new page that you create in your target portal will be stored in the portal's enterprise library at the path /Enterprise Libraries/HR Portal. You need to migrate your application's existing document to this folder using the Content Server UI. Figure I-5 shows the sample how you can move each subfolder of the Portal Framework application to the target portal's folder.
Figure I-5 FrameworkFolders Setup: Folder Structure Before and After Migration

Description of ''Figure I-5 FrameworkFolders Setup: Folder Structure Before and After Migration''
To update the folder path references and documents metadata, suppose you create a mapping file named MigrationMappingFile.csv. To update the folder structure displayed in Figure I-5, your mapping file must contain the following entries:
#old_path,new_path
/Enterprise Libraries/hrapp/Blogs,/Enterprise Libraries/HR Portal/Blogs
/Enterprise Libraries/hrapp/Documents,/Enterprise Libraries/HR Portal/Documents
/Enterprise Libraries/hrapp/Training,/Enterprise Libraries/HR Portal/Training
When you run the migrateFrameworkApplicationDocumentsToWebCenter WLST command, specifying the mapping file's name in the migrationFolderMappingFile argument will update the document paths and metadata and then the documents will show up correctly on the migrated pages.
I.2.7.2 How to Migrate Documents
To migrate the documents used in your Portal Framework application to the folder provisioned for the target portal:
-
Log on to WebCenter Portal.
-
Enable the documents service on the target portal. For information, see "Enabling and Disabling Tools and Services Available to a Portal" in Building Portals with Oracle WebCenter Portal.
-
Log on to Content Server, and move the top-level folders used in your Portal Framework application to the folder provisioned for the target portal.
For information about the folder structure used in Folders_g and FrameworkFolders setups, see Section I.2.7.1, "About Migration of Documents."
-
Create a
.csvfile containing the mapping of the folder structure before and after migration of the top-level folders of your Portal Framework application to the target portal's folder on Content Server.Note:
Ensure that the.csvmapping file contains accurate and complete details about the old and new folder paths. If the paths are incorrect, document migration will fail and documents will not be available in the target portal in WebCenter Portal.To view the sample
.csvmapping file entries used in the Folders_g and FrameworkFolders setups, see Section I.2.7.1, "About Migration of Documents." -
Run the
migrateFrameworkApplicationDocumentsToWebCenterWLST command to update all old folder path references with the new paths in the target portal and migrate documents metadata of the Portal Framework application to WebCenter Portal.migrateFrameworkApplicationDocumentsToWebCenter(appName, server, targetPortal, migrationFolderMappingFile, migrationDirectory, [connectionName, applicationVersion])
For information about the command syntax, see "migrateFrameworkApplicationDocumentsToWebCenter" in WebLogic Scripting Tool Command Reference. For information about how to run WLST commands, see Section 1.13.3.1, "Running Oracle WebLogic Scripting Tool (WLST) Commands."
For example, the following command migrates the Portal Framework application documents metadata to the WebCenter Portal application deployed on the
WC_Spacesmanaged server. Migration is performed on the target portalHR Portalusing the default Content Server connection. Migration logs are stored at the pathtmp/migrate. Folder paths are updated using the mapping fileMigrationMappingFile.csv.migrateFrameworkApplicationDocumentsToWebCenter(appName='webcenter', server='WC_Spaces', targetPortal='HR Portal', migrationFolderMappingFile='/tmp/migrationmap/MigrationMappingFile.csv', migrationDirectory='/tmp/migrate')
-
Restart the Node Manager and all servers.
I.2.7.3 Output Generated by migrateFrameworkApplicationDocumentsToWebCenter
When you run the migrateFrameworkApplicationDocumentsToWebCenter WLST command, the FwkAppDocumentMigrationDiagnostic.log file gets generated in the logs directory under the directory specified in the migrationDirectory parameter. The FwkAppDocumentMigrationDiagnostic.log contains details of the document migration process, such as details of the export and import operations of MDS documents.
The following is the sample output of a FwkAppDocumentMigrationDiagnostic.log file:
WebCenter Framework Application Documents Migration Log File
-----------------------------------------------------------

#############################################################################
Executing migration wlst command migrateFrameworkApplicationDocumentsToWebCenter
#############################################################################
[TRACE]: Entering class: FwkAppMigration, method: migrateFrameworkApplicationDocumentsToWebCenter
[TRACE]: Parameters provided are: appName: webcenter, server: WC_Spaces, targetPortal: FwkAppPortal1, migrationDirectory: /scratch/migration/migration_log/migrationLog-2016_05_25/docMigration, connectionName: ,applicationVersion:
[TRACE]: The migration directory default/specified: /scratch/migration/migration_log/migrationLog-2016_05_25/docMigration has necessary permissions
[TRACE]: Entering class: FwkAppMigration, method: _getDefaultDocLibConnectionName
[TRACE]: Exiting method: _getDefaultDocLibConnectionName, returning:: connectionName: UCM
[TRACE]: Entering class: FwkAppMigration, method: _getUCMConnectionUrl
[TRACE]: Exiting method: _getUCMConnectionUrl, returning:: ucmUrl: idc://adc.example.com:9444
[TRACE]: Entering class: FwkAppMigration, method: _getDocumentsSpacesRoot
[TRACE]: Exiting method: _getDocumentsSpacesRoot, returning:: spacesRoot: /webcenter
[TRACE]: derived attributes,  ucmConnectionUrl: idc://adc.example.com:9444, Portal Server Spaces Root: /webcenter

[TRACE]: Entering the class: oracle.webcenter.doclib.fwkapp.FwkAppDocumentMigrationUtils, method: isDocLibProvisioned with parameters, scope: FwkAppPortal1 (guid=s0fd1c1cc_00e3_4e0a_9bb1_f2bffc1001d5), migrationDirectory: /scratch/migration/migration_log/migrationLog-2016_05_25/docMigration
[TRACE]: The connection to Content Server exists and the Documents service is provisioned for the portal.
[SUCCESS]: Documents service is validated. Connection to Content Server exists and documents service is provisioned for the portal.

[TRACE]: Migration folder mapping file: /tmp/MigrationMapping.txt

[TRACE]: Entering the class: oracle.webcenter.doclib.fwkapp.FwkAppDocumentMigrationUtils, method: validateMigrationFolderMappingFile with parameters, migrationFolderMappingFile: /tmp/MigrationMapping.txt, migrationDirectory: /scratch/migration/migration_log/migrationLog-2016_05_25/docMigration, connectionName: UCM, connectionUrl: idc://adc.example.com:9444
[TRACE]: Socket Timeout: 18000000
[TRACE]: Migration folder mapping file data: /Enterprise Libraries/fwkapproot/Blogs,/Enterprise Libraries/FwkAppPortal1(webcenter)/Blogs
[TRACE]: Foldering Service :FRAMEWORK_FOLDERS
[TRACE]: Migration folder mapping file data: /Enterprise Libraries/fwkapproot/Documents,/Enterprise Libraries/FwkAppPortal1(webcenter)/Documents
[TRACE]: Foldering Service :FRAMEWORK_FOLDERS
[SUCCESS]: The migration folder mapping file validation is successful.
[SUCCESS]: validation completed successfully on migration mapping file.

[SUCCESS]: Export of MDS documents is complete.

[TRACE]: Starting migration of MDS documents.

[TRACE]: Entering the class: oracle.webcenter.doclib.fwkapp.FwkAppDocumentMigrationUtils, method: massageMdsDocuments with parameters, scope: FwkAppPortal1 (guid=s0fd1c1cc_00e3_4e0a_9bb1_f2bffc1001d5), connectionName: UCM, migrationDirectoryPath: /scratch/migration/migration_log/migrationLog-2016_05_25/docMigration
[TRACE]: migration map entry line (1): /Enterprise Libraries/fwkapproot/Blogs,/Enterprise Libraries/FwkAppPortal1(webcenter)/Blogs
[TRACE]: migration map entry line (2): /Enterprise Libraries/fwkapproot/Documents,/Enterprise Libraries/FwkAppPortal1(webcenter)/Documents
[TRACE]: In the File: /scratch/migration/migration_log/migrationLog-2016_05_25/docMigration/ExportDirectory/pageDefs/oracle/webcenter/page/scopedMD/s0fd1c1cc_00e3_4e0a_9bb1_f2bffc1001d5/Page24PageDef.xml, all refrences of '/Enterprise Libraries/fwkapproot/Documents' is replaced with '/Enterprise Libraries/FwkAppPortal1(webcenter)/Documents'.
[TRACE]: In the File: /scratch/migration/migration_log/migrationLog-2016_05_25/docMigration/ExportDirectory/pageDefs/oracle/webcenter/page/scopedMD/s0fd1c1cc_00e3_4e0a_9bb1_f2bffc1001d5/Page25PageDef.xml, all refrences of '/Enterprise Libraries/fwkapproot/Documents' is replaced with '/Enterprise Libraries/FwkAppPortal1(webcenter)/Documents'.
[TRACE]: In the File: /scratch/migration/migration_log/migrationLog-2016_05_25/docMigration/ExportDirectory/pageDefs/oracle/webcenter/page/scopedMD/s0fd1c1cc_00e3_4e0a_9bb1_f2bffc1001d5/Page37PageDef.xml, all refrences of '/Enterprise Libraries/fwkapproot/Documents' is replaced with '/Enterprise Libraries/FwkAppPortal1(webcenter)/Documents'.
[SUCCESS]: Migration of MDS documents is complete.

[SUCCESS]: Migration of MDS documents is complete.
[TRACE]: Importing the modified MDS documents.

[SUCCESS]: Successfully imported the modified MDS documents.

[TRACE]: Entering the class: oracle.webcenter.doclib.fwkapp.FwkAppDocumentMigrationUtils, method: propagatePortalAccount with parameters, scope: FwkAppPortal1 (guid=s0fd1c1cc_00e3_4e0a_9bb1_f2bffc1001d5), connectionName: UCM, connectionUrl: idc://adc.example.com:9444, spacesRoot: webcenter, migrationDirectory: /scratch/migration/migration_log/migrationLog-2016_05_25/docMigration
[TRACE]: Socket Timeout: 18000000
[TRACE]: Foldering Service :FRAMEWORK_FOLDERS
[TRACE]: Portal enterprise library fFolderGUID: 13ECEF7A2661182EF3CE253B2BBD88EC
[TRACE]: Account to be propagated to all child items of the portal: s0fd1c1cc00e34e0a9bb1f2bffc1001d5
[TRACE]: Foldering Service :FRAMEWORK_FOLDERS
[TRACE]: Portal account is successfully propagated to: s0fd1c1cc00e34e0a9bb1f2bffc1001d5

[SUCCESS]: migrateFrameworkApplicationDocumentsToWebCenter successfully executed.
I.2.8 Migrating Announcements and Discussions
This section includes the following topics:
-
Section I.2.8.1, "About Migration of Announcements and Discussions"
-
Section I.2.8.2, "How to Migrate Announcements and Discussions"
-
Section I.2.8.3, "Output Generated by migrateFrameworkApplicationDiscussionsToWebCenter"
I.2.8.1 About Migration of Announcements and Discussions
After you migrate your Portal Framework application to the target portal, the migrated pages containing announcement and discussion task flows will continue to work as before. The target portal will continue to access announcements and discussion topics from the forums or category configured for your Portal Framework application. If you had permissions to manage announcements and discussions in your application, you continue to do so in the migrated portal as well. However, Oracle strongly recommends that you reconcile your announcement and discussion usage to the portal server security model by moving announcements and discussions to the forum or category provisioned for the target portal. This provides the benefit of managing the announcement and discussion security from within the target portal.
Portal Server Security Model
In a Portal Framework application setup, you manage announcement and discussion permissions using the Discussion Server Admin Console. On the discussions server, you can grant access to users and enterprise roles directly. Whereas, in the portal server setup, you can manage announcement and discussion permissions from within a portal using the WebCenter Portal Administration. In portal server, you use portal roles to manage security. You grant appropriate announcement and discussion permissions to various roles. Subsequently, you can manage membership of these roles by adding the appropriate users and enterprise roles. Each time you add or remove a user or enterprise role from a portal role, the corresponding announcement or discussion permission is automatically granted or revoked from that user or enterprise role on the discussions server also.
On the discussions server, forums under a category can override the security settings inherited from the parent category. In the portal server security model, all forums inherit security from the parent category, and cannot override parent security settings. While reconciling to the portal server security model, you must ensure that there are no forum-specific security settings configured if your target portal is provisioned to use a category.
Announcements
When you enable the Announcement service for a portal, a new forum gets created for the portal using the naming format Portal_Name-Announcements, for example HR Portal-Announcements. This forum is linked to the Announcements system page of the portal. To benefits from the portal server model, you need to migrate all your existing announcements to the forum provisioned for your target portal on the discussions server.
Discussions
When you enable the Discussions service for a portal, a new discussion forum gets created for the portal using the naming format Portal_Name, for example HR Portal. This forum is linked to the Discussions system page of the portal. To benefits from the portal server model, you need to migrate all your existing discussions to the forum provisioned for your target portal on the discussions server.
In your Portal Framework application if discussion topics are stored across various forums, you need to enable the support for multiple forums on the target portal. This creates a category for your portal that will store all your portal forums. You must move all your existing discussion forums to the category provisioned for your portal.
Migration
When you migrate all your existing announcements and discussions to the forum or category provisioned for your target portal on the discussions server, you need to update the forum or category IDs on the migrated portal pages. To do this, you create a CSV file containing the mapping of the old and new IDs. Then you need to run the migrateFrameworkApplicationDiscussionsToWebCenter WLST command and pass the .csv file as a parameter to update the IDs.
Example: Migrating Announcements and Discussions
Consider a scenario where your Portal Framework application named hrapp stores its announcements and discussions in the following forums on discussions server:
-
Announcements: Stored in the
hrapp-announcementsforum, whose forum ID is 3. -
Discussions: Stored across different forums:
hrapp-training,hrapp-process,hrapp-policies, all under a category namedhrapp-catwith the ID as 2. Thehrapp-trainingforum has explicit security settings that override the security settings inherited from the parent category,hrapp-cat.
When you migrate hrapp to the target portal named HR Portal,the migrated pages continue to access announcements and discussions from the hrapp-announcements forum and the hrapp-cat category.
To move to the portal server security model when you enable the Announcements and Discussions services for HR Portal, the following get created:
-
Announcements: A forum named
HR Portal-Announcementsgets created, with the ID as 7. -
Discussions: A forum named
HR Portalgets created by default, with the ID 5. But when you enable the support for multiple forums, a category namedHR Portalgets created with the ID 3. TheHR Portalforum is moved under theHR Portalcategory.
On discussions server, you move announcements and discussions as follows:
-
Merge
hrapp-announcementsforum withthe HR Portal-Announcementsforum to migrate announcements. This also moves discussion topics, if any, inhrapp-announcementstoHR Portal-Announcements. -
Move the
hrapp-trainingforum from thehrapp-catcategory to theHR Portalcategory. -
Move the
hrapp-processforum from thehrapp-catcategory to theHR Portalcategory. -
Move the
hrapp-policiesforum from thehrapp-catcategory to theHR Portalcategory. -
Move discussion topics merged with
HR Portal-Announcementsto theHR Portalforum. -
Remove the explicit security settings from the
hrapp-trainingforum so that it inherits security from the parent categoryHR Portal.
Next, you need to create the DiscussionsMappingFile.csv file with the following entries:
 #old id, new id
  a3, a7
  f3, f5
  c2, c3
Where, a refers to an announcement forum, f refers to a discussions forum, and c refers to a category.
While running the migrateFrameworkApplicationDiscussionsToWebCenter WLST command to update the IDs and fix parameters in page definitions, you need to pass the DiscussionsMappingFile.csv file as a parameter.
After you run the WLST command, the migrated pages in HR Portal will show announcements from the HR Portal-Announcements forum, and discussion topics and forums from the HR Portal category.
I.2.8.2 How to Migrate Announcements and Discussions
To migrate announcements and discussions to the portal server model:
-
Log on to WebCenter Portal.
-
Enable the announcements and discussions services on the target portal. For information, see "Enabling and Disabling Tools and Services Available to a Portal" in Building Portals with Oracle WebCenter Portal.
For announcements, typically this will create a forum for your portal in the root category configured for the portal server by the name of
Portal_Name-Announcements, for exampleHR Portal-Announcements.For discussions, this will create a single forum by the same name as the portal, for example
HR Portal, under the root category configured for the portal server. -
Navigate to the Announcements page under the Tools and Services administration for your portal and note down the forum ID specified for the portal. This is the forum where you will move all the announcements from the forum used by your Portal Framework application. For information about accessing the Announcements page, see "Modifying Announcement Forum Settings for a Portal" in Building Portals with Oracle WebCenter Portal.
-
Navigate to the Discussions page under the Tools and Services administration for your portal.
-
Single forum: When you enable the discussions service for your portal, by default a single forum is provisioned for the portal. If your Portal Framework application used a single forum for discussions, continue to use a single forum. Note down the forum ID displayed for the portal. You will move all discussion topics from your Portal Framework application to this forum.
-
Multiple forums: If usage of discussions in your Portal Framework application spanned different forums, select the Support Multiple Forums for the Portal option. This creates a category for the portal. Note down the category ID. You will move all forums from your Portal Framework application to this category.
-
Multiple categories: WebCenter Portal does not support multiple categories for a portal. If your Portal Framework application stored discussions under different categories, select the Support Multiple Forums for the Portal option and note down the category ID. You will need to move all forums across different categories into the category provisioned for the portal.
For information about accessing the Discussions page, see "Modifying Discussion Forum Settings for a Portal" in Building Portals with Oracle WebCenter Portal.
-
-
Log on to the Discussions Server Admin Console. For information, see Section 12.11.1, "Accessing the Discussions Server Admin Console."
You must first move announcements to the announcement forum provisioned for your portal, that is
Portal_Name-Announcements. -
To move the existing announcements to your target portal's forum:
-
On the Content tab, under Category Summary, open the forum that contains the announcements data of your Portal Framework application. You will move announcements from this forum to the forum provisioned for your portal.
-
Note down the forum ID. You will need to specify this ID in a mapping file later.
-
From the Forum Options navigation list, select Merge Data.
This will present the option to move all announcements data to an existing forum or a new forum.
-
From the Move all data TO the following forum list, select the forum used by your target portal, for example,
HR Portal-Announcements.Figure I-6 Moving Announcements to Your Target Portal's Forum
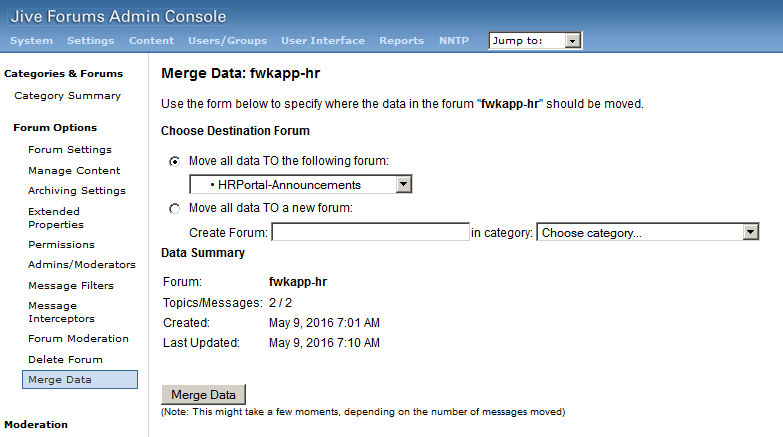
Description of ''Figure I-6 Moving Announcements to Your Target Portal's Forum''
-
Click Merge Data.
This moves all the announcements from the old forum to your target portal's forum, such as
HR Portal-Announcements. If the old forum contained discussion topics, those are also moved toHR Portal-Announcements. You will need to move these topics from the announcements forum to the discussions forum when you move discussions later in this procedure.In WebCenter Portal, if you now access the Announcements system page, you will notice it lists all the announcements that you have moved. However, if you access a portal page that contains the announcement task flow, you will notice that it is empty because you have moved announcements to a different forum. To fix this issue, you will create a mapping file to update the forum ID and run a WLST command later in this procedure.
-
Move announcements from other forums using the same procedure if your Portal Framework application stored announcements in multiple forums.
-
-
To move discussions to your target portal's forum or category:
-
On the Content tab, under Category Summary, open the forum containing the discussions that you want to migrate. If your Portal Framework application stored discussions data in a category, open the category.
-
Note down the forum or category ID. You will need to specify this ID in a mapping file later.
-
From the Forum Options navigation list, select Manage Content.
This will list all the topics that you need to move to the forum provisioned for your portal. If you selected a category, this will list all the forums that you need to move to the category provisioned for your portal.
-
In the Actions column, select the check box for each topic or forum, and then click Move (Figure I-7).
Figure I-7 Moving Discussion Topics to Your Target Portal's Forum
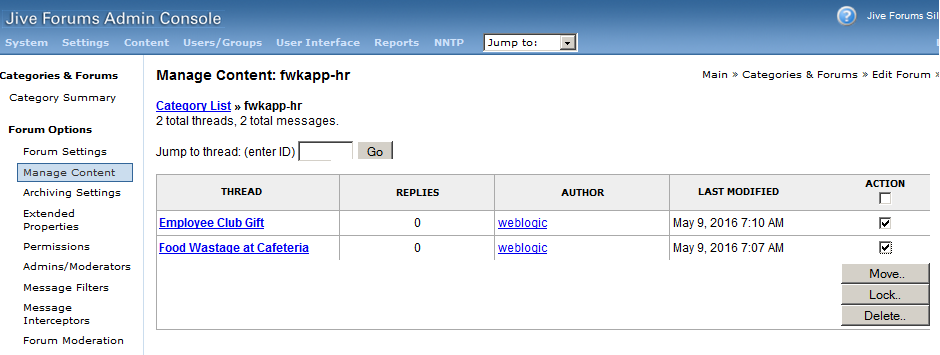
Description of ''Figure I-7 Moving Discussion Topics to Your Target Portal's Forum''
-
From the list of forums or categories displayed, select the one to which you want to move all the discussion topics or forums. For example, select
HR Portal. -
Click Move Thread(s) to move the discussion topics. If you are moving forums to a category, the Move Forum(s) button is displayed.
This will move all the topics to the selected forum or all the forums to the selected category. Figure I-8 shows that all the selected forums of a category will be moved to the target portal's category.
Figure I-8 Moving Discussion Forums to Your Target Portal's Category
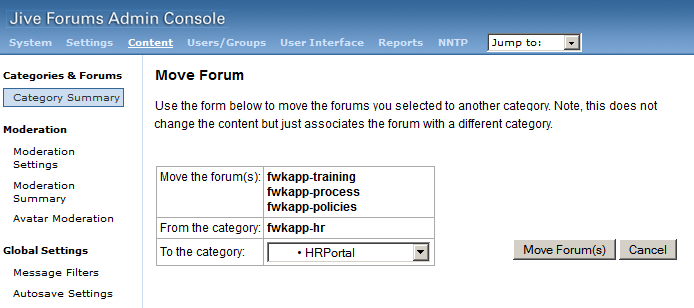
Description of ''Figure I-8 Moving Discussion Forums to Your Target Portal's Category''
-
When you moved announcements, if the old forum contained any discussion topics they were also moved to the portal's announcements forum (
HR Portal-Announcements). You must move out the discussion topics from the announcements forum to the discussions forum used by your portal. -
In the WebCenter Portal administration, set the permissions for announcements and discussions as per your requirements.
For information about managing portal security, see "Managing Roles and Permissions for a Portal" in Building Portals with Oracle WebCenter Portal. For more information about announcement and discussion security, see Section I.2.8.1, "About Migration of Announcements and Discussions."
-
On the Discussions Server Admin Console, remove all forum-specific explicit security settings. This is applicable if you are moving forums to a category and a forum overrides the security derived from the parent category provisioned for the target portal.
To remove permissions, from the Forum Options navigation list, select Permissions. Then, on the Permission Summary tab, in the Remove column, click the Remove icon to remove all the permissions for a user. Perform this action for all users and groups (Figure I-9).
From the Forum Options navigation list, select Admins/Moderators, and remove all users and groups listed on the Permission Summary tab.
Figure I-9 Removing Forum-Specific Permissions
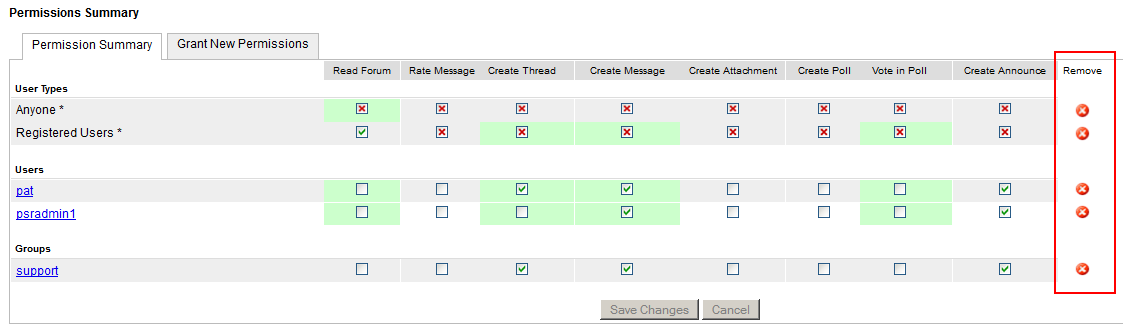
Description of ''Figure I-9 Removing Forum-Specific Permissions''
Once you move discussion topics or forums, the Discussions system page will start displaying all your topics/forums appropriately. However, your migrated pages containing the discussion task flows will stop showing discussions because you have moved the topics/forums to another location. To fix this, you will next create a mapping file containing the mapping of old and new discussion IDs, and run a WLST command by providing the mapping file.
-
-
Create a mapping
.csvfile containing the mapping of the old and new forum and category IDs.For example, suppose you moved announcements from a forum whose ID is 6 to the
HR Portal-Announcementsforum whose ID is 8. You also moved data from a discussion forum with ID 3 to your portal's discussion forum that has the ID 5. Further, you moved forums belonging to a category with ID 2 to another category with the ID 3. Your mapping file will contain the following entries:#old id, new id a6, a8 f3, f5 c2, c3
Where,
arefers to an announcement forum,frefers to a discussions forum, andcrefers to a category.Note:
Ensure that the mapping.csvfile contains accurate and complete details about the old and new IDs. If the details are not correct, announcements and discussions will not be accessible in your target portal in WebCenter Portal.You will need to provide the path to this
.csvfile when you run the WLST command in the next step. -
Run the
migrateFrameworkApplicationDiscussionsToWebCenterWLST command to fix parameters in your page definitions after which announcements and discussions will display correctly when you access your portal pages that contain the announcement and discussion task flows.migrateFrameworkApplicationDiscussionsToWebCenter(appName, server, targetPortal, discussionsMappingFile, migrationDirectory, [applicationVersion])
For information about the command syntax, see "migrateFrameworkApplicationDiscussionsToWebCenter" in WebLogic Scripting Tool Command Reference. For information about how to run WLST commands, see Section 1.13.3.1, "Running Oracle WebLogic Scripting Tool (WLST) Commands."
-
Restart the Node Manager and all servers.
With this, you have successfully reconciled your announcements and discussions usage to the portal server model.
I.2.8.3 Output Generated by migrateFrameworkApplicationDiscussionsToWebCenter
When you run the migrateFrameworkApplicationDiscussionsToWebCenter WLST command, the FwkAppMigrationReport.log file is updated and the FwkAppDiscussionMigrationDiagnostic.log file is generated in the directory specified in the migrationDirectory parameter.
FwkAppMigrationReport.log
The FwkAppMigrationReport.log file contains high-level migration details such as the number of artifacts successfully migrated and those that failed to be migrated. When you run the migrateFrameworkApplicationDiscussionsToWebCenter WLST command, discussion and announcement-related details are appended to FwkAppMigrationReport.log. For example, the file may contain the sample entries:
-------------------------------------------------------
Discussions Migration
-------------------------------------------------------
3 files modified to fix discussion ids
Fixing up discussion ids successfully completed
FwkAppDiscussionMigrationDiagnostic.log
Running the migrateFrameworkApplicationDiscussionsToWebCenter WLST command generates the FwkAppDiscussionMigrationDiagnostic.log file. It contains details such as the discussion IDs updated based the discussions mapping file. The following is the sample output of a FwkAppDiscussionMigrationDiagnostic.log file:
-----------------------------------------------------------
WebCenter Framework Application Discussions Migration Log File
-----------------------------------------------------------
#############################################################################
Executing migration wlst command migrateFrameworkApplicationDiscussionsToWebCenter
#############################################################################
[TRACE]: Entering class: FwkAppMigration, method: migrateFrameworkApplicationDiscussionsToWebCenter
[TRACE]: Parameters provided are: appName: webcenter, server: WC_Spaces, targetPortal: FwkAppPortal1, migrationDirectory: /scratch/migration/migration_log/migrationLog-2016_05_09, discussionsMappingFile: /tmp/DiscussionsMappingFile.csv,applicationVersion:
[TRACE]: The migration directory default/specified: /scratch/migration/migration_log/migrationLog-2016_05_09 has necessary permissions
[TRACE]: Discussion mapping file: /tmp/DiscussionsMappingFile.csv
[TRACE]: Entering the class: DiscussionMigrationUtil, method: validateMappingFile with parameters, migrationDiscussionsMappingFile: /tmp/DiscussionsMappingFile.csv, migrationDirectory: /scratch/migration/migration_log/migrationLog-2016_05_09
[TRACE]: Migration discussion mapping file data: a6,a8
[TRACE]: Migration discussion mapping file data: f1,f9
[TRACE]: Migration discussion mapping file data: c4,c5
[SUCCESS]: The discussion migration mapping file validation is successful.
[SUCCESS]: validation completed successfully on discussions mapping file.
[SUCCESS]: Obtained Portal GUID used for discussions migration: s0fd1c1cc_00e3_4e0a_9bb1_f2bffc1001d5
[SUCCESS]: Export of MDS documents is complete.
[TRACE]: Starting migration of MDS documents.
[TRACE]: Entering the class: DiscussionMigrationUtil, method: migrateDiscussions with parameters, scope: FwkAppPortal1 (guid=s0fd1c1cc_00e3_4e0a_9bb1_f2bffc1001d5), migrationDirectoryPath: /scratch/migration/migration_log/migrationLog-2016_05_09
[TRACE]: migration map entry line (1): a6,a8
[TRACE]: migration map entry line (2): f1,f9
[TRACE]: migration map entry line (3): c4,c5
[TRACE]: In the File: /scratch/migration/migration_log/migrationLog-2016_05_09/portal-data/discussions-mds-export/pageDefs/oracle/webcenter/page/scopedMD/s0fd1c1cc_00e3_4e0a_9bb1_f2bffc1001d5/Page14PageDef.xml, for taskflow /oracle/webcenter/collab/forum/view/taskflows/main-task-flow.xml#forum-main, Category Id 4 is replaced with id 5
[TRACE]: In the File: /scratch/migration/migration_log/migrationLog-2016_05_09/portal-data/discussions-mds-export/pageDefs/oracle/webcenter/page/scopedMD/s0fd1c1cc_00e3_4e0a_9bb1_f2bffc1001d5/Page15PageDef.xml, for taskflow /oracle/webcenter/collab/announcement/view/taskflows/main-view-definition.xml#announcement-main-view, Announcement Id 6 is replaced with id 8
[TRACE]: In the File: /scratch/migration/migration_log/migrationLog-2016_05_09/portal-data/discussions-mds-export/pageDefs/oracle/webcenter/page/scopedMD/s0fd1c1cc_00e3_4e0a_9bb1_f2bffc1001d5/Page5PageDef.xml, for taskflow /oracle/webcenter/collab/forum/view/taskflows/main-task-flow.xml#forum-main, Forum Id 1 is replaced with id 9
[SUCCESS]: Migration of MDS documents is complete.
[TRACE]: Importing the modified MDS documents.
[SUCCESS]: Successfully imported the modified MDS documents.
Framework Application discussions migration is complete.
I.3 Portal Framework Application Migration Details
This section provides information about how migration of artifacts such as pages, assets, and lists, is handled in the background when you migrate a Portal Framework application to WebCenter Portal.
It includes the following sections:
I.3.1 Pages
Pages are the fundamental building blocks of a Portal Framework application that are used to expose the different types of content you want to provide to your users.
Pages in a Portal Framework Application
In a Portal Framework application, you can create pages at design time and runtime. By default, pages are stored under the following locations:
-
Runtime pages:
/oracle/webcenter/portalapp/pagehierarchy -
Design time pages and their page definitions files:
/oracle/webcenter/portalapp/pagesThis is the recommended location for design time pages. You can choose to store your pages at any other location. A page definition file also gets stored in the same MDS namespace as the page's
.jspxfile.
Page hierarchy is managed through pages.xml available in /oracle/webcenter/portalapp/pagehierarchy. For every page that has child pages, there is a separate pagePages.xml that references the parent pages.xml.
By default, an application's navigation model is defined in default-navigation-model.xml. Typically, the pages in your application are accessible by being explicitly included in the application's navigation, or referenced through the pages.xml page query if pages have been included in the page hierarchy.
Pages in WebCenter Portal
In the WebCenter Portal application, pages and artifacts of a portal are created at the following path: oracle/webcenter/page/scopedMD/<scopeGUID>/. Page hierarchy is not maintained through pages.xml. This file simply contains a reference to all the pages available in the portal. Instead, the portal hierarchy is maintained through the portal navigation file portal-default-navigation.xml, stored at /oracle/webcenter/siteresources/scopedMD/scopeGUID/navigation/GSRID/. You can edit this file to add other navigation items. However, you cannot rename the file or use another file to manage portal navigation.
Migration of Pages
During migration of a Portal Framework application, all pages found under the default paths are migrated to the target portal, and the application's default navigation file is used to build the target portal's navigation.
If your application's pages are stored at locations other than the default location, before starting the migration procedure you must import such pages into the MDS. Then while running the migrateFrameworkApplicationToWebCenter WLST command, you need to specify the pagePath parameter to migrate the pages. Further, if your application uses a custom navigation file, you need to specify its path in the navigationFile parameter while running the WLST command.
For example, in the code given below, all the pages found under the default paths in hrapp are migrated to HR Portal. In addition, pages at the location specified in the pagePath parameter are migrated. The navigationModel1.xml file is used to build the navigation model for HR Portal.
migrateFrameworkApplicationToWebCenter(appName='webcenter', fwkAppName='hrapp', fwkAppServer='WC_Spaces', migrationDirectory='/tmp/mig1', targetPortal='HR Portal', pagePath='/com/xyz/hr/pages,/com/xyz/hr/pages', navigationFile='/oracle/webcenter/portalapp/navigations/navigationModel1.xml')
Page-Related Output Generated by migrateFrameworkApplicationToWebCenter
When you run the migrateFrameworkApplicationToWebCenter command, the following page-related files are generated and stored in the location specified in the migrationDirectory parameter:
-
pages/migratedPages.properties: Contains a mapping of the Portal Framework application pages migrated to the target portal. For example, Figure I-10 shows thatPage1.jspxis migrated internally asPage7.jspx.Figure I-10 The migratedPages.properties File
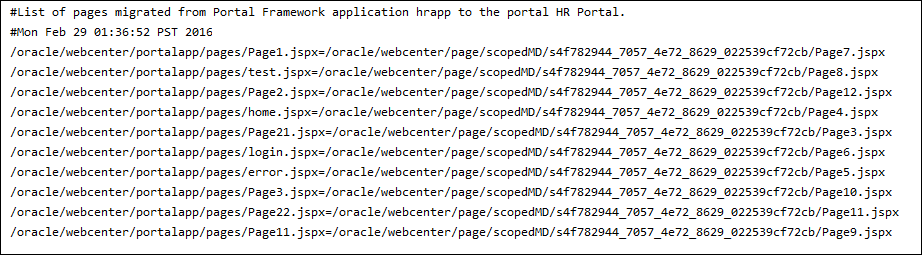
Description of ''Figure I-10 The migratedPages.properties File''
-
pages/migratedPagesWithOverridePolicy.properties: Contains a mapping of the Portal Framework application pages migrated to the target portal that override security (Figure I-11).Figure I-11 The migratedPagesWithOverridePolicy.properties File

Description of ''Figure I-11 The migratedPagesWithOverridePolicy.properties File''
-
pages/fwkAppPageDef.properties: Contains mappings of pages and their page definition files in the Portal Framework application. This file is used to identify the appropriate page definition for a page during migration (Figure I-12).Figure I-12 The fwkAppPageDef.properties File
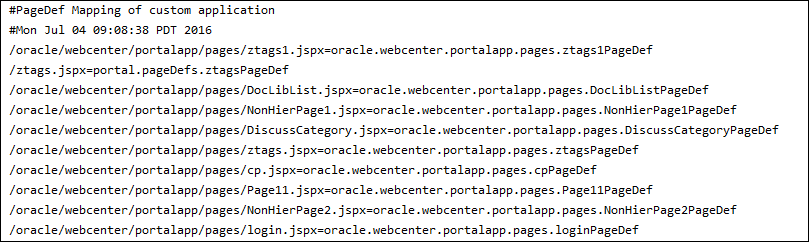
Description of ''Figure I-12 The fwkAppPageDef.properties File''
-
logs/FwkAppMigrationReport.log: Contains high-level page details such as the number of pages considered for migration, migrated successfully, or failed to be migrated (Figure I-13).Figure I-13 The FwkAppMigrationReport.log File

Description of ''Figure I-13 The FwkAppMigrationReport.log File''
-
logs/FwkAppMigrationDiagnostic.log:Contains detailed logs specifying which pages were successfully migrated and the reason if any pages could not be migrated. It also lists other details such as which navigation file was used (Figure I-14).Figure I-14 The FwkAppMigrationDiagnostic.log File
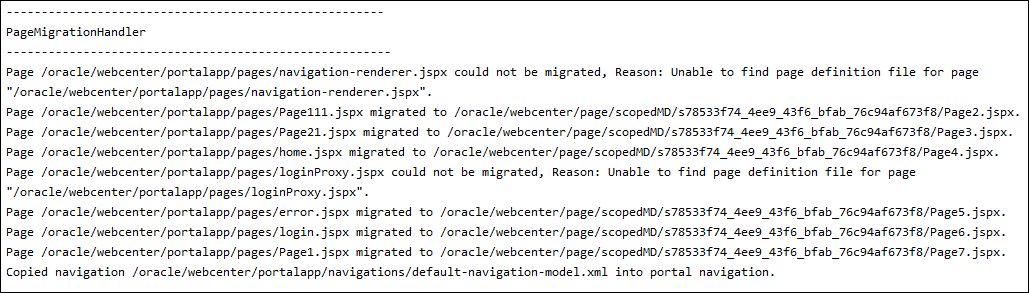
Description of ''Figure I-14 The FwkAppMigrationDiagnostic.log File''
What You Should Know
-
In a Portal Framework application, it is possible to create a page without creating its page definition file. During migration, if a page does not have a corresponding page definition file, it is not migrated to the target portal. You need to create the page definition file and then attempt the migration again.
-
When pages are migrated, their page templates usage (if any) are defaulted to use the template configured at the portal level. This template at the portal level can be changed to the desired page template asset after migration. Alternatively, individual page templates can be changed to the desired page template at the page-level settings.
-
If your pages are at any other location other than
/oracle/webcenter/portalapp/pages, you need to import them into MDS so that they can be considered for migration, as described in Section I.2.1, "Importing Pages from Non-Default Locations into MDS." Then while running themigrateFrameworkApplicationToWebCenterWLST command, you need to specify thepagePathargument. -
For all migrated pages, the page security settings specified at the target portal level are used. In a Portal Framework application if a page had overridden the security, it will continue to override the security in the target portal as well.
-
During migration, all page links, pretty URIs, and other resource paths get updated to reflect the new updated paths.
-
When you re-run the
migrateFrameworkApplicationToWebCenterWLST command, only those pages that failed to be migrated previously or are new since the previous migration attempt are considered for migration. Each time you run the command, the portal navigation is dropped and re-created.
I.3.2 Assets
When you migrate a Portal Framework application, the following assets (previously referred as resources), if present, are migrated to WebCenter Portal:
-
Content Presenter template
-
Data control
-
Navigation model
-
Page template
-
Page style
-
Resource catalog
-
Skin
-
Task flow
-
Task flow style
A Portal Framework application includes certain seeded, or default, portal assets. While building the application, you could choose to use the default assets or create your own custom assets to meet your particular requirements. When you migrate your application, only custom assets are migrated to WebCenter Portal. Seeded assets are not migrated as they already exist on the portal server.
Assets of a Portal Framework application are migrated as shared assets on the portal server. Each time you rerun the migrateFrameworkApplicationToWebCenter WLST command to migrate your application, custom assets on the portal server are overwritten with the custom assets from the Portal Framework application.
The migrateFrameworkApplicationToWebCenter WLST command generates the migratedAssets.properties file under the assets directory in the location specified in the migrationDirectory parameter. Figure I-15 shows the sample output of migratedAssets.properties. It shows the old and new paths for the migrated assets, skin and navigation model.
Figure I-15 The migratedAssets.properties File

Description of ''Figure I-15 The migratedAssets.properties File''
Asset-related logs are also stored in the FwkAppMigrationReport.log and FwkAppMigrationDiagnostic.log files under the logs directory. For information about these files, see Section I.3.1, "Pages."
I.3.3 Lists
The data related to the lists service is stored in tables in the WEBCENTER schema of a Portal Framework application. During migration, the data is migrated to the corresponding tables in the WEBCENTER schema used by WebCenter Portal.
After migrating your Portal Framework application to the target portal, you need to enable the Lists service manually if your portal pages contain Lists task flows.
I.3.4 People Connection
The data related to the people connections service is stored in tables in the WEBCENTER schema of a Portal Framework application. During migration, the data is migrated to the corresponding tables in the WEBCENTER schema used by WebCenter Portal.
I.3.5 Portlets
All the portlets and their metadata are migrated to WebCenter Portal when you migrate your Portal Framework application. During migration, the portlet metadata is exported from the Portal Framework application's MDS and re-imported into WebCenter Portal's MDS.
If a portlet producer is down at the time of migration, the corresponding portlets are not migrated. Before starting the migration ensure the portlet producer is up and running, and then you can attempt to migrate your application again.
I.3.6 Links and Tags
The data related to the links and tagging services is stored in the tables present in the WEBCENTER schema of a Portal Framework application. During migration, the data is migrated to the corresponding tables in the WEBCENTER schema used by WebCenter Portal. The resources are updated to use new resource paths in the target portal if applicable.
I.3.7 Activity Stream
The data related to the activity stream service is stored in the tables present in the WEBCENTER schema of a Portal Framework application. Activity Stream data can be liked and commented upon by users. This data is also stored in WEBCENTER. During migration, all the activity stream data is migrated to the tables in the WEBCENTER schema used by WebCenter Portal.
I.3.8 Security
The following security-related changes are performed when you migrate your Portal Framework application to the target portal in WebCenter Portal:
-
If a custom role contains permissions related to assets, relationship, and profile or application-level permission, post migration this role is created at the portal server level. If a custom role contains page permissions, post migration this role is created in the target portal.
If the custom role contains all the permissions listed above, post migration the roles are created in both the target portal and at the portal server level.
-
Permissions and users and groups granted to roles in a Portal Framework application are carried over to the portal server roles.
-
Members of the seeded Administrator role in a Portal Framework application are added to the WebCenter Portal Administrator and Portal Moderator roles. Members of the seeded AppConnectionManager and AppConnectionViewer roles are added to WebCenter Portal Server Administrator role.
-
In a Portal Framework application, default permission could be granted to users, groups, and application roles that were applicable to all the pages except the pages that override security. Only users and groups membership, and not the permissions, is carried over, and they are made members of the target portal.
-
Custom page permissions are carried over to portal pages. The users or groups who have been granted privileges on pages cannot access the pages unless they are member of the portal. Post migration they are granted the Portal Viewer role in the target portal.
-
In a Portal Framework application, pages might be stored in a non-default location, and the application might use a custom navigation model. For these pages to appear in WebCenter Portal, permissions are granted on their page definitions files to the anonymous or authenticated role. Post migration, these grants are not carried over and the pages follow the security model defined for the portal pages.
The following security settings are not migrated:
-
The grants on the seeded Administrator role in Portal Framework application are not migrated to the WebCenter Portal Administrator role. Only membership is carried over.
-
Only custom page permissions granted to the anonymous-role and authenticated-role are carried over to WebCenter Portal. No other permissions granted to these roles are carried over.
-
In a Portal Framework application, you could specify application roles as members of another application role or the Default Permission node. This is not supported in WebCenter Portal, and therefore only users and group membership is carried over to the custom role in WebCenter Portal.
-
Any overridden asset permission in a Portal Framework application is not carried over to WebCenter Portal. If required, you can override the permissions manually.
-
In a Portal Framework application, you could grant permissions for individual task flows to provide custom access to users for each task flow. During migration of your application, task flow permissions are not migrated. If you created a custom permission class, it is also not migrated to the portal server. You must use the permission classes available on the portal server.
I.4 Troubleshooting Portal Framework Application Migration Issues
This section describes how to troubleshoot the issues that you might encounter while migrating a Portal Framework application to WebCenter Portal.
It includes the following sections:
-
Section I.4.1, "Pages Not Migrated due to Missing Page Definition Files"
-
Section I.4.3, "Unable to Access Task Flows Due to Connection Errors"
-
Section I.4.5, "Unable to Access the Specified Migration Directory"
I.4.1 Pages Not Migrated due to Missing Page Definition Files
Problem
The logs show that a page was not migrated because of the missing page definition file. The log contains the following entry:
Page /oracle/webcenter/portalapp/pages/navigation-renderer.jspx could not be migrated, Reason: Unable to find page definition file for page "/oracle/webcenter/portalapp/pages/navigation-renderer.jspx".
Solution
During migration, if a page does not have a corresponding page definition file, it is not migrated to the target portal. Create the page definition file and then attempt the migration again.
I.4.2 Page Template Not Rendering Post Migration
Problem
Your Portal Framework application was configured to use a custom page template based on the swooshy page template. After migration, the page template is not rendering correctly in the target portal. The image used in the page template is missing and the links on top, such as the Welcome message, Administration, Back to Portal, and Login/Logout links, are not clearly visible as they are displayed in white.
Solution
When you migrate your Portal Framework application, static resources such as images and style and any custom code used in a page template are not migrated automatically. Ensure that you deploy all custom resources and code as a shared library in WebCenter Portal to make them available in the target portal. For information, see Section I.2.5, "Migrating Static Resources."
You need to ensure that the custom code is relevant in the WebCenter Portal environment. For example, in the swooshy page template, the Administration link is rendered in a Portal Framework application based on whether the user is assigned to the Administrator role. Whereas, the Administrator role is not relevant in WebCenter Portal. Similarly, login and logout operations in WebCenter Portal are also handled differently than a Portal Framework application.
It is recommended that after migration you build and use a custom portal template based on one of the default portal templates and modify it according to your requirement.
I.4.3 Unable to Access Task Flows Due to Connection Errors
Problem
Your Portal Framework application contains two connections to a mail server. After migration, when you access the mail task flow in the target portal, the following error message is displayed:
No default or active connection available for: oracle.webcenter.collab.mail
Solution
In WebCenter Portal, it is mandatory to specify a default connection for a service to function. If your Portal Framework application contains only one mail server connection, whether or not it is specified as the default connection, after migration it is marked as default on the portal server. If your application contain multiple connections of the same type (say, mail server connection), and none is set as the default, then after migration no connection of that type is marked as default on the portal server. After migration, you must set a default connection manually.
For the mail task flow to function, set a mail server connection as the default connection for WebCenter Portal. For information, see the "Choosing the Active (or Default) Mail Server Connection" section in Administering Oracle WebCenter Portal.
Review the FwkAppConnectionMigrationDiagnostic.log file, and if it contains messages as shown in the following sample log, ensure that you set a default connection for all the required services:
IMP connection: Either no connection exists or multiple connections exist, hence not setting default connection.
Mail connection: Either no connection exists or multiple connections exist, hence not setting default connection.
SES connection: Either no connection exists or multiple connections exist, hence not setting default connection.
Personal Event connection: Either no connection exists or multiple connections exist, hence not setting default connection.
I.4.4 Pages Not Migrated
Problem
While reviewing your target portal after migration you notice that a few pages from your Portal Framework application have not been migrated and are not listed in the portal navigation.
Solution
During migration, only the pages stored at the default location are migrated to the target portal. If your Portal Framework application contains pages that are stored at a non-default location, you need to import such pages into the MDS manually to ensure they are picked up for migration. While running the migrateFrameworkApplicationToWebCenter WLST command, you need to specify the non-default location of pages in the pagePath parameter to migrate such pages to WebCenter Portal. For information, see Section I.2.1, "Importing Pages from Non-Default Locations into MDS" and Section I.2.3, "Running migrateFrameworkApplicationToWebCenter to Migrate a Portal Framework Application."
I.4.5 Unable to Access the Specified Migration Directory
Problem
The attempt to migrate your Portal Framework application returns an error indicating that the migration process could not create or access the directory specified in the migrationDirectory parameter of the WLST command to store migration data.
Solution
When migrating a Portal Framework application in a multi-node setup, in the migrationDirectory parameter of the WLST command specify a shared directory that can be accessed and written onto from all nodes. Also, ensure that the directory is accessible using the same path from all nodes.