32 Configuring the Policy and Credential Store
This chapter describes how to configure the policy and credential store to use either an Oracle database or external LDAP server in place of the default file-based LDAP.
Caution:
When WebCenter Portal is first installed, the policy and credential store is configured to use an XML file-based LDAP. Although you can use the file-based store for single-node development environments, for production and high availability environments your policy and credential store must be configured to use an Oracle database (recommended), or external LDAP.
You can reassociate the policy and credential store for your WebCenter Portal domain with either Oracle RDBMS (releases 10.2.0.4 or later; releases 11.1.0.7 or later; and releases 11.2.0.1 or later), or Oracle Internet Directory 11gR1 or 10.1.4.3. For the steps to configure an Oracle database as the policy and credential store, see the "Using a DB-Based OPSS Security Store" section in Securing Applications with Oracle Platform Security Services. If the reassociation fails, see the "Reassociation Failure" section in Securing Applications with Oracle Platform Security Services.
Note:
When you reassociate the policy and credential store to use an external LDAP-based store, the credential store and policy store must be configured to use the same LDAP server. Similarly with using an Oracle database, the credential store and policy store must be configured to use the same database. The identity store can, however, use any of the other supported LDAP servers; it does not need to use the same LDAP server as the policy and credential stores.Caution:
Before reassociating the policy store, be sure to back up the relevant configuration files:-
jps-config.xml -
system-jazn-data.xml
As a precaution, you should also back up the boot.properties file for the Administration Server for the domain.
Permissions:
To perform the tasks in this chapter, you must be granted the WebLogic ServerAdmin role through the Oracle WebLogic Server Administration Console. Users with the Monitor or Operator roles can view security information but cannot make changes.
See also, Section 1.8, "Understanding Administrative Operations, Roles, and Tools."
This chapter contains the following sections:
-
Section 32.2, "Reassociating the Credential and Policy Store Using Fusion Middleware Control"
-
Section 32.3, "Reassociating the Credential and Policy Store Using WLST"
-
Section 32.6, "Configuring Self-Registration By Invitation in WebCenter Portal"
-
Section 32.7, "Setting the Policy Store Refresh Interval and Other Cache Settings"
32.1 Creating a root Node
The first step in reassociating the policy and credential store with OID, is to create an LDIF file in the LDAP directory and add a root node under which all data is added. To create the root node, follow the steps in the "Prerequisites to Using an LDAP-Based Security Store" section in Securing Applications with Oracle Platform Security Services. After creating the file and adding the node, continue by reassociating the store using either Fusion Middleware Control or WLST.
32.2 Reassociating the Credential and Policy Store Using Fusion Middleware Control
Before reassociating the policy and credential store with Oracle Internet Directory, you must first have created the root node as described in the "Prerequisites to Using an LDAP-Based Security Store" section in Securing Applications with Oracle Platform Security Services. After creating the root node, follow the steps in the "Reassociating with Fusion Middleware Control" section in Securing Applications with Oracle Platform Security Services. If the reassociation fails, see the "Reassociation Failure" section in Securing Applications with Oracle Platform Security Services.
32.3 Reassociating the Credential and Policy Store Using WLST
Before reassociating the policy and credential store with Oracle Internet Directory, you must first have created the root node as described in the "Prerequisites to Using an LDAP-Based Security Store" section in Securing Applications with Oracle Platform Security Services. If the reassociation fails, see the "Reassociation Failure" section in Securing Applications with Oracle Platform Security Services.
To reassociate the Credential and Policy Store using WLST:
-
Start WLST as described in Section 1.13.3.1, "Running Oracle WebLogic Scripting Tool (WLST) Commands."
-
Connect to the Administration Server for the target domain with the following command:
connect('username>,'password', 'host_id:port')where:
-
usernameis the administrator account name used to access the Administration Server (for example,weblogic) -
passwordis the administrator password used to access the Administration Server (for example,weblogic) -
host_idis the server ID of the Administration Server (for example,example.com) -
portis the port number of the Administration Server (for example,7001).
-
-
Reassociate the policy and credential store using the
reassociateSecurityStorecommand:reassociateSecurityStore(domain="domain_name", admin="admin_name", password="password", ldapurl="ldap_uri", servertype="ldap_srvr_type", jpsroot="root_webcenter_xxxx")
Where:
-
domain_namespecifies the domain name where reassociation takes place. -
admin_namespecifies the administrator's user name on the LDAP server. The format iscn=usrName. -
passwordspecifies the password associated with the user specified for the argumentadmin. -
ldap_urispecifies the URI of the LDAP server. The format isldap://host:port, if you are using a default port, orldaps://host:port, if you are using a secure LDAP port. The secure port must have been configured to handle an anonymous SSL connection, and it is distinct from the default (non-secure) port. -
ldap_srvr_typespecifies the kind of the target LDAP server. SpecifyOIDfor Oracle Internet Directory. -
root_webcenter_xxxxspecifies the root node in the target LDAP repository under which all data is migrated. Be sure to include thecn=. The format iscn=nodeName.
All arguments are required. For example:
reassociateSecurityStore(domain="myDomain", admin="cn=adminName", password="myPass", ldapurl="ldaps://myhost.example.com:3060", servertype="OID", jpsroot="cn=testNode")
-
32.4 Managing Credentials
Administrators can manage credentials for the WebCenter Portal domain credential store using Fusion Middleware Control. For more information, see the "Managing Credentials with Fusion Middleware Control" section in Securing Applications with Oracle Platform Security Services.
32.5 Managing Users and Application Roles
This section describes how you can use Fusion Middleware Control, WLST, and the runtime administration pages in WebCenter Portal and Portal Framework applications to manage users and application roles.
This section contains the following subsections:
32.5.1 Granting the WebCenter Portal Administrator Role
WebCenter Portal only recognizes users in the identity store that is mapped by the first authenticator. Since the WebCenter Portal Administrator account is initially created only in the embedded LDAP server, if an external LDAP such as Oracle Internet Directory is configured as the primary authenticator for WebCenter Portal, you must also create a user in that LDAP and grant that user the WebCenter Portal Administrator role.
You can grant a user the WebCenter Portal Administrator role using Fusion Middleware Control or WLST as shown below in the sections on:
-
Section 32.5.1.1, "Granting the WebCenter Portal Administrator Role Using Fusion Middleware Control"
-
Section 32.5.1.2, "Granting the WebCenter Portal Administrator Role Using WLST"
For more information, see the "Granting Administrator Privileges to a Non-Default User" section in Installation Guide for Oracle WebCenter Portal.
32.5.1.1 Granting the WebCenter Portal Administrator Role Using Fusion Middleware Control
This section describes how to grant the WebCenter Portal administrator role to a user account other than the default "weblogic" account.
To grant the WebCenter Portal Administrator role using Fusion Middleware Control:
-
Log into Fusion Middleware Control and navigate to the WebCenter Portal home page.
See Section 6.2, "Navigating to the Home Page for WebCenter Portal."
-
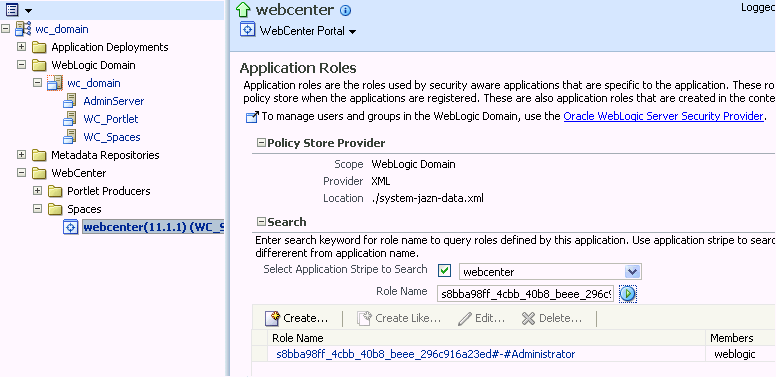
From the WebCenter Portal menu, select Security -> Application Roles.
The Application Roles page displays (see Figure 32-1).
-
Search for the WebCenter Portal Administrator role:
-
Select Select Application Stripe to Search.
-
Select
webcenter. -
In the Role Name field, enter the following internal identifier for the Administrator role, and then click the Search (arrow) icon:
s8bba98ff_4cbb_40b8_beee_296c916a23ed#-#Administrator
The search should return
s8bba98ff_4cbb_40b8_beee_296c916a23ed#-#Administrator, which is the administrator role identifier. -
-
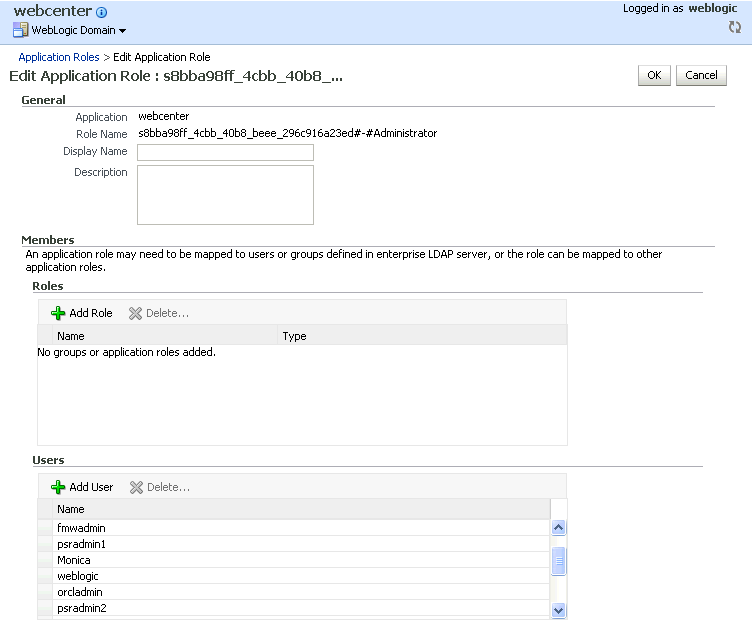
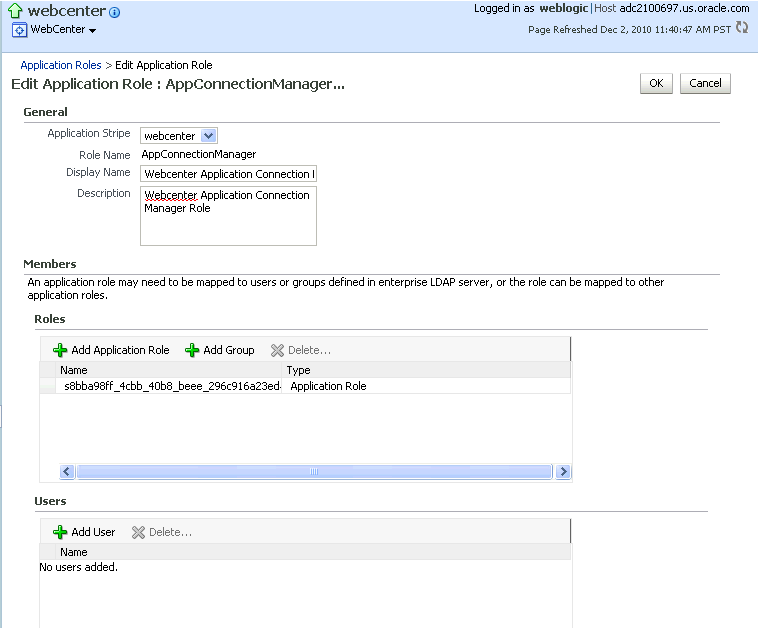
Click the administrator role identifier in the Role Name column.
The Edit Application Role page displays (see Figure 32-2).
-
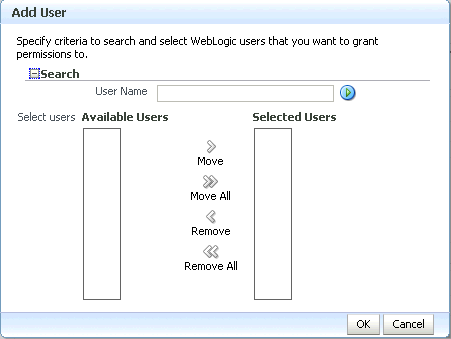
Click Add User.
The Add User pop-up displays (see Figure 32-3).
-
Use the Search function to search for the user to whom to assign the Administrator role.
-
Use the arrow keys to move the user from the Available Users column to the Selected Users column, and click OK.
-
On the Edit Application Role page, click OK.
-
To remove the weblogic role, on the Edit Application Role page under Users, click
weblogicand then click Delete. -
Restart the
WC_Spacesmanaged server.When you log into WebCenter Portal, the Administration link should appear and you should be able to perform all administrator operations.
32.5.1.2 Granting the WebCenter Portal Administrator Role Using WLST
To grant the WebCenter Portal Administrator role to another user using WLST:
-
Start WLST as described in Section 1.13.3.1, "Running Oracle WebLogic Scripting Tool (WLST) Commands."
-
Connect to the WebCenter Portal Administration Server for the target domain with the following command:
connect('user_name','password, 'host_id:port')Where:
-
user_nameis the name of the user account with which to access the Administration Server (for example,weblogic) -
passwordis the password with which to access the Administration Server -
host_idis the host ID of the Administration Server -
portis the port number of the Administration Server (for example,7001).
-
-
Grant the WebCenter Portal administrator application role to the user in Oracle Internet Directory using the
grantAppRolecommand as shown below:grantAppRole(appStripe="webcenter", appRoleName="s8bba98ff_4cbb_40b8_beee_296c916a23ed#-#Administrator", principalClass="weblogic.security.principal.WLSUserImpl", principalName="wc_admin")Where
wc_adminis the name of the administrator account to create. -
To test the new account, log into WebCenter Portal using the new account name.
The Administration link should appear, and you should be able to perform all administrator operations.
-
After granting the WebCenter Portal Administrator role to new accounts, remove this role from accounts that no longer need or require it using the WLST
revokeAppRolecommand. For example, if WebCenter Portal was installed with a different administrator user name thanweblogic, the administrator role should be given to that user and should be revoked from the defaultweblogic.revokeAppRole(appStripe="webcenter", appRoleName="s8bba98ff_4cbb_40b8_beee_296c916a23ed#-#Administrator", principalClass="weblogic.security.principal.WLSUserImpl", principalName="weblogic")
32.5.2 Granting Application Roles
This section describes how to add users to application roles using Fusion Middleware Control and WLST commands.
This section contains the following subsections:
32.5.2.1 Granting Application Roles Using Fusion Middleware Control
This section describes how to grant an application role to users using Fusion Middleware Control.
-
Log in to Fusion Middleware Control and navigate to the home page for WebCenter Portal or your Portal Framework application. For more information, see:
-
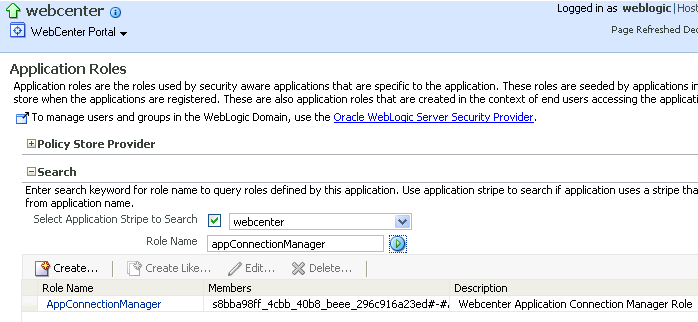
From the WebCenter Portal menu, select Security -> Application Roles.
The Application Roles page displays (see Figure 32-4).
-
Search for the WebCenter Portal or Portal Framework application role:
-
Select Select Application Stripe to Search.
-
Sect the application stripe (
webcenterfor WebCenter Portal). -
In the Role Name field, enter the name of the role you are looking for (for example,
appConnectionManager), and then click the Search (arrow) icon:If you are not sure of the name, enter a partial search term or leave the field blank to display all the application roles.
-
-
Click the role identifier in the Role Name column.
The Edit Application Role page displays (see Figure 32-5).
-
Click Add User.
The Add User pop-up displays (see Figure 32-6).
-
Use the Search function to search for the user to assign the application role to.
-
Use the arrow keys to move the user from the Available Users column to the Selected Users column, and click OK.
-
On the Edit Application Role page, click OK.
-
Restart the managed server on which WebCenter Portal or the Portal Framework application is deployed (for WebCenter Portal this is always
WC_Spaces).
32.5.2.2 Granting Application Roles Using WLST
Use the grantAppRole command to grant an application role to a user. For syntax and usage information, see "grantAppRole" in the WebLogic Scripting Tool Command Reference.
32.5.3 Using the Runtime Administration Pages
WebCenter Portal provides a Security tab from which an administrator can define application roles and grant application roles to users defined in the identity store. For information about managing users and application roles in WebCenter Portal, see the "Managing Users and Roles for WebCenter Portal" section in Using Oracle WebCenter Portal.
Caution:
The "Allow Password Change" property, which specifies whether users can change their passwords within WebCenter Portal, should be carefully controlled for corporate identity stores. WebCenter Portal administrators can set this property from the Profile Management Settings page in WebCenter Portal. For more information, see the "Configuring Profiles" section in Using Oracle WebCenter Portal.Portal Framework applications can provide a similar Security tab for application administrators. For details, see Section 43.4, "Managing Members and Roles for Portal Framework Applications." For more information about role-mapping for ADF-security based Portal Framework applications, see the "What You May Need to Know About Enterprise Roles and Application Roles " section in Fusion Developer's Guide for Oracle Application Development Framework.
32.6 Configuring Self-Registration By Invitation in WebCenter Portal
WebCenter Portal supports self-registration by invitation, as described in the "Enabling Self-Registration By Invitation-Only" section in Using Oracle WebCenter Portal. The self-registration 'by-invitation' feature requires that the WebCenter Portal domain credential store contain the following password credentials:
-
map name = o.webcenter.security.selfreg -
key= o.webcenter.security.selfreg.hmackey -
user name = o.webcenter.security.selfreg.hmackey
To enable 'self-registration by invitation' in WebCenter Portal, use Fusion Middleware Control or the WLST command createCred to create the password credentials detailed above. For example:
createCred(map="o.webcenter.security.selfreg", key="o.webcenter.security.selfreg.hmackey", type="PC",
user="o.webcenter.security.selfreg.hmackey", password="<password>", url="<url>", port="<port>", [desc="<description>"])
For more information, see the "Managing Credentials with WLST Commands" section in Securing Applications with Oracle Platform Security Services.
32.7 Setting the Policy Store Refresh Interval and Other Cache Settings
This section provides recommended cache settings that should be configured after installation. Although settings for cache sizes and maximum group hierarchies should be based on your specific environment, the following sections provide recommendations that you can use as a starting point. For a complete list of tuning parameters and recommended values for WebCenter Portal, see the "Oracle WebCenter Portal Performance Tuning" section in the Performance Tuning Guide.
This section includes the following subsections:
32.7.1 Setting the Policy Store Refresh Interval
The authorization policies used by WebCenter Portal use an in-memory cache with a default policy refresh time of 10 minutes. When a portal is created in a multi-node high availability environment, and you need a node failure to replicate the policy data more quickly, you can shorten the policy store refresh interval by modifying the domain-level jps-config.xml file, and adding the following entry:
oracle.security.jps.ldap.policystore.refresh.interval=<time_in_milli_seconds>
This should be added to the PDP service node:
<serviceInstance provider="pdp.service.provider" name="pdp.service">
Note that the policy refresh interval should not be set to too small a value as the frequency at which the server cached policy is refreshed may impact performance.
After modifying the jps-config.xml file, restart all servers in the domain. For more information, see the "Caching and Refreshing the Cache" section in Securing Applications with Oracle Platform Security Services.
32.7.2 Setting the Connection Pool Cache
This section describes the recommended settings for the connection pool cache.
To set the connection pool cache:
-
Log into the WLS Administration Console.
-
Select Security Realms > [realm] > Providers > [provider] > Configuration > Provider Specific.
-
Set the connection pool cache parameters to the following recommended values:
-
Connection Pool Size = max connection users
-
Connect Timeout =
30 -
Connection Retry Limit =
1 -
Results Time Limit =
1000 -
Keep Alive Enable =
true
-
-
Save your changes and restart all servers in the domain.
32.7.3 Setting User Cache Settings
This section describes the recommended settings for user cache settings.
To set user cache settings:
-
Log into the WLS Administration Console.
-
Select Security Realms > [realm] > Providers > [provider] > Configuration > Provider Specific.
-
Set the user cache parameters to the following recommended values:
-
Cache Enabled =
true -
Cache Size =
3200 -
Cache TTL =
session timeout -
Results Time Limit =
1000 -
Keep Alive Enable =
true
-
-
Save your changes and restart all servers in the domain.
32.7.4 Setting Group Cache Settings
This section describes the recommended settings for group cache settings.
To set group cache settings:
-
Log into the WLS Administration Console.
-
Select Security Realms > [realm] > Providers > [provider] > Performance.
-
Set the group cache parameters to the following recommended values:
-
Enable Group Membership Lookup Hierarchy Caching =
true -
Cache Size =
3200 -
Max Group Hierarchies in Cache =
1024 -
Group Hierarchy Cache TTL =
session timeout -
Keep Alive Enable =
true
-
-
Save your changes and restart all servers in the domain.
