A Using Oracle WebLogic Server Proxy Plug-In for Third-Party Web Servers
This appendix explains how the Oracle WebLogic Server Proxy Plug-In and Oracle SSO Plug-In enable you to use Oracle Fusion Middleware components in conjunction with a third-party HTTP listener.
Note:
Unless otherwise mentioned, the information in this document is applicable when Oracle HTTP Server is installed with Oracle WebLogic Server and Oracle Fusion Middleware Control. It is assumed that readers are familiar with the key concepts of Oracle Fusion Middleware, as described in the Oracle Fusion Middleware Concepts Guide and the Oracle Fusion Middleware Administrator's Guide.For information about installing Oracle HTTP Server in standalone mode, see ”Installing Oracle Web Tier in Stand-Alone Mode” in the Oracle Fusion Middleware Installation Guide for Oracle Web Tier.
This appendix includes the following sections:
Documentation from the Apache Software Foundation is referenced when applicable.
A.1 Plug-in Compatibility
In the 11g environment, the expectation is that the Oracle WebLogic Server Plug-ins will be used instead of OProxy. The expectation is that you are using Oracle WebLogic Server.
Critical Note:
The FMW 10g-based Proxy Plug-In known as the OProxy Plug-In for Oracle HTTP Server 11g and other Web Servers, such as IIS has been deprecated and will be discontinued in a future release. This legacy proxy solution is designed to front-end applications deployed on Oracle Application Server 10g. Oracle Fusion Middleware 11g Applications are now deployed on WebLogic. Oracle HTTP Server 11g includes a built-in proxy module optimized to front-end this environment.If you are using FMW 10g-based Proxy Plug-In, you should migrate to Oracle HTTP Server 11g based proxy solutions for a well integrated deployment or leverage the built-in proxy modules within other Web Servers
The following table recommends which plug-ins to use with various servers and server combinations.
| For These Servers... | Use These Plug-ins... |
|---|---|
| Oracle HTTP Server | Use mod_wl_ohs, the WebLogic plug-in for Oracle HTTP Server. |
| Oracle HTTP Server and iPlanet or Microsoft IIS, but not using Oracle WebLogic Server | Use OProxy, but be careful of limited certifications. It is assumed you will not be using Java or servlets. |
| Both Oracle WebLogic Server and other applications with Oracle HTTP Server | Use both OProxy and mod_wl_ohs, but keep them separate. |
| Microsoft IIS or iPlanet with Oracle WebLogic Server only (no Oracle WebLogic Server) | Use the Oracle WebLogic Server Plug-ins supplied with Oracle WebLogic Server—not OProxy. |
A.2 Deprecated Plug-ins
-
The FMW 10g-based Single Sign-On Plug-In, OSSO Plug-In for Oracle HTTP Server and other web servers. such as IIS, has been deprecated and will be discontinued in future releases.
You should migrate to the FMW 11g-based Oracle Access Manager WebGate for single sign-on functionality. Note that Oracle Access Manager and WebGate must be installed separately. For more information, see Fusion Middleware Administrator's Guide for Oracle Access Management at:
http://docs.oracle.com/cd/E40329_01/admin.1112/e27239/toc.htm -
The FMW 10g-based Proxy Plug-In known as the OProxy Plug-In for Oracle HTTP Server 11g and other Web Servers, such as IIS has been deprecated and will be discontinued in a future release. This legacy proxy solution is designed to front-end applications deployed on Oracle Application Server 10g. Oracle Fusion Middleware 11g Applications are now deployed on WebLogic. Oracle HTTP Server 11g includes a built-in proxy module optimized to front-end this environment.
If you are using FMW 10g-based Proxy Plug-In, you should migrate to Oracle HTTP Server 11g based proxy solutions for a well integrated deployment or use the built-in proxy modules within other Web Servers.
A.3 Using Oracle WebLogic Server Proxy Plug-In
Oracle WebLogic Server Proxy Plug-In enables you to proxy/send requests from a third-party HTTP listener to Oracle Fusion Middleware. The Oracle WebLogic Server Proxy Plug-In is provided and certified to work with Sun Java System Web Server Enterprise Edition on UNIX and Microsoft Windows systems, or Microsoft Internet Information Server (IIS). For more information on using Oracle WebLogic Server Proxy Plug-Ins on these systems, see Using Web Server 1.1 Plug-Ins with Oracle WebLogic Server at:
http://docs.oracle.com/middleware/11119/webtier/PLGWL/toc.htm
For other third-party HTTP listeners, you can use the respective listener's native proxy functionality.
See Also:
http://www.oracle.com/technology/software/products/ias/files/fusion_certification.html for complete certification information.A.4 Using Oracle SSO Plug-In
Oracle SSO Plug-In is designed to protect native third-party listener applications using the Oracle single sign-on (SSO) infrastructure. The Oracle SSO Plug-In is provided and certified to work with Microsoft Internet Information Server (IIS) v6.0 and v7.0 on Microsoft Windows systems.
See Also:
http://www.oracle.com/technology/software/products/ias/files/fusion_certification.html for complete certification informationThis chapter includes the following topics:
-
Section A.4.3, "Registering with the Oracle Single Sign-On Server."
-
Section A.4.5, "Configuring Microsoft IIS 6.0 Listener to Use Oracle Single Sign-On."
-
Section A.4.6, "Configuring Microsoft IIS 7.0 Listener to Use Oracle Single Sign-On."
A.4.1 Overview of Oracle SSO Plug-In
Oracle SSO Plug-In is the Oracle single sign-on (SSO) solution for Microsoft IIS. The plug-in is designed to protect native third-party listener applications using the SSO infrastructure. With the help of the Oracle SSO Plug-In, users can be authenticated to different third-party listener applications using only one SSO password. You can integrate these SSO-protected third-party listener applications with SSO-enabled Oracle HTTP Server applications or legacy Oracle SSO enabled applications as long as they are all protected on the same SSO server.
Oracle SSO Plug-In is a simple version of mod_osso, and only implements some of its basic functionality. Features such as dynamic authentication, global logout, idle timeout, global timeout, and basic authentication for legacy application are not implemented in the current Oracle SSO Plug-In release.
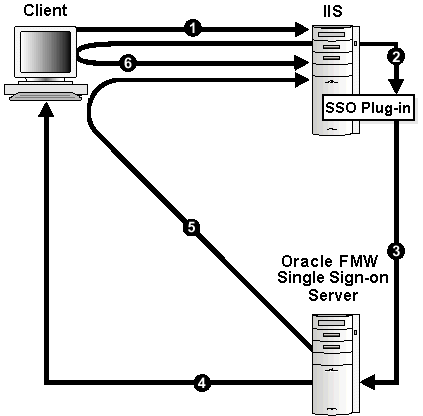
Figure A-1 illustrates the process when a user requests a URL protected by the Oracle SSO Plug-In.
-
The user requests a URL through a Web browser.
-
The Web server looks for an Oracle SSO Plug-In cookie for the user. If the cookie exists, the Web server extracts the user's information and uses it to log the user in to the requested application.
-
If the cookie does not exist, the Oracle SSO Plug-In redirects the user to the single sign-on server.
-
The single sign-on server looks for its own cookie in the browser. If a cookie exists, then the single sign-on server authenticates using the cookie. If authentication is successful, then the single sign-on server creates a cookie in the browser as a reminder that the user has been authenticated. If it finds none, it tries to authenticate the user with a user name and password.
-
The single sign-on server returns the user's encrypted information to the Oracle SSO Plug-In.
-
Oracle SSO Plug-In creates its own cookie for the user in the browser and redirects the user to the requested URL.
During the same session, if the user again seeks access to the same or to a different application, the user is not prompted for a user name and password. The application uses an HTTP header to obtain this information from the Oracle SSO Plug-In session cookie.
See Also:
Oracle Fusion Middleware Security GuideA.4.2 Installing Oracle SSO Plug-In
The Oracle SSO Plug-In for Microsoft IIS is available in the Oracle Fusion Middleware Web Tier and Utilities installer (11.1.1.2 and later full installers, not on patch-set installers).
Location: \Disk1\plugins\iis\oracle_osso.dll
To install the plug-in for the listener, copy oracle_osso.dll to a directory the listener can access. For security reasons, ensure that the plug-in library is given minimum privileges.
Install Oracle SSO Plug-In on a system that has an Oracle Fusion Middleware installation. This installation is required only for the network and security dependent libraries and the single sign-on registration tool. It is not required to be running.
A.4.3 Registering with the Oracle Single Sign-On Server
The single sign-on registration process enables the single sign-on server and the listener to share information such as server location, protocol version, and common encryption key, before they communicate. After the registration process, this information is stored on the single sign-on server side as a single sign-on partner application entry. On the listener side, a single sign-on file called osso_conf is created. The osso_conf file is obfuscated for security purposes. Copy the file to an appropriate location so the listener can access it.
A.4.4 Configuring the Oracle SSO Plug-In
To configure Oracle SSO Plug-In, you must create a configuration file such as the osso_plugin.conf file. This file must reside in a directory that is readable by the third-party listener. You define all the plug-in functionality within the file. It can also be referred as the osso property file. The file contains the following:
-
Plug-in directives such as
LoginServerFileandIpCheck -
A set of rules that match resources to be protected.
A.4.4.1 Oracle SSO Plug-In Directives
Table A-1 lists the configuration directives for the Oracle SSO Plug-In.
Table A-1 Oracle SSO Plug-In Configuration Directives
| Directive | Function |
|---|---|
|
Specifies the location of the single sign-on server configuration file such as the This is a global parameter and should not be used on a per-resource basis. You must provide one and only one single sign-on server configuration file.
|
|
|
Specifies whether the Oracle SSO plug-in should check the IP address of each request when it examines the cookie. Setting it to
Note: Set it to |
A.4.4.2 Rules to Protect Resources
To ensure resource protection via the Oracle SSO Plug-In, a set of rules must be defined. The rules are defined according to the following format:
<OSSO url-matching-rule>
  SSO_configuration_directives
</OSSO>
Use the following rules to define the url-matching-rule:
| Rule Name | Description |
|---|---|
| Exact Match | This option identifies an exact file as a protected resource, for example: /examples/hello.html |
| Context Match | This option identifies a directory as a protected resource, for example: /examples/* |
| Extension Match | This option identifies files with a certain extension in a particular directory as a protected resource, for example: /examples/*.jsp |
When multiple rules apply to the same URL, the following precedence applies:
-
Exact matches
-
Longest context match plus suffix match
-
Longest context match
Some examples of the precedence are:
-
/foo/bar/index.html would take precedence over /foo/bar/*
-
/foo/bar/*.jsp would take precedence over /foo/bar/*
-
/foo/bar/* would take precedence over /foo/*
Example A-1 shows a simple file with the commands for resource protection. In the example, the IpCheck directive is set to false for the /private/hello.html file, but it is set to true for /private2/*.jsp. This setting ensures the cookies used with requests to the /private2/*.jsp files are not accessed by another user.
A.4.5 Configuring Microsoft IIS 6.0 Listener to Use Oracle Single Sign-On
This section provides instructions on configuring the Microsoft IIS 6.0 Listener to use Oracle SSO Plug-In. The plug-in consists of a single .dll file, oracle_osso.dll. To install the plug-in, copy the .dll to the host on which Microsoft IIS 6.0 resides and perform the following steps:
-
Use the Microsoft Windows Registry Editor to create new registry entries.
-
From the Start menu, Select Run, and the type
regeditin the dialog box, and click OK. The Registry Editor window opens -
Expand the HKEY_LOCAL_MACHINE folder by clicking the plus sign (+) preceding its name In the Registry Editor window.
-
Expand the SOFTWARE folder by clicking the plus sign (+) preceding its name, and then Click the ORACLE folder.
-
From the Edit menu, select New > Key. A new folder is added under the ORACLE folder with the name New Key #1.
-
Enter
IIS OSSO Adapterfor the key name. -
From the Edit menu, select New > String Value. A new value is added in the right window pane with the name New Value #1. Enter
cfg_filefor the value name. -
From the Edit menu, select Modify. The Edit String dialog box appears.
-
In the Value data field, enter the full path of the OSSO plug-in configuration file you created (e.g.,
c:\osso\osso_plugin.conf).Note:
This is the plug-in configuration file and not the encryptedosso.conf filegenerated by the SSO registration process. -
Optionally, you can specify log_file and log_level using the procedure specified in steps d.) through h.).
-
Add a string value with the name
log_fileand the desired location of the log file, such asc:\osss\osso_plugin.log. -
Add a string value with the name
log_leveland a value for the desired log level. Valid values aredebug,inform,error, andemerg.
-
-
Close the Registry Editor window by selecting Exit from the File menu.
-
-
Use the Microsoft IIS management console to add a new virtual directory to your Microsoft IIS Web site with the same physical path as that of the
osso.dll.-
Open the IIS Manager by clicking Start -> Programs -> Administrative Tools -> Internet Information Services (IIS) Manager.
-
Expand the server folder by clicking the plus sign (+) preceding the server name.
-
Right-click the Default Sites folder, and then select the New -> Virtual Directory option from the menu.
-
In the Virtual Directory Creation Wizard window, enter osso for the Alias. Then, enter the path or browse to the directory containing the
oracle_osso.dllfile (e.g.,c:\osso) and select the Execute (such as ISAPI applications or CGI) check box. -
Click Finish to close the Virtual Directory Creation Wizard.
-
-
Use the Microsoft IIS management console to add
oracle_osso.dllas a filter in your Microsoft IIS Web site. The name of the filter should be osso and its executable must point to the directory containing theoracle_osso.dllfile.-
Right-click the Default Sites folder, and then select the Properties option from the menu.
-
In the Default Web Site Properties window, select the ISAPI Filters tab.
-
Click Add to add a new filter.
The Add/Edit Filter Properties window is displayed.
-
In the Filter Name field, enter osso for the filter name.
-
In the Executable field, enter the path for the location containing the
oracle_osso.dll(e.g.,c:\osso\oracle_osso.dll), or click the ellipsis button (...) to navigate to the folder that contains theoracle_osso.dllfile.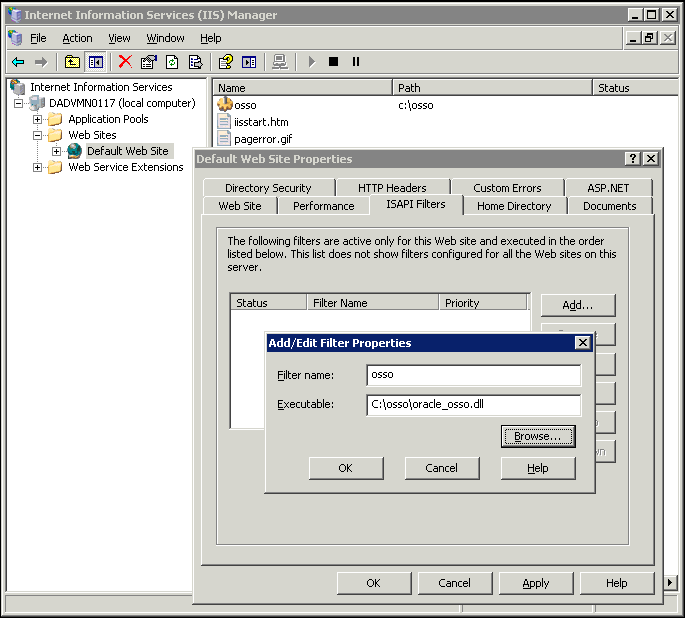
Description of the illustration ''iis6_addfilter_osso.gif''
-
Click OK to close the Add/Edit Filter Properties window.
-
Click OK to close the Default Web Site Properties window.
-
-
Configure security settings for Oracle Home directory. Make sure you login to machine as an administrator user.
-
In Windows Explorer, right-click the
ORACLE_HOME\binfolder, select Properties from the menu, and then click the Security tab. -
Add the IIS_WPG, NETWORK and NETWORK SERVICE groups with Read and Execute permissions.
-
Click OK.
-
-
Stop and restart the Microsoft IIS 6.0 Server.
Notes:
-
To restart Microsoft IIS 6.0, you must stop all the Microsoft IIS 6.0 services through the control panel or restart the computer. This is the only way to ensure that the
.dllfile is reloaded. Restarting Microsoft IIS 6.0 through the management console is not sufficient. -
If you want multiple Oracle installations on the same home, then the
ORACLE_HOME\binPATH entry for the installation that you plan to use in conjunction with the Oracle SSO Plug-In must appear first in your PATH. -
Make sure the newly added ISAPI filter is marked with a green upward arrow.
A.4.6 Configuring Microsoft IIS 7.0 Listener to Use Oracle Single Sign-On
This section provides instructions on configuring the Microsoft IIS 7.0 Listener to use Oracle SSO Plug-In. The plug-in consists of a single .dll file, oracle_osso.dll. To install the plug-in, copy the .dll to the host on which Microsoft IIS 7.0 resides and perform the following steps:
-
Complete step 1 in Section A.4.5, "Configuring Microsoft IIS 6.0 Listener to Use Oracle Single Sign-On" to use the Microsoft Windows Registry Editor to create new registry entries for the plug-in.
-
Use the Microsoft IIS management console to add the
oracle_osso.dllas a filter in your Microsoft IIS Web site:-
Open the IIS Manager by clicking Start -> Programs -> Administrative Tools -> Internet Information Services (IIS) Manager.
-
Expand the server folder by clicking the plus sign (+) preceding the server name (e.g, DSCDAA10-VM6).
-
Expand the Sites folder by clicking the plus sign (+) preceding its name.
-
Click the Default Web Site icon to open the Default Web Site Home page.
-
Double-click the ISAPI Filters icon to open the ISAPI Filters page, and then complete the following tasks:
-
In the Actions pane, click Add to open the Add ISAPI Filter dialog box.
-
In the Filter Name field, enter osso.
-
In the Executable field, enter the file system path for the location containing the
oracle_osso.dll(e.g.,c:\osso\oracle_osso.dll), or click the ellipsis button (...) to navigate to the folder that contains theoracle_osso.dllfile.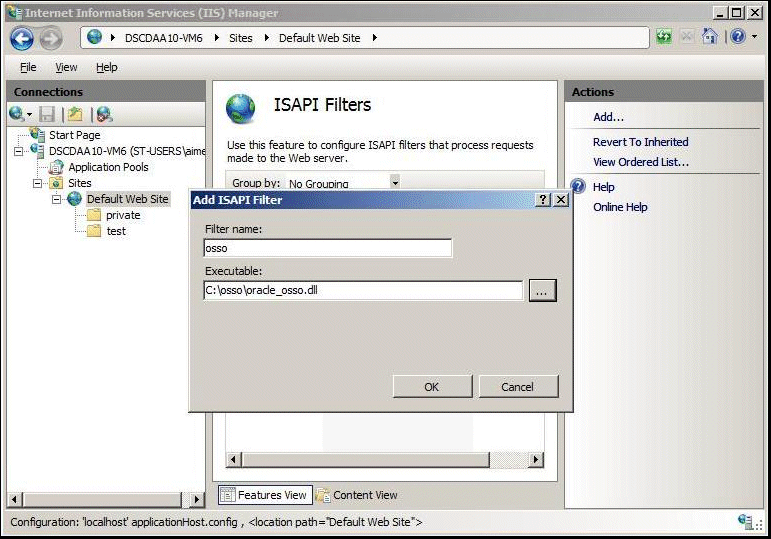
Description of the illustration ''isapi3_osso.gif''
-
Click OK.
-
-
-
Configure security settings for Oracle Home directory. Make sure you log in to machine as an administrator user.
-
In Windows Explorer, right-click the
ORACLE_HOME\binfolder, select Properties from the menu, and then click the Security tab. -
Add the IIS_WPG, NETWORK and NETWORK SERVICE groups with Read and Execute permissions.
-
Click OK.
-
-
Restart the Microsoft IIS server by opening the Services Control Panel, and then stopping and restarting the World Wide Web Publishing Service.
Notes:
-
To restart Microsoft IIS 7.0, you must stop all the Microsoft IIS 7.0 services through the Services Control Panel or restart the computer. This is the only way to ensure that the
.dllfile is reloaded. Restarting Microsoft IIS 7.0 through the management console is not sufficient. -
If you want multiple Oracle installations on the same home, then the
ORACLE_HOME\binPATH entry for the installation that you plan to use in conjunction with the Oracle SSO Plug-In must appear first in your PATH.
A.4.7 Troubleshooting Oracle SSO Plug-In
This section describes common problems and solutions.
Oracle Dependency Libraries Not Found
You may not have included ORACLE_HOME in your path.
Check to see that you have ORACLE_HOME/lib included in your library path variable on UNIX. On Microsoft Windows, ensure that you have ORACLE_HOME\bin in your path.
If you continue to receive this message in your osso.log file, then verify that all configuration files are properly configured, as described in Section A.4.4, "Configuring the Oracle SSO Plug-In".
Microsoft IIS Oracle SSO Plug-In Does not Work with HTML Authentication
The Oracle SSO Plug-In is designed not to work with other authentication modules. Authentication is either a native listener authentication module or a third-party module.