2 Overview of the Oracle ADF Process Flow
This chapter contains an overview of the process for developing an application with Oracle ADF technologies and illustrates the process with a concrete use case.
This chapter includes the following sections:
2.1 Oracle ADF High-Level Process Flow
At a high level, the development process for a Fusion web application usually involves a combination of the following steps:
-
Creating an application workspace: Using a wizard, JDeveloper automatically adds the libraries and configuration needed for the technologies you select, and structures your application into projects with packages and directories.
-
Obtaining a database schema or modeling the database objects from scratch: Within JDeveloper, you can create an offline replica of any database, and use JDeveloper editors and diagrammers to edit definitions and update schemas.
-
Creating use cases: Using JDeveloper's UML modeler, you can create use cases for your application.
-
Identifying shared resources: If you have components that can be used throughout your application or be used by multiple applications, you can develop and package those components as a ADF Library JARs and then have those JARs available in the Resources window for adding to your application.
-
When using ADF Business Components, creating your own custom classes that extend the base framework classes and then configuring the model project to base any business components that you create on these custom classes: Even if you have no initial plans to put custom code into these custom classes, they provide a mechanism to later change base framework behavior and have those changes apply to all of the business components you have created in the application.
-
Creating business services to access data and building a data model around those services: Based on your data source, you create business services using wizards or dialogs. Alternatively, you can create business services from scratch and then associate them with database tables later. You can also create services directly within a UML diagram.
These business services can be ADF Business Components services, which are tightly integrated with ADF Model, which enables you to implement validation rules and other types of business logic declaratively and which enables you to easily bind data to UI components. Or they can be other types of services such as EJB session beans or web services, on top of which you can create ADF Model data controls to enable data binding and implement declarative business logic.
-
Adding declarative logic to the business services, such as control hints and validation rules.
-
Implementing the base user interface with ADF Faces, including page templates and layouts.
-
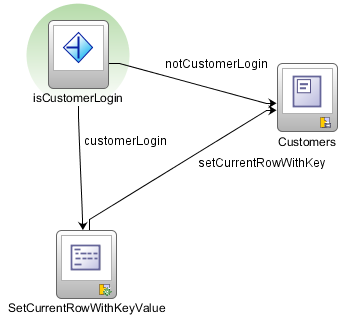
Designing ADF task flows to define application control and navigation: You use diagrammers to visually determine navigation and control flow cases. JDeveloper creates the underlying XML for you. Figure 2-2 shows a task flow in the Summit sample application for ADF Task Flows that handles customer login.
-
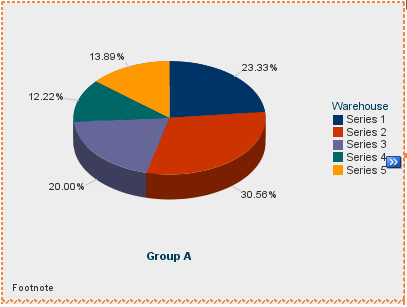
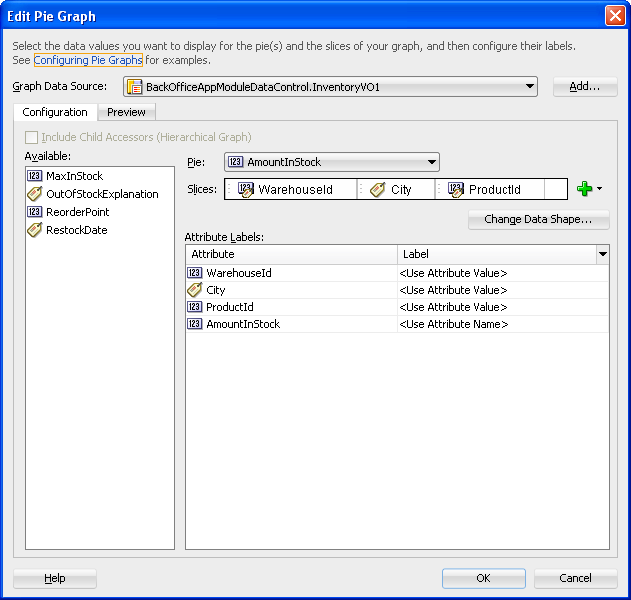
Creating databound UI components: You can create databound components by dragging objects from the Data Controls panel onto a page and selecting the UI component you want to generate to display the underlying data. Figure 2-3 shows a pie graph that has been created by dropping a collection as a pie graph on a page in the Summit sample application for ADF Task Flows. You can bind existing UI components to the data model (or change generated bindings) using JDeveloper's binding editors. Figure 2-4 shows the binding editor for the same pie graph. In both cases, JDeveloper generates the binding code.
-
Incorporating any page-specific validation and error handling: Once your application is created, you use editors to add additional validation and to define error handling.
-
Securing the application: You use the Configure ADF Security wizard to enable base security features. Then you can use visual editors to define security policies for the application's resources, create roles, and populate the roles with test users.
-
Enabling MDS customization of the application: If you want to enable your customers to provide further customization of the application for their users or to enable persistence of user changes to UI components within a session, you create customization classes and make them available to the application at design time and you enable seeded customization for any pages that you want to make customizable.
-
Testing and debugging: JDeveloper includes an integrated application server that allows you to fully test your application without needing to package it up and deploy it to a standalone server. JDeveloper also includes the ADF Declarative Debugger, a tool that allows you to set breakpoints and examine the data.
-
Refactoring: After testing your application (or even after having already deployed your application), you may need to rename components and reorganize code. JDeveloper has refactoring tools that simplify this work and protect against changes that would introduce bugs.
-
Integrating the application with other applications in a service-oriented architecture (SOA): You can integrate your Fusion web application with an existing or new applications using SOA principals.
-
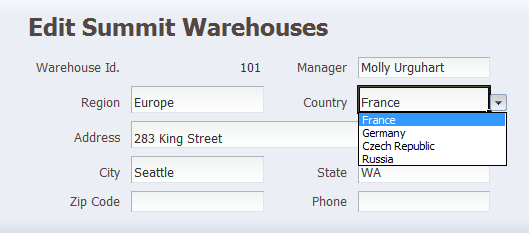
Developing additional views: You can extend the application to provide functionality for other types of user interfaces, such as mobile browsers and desktop clients. Figure 2-5 shows an input form on an Excel worksheet from the Summit sample application for ADF Desktop Integration.
-
Deploying the application: You use JDeveloper wizards and editors to create and edit deployment descriptors, JAR files, and application server connections. You can then use JDeveloper to deploy applications directly to a standalone application server or use other deployment tools.
2.2 Using Oracle ADF to Create a Rich Enterprise Application
This section walks you through the high-level steps of creating one of the Summit sample applications for Oracle ADF, which are a set of rich enterprise applications that are based on the ADF technology stack. The Summit sample applications support a sporting goods supplier with features for maintaining data on customers, customer orders, and products.
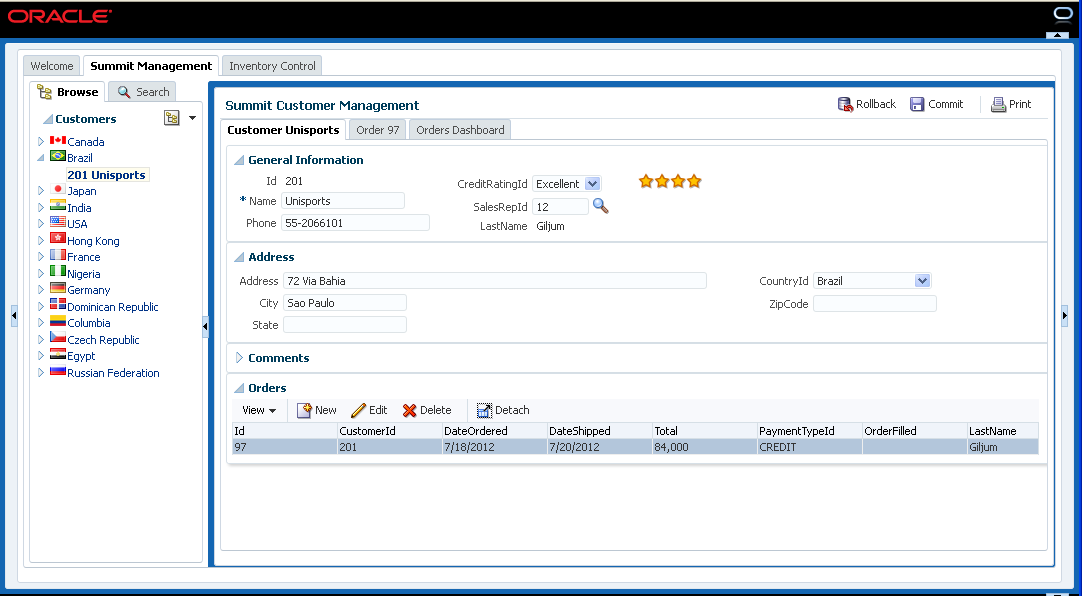
Figure 2-6 shows a page of the application showing an overview of one of its customers.
The following are the high-level steps for creating the application:
-
Install an Oracle RDBMS on your local system or on a remote machine that you have access to.
For information about the specific versions of Oracle Database that are supported, see "Certification Information" at
http://www.oracle.com/technetwork/developer-tools/jdev/documentation/index.html. -
Install the Summit schema in the database.
Note:
The Summit schema, along with an SQL script for installing the Summit database, was created within an JDeveloper application workspace using JDeveloper's offline database tools. You can install the database by running SQL scripts from the project for the schema in JDeveloper.
-
In JDeveloper, create an application workspace for the
Summit_Extensionsproject. The output of this project is a library that contains some utility code related to calling database procedures that is later used in the Summit sample application and which might be useful for other applications as well. -
In JDeveloper, create a new application workspace for the main application. In the New Gallery, select the ADF Fusion Web Application template and complete the steps in the ensuing wizard to create an application workspace that is configured with a model project to hold your ADF Business Components business services and a UI project to hold your ADF Faces pages and ADF Controller task flows.
-
In the application's model project, create stub custom classes that extend the ADF Business Components implementation classes (in the
oracle.jbopackage) to which extended functionality may eventually be added. Then, in the Project Properties dialog for the project, update the ADF Business Components Base Classes so that new business components that you generate are based on these custom classes. For more information, see "Creating ADF Business Components Extension Classes" in Developing Fusion Web Applications with Oracle Application Development Framework.This gives you the flexibility to later make changes to the base framework classes that can be picked up by their subclasses in your application. For example, the Summit sample application sub-classes
oracle.jbo.server.EntityImplwithSummitEntityImpland provides thenextValSequence()method, which enables entity objects to easily read the next value from a specified database sequence. -
In the application's model project, create the ADF Business Components services that will comprise the Summit sample application's data model. These include entity objects, view objects, and application modules. You can do much of the work in the Create Business Components from Tables wizard, which also enables you generate entity associations based on foreign keys in your database tables, view links that describe relationship between view objects, and a UML diagram for the business components that you create.
You need entity objects for all of the database tables that you will use, view objects for SQL queries that the application needs to make, and application modules to aggregate the view objects required for a given user task. For example, the Summit sample application contains the following:
-
Entity objects for database tables that store information on customers, orders, products, warehouses, regions, countries, and so on.
-
Entity associations that correspond to each foreign key relationship between database tables that are represented by entity objects n the application.
-
View objects, from which you can create databound UI components. Most of the view objects are based on columns in one or more entity objects, but a few of them are based on direct SQL queries to the database and are read-only.
-
View links to describe the relationships between various view objects.
-
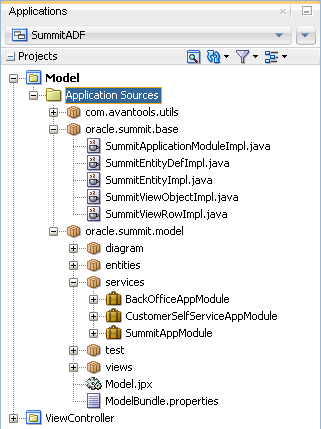
The following three application modules:
-
BackOfficeAppModule, which encompasses the view objects that are needed to develop the functionality needed for the Summit employees to manage the customer and order database. -
CustomerSelfServiceAppModule, which encompasses the view objects that are needed to develop the functionality needed for a customer application. -
SummitAppModule, which nests the two other application modules and thus provides the services encompassed by those application modules should you later develop an application that needs all of those services.
-
Figure 2-7 shows the overall structure of the Summit sample application's data model project, including the extended implementation classes and the application modules.
-
-
Add declarative logic to the business components so that the UI developer has to code less of this logic in the view layer and so that there are defaults that help make the appearance and behavior of the generated UI components consistent among UI components generated from the same business components. For example, the Summit sample application includes the following types of declarative logic:
-
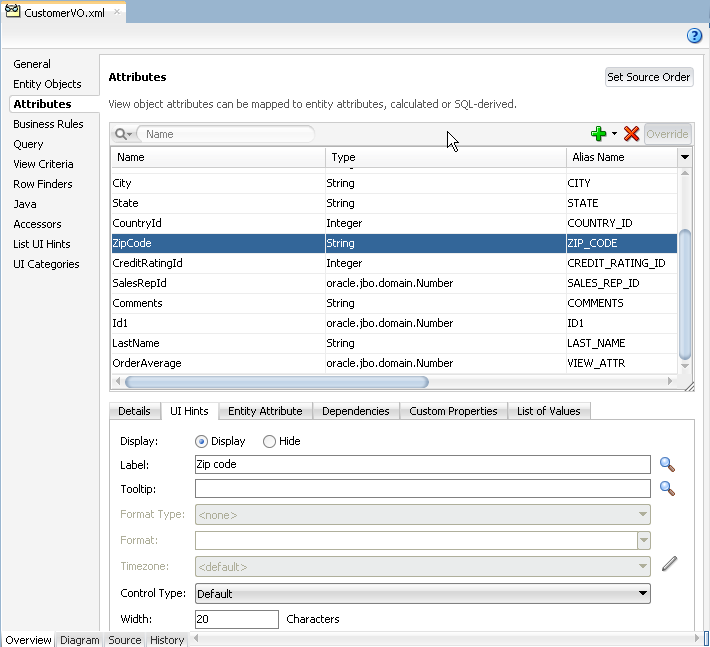
UI hints for various view object attributes. For example, the
ZipCodeattribute of theCustomerVOview object is configured so that its default label isZip code, as shown in Figure 2-8, and its default display width is 20 characters. -
Business rules that ensure that user input is valid. These rules come in the form of built-in rule types such as ranges and comparisons and in the form of expressions that you can insert yourself.
-
List-of-value (LOV) objects that you can use to create selection lists and other UI components based on the contents of a database table or a static list. You can also use LOV objects to validate user input.
-
Transient attributes, from which you can create components to display dynamically calculated values, such as the total price a the displayed list of order items.
-
Default values for input components.
-
Primary keys attributes that are set to use the
oracle.jbo.domain.DBSequencedata type so that the values of those attributes in new rows are obtained from database sequences. For example, theIdattribute of theCustomerEOentity object is set tooracle.jbo.domain.DBSequence, and its value is obtained from a database trigger that calls for the next value in the sequence when a new row is inserted into the database.
-
-
In the application's UI project, create the project's main page: The Summit sample application has an
index.jsfpage, which in turn is based on a<af:pageTemplate>component that defines the UI elements that establish the visual style for the web interface. -
Create the task flows that define the application's flow: The Summit sample application contains an unbounded task flow that serves as the entry point to the application and bounded task flows to manage viewing and updating of customer data and managing orders.The Summit sample application includes the following task flows:
-
An unbounded task flow (represented by the
adfc-config.xmlfile) that serves as the user's entry point to the application and that contains bounded task flows that demarcate the work flow for given tasks. -
The
customer-task-flow-definition.xmlbounded task flow, which handles user navigation and management of customer information. This task flow also specifies a managed bean that provides some view-side logic for the controls. -
The
create-edit-orders-task-flow-definition.xmltask flow, which enables a user to log new orders.
-
-
Create regions on the
index.jsfpage and populate them with databound UI components: This consists of the following sub-steps:-
Creating page fragments based on the task flow view activities.
-
Creating UI components by dragging and dropping objects from the Data Controls panel on to the page. You can create databound forms, tables, and trees, as well as DVT components such as gauges, graphs, and carousels by dropping view objection collections. You can create buttons for standard navigation and CRUD commands by dragging and dropping standard operations that are built-in to the data controls by ADF Model.
-
Dragging the task flows on to the
index.jsfpage and dropping them as ADF regions.
Among others, the Summit sample application has the following fragments:
-
Customers.jsff, which is embedded as a view activity within thecustomer-task-flow-definition.xmlbounded task flow. -
Orders.jsff, which is embedded as a view activity within thecreate-edit-orders-task-flow-definition.xmlbounded task flow.
-
-
Use the Configure ADF Security wizard to enable security for the application and establish roles and test users. In addition to the default roles, the Summit sample application contains roles for the application customer and the application employee, each of which is given resource grants appropriate for their roles.
