6 Configuring SSL in Oracle Fusion Middleware
You can secure communications between Oracle Fusion Middleware components using SSL, which is an industry standard for securing communications. Oracle Fusion Middleware supports TLS version 1.
This chapter provides an overview of SSL and how you can use it with Oracle Fusion Middleware components and applications. It contains these topics:
Note:
Where SSL connections are configured within Oracle WebLogic Server, this chapter provides references to the relevant Oracle WebLogic Server documentation rather than duplicating the instructions here.6.1 How SSL Works
This section introduces basic SSL concepts. It contains these topics:
6.1.1 What SSL Provides
SSL secures communication by providing message encryption, integrity, and authentication. The SSL standard allows the involved components (such as browsers and HTTP servers) to negotiate which encryption, authentication, and integrity mechanisms to use.
-
Encryption provides confidentiality by allowing only the intended recipient to read the message. SSL can use different encryption algorithms to encrypt messages. During the SSL handshake that occurs at the start of each SSL session, the client and the server negotiate which algorithm to use. Examples of encryption algorithms supported by SSL include AES, RC4, and 3DES.
-
Integrity ensures that a message sent by a client is received intact by the server, untampered. To ensure message integrity, the client hashes the message into a digest using a hash function and sends this message digest to the server. The server also hashes the message into a digest and compares the digests. Because SSL uses hash functions that make it computationally infeasible to produce the same digest from two different messages, the server can tell that if the digests do not match, someone had tampered with the message. An example of a hash function supported by SSL is SHA1.
-
Authentication enables the server and client to check that the other party is who it claims to be. When a client initiates an SSL session, the server typically sends its certificate to the client. Certificates are digital identities that are issued by trusted certificate authorities, such as Verisign. Chapter 7, "Managing Keystores, Wallets, and Certificates" describes certificates in more detail.
The client verifies that the server is authentic and not an imposter by validating the certificate chain in the server certificate. The server certificate is guaranteed by the certificate authority (CA) who signed the server certificate.
The server can also require the client to have a certificate, if the server needs to authenticate the identity of the client.
6.1.2 About Private and Public Key Cryptography
To provide message integrity, authentication, and encryption, SSL uses both private and public key cryptography.
Symmetric key cryptography requires a single, secret key shared by two or more parties to secure communication. This key is used to encrypt and decrypt secure messages sent between the parties. It requires prior and secure distribution of the key to each party. The problem with this method is that it is difficult to securely transmit and store the key.
In SSL, each party calculates the secret key individually using random values known to each side. The parties then send encrypted messages using the secret key.
Public key cryptography solves this problem by employing public and private key pairs and a secure method for key distribution. The freely available public key is used to encrypt messages that can only be decrypted by the holder of the associated private key. Together with other security credentials, private key is securely stored in an encrypted container such as an Oracle wallet.
Public key algorithms can guarantee the secrecy of a message. However, they do not necessarily guarantee secure communication because they do not verify the identities of the communicating parties. To establish secure communication, it is important to verify that the public key used to encrypt a message does in fact belong to the target recipient. Otherwise, a third party can potentially eavesdrop on the communication and intercept public key requests, substituting its own public key for a legitimate key (the man-in-the-middle attack).
To avoid such an attack, it is necessary to verify the owner of the public key with a process called authentication. trusted by both of the communicating parties, a third party known as a certificate authority (CA) can accomplish the authentication process.
The CA issues public key certificates that contain an entity's name, public key, and certain other security credentials. Such credentials typically include the CA name, the CA signature, and the certificate effective dates (From Date, To Date).
The CA uses its private key to encrypt a message, while the public key is used to decrypt it, thus verifying that the message was encrypted by the CA. The CA public key is well known, and does not have to be authenticated each time it is accessed. Such CA public keys are stored in wallets.
6.1.3 Keystores and Wallets
In Oracle Fusion Middleware, some components use the Oracle Wallet as their storage mechanism. An Oracle wallet is a container that stores your credentials, such as certificates, trusted certificates, certificate requests, and private keys. You can store Oracle wallets on the file system or in LDAP directories such as Oracle Internet Directory. Oracle wallets can be auto-login or password-protected wallets.
Oracle HTTP Server uses Oracle wallet. Configuring SSL for Oracle HTTP Server thus requires setting up and using Oracle wallets.
Other components use a JKS keystore or KSS keystore to store keys and certificates, and configuring SSL for these components requires setting up and using the appropriate keystores.
For more information about configuring keystores and wallets, see:
-
Section 6.2, "About SSL in Oracle Fusion Middleware" for a fuller description of keystore and wallet usage in Oracle Fusion Middleware
-
Chapter 7, "Managing Keystores, Wallets, and Certificates" for a discussion of these terms, and administration details
6.1.4 How SSL Sessions Are Conducted
The SSL protocol has two phases: the handshake phase and the data transfer phase. The handshake phase authenticates the server and optionally the client, and establishes the cryptographic keys that will be used to protect the data to be transmitted in the data transfer phase.
When a client requests an SSL connection to a server, the client and server first exchange messages in the handshake phase. (A common scenario is a browser requesting a page using the https:// instead of http:// protocol from a server. The HTTPS protocol indicates the usage of SSL with HTTP.)
Figure 6-1 shows the handshake messages for a typical SSL connection between a Web server and a browser. The following steps are shown in the figure:
-
The client sends a Hello message to the server.
The message includes a list of algorithms supported by the client and a random number that will be used to generate the keys.
-
The server responds by sending a Hello message to the client. This message includes:
-
The algorithm to use. The server selected this from the list sent by the client.
-
A random number, which will be used to generate the keys.
-
-
The server sends its certificate to the client.
-
The client authenticates the server by checking the validity of the server's certificate, the issuer CA, and optionally, by checking that the host name of the server matches the subject DN. The client sends a Session ID for session caching.
-
The client generates a random value ("pre-master secret"), encrypts it using the server's public key, and sends it to the server.
-
The server uses its private key to decrypt the message to retrieve the pre-master secret.
-
The client and server separately calculate the keys that will be used in the SSL session.
These keys are not sent to each other because the keys are calculated based on the pre-master secret and the random numbers, which are known to each side. The keys include:
-
Encryption key that the client uses to encrypt data before sending it to the server
-
Encryption key that the server uses to encrypt data before sending it to the client
-
Key that the client uses to create a message digest of the data
-
Key that the server uses to create a message digest of the data
The encryption keys are symmetric, that is, the same key is used to encrypt and decrypt the data.
-
-
The client and server send a
Finishedmessage to each other. These are the first messages that are sent using the keys generated in the previous step (the first "secure" messages).The
Finishedmessage includes all the previous handshake messages that each side sent. Each side verifies that the previous messages that it received match the messages included in theFinishedmessage. This checks that the handshake messages were not tampered with. -
The client and server now transfer data using the encryption and hashing keys and algorithms.

6.2 About SSL in Oracle Fusion Middleware
This section introduces SSL in Oracle Fusion Middleware. It contains these topics:
6.2.1 SSL in the Oracle Fusion Middleware Architecture
Figure 6-2 SSL in Oracle Fusion Middleware

Description of "Figure 6-2 SSL in Oracle Fusion Middleware"
Notes:
-
In Figure 6-2, the label "Oracle Enterprise Manager" refers to the Fusion Middleware Control user interface.
-
Other administrative tools are available for specific tasks.
In the Oracle Fusion Middleware architecture shown in Figure 6-2, the numbered circles represent the endpoints that can be SSL-enabled. For configuration details about each endpoint, see:
-
Section 6.4.2.1, "Enable SSL for Inbound Requests to Oracle HTTP Server Virtual Hosts Using Fusion Middleware Control" and Section 6.4.2.2, "Enable SSL for Inbound Requests to Oracle HTTP Server Virtual Hosts Using WLST"
-
Section 6.4.2.3, "Enable SSL for Outbound Requests from Oracle HTTP Server"
-
Outbound connections to the LDAP server can originate from Oracle Platform Security Services or from Oracle WebLogic Server:
Keystores and wallets are central to SSL configuration and are used to store certificates and keys.
For details, see Section 6.2.2, "Keystores and Oracle Wallets."
6.2.2 Keystores and Oracle Wallets
Oracle Fusion Middleware 12c (12.1.2) supports different types of keystores for keys and certificates:
-
JKS-based keystore and truststore
Oracle WebLogic Server uses JKS keystores in upgraded environments.
JDK's
keytoolutility manages JKS keystores and certificates. -
Oracle wallet
System components like Oracle HTTP Server use the Oracle wallet.
Use Fusion Middleware Control, or the command-line WLST and
orapkiinterfaces, to manage wallets and their certificates for system components. You can use either the Fusion Middleware Control or WLST to SSL-enable the listeners for these components. -
OPSS Keystore Service (KSS) keystore and truststore
The Keystore Service provides an alternative mechanism to manage keys and certificates. Oracle WebLogic Server uses KSS keystores out-of-the-box in new 12c (12.1.2) installations.
Use Fusion Middleware Control or WLST to manage KSS keystores and their certificates. Use the WebLogic console to SSL-enable the listeners for WebLogic servers.
For more information about these types of stores, and when to use which type of store, see Section 6.1.3, "Keystores and Wallets".
See Also:
Section 7.1, "Key and Certificate Storage in Oracle Fusion Middleware" for keystore management6.2.3 Authentication Modes
The following authentication modes are supported:
-
In no-authentication mode, neither server nor client are required to authenticate.
Other names for this mode include Anonymous SSL/No Authentication/Diffie-Hellman. This mode is considered unsecured.
-
In server authentication mode, a server authenticates itself to a client.
This mode is also referred to as One-way SSL/Server Authentication.
-
In mutual authentication mode, a client authenticates itself to a server and that server authenticates itself to the client.
This mode is also known as Two-way SSL/Client Authentication.
-
In optional client authentication mode, the server authenticates itself to the client, but the client may or may not authenticate itself to the server. Even if the client does not authenticate itself, the SSL session still goes through.
6.2.4 Tools for SSL Configuration
Oracle Fusion Middleware uses two kinds of configuration tools, common and advanced.
-
Fusion Middleware Control
-
WLST command-line interface
-
Oracle WebLogic Server Administration Console
-
keytoolcommand-line tool
These tools allow you to configure SSL and manage Oracle Wallet/JKS keystore for any listener or component in Oracle Fusion Middleware.
The first three tools on this list are usable when the component is associated with the application server domain (when the component is not a stand-alone installation).
-
orapkicommand-line interface
This tool is needed to manage wallets for certain stand-alone installations.
In addition, this tool allows you to configure advanced features like managing file-based CRLs, PKCS11-based wallets, and so on.
See Also:
Section 7.1, "Key and Certificate Storage in Oracle Fusion Middleware" for keystore management6.3 Configuring SSL for Configuration Tools
Several tools are available for Oracle Fusion Middleware configuration. This section describes how to configure SSL for these tools to enable them to connect to an SSL-enabled Oracle WebLogic Server.
See Also:
Section 6.5.1.1 for details about enabling inbound SSL on Oracle WebLogic Server.For a list of all the configuration tools, see Section 6.2.4, "Tools for SSL Configuration.".
This section contains these topics:
6.3.1 Oracle Enterprise Manager Fusion Middleware Control
Take these steps:
-
Ensure that the SSL port is enabled on the Oracle WebLogic Server instance on which Fusion Middleware Control is deployed, and that the browser (from which you will launch Fusion Middleware Control) trusts the server certificate.
-
Now launch Fusion Middleware Control using an SSL-based URL, in the format https://
host:port.
6.3.2 Oracle WebLogic Server Administration Console
Ensure that the SSL port is enabled on the Oracle WebLogic Server instance. Now launch the administration console by providing the SSL port in the URL. You may get a warning that the certificate is not trusted; accept this certificate and continue.
6.3.3 WLST Command-Line Tool
For details about configuring SSL for WLST, take these steps:
-
Launch the WLST shell.
-
Execute the WLST command:
help('connect')
Follow the instructions described in the help text to set up the WLST shell in SSL mode.
See Also:
Section 6.9 for details about using WLST.6.4 Configuring SSL for the Web Tier
This section contains these topics:
Note:
-
This discussion applies to the Web Tier in the context of an Oracle WebLogic Server domain.
-
The order in which these topics appear should not be confused with the sequence in which SSL is enabled (which varies depending on topology). Rather, they are arranged in order starting with the most front-ending component.
6.4.1 Configuring Load Balancers
Use the instructions specific to your load-balancing device to configure load balancers in your Oracle Fusion Middleware environment.
6.4.2 Enabling SSL for Oracle HTTP Server Virtual Hosts
This section shows how to manage SSL configuration for Oracle HTTP Server virtual hosts operating in an Oracle WebLogic Server environment.
Note:
For Oracle HTTP Server in standalone mode, see Administering Oracle HTTP Server.For inbound traffic:
-
Section 6.4.2.1 (using Fusion Middleware Control)
-
Section 6.4.2.2 (using WLST)
For outbound traffic:
-
Section 6.4.2.3 (using either Fusion Middleware Control or WLST)
6.4.2.1 Enable SSL for Inbound Requests to Oracle HTTP Server Virtual Hosts Using Fusion Middleware Control
You can SSL-enable inbound traffic to Oracle HTTP Server virtual hosts using these steps:
-
Select the Oracle HTTP Server instance in the navigation pane on the left.
-
Create a wallet, if necessary, by navigating to Oracle HTTP Server, then Security, then Wallets.
For details about wallet creation and maintenance, see Chapter 7, "Managing Keystores, Wallets, and Certificates".
-
Navigate to Oracle HTTP Server, then Administration, then Virtual Hosts.
This page shows what hosts are currently configured, and whether they are configured for http or https.
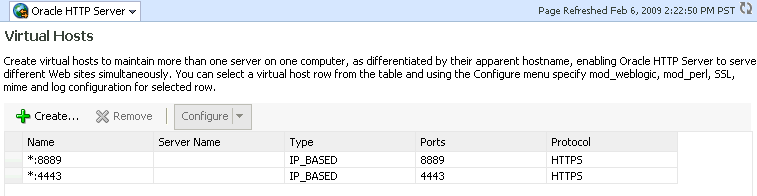
Description of the illustration ohsssl1.gif
-
Select the virtual host you wish to update, and click Configure, then SSL Configuration. (Note: If creating a new virtual host, see Administering Oracle HTTP Server.)
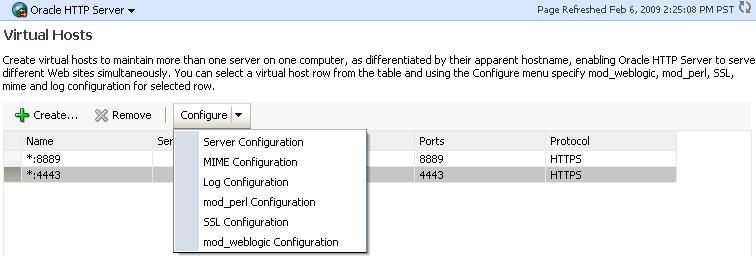
Description of the illustration ohsssl2.gif
The SSL Configuration page appears.
-
You can convert an https port to http by simply unchecking Enable SSL.
To configure SSL for a virtual host that is currently using http:
-
Check the Enable SSL box.
-
Select a wallet from the drop-down list.
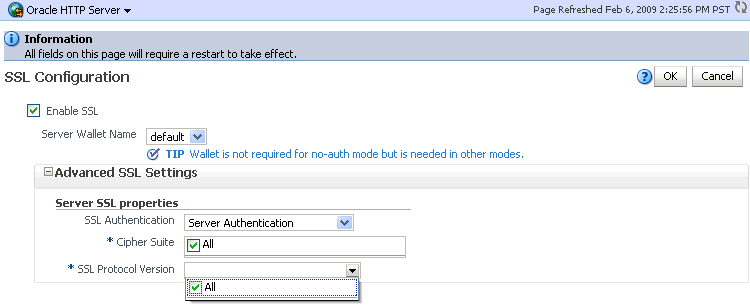
Description of the illustration ohsssl3.gif
-
From the Server SSL properties, select the SSL authentication type, cipher suites to use, and the SSL protocol version.
Note:
The default values are appropriate in most situations.Note:
- This assumes that the certificate is available in Fusion Middleware Control. If it was created through orapki, import it first as explained in Section 7.4.4.9.
-
The choice of authentication type determines the available cipher suites, and the selected cipher suites determine the available protocol versions. For more information about ciphers and protocol versions, see Section 6.9.16.
-
-
Click OK to apply the changes.
-
On Windows platforms only, open Windows Explorer and navigate to your cwallet.sso file. Under properties, security, add
SYSTEMin "group or user names". -
Restart the Oracle HTTP Server instance by navigating to Oracle HTTP Server, then Control, then Restart.
-
Open a browser session and connect to the port number that was SSL-enabled.
6.4.2.2 Enable SSL for Inbound Requests to Oracle HTTP Server Virtual Hosts Using WLST
Take these steps:
-
Determine the virtual hosts for this Oracle HTTP Server instance by running the following command:
listListeners('inst1','ohs1' )This command lists all the virtual hosts for this instance. Select the one that needs to be configured for SSL. For example, you can select vhost1. For details about this command, see WLST Command Reference for WebLogic Server.
-
Configure the virtual host with SSL properties:
configureSSL('inst1',
   'ohs1',
   'ohs',
   'vhost1')
Note:
-
configureSSLuses defaults for all SSL attributes; see Table 6-4 for details. -
You could also specify a properties file as a parameter to
configureSSL. See Table 6-3 for details about the parameters. SeeconfigureSSLin the WLST Command Reference for WebLogic Server for examples of how to use a properties file. -
For details about this command, see Section 6.9.
-
-
On Windows platforms only, open Windows Explorer and navigate to your cwallet.sso file. Under properties, security, add
SYSTEMin "group or user names".
6.4.2.3 Enable SSL for Outbound Requests from Oracle HTTP Server
You enable SSL for outbound requests from Oracle HTTP Server by configuring mod_wl_ohs.
The steps are as follows:
-
Generate a custom keystore for Oracle WebLogic Server (see Section 6.5.1) containing a certificate.
-
Import the certificate used by Oracle WebLogic Server from Step 1 into the Oracle HTTP Server wallet as a trusted certificate. You can use any available utility such as WLST or Fusion Middleware Control for this task. (Note: The wallet mentioned here is the one that the Oracle HTTP Server listen port uses for SSL. The trusted (root) CA certificate that signed the Oracle WebLogic Server certificate must exist in this wallet. For details on importing trusted certificates see Section 7.4.7.5.)
-
Edit the Oracle HTTP Server configuration file
DOMAIN_HOME/config/fmwconfig/components/OHS/instance_name/ssl.conf and add the following line to the SSL configuration undermod_weblogic:WlSSLWallet "$(DOMAIN_HOME}/config/fmwconfig/components/COMPONENT_TYPE/COMPONENT_NAME/keystores/default"where
defaultis the name of the Oracle HTTP Server wallet in Step 2.Here is an example of how the configuration should look:
<IfModule mod_weblogic.c>
WebLogicHost myweblogic.server.com
WebLogicPort 7002
MatchExpression *.jsp
SecureProxy On
WlSSLWallet "$(DOMAIN_HOME}/config/fmwconfig/components/OHS/ohs1/keystores/default"
</IfModule>
Save the file and exit.
-
On Windows platforms only, open Windows Explorer and navigate to your cwallet.sso file. Under properties, security, add
SYSTEMin "group or user names". -
Restart Oracle HTTP Server to activate the changes. See Administering Oracle HTTP Server for details.
-
Ensure that your Oracle WebLogic Server instance is configured to use the custom keystore generated in Step 1, and that the alias points to the alias value used in generating the certificate. Restart the Oracle WebLogic Server instance.
mod_wl_ohs also supports two-way SSL communication. To configure two-way SSL:
-
Perform Steps 1 through 4 of the preceding procedure for one-way SSL.
-
Generate a trust store,
trust.jks, for Oracle WebLogic Server.The keystore created for one-way SSL (Step 1 of the preceding procedure) could also be used to store trusted certificates, but it is recommended that you create a separate truststore for this procedure.
-
Export the user certificate from the Oracle HTTP Server wallet, and import it into the truststore created in Step 2.
You can use any available utility such as WLST or Fusion Middleware Control for export, and the
keytoolutility for import. -
From the Oracle WebLogic Server Administration Console, select the Keystores tab for the server being configured.
-
Set the custom trust store with the
trust.jksfile location of the trust store that was created in Step 2 (use the full name). -
Set the keystore type as JKS, and set the passphrase used to create the keystore.
-
Under the SSL tab, ensure that Trusted Certificate Authorities is set as from Custom Trust Keystore.
-
Ensure that Oracle WebLogic Server is configured for two-way SSL. For details, see "Configuring SSL" in Administering Security for Oracle WebLogic Server.
6.5 Configuring SSL for the Middle Tier
Using SSL in the middle tier includes:
-
SSL-enabling the application server
-
SSL-enabling components and applications running on the application server
This section addresses mid-tier SSL configuration and contains these topics:
6.5.1 Configuring SSL for Oracle WebLogic Server
This section describes configuration for the application server.
6.5.1.1 Inbound SSL to Oracle WebLogic Server
For information and details about implementing SSL to secure Oracle WebLogic Server, see the following topics in Administering Security for Oracle WebLogic Server:
-
"Configuring Oracle OPSS Keystore Service "
-
"Configuring SSL"
6.5.1.2 Outbound SSL from Oracle WebLogic Server
This section describes how to SSL-enable outbound connections from Oracle WebLogic Server.
6.5.1.2.1 Outbound SSL from Oracle Platform Security Services to LDAP
This section explains how to configure SSL (needs server- and client-side) for policy store and credential store connections to an LDAP directory. It supports anonymous and one-way SSL.
See Securing Applications with Oracle Platform Security Services for details about the jps-config.xml file referenced in this section.
Anonymous SSL (Server-side)
Start the LDAP server in anonymous authentication mode.
Consult your LDAP server documentation for information on this task.
Anonymous SSL (Client-side)
In your jps-config.xml file, you must set the protocol to ldaps and specify the appropriate port for the property ldap.url. This information needs to be updated for policy store, credential store, key store and any other service instances that use ldap.url.
One-Way SSL (Client-side)
The following must be in place for the client-side configuration:
-
The JVM needs to know where to find the trust store that it uses to trust certificates from LDAP. You do this by setting:
-Djavax.net.ssl.trustStore=path_to_jks_fileThis property is added either to the JavaSE program, or to the server start-up properties in a JavaEE environment.
-
In your
jps-config.xmlfile, you must set the protocol toldapsand specify the appropriate port for the propertyldap.url. This information needs to be updated for policy store, credential store, key store and any other service instances that useldap.url. -
Using keytool, import the LDAP server's certificate into the trust store specified in step 1.
6.5.1.2.2 Outbound SSL from Oracle Platform Security Services to Oracle Database
You can set up a one-way or two-way SSL connection to a database-based OPSS security store.
For details about configuring the database server and clients, see Securing Applications with Oracle Platform Security Services.
6.5.1.2.3 Outbound SSL from LDAP Authenticator to LDAP
For details about outbound SSL to LDAP directories, see "How SSL Certificate Validation Works in WebLogic Server" in Administering Security for Oracle WebLogic Server.
6.5.1.2.4 Outbound SSL to Database
See "Configuring Secure Sockets Layer Authentication" in the Oracle Advanced Security Administrator's Guide at http://docs.oracle.com/cd/E11882_01/network.112/e10746/asossl.htm for more information about configuring SSL for the database listener.
6.5.2 Client-Side SSL for Applications
For information on how to write SSL-enabled applications, see "Using SSL Authentication in Java Clients" in Developing Applications with the WebLogic Security Service.
For best practices, refer to Section 6.8.2, "Best Practices for Application Developers."
6.6 Configuring SSL for the Data Tier
This section contains this topic:
6.6.1 Configuring SSL for the Database
This section contains these topics:
6.6.1.1 SSL-Enable Oracle Database
Take these steps to SSL-enable Oracle database:
-
Create a root CA and a certificate for the DB. Here is an example:
Note:
Self-signed certificates are not recommended for production use. For information about obtain production wallets, see Section 7.4.8.3, "Changing a Self-Signed Wallet to a Third-Party Wallet.".mkdir root mkdir server # Create root wallet, add self-signed certificate and export orapki wallet create -wallet ./root -pwd password orapki wallet add -wallet ./root -dn CN=root_test,C=US -keysize 2048 -self_signed -validity 3650 -pwd password orapki wallet display -wallet ./root -pwd password orapki wallet export -wallet ./root -dn CN=root_test,C=US -cert ./root/b64certificate.txt -pwd password #Create server wallet, add self-signed certificate and export orapki wallet create -wallet ./server -pwd password orapki wallet add -wallet ./server -dn CN=server_test,C=US -keysize 2048 -pwd password orapki wallet display -wallet ./server -pwd password orapki wallet export -wallet ./server -dn CN=server_test,C=US -request ./server/creq.txt -pwd password # Import trusted certificates orapki cert create -wallet ./root -request ./server/creq.txt -cert ./server/cert.txt -validity 3650 -pwd password orapki cert display -cert ./server/cert.txt -complete orapki wallet add -wallet ./server -trusted_cert -cert ./root/b64certificate.txt -pwd password orapki wallet add -wallet ./server -user_cert -cert ./server/cert.txt -pwd password orapki wallet create -wallet ./server -auto_login -pwd password}}
-
Update
listener.ora,sqlnet.ora, andtnsnames.orafor the database.-
This example shows the default
listener.ora:SID_LIST_LISTENER = (SID_LIST =(SID_DESC =(SID_NAME = PLSExtProc)(ORACLE_HOME = /path_to_O_H)(PROGRAM = extproc))) LISTENER =(DESCRIPTION_LIST =(DESCRIPTION = (ADDRESS = (PROTOCOL = IPC)(KEY = EXTPROC1)) (ADDRESS = (PROTOCOL = TCP)(HOST = mynode.mycorp.com)(PORT = 1521)) (ADDRESS = (PROTOCOL = TCPS)(HOST = mynode.mycorp.com)(PORT = 2490)) )) WALLET_LOCATION=(SOURCE=(METHOD=FILE)(METHOD_DATA=(DIRECTORY=/wallet_location))) SSL_CLIENT_AUTHENTICATION=FALSE}}
And here is an updated
listener.orafile, illustrating a scenario with no client authentication:SID_LIST_LISTENER = (SID_LIST = (SID_DESC = (GLOBAL_DBNAME = dbname) (ORACLE_HOME = /path_to_O_H) (SID_NAME = sid) ) ) SSL_CLIENT_AUTHENTICATION = FALSE WALLET_LOCATION = (SOURCE = (METHOD = FILE) (METHOD_DATA = (DIRECTORY = /wallet_path) ) ) LISTENER = (DESCRIPTION_LIST = (DESCRIPTION = (ADDRESS = (PROTOCOL = IPC)(KEY = EXTPROC1521)) ) (DESCRIPTION = (ADDRESS = (PROTOCOL = TCP)(HOST = mynode.mycorp.com)(PORT = 1521)) ) (DESCRIPTION = (ADDRESS = (PROTOCOL = TCPS)(HOST = mycorp.com)(PORT = 2490)) ) )Note that the SSL port has been added.
-
Likewise, a modified
sqlnet.orafile may look like this:NAMES.DIRECTORY_PATH= (TNSNAMES, EZCONNECT) SQLNET.AUTHENTICATION_SERVICES=(BEQ,TCPS,NTS) WALLET_LOCATION=(SOURCE=(METHOD=FILE)(METHOD_DATA=(DIRECTORY=/directory))) SSL_CLIENT_AUTHENTICATION=FALSE
-
A modified
tnsnames.orafile may look like this:OID = (DESCRIPTION = (ADDRESS = (PROTOCOL = TCP)(HOST = mynode.mycorp.com)(PORT = 1521)) (CONNECT_DATA = (SERVER = DEDICATED) (SERVICE_NAME = mynode.mycorp.com) ) ) SSL = (DESCRIPTION = (ADDRESS_LIST = (ADDRESS = (PROTOCOL = TCPS)(HOST = mynode.mycorp.com)(PORT = 2490)) ) (CONNECT_DATA = (SERVICE_NAME = mynode.mycorp.com) or (SID = mynode.mycorp.com) ) (SECURITY=(SSL_SERVER_CERT_DN=\"CN=server_test,C=US\")) )
-
-
Test the connection to the database using the new connect string. For example:
$ tnsping ssl
$ sqlplus username/password@ssl
See Also:
The chapter "Configuring Secure Sockets Layer Authentication" in the Oracle Database Advanced Security Administrator's Guide.6.6.1.2 SSL-Enable a Data Source
Take these steps to configure your data sources on Oracle WebLogic Server to use SSL.
-
Create a truststore and add the root certificate (which is created when SSL-enabling the database) as a trusted certificate to the truststore.
-
In the Oracle WebLogic Server Administration Console, navigate to the Connection pool tab of the data source that you are using.
Note:
The data source can be an existing source such as an Oracle WebCenter Portal data source, or a new data source. See Creating a JDBC Data Source in Administering JDBC Data Sources for Oracle WebLogic Server for details.The properties you need to specify in the JDBC Properties text box depend on the type of authentication you wish to configure.
-
If you will require client authentication (two-way authentication):
javax.net.ssl.keyStore=..(password of the keystore) javax.net.ssl.keyStoreType=JKS javax.net.ssl.keyStorePassword=...(password of the keystore) javax.net.ssl.trustStore=...(the truststore location on the disk) javax.net.ssl.trustStoreType=JKS javax.net.ssl.trustStorePassword=...(password of the truststore) -
If you will require no client authentication:
javax.net.ssl.trustStore=...(the truststore location on the disk)
       javax.net.ssl.trustStoreType=JKS
       javax.net.ssl.trustStorePassword=...(password of the truststore)
-
-
In the URL text box, enter the JDBC connect string. Ensure that the protocol is TCPS and that SSL_SERVER_CERT_DN contains the full DN of the database certificate.
Use the following syntax if tnsnames.ora uses "SERVICE_NAME":
jdbc:oracle:thin:@(DESCRIPTION=(ADDRESS_LIST=(ADDRESS=(PROTOCOL=TCPS)(HOST=host-name)(PORT=port-number)))(CONNECT_DATA=(SERVICE_NAME=service))(SECURITY=(SSL_SERVER_CERT_DN="CN=server_test,C=US")))
Use the following syntax if tnsnames.ora uses "SID":
jdbc:oracle:thin:@(DESCRIPTION=(ADDRESS_LIST=(ADDRESS=(PROTOCOL=TCPS)(HOST=host-name)(PORT=port-number)))(CONNECT_DATA=(SID=service))(SECURITY=(SSL_SERVER_CERT_DN="CN=server_test,C=US")))
-
Test and verify the connection. Your data source is now configured to use SSL.
6.7 Advanced SSL Scenarios
This section explains how to handle additional SSL configuration scenarios beyond the basic topologies described earlier:
For details and examples of the commands used in this section see Section 6.9.
6.7.1 Hardware Security Modules and Accelerators
A Hardware Security Module (HSM) is a physical plug-in card or an external security device that can be attached to a computer to provide secure storage and use of sensitive content.
Note:
This discussion applies only to Oracle HTTP Server, which is a system component supporting HSM.Oracle Fusion Middleware supports PKCS#11-compliant HSM devices that provide a secure storage for private keys.
Take these steps to implement SSL for a component using a PKCS#11 wallet:
-
Install the HSM libraries on the machine where the component is running. This is a one-time task and is device-dependent.
-
Next, create a wallet using the
orapkicommand-line tool. Note the following:-
Choose
PKCS11as the wallet type. -
Specify the device-specific PKCS#11 library used to communicate with the device. This library is part of the HSM software.
On Linux, the library is located at:
For LunaSA (Safenet):  /usr/lunasa/lib/libCryptoki2.so
For nCipher:  /opt/nfast/toolkits/pkcs11/libcknfast.so
On Windows, the library is located at:
For LunaSA (Safenet): C:\Program Files\LunaSA\cryptoki.dll
-
-
Now follow the standard procedure for obtaining third-party certificates: create a certificate request; get the request approved by a Certificate Authority (CA); and install the certificate signed by that CA.
The wallet you set up is used like any other wallet.
-
Verify the wallet with the
orapkiutility. Use the following command syntax:orapki wallet p11_verify [-wallet [wallet]] [-pwd password] -
Configure SSL on your component listener using the
configureSSLWLST command, providing a properties file as input. Your properties file should specify the full path of the PKCS#11 wallet directory on the machine where the component is running. (Note: Do not save the PKCS#11 wallet in the instance home directory. Only wallets created and managed through Fusion Middleware Control or WLST should reside in the instance home.)A sample properties file could look like this:
SSLEnabled=true
AuthenticationType=Server
PKCS11Wallet=/tmp/lunasa/wallet
Note:
You must use the WLST commandconfigureSSL to configure the PKCS11 wallet. You cannot do this task using Fusion Middleware Control or any other tool.6.7.2 CRL Integration with SSL
Note:
-
This discussion applies only to Oracle HTTP Server in the context of an Oracle WebLogic Server environment. For SSL configuration in standalone components, see Administering Oracle HTTP Server.
-
Manage CRL validation through WLST. You cannot perform this task through Fusion Middleware Control.
Components that use SSL can optionally turn on certificate validation using a certificate revocation list (CRL). This allows them to validate the peer certificate in the SSL handshake and ensure that it is not on the list of revoked certificates issued by the Certificate Authority (CA).
This section describes how to configure a component to use CRL-based validation, and how to create and set up CRLs on the file system.
6.7.2.1 Configuring CRL Validation for a Component
Configure SSL on your component listener using the configureSSL WLST command, providing a properties file as input.
The properties file must be set up as follows:
-
The CertValidation attribute must be set to
url. -
The CertValidationPath attribute must be of the form
file://file_pathordir://directory_path.-
Use the first format if you are using a single CRL file for certificate validation. This CRL file should contain a concatenation of all CRLs.
-
Use the second format if you are specifying a directory path that contains multiple CRL files in hashed form.
See Section 6.7.2.2, "Manage CRLs on the File System" on how to create CRLs in hashed form.
-
In this example, the properties file specifies a single CRL file:
SSLEnabled=true
AuthenticationType=Server
CertValidation=crl
KeyStore=ohs1
CertValidationPath=file:///tmp/file.crl
In this example, the properties file specifies a directory path to multiple CRL files:
SSLEnabled=true
AuthenticationType=Server
KeyStore=ohs1
CertValidation=crl
CertValidationPath=dir:///tmp
6.7.2.2 Manage CRLs on the File System
Note:
LDAP-based CRLs or CRL distribution points are not supported.You use the orapki command-line tool to manage CRLs on the file system. For details on this topic, see Section G.1.5, "Managing Certificate Revocation Lists (CRLs) with orapki Utility."
If specifying a CRL storage location, the CRL must be renamed. This enables CRLs to be loaded in an efficient manner at runtime. This operation creates a symbolic link to the actual CRL file. On Windows, it copies the CRL to a file with a new name.
To rename a CRL:
orapki crl hash
[-crl [url|filename]] [-wallet wallet] [-symlink directory]
[-copy directory] [-summary] [-pwd password]
For example:
orapki crl hash -crl nzcrl.txt -symlink wltdir -pwd password
If the CRL file name is specified at runtime, multiple CRLs can be concatenated in that file. The CRL created in this example is in Base64 format, and you can use a text editor to concatenate the CRLs.
Note:
CRL creation and Certificate Revocation are for test purposes and only used in conjunction with self-signed certificates. For production use, obtain production certificates from well-known CAs and obtain the CRLs from those authorities.To create a CRL:
orapki crl create
[-crl [url|filename]] [-wallet [cawallet]] [-nextupdate [days]] [-pwd password]
For example:
orapki crl create
-crl nzcrl.crl -wallet rootwlt -nextupdate 3650 -pwd password
Revoking a certificate adds the certificate's serial number to the CRL.
To revoke a certificate:
orapki crl revoke
[-crl [url|filename]] [-wallet [cawallet]] [-cert   [revokecert]] [-pwd password]
For example:
orapki crl revoke
-crl nzcrl.txt -wallet rootwlt -cert cert.txt -pwd password
6.7.2.3 Test a Component Configured for CRL Validation
To test that a component is correctly configured for CRL validation, take these steps:
-
Set up a wallet with a certificate to be used in your component.
-
Generate a CRL with this certificate in the revoked certificates list. Follow the steps outlined in Section 6.7.2.2, "Manage CRLs on the File System."
-
Configure your component to use this CRL. Follow the steps outlined in Section 6.7.2.1, "Configuring CRL Validation for a Component."
-
The SSL handshake should fail when this revoked certificate is used.
6.7.3 Oracle Fusion Middleware FIPS 140-2 Settings
This section describes how to configure Oracle Fusion Middleware components to comply with the FIPS 140-2 advanced security standard. Topics include:
See Also:
For more information about this standard, refer to the Cryptographic Modules Validation Program Web site at:6.7.3.1 FIPS-Configurable Products
Any product using the Oracle SSL SDK can be configured to run in the FIPS mode. Specifically, you can configure Oracle HTTP Server in FIPS mode.
6.7.3.2 Setting the SSLFIPS_140 Parameter
You can configure these components to run in the FIPS mode by setting the SSLFIPS_140 parameter to TRUE in the fips.ora file:
SSLFIPS_140=TRUE
This file does not exist out-of-the-box and has to be created. Locate fips.ora either in the $ORACLE_HOME/ldap/admin directory, or in the directory pointed to by the FIPS_HOME environment variable.
The SSLFIPS_140 parameter is set to FALSE by default. You must set it to TRUE for FIPS mode operation.
6.7.3.3 Selecting Cipher Suites
A cipher suite is a set of authentication, encryption, and data integrity algorithms used for exchanging messages between network nodes. During an SSL handshake, for example, the two nodes negotiate to see which cipher suite they will use when transmitting messages back and forth.
Only the following cipher suites are approved for use in FIPS mode:
SSL_RSA_WITH_3DES_EDE_CBC_SHA
SSL_DH_anon_WITH_3DES_EDE_CBC_SHA
TLS_RSA_WITH_AES_128_CBC_SHA
TLS_RSA_WITH_AES_256_CBC_SHA
Any other ciphers should not be used while running in FIPS mode.
You can configure one or more of these ciphers using comma-separated values. These should be specified in the SSL properties file for the key 'Ciphers' in the WLST configureSSL command, or through Fusion Middleware Control.
See Section 6.9.16, "Properties Files for SSL" for details about specifying the SSL properties file with the configureSSL command.
6.7.3.4 Other Configuration Parameters
The minimum key size for enabling FIPS mode is 1024 bits. You need to ensure that the keys used in FIPS mode are at least 1024 bits. This is because the certificate in the wallet used by components like Oracle HTTP Server must have a minimum public key size of 1024 bits.
You can only use wallets created using Oracle tools such as orapki. Third-party PKCS#12 wallet files cannot be used in FIPS mode.
6.8 Best Practices for SSL
This section outlines some best practices for Oracle Fusion Middleware component administrators and application developers. It contains these topics:
6.8.1 Best Practices for Administrators
Best practices for system administrators include the following:
-
Use self-signed wallets only in test environment. You should obtain a CA signed certificate in the wallet before moving to production environment. For details, see Chapter 7, "Managing Keystores, Wallets, and Certificates."
-
It is recommended that components (at least in the Web tier) use certificates that have the system host name or virtual host or site name as the DN. This allows browsers to connect in SSL mode without giving unsettling warning messages.
-
A minimum key size of 1024 bits is recommended for certificates used for SSL. Higher key size provides more security but at the cost of reduced performance. Pick an appropriate key size value depending on your security and performance requirements.
-
Lack of trust is one of the most common reasons for SSL handshake failures. Ensure that the client trusts the server (by importing the server CA certificate into the client keystore) before starting SSL handshake. If client authentication is also required, then the reverse should also be true.
6.8.2 Best Practices for Application Developers
The following practices are recommended:
-
Use Java Key Store (JKS) to store certificates for your Java EE applications.
-
Externalize SSL configuration parameters like keystore path, truststore path, and authentication type in a configuration file, rather than embedding these values in the application code. This allows you the flexibility to change SSL configuration without having to change the application itself.
6.9 WLST Reference for SSL
WLST commands are available to manage Oracle wallets and to configure SSL for Oracle Fusion Middleware components.
Use the commands listed in Table 6-1 and Table 6-2 for this task.
See Also:
Section 7.2, "Command-Line Interface for Keystores and Wallets" for important instructions on how to launch the WLST shell to run SSL-related commands. Do not launch the WLST interface from any other location.Note:
All WLST commands for SSL configuration must be run in online mode.You can obtain help for each command by issuing:
help('command_name')
Certain commands require parameters like instance name, ias-component and process type. You can obtain this information with the command:
state('serverName') [in WebLogic domain]

nmServerStatus(serverName='name', serverType='type') [in Standalone domain]
Table 6-1 WLST Commands for SSL Configuration
| Use this command... | To... | Use with WLST... |
|---|---|---|
|
Set the SSL attributes for a component listener. |
Online |
|
|
Display the SSL attributes for a component listener. |
Online |
Table 6-2 WLST Commands for Oracle Wallet Management
| Use this command... | To... | Use with WLST... |
|---|---|---|
|
Generate a certificate signing request in an Oracle wallet. |
Online |
|
|
Add a self-signed certificate to an Oracle wallet. |
Online |
|
|
Change the password to an Oracle wallet. |
Online |
|
|
Create an Oracle wallet. |
Online |
|
|
Delete an Oracle wallet. |
Online |
|
|
Export an Oracle wallet to a file. |
Online |
|
|
Export an object (for example, a certificate) from an Oracle wallet to a file. |
Online |
|
|
Display a certificate or other object present in an Oracle wallet. |
Online |
|
|
Import an Oracle wallet from a file. |
Online |
|
|
Import a certificate or other object from a file to an Oracle wallet. |
Online |
|
|
List all objects (such as certificates) present in an Oracle wallet. |
Online |
|
|
List all Oracle wallets configured for a component instance. |
Online |
|
|
Remove a certificate or other object from a component instance's Oracle wallet. |
Online |
Note:
WLST allows you to import certificates only in PEM format.6.9.1 addCertificateRequest
Online command that generates a certificate signing request in an Oracle wallet.
6.9.1.1 Description
This command generates a certificate signing request in Base64 encoded PKCS#10 format in an Oracle wallet for a component instance (Oracle HTTP Server). To get a certificate signed by a certificate authority (CA), send the certificate signing request to your CA.
6.9.1.2 Syntax
addCertificateRequest('instName', 'compName', 'compType', 'walletName', 'password', 'DN', 'keySize')
| Argument | Definition |
|---|---|
| instName | Specifies the name of the application server instance. |
| compName | Specifies the name of the component instance. |
| compType | Specifies the type of component. Valid value is 'ohs'. |
| walletName | Specifies the name of the wallet file. |
| password | Specifies the password of the wallet. |
| DN | Specifies the Distinguished Name of the key pair entry. |
| keySize | Specifies the key size in bits. |
6.9.1.3 Example
The following command generates a certificate signing request with DN cn=www.acme.com and key size 1024 in wallet1, for Oracle HTTP Server instance ohs1, in application server instance inst1:
wls:/mydomain/serverConfig> addCertificateRequest('inst1', 'ohs1', 'ohs','wallet1', 'password', 'cn=www.acme.com', '1024',)
6.9.2 addSelfSignedCertificate
Online command that adds a self-signed certificate.
6.9.2.1 Description
This command creates a key pair and wraps it in a self-signed certificate in an Oracle wallet for the specified component instance (Oracle HTTP Server). Only keys based on the RSA algorithm are generated.
6.9.2.2 Syntax
addSelfSignedCertificate('instName', 'compName', 'compType', 'walletName', 'password', 'DN', 'keySize')
| Argument | Definition |
|---|---|
| instName | Specifies the name of the application server instance. |
| compName | Specifies the name of the component instance. |
| compType | Specifies the type of component. Valid value is 'ohs'. |
| walletName | Specifies the name of the wallet file. |
| password | Specifies the password of the wallet. |
| DN | Specifies the Distinguished Name of the key pair entry. |
| keySize | Specifies the key size in bits. |
6.9.2.3 Example
The following command adds a self-signed certificate with DN cn=www.acme.com, key size 1024 to wallet1, for Oracle HTTP Server instance ohs1, in application server instance inst1:
wls:/mydomain/serverConfig> addSelfSignedCertificate('inst1', 'ohs1', 'ohs','wallet1', 'password', 'cn=www.acme.com', '1024')
6.9.3 changeWalletPassword
Online command that changes the password of an Oracle wallet.
6.9.3.1 Description
This command changes the password of an Oracle wallet for the specified component instance (Oracle HTTP Server). This command is only applicable to password-protected wallets.
6.9.3.2 Syntax
changeWalletPassword('instName', 'compName', 'compType', 'walletName','currPassword', 'newPassword')
| Argument | Definition |
|---|---|
| instName | Specifies the name of the application server instance. |
| compName | Specifies the name of the component instance. |
| compType | Specifies the type of component. Valid value is 'ohs'. |
| walletName | Specifies the filename of the wallet. |
| currPassword | Specifies the current wallet password. |
| newPassword | Specifies the new wallet password. |
6.9.4 configureSSL
Online command that sets SSL attributes.
6.9.4.1 Description
This command sets the SSL attributes for a component listener. The attributes are specified in a properties file format (name=value). If a properties file is not provided, or it does not contain any SSL attributes, then default attribute values are used.
For details about the format of properties files, see Section 6.9.16, "Properties Files for SSL."
6.9.4.2 Syntax
configureSSL('instName', 'compName', 'compType', 'listener', 'filePath')
| Argument | Definition |
|---|---|
| instName | Specifies the name of the application server instance. |
| compName | Specifies the name of the component instance. |
| compType | Specifies the type of component. Valid value is 'ohs'. |
| listener | Specifies the name of the component listener to be configured for SSL. |
| filePath | Specifies the absolute path of the properties file containing the SSL attributes to set. |
6.9.4.3 Examples
The following command configures SSL attributes specified in the properties file /tmp/ssl.properties for Oracle Virtual Directory instance ovd1 in application server instance inst1, for listener listener1:
wls:/mydomain/serverConfig> configureSSL('inst1', 'ovd1', 'ovd', 'listener1','/tmp/ssl.properties')
The following command configures SSL attributes without specifying a properties file. Since no file is provided, the default SSL attribute values are used:
wls:/mydomain/serverConfig> configureSSL('inst1', 'ovd1', 'ovd', 'listener2')
6.9.5 createWallet
Online command that creates an Oracle wallet.
6.9.5.1 Description
This command creates an Oracle wallet for the specified component instance (Oracle HTTP Server). Wallets can be of password-protected or auto-login type. For wallet details, see Chapter 7, "Managing Keystores, Wallets, and Certificates."
6.9.5.2 Syntax
createWallet('instName', 'compName', 'compType', 'walletName', 'password')
| Argument | Definition |
|---|---|
| instName | Specifies the name of the application server instance. |
| compName | Specifies the name of the component instance. |
| compType | Specifies the type of component. Valid value is 'ohs'. |
| walletName | Specifies the name of the wallet file to be created. |
| password | Specifies the wallet password. |
6.9.5.3 Examples
The following command creates a wallet named wallet1 with password password, for Oracle HTTP Server instance ohs1 in application server instance inst1:
wls:/mydomain/serverConfig> createWallet('inst1', 'ohs1', 'ohs','wallet1', 'password')
The following command creates an auto-login wallet named wallet2 for Oracle WebCache instance wc1, in application server instance inst1:
wls:/mydomain/serverConfig> createWallet('inst1', 'wc1', 'webcache','wallet2', '')
6.9.6 deleteWallet
Online command that deletes an Oracle wallet.
6.9.6.2 Syntax
deleteWallet('instName', 'compName', 'compType', 'walletName')
| Argument | Definition |
|---|---|
| instName | Specifies the name of the application server instance. |
| compName | Specifies the name of the component instance. |
| compType | Specifies the type of component. Valid value is 'ohs'. |
| walletName | Specifies the name of the wallet file to be deleted. |
6.9.7 exportWallet
Online command that exports an Oracle wallet.
6.9.7.1 Description
This command exports an Oracle wallet, configured for a specified component instance, to files under the given directory. If the exported file is an auto-login only wallet, the file name is cwallet.sso. If it is password-protected wallet, two files are created—ewallet.p12 and cwallet.sso.
6.9.7.2 Syntax
exportWallet('instName', 'compName', 'compType', 'walletName','password', 'path')
| Argument | Definition |
|---|---|
| instName | Specifies the name of the application server instance. |
| compName | Specifies the name of the component instance. |
| compType | Specifies the type of component. Valid value is 'ohs'. |
| walletName | Specifies the name of the wallet file. |
| password | Specifies the password of the wallet. |
| path | Specifies the absolute path of the directory under which the object is exported. |
6.9.7.3 Examples
The following command exports auto-login wallet wallet1 for Oracle HTTP Server instance ohs1 to file cwallet.sso under /tmp:
wls:/mydomain/serverConfig> exportWallet('inst1', 'ohs1', 'ohs', 'wallet1','','/tmp')
The following command exports password-protected wallet wallet2 for Oracle HTTP Server instance ohs1 to two files, ewallet.p12 and cwallet.sso, under /tmp:
wls:/mydomain/serverConfig> exportWallet('inst1', 'ohs1', 'ohs', 'wallet2', 'password', '/tmp')
6.9.8 exportWalletObject
Online command that exports a certificate or other wallet object to a file.
6.9.8.1 Description
This command exports a certificate signing request, certificate, certificate chain or trusted certificate present in an Oracle wallet to a file for the specified component instance. DN indicates the object to be exported.
6.9.8.2 Syntax
exportWalletObject('instName', 'compName', 'compType', 'walletName', 'password', 'type', 'path', 'DN')
| Argument | Definition |
|---|---|
| instName | Specifies the name of the application server instance. |
| compName | Specifies the name of the component instance. |
| compType | Specifies the type of component. Valid value is 'ohs'. |
| walletName | Specifies the name of the wallet file. |
| password | Specifies the password of the wallet. |
| type | Specifies the type of wallet object to be exported. Valid values are 'CertificateRequest', 'Certificate', 'TrustedCertificate' or 'TrustedChain'. |
| path | Specifies the absolute path of the directory under which the object is exported as a file base64.txt. |
| DN | Specifies the Distinguished Name of the wallet object being exported. |
6.9.8.3 Examples
The following command exports a certificate signing request with DN cn=www.acme.com in wallet1, for Oracle HTTP Server instance ohs1, in application server instance inst1. The certificate signing request is exported under the directory /tmp:
wls:/mydomain/serverConfig> exportWalletObject('inst1', 'ohs1', 'ohs','wallet1', 'password', 'CertificateRequest', '/tmp','cn=www.acme.com')
The following command exports a certificate with DN cn=www.acme.com in wallet1, for Oracle HTTP Server instance ohs1, in application server instance inst1. The certificate or certificate chain is exported under the directory /tmp:
wls:/mydomain/serverConfig> exportWalletObject('inst1', 'ohs1', 'ohs','wallet1', 'password', 'Certificate', '/tmp','cn=www.acme.com')
The following command exports a trusted certificate with DN cn=www.acme.com in wallet1, for Oracle HTTP Server instance ohs1, in application server instance inst1. The trusted certificate is exported under the directory /tmp:
wls:/mydomain/serverConfig> exportWalletObject('inst1', 'ohs1', 'ohs','wallet1', 'password', 'TrustedCertificate', '/tmp','cn=www.acme.com')
The following command exports a certificate chain with DN cn=www.acme.com in wallet1, for Oracle HTTP Server instance ohs1, in application server instance inst1. The certificate or certificate chain is exported under the directory /tmp:
wls:/mydomain/serverConfig> exportWalletObject('inst1', 'ohs1', 'ohs','wallet1', 'password', 'TrustedChain', '/tmp','cn=www.acme.com')
6.9.9 getSSL
Online command that lists the configured SSL attributes.
6.9.9.1 Description
This command lists the configured SSL attributes for the specified component listener.
6.9.9.2 Syntax
getSSL('instName', 'compName', 'compType', 'listener')
| Argument | Definition |
|---|---|
| instName | Specifies the name of the application server instance. |
| compName | Specifies the name of the component instance. |
| compType | Specifies the type of component. Valid value is 'ohs'. |
| listener | Specifies the name of the component listener. |
6.9.10 getWalletObject
Online command that displays information about a certificate or other object in an Oracle wallet.
6.9.10.1 Description
This command displays a specific certificate signing request, certificate or trusted certificate present in an Oracle wallet for the specified component instance. The wallet object is indicated by its index number, as given by the listWalletObjects command. For certificates or trusted certificates, it shows the certificate details including DN, key size, algorithm and other data. For certificate signing requests, it shows the subject DN, key size and algorithm.
6.9.10.2 Syntax
getWalletObject('instName', 'compName', 'compType', 'walletName', 'password', 'type', 'index')
| Argument | Definition |
|---|---|
| instName | Specifies the name of the application server instance. |
| compName | Specifies the name of the component instance. |
| compType | Specifies the type of component. Valid value is 'ohs'. |
| walletName | Specifies the name of the wallet file. |
| password | Specifies the password of the wallet. |
| type | Specifies the type of wallet object to be exported. Valid values are 'CertificateRequest', 'Certificate', and 'TrustedCertificate'. |
| index | Specifies the index number of the wallet object as returned by the listWalletObjects command. |
6.9.10.3 Examples
The following command shows certificate signing request details for the object with index 0 present in wallet1, for Oracle HTTP Server instance ohs1, in application server instance inst1:
wls:/mydomain/serverConfig> getKeyStoreObject('inst1', 'ohs1', 'ohs','wallet1','password', 'CertificateRequest', '0')
The following command shows certificate details for the object with index 0 present in wallet1, for Oracle HTTP Server instance ohs1, in application server instance inst1:
wls:/mydomain/serverConfig> getKeyStoreObject('inst1', 'ohs1', 'ohs','wallet1','password', 'Certificate', '0')
The following command shows trusted certificate details for the object with index 0, present in wallet1, for Oracle HTTP Server instance ohs1, in application serverinstance inst1:
wls:/mydomain/serverConfig> getKeyStoreObject('inst1', 'ohs1', 'ohs','wallet1','password', 'TrustedCertificate', '0')
6.9.11 importWallet
Online command that imports an Oracle wallet from a file.
6.9.11.1 Description
This command imports an Oracle wallet from a file to the specified component instance for manageability. If the wallet being imported is an auto-login wallet, the file path must point to cwallet.sso; if the wallet is password-protected, it must point to ewallet.p12. The wallet name must be unique for the component instance.
6.9.11.2 Syntax
importWallet('instName', 'compName', 'compType', 'walletName', 'password', 'filePath')
| Argument | Definition |
|---|---|
| instName | Specifies the name of the application server instance. |
| compName | Specifies the name of the component instance. |
| compType | Specifies the type of component. Valid value is 'ohs'. |
| walletName | Specifies the name of the wallet being imported. The name must be unique for the component instance. |
| password | Specifies the password of the wallet. |
| filePath | Specifies the absolute path of the wallet file being imported. |
6.9.11.3 Examples
The following command imports the auto-login wallet file /tmp/cwallet.sso as wallet1 into Oracle HTTP Server instance ohs1. Subsequently, the wallet is managed with the name wallet1. No password is passed since it is an auto-login wallet:
wls:/mydomain/serverConfig> importWallet('inst1', 'ohs1', 'ohs', 'wallet1', '', '/tmp/cwallet.sso')
The following command imports password-protected wallet /tmp/ewallet.p12 as wallet2 into Oracle HTTP Server instance ohs1. Subsequently, the wallet is managed with the name wallet2. The wallet password is passed as a parameter:
wls:/mydomain/serverConfig> importWallet('inst1', 'ohs1', 'ohs', 'wallet2', 'password', '/tmp/ewallet.p12')
6.9.12 importWalletObject
Online command that imports a certificate or other object into an Oracle wallet.
6.9.12.1 Description
This command imports a certificate, trusted certificate or certificate chain into an Oracle wallet for the specified component instance. When importing a certificate, use the same wallet file from which the certificate signing request was generated.
6.9.12.2 Syntax
importWalletObject('instName', 'compName', 'compType', 'walletName', 'password', 'type', 'filePath')
| Argument | Definition |
|---|---|
| instName | Specifies the name of the application server instance. |
| compName | Specifies the name of the component instance. |
| compType | Specifies the type of component. Valid value is 'ohs'. |
| walletName | Specifies the name of the wallet file. |
| password | Specifies the password of the wallet. |
| type | Specifies the type of wallet object to be imported. Valid values are 'Certificate', 'TrustedCertificate' and 'TrustedChain'. |
| filePath | Specifies the absolute path of the file containing the wallet object. |
6.9.12.3 Examples
The following command imports a certificate chain in PKCS#7 format from file chain.txt into wallet1, for Oracle HTTP Server instance ohs1, in application server instance inst1:
wls:/mydomain/serverConfig> importWalletObject('inst1', 'ohs1', 'ohs','wallet1', 'password', 'TrustedChain','/tmp/chain.txt')
The following command imports a certificate from file cert.txt into wallet1, for Oracle HTTP Server instance ohs1, in application server instance inst1:
wls:/mydomain/serverConfig> > importWalletObject('inst1', 'ohs1', 'ohs','wallet1', 'password', 'Certificate','/tmp/cert.txt')
The following command imports a trusted certificate from file trust.txt into wallet1, for Oracle HTTP Server instance ohs1, in application server instance inst1:
wls:/mydomain/serverConfig> importWalletObject('inst1', 'ohs1', 'ohs','wallet1', 'password', 'TrustedCertificate','/tmp/trust.txt')
6.9.13 listWalletObjects
Online command that lists all objects in an Oracle wallet.
6.9.13.1 Description
This command lists all certificate signing requests, certificates, or trusted certificates present in an Oracle wallet for the specified component instance.
6.9.13.2 Syntax
listWalletObjects('instName', 'compName', 'compType', 'walletName', password', 'type')
| Argument | Definition |
|---|---|
| instName | Specifies the name of the application server instance. |
| compName | Specifies the name of the component instance. |
| compType | Specifies the type of component. Valid value is 'ohs'. |
| walletName | Specifies the name of the wallet file. |
| password | Specifies the password of the wallet. |
| type | Specifies the type of wallet object to be listed. Valid values are 'CertificateRequest', 'Certificate', and 'TrustedCertificate'. |
6.9.13.3 Examples
The following command lists all certificate signing requests in wallet1, for Oracle HTTP Server instance ohs1, in application server instance inst1:
wls:/mydomain/serverConfig> > listWalletObjects('inst1', 'ohs1', 'ohs','wallet1','password', 'CertificateRequest')
The following command lists all certificates in wallet1, for Oracle HTTP Server instance ohs1, in application server instance inst1:
wls:/mydomain/serverConfig> listWalletObjects('inst1', 'ohs1', 'ohs','wallet1','password', 'Certificate')
The following command lists all trusted certificates in wallet1, for Oracle HTTP Server instance ohs1, in application server instance inst1:
wls:/mydomain/serverConfig> listWalletObjects('inst1', 'ohs1', 'ohs','wallet1','password', 'TrustedCertificate')
6.9.14 listWallets
Online command that lists all wallets configured for a component instance.
6.9.14.1 Description
This command displays all the wallets configured for the specified component instance, and identifies the auto-login wallets.
6.9.15 removeWalletObject
Online command that removes a certificate or other object from an Oracle wallet.
6.9.15.1 Description
This command removes a certificate signing request, certificate, trusted certificate or all trusted certificates from an Oracle wallet for the specified component instance. DN is used to indicate the object to be removed.
6.9.15.2 Syntax
removeWalletObject('instName', 'compName', 'compType', 'walletName', 'password', 'type', 'DN')
| Argument | Definition |
|---|---|
| instName | Specifies the name of the application server instance. |
| compName | Specifies the name of the component instance. |
| compType | Specifies the type of component. Valid value is 'ohs'. |
| walletName | Specifies the name of the wallet file. |
| password | Specifies the password of the wallet. |
| type | Specifies the type of the keystore object to be removed. Valid values are 'CertificateRequest', 'Certificate', 'TrustedCertificate' or 'TrustedAll'. |
| DN | Specifies the Distinguished Name of the wallet object to be removed. |
6.9.15.3 Examples
The following command removes all trusted certificates from wallet1, for Oracle HTTP Server instance ohs1, in application server instance inst1. It is not necessary to provide a DN, so you pass null (denoted by None) for the DN parameter:
wls:/mydomain/serverConfig> removeWalletObject('inst1', 'ohs1', 'ohs','wallet1', 'password', 'TrustedAll',None)
The following command removes a certificate signing request indicated by DN cn=www.acme.com from wallet1, for Oracle HTTP Server instance ohs1, in application server instance inst1:
wls:/mydomain/serverConfig> removeWalletObject('inst1', 'ohs1', 'ohs','wallet1', 'password', 'CertificateRequest','cn=www.acme.com')
The following command removes a certificate indicated by DN cn=www.acme.com from wallet1, for Oracle HTTP Server instance ohs1, in application server instance inst1:
wls:/mydomain/serverConfig> removeWalletObject('inst1', 'ohs1', 'ohs','wallet1', 'password', 'Certificate','cn=www.acme.com')
The following command removes a trusted certificate indicated by DN cn=www.acme.com from wallet1, for Oracle HTTP Server instance ohs1, in application server instance inst1:
wls:/mydomain/serverConfig> removeWalletObject('inst1', 'ohs1', 'ohs','wallet1', 'password', 'TrustedCertificate','cn=www.acme.com')
6.9.16 Properties Files for SSL
SSL configuration employs certain properties files for use with the WLST configureSSL command. The files contain parameters to specify the desired SSL configuration, such as authentication type, cipher values, and SSL version.
You can use descriptive names if you need to manage multiple properties files for different components. For example, you could have properties files named ohs-ssl-properties.prop or ovd-ssl-properties.prop.
6.9.16.1 Structure of Properties Files
All the SSL properties files have a consistent structure.
Table 6-3 provides details about the key-value structure and usage of these files.
Table 6-3 Parameters in Properties File
| Key | Mandatory? | Allowed Values for Oracle HTTP Server | Usage |
|---|---|---|---|
|
SSLEnabled |
No |
true false |
Either value |
|
Ciphers |
No |
See "SSLCipherSuite" in Administering Oracle HTTP Server. |
One or more comma separated values |
|
SSLVersions |
No |
See "SSLProtocol" in Administering Oracle HTTP Server. |
One or more comma separated values |
|
CertValidation |
No |
none crl |
Either value |
|
CertValidation |
No |
file:// dir:// |
Path of the CRL file, or directory containing CRL files |
|
KeyStore |
No |
Valid wallet name |
|
|
TrustStore |
No |
N/A |
|
|
AuthenticationType |
No |
None Server Optional Mutual |
Any one value |
Table 6-4 shows the default values:
Table 6-4 Default Values of Parameters
| Key | Default Value for Oracle HTTP Server |
|---|---|
|
SSLEnabled |
true |
|
Ciphers |
null |
|
SSLVersions |
null |
|
CertValidation |
none |
|
CertValidation |
null |
|
KeyStore |
default |
|
TrustStore |
- |
|
Authentication |
Server |
Note:
-
At least one
DH_anoncipher must be used in SSL no-auth mode. For all other modes, at least oneRSAcipher must be used. -
The value of the
KeyStoreparameter must be specified when configuring SSL in server-auth, mutual-auth, or optional client auth. -
If only
AESciphers have been specified, theSSLVersionsparameter must containTLSv1ornzos_Version_1_0. -
If you are doing CRL-based validation, the value of the
CertValidationparameter should becrland the value of theCertValidationPathparameter should point to the CRL file/directory.
6.9.16.2 Examples of Properties Files
Some examples demonstrating the use of the properties files follow.
Example 1: Basic Properties File
SSLEnabled=true
AuthenticationType=None
CertValidation=none
This properties file specifies no authentication mode, and default values will be used during SSL configuration for ciphers and SSL version. Keystore and truststore properties are not specified since the authentication type is None. For other authentication types, keystore must be specified.
Example 2: Basic Properties File
SSLEnabled=
AuthenticationType=None
CertValidation=none
This properties file is exactly the same as above, except that SSLEnabled is explicitly specified without any value. This is the same as not specifying the key at all. In both cases, the default value will be used.
Therefore, all the following three settings have the same meaning:
-
The setting:
SSLEnabled=true
Here the value
trueis explicitly specified. -
The setting:
SSLEnabled=
Since no value is mentioned here, the default value of
SSLEnabled(true) is used. -
The key
SSLEnabledis not present in the properties file.Since the key is not present, its default value (
true) is used.
Example 3: Properties File with Version for OHS
SSLEnabled=true
AuthenticationType=Mutual
SSLVersion=nzos_Version_1_0
CertValidation=crl
CertValidationPath=file:///tmp/file.crl
KeyStore=ohs1
This properties file has:
-
Default values for ciphers
-
Keystore
-
SSL version v1
-
CRL validation turned on
-
Mutual Authentication mode