3 Upgrading Your Oracle Data Integrator Standalone Agent Environment (no WebLogic Domain)
This chapter describes the tasks required to upgrade your 11g Oracle Data Integrator standalone agent environment to Oracle Fusion Middleware 12c (see Section 1.1 for valid 11g starting points).
The following upgrade scenarios are covered:
-
Upgrading an 11g Release 1 (11.1.1.6.0) or 11g Release 1 (11.1.1.7.0) standalone agent not managed by OPMN to 12c.
-
Upgrading an 11g Release 1 (11.1.1.6.0) or 11g Release 1 (11.1.1.7.0) standalone agent managed by OPMN to 12c.
The following topics are covered in this chapter:
3.1 Understanding the Standalone Agent Upgrade Process
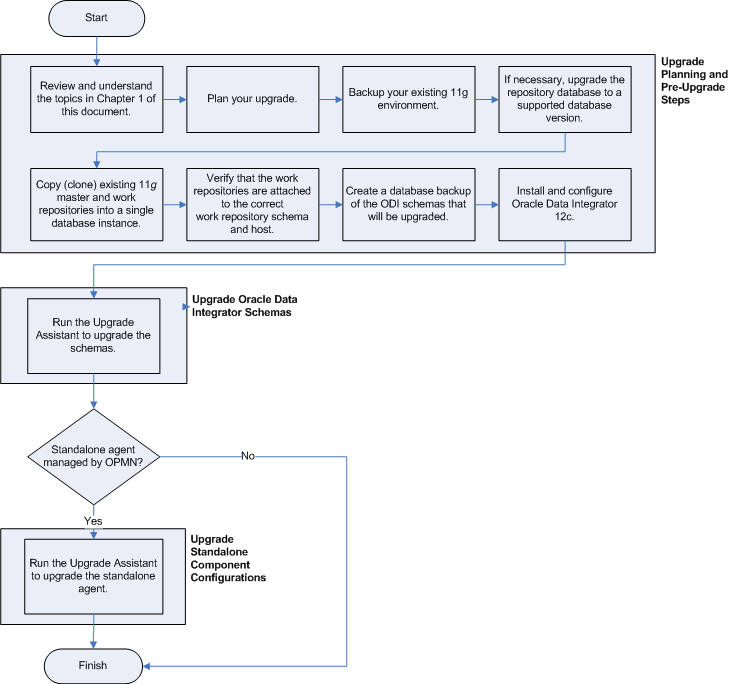
Figure 3-1 provides an overview of the upgrade process for the standalone agent topology.
Figure 3-1 Upgrade Process Flowchart for Standalone Agents (no WebLogic Domain)

Description of "Figure 3-1 Upgrade Process Flowchart for Standalone Agents (no WebLogic Domain)"
Table 3-1 describes each of the steps in the upgrade process flowchart which is shown in Figure 3-1. The table also provides information on where to go to get more information on each step in the process.
Table 3-1 Oracle Data Integrator Standalone Agent Upgrade Procedure
| Task | Description | More Information |
|---|---|---|
|
Review and understand the topics in Chapter 1 of this document. |
This chapter provides important information you should read and understand before beginning your upgrade process. |
|
|
Plan your upgrade. |
Understand important concepts and tasks when planning your upgrade. |
|
|
Backup your existing 11g environment. |
Before you begin your upgrade, make a complete backup of your existing 11g environment. |
|
|
If necessary, upgrade the repository database to a supported database version |
The Oracle Data Integrator Repositories are stored into database schemas. Before you can upgrade these schemas, you must make sure the database is a supported version. |
|
|
Copy (clone) existing Master and Work Repositories before running the Upgrade Assistant |
Oracle recommends that you perform repository upgrades on cloned repository schemas. |
|
|
Verify that the work repositories are attached to the correct work repository schema and host |
The Upgrade Assistant upgrades all work repositories attached to master repository. Each work repository must be attached to the correct work repository schema and host before performing the upgrade. |
|
|
Create a database backup of the ODI schema that will be upgraded. |
Creating a backup is mandatory if the repository schemas have not been cloned and you are attempting to upgrade a non-cloned schema. Performing a backup of the ODI schemas is particularly important if the upgrade fails and corrupts the content. With a backup, you can delete the corrupted schemas and re-clone the originals to complete the upgrade. |
|
|
Install and Configure Oracle Data Integrator 12c. |
Install Oracle Data Integrator 12c. This procedure includes creating the necessary database schemas. The Upgrade Assistant is available as part of the ODI product installation. |
|
|
Run Upgrade Assistant to Upgrade the Oracle Data Integrator Master Repository and Work Repository schema. |
The Upgrade Assistant upgrades the Oracle Data Integrator 11g repository schemas to Oracle Data Integrator 12c. |
|
|
If your standalone agent is managed by OPMN, run the Upgrade Assistant again to upgrade the Oracle Data Integrator standalone agent. |
This step configures the 11g standalone agent infrastructure to 12c. |
3.2 Verifying Your Upgrade
Perform the tasks in this section to verify that your upgrade was successful.
3.2.1 Starting the Node Manager
Follow the instructions in this section to start the Node Manager:
On UNIX operating systems, go to the DOMAIN_HOME/bin directory and run the following command:
./startNodeManager.sh
On Windows operating systems, go to the ORACLE_HOME\bin directory, and run the following command:
startNodeManager.cmd
3.2.2 Starting the Standalone Agent
Follow the instructions below to start your standalone agent:
-
Go to the
ORACLE_HOME/oracle_common/common/bin(on UNIX operating systems) orORACLE_HOME\oracle_common\common\bin(on Windows operating systems) directory. -
Invoke the WebLogic Scripting Tool (WLST).
On UNIX operating systems:
./wlst.sh
On Windows operating systems:
wlst.cmd
-
Connect to the Node Manager using the following command (replace the example values with your own values):
nmConnect(username="example_nm_user", password="example_password", port="example_port",domainName="example_domain");
-
Start the agent (replace the example agent name with your actual agent name).
nmStart(serverName="example_agent", serverType="ODI");