4 Sending and Receiving Messages using the User Messaging Service Web Service API
This chapter describes how to use the User Messaging Service (UMS) Web Service API to develop applications. This API serves as a programmatic entry point for Fusion Middleware application developers to implement UMS messaging applications that run in a remote container relative to the UMS server.
This chapter includes the following sections:
-
Section 4.2, "Creating a UMS Client Instance and Specifying Runtime Parameters"
-
Section 4.7, "Using UMS Web Service API to Specify Message Resends"
-
Section 4.10, "Sample Chat Application with Web Services APIs"
Note:
To learn more about the code samples for Oracle User Messaging Service, or to run the samples yourself, see the samples at:
http://www.oracle.com/technetwork/indexes/samplecode/sample-ums-1454424.html
4.1 Introduction to the UMS Web Service API
The UMS Web Service API is functionally identical to the Java API. The JAX-WS and JAXB bindings of the web service types and interfaces are named similarly to the corresponding Java API classes, but are in their own package space. Classes from the two APIs are not interoperable.
The UMS Web Service API consists of packages grouped as follows:
-
Common and Client Packages
-
oracle.ucs.messaging.ws -
oracle.ucs.messaging.ws.types
-
-
Web Service API Web Service Definition Language (WSDL) files:
-
messaging.wsdl: defines the operations invoked by a web service client. -
listener.wsdl: defines the callback operations that a client must implement to receive asynchronous message or status notifications.
-
The samples with source code are available on Oracle Technology Network (OTN).
4.2 Creating a UMS Client Instance and Specifying Runtime Parameters
This section describes the requirements for creating a UMS Client. You can create a instance of oracle.ucs.messaging.ws.MessagingClient by using the public constructor. Client applications can specify a set of parameters at runtime when instantiating a client object. For example, you configure a MessagingClient instance by specifying parameters as a map of key-value pairs in a java.util.Map<String, Object>. Among other things, the configuration parameters serve to identify the web service endpoint URL identifying the UMS server to communicate with, and other web service-related information such as security policies. Client applications are responsible for storing and loading the configuration parameters using any available mechanism.
You are responsible for mapping the parameters to or from whatever configuration storage mechanism is appropriate for your deployment. The MessagingClient class uses the specified key/value pairs for configuration, and passes through all parameters to the underlying JAX-WS service. Any parameters recognized by JAX-WS are valid. Table 4-1 lists the most common configuration parameters:
Table 4-1 Configuration Parameters Specified at Runtime
| Key | Type | Use |
|---|---|---|
|
|
String |
Endpoint URL for the remote UMS WS. This is typically "http://<host>:<port>/ucs/messaging/webservice". |
|
|
String |
Username to be asserted in WS-Security headers when relevant |
|
|
String[] |
Set of OWSM WS-Security policies to attach to the client's requests. These must match the policies specified on the server side. |
|
|
String |
Used for OWSM policy attachment. Specifies an alternate alias to use for looking up encryption and signing keys from the credential store. |
|
|
String |
Used for OWSM policy attachment. Specifies a credential store key to use for looking up remote username/password information from the Oracle Web Services Management credential store map. |
A MessagingClient cannot be reconfigured after it is instantiated. Instead, a new instance of the MessagingClient class must be created using the new configuration.
Example 4-1 shows code for creating a MessagingClient instance using username/token security, using the programmatic approach:
Example 4-1 Programmatic Approach to Creating a MessagingClient Instance, Username/Token Security
HashMap<String, Object> config = new HashMap<String, Object>();
config.put(BindingProvider.ENDPOINT_ADDRESS_PROPERTY,
 "http://example.com:8001/ucs/messaging/webservice");
config.put(ClientConstants.POLICIES, new String[] {"oracle/wss11_username_token_
with_message_protection_client_policy"});
config.put(BindingProvider.USERNAME_PROPERTY, "user1");
config.put(oracle.wsm.security.util.SecurityConstants.Config.CLIENT_CREDS_
LOCATION, oracle.wsm.security.util.SecurityConstants.Config.CLIENT_CREDS_LOC_
SUBJECT);
config.put(oracle.wsm.security.util.SecurityConstants.ClientConstants.WSS_CSF_KEY,
 "user1-passkey");
config.put(MessagingConstants.APPLICATION_NAME, "MyUMSWSApp");
mClient = new MessagingClient(config);
Example 4-2 shows code for creating a MessagingClient instance using SAML token security, using the programmatic approach:
Example 4-2 Programmatic Approach to Creating a MessagingClient Instance, SAML Token Security
HashMap<String, Object> config = new HashMap<String, Object>();
config.put(BindingProvider.ENDPOINT_ADDRESS_PROPERTY,
 "http://example.com:8001/ucs/messaging/webservice");
config.put(ClientConstants.POLICIES, new String[] {"oracle/wss11_saml_token_
identity_switch_with_message_protection_client_policy"});
config.put(BindingProvider.USERNAME_PROPERTY, "user1");
config.put(oracle.wsm.security.util.SecurityConstants.Config.CLIENT_CREDS_
LOCATION, oracle.wsm.security.util.SecurityConstants.Config.CLIENT_CREDS_LOC_
SUBJECT);
config.put(oracle.wsm.security.util.SecurityConstants.Config.KEYSTORE_RECIPIENT_
ALIAS_PROPERTY, "example.com");
config.put(MessagingConstants.APPLICATION_NAME, "MyUMSWSApp");
mClient = new MessagingClient(config);
A MessagingClient cannot be reconfigured after it is instantiated. Instead, you must create a new instance of the MessagingClient class using the desired configuration.
Factory methods are provided for creating Web Service API types in the class "oracle.ucs.messaging.ws.MessagingFactory".
4.3 Sending a Message
Invoking the send method causes the message to be delivered to UMS and processed accordingly. The send method returns a String message identifier that the client application can later use to retrieve message delivery status, or to correlate with asynchronous status notifications that are delivered to a Listener. The status returned is the latest known status based on UMS internal processing and delivery notifications received from external gateways.
The types of messages that can be created include plaintext messages, multipart messages that can consist of text/plain and text/html parts, and messages that include the creation of delivery channel (DeliveryType) specific payloads in a single message for recipients with different delivery types.
4.3.1 Creating a Message
This section describes the various types of messages that can be created.
4.3.1.1 Creating a Plaintext Message
Example 4-3 shows two ways to create a plaintext message using the UMS Web Service API.
Example 4-3 Creating a Plaintext Message Using the UMS Web Service API
Message message = MessagingFactory.createTextMessage("This is a Plain Text
 message.");

or

Message message = MessagingFactory.createMessage();
message.setContent(new DataHandler(new StringDataSource("This is a Plain Text
 message.", "text/plain; charset=UTF-8")));
4.3.1.2 Creating a Multipart/Mixed Message (with Text and Binary Parts)
Example 4-4 shows how to create a multipart/mixed message using the UMS Web Service API.
Example 4-4 Creating a Multipart/Mixed Message Using the UMS Web Service API
Message message = MessagingFactory.createMessage();
MimeMultipart mp = new MimeMultipart("mixed");

// Create the first body part
MimeBodyPart mp_partPlain = new MimeBodyPart();
StringDataSource plainDS = new StringDataSource("This is a Plain Text part.",
 "text/plain; charset=UTF-8");
mp_partPlain.setDataHandler(new DataHandler(plainDS));
mp.addBodyPart(mp_partPlain);

byte[] imageData;
// Create or load image data in the above byte array (code not shown for brevity)

// Create the second body part
MimeBodyPart mp_partBinary = new MimeBodyPart();
ByteArrayDataSource binaryDS = new ByteArrayDataSource(imageData, "image/gif");
mp_partBinary.setDataHandler(binaryDS);
mp.addBodyPart(mp_partBinary);

message.setContent(new DataHandler(mp, mp.getContentType()));
4.3.1.3 Creating a Multipart/Alternative Message (with Text/Plain and Text/HTML Parts)
Example 4-5 shows how to create a multipart/alternative message using the UMS Web Service API.
Example 4-5 Creating a Multipart/Alternative Message Using the UMS Web Service API
Message message = MessagingFactory.createMessage();
MimeMultipart mp = new MimeMultipart("alternative");
MimeBodyPart mp_partPlain = new MimeBodyPart();
StringDataSource plainDS = new StringDataSource("This is a Plain Text part.", "text/plain; charset=UTF-8");
mp_partPlain.setDataHandler(new DataHandler(plainDS));
mp.addBodyPart(mp_partPlain);

MimeBodyPart mp_partRich = new MimeBodyPart();
StringDataSource richDS = new StringDataSource(
    "<html><head></head><body><b><i>This is an HTML part.</i></b></body></html>",
    "text/html");
mp_partRich.setDataHandler(new DataHandler(richDS));
mp.addBodyPart(mp_partRich);

message.setContent(new DataHandler(mp, mp.getContentType()));
4.3.1.4 Creating Delivery Channel-Specific Payloads in a Single Message for Recipients with Different Delivery Types
When sending a message to a destination address, there could be multiple channels involved. Oracle UMS application developers are required to specify the correct multipart format for each channel.
Example 4-6 shows how to create delivery channel (DeliveryType) specific payloads in a single message for recipients with different delivery types.
Each top-level part of a multiple payload multipart/alternative message should contain one or more values of this header. The value of this header should be the name of a valid delivery type. Refer to the available values for DeliveryType in the enum DeliveryType.
Example 4-6 Creating Delivery Channel-specific Payloads in a Single Message for Recipients with Different Delivery Types
Message message = MessagingFactory.createMessage();

// create a top-level multipart/alternative MimeMultipart object.
MimeMultipart mp = new MimeMultipart("alternative");

// create first part for SMS payload content.
MimeBodyPart part1 = new MimeBodyPart();
part1.setDataHandler(new DataHandler(new StringDataSource("Text content for SMS.",
 "text/plain; charset=UTF-8")));
part1.setHeader(Message.HEADER_NS_PAYLOAD_PART_DELIVERY_TYPE, "SMS");
// add first part
mp.addBodyPart(part1);

// create second part for EMAIL and IM payload content.
MimeBodyPart part2 = new MimeBodyPart();
MimeMultipart part2_mp = new MimeMultipart("alternative");
MimeBodyPart part2_mp_partPlain = new MimeBodyPart();
part2_mp_partPlain.setDataHandler(new DataHandler(new StringDataSource("Text
 content for EMAIL/IM.", "text/plain; charset=UTF-8")));
part2_mp.addBodyPart(part2_mp_partPlain);
MimeBodyPart part2_mp_partRich = new MimeBodyPart();
part2_mp_partRich.setDataHandler(new DataHandler(new
 StringDataSource("<html><head></head><body><b><i>" + "HTML content for EMAIL/IM."
 +
    "</i></b></body></html>", "text/html; charset=UTF-8")));
part2_mp.addBodyPart(part2_mp_partRich);
part2.setContent(part2_mp, part2_mp.getContentType());
part2.addHeader(Message.HEADER_NS_PAYLOAD_PART_DELIVERY_TYPE, "EMAIL");
part2.addHeader(Message.HEADER_NS_PAYLOAD_PART_DELIVERY_TYPE, "IM");
// add second part
mp.addBodyPart(part2);

// set the content of the message
message.setContent(new DataHandler(mp, mp.getContentType()));

// set the MultiplePayload flag to true
MimeHeader multiHeader = new MimeHeader();
multiHeader.setName(oracle.sdp.client.Message.HEADER_SDPM_MULTIPLE_PAYLOAD);
multiHeader.setValue(Boolean.TRUE.toString());
message.getHeaders().add(multiHeader);
4.3.2 API Reference for Interface Message
The API reference for interface Message can be accessed from the Javadoc.
4.3.3 API Reference for Enum DeliveryType
The API reference for enum DeliveryType can be accessed from the Javadoc.
4.3.4 Addressing a Message
This section describes type of addresses and how to create address objects.
4.3.4.1 Types of Addresses
There are two types of addresses, device addresses and user addresses. A device address can be of various types, such as email addresses, instant messaging addresses, and telephone numbers. User addresses are user IDs in a user repository.
4.3.4.2 Creating Address Objects
You can address senders and recipients of messages by using the class MessagingFactory to create Address objects defined by the Address interface.
4.3.4.2.1 Creating a Single Address Object
Example 4-7 shows code for creating a single Address object:
4.3.4.2.2 Creating Multiple Address Objects in a Batch
Example 4-8 shows code for creating multiple Address objects in a batch:
4.3.4.2.3 Adding Sender or Recipient Addresses to a Message
Example 4-9 shows code for adding sender or recipient addresses to a message:
4.3.4.3 Creating a Recipient with a Failover Address
Example 4-10 shows code for creating a recipient with a failover address:
4.3.4.4 Recipient Types
The WS API provides support for sending and receiving messages with To/Cc/Bcc recipients for use with the email driver:
-
To send a message and specify a Cc/Bcc recipient, create the
oracle.ucs.messaging.ws.Addressobject usingoracle.ucs.messaging.ws.MessagingFactory.buildAddressmethod. The arguments are the address value (for example, user@domain.com), delivery type (for example,DeliveryType.EMAIL), and email mode (for example, "Cc" or "Bcc"). -
To determine the recipient type of an existing address object, for example in a received message, use the
oracle.ucs.messaging.ws.MessagingFactory.getRecipientTypemethod, passing it the Address object. It returns a string indicating the recipient type.
4.3.4.5 API Reference for Class MessagingFactory
The API reference for class MessagingFactory can be accessed from the Javadoc.
4.3.5 User Preference Based Messaging
When sending a message to a user recipient (to leverage the user's messaging preferences), you can pass facts (current values) for various business terms in the message as metadata. The UMS server matches the supplied facts in the message against conditions for business terms specified in the user's messaging filters.
Note:
All facts must be added as metadata in the oracle.sdp.client.Message.NAMESPACE_NOTIFICATION_PREFERENCES namespace. Metadata in other namespaces are ignored (for resolving User Communication Preferences).
Example 4-11 shows how to specify a user recipient and supply facts for business terms for the user preferences in a message. For a complete list of supported business terms, refer to Chapter 6, "User Communication Preferences."
Example 4-11 User Preference Based Messaging
Message message = MessagingFactory.createMessage();
// create and add a user recipient
Address userRecipient1 = MessagingFactory.createAddress("USER:sampleuser1");
message.addRecipient(userRecipient1);
// specify business term facts
MessagingFactory.setMetadata(message, oracle.sdp.client.Message.NAMESPACE_
NOTIFICATION_PREFERENCES, "Customer Name", "ACME");
//  where "Customer Name" is the Business Term name, and "ACME" is the
Business Term value (i.e, fact).
4.4 Retrieving Message Status
After sending a message, you can use Oracle UMS to retrieve the message status either synchronously or asynchronously.
4.4.1 Synchronous Retrieval of Message Status
To perform a synchronous retrieval of current status, use the following flow from the MessagingClient API:
String messageId = messagingClient.send(message);
List<Status> statuses = messagingClient.getStatus(messageId, null)
or,
List<Status> statuses = messagingClient.getStatus(messageId, addresses) --- where
addresses is a "List<Address>" of one or more of the recipients set in the message.
4.4.2 Asynchronous Receiving of Message Status
To receive statuses asynchronously, a client application must implement the listener web service as described in listener.wsdl. There is no constraint on how the listener endpoint must be implemented. For example, one method is to use the javax.xml.ws.Endpoint JAX-WS Service API to publish a web service endpoint. This mechanism is available in Java SE 6 and does not require the consumer to explicitly define a Java EE servlet module.
However, a servlet-based listener implementation is acceptable as well.
When sending a message, the client application can provide a reference to the listener endpoint, consisting of the endpoint URL and a SOAP interface name. As statuses are generated during the processing of the message, the UMS server invokes the listener endpoint' s onStatus method to notify the client application.
4.4.2.1 Creating a Listener Programmatically
Listeners are purely programmatic. You create a listener by implementing the oracle.ucs.messaging.ws.Listener interface. You can implement it as any concrete class - one of your existing classes, a new class, or an anonymous or inner class.
The following code example shows how to implement a status listener:
@PortableWebService(serviceName="ListenerService",
targetNamespace="http://xmlns.oracle.com/ucs/messaging/",
endpointInterface="oracle.ucs.messaging.ws.Listener",
wsdlLocation="META-INF/wsdl/listener.wsdl",
portName="Listener")
public class MyListener implements Listener {
  public MyListener() {
  }

  @Override
  public void onMessage(Message message, byte[] correlator) throws MessagingException {
    System.out.println("I got a message!");
  }  @Override
  public void onStatus(Status status, byte[] correlator) throws MessagingException {
    System.out.println("I got a status!");
  }
}
4.4.2.2 Publish the Callback Service
To publish the callback service, you can either declare a servlet in web.xml in a web module within your application, or use the JAX-WS javax.xml.ws.Endpoint class's publish method to programmatically publish a WS endpoint (Example 4-12):
4.4.2.3 Stop a Dynamically Published Endpoint
To stop a dynamically published endpoint, call the stop() method on the Endpoint object returned from Endpoint.publish() (Example 4-13).
4.4.2.4 Registration
Once the listener web service is published, you must register the fact that your client has such an endpoint. There are the following relevant methods in the MessagingClient API:
-
setStatusListener(ListenerReference listener) -
send(Message message, ListenerReference listener, byte[] correlator)
setStatusListener() registers a "default" status listener whose callback is invoked for any incoming status messages. A listener passed to send() is only invoked for status updates related to the corresponding message.
4.5 Receiving a Message
This section describes how an application receives messages.
An application that wants to receive incoming messages must register one or more access points that represent the recipient addresses of the messages. The server matches the recipient address of an incoming message against the set of registered access points, and routes the incoming message to the application that registered the matching access point. From the application perspective there are two modes for receiving a message, synchronous and asynchronous.
4.5.1 Registering an Access Point
The client application can create and register an access point, specifying that it wants to receive incoming messages sent to a particular address.
The client application can then invoke the receive method to fetch the pending messages. When receiving messages without specifying an access point, the application receives messages for any of the access points that it has registered. Otherwise, if an access point is specified, the application receives messages sent to that access point.
AccessPoint represents one or more device addresses to receive incoming messages.
You can use MessagingFactory.createAccessPoint to create an access point and MessagingClient.registerAccessPoint to register it for receiving messages.
To register an email access point:
Address apAddress = MessagingFactory.createAddress("EMAIL:user1@example.com");
AccessPoint ap = MessagingFactory.createAccessPoint(apAddress);
MessagingClient.registerAccessPoint(ap);
To register an SMS access point for the number 9000:
AccessPoint accessPointSingleAddress =
 MessagingFactory.createAccessPoint(AccessPointType.SINGLE_ADDRESS,
 DeliveryType.SMS, "9000");
messagingClient.registerAccessPoint(accessPointSingleAddress);
To register SMS access points in the number range 9000 to 9999:
AccessPoint accessPointRangeAddress =
 MessagingFactory.createAccessPoint(AccessPointType.NUMBER_RANGE,
 DeliveryType.SMS,"9000,9999");
messagingClient.registerAccessPoint(accessPointRangeAddress);
4.5.2 Synchronous Receiving
Use the method MessagingClient.receive to synchronously receive messages that UMS makes available to the application. This is a convenient polling method for light-weight clients that do not want the configuration overhead associated with receiving messages asynchronously.
Receive is a nonblocking operation. If there are no pending messages for the application or access point, the call returns immediately with an empty list. Receive is not guaranteed to return all available messages, but may return only a subset of available messages for efficiency reasons.
It performs a nonblocking call, so if no message is currently available, the method returns null.
Note:
A single invocation does not guarantee retrieval of all available messages. You must poll to ensure receiving all available messages.
4.5.3 Asynchronous Receiving
To receive messages asynchronously, a client application must implement the Listener web service as described in listener.wsdl. There is no constraint on how the listener endpoint must be implemented. For example, one mechanism is using the javax.xml.ws.Endpoint JAX-WS Service API to publish a web service endpoint. This mechanism is available in Java SE 6 and does not require the consumer to explicitly define a Java EE servlet module. However, a servlet-based listener implementation is also acceptable.
4.5.3.1 Creating a Listener Programmatically
Listeners are purely programmatic. You create a listener by implementing the oracle.ucs.messaging.ws.Listener interface. You can implement it as any concrete class - one of your existing classes, a new class, or an anonymous or inner class.
The following code example shows how to implement a message listener:
@PortableWebService(serviceName="ListenerService",
targetNamespace="http://xmlns.oracle.com/ucs/messaging/",
endpointInterface="oracle.ucs.messaging.ws.Listener",
wsdlLocation="META-INF/wsdl/listener.wsdl",
portName="Listener")
public class MyListener implements Listener {
  public MyListener() {
  }

  @Override
  public void onMessage(Message message, byte[] correlator) throws MessagingException {
    System.out.println("I got a message!");
  }  @Override
  public void onStatus(Status status, byte[] correlator) throws MessagingException {
    System.out.println("I got a status!");
  }
}
You pass a reference to the Listener object to the setMessageListener or registerAccessPoint methods, as described in "Default Message Listener" and "Per Access Point Message Listener". When a message arrives for your application, the UMS infrastructure invokes the Listener's onMessage method.
4.5.3.2 Default Message Listener
The client application typically sets a default message listener (Example 4-14). This listener is invoked for any delivery statuses for messages sent by this client application that do not have an associated listener. When Oracle UMS receives messages addressed to any access points registered by this client application, it invokes the onMessage callback for the client application's default listener.
To remove a default listener, call this method with a null argument.
4.5.3.3 Per Access Point Message Listener
The client application can also register an access point and specify a Listener object and an optional correlator object (Example 4-15). When incoming messages arrive at the specified access point address, the specified listener' s onMessage method is invoked. The originally-specified correlator object is also passed to the callback method.
Example 4-15 Per Access Point Message Listener
AccessPoint accessPoint =
 MessagingFactory.createAccessPoint(AccessPointType.SINGLE_ADDRESS,
DeliveryType.EMAIL, "test@example.org");
ListenerReference listenerRef = new ListenerReference();
listenerRef.setEndpoint("url_to_your_webservice_message_listener");
byte[] correlator = null; // Not to correlate the callback
messagingClient.registerAccessPoint(accessPoint, listenerRef, correlator);
4.5.4 Message Filtering
A MessageFilter is used by an application to exercise greater control over what messages are delivered to it. A MessageFilter contains a matching criterion and an action. An application can register a series of message filters; they are applied in order against an incoming (received) message; if the criterion matches the message, the action is taken. For example, an application can use MessageFilters to implement necessary blacklists, by rejecting all messages from a given sender address.
You can use MessagingFactory.createMessageFilter to create a message filter, and MessagingClient.registerMessageFilter to register it. The filter is added to the end of the current filter chain for the application. When a message is received, it is passed through the filter chain in order; if the message matches a filter's criterion, the filter's action is taken immediately. If no filters match the message, the default action is to accept the message and deliver it to the application.For example, to reject a message with the subject "spam":
MessageFilter subjectFilter = MessagingFactory.createMessageFilter("spam",
 FilterFieldType.SUBJECT, null, FilterActionType.REJECT);
messagingClient.registerMessageFilter(subjectFilter);
To reject messages from email address spammer@foo.com:
MessageFilter senderFilter =
 MessagingFactory.createBlacklistFilter("spammer@foo.com");
messagingClient.registerMessageFilter(senderFilter);
4.6 Configuring for a Cluster Environment
The API supports an environment where client applications and the UMS server are deployed in a cluster environment. For a clustered deployment to function as expected, client applications must be configured correctly. The following rules apply:
-
Two client applications are considered to be instances of the same application if they use the same
ApplicationNameconfiguration parameter. -
The
ApplicationInstanceNameconfiguration parameter enables you to distinguish instances from one another. -
Application sessions are instance-specific. You can set the session flag on a message to ensure that any reply is received by the instance that sent the message.
-
Listener correlators are instance-specific. If two different instances of an application register listeners and supply different correlators, then when instance A' s listener is invoked, correlator A is supplied; when instance B' s listener is invoked, correlator B is supplied.
4.7 Using UMS Web Service API to Specify Message Resends
UMS allows you to schedule a message resend when the message send attempt fails. You can specify the maximum number of message resends by calling the setMaxResend method as shown in the following example:
MessageInfo msgInfo = new oracle.ucs.messages.ws.types.MessageInfo();
msgInfo.setMaxResend(new Integer(1));
// When MessageInfo is created we must also set priority
msgInfo.setPriority(PriorityType.NORMAL);
message.setMessageInfo(msgInfo);
String mid = client.send(message, null, null);
The status of the failover addresses can be received by calling getTotalFailovers() and getFailoverOrder(). When failover order equals total failovers, the API user knows that the failover chain is exhausted. However, the resend functionality works as a loop over the failover chain. You can call getMaxResend() and getCurrentResend() to know when the resend and failover chain is completely exhausted.
For more information about setMaxResend, getTotalFailovers() and getFailoverOrder() methods, see User Messaging Service Java API Reference.
4.8 Configuring Security
The following sections discuss security considerations:
4.8.1 Client and Server Security
There are two supported security modes for the UMS Web Service: Security Assertions Markup Language (SAML) tokens and username tokens.
The supported SAML-based policy is "oracle/wss11_saml_token_with_message_protection_client_policy". This policy establishes a trust relationship between the client application and the UMS server based on the exchange of cryptographic keys. The client application is then allowed to assert a user identity that is respected by the UMS server. To use SAML tokens for WS-Security, some keystore configuration is required for both the client and the server. See Example 4-2 for more details about configuring SAML security in a UMS web service client.
The supported username token policy is "oracle/wss11_username_token_with_message_protection_client_policy". This policy passes an encrypted username/password token in the WS-Security headers, and the server authenticates the supplied credentials. It is highly recommended that the username and password be stored in the Credential Store, in which case only a Credential Store key must be passed to the MessagingClient constructor, ensuring that credentials are not hard-coded or stored in an unsecure manner. See Example 4-1 for more details about configuring SAML security in a UMS web service client.
4.8.2 Listener or Callback Security
Username token and SAML token security are also supported for the Listener callback web services. When registering a listener, the client application must supply additional parameters specifying the security policy and any key or credential lookup information that the server requires to establish a secure connection.
Example 4-16 illustrates how to establish a secure callback endpoint using username token security:
Example 4-16 Establishing a Secure Callback Endpoint Using Username Token Security
MessagingClient client = new MessagingClient(clientParameters);
...
ListenerReference listenerRef = new ListenerReference();
// A web service implementing the oracle.ucs.messaging.ws.Listener
// interface must be available at the specified URL.
listenerRef.setEndpoint(myCallbackURL);
Parameter policyParam = new Parameter();
policyParam.setName(ClientConstants.POLICY_STRING);
policyParam.setValue("oracle/wss11_username_token_with_message_protection_client_policy");
listenerRef.getParameters.add(policyParam);
// A credential store entry with the specified key must be
// provisioned on the server side so it will be available when the callback
// is invoked.
Parameter csfParam = new Parameter();
csfParam.setName(oracle.wsm.security.util.SecurityConstants.ClientConstants.WSS_CSF_KEY);
csfParam.setValue("callback-csf-key");
listenerRef.getParameters.add(csfParam);
client.setMessageListener(listenerRef);
4.9 Threading Model
Instances of the WS MessagingClient class are not thread-safe due to the underlying services provided by the JAX-WS stack. You are responsible for ensuring that each instance is used by only one thread at a time.
4.10 Sample Chat Application with Web Services APIs
This section describes how to create, deploy and run the sample chat application with the Web Services APIs provided with Oracle User Messaging Service on OTN.
Note:
To learn more about the code samples for Oracle User Messaging Service, or to run the samples yourself, see the samples at:
http://www.oracle.com/technetwork/indexes/samplecode/sample-ums-1454424.html.
This section describes the following topics:
4.10.1 Overview
This sample demonstrates how to create a web-based chat application to send and receive messages through email, SMS, or IM. The sample uses the Web Service APIs to interact with a User Messaging server. You define an application server connection in Oracle JDeveloper, and deploy and run the application.
The application is provided as a pre-built Oracle JDeveloper project that includes a simple web chat interface.
Note:
For this sample to work, a UMS Server must be available and properly configured with the required drivers.
4.10.2 Running the Pre-Built Sample
Perform the following steps to run and deploy the pre-built sample application:
-
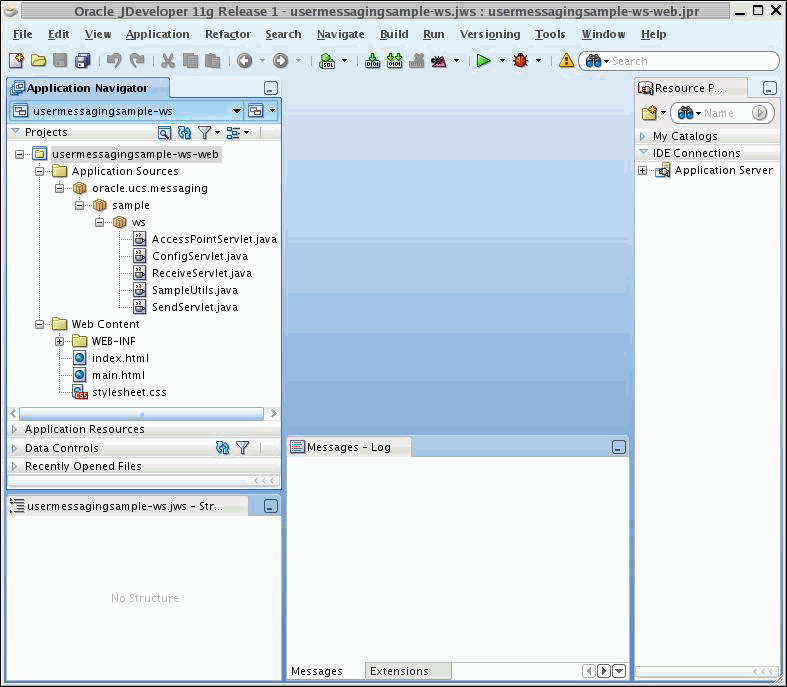
Extract "usermessagingsample-ws-src.zip" and open usermessagingsample-ws.jws in Oracle JDeveloper.
Figure 4-1 Opening the Project in Oracle JDeveloper
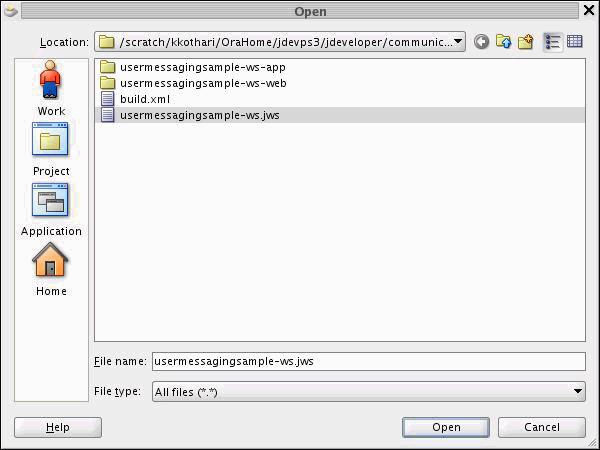
Description of "Figure 4-1 Opening the Project in Oracle JDeveloper"
In the Oracle JDeveloper main window the project appears.
The application contains one web module. All of the source code for the application is in place.
-
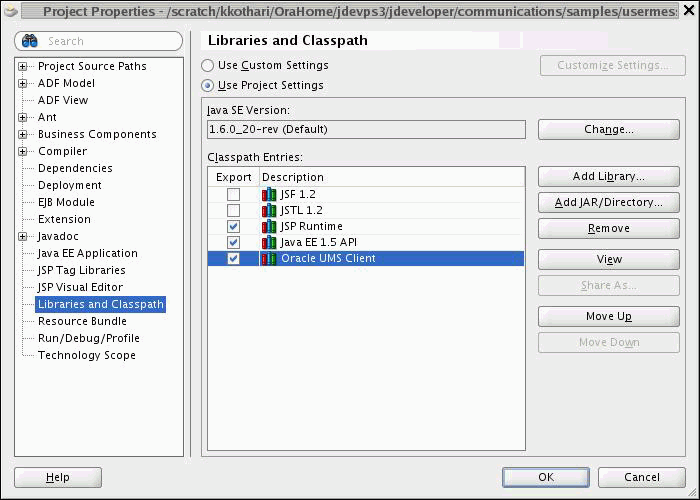
Satisfy the build dependencies for the sample application by ensuring the "Oracle UMS Client" library is used by the web module.
-
In the Application Navigator, right-click web module usermessagingsample-ws-war, and select Project Properties.
-
In the left pane, select Libraries and Classpath.
-
Click OK.
-
-
Create an Application Server Connection by right-clicking the project in the navigation pane and selecting New. Follow the instructions in Section 4.10.4, "Creating a New Application Server Connection".
-
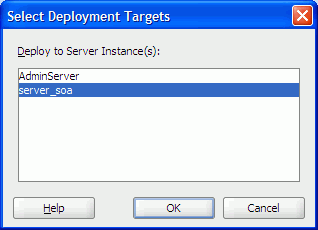
Deploy the project by selecting the usermessasgingsample-ws project, Deploy, usermessasgingsample-ws, to, and SOA_server (Figure 4-4).
-
Verify that the message
Build Successfulappears in the log. -
Verify that the message
Deployment Finishedappears in the deployment log.You have successfully deployed the application.
4.10.3 Testing the Sample
Perform the following steps to run and test the sample:
-
Open a web browser.
-
Navigate to the URL of the application as follows, and log in:
http://host:port/usermessagingsample-ws/The Messaging Web Services Sample web page appears (Figure 4-5). This page contains navigation tabs and instructions for the application.
Figure 4-5 Messaging Web Services Sample Web Page
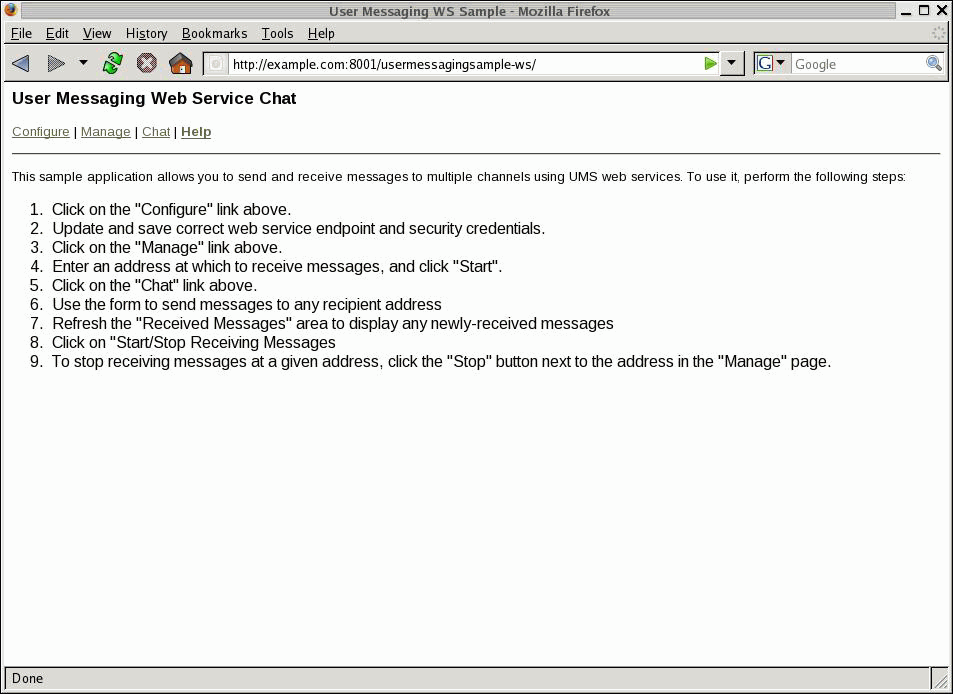
Description of "Figure 4-5 Messaging Web Services Sample Web Page"
-
Click Configure and enter the following values (Figure 4-6):
-
Specify the web service endpoint. For example,
http://example.com:8001/ucs/messaging/webservice -
Specify the Username and Password.
-
Specify a Policy (required if the User Messaging Service instance has WS security enabled).
-
Figure 4-6 Configuring the Web Service Endpoints and Credentials
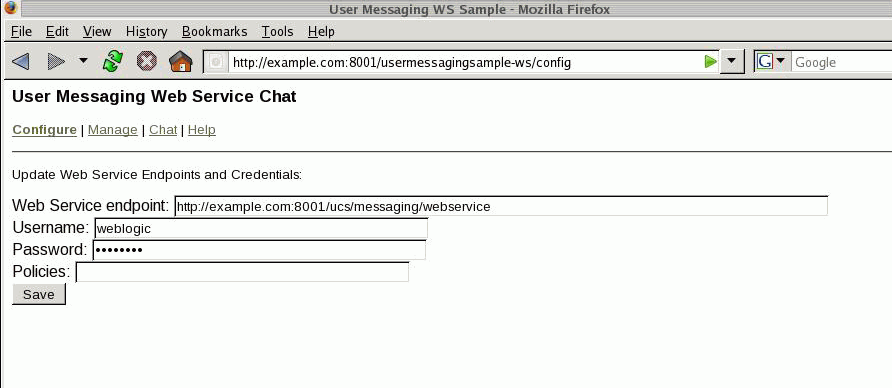
Description of "Figure 4-6 Configuring the Web Service Endpoints and Credentials"
-
-
Click Save.
-
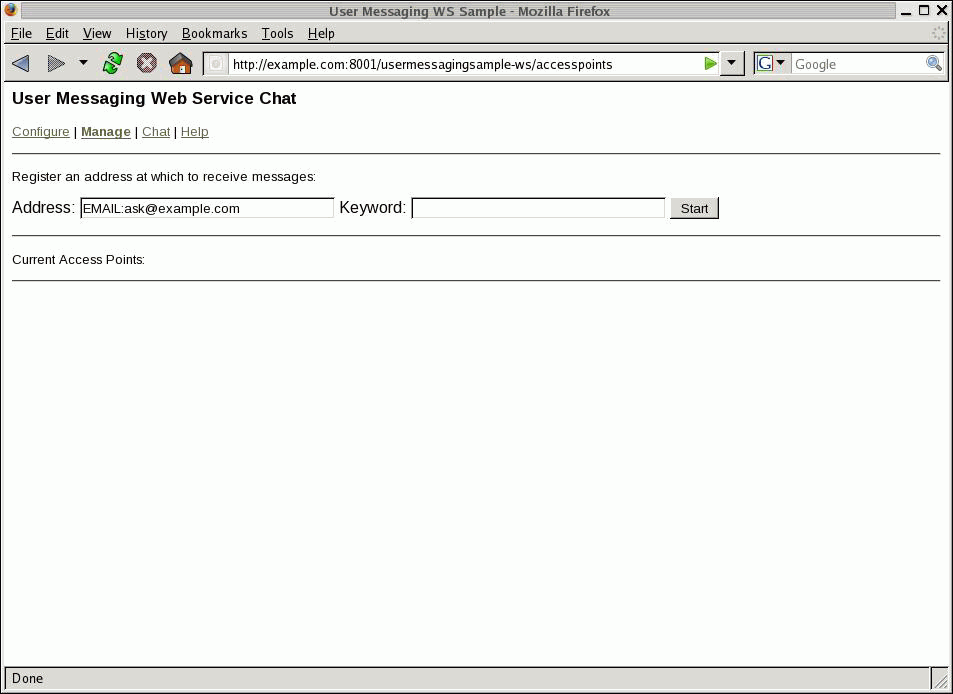
Click Manage.
-
Enter an address and optional keyword at which to receive messages (Figure 4-7).
-
Click Start.
Verify that the message
Registration operation succeededappears. -
Click Chat.
-
Enter recipients in the To: field.
-
Enter a message.
-
Click Send.
-
Verify that the message is received.
4.10.4 Creating a New Application Server Connection
You define an application server connection in Oracle JDeveloper, and deploy and run the application. Perform the steps in Section A.3, "Creating a New Application Server Connection" to create an Application Server Connection.
