3 Developing a Basic JMS Application Using the WebLogic JMS .NET API
This chapter describes the steps required to develop a basic JMS application in C# using the JMS .NET API. The process for developing a JMS application using the WebLogic JMS .NET client is very similar to the process used to develop a Java client.
Creating a JMS .NET Client Application
The following flowchart illustrates the steps in a basic JMS .NET application.
Figure 3-1 Basic Steps in a JMS .NET Client Application
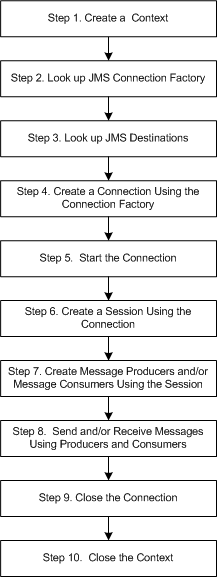
Description of "Figure 3-1 Basic Steps in a JMS .NET Client Application"
Note:
Creating and closing resources has relatively higher overhead in comparison to sending and receiving messages. Oracle recommends that contexts be shared between threads, and that other resources be cached for reuse. For more information, see Best Practices.Example: Writing a Basic PTP JMS .NET Client Application
The following example shows how to create a basic PTP JMS .NET client application, written in C#. It uses synchronous receive on a queue configured using auto acknowledge mode. A complete copy of the example is provided in Appendix A, "JMS .NET Client Sample Application."
For more information about the .NET API classes and methods used in this example, see Understanding the WebLogic JMS .NET API, or the WebLogic Messaging API Reference for .NET Clients documentation.
Prerequisites
Before proceeding, ensure that the system administrator responsible for configuring WebLogic Server has configured the following:
-
Listen port configured for T3 protocol on the server hosting the JMS .NET client host. For more information, see Configuring the Listen Port.
-
The required JMS resources, including the connection factories, JMS servers, and destinations. For more information, see Configuring JMS Resources for the JMS .NET Client.
Basic Steps
The following steps assume you have defined the required variables, including the WebLogic Server host, the connection factory, and the queue and topic names at the beginning of your program.
using System;
using System.Collections;
using System.Collections.Generic;
using System.Threading;


using WebLogic.Messaging;

public class MessagingSample
{
  private string host      = "localhost";
  private int    port      = 7001;
  private string cfName    = "weblogic.jms.ConnectionFactory";
  private string queueName = "jms.queue.TestQueue1";
Step 1
Create a context to establish a network connection to the WebLogic Server host and optionally login.
IDictionary<string, Object> paramMap = new Dictionary<string, Object>();

paramMap[Constants.Context.PROVIDER_URL] =
 "t3://" + this.host + ":" + this.port;

IContext context = ContextFactory.CreateContext(paramMap);
Note:
The Provider_URL may contain multiple addresses, separated by commas. For details about specifying multiple addresses, see Specifying the URL Format.When multiple addresses are specified, the context tries each address in turn until one succeeds or they all fail, starting at a random location within the list of addresses, and rotating through all addresses. Starting at a random location facilitates load balancing of multiple clients, as different client contexts will randomly load balance their network connection to different .NET client host servers.
Note:
You also have the option of supplying a username and password with the initial context, as follows:paramMap[Constants.Context.SECURITY_PRINCIPAL] = username; paramMap[Constants.Context.SECURITY_CREDENTIALS] = password;
Step 2
Look up the JMS connection factory.
IConnectionFactory cf = context.LookupConnectionFactory(this.cfName);
Step 3
Look up JMS destination resources in the context using their configured JNDI names.
IQueue queue = (IQueue)context.LookupDestination(this.queueName);
Step 4
Create a connection using the connection factory. This establishes a JMS connection from the .NET client host to the JMS connection host. The connection host will be one of the servers that is in the configured target list for the connection factory, and which can be the same as the .NET client host.
IConnection connection = cf.CreateConnection();
Step 5
Start the connection to allow consumers to get messages.
connection.Start();
Step 6
Create a session using the AUTO_ACKNOWLEDGE acknowledge mode.
Note:
Sessions are not thread safe. Use multiple sessions if you need to run producers and/or consumers concurrently. For an example using multiple sessions, see the asynchronous example in Appendix A, "JMS .NET Client Sample Application."ISession session = connection.CreateSession( Constants.SessionMode.AUTO_ACKNOWLEDGE);
Step 7
Create a message producer and send a persistent message.
IMessageProducer producer = session.CreateProducer(queue);

producer.DeliveryMode = Constants.DeliveryMode.PERSISTENT;

ITextMessage sendMessage = session.CreateTextMessage("My q message");

producer.Send(sendMessage);
Step 8
Create a message consumer and receive a message. Note that the message is automatically deleted from the server because the session was created in AUTO_ACKNOWLEDGE mode, as shown in Step 6.
IMessageConsumer consumer = session.CreateConsumer(queue);

IMessage recvMessage = consumer.Receive(500);
Using Advanced Concepts in JMS .NET Client Applications
Appendix A, "JMS .NET Client Sample Application," provides a complete example of a JMS .NET client application, written in C#, that demonstrates some of the following advanced concepts:
-
The use of local transactions instead of acknowledge modes.
-
Message persistence. For more information, see Persistent vs. Non-Persistent Messages in Developing JMS Applications for Oracle WebLogic Server.
-
Acknowledge modes. For more information, see Non-Transacted Session in Developing JMS Applications for Oracle WebLogic Server.
-
Exception listeners. For more information, see Best Practices.
-
Durable Subscriptions. For more information, see Setting Up Durable Subscriptions in Developing JMS Applications for Oracle WebLogic Server.
For guidelines in the use of other advanced concepts in the JMS .NET client such as interoperability, security, and best practices, see Chapter 4, "Programming Considerations."