35 Adding Drag and Drop Functionality
This chapter describes how to add drag and drop functionality to your pages, which allows users to drag the values of attributes or objects from one component to another, or allows users to drag and drop components. It describes how to add drag and drop functionality for attributes, objects, collections, components, calendars, and supported DVT components. It also describes how to drag and drop functionality into and out of a panelDashboard component.
This chapter includes the following sections:
-
Section 35.2, "Adding Drag and Drop Functionality for Attributes"
-
Section 35.3, "Adding Drag and Drop Functionality for Objects"
-
Section 35.4, "Adding Drag and Drop Functionality for Collections"
-
Section 35.5, "Adding Drag and Drop Functionality for Components"
-
Section 35.6, "Adding Drag and Drop Functionality Into and Out of a panelDashboard Component"
-
Section 35.7, "Adding Drag and Drop Functionality to a Calendar"
-
Section 35.8, "Adding Drag and Drop Functionality for DVT Components"
35.1 About Drag and Drop Functionality
The ADF Faces framework provides the ability to drag and drop items from one place to another on a page. In most cases, drag and drop can easily be implemented by adding the appropriate tags to the source and target and implementing code in a managed bean. Drag and drop provides users with the GUI experience that is expected in web applications. For example, in the File Explorer application, you can drag a file from the Table tab and drop it into another directory folder, as shown in Figure 35-1.
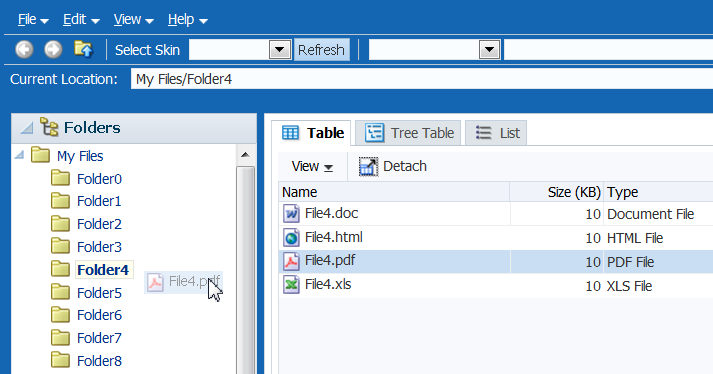
In this scenario, you are actually dragging an object from one collection (Folder0) and dropping it into another collection (Folder2). This is one of the many supported drag and drop scenarios. ADF Faces supports the following scenarios:
-
Dragging an attribute value from one component instance and copying it to another. For example, a user might be able to drag an
outputTextcomponent onto aninputTextcomponent, which would result in thevalueattribute of theoutputTextcomponent becoming thevalueattribute on theinputTextcomponent. -
Dragging the value of one object and dropping it so that it becomes the value of another object. For example, a user might be able to drag an
outputTextcomponent onto anotheroutputTextcomponent, which would result in an array ofStringobjects populating thetextattribute of the secondoutputTextcomponent. -
Dragging an object from one collection and dropping it into another, as shown in Figure 35-1.
-
Dragging a component from one place on a page to another. For example, a user might be able to drag an existing
panelBoxcomponent to a new place within apanelGridcomponent. -
Dragging an activity in a calendar from one start time or date to another.
-
Dragging a component into or out of a
panelDashboardcomponent. -
Dropping an object from another component into a DVT Pareto or stock graph.
-
Dragging an object from a DVT Gantt chart to another component.
-
Dragging a node from or dropping an object to DVT treemap and sunburst components.
-
Dragging and dropping one or more nodes within DVT hierarchy viewers, dragging one or more nodes from a hierarchy viewer to another component, or dragging from one or more components to a hierarchy viewer.
-
Dragging and dropping an event from a DVT timeline to a collection component such as a table, or dragging and dropping a row from a table of time-based events into a timeline.
When users click on a source and begin to drag, the browser displays the element being dragged as a ghost element attached to the mouse pointer. Once the ghost element hovers over a valid target, the target component shows some feedback (for example, it becomes highlighted and the cursor changes to indicate the target is valid). If the user drags the ghost element over an invalid target, the cursor changes to indicate that the target is not valid.
When dragging attribute values, the user can only copy the value to the target. For all other drag and drop scenarios, on the drop, the element can be copied (copy and paste), moved (cut and paste), or linked (creating a shortcut for a file in a directory in which the link is a reference to the real file object).
The component that will be dragged and that contains the value is called the source. The component that will accept the drop is called the target. You use a specific tag as a child to the source and target components that tells the framework to allow the drop. Table 35-1 shows the different drag and drop scenarios, the valid source(s) and target(s), and the associated tags to be used for that scenario.
Table 35-1 Drag and Drop Scenarios
| Scenario | Source | Target |
|---|---|---|
|
Dragging an attribute value |
An attribute value on a component |
An attribute value on another component, as long as it is the same object type |
|
Tag: |
Tag: |
|
|
Dragging an object from one component to another |
Any component |
Any component |
|
Tag: |
Tag: |
|
|
Dragging an item from one collection and dropping it into another |
|
|
|
Tag: |
Tag: |
|
|
Dragging a component from one container to another |
Any component |
Any component |
|
Tag: |
Tag: |
|
|
Dragging a calendar activity from one start time or date to another |
|
|
|
Tag: |
Tag: |
|
|
Dragging a |
|
|
|
Tag: |
Tag: |
|
|
Dragging a panelBox component out of a |
panelBox component in a |
Any component |
|
Tag: |
Tag: |
|
|
Dropping an object from another component into a Pareto or stock graph. |
Any component |
|
|
Tag: |
Tag: |
|
|
Dragging an object from a DVT Gantt chart and dropping it on another component |
Gantt chart |
Any component |
|
Tag: |
Tag: |
|
|
Dragging a node from a DVT hierarchy viewer, sunburst, or treemap and dropping it on another component |
|
Any component |
|
Tag: |
Tag: |
|
|
Dragging an event from a timeline and dropping it into a collection component |
|
|
|
Tag: |
Tag: |
You can restrict the type of the object that can be dropped on a target by adding a dataFlavor tag. This helps when the target can accept only one object type, but the source may be one of a number of different types. The dataFlavor tag also allows you to set multiple types so that the target can accept objects from more than one source or from a source that may contain more than one type. For the drop to be successful, both the target and the source must contain the dataFlavor tag, and both the Java type that the dataFlavor encapsulates along with the discriminant need to be same between the source and the target.
Note:
Drag and drop functionality is not supported between windows. Any drag that extends past the window boundaries will be canceled. Drag and drop functionality is supported between popup windows and the base page for the popup.Also note that drag and drop functionality is not accessible; that is, there are no keyboard strokes that can be used to execute a drag and drop. Therefore, if your application requires all functionality to be accessible, you must provide this logic. For example, your page might also present users with a method for selecting objects and a Move button or menu item that allows them to move those selected objects.
35.1.1 Additional Functionality for Drag and Drop
You may find it helpful to understand other ADF Faces features before you implement drag and drop. Following are links to other sections that may be useful for implementing drag and drop.
-
Managed beans: You may be using managed beans for your code. For information about using managed beans, see Section 3.6, "Creating and Using Managed Beans."
-
Events: Table and tree components fire both server-side and client-side events that you can have your application react to by executing some logic. For more information, see Chapter 6, "Handling Events."
35.2 Adding Drag and Drop Functionality for Attributes
You add drag and drop functionality for attributes by defining one component's attribute to be a target and another component's attribute to be a source.
Note:
The target and source attribute values must both be the same data type. For example, attribute drag and drop is available when both the source and target are of type String. If they are both of type number, they both use the same converters.35.2.1 How to add Drag and Drop Functionality
You can drag and drop your target and source components that are already on the JSF page.
It may be helpful to have an understanding of drag and drop functionality. For more information, see Section 35.2, "Adding Drag and Drop Functionality for Attributes."
You may also find it helpful to understand functionality that can be added using other ADF Faces features. For more information, see Section 35.1.1, "Additional Functionality for Drag and Drop."
To add drag and drop functionality for attributes:
-
In the Components window, from the Operations panel, in the Drag and Drop group, drag and drop an Attribute Drop Target as a child to the target component on the page.
-
In the Insert Attribute Drop Target dialog, use the Attribute dropdown to select the attribute that will be populated by the drag and drop action. This dropdown list shows all valid attributes on the target component.
-
In the Components window, from the Operations panel, in the Drag and Drop group, drag and drop an Attribute Drag Source as a child to the component that can provide a value for the target.
-
In the Insert Attribute Drag Source dialog, use the Attribute dropdown to select the attribute whose value will be used to populate the target attribute. This dropdown list shows all valid attributes on the source component.
35.3 Adding Drag and Drop Functionality for Objects
When you want users to be able to drag things other than attribute values, or you want users to be able to do something other than copy attributes from one component to another, you use the dropTarget tag. Additionally, use the DataFlavor object to determine the valid Java types of sources for the drop target. Because there may be several drop targets and drag sources, you can further restrict valid combinations by using discriminant values. You also must implement any required functionality in response to the drag and drop action.
For example, suppose you have an outputText component with an array of Strings and you want the user to be able to drag the outputText component to a panelBox component and have the panelBox display the String array, as shown in Figure 35-2.
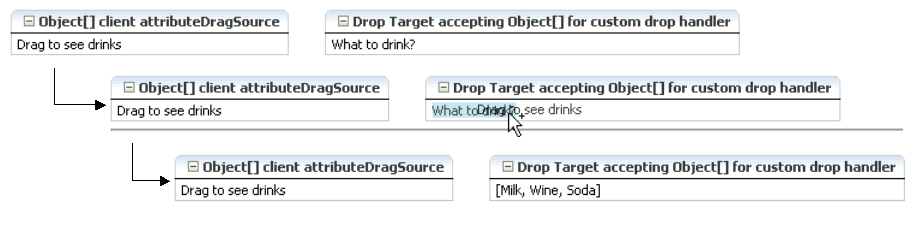
The outputText component contains an attributeDragSource tag. However, because you want to drag an array of String values from the outputText component, you must use the dropTarget tag instead of the attributeDropTarget tag on the target outputText component. Also use a dataFlavor tag to ensure that only an array object will be accepted on the target.
You can also define a discriminant value for the dataFlavor tag. This is helpful if you have two targets and two sources, all with the same object type. By creating a discriminant value, you can be sure that each target will accept only valid sources. For example, suppose you have two targets that both accept an EMPLOYEE object, TargetA and TargetB. Suppose you also have two sources, both of which are EMPLOYEE objects. By setting a discriminant value on TargetA with a value of alpha, only the EMPLOYEE source that provides the discriminant value of alpha will be accepted.
You also must implement a listener for the drop event. The object of the drop event is called the Transferable, which contains the payload of the drop. Your listener must access the Transferable object, and from there, use the DataFlavor object to verify that the object can be dropped. You then use the drop event to get the target component and update the property with the dropped object. More details about this listener are covered in the procedure in Section 35.8, "Adding Drag and Drop Functionality for DVT Components.".
35.3.1 How to Add Drag and Drop Functionality for a Single Object
To add drag and drop functionality, first add tags to a component that define it as a target for a drag and drop action. Then implement the event handler method that will handle the logic for the drag and drop action. Last, you define the sources for the drag and drop.
It may be helpful to have an understanding of drag and drop functionality. For more information, see Section 35.3, "Adding Drag and Drop Functionality for Objects."
You may also find it helpful to understand functionality that can be added using other ADF Faces features. For more information, see Section 35.1.1, "Additional Functionality for Drag and Drop."
You will need to complete this task:
- Create the source and target components on the page.
To add drag and drop functionality:
-
In the Components window, from the Operations panel, in the Drag and Drop group, drag a Drop Target and drop it as a child to the target component on the page.
-
In the Insert Drop Target dialog, enter an expression that evaluates to a method on a managed bean that will handle the event (you will create this code in Step 5).
For information about using managed beans, see Section 3.6, "Creating and Using Managed Beans."
Tip:
You can also intercept the drop on the client by populating theclientDropListenerattribute. For more information, see Section 35.3.3, "What You May Need to Know About Using the ClientDropListener." -
In the Insert Data Flavor dialog, enter the class for the object that can be dropped onto the target, for example
java.lang.Object. This selection will be used to create adataFlavortag, which determines the type of object that can be dropped onto the target, for example aStringor aDate. MultipledataFlavortags are allowed under a single drop target to allow the drop target to accept any of those types.Tip:
To specify a typed array in aDataFlavortag, add brackets ([]) to the class name, for example,java.lang.Object[]. -
In the Structure window, select the
dropTargettag. In the Properties window, select a value for theactionsattribute. This defines what actions are supported by the drop target. Valid values can beCOPY(copy and paste),MOVE(cut and paste), andLINK(copy and paste as a link), for example:.MOVE COPY
If no actions are specified, the default is
COPY.Example 35-1 shows the code for a
dropTargetcomponent inserted into anpanelBoxcomponent that takes an array object as a drop target. Note that because an action was not defined, the only allowed action will beCOPY. -
In the managed bean referenced in the EL expression created in Step 2, create the event handler method (using the same name as in the EL expression) that will handle the drag and drop functionality.
This method must take a
DropEventevent as a parameter and return aDnDActionobject, which is the action that will be performed when the source is dropped. Valid return values areDnDAction.COPY,DnDAction.MOVE,and DnDAction.LINK, and were set when you defined the target attribute in Step 4. This method should check theDropEventevent to determine whether or not it will accept the drop. If the method accepts the drop, it should perform the drop and return theDnDActionobject it performed. Otherwise, it should returnDnDAction.NONEto indicate that the drop was rejected.The method must also check for the presence for each
dataFlavorobject in preference order.Tip:
If your target has more than one defineddataFlavorobject, then you can use theTransferable.getSuitableTransferData()method, which returns aListofTransferDataobjects available in theTransferableobject in order, from highest suitability to lowest.The
DataFlavorobject defines the type of data being dropped, for examplejava.lang.Object, and must be as defined in theDataFlavortag on the JSP, as created in Step 3.Tip:
To specify a typed array in aDataFlavorobject, add brackets ([]) to the class name, for example,java.lang.Object[].DataFlavorobjects support polymorphism so that if the drop target acceptsjava.util.List, and theTransferableobject contains ajava.util.ArrayList, the drop will succeed. Likewise, this functionality supports automatic conversion betweenArraysandLists.If the drag and drop framework doesn't know how to represent a server
DataFlavorobject on the client component, the drop target will be configured to allow all drops to succeed on the client.Example 35-2 shows a method that the event handler method calls (the event handler itself does nothing but call this method; it is needed because this method also needs a
Stringparameter that will become the value of theoutputTextcomponent in thepanelBoxcomponent). This method copies an array object from the event payload and assigns it to the component that initiated the event.Example 35-2 Event Handler Code for a dropListener
public DnDAction handleDrop(DropEvent dropEvent)
{
  Transferable dropTransferable = dropEvent.getTransferable();
          Object[] drinks = dropTransferable.getData(DataFlavor.OBJECT_ARRAY_FLAVOR);

    if (drinks != null)
    {
      UIComponent dropComponent = dropEvent.getDropComponent();

// Update the specified property of the drop component with the Object[] dropped
      dropComponent.getAttributes().put("value", Arrays.toString(drinks));

      return DnDAction.COPY;
    }
    else
    {
      return DnDAction.NONE;
    }
  }
In this example, the drop component is the
panelBoxcomponent. Because thepanelBoxdoes not have avalueattribute, you would need to call the following method to set thetextattribute of thepanelBox.dropComponent.getAttributes().put("text", Arrays.toString(drinks)); -
In the Components window, from the Operations panel, drag a Client Attribute and drop it as a child to the source component on the page.
This tag is used to define the payload of the source for the event. Define the following for the
clientAttributetag in the Properties window:-
Name: Enter any name for the payload.
-
Value: Enter an EL expression that evaluates to the value of the payload. In the drinks example, this would resolve to the
Arraythat holds the different drink values.
-
-
In the Components window, from the Operations panel, in the Drag and Drop group, drag a Attribute Drag Source and drop it as a child to the source component on the page.
In the Insert Attribute Drag Source dialog, use the dropdown list to select the
namedefined for theclientAttributetag created in the previous step. Doing so makes the value of theclientAttributetag the source's payload. Example 35-3 shows the code for anoutputTextcomponent that is the source of the drag and drop operation.
35.3.2 What Happens at Runtime: How to Use Keyboard Modifiers
When performing a drag and drop operation, users can press keys on the keyboard (called keyboard modifiers) to select the action they wish to take on a drag and drop. The drag and drop framework supports the following keyboard modifiers:
-
SHIFT: MOVE
-
CTRL: COPY
-
CTRL+SHIFT: LINK
When a user executes the drag and drop operation, the drop target first determines that it can accept the drag source's data flavor value. Next, if the source and target are collections, the framework intersects the actions allowed between the drag source and drop target and executes the action (one of COPY, MOVE, or LINK) in that order from the intersection. When there is only one valid action, that action is executed. When there is more than one possible action and the user's keyboard modifier matches that choice, then that is the one that is executed. If either no keyboard modifier is used, or the keyboard modifier used does not match an allowed action, then the framework chooses COPY, MOVE, LINK in that order, from the set of allowed actions.
For example, suppose you have a drop target that supports COPY and MOVE. First the drop target determines that drag source is a valid data flavor. Next, it determines which action to perform when the user performs the drop. In this example, the set is COPY and MOVE. If the user holds down the SHIFT key while dragging (the keyboard modifier for MOVE), the framework would choose the MOVE action. If the user is doing anything other than holding down the SHIFT key when dragging, the action will be COPY because COPY is the default when no modifier key is chosen (it is first in the order). If the user is pressing the CTRL key, that modifier matches COPY, so COPY would be performed. If the user was pressing the CTRL+SHIFT keys, the action would still be COPY because that modifier matches the LINK action which is not in the intersected set of allowed actions.
Note:
Because information is lost during the roundtrip between Java and JavaScript, the data in the drop may not be the type that you expect. For example, all numeric types appear asdouble objects, char objects appear as String objects, List and Array objects appear as List objects, and most other objects appear as Map objects. For more information, see Section 6.4.3, "What You May Need to Know About Marshalling and Unmarshalling Data.".35.3.3 What You May Need to Know About Using the ClientDropListener
The dropTarget tag contains the clientDropListener attribute where you can reference JavaScript that will handle the drop event on the client. The client handler should not take any parameters and return an AdfDnDContext action. For example, if the method returns AdfDnDContext.ACTION_NONE the drop operation will be canceled and no server call will be made; if the method returns AdfDnDContext.ACTION_COPY, a copy operation will be allowed and a server call will be made which will execute the dropListener method if it exists.
For example, suppose you want to log a message when the drop event is invoked. You might create a client handler to handle logging that message and then returning the correct action so that the server listener is invoked. Example 35-4 shows a client handler that uses the logger to print a message.
35.4 Adding Drag and Drop Functionality for Collections
You use the collectionDropTarget and dragSource tags to add drag and drop functionality that allows users to drag an item from one collection (for example, a row from a table), and drop it into another collection component such, as a tree. For example, in the File Explorer application, users can drag a file from the table that displays directory contents to any folder in the directory tree. Figure 35-3 shows the File0.doc object being dragged from the table displaying the contents of the Folder0 directory to the Folder3 directory. Once the drop is complete, the object will become part of the collection that makes up Folder3.
As with dragging and dropping single objects, you can have a drop on a collection with a copy, move, or copy and paste as a link (or a combination of the three), and use dataFlavor tags to limit what a target will accept.
When the target source is a collection and it supports the move operation, you may also want to also implement a method for the dragDropEndListener attribute, which is referenced from the source component and is used to clean up the collection after the drag and drop operation. For more information, see Section 35.4.2, "What You May Need to Know About the dragDropEndListener".
35.4.1 How to Add Drag and Drop Functionality for Collections
To add drag and drop functionality for collections, instead of using the dropTarget tag, you use the collectionDropTarget tag. You then must implement the event handler method that will handle the logic for the drag and drop action. Next, you define the source for the drag and drop operation using the dragSource tag.
It may be helpful to have an understanding of drag and drop functionality. For more information, see Section 35.4, "Adding Drag and Drop Functionality for Collections."
You may also find it helpful to understand functionality that can be added using other ADF Faces features. For more information, see Section 35.1.1, "Additional Functionality for Drag and Drop."
You will need to complete this task:
- Create the source and target components on the page.
To add drag and drop functionality:
-
In the Components window, from the Operations panel, in the Drag and Drop group, drag a Collection Drop Target and drop it as a child to the target collection component on the page.
-
In the Insert Collection Drop Target dialog, enter an expression for the
dropListenerattribute that evaluates to a method on a managed bean that will handle the event (you will create this code in Step 4). -
In the Properties window, set the following:
-
actions: Select the actions that can be performed on the source during the drag and drop operation.If no actions are specified, the default is
COPY. -
modelName: Define the model for the collection.The value of the
modelNameattribute is aStringobject used to identify the drag source for compatibility purposes. The value of this attribute must match the value of thediscriminantattribute of thedragSourcetag you will use in a Step 6. In other words, this is an arbitrary name and works when the target and the source share the samemodelNamevalue or discriminant value.
-
-
In the managed bean inserted into the EL expression in Step 2, implement the handler for the drop event.
This method must take a
DropEventevent as a parameter and return aDnDAction. This method should use theDropEventto get theTransferableobject and from there get theRowKeySet(the rows that were selected for the drag). Using theCollectionModelobtained through theTransferableobject, the actualrowDatacan be obtained to complete the drop. The method should then check theDropEventto determine whether it will accept the drop or not. If the method accepts the drop, it should perform the drop and return theDnDActionit performed --DnDAction.COPY,DnDAction.MOVEorDnDAction.LINK, otherwise it should returnDnDAction.NONEto indicate that the drop was rejected.Example 35-5 shows the event handler method on the
CollectionDnd.javamanaged bean used in thecollectionDropTargetdemo that handles the copy of the row between two tables.Example 35-5 Event Handler Code for a dropListener for a Collection
public DnDAction handleDrop(DropEvent dropEvent) { return _handleDrop(dropEvent, getTargetValues(), "DnDDemoModel"); } private DnDAction _handleDrop(DropEvent dropEvent, ArrayList<DnDDemoData> targetValues, String discriminator) { Transferable transferable = dropEvent.getTransferable(); // The data in the transferable is the row key for the dragged component. DataFlavor<RowKeySet> rowKeySetFlavor = DataFlavor.getDataFlavor(RowKeySet.class, discriminator); RowKeySet rowKeySet = transferable.getData(rowKeySetFlavor); if (rowKeySet != null) { // Get the model for the dragged component. CollectionModel dragModel = transferable.getData(CollectionModel.class); if (dragModel != null) { // Set the row key for this model using the row key from the transferable. Object currKey = rowKeySet.iterator().next(); dragModel.setRowKey(currKey); // And now get the actual data from the dragged model. // Note this won't work in a region. //Need to change this to use collectionModel data flavor. DnDDemoData dnDDemoData = (DnDDemoData)dragModel.getRowData(); // Put the dragged data into the target model directly. // Note that if you wanted validation/business rules on the drop, // this would be different. // getTargetValues() is the target collection used by the target component if (dropEvent.getProposedAction() == DnDAction.LINK) dnDDemoData = DnDDemoData.addALink(dnDDemoData); targetValues.add(dnDDemoData); } return dropEvent.getProposedAction(); } else { return DnDAction.NONE; } } -
In the Components window, from the Operations panel, in the Drag and Drop group, drag and drop a Drag Source as a child to the source component.
-
With the
dragSourcetag selected, in the Properties window set theactions,discriminant, and anydragDropEndListeneras configured for the target. For instance, thedragSourcetag may appear similar to the following:<af:dragSource actions="MOVE" discriminant="DnDDemoModel dragDropEndListener="#{collectionDnD.endListener}"/>
35.4.2 What You May Need to Know About the dragDropEndListener
There may be cases when after a drop event, you have to clean up the source collection. For example, if the drag caused a move, you may have to clean up the source component so that the moved item is no longer part of the collection.
The dragSource tag contains the dragDropEndListener attribute that allows you to register a handler that contains logic for after the drag drop operation ends.
For example, if you allow a drag and drop to move an object, you may have to physically remove the object from the source component once you know the drop succeeded. Example 35-6 shows a handler for a dragDropEndListener attribute
Example 35-6 Handler for dragDropEndListener
public void endListener(DropEvent dropEvent)
{
  Transferable transferable = dropEvent.getTransferable();

  // The data in the transferrable is the row key for the dragged component.
  DataFlavor<RowKeySet> rowKeySetFlavor =
      DataFlavor.getDataFlavor(RowKeySet.class, "DnDDemoModel");
  RowKeySet rowKeySet = transferable.getData(rowKeySetFlavor);
  if (rowKeySet != null)
  {
    Integer currKey = (Integer)rowKeySet.iterator().next();

   // Remove the dragged data from the source model directly.
   // getSourceValues() represents a collection object used by the source
   // component
    Object removed = getSourceValues().remove(currKey.intValue());
  }
  // Need to add the drag source table so it gets redrawn.
  // The drag source component needs to be partially refreshed explicitly, while
  // drop target component automatically refreshed and displayed.
    AdfFacesContext.getCurrentInstance().addPartialTarget(dropEvent.getDragComponent());
35.5 Adding Drag and Drop Functionality for Components
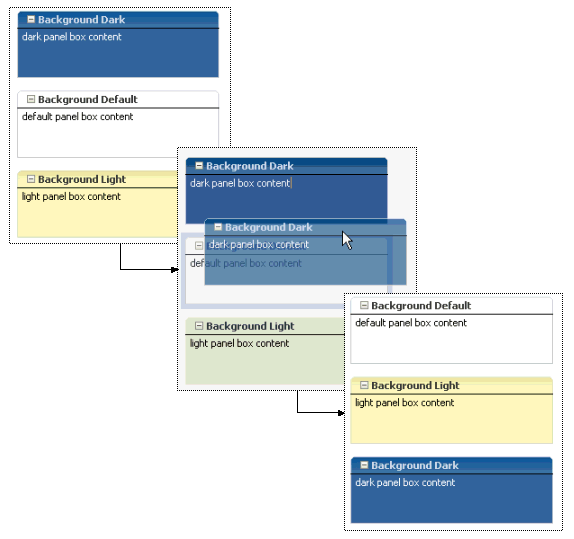
You can allow components to be moved from one parent to another, or you can allow child components of a parent component to be reordered. For example, Figure 35-4 shows the darker panelBox component being moved from being the first child component of the panelGrid component to the last.
Note:
If you want to move components into or out of a panelDashboard component, then you need to use procedures specific to that component. For more information, see Section 35.6, "Adding Drag and Drop Functionality Into and Out of a panelDashboard Component."35.5.1 How to Add Drag and Drop Functionality for Components
Adding drag and drop functionality for components is similar for objects. However, instead of using the attributeDragSource tag, use the componentDragSource tag. As with dragging and dropping objects or collections, you also must implement a dropListener handler.
It may be helpful to have an understanding of drag and drop functionality. For more information, see Section 35.5, "Adding Drag and Drop Functionality for Components."
You may also find it helpful to understand functionality that can be added using other ADF Faces features. For more information, see Section 35.1.1, "Additional Functionality for Drag and Drop."
To add drag and drop functionality:
-
In the Components window, from the Operations panel, in the Drag and Drop group, drag a Drop Target and drop it as a child to the target component on the page.
-
In the Insert Drop Target dialog, enter an expression that evaluates to a method on a managed bean that will handle the event (you will create this code in Step 4).
-
With the
dropTargettag still selected, in the Properties window, select a valid action set for theactionsattribute. -
In the managed bean referenced in the EL expression created in Step 2 for the
dropListenerattribute, create the event handler method (using the same name as in the EL expression) that will handle the drag and drop functionality.If the method accepts the drop, it should perform the drop and return the
DnDActionit performed --DnDAction.COPY,DnDAction.MOVEorDnDAction.LINK, otherwise it should returnDnDAction.NONEto indicate that the drop was rejectedThis handler method should use the
DropEventevent to get theTransferableobject and its data and then complete the move or copy, and reorder the components as needed. Once the method completes the drop, it should return theDnDActionit performed. Otherwise, it should returnDnDAction.NONEto indicate that the drop was rejected.Example 35-7 shows the
handleComponentMoveevent handler on theDemoDropHandler.javamanaged bean used by thecomponentDragSourceJSF page in the demo application.Example 35-7 Event Handler Code for a dropListener That Handles a Component Move
public DnDAction handleComponentMove(DropEvent dropEvent) { Transferable dropTransferable = dropEvent.getTransferable(); UIComponent movedComponent = dropTransferable.getData (DataFlavor.UICOMPONENT_FLAVOR); if ((movedComponent != null) && DnDAction.MOVE.equals(dropEvent.getProposedAction())) { UIComponent dropComponent = dropEvent.getDropComponent(); UIComponent dropParent = dropComponent.getParent(); UIComponent movedParent = movedComponent.getParent(); UIComponent rootParent = null; ComponentChange change = null; // Build the new list of IDs, placing the moved component after the dropped //component. String movedLayoutId = movedParent.getId(); String dropLayoutId = dropComponent.getId(); List<String> reorderedIdList = new ArrayList<String>(dropParent.getChildCount()); for (UIComponent currChild : dropParent.getChildren()) { String currId = currChild.getId(); if (!currId.equals(movedLayoutId)) { if(!movedLayoutIdFound && currId.equals(dropLayoutId)) reorderedIdList.add(movedLayoutId); reorderedIdList.add(currId); if(movedLayoutIdFound && currId.equals(dropLayoutId)) reorderedIdList.add(movedLayoutId); } else movedLayoutIdFound = true; } change = new ReorderChildrenComponentChange(reorderedIdList); rootParent = dropParent; ChangeManager cm = RequestContext.getCurrentInstance().getChangeManager(); // add the change cm.addComponentChange(FacesContext.getCurrentInstance(),rootParent, change); // apply the change to the component tree immediately change.changeComponent(rootParent); // redraw the shared parent AdfFacesContext.getCurrentInstance().addPartialTarget(rootParent); return DnDAction.MOVE; } else { return DnDAction.NONE; } } -
In the Components window, from the Operations panel, in the Drag and Drop group, drag a Component Drag Source and drop it as a child of the source component on the page.
For instance, the
componentDragSourcetag may appear similar to the following:<af:componentDragSource discriminant="col2"/>
35.6 Adding Drag and Drop Functionality Into and Out of a panelDashboard Component
By default the panelDashboard component supports dragging and dropping components within itself. That is, you can reorder components in a panelDashboard component without needing to implement a listener or use additional tags. However, if you want to be able to drag a component into a panelDashboard component, or to drag a component out of a panelDashboard component, you do need to use tags and implement a listener. Because you would be dragging and dropping a component, you use the componentDragSource tag when dragging into the panelDashboard. However, because the panelDashboard already supports being a drop target, you do not need to use the dropTarget tag. Instead, you need to use a dataFlavor tag with a discriminant. The tag and discriminant notify the framework that the drop is from an external component.
Dragging a component out of a panelDashboard is mostly the same as dragging and dropping any other component. You use a dropTarget tag for the target and the componentDragSource tag for the source. However, you must also use the dataFlavor tag and a discriminant.
35.6.1 How to Add Drag and Drop Functionality Into a panelDashboard Component
Because the panelDashboard component has built-in drag and drop functionality used to reorder panelBox components within the dashboard, you need not use a dropTarget tag, but you do need to use a dataFlavor tag with a discriminant and implement the dropListener. In that implementation, you need to handle the reorder of the components.
It may be helpful to have an understanding of drag and drop functionality. For more information, see Section 35.6, "Adding Drag and Drop Functionality Into and Out of a panelDashboard Component."
You may also find it helpful to understand functionality that can be added using other ADF Faces features. For more information, see Section 35.1.1, "Additional Functionality for Drag and Drop."
-
Create a
panelDashboardcomponent. For more information, see Section 9.8, "Arranging Contents in a Dashboard." -
Create another component outside of the
panelDashboardthat containspanelBoxcomponents. For more information aboutpanelBoxcomponents, see Section 9.9.3, "How to Use the panelBox Component."
To add drag and drop functionality into a panelDashboard component:
-
In the Structure window, select the
panelDashboardcomponent that is to be the target component. -
In the Properties window, for DropListener, enter an expression that evaluates to a method on a managed bean that will handle the drop event (you will create this code in Step 6).
-
In the Components window, from the Operations panel, in the Drag and Drop group, drag a Data Flavor and drop it as a child to the
panelDashboardcomponent. -
In the Insert Data Flavor dialog, enter
javax.faces.component.UIComponent. -
In the Properties window, set Discriminant to a unique name that will identify the components allowed to be dragged into the
panelDashboardcomponent, for example,dragIntoDashboard. -
In the Components window, from the Operations panel, in the Drag and Drop group, drag a Component Drag Source and drop it as a child to the
panelBoxcomponent that will be the source component. -
In the Properties window, set Discriminant to be the same value as entered for the Discriminant on the
panelDashboardin Step 5.
35.6.2 How to Add Drag and Drop Functionality Out of a panelDashboard Component
Implementing drag and drop functionality out of a panelDashboard component is similar to standard drag and drop functionality for other components, except that you must use a dataFlavor tag with a discriminant.
It may be helpful to have an understanding of drag and drop functionality. For more information, see Section 35.6, "Adding Drag and Drop Functionality Into and Out of a panelDashboard Component."
You may also find it helpful to understand functionality that can be added using other ADF Faces features. For more information, see Section 35.1.1, "Additional Functionality for Drag and Drop."
How to add drag and drop functionality out of a panelDashboard component:
-
In the Components window, from the Operations panel, in the Drag and Drop group, drag and drop a Drop Target as a child to the target component.
-
In the Insert Drop Target dialog, enter an expression that evaluates to a method on a managed bean that will handle the event (you will create this code in Step 5) and enter javax.faces.component.UIComponent as the FlavorClass.
-
With the
dropTargettag still selected, in the Properties window, select MOVE as the valueactionattribute. -
In the Structure window, select the
dataFlavortag and in the Properties window, set Discriminant to a unique name that will identify thepanelBoxcomponents allowed to be dragged into this component, for example,dragOutOfDashboard. -
In the managed bean referenced in the EL expression created in Step 2 for the
dropListenerattribute, create the event handler method (using the same name as in the EL expression) that will handle the drag and drop functionality.This handler method should use the
DropEventevent to get theTransferableobject and its data and then complete the move and reorder the components as needed. Once the method completes the drop, it should return aDnDActionof NONE.You can use the
dashboardComponent.prepareOptimizedEncodingOfDeletedChild()method to animate the removal of thepanelBoxcomponent.Example 35-8 shows the
handleSideBarDropevent handler and helper methods on theoracle.adfdemo.view.layout.DemoDashboardBean.javamanaged bean used by thedashboardJSF page in the demo application.Example 35-8 Event Handler Code for a dropListener to Move a panelBox Out of a panelDashboard
public DnDAction handleSideBarDrop(DropEvent e) { UIComponent dragComponent = e.getDragComponent(); UIComponent dragParent = dragComponent.getParent(); // Ensure that the drag source is one of the items from the dashboard: if (dragParent.equals(_getDashboard())) { _minimize(dragComponent); } return DnDAction.NONE; // the client is already updated, so no need to redraw it again } private void _minimize(UIComponent panelBoxToMinimize) { // Make this panelBox non-rendered: panelBoxToMinimize.setRendered(false); // If the dashboard is showing, let's perform an optimized render so the whole dashboard doesn't // have to be re-encoded. // If the dashboard is hidden (because the panelBox is maximized), we will not do an optimized // encode since we need to draw the whole thing. if (_maximizedPanelKey == null) { int deleteIndex = 0; RichPanelDashboard dashboard = _getDashboard(); List<UIComponent> children = dashboard.getChildren(); for (UIComponent child : children) { if (child.equals(panelBoxToMinimize)) { dashboard.prepareOptimizedEncodingOfDeletedChild( FacesContext.getCurrentInstance(), deleteIndex); break; } if (child.isRendered()) { // Only count rendered children since that's all that the panelDashboard can see: deleteIndex++; } } } RequestContext rc = RequestContext.getCurrentInstance(); if (_maximizedPanelKey != null) { // Exit maximized mode: _maximizedPanelKey = null; UIXSwitcher switcher = _getSwitcher(); switcher.setFacetName("restored"); rc.addPartialTarget(switcher); } // Redraw the side bar so that we can update the colors of the opened items: rc.addPartialTarget(_getSideBarContainer()); } -
In the Components window, from the Operations panel, drag and drop a Component Drag Source as a child of the source
panelBoxcomponent within thepanelDashboardcomponent. -
In the Properties window, set Discriminant to be the same value as entered for the Discriminant on the
dataFlavortag for the target component in Step 4.
35.7 Adding Drag and Drop Functionality to a Calendar
The calendar includes functionality that allows users to drag the handle of an activity to change the end time. However, if you want users to be able to drag and drop an activity to a different start time, or even a different day, then you implement drag and drop functionality. Drag and drop allows you to not only move an activity, but also to copy one.
35.7.1 How to Add Drag and Drop Functionality to a Calendar
You add drag and drop functionality by using the calendarDropTarget tag. Unlike dragging and dropping a collection, there is no need for a source tag; the target (that is the object to which the activity is being moved, in this case, the calendar) is responsible for moving the activities. If the source (that is, the item to be moved or copied), is an activity within the calendar, then you use only the calendarDropTarget tag. The tag expects the Transferable to be a CalendarActivity object.
However, you can also drag and drop objects from outside the calendar. When you want to enable this, use dataFlavor tags configured to allow the source object (which will be something other than a calendarActivity object) to be dropped.
It may be helpful to have an understanding of drag and drop functionality. For more information, see Section 35.7, "Adding Drag and Drop Functionality to a Calendar."
You may also find it helpful to understand functionality that can be added using other ADF Faces features. For more information, see Section 35.1.1, "Additional Functionality for Drag and Drop."
To add drag and drop functionality to a calendar:
-
In the Components window, from the Operations panel, in the Drag and Drop group, drag and drop a Calendar Drop Target as a child to the
calendarcomponent. -
In the Insert Calendar Drop Target dialog, enter an expression for the
dropListenerattribute that evaluates to a method on a managed bean that will handle the event (you will create this code in Step 4). -
In the Properties window, set Actions. This value determines whether the activity (or other source) can be moved, copied, or copied as a link, or any combination of the three. If no action is specified, the default is
COPY. -
In the managed bean inserted into the EL expression in Step 2, implement the handler for the drop event.
This method must take a
DropEventevent as a parameter and return aDnDAction. TheDnDActionis the action that will be performed when the source is dropped. Valid return values areCOPY,MOVE, andLINK, and are set when you define theactionsattribute in Step 3. This method should use theDropEventto get theTransferableobject, and from there, access theCalendarModelobject in the dragged data and from there, access the actual data. The listener can then add that data to the model for the source and then return theDnDActionit performed:DnDAction.COPY,DnDAction.MOVEorDnDAction.LINK; otherwise, the listener should returnDnDAction.NONEto indicate that the drop was rejected.The drop site for the drop event is an instance of the
oracle.adf.view.rich.dnd.CalendarDropSiteclass. For an example of a drag and drop handler for a calendar, see thehandleDropmethod on theoracle.adfdemo.view.calendar.rich.DemoCalendarBeanmanaged bean in the ADF Faces demo application. -
If the source for the activity is external to the calendar, drag a Data Flavor and drop it as a child to the
calendarDropTargettag. This tag determines the type of object that can be dropped onto the target, for example aStringor aDateobject. MultipledataFlavortags are allowed under a single drop target to allow the drop target to accept any of those types. -
In the Insert Data Flavor dialog, enter the class for the object that can be dropped onto the target, for example
java.lang.Object.Tip:
To specify a typed array in adataFlavortag, add brackets ([]) to the class name, for example,java.lang.Object[].
35.7.2 What You May Need to Know About Dragging and Dropping in a Calendar
For dragging and dropping activities within a calendar, users can drag and drop only within a view. That is, users can drag an activity from one time slot to another in the day view, but cannot cut an activity from a day view and paste it into a month view.
When the user is dragging and dropping activities in the day or week view, the calendar marks the drop site by half-hour increments. The user cannot move any all-day or multi-day activities in the day view.
In the week view, users can move all-day and multi-day activities, however, they can be dropped only within other all-day slots. That is, the user cannot change an all-day activity to an activity with start and end times. In the month view, users can move all-day and multi-day activities to any other day.
35.8 Adding Drag and Drop Functionality for DVT Components
You can configure drag and drop functionality for the following DVT components:
-
Pareto and stock graphs (drop target only)
-
Gantt charts
-
Hierarchy viewers
-
Sunbursts
-
Thematic Maps
-
Timelines
-
Treemaps
DVT components use essentially the same process as dragging and dropping other ADF Faces components. However, DVT components may impose limitations on the items that you can drag to or drop from the component.
As with dragging and dropping objects or collections, you must also implement a dropListener handler to respond to the drop requests. The object of the drop event is called the Transferable, which contains the payload of the drop. Your listener must access the Transferable object, and from there, use the DataFlavor object to verify that the object can be dropped. You then use the drop event to get the target component and update the property with the dropped object.
35.8.1 Adding Drop Functionality for DVT Pareto and Stock Graphs
Pareto and stock graphs can be configured as a drop target to allow drops from other ADF components. For example, you can configure a stock graph to allow drops from an ADF table cell.
35.8.1.1 How to Add Drop Functionality to Pareto and Stock Graphs
To configure a Pareto or stock graph as a drop target, add the af:dropTarget tag as a child of the Pareto or stock Graph, and add a method in a managed bean to respond to the drop event. Example 35-9 shows a sample drop listener for a graph configured to accept drops from an ADF table.
Example 35-9 Managed Bean Sample for Handling Drag and Drop Targets
public class dragAndDrop {
  public DnDAction fromTableDropListener(DropEvent event) {
    Transferable transferable = event.getTransferable();
    DataFlavor<RowKeySet> dataFlavor = DataFlavor.getDataFlavor(RowKeySet.class, "fromTable");
    RowKeySet set = transferable.getData(dataFlavor);
    Employee emp = null;
    if(set != null && !set.isEmpty()) {
      int index = (Integer) set.iterator().next();
      emp = m_tableModel.get(index);
    }
    if(emp == null)
        return DnDAction.NONE;
    DnDAction proposedAction = event.getProposedAction();
    if(proposedAction == DnDAction.COPY) {
      m_graphList.add(emp);
    }
    else if(proposedAction == DnDAction.LINK) {
      m_graphList.add(emp);
    }
    else if(proposedAction == DnDAction.MOVE) {
      m_graphList.add(emp);
      m_tableModel.remove(emp);
    }
    else
        return DnDAction.NONE;
  RequestContext.getCurrentInstance().addPartialTarget(event.getDragComponent());
    return event.getProposedAction();
  }
You must also configure the ADF Faces component, object, or collection as a drag source and define the method that will respond to the drag.
It may be helpful to have an understanding of drag and drop functionality. For more information, see Section 35.1, "About Drag and Drop Functionality."
You must complete the following tasks:
-
Add a Pareto or stock graph to your page. For more information, see Section H.2.3, "How to Add a Graph to a Page."
-
If you plan to allow drops to the DVT component, add the component that will serve as the drag source to the page.
For help with adding other ADF Faces components, see Section 1.3, "ADF Faces Components."
-
Create the method that will listen for drops on the graph. For information about using managed beans, see Section 3.6, "Creating and Using Managed Beans."
To configure a Pareto or stock graph as a drop target:
-
In the Structure window, right-click dvt:paretoGraph or dvt:stockGraph and choose Insert Inside (Pareto or Stock) > Drop Target.
-
In the Insert Drop Target dialog, specify the DropListener as an EL Expression that evaluates the reference to the
oracle.adf.view.rich.event.DropEventmethod called when a drop occurs on the component.To specify the DropListener used in Example 35-9, enter:
#{dragAndDrop.fromTableDropListener}. -
In the Insert Data Flavors dialog, specify the flavorClass, the fully qualified Java class name for this
dataFlavor. If the drop contains thisdataFlavor, the drop target is guaranteed to be able to retrieve an Object from the drop with this Java type using thisdataFlavor.For example, to specify the flavorClass for a drop target configured to allow drops from an ADF table, enter:
org.apache.myfaces.trinidad.model.RowKeySet.
You also must implement a listener for the drop event. The object of the drop event is called the Transferable, which contains the payload of the drop. Your listener must access the Transferable object, and from there, use the DataFlavor object to verify that the object can be dropped. You then use the drop event to get the target component and update the property with the dropped object.
35.8.2 Adding Drag and Drop Functionality for DVT Gantt Charts
When you want users to be able to drag and drop between Gantt charts and other components, you use the dragSource and dropTarget tags. Additionally, you use the DataFlavor object to determine the valid Java types of sources for the drop target. You also must implement any required functionality in response to the drag and drop action. Both the projectGantt and schedulingGantt components support drag and drop functionality.
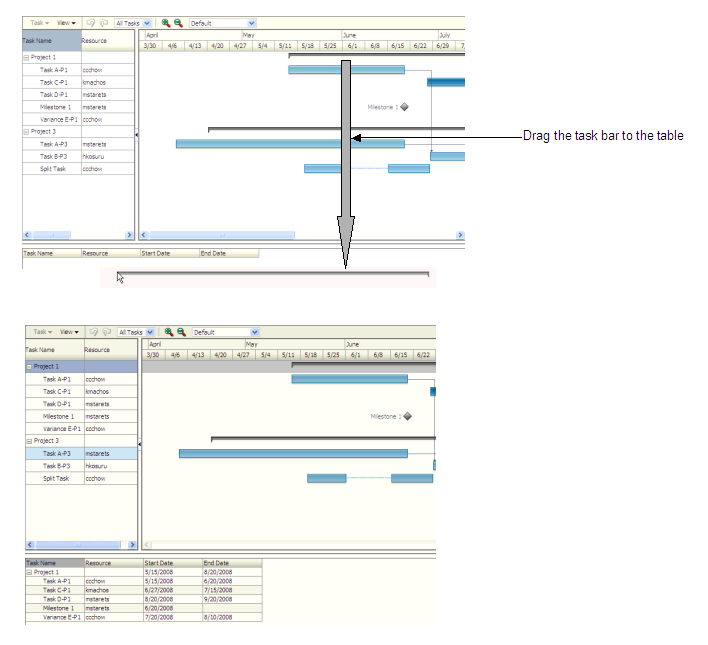
For example, suppose you have an projectGantt component and you want the user to be able to drag one time bucket to a treeTable component and have that component display information about the time bucket, as shown in Figure 35-5.
The projectGantt component contains a dragSource tag. And because the user will drag the whole object and not just the String value of the output text that is displayed, you use the dropTarget tag instead of the attributeDropTarget tag.
You also use a dataFlavor tag to determine the type of object being dropped. On this tag, you can define a discriminant value. This is helpful if you have two targets and two sources, all with the same object type. By creating a discriminant value, you can be sure that each target will accept only valid sources. For example, suppose you have two targets that both accept an TaskDragInfo object, TargetA and TargetB. Suppose you also have two sources, both of which are TaskDragInfo objects. By setting a discriminant value on TargetA with a value of alpha, only the TaskDragInfo source that provides the discriminant value of alpha will be accepted.
You also must implement a listener for the drop event. The object of the drop event is called the Transferable, which contains the payload of the drop. Your listener must access the Transferable object, and from there, use the DataFlavor object to verify that the object can be dropped. You then use the drop event to get the target component and update the property with the dropped object.
35.8.2.1 How to Add Drag and Drop Functionality for a DVT Gantt Component
To add drag and drop functionality, first add tags to a component that define it as a target for a drag and drop action. Then implement the event handler method that will handle the logic for the drag and drop action. Last, you define the sources for the drag and drop. For information about what happens at runtime, see Section 35.3.2, "What Happens at Runtime: How to Use Keyboard Modifiers." For information about using the clientDropListener attribute, see Section 35.3.3, "What You May Need to Know About Using the ClientDropListener."
It may be helpful to have an understanding of drag and drop functionality. For more information, see Section 35.1, "About Drag and Drop Functionality."
You must complete the following tasks:
-
Add the DVT component to your page.
For help with creating the DVT components, see Chapter 22, "Introduction to ADF Data Visualization Components."
-
If you plan to allow drops to the DVT component, add the component that will serve as the drag source to the page.
For help with adding other ADF Faces components, see Section 1.3, "ADF Faces Components."
-
If you plan on allowing drags from the DVT component to another component, add the component that will serve as the drop target to the page.
To add drag and drop functionality:
-
In the Components window, from the Operations panel, drag a Drop Target tag and drop it as a child to the target component.
-
In the Insert Drop Target dialog, enter an expression that evaluates to a method on a managed bean that will handle the event (you will create this code in Step 6).
Tip:
You can also intercept the drop on the client by populating theclientDropListenerattribute. For more information, see Section 35.3.3, "What You May Need to Know About Using the ClientDropListener.". -
In the Insert Data Flavor dialog, enter the class for the object that can be dropped onto the target, for example
java.lang.Object. This selection will be used to create adataFlavortag, which determines the type of object that can be dropped onto the target. MultipledataFlavortags are allowed under a single drop target to allow the drop target to accept any of those types.Tip:
To specify a typed array in aDataFlavortag, add brackets ([]) to the class name, for example,java.lang.Object[]. -
In the Properties window, set a value for Discriminant, if needed. A discriminant is an arbitrary string used to determine what sources of the type specified by the dataFlavor will be allowed as a source.
-
In the Structure window, select the
dropTargettag. In the Properties window, select a value for Actions. This defines what actions are supported by the drop target. Valid values can beCOPY(copy and paste),MOVE(cut and paste), andLINK(copy and paste as a link), for example:MOVE COPY
If no actions are specified, the default is
COPY.Example 35-10 shows the code for a
dropTargetcomponent that takes aTaskDragInfoobject as a drop source. Note that because COPY was set as the value for theactionsattribute, that will be the only allowed action.Example 35-10 JSP Code for a dropTarget tag
<af:treeTable id="treeTableDropTarget" var="task" value="#{projectGanttDragSource.treeTableModel}"> <f:facet name="nodeStamp"> <af:column headerText="Task Name"> <af:outputText value="#{task.taskName}"/> </af:column> </f:facet> <af:column headerText="Resource"> <af:outputText value="#{task.resourceName}"/> </af:column> <af:column headerText="Start Date"> <af:outputText value="#{task.startTime}"/> </af:column> <af:column headerText="End Date"> <af:outputText value="#{task.endTime}"/> </af:column> <af:dropTarget actions="COPY" dropListener="#{projectGanttDragSource.onTableDrop}"> <af:dataFlavor flavorClass= "oracle.adf.view.faces.bi.component.gantt.TaskDragInfo"/> </af:dropTarget> </af:treeTable> -
In the managed bean referenced in the EL expression created in Step 2, create the event handler method (using the same name as in the EL expression) that will handle the drag and drop functionality.
This method must take a
DropEventevent as a parameter and return aDnDActionobject, which is the action that will be performed when the source is dropped. Valid return values areDnDAction.COPY,DnDAction.MOVE,and DnDAction.LINK, and were set when you defined the target attribute in Step 5. This method should check theDropEventevent to determine whether or not it will accept the drop. If the method accepts the drop, it should perform the drop and return theDnDActionobject it performed. Otherwise, it should returnDnDAction.NONEto indicate that the drop was rejected.The method must also check for the presence for each
dataFlavorobject in preference order.Tip:
If your target has more than one defineddataFlavorobject, then you can use theTransferable.getSuitableTransferData()method, which returns aListofTransferDataobjects available in theTransferableobject in order, from highest suitability to lowest.The
DataFlavorobject defines the type of data being dropped, for examplejava.lang.Object, and must be as defined in theDataFlavortag on the JSP, as created in Step 3.Tip:
To specify a typed array in aDataFlavorobject, add brackets ([]) to the class name, for example,java.lang.Object[].DataFlavorobjects support polymorphism so that if the drop target acceptsjava.util.List, and theTransferableobject contains ajava.util.ArrayList, the drop will succeed. Likewise, this functionality supports automatic conversion betweenArraysandLists.If the drag and drop framework doesn't know how to represent a server
DataFlavorobject on the client component, the drop target will be configured to allow all drops to succeed on the client.Example 35-11 shows a handler method that copies a
TaskDragInfoobject from the event payload and assigns it to the component that initiated the event.Example 35-11 Event Handler Code for a dropListener
public DnDAction onTableDrop(DropEvent evt) { // retrieve the information about the task dragged DataFlavor<TaskDragInfo> _flv = DataFlavor.getDataFlavor(TaskDragInfo.class, null); Transferable _transferable = evt.getTransferable(); // if there is no data in the Transferable, then the drop is unsuccessful TaskDragInfo _info = _transferable.getData(_flv); if (_info == null) return DnDAction.NONE; // find the task Task _draggedTask = findTask(_info.getTaskId()); if (_draggedTask != null) { // process the dragged task here and indicate the drop is successful by returning DnDAction.COPY return DnDAction.COPY; } else return DnDAction.NONE; } -
In the Components window, from the Operations panel, drag and drop a Drag Source as a child to the source component.
-
With the
dragSourcetag selected, in the Properties window, set the allowed Actions and any needed discriminant, as configured for the target.
35.8.3 Adding Drag and Drop Functionality for DVT Hierarchy Viewers, Sunbursts, and Treemaps
You can configure hierarchy viewers, sunbursts, and treemaps as drag sources and drop targets for drag and drop operations between supported components on a page.
35.8.3.1 Drag and Drop Example for DVT Hierarchy Viewers
Hierarchy viewers support the following drag and drop operations:
-
Drag and drop one or more nodes within a hierarchy viewer
-
Drag one or more nodes from a hierarchy viewer to another component
-
Drag one or more items from another component to a hierarchy viewer
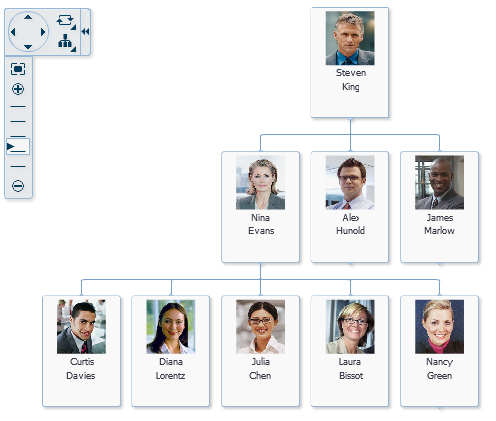
Figure 35-6 shows a hierarchy viewer configured to allow drags and drops within itself. If you click and hold a node for more than one-half second, you can drag it to the background to make it another root in the hierarchy or drag it to another node to add it as a child of that node.
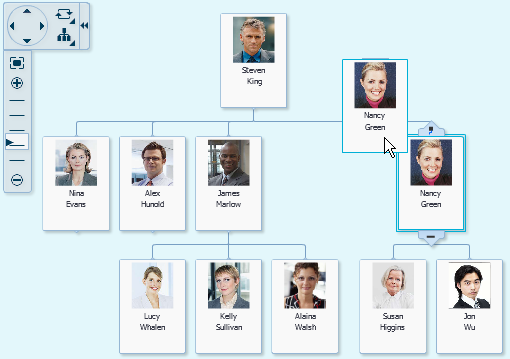
In this example, if you drag the node to another node, the dragged node and its children become the child of the targeted node. Figure 35-7 shows the result of the drag to the node containing the data for Nina Evans. Nancy Green and her subordinates are now shown as subordinates to Nina Evans.
35.8.3.2 Drag and Drop Example for DVT Sunbursts
Sunbursts support the drag of one or more nodes to another component. The payload of the drag is a org.apache.myfaces.trinidad.model.RowKeySet. You can also configure sunbursts to accept drops from another object.
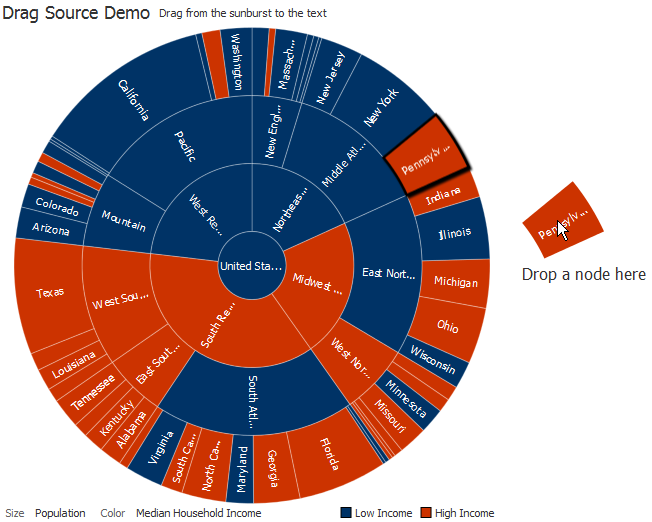
Figure 35-8 shows a sunburst configured to allow drags from it to an af:outputFormatted component. If the sunburst is configured for multiple selection, the user can drag multiple nodes using the Ctrl+click operation.
35.8.3.3 Drag and Drop Example for DVT Treemaps
Treemaps support the drag of one or more nodes to another component. The payload of the drag is a org.apache.myfaces.trinidad.model.RowKeySet. You can also configure treemaps to accept drops from another object.
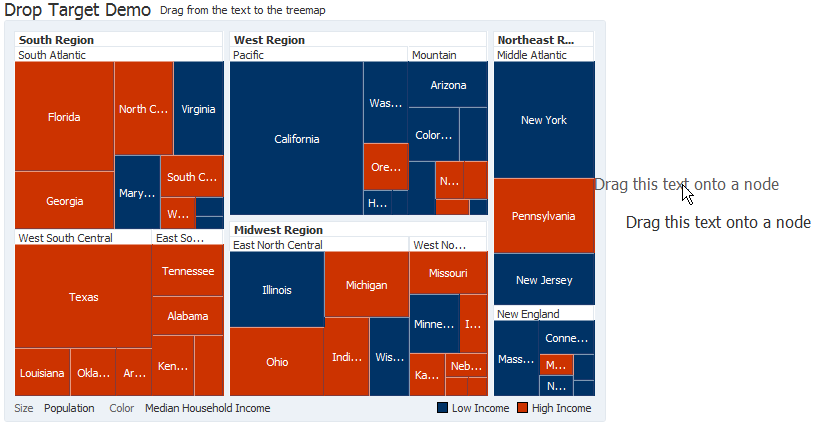
Figure 35-9 shows a treemap configured as a drop target. In this example, the drag source is an af:outputFormatted component.
35.8.3.4 How to Add Drag and Drop Functionality for a DVT Hierarchy Viewer, Sunburst, or Treemap Component
To add drag and drop functionality, first add tags to a supported DVT component that define it as a target for a drag and drop action. Then implement the event handler method that will handle the logic for the drag and drop action. Last, you define the sources for the drag and drop. For information about what happens at runtime, see Section 35.3.2, "What Happens at Runtime: How to Use Keyboard Modifiers." For information about using the clientDropListener attribute, see Section 35.3.3, "What You May Need to Know About Using the ClientDropListener."
It may be helpful to have an understanding of drag and drop functionality. For more information, see Section 35.1, "About Drag and Drop Functionality."
You must complete the following tasks:
-
Add the DVT component to your page.
For help with creating the DVT components, see Chapter 22, "Introduction to ADF Data Visualization Components."
-
If you plan to allow drops to the DVT component, add the component that will serve as the drag source to the page.
For help with adding other ADF Faces components, see Section 1.3, "ADF Faces Components."
-
If you plan on allowing drags from the DVT component to another component, add the component that will serve as the drop target to the page.
To add drag and drop functionality to a DVT hierarchy viewer, sunburst, or treemap component:
-
To configure the DVT component as a drop target, do the following:
-
In the Components window, from the Operations panel, drag a Drop Target tag and drop it as a child to a DVT component that supports drag and drop.
-
In the Insert Drop Target dialog, enter an expression that evaluates to a drop listener method on a managed bean that will handle the event (you will create this code in Step 6).
Tip:
You can also intercept the drop on the client by populating theclientDropListenerattribute. For more information, see Section 35.3.3, "What You May Need to Know About Using the ClientDropListener.". -
In the Insert Data Flavor dialog, enter the class for the object that can be dropped onto the target, for example
java.lang.Object. This selection will be used to create adataFlavortag, which determines the type of object that can be dropped onto the target. MultipledataFlavortags are allowed under a single drop target to allow the drop target to accept any of those types.Tip:
To specify a typed array in aDataFlavortag, add brackets ([]) to the class name, for example,java.lang.Object[]. -
In the Properties window, set a value for Discriminant, if needed. A discriminant is an arbitrary string used to determine which source can drop on the target. For example, suppose you have two treemaps that both accept a
java.lang.Object, Treemap A and Treemap B. You also have two sources, both of which arejava.lang.Objectobjects. By setting a discriminant value on GraphA with a value ofalpha, only thejava.lang.Objectsource that provides the discriminant value ofalphawill be accepted. -
In the Structure window, select the
dropTargettag. In the Properties window, select a value for Actions. This defines what actions are supported by the drop target. Valid values can beCOPY(copy and paste),MOVE(cut and paste), andLINK(copy and paste as a link), for example:.MOVE COPY
If no actions are specified, the default is
COPY.Example 35-12 shows the code for a treemap component that accepts a
java.lang.Objectas a drag source. Note that becauseCOPYwas set as the value for Actions, that will be the only allowed action.Example 35-12 JSP Code for a dropTarget tag on a DVT Treemap Component
<dvt:treemap id="t1" value="#{treemap.censusData}" var="row" displayLevelsChildren="3" colorLabel="Median Household Income sizeLabel="Population" summary="Treemap Configured as Drag Source" legendSource="ag1"> <dvt:treemapNode id="tn1" value="#{row.size}" label="#{row.text}"> <dvt:attributeGroups id="ag1" value="#{row.income > 50000}" label="#{row.income > 50000 ? 'High Income' : 'Low Income'}" type="color"/> </dvt:treemapNode> <af:dropTarget dropListener="#{treemap.toDropListener}" actions="COPY"> <af:dataFlavor flavorClass="java.lang.Object"/> </af:dropTarget> </dvt:treemap> -
In the managed bean referenced in the EL expression created in Step 2, create the event handler method (using the same name as in the EL expression) that will handle the drag and drop functionality.
This method must take a
DropEventevent as a parameter and return aDnDActionobject, which is the action that will be performed when the source is dropped. Valid return values areDnDAction.COPY,DnDAction.MOVE,and DnDAction.LINK, and were set when you defined the target attribute in Step 5. This method should check theDropEventevent to determine whether or not it will accept the drop. If the method accepts the drop, it should perform the drop and return theDnDActionobject it performed. Otherwise, it should returnDnDAction.NONEto indicate that the drop was rejected.The method must also check for the presence for each
dataFlavorobject in preference order.Tip:
If your target has more than one defineddataFlavorobject, then you can use theTransferable.getSuitableTransferData()method, which returns aListofTransferDataobjects available in theTransferableobject in order, from highest suitability to lowest.The
DataFlavorobject defines the type of data being dropped, for examplejava.lang.Object, and must be as defined in theDataFlavortag on the JSP, as created in Step 3.Tip:
To specify a typed array in aDataFlavorobject, add brackets ([]) to the class name, for example,java.lang.Object[].DataFlavorobjects support polymorphism so that if the drop target acceptsjava.util.List, and theTransferableobject contains ajava.util.ArrayList, the drop will succeed. Likewise, this functionality supports automatic conversion betweenArraysandLists.If the drag and drop framework doesn't know how to represent a server
DataFlavorobject on the client component, the drop target will be configured to allow all drops to succeed on the client.Example 35-13 shows a handler method that copies a
java.lang.Objectfrom the event payload and assigns it to the component that initiated the event.Example 35-13 Sample Drop Listener for a DVT Treemap
// imports needed by methods
import java.util.Map;
import oracle.adf.view.rich.dnd.DnDAction;
import oracle.adf.view.rich.event.DropEvent;
import oracle.adf.view.rich.datatransfer.DataFlavor;
import oracle.adf.view.rich.datatransfer.Transferable;
import org.apache.myfaces.trinidad.context.RequestContext;
import org.apache.myfaces.trinidad.render.ClientRowKeyManager;
import javax.faces.context.FacesContext;
import oracle.adf.view.faces.bi.component.treemap.UITreemap;
import javax.faces.component.UIComponent;
// variables need by methods
private String dragText = "Drag this text onto a node";
// drop listener
public DnDAction toDropListener(DropEvent event) {
  Transferable transferable = event.getTransferable();
  DataFlavor<Object> dataFlavor = DataFlavor.getDataFlavor(Object.class);
  Object transferableObj = transferable.getData(dataFlavor);
  if(transferableObj == null)
    return DnDAction.NONE;
  // Build up the string that reports the drop information
  StringBuilder sb = new StringBuilder();
  // Start with the proposed action
  sb.append("Drag Operation: ");
  DnDAction proposedAction = event.getProposedAction();
  if(proposedAction == DnDAction.COPY) {
    sb.append("Copy<br>");
  }
  else if(proposedAction == DnDAction.LINK) {
    sb.append("Link<br>");
  }
  else if(proposedAction == DnDAction.MOVE) {
    sb.append("Move<br>");
  }
  // Then add the rowKeys of the nodes that were dragged
  UIComponent dropComponent = event.getDropComponent();
  Object dropSite = event.getDropSite();
  if(dropSite instanceof Map) {
    String clientRowKey = (String) ((Map) dropSite).get("clientRowKey");
    Object rowKey = getRowKey(dropComponent, clientRowKey);
    if(rowKey != null) {
      sb.append("Drop Site: ");
      sb.append(getLabel(dropComponent, rowKey));
    }
  }
  // Update the output text
  this.dragText = sb.toString();
  RequestContext.getCurrentInstance().addPartialTarget(event.getDragComponent());
  return event.getProposedAction();
}

public String getDragText() {
  return dragText;
}

private String getLabel(UIComponent component, Object rowKey) {
  if(component instanceof UITreemap) {
    UITreemap treemap = (UITreemap) component;
    TreeNode rowData = (TreeNode) treemap.getRowData(rowKey);
    return rowData.getText();
  }
  return null;
}

private Object getRowKey(UIComponent component, String clientRowKey) {
  if(component instanceof UITreemap) {
    UITreemap treemap = (UITreemap) component;
    ClientRowKeyManager crkm = treemap.getClientRowKeyManager();
    return crkm.getRowKey(FacesContext.getCurrentInstance(), component, clientRowKey);
  }
  return null;
}
-
-
To configure the DVT component as a drag source, do the following:
-
In the Components window, from the Operations panel, drag and drop a Drag Source as a child to the DVT component.
-
With the
dragSourcetag selected, in the Properties window, set the allowed Actions and any needed discriminant, as configured for the target.
Example 35-14 shows the JSP code for a treemap configured as a drag source. Note that all actions (
COPY,MOVE, andLINK) are permitted.Example 35-14 JSP Sample Code for a dragSource Tag on a DVT Treemap
<dvt:treemap id="t1" value="#{treemap.censusData}" var="row" displayLevelsChildren="3" colorLabel="Median Household Income sizeLabel="Population" summary="Treemap Configured as Drag Source" legendSource="ag1"> <dvt:treemapNode id="tn1" value="#{row.size}" label="#{row.text}"> <dvt:attributeGroups id="ag1" value="#{row.income > 50000}" label="#{row.income > 50000 ? 'High Income' : 'Low Income'}" type="color"/> </dvt:treemapNode> <af:dragSource defaultAction="MOVE" actions="COPY MOVE LINK"/> </dvt:treemap> -
-
To use the DVT component as the drop target which will allow drags to it from another component, in the Components window, from the Operations panel, drag and drop a Drag Source as a child to the component that will be the source of the drag.
For example, drag and drop a Drag Source as a child to an
af:outputFormattedcomponent to display node information about a treemap. With thedragSourcetag selected, in the Properties window, set the allowed Actions and any needed discriminant for the target. -
To add the DVT component as a drag source for another supported DVT or ADF Faces component, do the following:
-
In the Components window, from the Operations panel, drag and drop a Drop Target onto the component that will receive the drop.
For example, drag and drop a Drop Target onto a
treeTablecomponent. -
In the Insert Drop Target dialog, enter the name of a drop listener that the component will use to respond to the DVT component drop.
See the examples in this chapter for sample listeners.
-
In the Insert Data Flavor dialog, enter the object that the drop target will accept. Alternatively, use the dropdown menu to navigate through the object hierarchies and choose the desired object.
For example, if you want the user to be able to drag a treemap node to a
treeTablecomponent and have that component display information about the treemap, enter the following for the data flavor:org.apache.myfaces.trinidad.model.RowKeySet. -
In the Structure window, right-click the
af:dropTargetcomponent and choose Go to Properties. -
In the Properties window, in the Actions field, enter a list of the operations that the drop target will accept, separated by spaces. Allowable values are:
COPY,MOVE, orLINK. If you do not specify a value, the drop target will useCOPY.Example 35-15 shows the sample code for an
af:outputFormattedcomponent configured to allow dragging from a treemap.Example 35-15 JSP Sample Code for Dragging Data from a Treemap to an af:outputFormatted Component
<af:outputFormatted value="#{treemap.dropText}" id="of1">
  <af:dropTarget dropListener="#{treemap.fromDropListener}">
    <af:dataFlavor flavorClass="org.apache.myfaces.trinidad.model.RowKeySet"/>
  </af:dropTarget>
</af:outputFormatted>
-
35.8.4 Adding Drag and Drop Functionality for Timeline Components
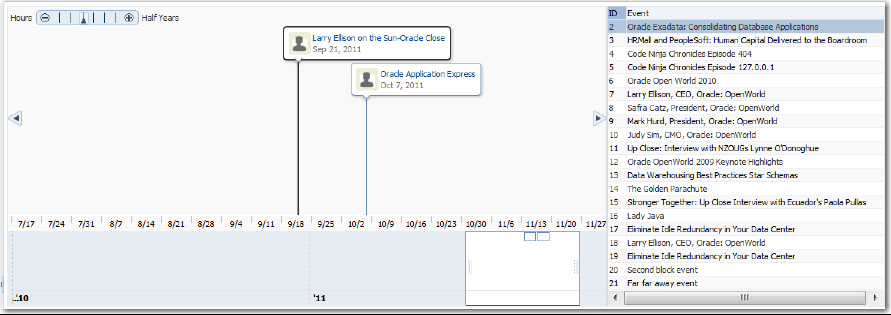
You can configure timelines as a drop target or drag source between collection components on a page. For example, you can drag an item from one collection such as a row from a table, and drop it into a timeline, or drag an event from a timeline and drop it into a table.
Figure 35-10 shows a timeline configured to allow drags and drops between the events in a timeline and a row in a table.
To add drag and drop functionality, first add tags to a supported DVT component that define it as a target for a drag and drop action. Then implement the event handler method that will handle the logic for the drag and drop action. Last, you define the sources for the drag and drop. For information about what happens at runtime, see Section 35.3.2, "What Happens at Runtime: How to Use Keyboard Modifiers." For information about using the clientDropListener attribute, see Section 35.3.3, "What You May Need to Know About Using the ClientDropListener."
It may be helpful to have an understanding of drag and drop functionality. For more information, see Section 35.1, "About Drag and Drop Functionality."
You must complete the following tasks:
-
Add the DVT component to your page.
For help with creating the DVT components, see Chapter 22, "Introduction to ADF Data Visualization Components."
-
If you plan to allow drops to the DVT component, add the component that will serve as the drag source to the page.
For help with adding other ADF Faces components, see Section 1.3, "ADF Faces Components."
-
If you plan on allowing drags from the DVT component to another component, add the component that will serve as the drop target to the page.
To add drag and drop support to a timeline:
-
In the Structure window, right-click the
timelinecomponent, and select Insert Inside Timeline > Drop Target. -
In the Insert Drop Target dialog, enter the name of the drop listener or use the dropdown menu to choose Edit to add a drop listener method to the timeline's managed bean. Alternatively, use the dropdown menu to choose Expression Builder and enter an EL Expression for the drop listener.
For example, to add a method named
handleDropOnTimeline()on a managed bean nameddnd, choose Edit, select dnd from the dropdown menu, and click New on the right of the Method field to create thehandleDropOnTimeline()method.Example 35-16 shows the sample drop listener and supporting methods for the timeline displayed in Figure 35-10.
Example 35-16 Sample Drop Listener for a Timeline
// imports needed by methods import java.text.DateFormat; import java.text.ParseException; import java.text.SimpleDateFormat; import java.util.ArrayList; import java.util.Date; import javax.faces.bean.ManagedBean; import javax.faces.bean.SessionScoped; import javax.faces.bean.RequestScoped; import oracle.adf.view.rich.datatransfer.DataFlavor; import oracle.adf.view.rich.datatransfer.Transferable; import oracle.adf.view.rich.dnd.DnDAction; import oracle.adf.view.rich.event.DropEvent; import org.apache.myfaces.trinidad.context.RequestContext; import org.apache.myfaces.trinidad.model.CollectionModel; import org.apache.myfaces.trinidad.model.ModelUtils; import org.apache.myfaces.trinidad.model.RowKeySet; // drop listener public DnDAction handleDropOnTimeline(DropEvent event) { Date _date = (Date)event.getDropSite(); Transferable _transferable = event.getTransferable(); RowKeySet _rowKeySet = _transferable.getData(DataFlavor.ROW_KEY_SET_FLAVOR); Object _rowKey = _rowKeySet.iterator().next(); EmpEvent _event = (EmpEvent)m_tableModel.getRowData(_rowKey); _event.setDate(_date); orderInsert(_event); RequestContext.getCurrentInstance().addPartialTarget (event.getDragComponent()); return DnDAction.COPY; } private void orderInsert(EmpEvent event) { int _index = -1; ArrayList _list = (ArrayList)m_timelineModel.getWrappedData(); for (int i=0; i<_list.size(); i++) { EmpEvent _current = (EmpEvent)_list.get(i); if (event.getDate().before(_current.getDate())) { _index = i; break; } } if (_index == -1) _list.add(event); else _list.add(_index, event); ArrayList _list2 = (ArrayList)m_tableModel.getWrappedData(); _list2.remove(event); } -
Click OK, and in the Insert Data Flavor dialog, enter
org.apache.myfaces.trinidad.model.RowKeySet. -
In the Structure window, right-click the
af:dropTargetcomponent and choose Go to Properties to set the following attributes in the Properties window:-
Actions: Enter a list of the operations that the drop target will accept, separated by spaces. Allowable values are:
COPY,MOVE, orLINK. If you do not specify a value, the drop target will useCOPY. -
Discriminant: Specify the model name shared by the drop target and drag source for compatibility purposes. The value of this attribute must match the value of the of the
discriminantattribute of theaf:dragSourcecomponent you will set for the collection component receiving the drags from the timeline.
-
-
To configure another collection component as the drag source for drops into the timeline, do the following:
-
In the Components window, from the Operations panel, drag and drop a Drag Source tag as a child to the component that will be the source of the drag.
For example, drag and drop a Drag Source tag as a child to an
af:tablecomponent. -
In the Properties window, for the component's Actions field, enter a list of the operations that the drop target will accept, separated by spaces.
-
For the component's Discriminant field, specify the model name shared by the drop target and drag source for compatibility purposes.
-
-
To configure the timeline as a drag source, in the Components window, from the Operations panel, drag and drop a Drag Source tag as a child to the timeline.
-
In the Structure window, right-click the
af:dragSourcecomponent and choose Go to Properties to set the following attributes in the Properties window:-
Actions: Enter a list of the operations that the collection drop target component will accept, separated by spaces.
-
Discriminant: Specify the name of the model shared by the drag source and collection drop target for compatibility purposes. The value of this attribute must match the value of the of the
modelNameattribute of theaf:collectionDropTargetcomponent you will set for the collection component receiving the drags from the timeline.
-
-
To make another collection component the drop target for drops from the timeline, do the following:
-
In the Components window, from the Operations panel, drag and drop a Collection Drop Target onto the component that will receive the drop.
For example, drag and drop a Collection Drop Target as a child to an
af:tablecomponent that displays the results of the drop. -
In the Insert Drop Target dialog, enter the name of the drop listener or use the dropdown menu to choose Edit to add a drop listener method to the appropriate managed bean.
Example 35-17 shows the sample drop listener for the timeline displayed in Figure 35-10. This example uses the same imports and helper methods used in Example 35-16, and they are not included here.
Example 35-17 Sample Drop Listener for a Table Using a Timeline as a Drag Source
//Drop Listener public DnDAction handleDropOnTable(DropEvent event) { Integer _dropSite = (Integer)event.getDropSite(); Transferable _transferable = event.getTransferable(); RowKeySet _rowKeySet = _transferable.getData(DataFlavor.ROW_KEY_SET_FLAVOR); Object _rowKey = _rowKeySet.iterator().next(); EmpEvent _event = (EmpEvent)m_timelineModel.getRowData(_rowKey); ArrayList _list = (ArrayList)m_tableModel.getWrappedData(); _list.add(_dropSite.intValue(), _event); ArrayList _list2 = (ArrayList)m_timelineModel.getWrappedData(); _list2.remove(_event); RequestContext.getCurrentInstance().addPartialTarget (event.getDragComponent()); return DnDAction.COPY; } private static Date parseDate(String date) { Date ret = null; try { ret = s_format.parse(date); } catch (ParseException e) { e.printStackTrace(); } return ret; } -
Click OK, and in the Insert Data Flavor dialog, enter
org.apache.myfaces.trinidad.model.RowKeySet. -
In the Structure window, right-click the
af:dropTargetcomponent and choose Go to Properties. -
In the Properties window, in the Actions field, enter a list of the operations that the drop target will accept, separated by spaces.
-
In the ModelName field, define the model for the collection.The value of the
modelNameattribute is a String object used to identify the drag source for compatibility purposes. The value of this attribute must match the value of thediscriminantattribute of theaf:dragSourcecomponent.
-
Example 35-18 shows the JSF page sample code for the ADF Faces demo application illustrated in Figure 35-10. For additional information about the af:table component, see Chapter 12, "Using Tables, Trees, and Other Collection-Based Components."
Example 35-18 Sample Code for Timeline Drop Target and Drag Source
<dvt:timeline id="tl1" startTime="2010-01-01" endTime="2011-12-31"
    inlineStyle="width:800px;height:400px" itemSelection="single">
  <f:attribute name="horizontalFetchSizeOverride" value="3000"/>
  <dvt:timelineSeries id="ts1" var="evt" value="#{dnd.timelineModel}">
    <dvt:timelineItem id="ti1" value="#{evt.date}" group="#{evt.group}">
      <af:panelGroupLayout id="pg1" layout="horizontal">
        <af:image id="img1" inlineStyle="width:30px;height:30px"
            source="/resources/images/timeline/employment.png"/>
        <af:spacer width="3"/>
        <af:panelGroupLayout id="pg2" layout="vertical">
          <af:outputText id="ot1" inlineStyle="color:#084B8A"
              value="#{evt.description}" noWrap="true"/>
          <af:outputText id="ot2" value="#{evt.date}"
              inlineStyle="color:#6e6e6e" noWrap="true">
          <af:convertDateTime dateStyle="medium"/>
          </af:outputText>
        </af:panelGroupLayout>
      </af:panelGroupLayout>
    </dvt:timelineItem>
  <af:dragSource actions="COPY" discriminant="model"/>
  <af:dropTarget actions="COPY" dropListener="#{dnd.handleDropOnTimeline}">
    <af:dataFlavor flavorClass="org.apache.myfaces.trinidad.model.RowKeySet"
        discriminant="model2"/>
  </af:dropTarget>
  </dvt:timelineSeries>
  <dvt:timeAxis id="ta1" scale="weeks"/>
  <dvt:timelineOverview id="ov1">
    <dvt:timeAxis id="ta2" scale="years"/>
  </dvt:timelineOverview
</dvt:timeline>
<af:table var="row" value="#{dnd.tableModel}" rowSelection="single"
    inlineStyle="width:370px;height:400px">
  <af:column headerText="ID" width="20">
    <af:outputText value="#{row.id}"/>
  </af:column>
  <af:column headerText="Event" width="340">
    <af:outputText value="#{row.description}"/>
  </af:column>
  <af:dragSource actions="COPY" discriminant="model2"/>
  <af:collectionDropTarget actions="COPY" modelName="model"
      dropListener="#{dnd.handleDropOnTable}"/>
</af:table>