9 Tuning View Object Performance
This chapter describes advanced techniques you can use while designing and working with your ADF view objects in an Oracle ADF application.
This chapter includes the following sections:
9.1 About View Object Tuning
This section describes a number of interesting view object concepts and features that have not been discussed in previous chapters.
9.1.1 Limiting the Maximum Number of Records Fetched for a View Object
When your application needs to iterate over the rows of the view object query result, you may want to specify a maximum number of records to fetch. The default maximum fetch size of a view object is minus one (-1), which indicates there should be no limit to the number of rows that can be fetched. By default, rows are fetched as needed, so -1 does not imply a view object will necessarily fetch all the rows. It does means that if you attempt to iterate through all the rows in the query result, you will get them all.
To put an upper bound on the maximum number of rows that a view object will retrieve, use the following settings:
-
You can configure a global threshold for all view objects queries using the Row Fetch Limit property on the Business Components page of the overview editor for the
adf-config.xmlfile. You can locate the file in the Application Resources panel by expanding the Descriptors and ADF META-INF nodes.Note: Since Row Fetch Limit specifies a global threshold for all query operations in the application (including iterator binding property RowCountThreshold used to determine an estimated row count for the iterator result set), using this property means you can avoid changing settings for individual query operations where that operation's default behavior allows all rows to be fetched. If you do specify a fetch limit for individual view objects using the Max Fetch Size, then the Row Fetch Limit setting will be ignored in those cases. Note that the Row Fetch Limit setting is also ignored if the view object implementation class overrides
getRowLimit()to return an appropriate value for a view object. -
You can configure a threshold for a specific view object query using the Only up to row number field selected in the Tuning section of the General page of the overview editor for the view object. Note that the Property Inspector displays this setting in the Max Fetch Size property.
Tip:
If you want to set the global threshold for query operations using Row Fetch Limit and you still need to allow specific view object queries to return all available rows, then you can set the Max Fetch Size with the Only up to row number field for those view objects to a very large number.For example, if you write a query containing an ORDER BY clause and only want to return the first n rows to display the "Top-N" entries in a page, you can use the overview editor for the view object to specify a value for the Only up to row number field in the Tuning section of the General page. For example, to fetch only the first five rows, you would enter "5" in this field. This is equivalent to calling the setMaxFetchSize() method on your view object to set the maximum fetch size to 5. The view object will stop fetching rows when it hits the maximum fetch size. Often you will combine this technique with specifying a Query Optimizer Hint of FIRST_ROWS also on the Tuning section of the General page of the overview editor. This gives a hint to the database that you want to retrieve the first rows as quickly as possible, rather than trying to optimize the retrieval of all rows.
9.1.2 Maintaining New Row Consistency in View Objects Based on the Same Entity
When multiple instances of entity-based view objects in an application module are based on the same underlying entity object, a new row created in one of them can be automatically added (without having to requery) to the row sets of the others to keep your user interface consistent or simply to consistently reflect new rows in different application pages for a pending transaction. Consider an application that displays a customer's list of orders. If the customer goes to create a new order, this task is performed through a different view object and handled by a custom application module method. Using the view object new row consistency feature, the newly created order automatically appears in the customer's list of open orders without having to requery the database.
For historical reasons, this capability is known as the view link consistency feature because in prior releases of Oracle Application Development Framework (Oracle ADF) the addition of new rows to other relevant row sets only was supported for detail view object instances in a view link based on an association. Now this view link consistency feature works for any view objects for which it is enabled, regardless of whether they are involved in a view link or not.
9.1.2.1 What Happens at Runtime When View Link Consistency is Enabled
Consider two entity-based view objects OrdersViewSummary and OrdersView both based on the same underlying Orders entity object. When a new row is created in a row set for one of these view objects (like OrdersView) and the row's primary key is set, any of the other row sets for view objects based on the same Orders entity object (like OrdersViewSummary) receive an event indicating a new row has been created. If their view link consistency flag is enabled, then a copy of the new row is inserted into their row set as well.
Caution:
By default the view link consistency mechanism adds new rows in an unqualified way. If you want to prevent the new rows from being added to the row sets of all participating view objects, you can write a filter expression on the RowMatch object to qualify the row before it is added to the row set. For more information, see Section 9.1.2.3, "How to Use a RowMatch to Qualify Which New, Unposted Rows Get Added to a Row Set."9.1.2.2 How to Change the Default View Link Consistency Setting
You can use the Edit Configuration dialog to control the default setting for the view link consistency feature using the jbo.viewlink.consistent configuration parameter, as shown in Figure 9-1.
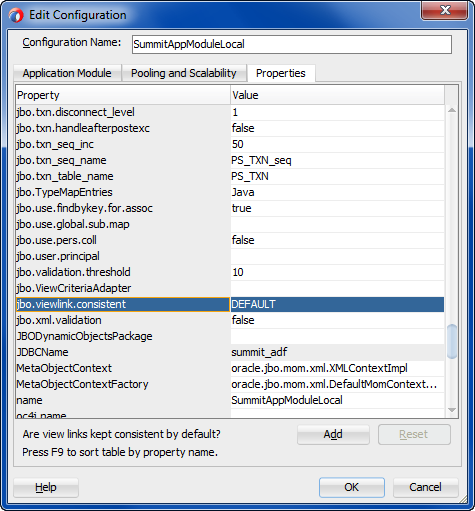
To display the configuration editor, double-click the application module in the Applications window and, in the overview editor, select the Configurations navigation tab. Then, in the Configurations page of the overview editor, select the configuration and click Edit. In the Edit Configuration dialog, select the Properties tab. The default setting for this parameter is the word "DEFAULT" which has the following meaning. If your view object has:
-
A single entity usage, view link consistency is enabled
-
Multiple entity usages, and:
-
If all secondary entity usages are marked as contributing reference information, then view link consistency is enabled
-
If any secondary entity usage marked as not being a reference view link consistency is disabled.
-
You can globally disable this feature by setting the jbo.viewlink.consistent to the value false in your configuration. Conversely, you could globally enable this feature by setting jbo.viewlink.consistent to the value true, but Oracle does not recommend doing this. Doing so would force view link consistency to be set on for view objects with secondary entity usages that are not marked as a reference which presently do not support the view link consistency feature well.
To set the feature programmatically, use the setAssociationConsistent() API on any RowSet. When you call this method on a view object, it affects its default row set.
9.1.2.3 How to Use a RowMatch to Qualify Which New, Unposted Rows Get Added to a Row Set
If a view object has view link consistency enabled, any new row created by another view object based on the same entity object is added to its row set. By default the mechanism adds new rows in an unqualified way. If your view object has a design-time WHERE clause that queries only a certain subset of rows, you can apply a RowMatch object to your view object to perform the same filtering in-memory. The filtering expression of the RowMatch object you specify prevents new rows from being added that wouldn't make sense to appear in that view object.
For example, an OrdersByStatus view object might include a design time WHERE clause like this:
WHERE /* ... */ AND STATUS LIKE NVL(:StatusCode,'%')
Its custom Java class overrides the create() method as shown in Example 9-1 to force view link consistency to be enabled. It also applies a RowMatch object whose filtering expression matches rows whose Status attribute matches the value of the :StatusCode named bind variable (or matches any row if :StatusCode = '%'). This RowMatch filter is used by the view link consistency mechanism to qualify the row that is a candidate to add to the row set. If the row qualifies by the RowMatch, it is added. Otherwise, it is not.
Example 9-1 Providing a Custom RowMatch to Control Which New Rows are Added
// In OrdersByStatusImpl.java
protected void create() {
  super.create();
  setAssociationConsistent(true);
  setRowMatch(new RowMatch("Status = :StatusCode or :StatusCode = '%'"));
}
See Section 10.3.4, "Performing In-Memory Filtering with RowMatch" for more information on creating and using a RowMatch object. For a list of supported SQL operators see Table 10-2. For a list of supported SQL function, see Table 10-3.
Note:
If theRowMatch facility does not provide enough control, you can override the view object's rowQualifies() method to implement a custom filtering solution. Your code can determine whether a new row qualifies to be added by the view link consistency mechanism or not.9.1.2.4 What You May Need to Know About the Dynamic WHERE Clause and View Link Consistency
If you call setWhereClause() on a view object to set a dynamic WHERE clause, the view link consistency feature is disabled on that view object. If you have provided an appropriate custom RowMatch object to qualify new rows for adding to the row set, you can call setAssociationConsistent(true) after setWhereClause() to reenable view link consistency.
If a row set has view link consistency enabled, then new rows added due to creation by other row sets are added to the bottom of the row set.
If a row set has view link consistency enabled, then when you call the executeQuery() method, any qualifying new, unposted rows are added to the top of the row set before the queried rows from the database are added.
9.1.3 Understanding View Link Accessors Versus Data Model View Link Instances
View objects support two different styles of master-detail coordination:
-
View link instances for data model master-detail coordination, as described in Section 9.1.3.1, "Enabling a Dynamic Detail Row Set with Active Master-Detail Coordination."
-
View link accessor attributes for programmatically accessing detail row sets on demand, as described in Section 9.1.3.2, "Accessing a Stable Detail Row Set Using View Link Accessor Attributes."
-
You can combine both styles, as described in Section 9.1.3.3, "Accessor Attributes Create Distinct Row Sets Based on an Internal View Object."
9.1.3.1 Enabling a Dynamic Detail Row Set with Active Master-Detail Coordination
When you add a view link instance to your application module's data model, you connect two specific view object instances. The use of the view link instance indicates that you want active master-detail coordination between the two. At runtime the view link instance in the data model facilitates the eventing that enables this coordination. Whenever the current row is changed on the master view object instance, an event causes the detail view object to be refreshed by automatically invoking executeQuery() with a new set of bind parameters for the new current row in the master view object.
A key feature of this data model master-detail is that the master and detail view object instances are stable objects to which client user interfaces can establish bindings. When the current row changes in the master — instead of producing a new detail view object instance — the existing detail view object instance updates its default row set to contain the set of rows related to the new current master row. In addition, the user interface binding objects receive events that allow the display to update to show the detail view object's refreshed row set.
Another key feature that is exclusive to data model hierarchy is that a detail view object instance can have multiple master view object instances. For example, an PaymentOptions view object instance may be a detail of both a Customers and a Orders view object instance. Whenever the current row in either the Customers or Orders view object instance changes, the default row set of the detail PaymentOptions view object instance is refreshed to include the row of payment information for the current customer and the current order. See Section 9.1.6, "Setting Up a Data Model with Multiple Masters" for details on setting up a detail view object instance with multiple-masters.
9.1.3.2 Accessing a Stable Detail Row Set Using View Link Accessor Attributes
When you need to programmatically access the detail row set related to a view object row by virtue of a view link, you can use the view link accessor attribute. You specify the finder name of the view link accessor attribute from the overview editor for the view link. Click the Edit icon in the Accessors section of the Relationship page and in the Edit View Link Properties dialog, edit the name of the view link accessor attribute.
Example 9-2 shows the XML for the view link that defines the _findername value of the <Attr> element.
Example 9-2 View Link Accessor Attribute Name
<ViewLinkDefEnd
    Name="Orders"
    Cardinality="1"
    Owner="devguide.advanced.multiplemasters.Orders"
    Source="true">
    <AttrArray Name="Attributes">
      <Item Value="devguide.advanced.multiplemasters.Orders.PaymentOptionId"/>
    </AttrArray>
    <DesignTime>
      <Attr Name="_minCardinality" Value="1"/>
      <Attr Name="_isUpdateable" Value="true"/>
      <Attr Name="_finderName" Value="Orders"/>
    </DesignTime>
</ViewLinkDefEnd>
Assuming you've named your accessor attribute AccessorAttrName, you can access the detail row set using the generic getAttribute() API like:
RowSet detail = (RowSet)currentRow.getAttribute("AccessorAttrName");
If you've generated a custom view row class for the master view object and exposed the getter method for the view link accessor attribute on the client view row interface, you can write strongly typed code to access the detail row set like this:
RowSet detail = (RowSet)currentRow.getAccessorAttrName();
Unlike the data model master-detail, programmatic access of view link accessor attributes does not require a detail view object instance in the application module's data model. Each time you invoke the view link accessor attribute, it returns a RowSet containing the set of detail rows related to the master row on which you invoke it.
Using the view link accessor attribute, the detail data rows are stable. As long as the attribute value(s) involved in the view link definition in the master row remain unchanged, the detail data rows will not change. Changing of the current row in the master does not affect the detail row set which is "attached" to a given master row. For this reason, in addition to being useful for general programmatic access of detail rows, view link accessor attributes are appropriate for UI objects like the tree control, where data for each master node in a tree needs to retain its distinct set of detail rows.
9.1.3.3 Accessor Attributes Create Distinct Row Sets Based on an Internal View Object
When you combine the use of data model master-detail with programmatic access of detail row sets using view link accessor, it is even more important to understand that they are distinct mechanisms. For example, imagine that you:
-
Define
PersonsVOandOrdersVOview objects -
Define a view link between them, naming the view link accessor
PersonsToOrders -
Add instances of them to an application module's data model named
master(of typePersonsVO) anddetail(of typeOrdersVO) coordinated actively by a view link instance.
If you find a person in the master view object instance, the detail view object instance updates as expected to show the corresponding orders. At this point, if you invoke a custom method that programmatically accesses the PersonsToOrders view link accessor attribute of the current PersonsVO row, you get a RowSet containing the set of OrdersVO rows. You might reasonably expect this programmatically accessed RowSet to have come from the detail view object instance in the data model, but this is not the case.
The RowSet returned by a view link accessor always originates from an internally created view object instance, not one you that added to the data model. This internal view object instance is created as needed and added with a system-defined name to the root application module.
The principal reason a distinct, internally created view object instance is used is to guarantee that it remains unaffected by developer-related changes to their own view objects instances in the data model. For example, if the view row were to use the detail view object in the data model for view link accessor RowSet, the resulting row set could be inadvertently affected when the developer dynamically:
-
Adds a
WHEREclause with new named bind parametersIf such a view object instance were used for the view link accessor result, unexpected results or an error could ensue because the dynamically added
WHEREclause bind parameter values have not been supplied for the view link accessor'sRowSet: they were only supplied for the default row set of the detail view object instance in the data model. -
Adds an additional master view object instance for the detail view object instance in the data model.
In this scenario, the semantics of the accessor would be changed. Instead of the accessor returning
OrdersVOrows for the currentPersonsVOrow, it could all of a sudden start returning only theOrdersVOrows for the currentPersonsVOthat were created by a current logged in customer, for example. -
Removes the detail view object instance or its containing application module instance.
In this scenario, all rows in the programmatically accessed detail
RowSetwould become invalid.
Furthermore, Oracle ADF needs to distinguish between the data model master-detail and view link accessor row sets for certain operations. For example, when you create a new row in a detail view object, the framework automatically populates the attributes involved in the view link with corresponding values of the master. In the data model master-detail case, it gets these values from the current row(s) of the possibly multiple master view object instances in the data model. In the case of creating a new row in a RowSet returned by a view link accessor, it populates these values from the master row on which the accessor was called.
9.1.4 Presenting and Scrolling Data a Page at a Time Using the Range
To present and scroll through data a page at a time, you can configure a view object to manage for you an appropriately sized range of rows. The range facility allows a client to easily display and update a subset of the rows in a row set, as well as easily scroll to subsequent pages, n rows as a time. You call setRangeSize() to define how many rows of data should appear on each page. The default range size is one (1) row. A range size of minus one (-1) indicates the range should include all rows in the row set.
Note:
When using the declarative bindings in the ADF Model layer, the iterator binding in the page definition file has aRangeSize attribute. At runtime, the iterator binding invokes the setRangeSize() method on its corresponding row set iterator, passing the value of this RangeSize attribute. The ADF design time by default sets this RangeSize attribute to 10 rows for most iterator bindings. An exception is the range size specified for a List binding to supply the set of valid values for a UI component like a dropdown list. In this case, the default range size is minus one (-1) to allow the range to include all rows in the row set.When you set a range size greater than one, you control the row set paging behavior using the iterator mode. The two iterator mode flags you can pass to the setIterMode() method are:
-
RowIterator.ITER_MODE_LAST_PAGE_PARTIALIn this mode, the last page of rows may contain fewer rows than the range size. For example, if you set the range size to 10 and your row set contains 23 rows, the third page of rows will contain only three rows. This is the style that works best for Fusion web applications.
-
RowIterator.ITER_MODE_LAST_PAGE_FULLIn this mode, the last page of rows is kept full, possibly including rows at the top of the page that had appeared at the bottom of the previous page. For example, if you set the range size to 10 and your row set contains 23 rows, the third page of rows will contain 10 rows, the first seven of which appeared as the last seven rows of page two. This is the style that works best for desktop-fidelity applications using Swing.
9.1.5 Efficiently Scrolling Through Large Result Sets Using Range Paging
As a general rule, for highest performance, Oracle recommends building your application in a way that avoids giving the end user the opportunity to scroll through very large query results. To enforce this recommendation, call the getEstimatedRowCount() method on a view object to determine how many rows would be returned by the user's query before actually executing the query and allowing the user to proceed. If the estimated row count is unreasonably large, your application can demand that the end-user provide additional search criteria.
However, when you must work with very large result sets, typically over 100 rows, you can use the view object's access mode called "range paging" to improve performance. The feature allows your applications to page back and forth through data, a range of rows at a time, in a way that is more efficient for large data sets than the default "scrollable" access mode.
The range paging access mode is typically used for paging through read-only row sets, and often is used with read-only view objects. You allow the user to find the row they are looking for by paging through a large row set with range paging access mode, then you use the Key of that row to find the selected row in a different view object for editing.
Range paging for view objects supports a standard access mode and a variation of the standard access mode that combines the benefits of range paging and result set scrolling with a minimum number of visits to the database. These modes for the view object range paging feature include:
-
RANGE_PAGING, standard access mode fetches the number of rows specified by a range size. In this mode, the number of rows that may be scrolled without requerying the database is determined by a range size that you set. The default is to fetch a single row, but it is expected that you will set a range size equal to the number of rows you want to be able to display to the user before they scroll to the next result set. The application requeries the database each time a row outside of the range is accessed by the end user. Thus, scrolling backward and forward through the row set will requery the database. For clarification about this database-centric paging strategy, see Section 9.1.5.1, "Understanding How to Oracle Supports "TOP-N" Queries." -
RANGE_PAGING_INCR, incremental access mode gives the UI designer more flexibility for the number of rows to display at a time while keeping database queries to a minimum. In this mode, the UI incrementally displays the result set from the memory cache and thus supports scrolling within a single database query. The number of rows that the end user can scroll though in a single query is determined by the range size and a range paging cache factor that you set. For example, suppose that you set the range size to 4 and the cache factor to 5. Then, the maximum number of rows to cache in memory will be 4*5 = 20. For further explanation of the caching behavior, see Section 9.1.5.4, "What Happens When View Rows are Cached When Using Range Paging."
Caution:
Additionally, the view object supports aRANGE_PAGING_AUTO_POST access mode to accommodate the inserting and deleting of rows from the row set. This mode behaves like the RANGE_PAGING mode, except that it eagerly calls postChanges() on the database transaction whenever any changes are made to the row set. However, this mode is typically not appropriate for use in Fusion web applications unless you can guarantee that the transaction will definitely be committed or rolled-back during the same HTTP request. Failure to heed this advice can lead to strange results in an environment where both application modules and database connections can be pooled and shared serially by multiple different clients.9.1.5.1 Understanding How to Oracle Supports "TOP-N" Queries
The Oracle database supports a feature called a "Top-N" query to efficiently return the first n ordered rows in a query. For example, if you have a query like:
SELECT EMPNO, ENAME,SAL FROM EMP ORDER BY SAL DESC
If you want to retrieve the top 5 employees by salary, you can write a query like:
SELECT * FROM (
   SELECT X.*,ROWNUM AS RN FROM (
      SELECT EMPNO,ENAME,SAL FROM EMP ORDER BY SAL DESC
   ) X
) WHERE RN <= 5
which gives you results like:
     EMPNO ENAME       SAL   RN
---------- -------- ------ ----
      7839 KING       5000    1
      7788 SCOTT      3000    2
      7902 FORD       3000    3
      7566 JONES      2975    4
      7698 BLAKE      2850    5
The feature is not only limited to retrieving the first n rows in order. By adjusting the criteria in the outermost WHERE clause you can efficiently retrieve any range of rows in the query's sorted order. For example, to retrieve rows 6 through 10 you could alter the query this way:
SELECT * FROM (
  SELECT X.*,ROWNUM AS RN FROM  (
     SELECT EMPNO,ENAME,SAL FROM EMP ORDER BY SAL DESC
  ) X
) WHERE RN BETWEEN 6 AND 10
Generalizing this idea, if you want to see page number P of the query results, where each page contains R rows, then you would write a query like:
SELECT * FROM (
  SELECT X.*,ROWNUM AS RN FROM (
    SELECT EMPNO,ENAME,SAL FROM EMP ORDER BY SAL DESC
  ) X
) WHERE RN BETWEEN ((:P - 1) * :R) + 1 AND (:P) * :R
As the result set you consider grows larger and larger, it becomes more and more efficient to use this technique to page through the rows. Rather than retrieving hundreds or thousands of rows over the network from the database, only to display ten of them on the page, instead you can produce a clever query to retrieve only the R rows on page number P from the database. No more than a handful of rows at a time needs to be returned over the network when you adopt this strategy.
To implement this database-centric paging strategy in your application, you could handcraft the clever query yourself and write code to manage the appropriate values of the :R and :P bind variables. Alternatively, you can use the view object's range paging access mode, which implements it automatically for you.
9.1.5.2 How to Enable Range Paging for a View Object
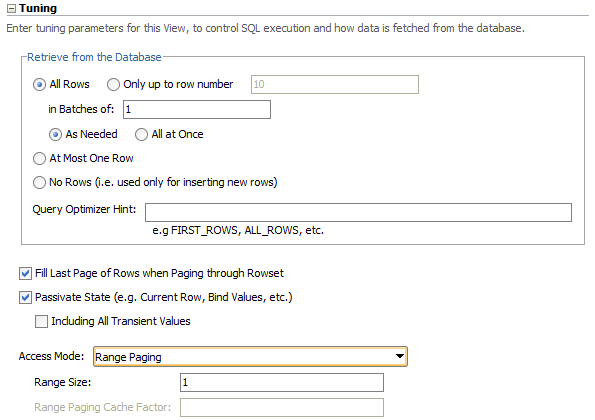
You can use the Tuning panel of the overview editor for the view object to set the access mode to either standard range paging or incremental range paging. The Range Paging Cache Factor field is only editable when you select Range Paging Incremental. Figure 9-2 shows the view object's Access Mode set to Range Paging (standard mode) with the default range size of 1. To understand the row set caching behavior of both access modes, see Section 9.1.5.4, "What Happens When View Rows are Cached When Using Range Paging."
To programmatically enable standard range paging for your view object, first call setRangeSize() to define the number of rows per page, then call the following method with the desired mode:
yourViewObject.setAccessMode(RowSet.RANGE_PAGING | RANGE_PAGING_INCR);
If you set RANGE_PAGING_INCR, then you must also call the following method to set the cache factor for your defined range size:
yourViewObject.setRangePagingCacheFactor(int f);
9.1.5.3 What Happens When You Enable Range Paging
When a view object's access mode is set to RANGE_PAGING, the view object takes its default query like:
SELECT EMPNO, ENAME, SAL FROM EMP ORDER BY SAL DESC
and automatically "wraps" it to produce a Top-N query.
For best performance, the statement uses a combination of greater than and less than conditions instead of the BETWEEN operator, but the logical outcome is the same as the Top-N wrapping query you saw above. The actual query produced to wrap a base query of:
SELECT EMPNO, ENAME, SAL FROM EMP ORDER BY SAL DESC
looks like this:
SELECT * FROM (
  SELECT /*+ FIRST_ROWS */ IQ.*, ROWNUM AS Z_R_N FROM (
    SELECT EMPNO, ENAME, SAL FROM EMP ORDER BY SAL DESC
  ) IQ  WHERE ROWNUM < :0)
WHERE Z_R_N > :1
The two bind variables are bound as follows:
-
:1index of the first row in the current page -
:0is bound to the last row in the current page
9.1.5.4 What Happens When View Rows are Cached When Using Range Paging
When a view object operates in RANGE_PAGING access mode, it only keeps the current range (or "page") of rows in memory in the view row cache at a time. That is, if you are paging through results ten at a time, then on the first page, you'll have rows 1 through 10 in the view row cache. When you navigate to page two, you'll have rows 11 through 20 in the cache. This also can help make sure for large row sets that you don't end up with tons of rows cached just because you want to preserve the ability to scroll backwards and forwards.
When a view object operates in RANGE_PAGING_INCR access mode, the cache factor determines the number of rows to cache in memory for a specific range size. For example, suppose the range size is set to 4 and cache factor to 5. Then, the memory will keep at most 4*5 = 20 rows in its collection. In this example, when the range is refreshed for the first time, the memory will have just four rows even though the range paging query is bound to retrieve rows 0 to 19 (for a total of twenty rows). When the range is scrolled past the forth row, more rows will be read in from the current result set. This will continue until all twenty rows from the query result are read. If the user's action causes the next set of rows to be retrieve, the query will be reexecuted with the new row number bind values. The exact row number bind values are determined by the new range-start and the number of rows that can be retained from the cache. For example, suppose all twenty rows have been filled up and the user asks to move the range-start to 18 (0-based). This means that memory can retain row 18 and row 19 and will need two more rows to fill the range. The query is reexecuted for rows 20 and 21.
9.1.5.5 How to Scroll to a Given Page Number Using Range Paging
When a view object operates in RANGE_PAGING access mode, to scroll to page number n call its scrollToRangePage() method, passing n as the parameter value.
9.1.5.6 Estimating the Number of Pages in the Row Set Using Range Paging
When a view object operates in RANGE_PAGING access mode, you can access an estimate of the total number of pages the entire query result would produce using the getEstimatedRangePageCount() method.
9.1.5.7 Understanding the Tradeoffs of Using a Range Paging Mode
You might ask yourself, "Why wouldn't I always want to use RANGE_PAGING or RANGE_PAGING_INCR mode?" The answer is that using range paging potentially causes more overall queries to be executed as you are navigating forward and backward through your view object rows. You would want to avoid using RANGE_PAGING mode in these situations:
-
You plan to read all the rows in the row set immediately (for example, to populate a dropdown list).
In this case your range size would be set to
-1and there really is only a single "page" of all rows, so range paging does not add value. -
You need to page back and forth through a small-sized row set.
If you have 100 rows or fewer, and are paging through them 10 at a time, with
RANGE_PAGINGmode you will execute a query each time you go forward and backward to a new page. Otherwise, in the default scrollable mode, you will cache the view object rows as you read them in, and paging backwards through the previous pages will not reexecute queries to show those already-seen rows. Alternatively, you can useRANGE_PAGING_INCRmode to allow scrolling through in-memory results based on a row set cache factor that you determine.
In the case of a very large (or unpredictably large) row set, the trade off of potentially doing a few more queries — each of which only returns up to the RangeSize number of rows from the database — is more efficient then trying to cache all of the previously viewed rows. This is especially true if you allow the user to jump to an arbitrary page in the list of results. Doing so in default, scrollable mode requires fetching and caching all of the rows between the current page and the page the users jumps to. In RANGE_PAGING mode, it will ask the database just for the rows on that page. Then, if the user jumps back to a page of rows that they have already visited, in RANGE_PAGING mode, those rows get requeried again since only the current page of rows is held in memory in this mode. The incremental range paging access mode RANGE_PAGING_INCR combines aspects of both standard range paging and scrollable access mode since it allows the application to cache more rows in memory and permits the user to jump to any combination of those rows without needing to requery.
9.1.6 Setting Up a Data Model with Multiple Masters
When useful, you can set up your data model to have multiple master view object instances for the same detail view object instance. Consider view objects named Customers, Orders, and PaymentOptions with view links defined between:
-
CustomersandPaymentOptions -
OrdersandPaymentOptions
Figure 9-3 shows what the data model panel looks like when you've configured both Customers and Orders view object instances to be masters of the same PaymentOptions view object instance.
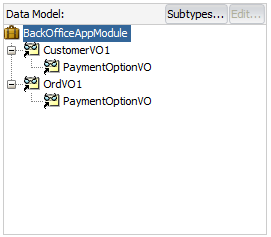
To set up the data model as shown in Figure 9-3 you use the overview editor for the application module and use the Data Model page.
It may be helpful to have an understanding of view objects. For more information, see Section 5.1, "About View Objects."
To create a view instance with multiple master view objects:
-
Add an instance of the first master view object to the data model.
Assume you name it
Customers. -
Add an instance of the second master view object to the data model.
Assume you name it
Orders. -
Select the first master view object instance in the Data Model list
-
In the Available View Objects list, select the detail view object indented beneath the first master view object and enter the view object instance name in the New Instance Name field. Click > to shuttle it into data model as a detail of the existing
Customersview object instance. -
Select the second master view object instance in the Data Model list
-
In the Available View Objects list, select the detail view object indented beneath the second master view object and the New Instance Name field, enter the same view object instance name as the previously entered detail view object. Click > to shuttle it into data model as a detail of the existing
Ordersview object instance.An alert will appear: An instance of a View Object with the name PaymentOptionsVO has already been used in the data model. Would you like to use the same instance?
-
Click Yes to confirm you want the detail view object instance to also be the detail of the second view object instance.
9.1.7 Understanding When You Can Use Partial Keys with findByKey()
View objects based on multiple entity usages support the ability to find view rows by specifying a partially populated key. A partial key is a multi-attribute Key object with some of its attributes set to null. However, there are strict rules about what kinds of partial keys can be used to perform the findByKey().
If a view object is based on n entity usages, where n > 1, then the view row key is by default comprised of all of the primary key attributes from all of the participating entity usages. Only the ones from the first entity object are required to participate in the view row key, but by default all of them do.
If you allow the key attributes from some secondary entity usages to remain as key attributes at the view row level, then you should leave all of the attributes that form the primary key for that entity object as part of the view row key. Assuming you have left the one or more key attributes in the view row for m of the n entity usages, where (m <= n), then you can use findByKey() to find rows based on any subset of these m entity usages. Each entity usage for which you provide values in the Key object, requires that you must provide non-null values for all of the attributes in that entity's primary key.
You have to follow this rule because when a view object is based on at least one or more entity usages, its findByKey() method finds rows by delegating to the findByPrimaryKey() method on the entity definition corresponding to the first entity usage whose attributes in the view row key are non-null. The entity definition's findByPrimaryKey() method requires all key attributes for any given entity object to be non-null in order to find the entity row in the cache.
As a concrete example, imagine that you have a OrderInfoVO view object with a OrderEO entity object as its primary entity usage, and an AddressEO entity as secondary reference entity usage. Furthermore, assume that you leave the Key Attribute property of both of the following view row attributes set to true:
-
OrderId— primary key for theOrderEOentity -
AddressId— primary key for theAddressEOentity
The view row key will therefore be the (OrderId, AddressId) combination. When you do a findByKey(), you can provide a Key object that provides:
-
A completely specified key for the underlying
OrderEOentityKey k = new Key(new Object[]{new Number(200), null}); -
A completely specified key for the underlying
AddressEOentityKey k = new Key(new Object[]{null, new Number(118)}); -
A completely specified key for both entities
Key k = new Key(new Object[]{new Number(200), new Number(118)});
When a valid partial key is specified, the findByKey() method can return multiple rows as a result, treating the missing entity usage attributes in the Key object as a wildcard.
9.1.8 Handling View Object Queries with Primary Keys Defined by Transient Attributes
In general, because a transient attribute will force reevaluation of the primary key attribute with each access, defining the primary key with a transient attribute may not be suitable for all use cases. In particular, Oracle recommends that you avoid using a transient attribute to define the primary key of any view object that will be bound to an ADF Faces component that may produce multiple queries, such as an ADF Tree component. In such situations, the performance of the application will be degraded by the need to reevaluate the transient attribute as the primary key.
Additionally, you should be aware that when your programmatic view object query relies on transient attributes for it primary key, it is possible for the user to receive a null pointer exception when they scroll the UI out of the view object's cached rows. In this case, since the view object query is not generated from a database table, your view object implementation must override the ViewObjectImpl classes' retrieveByKey() method to return the rows (or return an empty array when no rows are found).
Overriding this method will allow ADF Business Components to execute findByKey() to first find the requested rows from the cache. When that fails (because the primary key is a transient attribute), ADF Business Components will execute your retrieveByKey() override to perform the operations you defined to retrieve the rows that match the key coming in. The default implementation of this method tries to issue a database query to get the row(s) from the database:
protected Row[] retrieveByKey(ViewRowSetImpl rs, Key key,
                                  int maxNumOfRows, boolean skipWhere)
The method has these arguments:
maxNumOfRows is the maxNumOfRows you passed into the call to findByKey(). It may be 1 .. n or -1. n means that it's looking for n many rows whose key matches the one that got passed in. -1 means match all rows. Note that it is possible for the view object to have more than one row that matches the key when the key is a partial key and the view object is based on multiple entity objects.
skipWhere controls whether findByKey() should apply the same WHERE clause as the base view object. If the base view object has a WHERE clause DEPTNO = 10, if skipWhere is false, you're supposed to apply the same WHERE clause when looking for the row(s) from the backing store. If skipWhere is true, then don't bother with the WHERE clause from the base view object.
9.1.9 Creating Dynamic Attributes to Store UI State
You can add one or more dynamic attributes to a view object at runtime using the addDynamicAttribute() method. Dynamic attributes can hold any serializable object as their value. Typically, you will consider using dynamic attributes when writing generic framework extension code that requires storing some additional per-row transient state to implement a feature you want to add to the framework in a global, generic way.
9.1.10 Working with Multiple Row Sets and Row Set Iterators
While you typically work with a view object's default row set, you can call the createRowSet() method on the ViewObject interface to create secondary, named row sets based on the same view object's query. One situation where this could make sense is when your view object's SQL query contains named bind variables. Since each RowSet object stores its own copy of bind variable values, you could use a single view object to produce and process multiple row sets based on different combinations of bind variable values. You can find a named row set you've created using the findRowSet() method. When you're done using a secondary row set, call its closeRowSet() method.
For any RowSet, while you typically work with its default row set iterator, you can call the createRowSetIterator() method of the RowSet interface to create secondary, named row set iterators. You can find a named row set iterator you've created using the findRowSetIterator() method. When you're done using a secondary row set iterator, call its closeRowSetIterator() method.
Performance Tip:
When you need to perform programmatic iteration over a result set, create a secondary iterator to avoid disturbing the current row of the default row set iterator. For example, through the ADF Model declarative data binding layer, user interface pages in your application work with the default row set iterator of the default row set of view objects in the application module's data model. In this scenario, if you did not create a secondary row set iterator for the business logic you write to iterate over a view object's default row set, you would consequently change the current row of the default row set iterator used by the user interface layer.9.1.11 Optimizing View Link Accessor Access By Retaining the Row Set
Each time you retrieve a view link accessor row set, by default the view object creates a new RowSet object to allow you to work with the rows. This does not imply re-executing the query to produce the results each time, only creating a new instance of a RowSet object with its default iterator reset to the "slot" before the first row. To force the row set to refresh its rows from the database, you can call its executeQuery() method.
You can enable caching of the view link accessor row set when you do not want the application to incur the small amount of overhead associated with creating new detail row sets. For example, because view accessor row sets remain stable as long as the master row view accessor attribute remains unchanged, it would not be necessary to re-create a new row set for UI components, like the tree control, where data for each master node in a tree needs to retain its distinct set of detail rows. The view link accessor's detail row set can also be accessed programmatically. In this case, if your application makes numerous calls to the same view link accessor attributes, you can consider caching the view link accessor row set. This style of managing master-detail coordination differs from creating view link instances in the data model, as explained in Section 9.1.3, "Understanding View Link Accessors Versus Data Model View Link Instances."
You can enable retention of the view link accessor row set using the overview editor for the view object that is the source for the view link accessor. Select Retain Row Set in the View Accessors page of the overview editor for the view object.
Alternatively, you can enable a custom Java class for your view object, override the create() method, and add a line after super.create() that calls the setViewLinkAccessorRetained() method passing true as the parameter. It affects all view link accessor attributes for that view object.
When this feature is enabled for a view object, since the view link accessor row set is not re-created each time, the current row of its default row set iterator is also retained as a side-effect. This means that your code will need to explicitly call the reset() method on the row set you retrieve from the view link accessor to reset the current row in its default row set iterator back to the "slot" before the first row.
Note, however, that with accessor retention enabled, your failure to call reset() each time before you iterate through the rows in the accessor row set can result in a subtle, hard-to-detect error in your application. For example, if you iterate over the rows in a view link accessor row set like this, for example to calculate some aggregate total:
RowSet rs = (RowSet)row.getAttribute("OrdersShippedToPurchaser");
while (rs.hasNext()) {
  Row r = rs.next();
  // Do something important with attributes in each row
}
The first time you work with the accessor row set the code will work. However, since the row set (and its default row set iterator) are retained, the second and subsequent times you access the row set the current row will already be at the end of the row set and the while loop will be skipped since rs.hasNext() will be false. Instead, with this feature enabled, write your accessor iteration code like this:
RowSet rs = (RowSet)row.getAttribute("OrdersShippedToPurchaser");
rs.reset(); // Reset default row set iterator to slot before first row!
while (rs.hasNext()) {
  Row r = rs.next();
  // Do something important with attributes in each row
}
Recall that if view link consistency is on, when the accessor is retained the new unposted rows will show up at the end of the row set. This is slightly different from when the accessor is not retained (the default), where new unposted rows will appear at the beginning of the accessor row set.
9.2 Tuning Your View Objects for Best Performance
You can use view objects to read rows of data, create and store rows of transient data, as well as automatically coordinate inserts, updates, and deletes made by end users with your underlying business objects. How you design and use your view objects can definitely affect their performance at runtime. This section provides guidance on configuring your view objects to get the best possible performance.
9.2.1 Use Bind Variables for Parameterized Queries
Whenever the WHERE clause of your query includes values that might change from execution to execution, you should use named bind variables. The Create View Criteria dialog that you display from the Query page of the view object overview editor makes this an easy task. Their use also protects your application against abuse through SQL injection attacks by malicious end-users. For information about defining view criteria with bind variables, see Section 5.9.1, "How to Create Named View Criteria Declaratively."
9.2.1.1 Use Bind Variables to Avoid Reparsing of Queries
Bind variables are place holders in the SQL string whose value you can easily change at runtime without altering the text of the SQL string itself. Since the query text doesn't change from execution to execution, the database can efficiently reuse the same parsed statement each time. Avoiding reparsing of your statement alleviates the database from having to continually re-determine its query optimization plan and eliminates contention by multiple end-users on other costly database resources used during this parsing operation. This savings leads to higher runtime performance of your application. See Section 5.10.2, "How to Add WHERE Clause Bind Variables to a View Object Definition" for details on how to use named bind variables.
9.2.1.2 Use Bind Variables to Prevent SQL-Injection Attacks
Using bind variables for parameterized WHERE clause values is especially important if their values will be supplied by end-users of your application. Consider the example shown in Example 9-3. It adds a dynamic WHERE clause formed by concatenating a user-supplied parameter value into the statement.
Example 9-3 Using String Concatenation Instead of Bind Variables is Vulnerable to SQL-Injection Attacks
// EXAMPLE OF BAD PRACTICE, Do not follow this approach!
String userSuppliedValue = ... ;
yourViewObject.setWhereClause("BANK_ACCOUNT_ID = "+userSuppliedValue);
A user with malicious intentions — if able to learn any details about your application's underlying database schema — could supply a carefully constructed "bank account number" as a field value or URL parameter like:
BANK_ACCOUNT_ID
When the code in Example 9-3 concatenates this value into the dynamically applied where clause, what the database sees is a query predicate like this:
WHERE (BANK_ACCOUNT_ID = BANK_ACCOUNT_ID)
This WHERE clause retrieves all bank accounts instead of just the current user's, perhaps allowing the hacker to view private information of another person's account. This technique of short-circuiting an application's WHERE clause by trying to supply a maliciously constructed parameter value into a SQL statement is called a SQL injection attack. Using named bind variables instead for these situations as shown in Example 9-4 prevents the vulnerability.
Example 9-4 Use Named Bind Variables Instead of String Concatenation
// Best practice using named bind variables
String userSuppliedValue = ... ;
yourViewObject.setWhereClause("BANK_ACCOUNT_ID = :BankAcccountId");
yourViewObject.defineNamedWhereClauseParam("BankAcccountId", null, null);
yourViewObject.setNamedWhereClauseParam("BankAcccountId",userSuppliedValue);
If a malicious user supplies an illegal value in this case, they receive an error your application can handle instead of obtaining data they are not suppose to see.
9.2.1.3 Logging Bind Parameter Values
When you want to be able to determine the bind parameter values that are used to execute the queries of your view objects, you can configure the log level before a test run or during a debug session. The log level you specify will determine the type and quantity of log messages. To view bind parameter information, you must set a minimum Java log level of CONFIG. For details about using and configuring the Log Analyzer, see Section 42.6.4, "How to Use the Log Analyzer to View Log Messages."
Alternatively, you can log bind parameter values programmatically, by overriding the bindParametersForCollection() method on the view object's ViewObjectImpl class. This method is used to log bind parameter names and values used in the query. Your implementation may log the bind parameter values, which is especially useful in those scenarios where the bind parameter is generated by the runtime. For example, when an ADF Faces Tree component is built using view link association, the nodes will be populated by bind parameters that you may log. Example 9-5 shows how to define the bindParametersForCollection() method for this purpose.
Example 9-5 Logging Bind Parameter Values
@Override protected void bindParametersForCollection(QueryCollection qc,
                                               Object[] params,
                                               PreparedStatement stmt) throws
SQLException {        String vrsiName = null;
        if (qc != null) {
            ViewRowSetImpl vrsi = qc.getRowSetImpl();
            vrsiName = vrsi.isDefaultRS() ? "<Default>" : vrsi.getName();
        }
        String voName = getName();
        String voDefName = getDefFullName();
        if (qc != null) {
            System.out.println("----[Exec query for VO=" + voName + ", RS=" +
                               vrsiName + "]----");
        } else {
            System.out.println("----[Exec COUNT query for VO=" + voName +
                               "]----");
        }
        System.out.println("VODef =" + voDefName);
        System.out.println(getQuery());
        if (params != null) {
            if (getBindingStyle() == SQLBuilder.BINDING_STYLE_ORACLE_NAME) {
                StringBuilder binds = new StringBuilder("BindVars:(");
                int paramNum = 0;
                for (Object param : params) {
                    paramNum++;
                    Object[] nameValue = (Object[])param;
                    String name = (String)nameValue[0];
                    Object value = nameValue[1];
                    if (paramNum > 1) {
                        binds.append(",");
                    }
                    binds.append(name).append("=").append(value);
                }
                binds.append(")");
                System.out.println(binds);
            }
        }
        super.bindParametersForCollection(qc, params, stmt);
9.2.2 Consider Using Entity-Based View Objects for Read-Only Data
Typically view objects used for SQL-based validation purposes, as well as for displaying the list of valid selections in a dropdown list, can be read-only. You need to decide what kind of functionality your application requires and design the view object accordingly.
Best Practice:
In previous releases, an Oracle best practice recommendation for read-only data had been to create read-only, custom SQL view objects. The purpose of this recommendation had been to avoid the overhead of storing the relating rows in an entity object cache. Oracle has now optimized a solution such that this best practice is no longer relevant.In the current release, when you need to create a read-only view object for data lookup, use the entity-based view object and deselect the Updatable option in the Entity Objects page of the view object overview editor. This approach has two benefits: First, it benefits from the design time editors which aid in generating the SQL query, and second, if you ever decide to make the view object updatable, it is already backed by an updatable entity object.
The alternative of creating a read-only, custom SQL view object still has merit when you can specify a fully fledged SQL query, and will be especially useful for cases where Unions and Group By Queries cannot be expressed using entity objects.
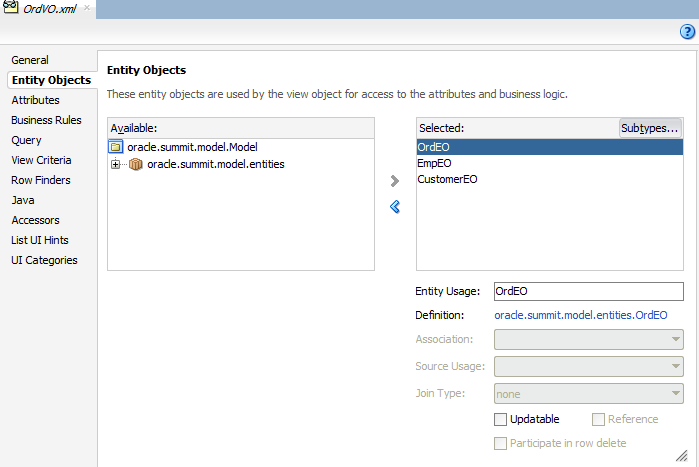
View objects can either be related to underlying entity objects or not. When a view object is related to one or more underlying entity objects the default behavior supports creating new rows and modifying or removing queried rows. However, the update feature can be disabled by deselecting Updatable in the overview editor for the entity-based view object, as shown in Figure 9-4.
The alternative is to create a read-only view object and define the SQL query by selecting Write Custom SQL in the Query page of the overview editor. For the Business Components developer not comfortable with constructing a complex SQL statement, it will always be more convenient to create a nonupdatable view object based on an entity object since the editor simplifies the task of creating the query. Entity-based view objects that you set to nonupdatable compare favorably to read-only, custom SQL view objects:
-
There is the ability to optimize the select list at runtime to include only those attributes that are required by the user interface
-
There is no significant performance degradation incurred by using the entity object to create the local cache
-
The data in the view object will reflect the state of the local cache rather than need to return to the database for each read operation
-
The data in the local cache will stay consistent should another view object you define need to perform an update on the nonupdatable view object's base entity object.
So, while there is a small amount of runtime overhead associated with the coordination between view object rows and entity object rows (estimates show less than 5% overhead), weigh this against the ability to keep the view object definition entirely declarative and maintain a customizable view object. Custom SQL view objects are not customizable but they can be used to perform Unions and Group By queries that cannot be expressed in entity objects. Custom SQL view objects are also useful in SQL-based validation queries used by the view object-based Key Exists validator.
When data is not read-only, the best (and only) choice is to create entity-based view objects. Entity-based view objects that are updatable (default behavior) are the only way to pickup entity-derived attribute default values, reflect pending changes made to relevant entity object attributes through other view objects in the same transaction, and reflect updated reference information when foreign key attribute values are changed is to use an entity-based view object.
9.2.3 Use SQL Tracing to Identify Ill-Performing Queries
After deciding whether your view object should be mapped to entities or not, your attention should turn to the query itself. On the Query page of the view object overview editor, click the Test and Explain button to see the query plan that the database query optimizer will use. If you see that it is doing a full table scan, you should consider adding indexes or providing a value for the Query Optimizer Hint field on the Tuning section of the overview editor's General page. This will let you explicitly control which query plan will be used. These facilities provide some useful tools to the developer to evaluate the query plans for individual view object SQL statements. However, their use is not a substitute for tracing the SQL of the entire application to identify poorly performing queries in the presence of a production environment's amount of data and number of end users.
You can use the Oracle database's SQL Tracing facilities to produce a complete log of all SQL statements your application performs. The approach that works in all versions of the Oracle database is to issue the command:
ALTER SESSION SET SQL_TRACE TRUE
Specifically in version 10g of Oracle, the DBA would need to grant ALTER SESSION privilege in order to execute this command.
This command enables tracing of the current database session and logs all SQL statements to a server-side trace file until you either enter ALTER SESSION SET SQL_TRACE FALSE or close the connection. To simplify enabling this option to trace your Fusion web applications, override the afterConnect() method of your application module (or custom application module framework extension class) to conditionally perform the ALTER SESSION command to enable SQL tracing based on the presence of a Java system property as shown in Example 9-6.
Example 9-6 Conditionally Enabling SQL Tracing in an Application Module
// In YourCustomApplicationModuleImpl.java
protected void afterConnect() {
  super.afterConnect();
  if (System.getProperty("enableTrace") != null) {
    getDBTransaction().executeCommand("ALTER SESSION SET SQL_TRACE TRUE");
  }
}
After producing a trace file, you use the TKPROF utility supplied with the database to format the information and to better understand information about each query executed like:
-
The number of times it was (re)parsed
-
The number of times it was executed
-
How many round-trips were made between application server and the database
-
Various quantitative measurements of query execution time
Using these techniques, you can decide which additional indexes might be required to speed up particular queries your application performs, or which queries could be changed to improve their query optimization plan. For details about working with the TKPROF utility, see sections "Understanding SQL Trace and TKPROF" and "Using the SQL Trace Facility and TKPROF" in the "Performing Application Tracing" chapter of the Oracle Database SQL Tuning Guide.
Note:
The Oracle database provides theDBMS_MONITOR package that further simplifies SQL tracing and integrates it with Oracle Enterprise Manager for visually monitoring the most frequently performed query statements your applications perform.9.2.4 Consider the Appropriate Tuning Settings for Every View Object
The Tuning section on the General page of the view object overview editor lets you set various options that can dramatically effect your query's performance. Figure 9-5 shows the default options that the new view object defines.
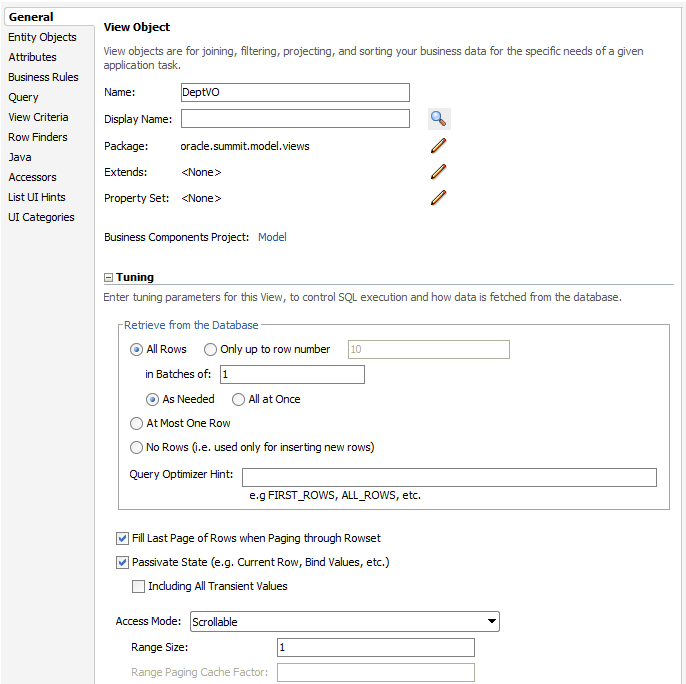
9.2.4.1 Set the Retrieve from Database Options Options Appropriately
In the Tuning section of the view object overview editor General page, the Retrieve from the Database group box controls how the view object retrieves rows from the database server. The options for the fetch mode are All Rows, Only Up To Row Number, At Most One Row, and No Rows. Most view objects will use the default All Rows option, which will be retrieved As Needed (default) or All at Once depending on which option you choose.
Note:
The All at Once option does not enforce a single database round trip to fetch the rows specified by the view object query. The As Needed and All at Once options work in conjunction with the value of in Batches of (also known as fetch size) to determine the number of round trips. For best database access performance, you should consider changing the fetch size as described in Section 9.2.4.2, "Consider Whether Fetching One Row at a Time is Appropriate."The As Needed option ensures that an executeQuery() operation on the view object initially retrieves only as many rows as necessary to fill the first page of a display, whose number of rows is set based on the view object's range size. If you use As Needed, then you will require only as many database round trips as necessary to deliver the number of rows specified by the initial range size, as defined by the Range Size option. Whereas, if you use All at Once, then the application will perform as many round trips as necessary to deliver all the rows based on the value of in Batches of (fetch size) and the number of rows identified by the query.
For view objects whose WHERE clause expects to retrieve a single row, set the option to At Most One Row for best performance. This way, the view object knows you don't expect any more rows and will skip its normal test for that situation. Finally, if you use the view object only for creating new rows, for optimal performance set the option to No Rows so no query will ever be performed.
It may be helpful to have an understanding of view objects. For more information, see Section 5.1, "About View Objects."
To set view object row fetch options:
-
In the Applications window, double-click the view object that you want to edit.
-
In the overview editor, click the General navigation tab and expand the Tuning section.
-
In the Retrieve from the Database group box, select the option to control how many rows should be fetched from the database.
-
Enter a Query Optimizer Hint hat the database will use to optimize the query for this view object.
At runtime, the hint is added immediately after the SELECT keyword in the query. For example, you would enter
ALL_ROWSwhen you want to retrieve all rows as quickly as possible orFIRST_ROWSwhen you want to retrieve the first rows as quickly as possible (rather than optimize the retrieval of all rows).
9.2.4.2 Consider Whether Fetching One Row at a Time is Appropriate
The fetch size controls how many rows will be returned in each round trip to the database. By default, the framework will fetch rows in batches of one row at a time. If you are fetching any more than one row, you will gain efficiency by setting this in Batches of value on the Tuning section of the General page of the view object overview editor.
Unless your query actually fetches just one row, leaving the default fetch size of one (1) in the in Batches of field is not recommended due to many unnecessary round trips between the application server and the database. Oracle strongly recommends considering the appropriate value for each view object's fetch size.
If you are displaying results n rows at a time in the user interface, for simple web pages, it is good to set the fetch size to at least n+3 so that each page of results can be retrieved in a single round trip to the database. However the higher the number, the larger the client-side buffer required, so avoid setting this number to values the exceed Oracle JDBC fetch size recommendations.
In general, fetch size should be consistent with Oracle database 12c recommendations, which states fetch size be no more than 100, although in some cases larger size may be appropriate. For more information, see Oracle JDBC Memory Management for Oracle Database 12c located at http://www.oracle.com/technetwork/database/application-development/jdbc-memory-management-12c-1964666.pdf.
It may be helpful to have an understanding of view objects. For more information, see Section 5.1, "About View Objects."
To limit the number of database roundtrips for a view object:
-
In the Applications window, double-click the view object that you want to edit.
-
In the overview editor, click the General navigation tab and expand the Tuning section.
-
In the Retrieve from the Database group box, select All Rows or Only up to Row Number.
-
In the In Batches of field, enter the number of rows to return from each database roundtrip.
-
Select the option All at Once when you want to fetch all rows whether or not the number of rows fetched fits within the web page displaying the row set. Otherwise, to fetch only the number of rows necessary to fill the first page of the web page displaying the row se, leave the default setting As Needed selected.
If you select All at Once, then the application will perform as many roundtrips as necessary to deliver all the rows based on the value of In Batches of (fetch size) and the number of rows identified by the query.
9.2.4.3 Specify a Query Optimizer Hint if Necessary
The Query Optimizer Hint field allows you to specify an optional hint to the Oracle query optimizer to influence what execution plan it will use. You can set this hint in the Tuning page of the overview editor for the view object, as shown in Figure 9-5.
At runtime, the hint you provide is added immediately after the SELECT keyword in the query, wrapped by the special comment syntax /*+ YOUR_HINT */. Two common optimizer hints are:
-
FIRST_ROWS— to hint that you want the first rows as quickly as possible -
ALL_ROWS— to hint that you want all rows as quickly as possible
There are many other optimizer hints that are beyond the scope of this manual to document. Reference the Oracle database reference manuals for more information on available hints.
It may be helpful to have an understanding of view objects. For more information, see Section 5.1, "About View Objects."
To edit a view object definition:
-
In the Applications window, double-click the view object that you want to edit.
-
In the overview editor, click the General navigation tab and expand the Tuning section.
-
In the Retrieve from the Database group box, select the option to control how many rows should be fetched from the database.
-
Enter a Query Optimizer Hint hat the database will use to optimize the query for this view object.
At runtime, the hint is added immediately after the SELECT keyword in the query. For example, you would enter
ALL_ROWSwhen you want to retrieve all rows as quickly as possible orFIRST_ROWSwhen you want to retrieve the first rows as quickly as possible (rather than optimize the retrieval of all rows).
9.2.5 Use Forward Only Mode to Avoid Caching View Rows
Often you will write code that programmatically iterates through the results of a view object. A typical situation will be custom validation code that must process multiple rows of query results to determine whether an attribute or an entity is valid or not. In these cases, if you intend to read each row in the row set a single time and never require scrolling backward or reiterating the row set a subsequent time, then you can use "forward only" mode to avoid caching the retrieved rows. To enable forward only mode, call setForwardOnly(true) on the view object.
Note:
Using a read-only view object (with no entity usages) in forward-only mode with an appropriately tuned fetch size is the most efficient way to programmatically read data.You can also use forward-only mode to avoid caching rows when inserting, updating, or deleting data as long as you never scroll backward through the row set and never call reset() to set the iterator back to the first row. Forward only mode only works with a range size of one (1).