6 Defining Master-Detail Related View Objects
This chapter describes how to link ADF view objects to other view objects to form master-detail hierarchies of any complexity in an Oracle ADF application.
This chapter includes the following sections:
-
Working with a Single Table in a Recursive Master-Detail Hierarchy
-
Working with Master-Detail Related View Objects in View Criteria
6.1 About Master-Detail View Objects
A master-detail relationship is established when a view link is created to associate two view object instances. A view link represents the relationship between two view objects, which is usually, but not necessarily, based on a foreign-key relationship between the underlying data tables. The view link associates a row of one view object instance (the master object) with one or more rows of another view object instance (the detail object).
6.1.1 Master-Detail View Object Use Cases and Examples
This chapter helps you understand these view object concepts as illustrated in Figure 6-1:
-
You can link a view object to one or more others to create master-detail hierarchies of any complexity.
-
You can arrange parent-child view object instances in the context of an application module such that at runtime the detail view instance is actively coordinated with the current row of the master view instance.
-
At design time, you can define a view link accessor that specifies an accessor attribute that the master collection uses at runtime to return the detail collection row set.
-
You can programmatically access the detail collection row set using the view link accessor attribute that you specify for the master view object in the master-detail relationship.
-
You can tune master-detail collection queries, by caching the row set of the detail view instance and support UI components, like the ADF Faces tree component, where data for each master node in a tree needs to retain its distinct set of detail rows.
-
You can create row finder conditions using view criteria to locate specific rows within the master view object.
-
You can define a self-referential master and detail hierarchy such that the source and destination view link attributes derive from a single table.
-
You can define an inline view criteria to filter the row set of the master view object using attribute values specified by attributes of the detail view object.

6.1.2 Additional Functionality for View Objects
You may find it helpful to understand other Oracle ADF features before you start working with view objects. Following are links to other functionality that may be of interest.
-
For details about using the interactive Oracle ADF Model Tester to validate view object query results, see Chapter 8, "Testing View Instance Queries."
-
For details about creating a data model consisting of view object instances, see Chapter 13, "Implementing Business Services with Application Modules."
-
For a quick reference to the most common code that you will typically write, use, and override in your custom view object classes, see Appendix D, "Most Commonly Used ADF Business Components Methods."
-
For API documentation related to the
oracle.jbopackage, see the following Javadoc reference document:
6.2 Working with Multiple Tables in a Master-Detail Hierarchy
Many queries you will work with will involve multiple tables that are related by foreign keys. In this scenario, you can create separate view objects that query the related information and link a "source" view object to one or more "target" view objects to form a master-detail hierarchy.
There are two ways you might handle this situation. You can either:
-
Create a view link based on an association between entity objects when the source and target view objects are based on the underlying entity objects' association.
-
Create a view link that defines how the source and target view objects relate.
Whether or not an association exists is determined when entity objects are created. By default, the entity object associations model the hierarchical relationships of the data source. For example, entity objects based on database tables related by foreign keys will capture these relationships in entity associations. If you do base the view link on an existing entity association, there is no performance penalty over defining the view link on the view objects alone. In either case, you use the Create View Link wizard to define the master-detail relationship.
Note:
A view link defines a basic master-detail relationship between two view objects. However, by creating more view links you can achieve master-detail hierarchies of any complexity, including:-
Multilevel master-detail-detail
-
Master with multiple (peer) details
-
Detail with multiple masters
The steps to define these more complex hierarchies are the same whether you create the relationships based on view objects alone or view objects with entity associations. In either case, you just need to create each additional hierarchy, one view link at time.
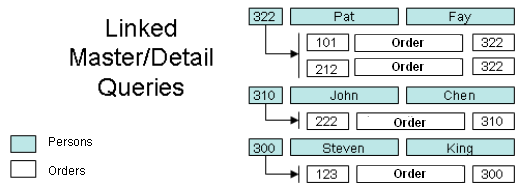
Figure 6-2 illustrates the multilevel result that master-detail linked queries produce.
6.2.1 How to Create a Master-Detail Hierarchy Based on Entity Associations
When you want to show the user a set of master rows, and for each master row a set of coordinated detail rows, then you can create view links to define how you want the master and detail view objects to relate. For example, you could link the DeptVO view object to the EmpVO view object to create a master-detail hierarchy of departments and the set of employees they define. When these view objects are backed by entity objects related by an existing association, you can select the association to define the master-detail view link.
To create an association-based view link, you use the Create View Link wizard.
It may be helpful to have an understanding of the ways to create a master-detail hierarchy. For more information, see Section 6.2, "Working with Multiple Tables in a Master-Detail Hierarchy."
You may also find it helpful to understand how entity associations are created. For more information, see Section 4.2.3, "What Happens When You Create Entity Objects and Associations from Existing Tables."
You may also find it helpful to understand functionality that can be added using other Oracle ADF features. For more information, see Section 6.1.2, "Additional Functionality for View Objects."
You will need to complete this task:
- Create the desired entity-based view objects, as described in Section 5.2.1, "How to Create an Entity-Based View Object."
To create an association-based view link
-
In the Applications window, right-click the package node of the project in which you want to create the view object and choose New and then View Link.
-
In the Create View Link wizard, on the Name page, supply a package and a component name.
For example, given the purpose of the view link, a name like
DeptToEmpFkLinkis a valid name to identify the link between a department list and its employees when the link is based on a foreign key. -
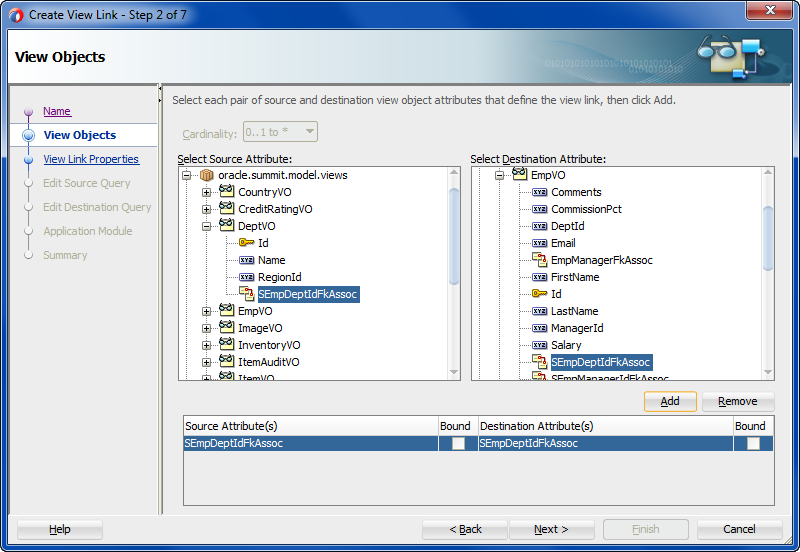
On the View Objects page, in the Select Source Attribute tree expand the source view object in the desired package. In the Select Destination Attribute tree, expand the destination view object.
For entity-based view objects, notice that in addition to the view object attributes, relevant associations also appear in the list.
-
Select the same association in both Source and Destination trees. Then click Add to add the association to the table below.
For example, Figure 6-3 shows the same
SEmpDeptIdFkAssocassociation in both Source and Destination trees selected. -
Click Finish.
6.2.2 How to Create a Master-Detail Hierarchy Based on View Objects Alone
Just as with association-based view links, you can directly link view objects to other view objects to form master-detail hierarchies of any complexity. The only difference in the creation steps, involves the case when both the master and detail view objects are not related by an existing association. In this situation, because there is no association to capture the set of source and destination attribute pairs that relate them, you create the view link by indicating which view object attributes it should be based on.
To create the view link, use the Create View Link wizard.
It may be helpful to have an understanding of the ways to create a master-detail hierarchy. For more information, see Section 6.2, "Working with Multiple Tables in a Master-Detail Hierarchy."
You may also find it helpful to understand functionality that can be added using other Oracle ADF features. For more information, see Section 6.1.2, "Additional Functionality for View Objects."
You will need to complete this task:
- Create the desired read-only view objects, as described in Section 5.8.1, "How to Create a Custom SQL Mode View Object."
To create a view link between view objects:
-
In the Applications window, right-click the package node of the project in which you want to create the view object and choose New and then View Link.
-
In the Create View Link wizard, on the Name page, enter a package name and a view link name. Click Next.
For example, given the purpose of the view link, a name like
OrdersPlacedByis a valid name to identify the link between a customer list and their orders. -
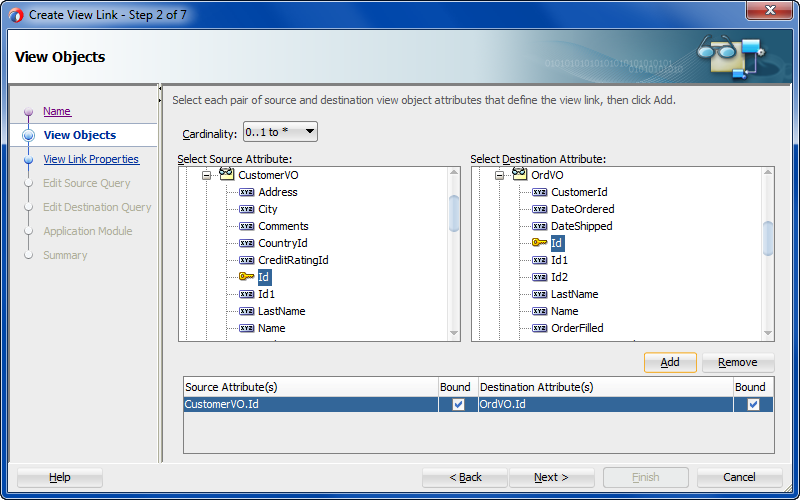
On the View Objects page, select a "source" attribute from the view object that will act as the master.
For example, Figure 6-4 shows the
Idattribute selected from theCustomerVOview object to perform this role. Click Next. -
On the View Objects page, select a corresponding destination attribute from the view object that will act as the detail.
For example, if you want the detail query to show orders that were placed by the currently selected customer, select the
Idattribute in theOrdersVOto perform this role. -
Click Add to add the matching attribute pair to the table of source and destination attribute pairs below. When you are finished defining master and detail link, click Next.
Figure 6-4 shows just one (
CustomerVO.Id,OrderVO.Id) pair. However, if you require multiple attribute pairs to define the link between master and detail, repeat the steps for the View Objects page to add additional source-target attribute pairs. -
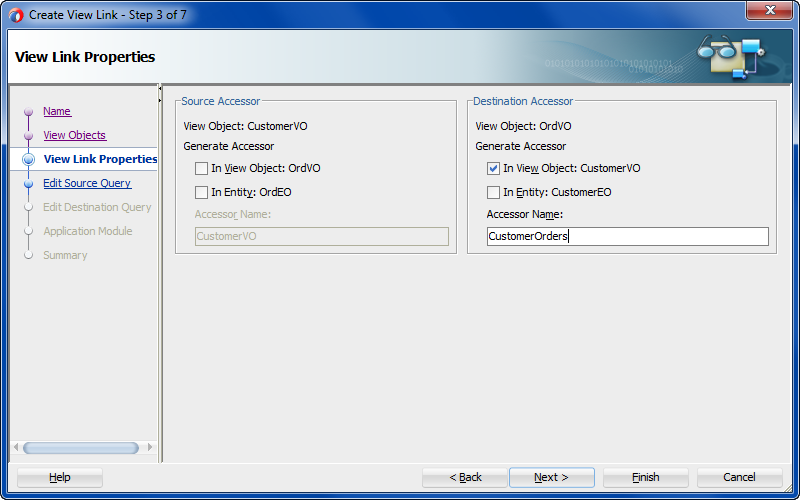
On the View Link Properties page, you can use the Accessor Name field to change the default name of the accessor that lets you programmatically access the destination view object.
By default, the accessor name will match the name of the destination view object. For example, you might change the default accessor name
OrdersVO1toCustomerOrdersto better describe the master-detail relationship that the accessor defines. -
Also on the View Link Properties page, you control whether the view link represents a one-way relationship or a bidirectional one.
By default, a view link is a one-way relationship that allows the current row of the source (master) to access a set of related rows in the destination (detail) view object. Leave the default settings unchanged for Generate Accessor when you want to enable support for hierarchical UI components, such as databound trees which require a view link accessor with accessor generated in the master view object.
For example, in Figure 6-5, the checkbox settings indicate that you'll be able to access a detail collection of rows from
OrdersVOfor the current row inCustomerVO, but not vice versa. In this case, this behavior is specified by the checkbox setting in the Destination Accessor group box forOrdersVO(the Generate Accessor In View Object: CustomerVO box is selected) and checkbox setting in the Source Accessor group box forCustomerVO(the Generate Accessor In View Object: OrdersVO box is not selected). -
On the Edit Source Query page, preview the view link SQL predicate that will be used at runtime to access the master row in the source view object and click Next.
-
On the Edit Destination Query page, preview the view link SQL predicate that will be used at runtime to access the correlated detail rows from the destination view object for the current row in the source view object and click Next.
-
On the Application Module page, add the view link to the data model for the desired application module and click Finish.
By default the view link will not be added to the application module's data model. Later you can add the view link to the data model using the overview editor for the application module.
6.2.3 What Happens When You Create Master-Detail Hierarchies Using View Links
When you create a view link or an association-based view link, JDeveloper creates the XML document file that represents its declarative settings and saves it in the directory that corresponds to the name of its package. For example, if the view link is named DeptToEmpFkLink and it appears in the views.links package, then the XML file created will be ./views/links/DeptToEmpFkLink.xml under the project's source path. This XML file contains the declarative information about the source and target attribute pairs you've specified and, in the case of an association-based view link, contains the declarative information about the association that relates the source and target view objects you've specified.
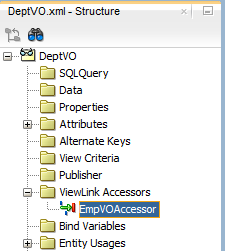
In addition to saving the view link component definition itself, JDeveloper also updates the XML definition of the source view object in the view link relationship to add information about the view link accessors that you may have defined. As a confirmation of this, you can select the source view object in the Applications window and inspect its details in the Structure window. As shown in Figure 6-6, you can see the default destination accessor EmpVOAccessor under the ViewLink Accessors node for the DeptVO source view object that accesses the destination EmpVO view object. This allows the source view object, using the view link accessor, to traverse the destination side of the view link. In addition to the view link accessor definition for the source view object, you can directly customize the view link to define a view link accessor on the destination view object, which provides access to row set of the source view object.
6.2.4 How to Enable Active Master-Detail Coordination in the Data Model
When you enable programmatic navigation to a row set of correlated details by defining a view link, as described in Section 6.2.1, "How to Create a Master-Detail Hierarchy Based on Entity Associations," the view link plays a passive role, simply defining the information necessary to retrieve the coordinated detail row set when your code requests it. The view link accessor attribute is present and programmatically accessible in any result rows from any instance of the view link's source view object. In other words, programmatic access does not require modifying the application module's data model.
However, since master-detail user interfaces are such a frequent occurrence in enterprise applications, the view link can be also used in a more active fashion so you can avoid needing to coordinate master-detail screen programmatically. You opt to have this active master-detail coordination performed by explicitly adding an instance of a view-linked view object to your application module's data model.
To enable active master-detail coordination, open the application module in the overview editor and select the Data Model page.
It may be helpful to have an understanding of the ways to create a master-detail hierarchy. For more information, see Section 6.2, "Working with Multiple Tables in a Master-Detail Hierarchy."
You may also find it helpful to understand the role of the application module. For more information, see Section 13.1, "About Application Modules."
You may also find it helpful to understand functionality that can be added using other Oracle ADF features. For more information, see Section 6.1.2, "Additional Functionality for View Objects."
You will need to complete these tasks:
-
Create the desired view objects, as described in Section 5.2.1, "How to Create an Entity-Based View Object" and Section 5.8.1, "How to Create a Custom SQL Mode View Object."
-
Create an application module, as described in Section 13.2.1, "How to Create an Application Module."
To add a detail instance of a view object:
-
In the Applications window, double-click the application module for which you define a new view instance.
-
In the overview editor, click the Data Model navigation tab.
-
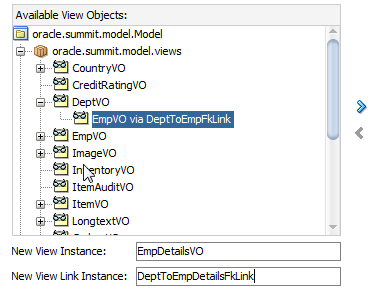
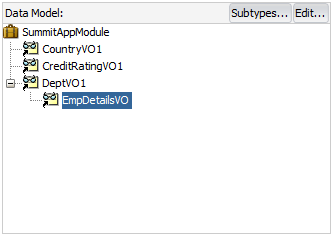
In the Data Model page, expand the View Object Instances section and, in the Available View Objects list, select the detail view object node that is indented beneath the master view object.
Note that the list shows the detail view object twice: once on its own, and once as a detail view object via the view link. For example, in Figure 6-7 you would select the detail view object
EmpVO via DeptToEmpFkLinkinstead of the view object labeled asEmpVO(which, in this case, appears beneath the highlighted view object). -
In the Name View Instance field below the Available View Objects list, enter a name for the detail instance you're about to create.
For example, Figure 6-7 shows the name
EmpDetailsVOfor the instance of theEmpVOview object that is a detail view. -
In the Data Model list, select the instance of the view object that you want to be the actively coordinating master.
-
Click Add Instance to add the detail instance to the currently selected master instance in the data model, with the name you've chosen.
For example, in Figure 6-8, the Data Model list shows a master-detail hierarchy of view object instances with
EmpDetailsVOas the detail view object.
6.2.5 How to Test Master-Detail Coordination
To test active master-detail coordination, launch the Oracle ADF Model Tester on the application module by choosing Run from its context menu in the Applications window. The Oracle ADF Model Tester data model tree shows the view link instance that is actively coordinating the detail view object instance with the master view object instance. You can double-click the view link instance node in the tree to open a master-detail data view page in the Oracle ADF Model Tester. Then, when you use the toolbar buttons to navigate in the master view object — changing the view object's current row as a result — the coordinated set of details is automatically refreshed and the user interface stays in sync.
If you double-click another view object that is not defined as a master and detail, a second tab will open to show its data; in that case, since it is not actively coordinated by a view link, its query is not constrained by the current row in the master view object.
For information about editing the data model and running the Oracle ADF Model Tester, see Section 8.3, "Testing View Object Instances Using the Oracle ADF Model Tester."
6.2.6 How to Access the Detail Collection Using the View Link Accessor
To work with view links effectively, you should also understand that view link accessor attributes return a RowSet object and that you can access a detail collection using the view link accessor programmatically.
6.2.6.1 Accessing Attributes of Row by Name
At runtime, the getAttribute() method on a Row object allows you to access the value of any attribute of that row in the view object's result set by name. The view link accessor behaves like an additional attribute in the current row of the source view object, so you can use the same getAttribute() method to retrieve its value. The only practical difference between a regular view attribute and a view link accessor attribute is its data type. Whereas a regular view attribute typically has a scalar data type with a value like 303 or ngreenbe, the value of a view link accessor attribute is a row set of zero or more correlated detail rows. Assuming that curUser is a Row object from some instance of the Orders view object, you can write a line of code to retrieve the detail row set of order items:
RowSet items = (RowSet)curUser.getAttribute("OrderItems");
Note:
If you generate the custom Java class for your view row, the type of the view link accessor will beRowIterator. Since at runtime the return value will always be a RowSet object, it is safe to cast the view link attribute value to RowSet.6.2.6.2 Programmatically Accessing a Detail Collection Using the View Link Accessor
Once you have retrieved the RowSet object of detail rows using a view link accessor, you can loop over the rows it contains just as you would loop over a view object's row set of results, as shown in Example 6-1.
Example 6-1 Programmatically Accessing a Detail Collection
while (items.hasNext()) {
  Row curItem = items.next();
  System.out.println("--> (" + curItem.getAttribute("LineItemId") + ") " +
                     curItem.getAttribute("LineItemTotal"));
}
For information about creating a test client, see Section 8.4.6, "How to Access a Detail Collection Using the View Link Accessor."
6.2.6.3 Optimizing View Link Accessor Access to Display Master-Detail Data
You can enable caching of the view link accessor row set when you do not want the application to incur the small amount of overhead associated with reexecuting queries to create new detail row sets. For example, because view accessor row sets remain stable as long as the master row view accessor attribute remains unchanged, it would not be necessary to re-create a new row set for UI components, like the ADF Faces tree component, where data for each master node in a tree needs to retain its distinct set of detail rows.
You can enable retention of the view link accessor row set using the overview editor for the view object that is the source for the view link accessor. Select the Retain Row Set flag in the View Accessors page of the overview editor for the source view object.
Performance Tip:
When you expect user interface developers will use the view link to create databound master-detail components where the detail collections are stable, such as an ADF Faces tree component, enable the Retain Row Set flag. At runtime, this setting ensures the accessors for each detail collection will be executed once. The compromise for this improvement in performance is that accessed collections may occupy more memory space as compared to accessing the detail collections without the flag enabled.To enable retention of the view link accessor row set:
-
In the Applications window, double-click the source view object that defines the view link.
-
In the overview editor, click the View Accessors navigation tab.
-
In the View Accessors page, expand the View Link Accessors section and select the Retain Row Set checkbox.
6.2.7 How to Create a Master-Detail Hierarchy for Entity Objects Consisting of Transient-Only Attributes
When you link entity-based view objects to form master-detail hierarchies, the view objects and their respective entity usages are typically related by an association. At runtime, the association constructs an internal association view object that enables a query to be executed to enable the master-detail coordination. An exception to this scenario occurs when the entity object that participates in an association consists exclusively of nonpersistent attributes. This may occur when you define an entity object with transient attributes that you wish to populate programmatically at runtime. In this case, you can use the association overview editor that links the nonpersistent entity object to select an association view object to perform the query.
It may be helpful to have an understanding of associations. For more information, see Section 4.2.3, "What Happens When You Create Entity Objects and Associations from Existing Tables."
You may also find it helpful to understand functionality that can be added using other Oracle ADF features. For more information, see Section 6.1.2, "Additional Functionality for View Objects."
You will need to complete these tasks:
-
Create the entity-based view object for the nonpersistent entity object, as described in Section 5.2.1, "How to Create an Entity-Based View Object."
-
Use the Create Association wizard to create an association between the nonpersistent entity object and a database-derived entity object. For details about creating an association, see Section 4.3, "Creating and Configuring Associations."
To customize an association for nonpersistent entity objects:
-
In the Applications window, double-click the association that you want to customize.
-
In the overview editor, click the Tuning navigation tab and then click the Edit accessors icon for the Custom View Objects section.
-
In the Custom Views dialog, select Use Custom View Object for the nonpersistent entity object.
-
In the Select View Object list, select the view object that you created based on the nonpersistent entity-object.
-
Click OK.
6.2.8 How to Find Rows of a Master View Object Using Row Finders
Row finders are objects that the application may use to locate specific rows within a row set using a view criteria. The row finder may be invoked on the master row set to match one or more criteria attributes supplied by the detail row set.
Currently, row finders that you define at design time can participate in these master-detail scenarios where non-row key attribute lookup is desired at runtime:
-
When you expose the row finder in an ADF Business Components web service, the end user may initiate row updates on the specific rows of the master service view instance that match one or more row-finder mapped attribute values on the detail service view instance. For more information about this use case, see Section 5.11.3, "What You May Need to Know About View Criteria and Row Finder Usage."
-
Programmatically, in the application, when you want to obtain a set of master view rows that match one or more row-finder mapped, non-key attribute values in the detail view instance. For more information about this use case, see Section 5.11.4, "Programmatically Invoking the Row Finder."
Note:
Row finders that you define on view objects are not currently supported by the ADF Business Components data control for use in a view project. Therefore row-finder mapped attributes of a view object that the application exposes as a collection in the Data Controls panel will not participate in row finder lookup operations.The view criteria attributes defined by the view criteria can be any attribute that the detail view object defines and specifically need not be a row key attribute. For example, in a master-detail relationship, where PersonVO is the master view object and AddressVO is the detail view object, the attribute EmailAddress will locate the person row that matches the email address of the person in the AddressVO row set.
To create a row finder to locate rows of the master view object using criteria attributes supplied by the detail view object, perform the following steps:
-
Define an inline view criteria on the master view object to reference the detail view object and specify the criteria attributes as a view criteria items defined by bind variables.
-
Define an updatable transient attribute on the master view object to receive the value of each criteria attribute. At runtime, the transient attribute may be set programmatically or exposed in a web service payload to allow an end user to supply the criteria attribute value (for example, an email address).
-
Define the row finder on the master view object by selecting the view criteria and setting each criteria attribute's bind variable to a corresponding transient attribute from the master view object.
6.2.8.1 Defining a Row Finder on the Master View Object
Row finders that you define to filter the row set of a master view object are defined entirely on the master view object. The row finder matches the criteria attributes that you specified in the inline view criteria with values obtained at runtime. In order to receive the criteria attribute values, the master view object may define transient attributes that the application can set programmatically using row finder methods on the view object or that a web service payload may expose to receive end user-supplied values.
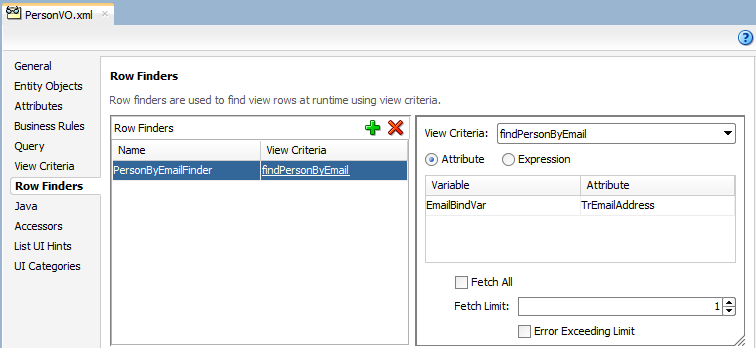
You use the Row Finders page of the master view object's overview editor to define the row finder. In the editor, you define a value source for each bind variable of the view criteria that you select. Attributes of the view object or attribute-value expressions are both valid sources for bind variables defined by the row finder.
Figure 6-9 shows the overview editor with a row finder that maps the view criteria bind variable EmailBindVar specified in the findPersonByEmail view criteria to the transient attribute TrEmailAddress defined by the master view object PersonVO as its value source.
Note:
You can also define row finders on view objects that do not participate in a master-detail hierarchy, as described in Section 5.11, "Working with Row Finders."It may be helpful to have an understanding of the row finder for master-detail view objects. For more information, see Section 6.2.8, "How to Find Rows of a Master View Object Using Row Finders."
It may be helpful to have an understanding of master-detail view objects. For more information, see Section 6.1, "About Master-Detail View Objects."
You may also find it helpful to understand functionality that can be added using other Oracle ADF features. For more information, see Section 6.1.2, "Additional Functionality for View Objects."
You will need to complete these tasks:
-
Create the desired master-detail view objects, as described in Section 6.2.1, "How to Create a Master-Detail Hierarchy Based on Entity Associations" or Section 6.2.2, "How to Create a Master-Detail Hierarchy Based on View Objects Alone."
-
Define an inline view criteria on the master view object, as described in Section 6.4, "Working with Master-Detail Related View Objects in View Criteria." The inline view criteria references the detail view object and specifies one or more detail attributes as view criteria items.
-
Optionally, add updatable transient attributes to the master view object, as described in Section 5.5, "Adding Calculated and Transient Attributes to a View Object." The transient attribute may be set programmatically by the application or exposed in an ADF Business Components web service payload to solicit the value from an end user. The transient attributes must be defined as updatable to receive the criteria lookup value.
To create a row finder for a master view object:
-
In the Applications window, double-click the master view object that you want to customize with a new row finder.
-
In the overview editor, click the Row Finders navigation tab and then click the Add Row Finder button.
-
In the Name field, rename the row finder.
For example, a row finder that you define to locate a person record by their email address, might be named
PersonByEmailFinder. -
Select the new row finder in the Row Finders list and then, in the View Criteria dropdown, select the view criteria that filters the view object row set.
The desired row finder should appear highlighted, as shown in Figure 6-9. The view criteria list will be empty unless you have created a view criteria for the row finder to use.
-
When you want the end user of an ADF Business Components web service to supply a value, leave Attribute selected, select the bind variable from the list, and then, in the Attribute dropdown, select the transient attribute from the master view object that supplies the bind variable value at runtime.
The transient attribute that you select will be used by the row finder to supply the criteria attribute value. For example, a
PersonVOmaster view object that matches rows based on the email address in theAddressVO, might include a transient attribute that you define namedTrEmailAddress.Note: When you create the transient attribute in the overview editor for the view object, be sure to define the transient attribute as Updatable so it can receive the criteria lookup value.
-
Deselect FetchAll when you want to specify the number of rows that the row finder is allowed to match.
When you enter a number of rows for Fetch Limit, you can also select Error Exceeding Limit to enable Oracle ADF to throw an exception when more matching rows exist in the database than the number you specify for Fetch Limit.
6.2.8.2 What Happens When You Create a Row Finder for a Master View Object
When you create a master view object row finder, the view object definition contains all the metadata required by the row finder, including the row finder definition itself. As Example 6-2 shows, the metadata for a row finder PersonByEmailFinder includes a bind variable EmailBindVar in the <Variable> element, a transient attribute TrEmailAddress in the <ViewAttribute> element, a view criteria findPersonByEmail and an inline view criteria AddressVONestedCriteria in the <ViewCriteria> element, and finally the row finder PersonByEmailFinder in the <RowFinders> element of the view object definition.
The row finder <VarAttributeMapping> subelement maps the view criteria bind variable EmailBindVar to the transient attribute TrEmailAddress of the master view object, which allows the end user to supply a value at runtime and allows the application to invoke the row finder with the required criteria attribute. The inline <ViewCriteriaItem> subelement sets the criteria attribute EmailAddress on the detail view object to the value of the bind variable.
At runtime, when the row finder is invoked on the master view object, one or more detail criteria attributes identify the matching rows in the master row set. In this example, the email address is used to match the person to which the email address belongs. The row finder locates the person record without the need to pass a row key value.
Example 6-2 Row Finder Defined on a Master View Object
<ViewObject
  xmlns="http://xmlns.oracle.com/bc4j"
  Name="PersonVO"
  SelectList="PersonEO.ID,
       PersonEO.FIRST_NAME
       PersonEO.LAST_NAME"
  FromList="PERSON PersonEO"
  ...
  <Variable
    Name="EmailBindVar"
    Kind="viewcriteria"
    Type="java.lang.String"/>
  <EntityUsage
    Name="PersonEO"
    Entity="model.entities.PersonEO"/>
    ...
  <ViewAttribute
    Name="TrEmailAddress"
    IsUpdateable="false"
    IsSelected="false"
    IsPersistent="false"
    PrecisionRule="true"
    Type="java.lang.String"
    ColumnType="CHAR"
    AliasName="VIEW_ATTR"
    SQLType="VARCHAR"/>
  <ViewCriteria
    Name="findPersonByEmail"
    ViewObjectName="model.views.PersonVO"
    Conjunction="AND">
    ...
    <ViewCriteriaRow
      Name="PersonVOCriteria_row_0"
      UpperColumns="1">
      <ViewCriteriaItem
        Name="PersonVOCriteria_PersonVOCriteria_row_0_AddressVO"
        ViewAttribute="AddressVO"
        Operator="EXISTS"
        Conjunction="AND"
        IsNestedCriteria="true"
        Required="Optional">
        <ViewCriteria
          Name="AddressVONestedCriteria"
          ViewObjectName="model.views.AddressVO"
          Conjunction="AND">
          <ViewCriteriaRow
            Name="AddressVONestedCriteria_row_0"
            UpperColumns="1">
            <ViewCriteriaItem
              Name="AddressVONestedCriteria_row_0_EmailAddress"
              ViewAttribute="EmailAddress"
              Operator="="
              Conjunction="AND"
              Value=":EmailBindVar"
              IsBindVarValue="true"
              Required="Optional"/>
          </ViewCriteriaRow>
        </ViewCriteria>
      </ViewCriteriaItem>
    </ViewCriteriaRow>
  </ViewCriteria>
  ...
   <RowFinders>
    <AttrValueRowFinder
      Name="PersonByEmailFinder"
      FetchLimit="1">
      <ViewCriteriaUsage
        Name="findPersonByEmail"
        FullName="model.views.PersonVO.findPersonByEmail"/>
      <VarAttributeMap>
        <VariableAttributeMapping
          Variable="EmailBindVar"
          Attribute="TrEmailAddress"/>
      </VarAttributeMap>
    </AttrValueRowFinder>
  </RowFinders>
</ViewObject>
6.3 Working with a Single Table in a Recursive Master-Detail Hierarchy
A recursive data model is one that utilizes a query that names source and destination attributes in a master-detail relationship based on a single table. In a typical master-detail relationship, the source attribute is supplied by the primary key attribute of the master view object and the destination attribute is supplied by foreign key attribute in the detail view object. For example, a typical master-detail relationship might relate the DepartmentId attribute on the DEPARTMENT table and the corresponding DepartmentId attribute on the EMPLOYEE table. However, in a recursive data model, the source attribute EmployeeId and the target attribute ManagerId both exist in the EMPLOYEE table. The query for this relationship therefore involves only a single view object. In this scenario, you create the view object for a single base entity object that specifies both attributes and then you define a self-referential view link to configure this view object as both the "source" and the "target" view object to form a master-detail hierarchy.
After you create the view link, there are two ways you can handle the recursive master-detail hierarchy in the data model project. You can either:
-
Create a data model that exposes two instances of the same view object, one playing the role as master and the other playing the role as detail, actively coordinated by a view link instance. This can be useful when you anticipate needing to show a single level of master rows and detail rows at a time in two separate tables.
-
Create a data model that exposes only a single instance of the view object, and use the view link accessor attribute in each row to access a row set of details. This is the more typical use case of the two because it allows you to display (or programmatically work with) the recursive master-detail hierarchy to any number of levels that exist in the data. For example, to show the recursive hierarchy in a
treeortreeTablecomponent, you would use this approach, as described in Section 31.4.1, "How to Display Master-Detail Objects in Trees."
6.3.1 How to Create a Recursive Master-Detail Hierarchy for an Entity-Based View Object
In a recursive master-detail hierarchy, the attributes of the view object that you select for the source and destination in the view link will typically be the same pair of attributes that define the self-referential association between the underlying entity object, if this association exists. While this underlying association is not required to create the view link, it does simplify the creation of the view link, so you will first create a foreign key association for the base entity object of the view object.
To create the recursive master-detail hierarchy:
-
Create an self-referential view link using the base entity object of the view object.
-
Expose the view object with a view criteria that will filter the view instance's results to include only those rows you want to see at the "root" of the hierarchy.
6.3.1.1 Creating an Association-Based, Self-Referential View Link
To create an association, you use the Create Association wizard. Then the association will appear as a selection choice when you use the Create View Link wizard. The view link will be self-referential because the association you select for the source and the destination view object names the same entity object, which is derived from a single database table.
It may be helpful to have an understanding of the recursive data model. For more information, see Section 6.3, "Working with a Single Table in a Recursive Master-Detail Hierarchy."
You may also find it helpful to understand functionality that can be added using other Oracle ADF features. For more information, see Section 6.1.2, "Additional Functionality for View Objects."
You will need to complete this task:
-
When you create the view link JDeveloper won't be able to infer the association between the source and destination attributes of the entity object. To support the recursive hierarchy, you can use the Create Association wizard to create an association between the source attribute and the destination attribute. On the Entity Objects page, select the same entity object to specify the source and destination attributes and leave all other default selections unchanged in the wizard. For details about creating an association, see Section 4.3, "Creating and Configuring Associations."
For example, assume the recursive master-detail hierarchy displays a list of employees based on their management hierarchy. In this scenario, you would create the association based on the
Employeesentity object. On the Entity Objects page of the Create Association wizard, you would selectEmployees.EmployeeIdas the source attribute andEmployee.ManagerIdas the destination attribute. The entity objectEmployeessupplies both attributes to ensure the association is self-referential.
To create an association-based, self-referential view link:
-
In the Applications window, right-click the project in which you want to create the view object and choose New.
To avoid having to type in the package name in the Create View Link wizard, you can choose New and then View Link on the context menu of the links package node in the Applications window.
-
In the New Gallery, expand Business Tier, select ADF Business Components and then View Link, and click OK.
-
In the Create View Link wizard, on the Name page, supply a package and a component name.
-
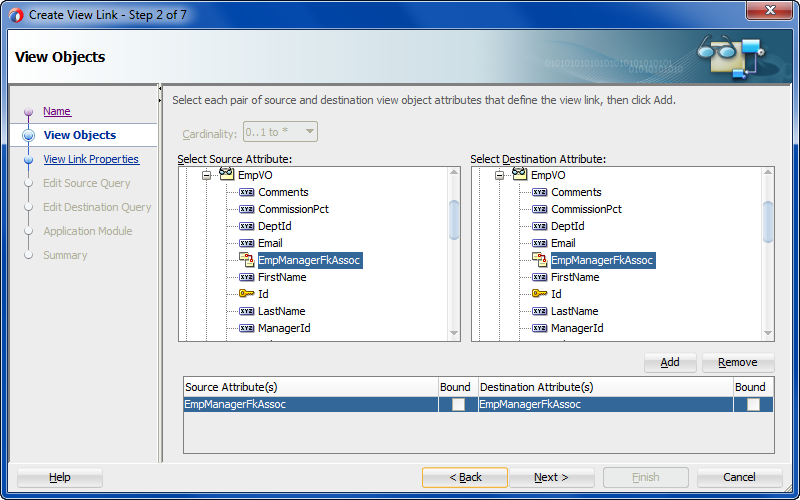
On the View Objects page, in the Select Source Attribute tree expand the source view object in the desired package. In the Select Destination Attribute tree expand the destination view object.
For entity-based view objects, notice that in addition to the view object attributes, relevant associations also appear in the list.
-
Select the same association in both Source and Destination trees. Then click Add to add the association to the table below.
For example, Figure 6-10 shows the same
EmpManagersFkAssocassociation in both Source and Destination trees selected. The view link is self-referential because the definition of the association names the source and destination attribute on the same entity object (in this case,Employees). -
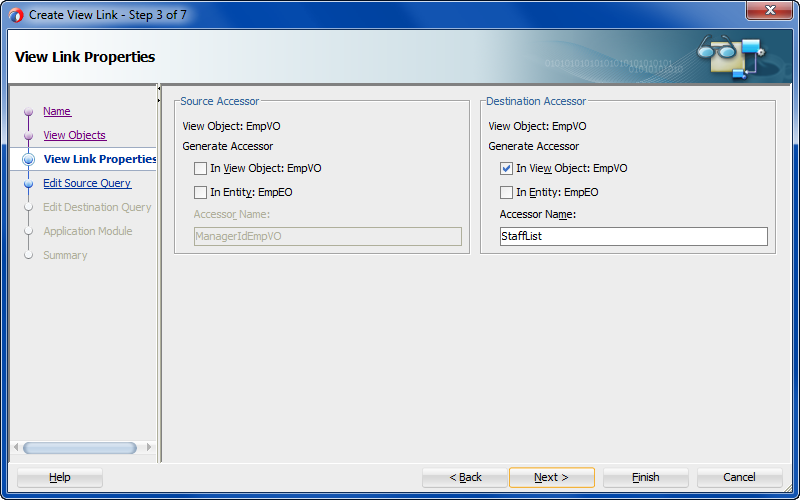
On the View Link Properties page, leave the default selections unchanged, but edit the accessor name of the destination accessor to provide a meaningful name.
For example, Figure 6-11 shows the destination accessor has been renamed from
EmployeesViewtoStaffList. This name will be exposed in the binding editor when the user interface developer populates the ADF Faces tree component by selecting this accessor. The name you provide will make clear to the UI developer the purpose of the accessor; in this case, to generate a list of employees associated with each manager. -
Click Finish.
6.3.1.2 Exposing the View Instance and Filter with a View Criteria
When you are ready to expose the view object in your project's data model, you will configure the view instance in the data model to use a view criteria to filter the initial value in the root of the tree. For example, assume the recursive master-detail hierarchy displays a list of employees based on their management hierarchy. In this scenario, you'll configure the view criteria's bind variable to specify the employee ID of the employee that you want to be the root value of the entire hierarchy. In this case, the root value of the recursive hierarchy of managers and employees would be the employee ID of the highest level manager in the organization.
It may be helpful to have an understanding of the recursive data model. For more information, see Section 6.3, "Working with a Single Table in a Recursive Master-Detail Hierarchy."
You may also find it helpful to understand functionality that can be added using other Oracle ADF features. For more information, see Section 6.1.2, "Additional Functionality for View Objects."
You will need to complete this task:
-
Create the entity-based view object and create a view criteria that will filter the view instance's results to include only those rows you want to see at the "root" of the hierarchy. To create a view criteria that uses a bind variable to filter the view object, see Section 5.9, "Working with Named View Criteria."
For example, in a recursive hierarchy of managers and employees, you would create the entity-based view object
EmployeesView. After you create the view object in the Create View Object wizard, you can use the Query page of the overview editor to create a bind variable and view criteria which allow you to identify the employee or employees that will be seen at the top of the hierarchy. If only a single employee should appear at the root of the hierarchy, then the view criteria in this scenario will filter the employees using a bind variable for the employee ID (corresponding to the source attribute) and theWHEREclause shown in the Create View Criteria dialog would look like((Employees.EMPLOYEE_ID = :TheEmployeeId )), whereTheEmployeeIdis the bind variable name. For more information on creating a view criteria that uses a bind variable to filter the view object, see Section 5.12.2.1, "Creating a Data Source View Object to Control the Cascading List."
To define the view object instance in an existing application module:
-
In the Applications window, double-click the application module for which you want to define a new view instance.
-
In the overview editor, click the Data Model navigation tab.
-
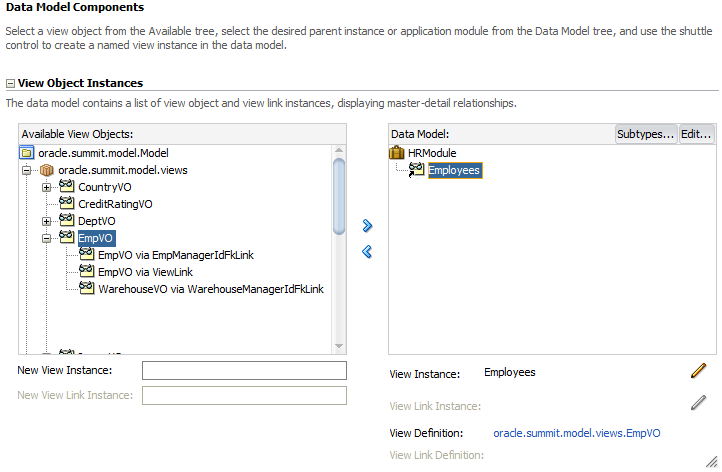
In the Data Model page, expand the View Object Instances section and, in the Available View Objects list, select the view object definition that you defined the view criteria to filter.
The New View Instance field below the list shows the name that will be used to identify the next instance of that view object that you add to the data model.
-
To change the name before adding it, enter a different name in the New View Instance field.
-
With the desired view object selected, shuttle the view object to the Data Model list.
Figure 6-12 shows the view object
EmployeesViewhas been renamed toEmployeesbefore it was shuttled to the Data Model list. -
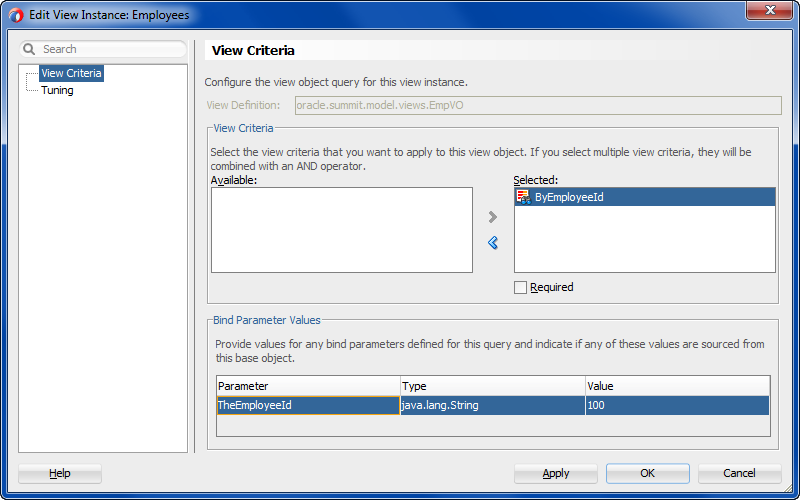
To filter the view object instance so that you specify the root value of the hierarchy, select the view object instance you added and click Edit.
-
In the Edit View Instance dialog, shuttle the view criteria you created to the Selected list and enter the bind parameter value that corresponds to the root of the hierarchy.
Figure 6-13 shows the view object
ByEmployeeIdview criteria with the bind parameterTheEmployeeIdset to the value100corresponding to the employee that is at the highest level of the hierarchy. -
Click OK.
6.3.2 What Happens When You Create a Recursive Master-Detail Hierarchy
When you create an self-referential view link, JDeveloper creates the XML document file that represents its declarative settings and saves it in the directory that corresponds to the name of its package. This XML file contains the declarative information about the source and target attribute pairs that the association you selected specifies and contains the declarative information about the association that relates the source and target view object you selected.
Example 6-3 shows how the EmpManagerFkLink defines the same view object EmployeesView for the source and destination in its XML document file.
Example 6-3 Self-Referential View Link Defined in XML
<ViewLink
  xmlns="http://xmlns.oracle.com/bc4j"
  Name="EmpManagerFkLink"
  EntityAssociation="test.model.EmpManagerFkAssoc">
  <ViewLinkDefEnd
    Name="EmployeesView1"
    Cardinality="1"
    Owner="test.model.EmployeesView"
    Source="true">
    <DesignTime>
      <Attr Name="_finderName" Value="ManagerIdEmployeesView"/>
      <Attr Name="_isUpdateable" Value="true"/>
    </DesignTime>
    <AttrArray Name="Attributes">
      <Item Value="test.model.EmployeesView.EmployeeId"/>
    </AttrArray>
  </ViewLinkDefEnd>
  <ViewLinkDefEnd
    Name="EmployeesView2"
    Cardinality="-1"
    Owner="test.model.EmployeesView">
    <DesignTime>
      <Attr Name="_finderName" Value="StaffList"/>
      <Attr Name="_isUpdateable" Value="true"/>
    </DesignTime>
    <AttrArray Name="Attributes">
      <Item Value="test.model.EmployeesView.ManagerId"/>
    </AttrArray>
  </ViewLinkDefEnd>
</ViewLink>
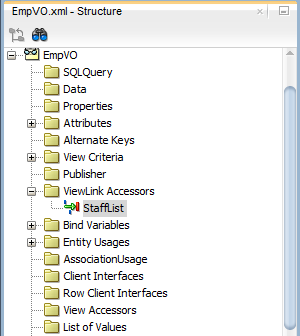
In addition to saving the view link component definition itself, JDeveloper also updates the XML definition of the view object to add information about the view link accessor you've defined. As a confirmation of this, you can select the view object in the Applications window and inspect its details in the Structure window. As shown in Figure 6-14, you can see the defined accessor under the ViewLink Accessors node for the EmployeesView view object of the EmpManagerFkLink view link.
6.4 Working with Master-Detail Related View Objects in View Criteria
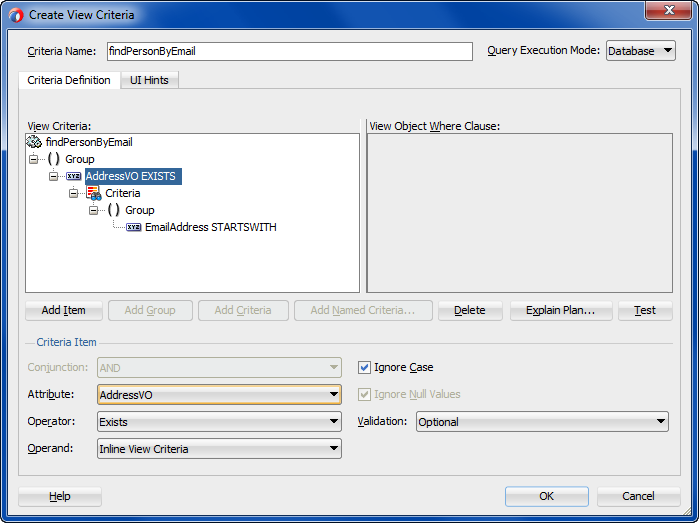
View criteria provide a declarative way to define view object query filters that apply to the view object's own query. In certain cases you may need to filter the master view object using attributes of the detail view object. View criteria that involve master and detail view objects rely on the EXISTS operator and an inline view criteria to define the query filter. The EXISTS operator allows the inline view criteria to reference a detail view object and apply attributes that you select as criteria items. For example, a view criteria used in combination with a row finder can filter the master row set and locate specific rows in the row set using view criteria items from the detail view object.
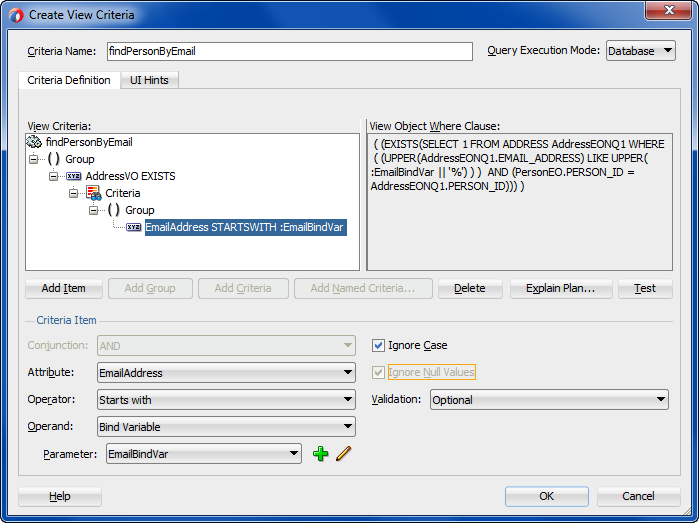
You use the View Criteria page of the view object overview editor to define the view criteria on the master view object. For example, a view criteria findPersonByEmail that filters the rows in the master PersonVO using the EmailAddress attribute of the detail AddressVO might look similar to the one shown in Example 6-4. In this example, the view criteria statement uses a bind variable EmailBindVar to obtain the value of the email attribute on the detail view object AddressVO at runtime.
Example 6-4 EXISTS View Criteria Statement
( (EXISTS(SELECT 1 FROM ADDRESS AddressEONQ1 WHERE
    (UPPER(AddressEONQ1.EMAIL_ADDRESS LIKE UPPER (:EmailBindVar || '%') ) )
         AND
      (PersonEO.PERSON_ID = AddressEONQ1.PERSON_ID) ) ) )
It may be helpful to have an understanding of the row finder that operates on a master view object. For more information, see Section 6.2.8, "How to Find Rows of a Master View Object Using Row Finders."
It may be helpful to have an understanding of view criteria. For more information, see Section 5.9, "Working with Named View Criteria."
You may also find it helpful to understand functionality that can be added using other Oracle ADF features. For more information, see Section 6.1.2, "Additional Functionality for View Objects."
You will need to complete this task:
- Create the desired master-detail view objects, as described in Section 6.2.1, "How to Create a Master-Detail Hierarchy Based on Entity Associations" or Section 6.2.2, "How to Create a Master-Detail Hierarchy Based on View Objects Alone."
To create an inline view criteria:
-
In the Applications window, double-click the master view object for which you want to customize with a new inline view criteria.
The view object that you create the inline view criteria on must be a master view object in a master-detail hierarchy.
-
In the overview editor, click the View Criteria navigation tab and click the Create New View Criteria button.
-
In the Create View Criteria dialog, enter the name of the view criteria to identify its usage in your application.
For example, to filter the person row set by an employee's email, you might specify a view criteria name like
findPersonByEmail. -
In the Query Execution Mode dropdown list, leave the default Database selected.
The default mode allows the view criteria to filter the database table specified by the view object query.
-
In the Criteria Definition tab, click Add Item to define the view criteria.
-
In the view criteria hierarchy, select the unassigned view criteria item node beneath Group and, in the Criteria Item section, select the Attribute dropdown and select the detail view object from the list.
When a view link exists for the current view object you are editing, you may select a detail view object to create a view criteria with a nested view criteria inline. The detail view object name will appear in the Attribute dropdown list. For example,
PersonVOis linked to theAddressVOand a view criteria definition forfindPersonByEmailfilters the master view objectPersonVOby attributes of the detail view objectAddressVO, as shown in Example 6-4. -
Leave the default Operator and Operand selections unchanged.
When you create an inline view criteria with a view object criteria item, the editor specifies the Exists operator and Inline View Criteria operand as the default choices. At runtime, the
EXISTSoperator tests for the presence of the attribute value in the detail view object and filter the rows in the master view object, as shown in Example 6-4. -
In the view criteria hierarchy, select the new view criteria item node beneath Group and, in the Criteria Item section, enter the following:
-
In the Attribute dropdown, select the attribute from the detail view object that you want to filter by.
The detail attribute is the attribute that will be used to filter the master view object. The value of this attribute can be supplied by the end user when a bind variable is defined for the criteria item.
-
In the Operator dropdown, select the desired filter operator.
-
In the Operand dropdown, select Bind Variable to specify the name of the bind variable for the detail attribute. If the variable was already defined for the view criteria, select it from the Parameter dropdown list. Otherwise, click New to display the New Variable dialog that lets you name a new bind variable on the view criteria.
Note: When you select an existing bind variable from the dropdown list for use by the view criteria, do not select a bind variable that has been defined for the view object query (these will appear on the Query page of the overview editor). Select only bind variables that you define in the View Criteria page of the overview editor.
-
-
To disable case-sensitive filtering of the attribute based on the case of the runtime-supplied value, leave Ignore Case selected.
This option is supported for attributes of type String only. The default disables case sensitive searches.
-
In the Validation dropdown list, leave the default Optional selected.
Optional means the view criteria (or search field) is added to the
WHEREclause only if the value is non-NULL. The default Optional for each new view criteria item means no exception will be generated for null values. For example, afindPersonByEmailview criteria definition filters the master view objectPersonVOby theEmailattribute of the detail view objectAddressVO, and the value may be null, as shown in Figure 6-16. -
Click OK.
-
In the View Criteria page of the overview editor, select the bind variable and in the Details section, leave the default settings unchanged:
-
Leave Literal selected but do not supply a default value. The value will be obtained from the end user at runtime.
-
Leave Updatable selected to allow the bind variable value to be defined through the user interface.
-
-
In the View Criteria page, click the UI Hints tab and specify hints like Label, Format Type, Format mask, and others.
The view layer will use bind variable UI hints when you build user interfaces like search pages that allow the user to enter values for the named bind variables. Note that formats are only supported for bind variables defined by the
Datetype or any numeric data type.