41 Enabling ADF Security in a Fusion Web Application
This chapter describes how you can enable ADF Security in the Fusion web application to define resource grants for Oracle ADF resources and to restrict the user's ability to view web pages associated those resources.
This chapter includes the following sections:
41.1 About ADF Security
The ADF Security framework is the preferred technology to provide authentication and authorization services to the Fusion web application. ADF Security is built on top of the Oracle Platform Security Services (OPSS) architecture, which itself is well-integrated with Oracle WebLogic Server. While other security-aware models exist that can handle user login and resource protection, ADF Security is ideally suited to provide declarative, permission-based protection for ADF bounded task flows, for top-level web pages that use ADF bindings (pages that are not contained in a bounded task flow), and at the lowest level of granularity, for rows of data defined by ADF entity objects and their attributes. In this document, these specific resources that the ADF Security framework protects are known as ADF security-aware resources.
You enable ADF Security for Fusion web applications when you run the Configure ADF Security wizard, as described in Section 41.3, "Enabling ADF Security." The wizard configures ADF Security for the entire Fusion web application, so that any web page associated with an ADF security-aware resource is protected by default. This means that after you enable ADF Security, your application is locked down so that the pages are considered secure by default.
After you enable ADF Security you must grant users access rights so that they may view the web pages of the Fusion web application. Access rights that you grant users are known as a security policy that you specify for the page's corresponding ADF security-aware resource. Ultimately, it is the security policy on the ADF resource that controls the user's ability to enter a task flow or view a web page.
Because ADF Security is based on Java Authentication and Authorization Service (JAAS), security policies identify the principal (the user or application role), the ADF resource, and the permission (an operation defined by the resource's ADF permission class). For example, the Summit sample application for ADF task flows secures the web pages contained by the customer-task-flow task flow to grant access only to logged-in users (also known as authenticated users). At runtime, the ADF Security framework performs authorization checking against the task flow's security policy to determine the user's right to complete the view operation. In this case, the security policy must grant the view permission to the user if they are to complete the checkout process.
To simplify the task of defining security policies for users and ADF resources, ADF Security defines a containment hierarchy that lets you define one security policy for the ADF bounded task flow and its contains web pages. In other words, when you define the security policy at the level of the bounded task flow, you protect the flow's entry point and then all pages within that flow are secured by the policy it defines. Additionally, instead of granting access to individual users, you group users into application roles and grant the view permission to the role.
Specifically, you will define security policies in the Fusion web application for the following ADF security-aware resources to make web pages accessible to users:
-
ADF bounded task flow protects the entry point to the task flow, which in turn controls the user's access to the pages contained by the flow
For example, a series of web pages may guide new customers through a registration process and the bounded task flow controls page navigation for the process. For a description of bounded task flows, see Section 20.1.2, "About Bounded Task Flows."
The ADF unbounded task flow is not an ADF security-aware component and thus does not participate in authorization checks. When you need to protect the constituent pages of an unbounded task flow, define grants for the page definition files associated with the pages instead.
-
ADF page definition files associated with web pages not contained by a bounded task flow
For example, a web page may display a summary of best selling products with data coordinated by the ADF bindings of the page's associated ADF page definition file. For a description of page definitions and ADF bindings, see Section 17.7, "Working with Page Definition Files."
-
ADF entity objects and attributes of entity objects that reference rows of data and help define collections for display in the user interface
For example, a web page may display an ADF Faces table component that displays columns that ADF bindings map to the attributes of an entity object as its data source. In the case of entity objects, enabling ADF Security does not automatically secure entity objects rows. The data will remain accessible to users until you define a security policy to explicitly protect the entity object or its attributes. For a description of entity objects, see Section 4.1, "About Entity Objects."
JDeveloper tools support iterative development of security so you can easily create, test, and edit security policies that you create for ADF resources. You can proceed to create test users in JDeveloper and run the application in Integrated WebLogic Server to simulate how end users will access the secured resources. This chapter describes how to configure the repository of user identities and login credentials known as the identity store.
Note:
References to the identity store in this chapter are always in the context of test user identities that you create for the purpose of running in Integrated WebLogic Server. Typically, you would not migrate these users to the staging environment when you deploy to Oracle WebLogic Server, as described in Section 41.9, "Preparing the Secure Application for Deployment."To avoid a situation where you have enabled ADF Security but have not yet defined security policies to grant access to test users, the Configure ADF Security wizard lets you grant temporary view rights to all existing ADF resources (a view permission grant will be added to the security policy for each ADF resource). This wizard option gives you the choice to disable automatic grants and proceed to define security policies for ADF resources as you create each resource or to enable automatic view grants and gradually replace these grants with security policies that you define. To understand iterative security development choices, see Section 41.2, "ADF Security Process Overview."
Tip:
Before you enable ADF Security and define security policies for the ADF security-aware resources, you will want to understand the rules that govern ADF authorization checking. Understanding these rules will help you to implement the security you intend. For a discussion of these rules, see Section 41.1.2, "ADF Security Use Cases and Examples."41.1.1 Integration of ADF Security and Java Security
The ADF Security model for securing Fusion web application resources is not based on the URL mapping of a security constraint as exemplified by the Java EE security model. In actual practice, security constraints are not feasible for securing a JavaServer Faces (JSF) web application where page navigation is not supported by specific page URLs. For example, when the user navigates to the next page in a task flow, the URL remains the same throughout the flow. As each new page is displayed, there is no means to trigger a URL-based security constraint.
Instead, ADF Security implements a Java Authentication and Authorization Service (JAAS) security model. The JAAS model is policy-based since JAAS is built on the existing Java security model and integrates with any JAAS implementation, including the Oracle Platform Security Services (OPSS) implementation of the JAAS service. Whereas applications that utilize URL security constraints are security-unaware because they rely on the Java EE container to manage security, Fusion web applications require an explicit call to the ADF Security framework to authorize access to resources based on user-defined policies. Thus, when you enable ADF Security and define access policies for ADF resources, your application is security-aware.
ADF Security simplifies the implementation of a JAAS authorization model. This implementation minimizes the work needed to create a security-aware application by exposing security policies on ADF resources in a declarative fashion and performing authorization checks on these resources at runtime.
The policy store in JDeveloper is file-based and contains a list of entries known as grants, which define the security policy for the ADF resource. The grant entry includes all the permissions granted to the user to perform operations on the protected resource, for instance, accessing a web page associated with an ADF bounded task flow. Permissions are granted in the policy store to an application role principal.
ADF Security expands on the JAAS model by allowing you to define grants using the actions specified by the ADF Security framework permission classes. These classes are specific to the ADF resource and map the actions to an operation supported by the resource. The policy store for the Fusion web application therefore contains grants that specify:
-
One or more permissions that associate an action defined by the resource's permission class with an instance of the ADF resource in the application (currently, only the
viewaction is supported for bounded task flows and page definitions resources) -
The grantee, which is an application role defined by your application that you populate with member users or, optionally, enterprise roles for whom you wish to confer the same access rights
In the case of entity objects, the permission class defines read, delete, and update actions that correspond to the read, removeCurrentRow, and update operations of the entity object.
For a description of the ADF permission classes and supported actions, see Appendix C, "ADF Security Permission Grants."
41.1.2 ADF Security Use Cases and Examples
The use of ADF Security enables web applications to easily adjust to real-world business security requirements, because rather than securing paths to application resources, you secure the view operation on ADF resources with JAAS. JAAS-based ADF Security provides:
-
Declarative security support for ADF resources, such as the bounded task flow
Because Java EE security is URL-based or page-based, it is not possible to have a navigation control without custom code. With ADF Security, you can control whether or not the user can enter a task flow. Thus, a single security policy for a task flow can control access to multiple web pages. Additionally, because declarative security lets you secure the ADF resource, not the access path, you can reuse the ADF resource elsewhere in the application and it will remain secured.
-
Simplified permission assignment by using application roles that allow for the inheritance of permissions
While Java EE security roles that are used by Java EE security constraints are flat, JAAS permissions are granted to application roles, which can be nested and may be mapped to enterprise roles that the Oracle WebLogic Server domain defines.
-
Utility methods for use in EL expressions to access ADF resources in the security context
You can use the ADF Security EL expression utility methods to determine whether the user is allowed to perform a known operation. For example, you can determine whether the user is allowed to view a particular task flow.
Additionally, JDeveloper enables you to quickly create test users and passwords to test security in Integrated WebLogic Server. When you are ready to deploy to Oracle WebLogic Server, you can migrate the application-specific authorization policies to the server and the administrator can configure the application to use an LDAP user repository.
Table 41-1 summarizes the effect that enabling ADF Security has on the application and the various ADF security-aware resources. For further discussion about how you can work most effectively with ADF Security, see Section 41.11.5, "Best Practices for Working with ADF Security."
Table 41-1 Summary of ADF Security-Aware Resources
| ADF Resource | How ADF Enforces Security | How to Grant Access |
|---|---|---|
|
Bounded task flows in all user interface projects |
Protected by default. Requires a grant to allow users to enter the bounded task flow. |
Define the grant for the task flow. Do not define grants for individual page definition files associated with the web pages of the bounded task flow. |
|
Page definition files in all user interface projects |
Protected by default. Requires a grant to allow users to view the page associated with the page definition. |
If the web page is contained by a bounded task flow, define the grant for the task flow. Define the grant for the page definition only when the web page is not contained by a bounded task flow or when the page is contained by an unbounded task flow. Note that the unbounded task flow is not an ADF security-aware component and allows no grants. |
|
Entity objects in the data model project |
Not protected by default. Requires a grant to prevent access by users. |
Define a grant on the entity object to protect data only if you need to control access at the level of the entire data collection. The data displayed by all components in the user interface that reference the protected entity object will be protected. Use entity-level security carefully. Instead, consider defining security at the level of the entity attribute. Note that grants in the data model project are saved as metadata on the entity object itself and do not appear in the ADF policy store. |
|
Attributes of entity objects in the data model project |
Not protected by default. Requires a grant to prevent access by users. |
Define a grant on the entity object attribute to protect data when you need to control access at the level of the columns of the data collection. The data displayed by all components in the user interface that reference the protected entity attribute will be protected. Note that grants in the data model project are saved as metadata on the entity object itself and do not appear in the ADF policy store. |
41.1.3 Additional Functionality for ADF Security
You may find it helpful to understand other Oracle ADF features before you start working with ADF Security. Following are links to other functionality that may be of interest.
-
To understand the security features of Oracle Platform Security Services, see Securing Applications with Oracle Platform Security Services.
41.2 ADF Security Process Overview
You work in JDeveloper when you want to secure the ADF resources of your Fusion web application. ADF Security will protect your application's bounded task flows and any web pages contained in an unbounded task flow. You enable this protection by running the Configure ADF Security wizard and later by defining ADF security policies to define user access rights for each resource.
As you create the user interface for your application, you may run the Configure ADF Security wizard at any time. You may choose to:
-
Iterate between creating web pages in the UI project and defining security policies on their associated ADF resources
-
Complete all of the web pages in the UI project and then define security policies on their associated ADF resources
Note:
Before you proceed to secure the Fusion web application, you should become familiar with the ADF security model, as described in Section 41.1.2, "ADF Security Use Cases and Examples."The iterative design and test process is supported by a variety of design time tools.
Each time you create a new bounded task flow or ADF page definition file in your user interface projects, the new ADF resource will be visible in the overview editor for the jazn-data.xml file. This editor is also called the overview editor for security policies. You use the overview editor to define security policies for ADF resources associated with web pages for the entire application. You can also use the overview editor to sort ADF resources and easily view those that have no security policy yet defined.
You use another editor to provision a few test users in the ADF identity store. The identity store you create in JDeveloper lets you define user credentials (user ID and password). The editor also displays the relationship between users you create and the application roles that you assign them to for the purpose of conferring the access rights defined by ADF security policies.
At design time, JDeveloper saves all policy store and identity store changes in a single file for the entire application. In the development environment, this is the jazn-data.xml file. After you configure the jazn-data.xml file using the editors, you can run the application in Integrated WebLogic Server and the contents of the policy store will be added to the domain-level store, the system-jazn-data.xml file, while the test users will be migrated to the embedded LDAP server that Integrated WebLogic Server uses for its identity store. The domain-level store allows you to test the security implementation by logging on as test users that you have created.
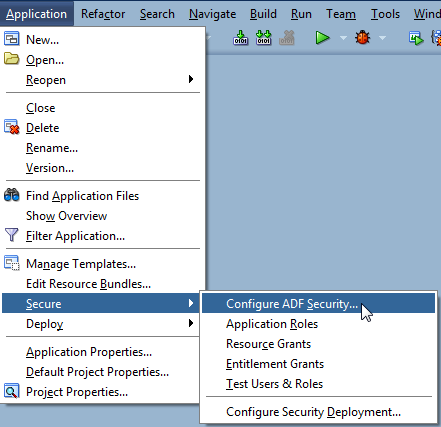
You access all design time tools for security under the main menu, using the Application > Secure menu, as shown in Figure 41-1.
To enable ADF Security and set up the policy store for the application that you will run in JDeveloper:
-
Enable ADF Security to allow dynamic authentication and enforce authorization by running the Configure ADF Security wizard.
When you run the wizard, if you choose to enable only dynamic authentication, skip the remaining design phase steps. The wizard configures files that integrate the security framework with OPSS on Oracle WebLogic Server.
-
Create an ADF security-aware resource, such as a bounded task flow with constituent web pages (or regions) or a top-level web page (or region) that is designed using ADF bindings.
Note: After you run the Configure ADF Security wizard, any web page associated with an ADF security-aware resource will be protected. This means that you must define security policies to make the web pages accessible before you can run the application and test security.
-
Associate the ADF security-aware resource with one or more application roles that you create.
Application roles you create are specific to the application and let you confer the same level of access to a set of users (also known as member users). In the test phase you will create some users and add them as members to the application roles you created.
-
Grant view permission to the ADF security-aware resource and each of its associated application roles.
The grant confers access rights to the application role's member users. Without the grant, the user would not be able to access the ADF security-aware resource. In the test phase, you will create some users and add them to your application roles.
Testing Phase
To provision the identity store and test security using Integrated WebLogic Server:
-
Create some users and, optionally, create their enterprise roles.
You will log in to the application using the user ID and password you define. An enterprise role is a logical role that lets you group users and associate these groups with application roles. The enterprise role is not needed for testing. For more information, see Section 41.4.3, "What You May Need to Know About Enterprise Roles and Application Roles."
-
Associate the users you created and, optionally, the enterprise roles, with one or more application roles.
A member user may belong to more than one application role when you wish to confer the access right granted to multiple application roles.
-
Optionally, replace the default login page with a custom login page.
The default login page generated by the Configure ADF Security wizard cannot utilize ADF Faces components. It is provided only as a convenience for testing ADF security policies. Your custom login page may be designed with ADF Faces components.
-
Run the application in JDeveloper and access any ADF security-aware resource.
The first time you attempt to access an ADF security-aware resource, the security framework will prompt you to log in.
-
Log in and check that you are able to access the page and its resources as you intended.
After you log in, the security framework checks the user's right to access the resource. For example, if you receive an unexpected 401 unauthorized user error, verify that you have created grants as suggested in Section 41.11.5, "Best Practices for Working with ADF Security."
Preparation for Staging
To prepare the secure application for deployment to Oracle WebLogic Server in a staging or production environment:
-
Remove any grants to the
test-allrole for all ADF security-aware resources and replace with grants that you define.Because ADF resources are secure by default, developers testing the application will be granted view access only after security policies are defined. The Configure ADF Security wizard gives you the option to generate grants to the
test-allrole that will make all ADF resources accessible. To avoid compromising enterprise security, you must eventually replace all temporary grants to thetest-allrole with explicit grants that you define. -
Remove all user identities that you created.
JDeveloper must not be used as an identity store provisioning tool, and you must be careful not to deploy the application with user identities that you create for testing purposes. Deploying user identities with the application introduces the risk that malicious users may gain unintended access. Instead, rely on the system administrator to configure user identities through the tools provided by the domain-level identity management system.
-
Confirm that the application roles shown in the policy store are the ones that you want an administrator to eventually map to domain-level groups.
-
Decide whether or not you what to define a security constraint to protect ADF Faces resource files.
Resource files including images, style sheets, and JavaScript libraries are files that the Fusion web application loads to support the individual pages of the application. These files are not secured by ADF Security, but you can secure their Java EE access paths if you require all users to be authenticated before they can access the application.
-
Migrate the finalized policy store and credentials store to the target server.
Application policies and credentials can be automatically migrated to the domain policy store when the application is deployed to a server in the Oracle WebLogic environment. Support to automatically migrate these stores is controlled by the target server's configuration. If Oracle Enterprise Manager is used to perform the deployment outside of JDeveloper, then the migration configuration settings can be specified in that tool. For information about migrating the
jazn-data.xmlsecurity policies and thecwallet.ssocredentials, see the "Configuring the OPSS Security Store" chapter in Securing Applications with Oracle Platform Security Services.
41.3 Enabling ADF Security
To simplify the configuration process which allows ADF Security to integrate with OPSS, JDeveloper provides the Configure ADF Security wizard. The wizard is the starting point for securing the Fusion web application using ADF Security. The wizard is an application-level tool that, once run, will enable ADF Security for all user interface projects that your application contains.
Note:
Because the Configure ADF Security wizard enables ADF Security for all user interface projects in the application, after you run it, users will be required to have authorization rights to view any web page contained by a bounded task flow and all web pages associated with an ADF page definition. Therefore, after you run the wizard, the application is essentially locked down until you define security policies to grant view rights to the user. For an overview of the process, see Section 41.2, "ADF Security Process Overview."41.3.1 How to Enable ADF Security
The Configure ADF Security wizard allows you to choose to enable authentication and authorization separately. You may choose to:
-
Enable only user authentication.
Although ADF Security leverages Java EE container-managed security for authentication, enabling only authentication means that you want to use the ADF authentication servlet to support user login and logout, but that you intend to define container-managed security constraints to secure web pages.
-
Enable user authentication and also enable authorization.
Enabling authorization means you intend to control access to the Fusion web application by creating security policies on ADF resources.
The ADF Security framework supports these two choices to give you the option to implement Java EE Security and still be able to support login and logout using the ADF authentication servlet. The benefit of enabling the ADF authentication servlet is that the servlet will automatically prompt the user to log in the first time the application is accessed. The ADF authentication servlet also allows you to redirect the user to a defined start page after successful authentication. You will also be able to manage the page redirect when the user logs out of the application. These redirect features provided by ADF Security are not available using only container-managed security.
Note that ADF Security does not perform authentication, but relies on the Java EE container to invoke the configured login mechanism, as described in Section 41.8.4, "What Happens at Runtime: How ADF Security Handles Authentication."
Best Practice:
Because Java EE security constraints cannot interact with the task flow to secure the current page of a task flow, container-managed security is not a useful solution when your application is designed with ADF task flows. When you use ADF task flows, select the ADF Authentication and Authorization option in the Configure ADF Security wizard. This option will allow you to define security policies to protect the task flows of your application.Because ADF Security delegates authentication to the web container, when you run the Configure ADF Security wizard, the wizard prompts you to configure the authentication method that you want the web container to use. The most commonly used types of authentication are HTTP Basic Authentication and Form-Based Authentication. Basic authentication uses the browser login dialog for the user to enter a user name and password. Note that with basic authentication, the browser caches credentials from the user, thus preventing logout. Basic authentication is useful when you want to test the application without requiring a custom login page. Form authentication allows the application developer to specify a custom login UI. If you choose Form-based authentication, you can also use the wizard to generate a simple login page. The default login page is useful for testing your application with Integrated WebLogic Server.
Note:
Because the generated login page is a simple JSP or HTML file, you will not be able to modify it with ADF Faces components. For information about replacing the default login page with a custom login page that uses ADF Faces components, see Section 41.7, "Creating a Login Page."It may be helpful to have an understanding of the Configure ADF Security wizard. For more information, see Section 41.3, "Enabling ADF Security."
You may also find it helpful to understand functionality that can be added using other Oracle ADF features. For more information, see Section 41.1.3, "Additional Functionality for ADF Security."
To enable ADF Security for the application:
-
In the main menu, choose Application and then Secure > Configure ADF Security.
-
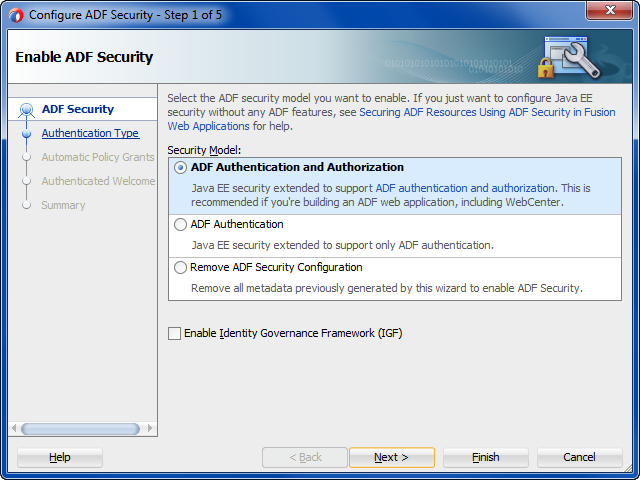
In the ADF Security page, leave the default ADF Authentication and Authorization option selected. Click Next.
When you run the wizard with the default option selected, your application will enforce authorization for ADF security-aware resources. Enforcing authorization for ADF resources means that you intend to define security policies for these resources to make the web pages of your application accessible. Until you do so, all pages that rely on the ADF bounded task flows and ADF page definitions will remain protected.
The other two wizard options to configure ADF Security should not be used when you want to enable ADF Security. Those options allow you to temporarily disable ADF Security and run your application without security protection, as described in Section 41.10, "Disabling ADF Security."
Specifically, the first page of the wizard lets you choose among three options, with the default option set to enable ADF Authentication and Authorization, as shown in Figure 41-2:
-
ADF Authentication and Authorization (default) enables the ADF authentication servlet so that you can redirect to a configured web page when the user logs in and logs out. This option also enables ADF authorization to enforce authorization checking against security policies that you define for ADF resources. This option assumes that you will define application roles and assign explicit grants to those roles to manage access to ADF security-aware resources.
-
ADF Authentication enables the ADF authentication servlet to require the user to log in the first time a page in the application is accessed and supports page redirect by mapping the Java EE application root "/" to the a Java EE security constraint that will trigger user authentication. Since the wizard disables ADF authorization, authorization checking is not performed, whether or not security policies exist for ADF resources. Once the user is logged in, all web pages containing ADF resources will be available to the user.
-
Remove ADF Security Configuration disables the ADF authentication servlet and prevents ADF Security from checking policy grants without altering the existing policy store. In this case, you may require users to log in, become authenticated, and test access rights against URL security constraints using standard Java EE security. Note that running the wizard with this option disables fine-grained security against ADF resources.
Note:
In the current release, the Enable Identity Governance Framework (IGF) checkbox is disabled by default. Selecting this option provides no additional functionality. The feature will be enabled in a future release. For details about IGF, see the Developer's Guide for Identity Governance Framework. -
-
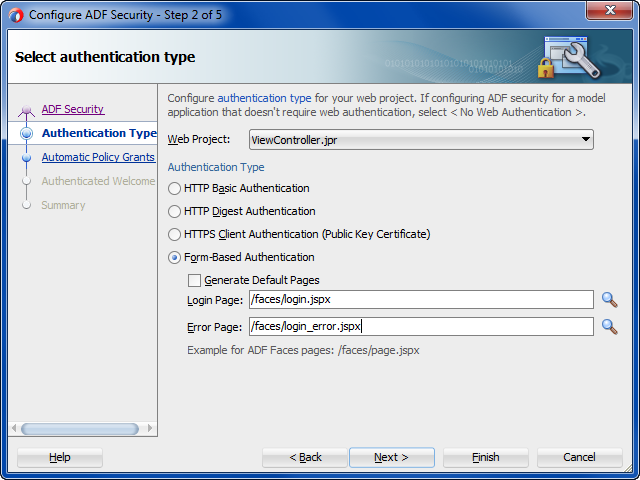
In the Authentication Type page, select the authentication type that you want your application to use when the user submits their login information. Click Next.
A known issue prevents the ADF authentication servlet from working with Basic type authentication and allows a user to access resources after logout. Use form-based authentication instead of basic authentication. For details about this issue, see Section 41.7.8, "What You May Need to Know About Fusion Web Application Logout and Browser Caching."
If you select Form-based Authentication, you can also select Generate Default Pages to allow the wizard to generate a default login and error page. By default the wizard generates the login and error pages at the top level of the user interface project, as shown in Figure 41-3. If you want to change the location, specify the full path relative to the user interface project.
-
In the Automatic Policy Grants page, leave the default No Automatic Grants option selected. Click Next.
When you select No Automatic Grants, you must define explicit grants that are specific to your application. The
test-allapplication role provides a convenient way to run and test application resources without the restricted access that ADF authorization enforces. However, it increases the risk that your application may leave some resources unprotected.Alternatively, you can use the wizard to grant to the
test-allapplication role. When you enable grants to thetest-allrole, you can postpone defining explicit grants to ADF resources until you are ready to refine the access policies of your application. If you decide to enable automatic grants, do not let application development progress too far and the content of the application become well-established before you replace grants to thetest-allrole with the your application's explicit grants. The explicit grant establishes the necessary privilege (for example,viewon a page) to allow users to access these resources. For more information about thetest-allrole, see Section 41.8.3, "How to Use the Built-In test-all Application Role." -
In the Authenticated Welcome page, select Redirect Upon Successful Authentication to direct the user to a specific web page after they log in. Click Next.
If you leave the Redirect Upon Successful Authentication option unselected, the user will be returned to the page from which the login was initiated. However, when the user presses Ctrl-N or Ctrl-T to open a new browser window or tab, they will receive a 403 or 404 error unless a welcome page definition appears in the application's
web.xmlfile. You can use this option to specify a welcome page so the definition appears in the application'sweb.xmlfile.Note that if the web page you specify contains ADF Faces components, you must define the page in the context of
/faces/. For example, the path foradffaces_welcome.jspxwould appear in the Welcome Page field as/faces/adffaces_welcome.jspx.For details about specifying other redirect options, see Section 41.7.5, "How to Redirect a User After Authentication."
-
In the Summary page, review your selections and click Finish.
41.3.2 What Happens When You Enable ADF Security
After you run the Configure ADF Security wizard with the default ADF Authentication and Authorization option selected in the ADF Security page, you will have:
-
Enabled ADF authentication to prompt the user to log in and to allow page redirects
-
Enabled ADF authorization checking so that only authorized users will have access to ADF resources
The wizard updates all security-related configuration files and ensures that ADF resources are secure by default. Table 41-2 shows which files the Configure ADF Security wizard updates.
Table 41-2 Files Updated for ADF Authentication and Authorization
| File | File Location | Wizard Configuration |
|---|---|---|
|
|
And, in JDeveloper, in the user interface project under the Web Content-WEB-INF node |
|
|
|
And, in JDeveloper, in the Application Resources panel of the Applications window under the Descriptors-ADF META-INF node |
|
|
|
And, in JDeveloper, in the Application Resources panel of the Applications window under the Descriptors-META-INF node |
|
|
|
And, in JDeveloper, in the user interface project under the Web Content-WEB-INF node |
|
|
|
. And, in JDeveloper, in the Application Resources panel of the Applications window under the Descriptors-META-INF node |
|
Because authentication is delegated to the web container, the wizard only updates the web.xml file to enable the ADF authentication servlet to trigger authentication dynamically. It defines servlet mapping for the ADF authentication servlet and adds two Java EE security constraints, allPages and adfAuthentication, to the web.xml file, as shown in Example 41-1.
Example 41-1 ADF Authentication Descriptors in the web.xml FIle
<servlet>
   <servlet-name>adfAuthentication</servlet-name>
   <servlet-class>
        oracle.adf.share.security.authentication.AuthenticationServlet
   </servlet-class>
   <load-on-startup>1</load-on-startup>
</servlet>
...
<servlet-mapping>
   <servlet-name>adfAuthentication</servlet-name>
   <url-pattern>/adfAuthentication</url-pattern>
</servlet-mapping>
...
<security-constraint>
   <web-resource-collection>
        <web-resource-name>allPages</web-resource-name>
        <url-pattern>/</url-pattern>
   </web-resource-collection>
   <auth-constraint>
        <role-name>valid-users</role-name>
   </auth-constraint>
</security-constraint>
<security-constraint>
   <web-resource-collection>
        <web-resource-name>adfAuthentication</web-resource-name>
        <url-pattern>/adfAuthentication</url-pattern>
   </web-resource-collection>
   <auth-constraint>
        <role-name>valid-users</role-name>
   </auth-constraint>
</security-constraint>
Because the allPages constraint maps to the '/' URL, it protects the Java EE application root. This mapping enables the Oracle WebLogic Server web container to trigger user authentication dynamically even before ADF Security is accessed. When the user first accesses the application, it forces the container to challenge the user for the user name and password. Then when the user accesses a page protected by ADF Security, there is no longer a need to authenticate the user and no need to redirect to the ADF authentication servlet.
Note:
You can remove theallPages constraint from the web.xml file if you prefer to provide a login link or button to explicitly trigger login. You could also have a link or button to perform logout. For details about creating a custom component to perform login and logout, see Section 41.7, "Creating a Login Page." If you keep the constraint to allow dynamic authentication, because it covers everything under the Java EE application root, your login page may not display supporting resources at runtime, as described in Section 41.7.3, "How to Ensure That the Custom Login Page's Resources Are Accessible for Explicit Authentication."Because every user of the application is required to be able to log in, the security constraint defined against the adfAuthentication resource allows all users to access this web resource. As such, the security role associated with the constraint must encompass all users. To simplify this task, the Java EE valid-users role is defined. The weblogic.xml file maps this role to an implicit users group defined by Oracle WebLogic Server. This mapping ensures that every user will have this role because Oracle WebLogic Server configures all properly authenticated users as members of the users group, as described in Section 41.3.7, "What You May Need to Know About the valid-users Role."
Note:
TheadfAuthentication resource constraint provides the definition of a single standard URL pattern against the ADF authentication servlet. Your web pages can provide an explicit login or logout link that references the ADF authentication servlet URL pattern. This explicit login scenario is an alternative to generating a simple login form in the Configure ADF Security wizard and relying on ADF authentication to prompt the user to log in. For details about handling the explicit login scenario, see Section 41.7, "Creating a Login Page."To enable authorization, the wizard updates the adf-config.xml file and sets the authorizationEnforce parameter in the <JaasSecurityContext> element to true, as shown in Example 41-2.
Example 41-2 AuthorizationEnforce Flag Enabled in the adf-config.xml FIle
<JaasSecurityContext
  initialContextFactoryClass="oracle.adf.share.security.JAASInitialContextFactory"
  jaasProviderClass="oracle.adf.share.security.providers.jps.JpsSecurityContext"
                             authorizationEnforce="true"
                             authenticationRequire="true"/>
When authorization is enabled, the ADF security context gets the user principal from the HttpServletRequest once the user is authenticated by the container. The user submits a user name and password and that data is compared against the data in the identity store where user information is stored. If a match is found, the originator of the request (the user) is authenticated. The user principal is then stored in the ADF security context, where it can be accessed to obtain other security-related information (such as the group the user belongs to) in order to determine authorization rights. For details about accessing the ADF security context, see Section 41.11.4, "Getting Information from the ADF Context."
41.3.3 What Happens When You Generate a Default Form-Based Login Page
The wizard-generated login and error pages are simple HTML pages that are added to the top-level folder of your user interface project. The generated login page defines an HTML form that will submit the user's login request with the standard j_security_check action. This action together with form-based authentication, which is the default option for container authentication provided by the wizard, allows the web container to authenticate users from many different web application resources.
The wizard updates the web.xml file to specify form-based authentication and identify the location of the pages, as shown in Example 41-3.
Example 41-3 Wizard-Generated Login Page Definition Added to in the web.xml FIle
<login-config>
   <auth-method>FORM</auth-method>
   <form-login-config>
       <form-login-page>/login.html</form-login-page>
       <form-error-page>/error.html</form-error-page>
   </form-login-config>
</login-config>
Your application will display the wizard-generated login page from a server-side redirect in response to the unauthenticated user attempting to access a protected resource. This is known as implicit authentication because the redirect to the login page only occurs when user navigates to a page that contains an ADF security-aware resource.
Note that web applications also have a notion of public pages and allow for explicit, as well as implicit authentication. This means that users should be able to log in to the application by clicking a login link before they navigate to secured content. For information about creating and using a login link, see Section 41.7, "Creating a Login Page."
41.3.4 What You May Need to Know About the Configure ADF Security Wizard
The first time you run the Configure ADF Security wizard and enable authentication and authorization, you secure ADF resources at the level of the application. Additionally, you select specific project-level settings for the user interface project, including the authentication type and the authentication welcome. The wizard adds these web application settings to the web.xml file in the project you select. When your application contains multiple user interface projects and web.xml files, you can return to the wizard and configure these settings in the web.xml file for another user interface project that you select.
41.3.5 What You May Need to Know About ADF Authentication
ADF applications that use Java EE container-managed authentication for login and ADF authentication for logout integrate with Oracle Single Sign-On (Oracle SSO) with no special requirements. The ADF authentication servlet handles the details of logout and invalidates the session. However, when the application uses login and logout methods provided by Servlet 3.0, Oracle SSO is not supported. Additionally, Servlet 3.0 login and logout is only compatible with application servers that fully support Java EE 6 or later.
On the first access to a page that relies on an ADF security-aware resource, if there is no subject defined, OPSS is configured by the JpsFilter to create a subject containing the anonymous user principal and the anonymous-role role principal. With this role principal, the unauthenticated user will be able to access public web pages that are not associated with any ADF security-aware resources (including ADF bounded task flows or page definitions).
In the case of pages associated with ADF security-aware resources, you must explicitly grant view permission to anonymous-role to make the page accessible to the anonymous user. For details about granting privileges to the anonymous user, see Section 41.5.1, "How to Make an ADF Resource Public."
41.3.6 What You May Need to Know About the Built-In test-all Role
The Configure ADF Security wizard lets you enable automatic grants to the built-in test-all application role for the purpose of granting view permission to all ADF security-aware resources in your application. Without a permission grant, either an automatic view grant or an explicit grant that you define, ADF Security authorization checking enforcement would prevent you from being able to run the application and access its resources. You can run the wizard with the test-all application role feature enabled and then gradually replace automatic view grants with explicit grants. Be aware that you must not deploy the application with grants to the test-all application role in place, since this feature makes all ADF resources public. If you choose to enable the built-in test-all application role in the wizard, see Section 41.9.1, "How to Remove the test-all Role from the Application Policy Store," before deploying your application.
41.3.7 What You May Need to Know About the valid-users Role
The valid-users role is a Java EE security role defined by ADF Security to ensure that all users will access the adfAuthentication servlet web resource defined in the web.xml file. The Configure ADF Security wizard updates the weblogic.xml file to map this ADF Security role to the users principal, as shown in Example 41-4. This mapping ensures that every user will have this role, because Oracle WebLogic Server configures all properly authenticated users as members of the users group.
Example 41-4 valid-users Role Mapping in the weblogic.xml FIle
<security-role-assignment>
   <role-name>valid-users</role-name>
   <principal-name>users</principal-name>
</security-role-assignment>
At runtime, the users principal is added automatically to a successfully authenticated subject by OPSS. From a security perspective, the valid-users role supports ADF authentication only in the case where you need to control access to web resources using security constraints alone. The end result of this mapping relies entirely on Java EE security and does not involve JAAS Permissions.
41.4 Creating Application Roles
You create application roles to represent the policy requirements of the application and to define groups of users with the same view permission rights. The application roles that you create in the application policy store are specific to your application. For example, in the context of the work flow, there may be application roles such as Application Customer Role and Application Employee Role, defined in the SummitADF_TaskFlows workspace of the Summit ADF sample applications.
At runtime, the access rights are conferred on the user through the application role for which the user is defined as a member. Thus, before you can define security policies, the policy store must contain the application roles that you intend to issue grants to. This can be an application role that you define (such as Application Customer Role) or it can be one of the two built-in application roles defined by OPSS: authenticated-role or anonymous-role. JDeveloper provides the built-in application roles to let you make ADF resources public, as described in Section 41.5.1, "How to Make an ADF Resource Public."
After you create the application role, you will:
-
Grant permissions to the application roles, as described in Section 41.5, "Defining ADF Security Policies."
-
Associate test users with each application role, as described in Section 41.6, "Creating Test Users."
Best Practice:
The ADF Security framework enforces a role-based access control mechanism with permissions granted either to application roles or to individual users. Although you may only need to test security and therefore might not need to create groups of users, you should still create application roles (with at least one user member). Later when you define security polices on the ADF resources, the overview editor for the application policy store will allow you to select an application role for the grant.41.4.1 How to Create Application Roles
JDeveloper lets you add application roles to the policy store of the jazn-data.xml file, which appears in the Descriptors/META-INF node of the Application Resources panel.
Note:
When you create application roles, be sure to add the new application roles to the policy store, not the identity store. Roles that you add to the identity store define enterprise security roles and provide a way to conveniently group users in the identity store. For more details about enterprise roles, see Section 41.4.3, "What You May Need to Know About Enterprise Roles and Application Roles."To create application roles in the policy store of the jazn-data.xml file, you use the Application Roles page of the overview editor for the jazn-data.xml file. This editor lets you view the relationship between identity store members and the application roles you create.
It may be helpful to have an understanding of application roles. For more information, see Section 41.4, "Creating Application Roles."
You may also find it helpful to understand functionality that can be added using other Oracle ADF features. For more information, see Section 41.1.3, "Additional Functionality for ADF Security."
-
In the main menu, choose Application and then Secure > Application Roles.
-
In the Application Roles page of the
jazn-data.xmloverview editor, select the policy store for your application from the Security Policy dropdown list.The policy store that JDeveloper creates in the
jazn-data.xmlfile is automatically based on the name of your application. -
In the Roles list, click the New icon.
-
In the Name field, enter the name of the role and click any other field to add the application role to the policy store.
-
If you have already set up test users in the identity store, you can map users and roles, as described in Section 41.6.3, "How to Associate Test Users with Application Roles."
41.4.2 What Happens When You Create Application Roles
When you add an application role to the policy store, JDeveloper updates the jazn-data.xml file located in the src/META-INF directory relative to the application workspace. Application roles are defined in <app-role> elements under <policy-store>, as shown in Example 41-5. Because the policy store <application> element names the application, at runtime all application roles that you create will be visible to your application only. Other web applications may define a policy store with their own set of application roles.
Example 41-5 Application Role Definition in the Policy Store
<policy-store>
     <applications>
         <application>
            <name>SummitADFTaskFlows</name>
            <app-roles>
               <app-role>
                  <name>Application Employee Role</name>
                  <display-name>Application Employee Role</display-name>
                  <class>oracle.security.jps.service.policystore.
                                                        ApplicationRole</class>
               </app-role>
               ...
            </app-roles>
            <jazn-policy>
              ...
            </jazn-policy>
         </application>
    </applictions>
</policy-store>
41.4.3 What You May Need to Know About Enterprise Roles and Application Roles
An enterprise role is a role that is maintained in the domain identity store (as opposed to an application identity store). Enterprise roles are available to every application deployed in the domain and are therefore also called external roles.
An application role is a role used by a Fusion web application. It is specific to the application, defined by the application policy, and not necessarily known to the Java EE container. Application roles are scoped in the sense that they can contain only users and roles defined in the application. Application roles must be mapped to enterprise roles.
You use the overview editor for the jazn-data.xml file to create enterprise roles to group users that you add to the identity store. You can use this mechanism to assign entire groups of users to application roles that you have defined for the purpose of conferring access rights defined by ADF security policies, as described in Section 41.6.3, "How to Associate Test Users with Application Roles."
However, Integrated WebLogic Server does not require you to create enterprise roles to run the application within JDeveloper. For the purpose of testing the application, it may be sufficient to create a few test users and assign them directly to application roles. When you run the application in JDeveloper, the users and any enterprise roles you defined will be created in the default security provider (which is embedded LDAP for Integrated WebLogic Server).
Typically, when you deploy the application for staging, you will migrate only the policy store to the target server. You can configure JDeveloper deployment options so that the identity store, including test users and enterprise roles, is not migrated, as described in Section 41.8.1, "How to Configure, Deploy, and Run a Secure Application in JDeveloper."
After you deploy the secure application, Oracle Fusion Middleware will merge your application's policy store with the policies of the domain-level policy store. To complete this task, the administrator for the Oracle WebLogic Server will eventually map the application roles of your policy store to the existing domain-level enterprise roles. This application role mapping at the domain level allows enterprise users to access application resources according to the ADF security policies you have defined. The domain-level application role mapping by the administrator also allows you to develop the ADF security policies of your application without requiring any knowledge of the identity store in the production environment.
41.5 Defining ADF Security Policies
Authorization relies on a policy store that is accessed at runtime and that contains permissions that grant privileges to execute predefined actions, like view, on a specified object. Initially, after you run the Configure ADF Security wizard, the policy store defines no grants. And, because the default wizard option ADF Authentication and Authorization enables authorization checking, the web pages of your application that rely on the ADF security-aware resources will be inaccessible to users. You must use JDeveloper to define explicit grants for the resources that you want to permit users to access.
Best Practice:
When you run the Configure ADF Security wizard with the default option ADF Authentication and Authorization selected, you will lock down the web pages of your application. This affords the most protection to the Fusion web application possible since you will define explicit grants to allow users to access only the pages you intend. For a discussion of this guideline and others, see Section 41.11.5, "Best Practices for Working with ADF Security."Before you can define security policies, the policy store for your application must contain the application roles that you intend to issue grants to. This can be an application role that you define (such as Application Customer Role) or it can be one of the two built-in application roles defined by OPSS: authenticated-role or anonymous-role. You use application roles to classify users, so that each member of the same role possesses the same access rights. As such, the security policy names the application role as the principal of the grant, rather than specific users. For details about defining application roles, see Section 41.4, "Creating Application Roles."
For the user interface project, you use the overview editor for security policies to secure ADF resources, including ADF task flows and ADF page definitions. You open the editor on the jazn-data.xml file by double-clicking the jazn-data.xml file (located in the Application Resources panel) or by choosing Secure > Resource Grants from the Application menu in the main menu.
Note that when you open the jazn-data.xml file, the overview editor provides additional editor pages that you use to create test users, enterprise roles, and application roles.
For the data model project, you do not secure entity objects or their attributes using the overview editor for security policies. Instead, you set metadata directly on these objects to manage whether or not the databound UI component displays the data. For details about granting permissions for row-level security, see Section 41.5.11, "How to Define Policies for Data."
41.5.1 How to Make an ADF Resource Public
It is a common requirement that some web pages be available to all users, regardless of their specific access privileges. For example, the home page should be seen by all visitors to the site, while a corporate site should be available only to those who have identified themselves through authentication.
In both cases, the page may be considered public, because the ability to view the page is not defined by the users' specific permissions. Rather, the difference is whether the user is anonymous or a known identity.
In the ADF security model, you differentiate between the absence of security and public access to content by granting access privileges to the anonymous-role principal. The anonymous role encompasses both known and anonymous users, thus permission granted to anonymous-role allows access to a resource by unauthenticated users, for example, guest users. To provide access to authenticated users only, the policy must be defined for the authenticated-role principal.
Note:
For details about creating a public home page which contains links to other pages in the application, see Section 41.7.4, "How to Create a Public Welcome Page."It may be helpful to have an understanding of ADF security policies. For more information, see Section 41.5, "Defining ADF Security Policies."
You may also find it helpful to understand functionality that can be added using other Oracle ADF features. For more information, see Section 41.1.3, "Additional Functionality for ADF Security."
You will need to complete these tasks:
-
Create bounded task flows, as described in Section 20.2, "Creating a Task Flow."
-
Create web pages with an ADF page definition file, as described in Section 17.7, "Working with Page Definition Files."
-
Run the Configure ADF Security wizard, as described in Section 41.3, "Enabling ADF Security."
-
Create application roles, as described in Section 41.4, "Creating Application Roles."
To grant public access to ADF security-aware resources:
-
In the main menu, choose Application and then Secure > Resource Grants.
-
In the Resource Grants page of the overview editor for security policies, select one of the following resources from the Resource Type dropdown list:
-
Task Flow when you want to make a bounded task flow public. The application displays the web pages under the permission you define for the task flow itself. Thus, all constituent web pages of the bounded task flow will become public.
-
Web Page when you want to make individual web pages public. Typically, these pages are defined by an unbounded task flow and are top-level pages in the application, such as a home page.
-
-
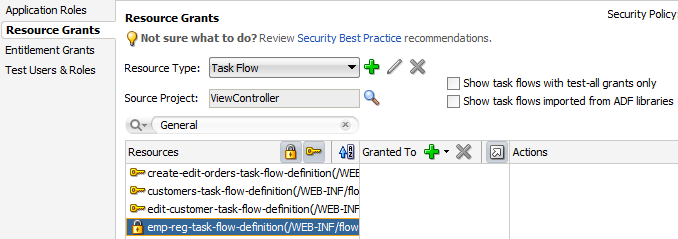
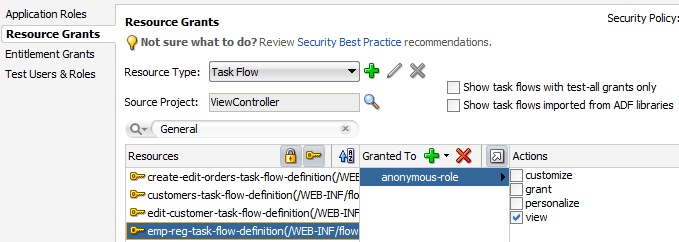
In the Resources column, select the ADF resource for which you want to grant access rights.
The resource you select should display the lock icon in the first column next to the resource name. The lock icon indicates that the resource has no security policy defined and therefore is "locked"—which means it remains inaccessible to users until you define a grant. For example, in Figure 41-4, the ADF resource
customer-registration-task-flow(a bounded task flow) shows the lock icon since no grant has been made.Tip:
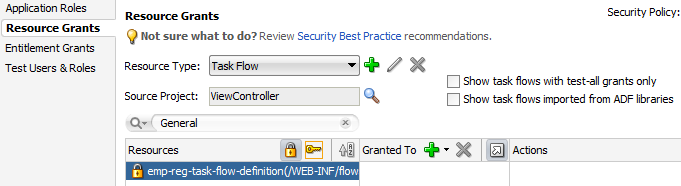
Click the key toggle icon in the header for the overview editor's first column to hide or show resources that already have grants and display only the resources without grants. The key icon indicates that the resource has a grant that will make the resource accessible to users with sufficient access rights. -
In the Granted to column, click the Add Grantee icon and choose Add Application Role.
-
In the Select Application Roles dialog, select one of these built-in application roles:
-
anonymous-role means the resource will be accessible to anyone who visits the site. A grant to this role is necessary if you want to make a web page associated with an ADF security-aware resource accessible before a user logs in. For example, you would grant to
anonymous-rolefor a task flow that manages customer registration. -
authenticated-role means the resource will be accessible only to authenticated users (ones who visit the site and log in). For example, you would grant to
authenticated-rolefor an employee registration task flow.
-
-
In the Select Application Roles dialog, click OK.
-
In the Resource Grants page of the overview editor, in the Actions column, leave the view action selected.
By default, the overview editor shows view selected, as shown in Figure 41-5. The view action is the only action currently supported for Fusion web applications.
41.5.2 What Happens When You Make an ADF Resource Public
When you define a security policy, the overview editor for security policies updates the jazn-data.xml file located in the /src/META-INF node relative to the web application workspace.
The overview editor writes the policy information to the <policy-store> section of the file. The security policy, or grant, contains both a grantee and one or more permissions. The grantee is the application role that the policy is being defined for—in this case, the anonymous role. Each permission defines the resource being secured and the action that can be performed against that resource.
Example 41-6 shows a security policy in the jazn-data.xml file that makes a customer registration task flow public. The grant to anonymous-role contains a single view permission for a bounded task flow, customer-registration-task-flow. With this grant, all users will be able to enter the customer registration task flow and complete the customer registration process. Additional grants to the anonymous role may be made and will appear in the <permissions> section of the anonymous role grant.
Example 41-6 Grants to anonymous-role in the Application-Level Policy Store
<policy-store>
   ...
   <jazn-policy>
      <grant>
         <grantee>
            <principals>
                <principal>
                   <class>oracle.security.jps.internal.core.
                                         principals.JpsAnonymousRoleImpl</class>
                   <name>anonymous-role</name>
                </principal>
            </principals>
         </grantee>
         <permissions>
            <permission>
                  <class>oracle.adf.controller.security.TaskFlowPermission</class>
                  <name>/WEB-INF/customer-registration-task-flow.xml#
                                           customer-registration-task-flow</name>
                  <actions>view</actions>
            </permission>
            ...
         </permissions>
      ...
      </grant>
      ...
   </jazn-policy>
</policy-store>
41.5.3 What Happens at Runtime: How the Built-in Roles Are Used
The anonymous-role and authenticated-role names are special roles defined by Oracle Platform Security Services (OPSS).
When you run the Configure ADF Security wizard, the wizard configures the JpsFilter definition in the web.xml file to enable support for the anonymous role. The enabled anonymous role allows ADF Security to support browsing of the site by anonymous users—those users who have not yet logged in. In contrast, the authenticated role is not declared and is always recognized by default. ADF Security supports both of these roles.
When an end user first accesses an ADF security-aware resource, the system creates a subject and populates it with the anonymous role principal. As long as the ADF security-aware resource being accessed has the view grant to anonymous role, the user is permitted access. If the anonymous role is not a grantee of the ADF resource, the user is prompted to log in. After logging in, the authenticated role is added to the subject. The wizard also adds the JpsFilter definition to the web.xml file, where remove.anonymous.role set to false ensures that the anonymous role principal is available even after the user logs in. With the authenticated role principal, the user may access resources that have an explicit grant to the authenticated role.
41.5.4 How to Define Policies for ADF Bounded Task Flows
You define the access policy for an ADF bounded task flow by creating permission grants in the Resource Grants page of the overview editor for security policies. The grants you create will appear as metadata in the policy store section of the jazn-data.xml file. This metadata defines a permission target (in this case, the bounded task flow definition name) for which you have issued grants to authorize the members of a specific application role.
Best Practice:
Do not create permission grants for the individual web pages of a bounded task flow. When the user accesses the bounded task flow, security for all pages will be managed by the permissions you grant to the task flow. And, because the contained web pages (with associated page definitions) will be inaccessible by default, ADF Security prevents users from directly accessing the pages of the task flow. This supports a well-defined security model for task flows that enforces a single entry point for all users. For further information about implementing security policies, see Section 41.11.5, "Best Practices for Working with ADF Security."You can sort the task flows in the overview editor by clicking the toggle buttons in the Task Flow header, as described in Table 41-3.
Table 41-3 Resource Grant Toggle Buttons for Bounded Task Flows
| Button | Toggle Action | Description |
|---|---|---|
|
|
Shows/hides bounded task flows with no grants |
Represents a bounded task flow with no permission grants defined. The web pages that the task flow calls will not be accessible to any user. |
|
|
Shows/hides bounded task flows with grants |
Represents a bounded task flow with one or more permission grants defined. The web pages that the task flow calls will be accessible to users who are members of the application role that received the grant. |
The list of available actions displayed by the overview editor is defined by the task flow permission class (oracle.adf.controller.security.TaskFlowPermission). The permission class maps these actions to the operations supported by the task flow. Table 41-4 shows the actions displayed by JDeveloper for ADF bounded task flows.
Note that the view action is the only action currently supported for Fusion web applications. Do not select customize, grant, or personalize actions—they are reserved for future use in task flow security.
Table 41-4 Secured Actions of ADF Bounded Task Flows
| Grantable Action | Effect on the User Interface |
|---|---|
|
|
Controls who can read and execute a bounded task flow in a Fusion web application. This is the only operation that the task flow supports. |
|
|
Reserved for future use. This action is not checked at runtime. |
|
|
Reserved for future use. This action is not checked at runtime. |
|
|
Reserved for future use. This action is not checked at runtime. |
To define a grant for the task flow security policy, use the Resource Grants page of the overview editor for the jazn-data.xml file.
It may be helpful to have an understanding of ADF security policies. For more information, see Section 41.5, "Defining ADF Security Policies."
You may also find it helpful to understand functionality that can be added using other Oracle ADF features. For more information, see Section 41.1.3, "Additional Functionality for ADF Security."
You will need to complete these tasks:
-
Create bounded task flows, as described in Section 20.2, "Creating a Task Flow."
Best Practice:
If you are creating bounded task flows in separate UI projects of the same application, you will want to assign unique task flow definition names. This is necessary because a grant's task flow definition name is scoped in thejazn-data.xmlpolicy store by path (for example,/WEB-INF/mytaskflow-definition.xml#mytaskflow-definition). Therefore creating bound task flows with unique definition names is the only way to impose project-level scoping of the grants. -
Run the Configure ADF Security wizard, as described in Section 41.3, "Enabling ADF Security."
-
Create application roles, as described in Section 41.4, "Creating Application Roles."
To define a permission grant on an ADF bounded task flow:
-
In the main menu, choose Application and then Secure > Resource Grants.
-
In the Resource Grants page of the overview editor for security policies, select Task Flow from the Resource Type dropdown list.
The overview editor displays all the task flows that your application defines. Task flows are defined by task flow definition files (
.xml) that appear in the Web Content/Page Flows node of the user interface project. -
In the Resources column, select the task flow for which you want to grant access rights.
The first time you make a grant to a bounded task flow, the first column should display the Resources without any grants icon (represented by a "lock") next to the task flow name. The overview editor displays the lock icon to indicate that a resource has no security policy defined and therefore is "locked"—which means it remains inaccessible to users until you define a grant.
Tip:
Click the Resources with grants icon (represented by a "key") in the header for the Resources column to hide all task flows that already have grants. This will display only task flows without grants, as shown in Figure 41-6. Additionally, you can type a partial task flow name in the search field to display only the task flows with character-matching names. -
In the Granted to column, click the Add Grantee icon and select Add Application Role.
-
In the Select Application Roles dialog, select the application role that you want to make a grantee of the permission.
The Select Application Roles dialog displays application roles from the
jazn-data.xmlfile. It also displays the built-in OPSS application roles,anonymous-roleandauthenticated-role, as described in Section 41.5.3, "What Happens at Runtime: How the Built-in Roles Are Used."If you do not see application roles that are specific to your application, create the role, as described in Section 41.4, "Creating Application Roles."
-
In the Select Application Roles dialog, click OK.
-
In the Resource Grants page of the overview editor, in the Actions column, leave the view action selected.
By default, the overview editor shows the view action selected, as shown in Figure 41-7. The view action is the only action currently supported for Fusion web applications. Do not select customize, grant, or personalize actions—they are reserved for future use and will not be checked by ADF Security at runtime.
The
TaskFlowPermissionclass defines task flow—specific actions that it maps to the task flow's operations, as described in Table 41-4. -
You can repeat these steps to make additional grants as desired.
The same task flow definition can have multiple grants made for different application roles. The grants appear in the policy store definition of the
jazn-data.xmlfile, as described in Section 41.5.7, "What Happens When You Define the Security Policy."

41.5.5 How to Define Policies for Web Pages That Reference a Page Definition
You define the access policy for an ADF page definition by creating permission grants in the Resource Grants page of the overview editor for security policies. The grants you create will appear as metadata in the policy store section of the jazn-data.xml file. This metadata defines a permission target (in this case, the page definition name) for which you have issued grants to authorize the members of a specific application role.
Best Practice:
Create permission grants for the individual web page only when the page is not a constituent of a bounded task flow. Page-level security is checked for pages that have an associated page definition binding file only if the page is directly accessed or if it is accessed in an unbounded task flow. For further information about implementing security policies, see Section 41.11.5, "Best Practices for Working with ADF Security."You can sort the web page definition resources in the overview editor by clicking the toggle buttons in the Resources header, as described in Table 41-5.
Table 41-5 Resource Grant Toggle Buttons for Web Page Definitions
| Button | Toggle Action | Description |
|---|---|---|
|
|
Shows/hides top-level pages with no grants |
Represents a page definition with no permission grants defined for a web page that is contained in an unbounded task flow. The web page will not be accessible to any user. |
|
|
Shows/hides top-level pages with grants |
Represents a page definition with one or more permission grants defined for a web page that is contained in an unbounded task flow. The web page will be accessible to users who are members of the application role that received the grant. |
|
|
Shows/hides pages included in a bounded task flow |
Represents a page definition associated with a web page that also is contained in a bounded task flow. Do not grant to these web page definitions. Instead, define a security policy for the bounded task flow. |
|
|
Shows/hides unsecurable pages (with no page definition) |
Represents a web page with no page definition defined that is contained in an unbounded task flow. (Pages like this that are contained by a bounded task flow are secured by the bounded task flow's permission.) The web page will be accessible to all users since it is not secured by an associated ADF security-aware resource. Optionally, you can secure the page by adding an empty page definition file, as described in Section 41.5.9, "What You May Need to Know About Defining Policies for Pages with No ADF Bindings." |
The list of available actions displayed by the overview editor is defined by the region permission class (oracle.adf.share.security.authorization.RegionPermission). The permission class maps these actions to the operations supported by the ADF page definition for the web page. Table 41-6 shows the actions displayed by JDeveloper for ADF page definitions.
Note that the view action is the only action currently supported for Fusion web applications.
Table 41-6 Securable Actions of ADF Page Definitions
| Grantable Action | Effect on the User Interface |
|---|---|
|
|
Controls who can view the page. This is the only operation that the page definition supports. |
To define a grant for the page definition security policy, use the Resource Grants page of the overview editor for security policies.
It may be helpful to have an understanding of ADF security policies. For more information, see Section 41.5, "Defining ADF Security Policies."
You may also find it helpful to understand functionality that can be added using other Oracle ADF features. For more information, see Section 41.1.3, "Additional Functionality for ADF Security."
You will need to complete these tasks:
-
Create the top-level web pages with an ADF page definition file, as described in Section 17.7, "Working with Page Definition Files."
Best Practice:
If you are creating top-level web pages in separate UI projects of the same application, you will want to assign unique page file names. This is necessary because a grant's page definition name is scoped in thejazn-data.xmlpolicy store by package (for example,view.pageDefs.mytoppagePageDef). Therefore creating top-level pages with unique file names is the only way to impose project-level scoping of the grants. -
Run the Configure ADF Security wizard, as described in Section 41.3, "Enabling ADF Security."
-
Create application roles, as described in Section 41.4, "Creating Application Roles."
To define a permission grant on an ADF page definition:
-
In the main menu, choose Application and then Secure > Resource Grants.
-
In the Resource Grants page of the overview editor for security policies, select Web Page from the Resource Type dropdown list.
The Resource Grants page of the overview editor displays all web pages, including those that have an associated ADF page definition. This includes any web page that uses ADF bindings or any web page for which you have created an empty page definition. Page definitions are defined by
PageDef.xmlfiles that appear in the Application Sources node of the user interface project. -
In the Resources column, select the page definition for which you want to grant access rights.
The first time you make a grant to a page definition, the first column should display the Resource without any grants icon (represented by the "lock" icon) next to the page definition name. The editor displays the lock icon to indicate that a resource has no security policy defined and therefore is "locked"—which means it remains inaccessible to users until you define a grant. For example, the page definition
account_updateUserInfoshown in Figure 41-8 displays the lock icon since no grant has been made. Other page definitions in Figure 41-8 show the Page included in bounded task flow icon because they are not top-level pages and thus are securable by the containing bounded task flow.Do not create grants for individual web page definitions that display the Page included in bounded task flow icon. Security policies for the associated web pages are secured by their bounded task flow. For example, in Figure 41-8, the page definition associated with the
account_addressDetails.jsffregion will be secured by the containing bounded task flow.Tip:
You can type a partial page definition name in the search field to display only the page definitions with character-matching names. For example, a search on the wordgeneralwould display only the page definitions that begin with the wordgeneral, as shown in Figure 41-8.Tip:
You can click the Resources with grants icon (represented by the "key" icon) to hide all page definitions that already have grants. Confirm that the Show pages included in a bounded task flow toggle button in the header for the Resources column is toggled off to hide all page definitions that are included in a bounded task flow (by default, it is set to hide these pages). This will display top-level pages that have no grants (and unsecurable pages, if any), as shown in Figure 41-9. -
In the Granted to column, click the Add Grantee icon and select Add Application Role.
-
In the Select Application Roles dialog, select the application role that you want to make a grantee of the permission.
The Select Application Roles dialog displays application roles from the
jazn-data.xmlfile. It also displays the built-in OPSS application roles, anonymous-role and authenticated-role, as described in Section 41.5.3, "What Happens at Runtime: How the Built-in Roles Are Used,"If you do not see application roles that are specific to your application, create the role, as described in Section 41.4, "Creating Application Roles."
-
In the Select Application Roles dialog, click OK.
-
In the Resource Grants page of the overview editor, in the Actions column, leave the view action selected.
By default, the overview editor shows view selected, as shown in Figure 41-10. The view action is the only action currently supported for Fusion web applications.
The
RegionPermissionclass defines page definition—specific actions that it maps to the page's operations, as described in Table 41-6. -
You can repeat these steps to make additional grants as desired.
The same page definition can have multiple grants made for different application roles. The grants appear in the policy store definition of the
jazn-data.xmlfile, as described in Section 41.5.7, "What Happens When You Define the Security Policy."
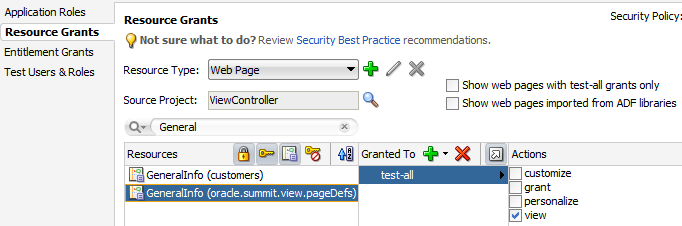
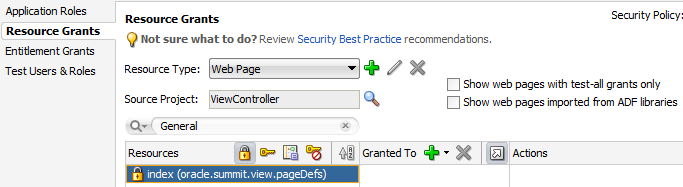
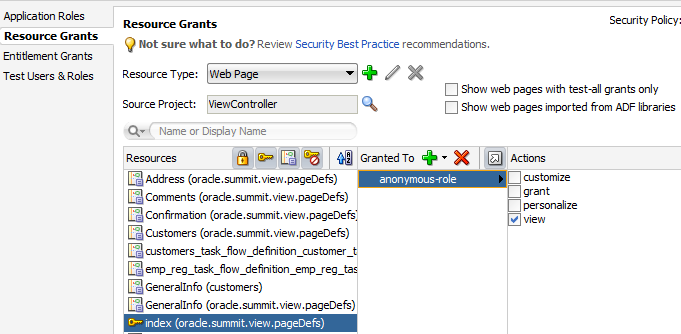
41.5.6 How to Define Policies to Control User Access to ADF Methods
ADF methods that your application defines may be dropped into the user interface as command components. By default, users who have access to the page that displays the command component for the method will also have rights to execute the method. When you want to create additional security to restrict access to the method operation, you must create a resource grant and test the permission at the level of the user interface. ADF Security does not perform authorization checking for ADF methods; you must enable authorization checking in your application. Based on a resource permission you have granted to the user for the ADF method, the user interface will either enable or disable the command component.
To control user access to a method that your page displays as a command component, you complete these steps:
-
Create a resource grant for a custom resource type and resource.
-
Enforce the permission grant in the user interface.
41.5.6.1 Creating a Resource Grant to Control Access to ADF Methods
The resource type that you create will be set to the matcher class oracle.security.jps.ResourcePermission, which will allow you to grant permission to parts of the application that are not protected by ADF Security. For example, your page may display a button that lets users cancel a product shipment to customers. However, only members of a specific application role may be allowed to cancel a shipment. To enforce this rule, you can create a resource permission that may be checked declaratively in the user interface at runtime to enable or disable the button.
To create a resource permission for user interface components that you want to protect, use the overview editor for security policies.
It may be helpful to have an understanding of how ADF Security handles ADF methods. For more information, see Section 41.5.6, "How to Define Policies to Control User Access to ADF Methods."
You may also find it helpful to understand functionality that can be added using other Oracle ADF features. For more information, see Section 41.1.3, "Additional Functionality for ADF Security."
You will need to complete these tasks:
-
Create the command component that executes the method that you want secure, as described in Section 30.2, "Creating Command Components to Execute Methods."
-
Run the Configure ADF Security wizard, as described in Section 41.3, "Enabling ADF Security."
-
Create application roles, as described in Section 41.4, "Creating Application Roles."
To grant a resource permission on a custom resource type:
-
In the main menu, choose Application and then Secure > Resource Grants.
-
In the Resource Grants page of the overview editor for security policies, next to the Resource Type dropdown list, click the New Resource Type button.
-
In the Create Resource Type dialog, enter the name of the resource type, a display name to display when granting resource permissions in JDeveloper, and a description.
Enter a resource type and display name that is appropriate for the user interface resource that needs to be protected. For example, if you want to protect a method button that cancels a product shipment, you might enter the resource type
CancelShipmentand display nameCancel Shipment. -
Next to the Actions list, click the Add Action button and enter the name of the action that you want to protect. Click OK.
The action name can be any name that you want to associate with the custom resource type. For example, if you want to protect a button that invokes a method, you might enter the action name
invoke. You can add multiple actions to the list when you need to support granting instances of the resource permission to separate application roles. -
In the Resource Grants page of the overview editor for security policies, in the Resources column, click the Add Resource icon.
The first time you make a grant to a custom resource type, no resource will be defined. You must create a custom resource for the policy that will be used to check user permissions in the user interface at runtime.
-
In the Create Resource dialog, enter the name of the resource and a display name to display when granting resource permissions in JDeveloper, and then click OK.
Enter a resource name and a display name that describes the user interface resource that you want to protect. For example, if you want to protect a method button that cancels a product shipment, you might enter the resource name
CancelShipmentButtonand display nameCancel Shipment Button. -
In the Granted to Roles column, click the Add Grantee icon and select Add Application Role.
-
In the Select Application Roles dialog, select the application role that you want to make a grantee of the permission.
The Select Application Roles dialog displays application roles from the
jazn-data.xmlfile. It also displays the built-in OPSS application roles, anonymous-role and authenticated-role, as described in Section 41.5.3, "What Happens at Runtime: How the Built-in Roles Are Used,"If you do not see application roles that are specific to your application, create the role, as described in Section 41.4, "Creating Application Roles."
-
In the Select Application Roles dialog, click OK.
-
In the Resource Grants page of the overview editor, in the Actions column, select the desired action.
By default, the overview editor shows all actions of the custom resource type unselected. The available actions are defined by the resource type.
-
You can repeat these steps to make additional grants as desired.
The same ADF method resource can have multiple grants made for different application roles. The grants appear in the policy store definition of the
jazn-data.xmlfile, as described in Section 41.5.7, "What Happens When You Define the Security Policy."
41.5.6.2 Enforcing the Resource Grant in the User Interface
You use the Expression Builder dialog that you display for the UI component display property to define an EL expression that checks the user's access rights to a previously defined custom resource type. When you run the application, the component will appear either enabled or disabled based on the outcome of the EL expression resource permission evaluation.
For example, you can define the userGrantedPermission expression on the disabled attribute of the af:button#cb1 button, as shown in Example 41-7. In this case, the expression tests whether the user has permission and then either enables the button or, when the user does not have permission, disables the button. Because the expression is not defined on the button's rendered attribute, the page always displays the button.
Example 41-7 Resource Grant Check Expression
<af:button actionListener="#{bindings.myMethodName.execute}"
     text="myMethodName"
     disabled="#{!securityContext.userGrantedPermission
       ['resourceName=CancelShipmentButton,resourceType=CancelShipment,
             action=invoke']}
     id="cb1"/>
It may be helpful to have an understanding of the limitations of ADF method authorization checking. For more information, see Section 41.5.6, "How to Define Policies to Control User Access to ADF Methods."
You may also find it helpful to understand functionality that can be added using other Oracle ADF features. For more information, see Section 41.1.3, "Additional Functionality for ADF Security."
You will need to complete this task:
- Create the resource grant for a custom resource type, as described in Section 41.5.6.1, "Creating a Resource Grant to Control Access to ADF Methods."
To check the resource permission using an expression:
-
In the Applications window, double-click the page that contains the command component bound to the ADF method.
-
In the visual editor for the page, select the command component that is used to execute the ADF method.
-
In the Property window, click the Property Menu dropdown menu next to the Disabled field and choose Expression Builder.
-
In the Expression Builder, expand the ADF Bindings - securityContext node and select userGrantedPermission, and then, in the Expression field, enter a concatenated string that defines the permission.
Enter the permission string as a semicolon-separated concatenation of
resourceName=aResourceName;resourceType=aResourceType;action=actionName. For example, to enable or disable a command button used to invoked the method in a page, you would enter an expression similar to the one shown in Example 41-7.In Example 41-7, the expression determines whether a resource policy grants invoke privileges for the resource type named
CancelShipmentto the user's defined application role. The resource policy must exist in the application policy store to test the expression at runtime. -
Click OK.
41.5.7 What Happens When You Define the Security Policy
When you define a security policy, the overview editor for security policies updates the jazn-data.xml file located in the /src/META-INF node relative to the web application workspace.
The overview editor writes the policy information to the <policy-store> section of the file. The security policy, or grant, contains both a grantee and one or more permissions. The grantee is the application role that the policy is being defined for. Each permission defines the resource being secured and the action that can be performed against that resource.
Example 41-8 shows a security policy in the jazn-data.xml file that grants unauthenticated users access to an employee registration task flow and a top-level web page used to access the task flow. The grant to the anonymous-role application role contains a view permission for a bounded task flow, emp-reg-task-flow, and a view permission on the web page with the indexPageDef page definition. With this grant, unauthenticated users will be able to enter the employee registration task flow and view the welcome page.
For the web page, notice that permission has been defined on the indexPageDef page definition created for the welcome page (index.jsf). Also, note that this is a top-level web page that is not already secured by a bounded task flow.
Example 41-8 Grants in the Application-Level Policy Store
<policy-store>
    ...
    <jazn-policy>
        <grant>
            <grantee>
                <principals>
                    <principal>
                         <name>anonymous-role</name>
                         <class>oracle.security.jps.internal.core.principals.
                                       JpsAnonymousRoleImpl</class>
                     </principal>
                 </principals>
             </grantee>
             <permissions>
                  <permission>
                      <class>oracle.adf.controller.security.TaskFlowPermission</class>
                      <name>/WEB-INF/flows/emp-reg-task-flow-definition.xml#
                                                  #emp-reg-task-flow-definition</name>
                      <actions>view</actions>
                  </permission>
                   <permission>
                        <class>oracle.adf.share.security.authorization.RegionPermission</class>
                        <name>oracle.summit.view.pageDefs.indexPageDef</name>
                        <actions>view</actions>
                  </permission>
                  ...
             </permissions>
        </grant>
        ...
    </jazn-policy>
</policy-store>
41.5.8 What Happens at Runtime: How ADF Security Policies Are Enforced
Grants that you make for ADF resources are standard JAAS Permissions. When you enable ADF Security in your application, Oracle Platform Security Service (OPSS) running in Oracle WebLogic Server will utilize the grants to allow authorization. In authorization mode, ADF Security uses fine-grained authorization, implemented with JAAS Permissions to perform security checks for access rights to pages. The ADF Security enforcement logic checks to see whether the user, represented by the JAAS subject, has the right permissions to access the resource.
The subject contains the user's principals, which include a user principal that contains their name (could be anonymous, before logging on, or some user name after logging on), and their list of role principals, which would include authenticated-role and some number of other roles that are obtained from the policy and identity stores. The principal is created to represent all of the user's memberships in application roles defined in the policy store. In turn, each application role may have multiple Permissions associated with them. These are the ADF security policies that are created through the overview editor for the jazn-data.xml file.
Note:
ADF security policies are scoped by application. This scoping allows two applications to refer to the same permission target, without producing unintentional results. You are not required to name application resources to impose application scoping of the policy store information.Before you run the application using Integrated WebLogic Server, you will need to provision the identity store with test users and add these users to the application roles that you want to configure. The application roles can define members that are specific users or groups of users (also known as enterprise roles), as described in Section 41.6, "Creating Test Users."
Then at runtime, whether the current user has view permission on the page they are trying to access will be determined by the context of the page:
-
If the page is an activity of a bounded task flow, the task flow controller determines the permission.
-
If the page is a top-level page with an associated page definition file, the ADF Model layer determines the permission.
Oracle Platform Security Services then checks to see whether the subject contains the roles that have the corresponding permissions needed to access the page. If the user is authorized, then the task flow is entered.
In the case of a bounded task flow and top-level pages (defined by an unbounded task flow), if the user is not authorized, ADF Controller throws an exception and passes control to an exception handler that the task flow configuration specifies. For details about specifying an error page, see Section 41.7.5, "How to Redirect a User After Authentication."
41.5.9 What You May Need to Know About Defining Policies for Pages with No ADF Bindings
The default Configure ADF Security wizard option ADF Authentication and Authorization enables authorization checking and secures a web page whenever the page is associated with an ADF security-aware resource. Therefore, after you run the wizard, a web page will not be secured if both of these conditions exist:
-
The page does not display databound ADF Faces components and therefore no ADF page definition exists for the page.
-
The page is not a constituent page of a bounded ADF task flow. (Any page that the user accesses as a process of a bounded task flow is checked under the permission of the task flow.)
JDeveloper will generate an ADF page definition file for you whenever you design a web page using the Data Controls panel to create databound ADF Faces components. However, if your web page does not use ADF bindings, you can still create an empty page definition file by right-clicking the web page in the user interface project and choosing Go to Page Definition. The page definition file can remain empty because the page does not need to work with ADF bindings to support databound ADF Faces components.
Once you associate a web page with an ADF page definition file, empty or not, authorization checking will be enforced when the user accesses the associated web page. You can define security policies for the page as you would any other ADF page definition. For details about making grants to an empty ADF page definition, see Section 41.5.5, "How to Define Policies for Web Pages That Reference a Page Definition."
It may be helpful to have an understanding of security for individual page definition files. For more information, see Section 41.5.5, "How to Define Policies for Web Pages That Reference a Page Definition."
You may also find it helpful to understand how JDeveloper normally generates page definition files. For more information, see Section 17.7, "Working with Page Definition Files."
You may also find it helpful to understand functionality that can be added using other Oracle ADF features. For more information, see Section 41.1.3, "Additional Functionality for ADF Security."
To create an empty page definition that you can define security policies for:
-
In the Applications window, locate the web page you want to secure, right-click the node and choose Go to Page Definition.
-
In the confirmation dialog, click Yes to create a new page definition for the page.
The page definition will be added to the
pageDefspackage.
41.5.10 How to Use Regular Expressions to Define Policies on Groups of Resources
When you want to define a grant that applies to multiple resources at once, you can create patterns as defined by the java.util.regex.Pattern class to form a regular expression that gets evaluated at runtime. For example, to match a grant to a set of resources, you can enter the expression .* (specifies any character zero or more times) on the name of the permission. ADF Security does not support the use of regular expressions on other security objects, such as the principal name.
You might use this feature to group bounded task flows that would have the same permissions into their own subfolders of WEB-INF and define the grant for the entire folder, as shown in Example 41-9. In this case, the expression uses the dot character (defined as, any character) followed by the asterisk quantifier (defined as, zero or more times).
Example 41-9 Task Flow Permission for an Entire Folder Defined in the Application-Level Policy Store
...
<grant>
   <grantee>
      <principals>
         <principal>
            <class>oracle.security.jps.service.policystore.ApplicationRole</class>
            <name>anonymous-role</name>
         </principal>
      </principals>
   </grantee>
   <permissions>
       <permission>
          <class>oracle.adf.controller.security.TaskFlowPermission</class>
          <name>/WEB-INF/.*</name>
          <actions>view</actions>
       </permission>
   </permissions>
</grant>
As the overview editor for the jazn-data.xml file does not support the use of regular expressions in the user interface, you must edit the file directly. Do not edit the policy store of the system-jazn-data.xml file directly. Instead, add grants using regular expressions to the jazn-data.xml file. These grants will then be merged to the policy store when you run or deploy the application.
The use of more complex regular expressions enables you to define business rules in the policy, thus creating a very targeted set of permissions. For example, you can grant the view permission on all page definitions and deny specific page definitions at the same time by defining an exclusion set in your regular expression. Example 41-10 shows how the view permission is granted to anonymous-role for all pages except those for which the page definition name starts with custom.
Example 41-10 Using Regular Expressions and Metacharacters to Define a Policy Grant
<grant>
   <grantee>
      <principals>
         <principal>
            <class>oracle.security.jps.service.policystore.ApplicationRole</class>
            <name>anonymous-role</name>
         </principal>
      </principals>
   </grantee>
   <permissions>
      <permission>
         <class>oracle.adf.share.security.authorization.RegionPermission</class>
         <name>[^(custom)].*</name>
         <actions>view</actions>
      </permission>
   </permissions>
</grant>
Table 41-7 shows some of the basic regular expression metacharacters that you can use in your policy definitions.
Table 41-7 Description of Metacharacters
| Metacharacter | Description |
|---|---|
|
[abc] |
a, b, or c (included in list) |
|
[^abc] |
Any character except a, b, or c (negation) |
|
[a-zA-Z] |
a to z or A to Z, inclusive (range) |
|
[a-d[m-p]] |
a to d, or m to p ~= [a-dm-p](union) |
|
[a-z&&[def]] |
d, e, or f (intersection) |
|
[a-z&&[^bc]] |
a through z, without b and c: [ad-z] (subtraction) |
|
[a-z&&[^m-p]] |
a through z, and not m through p |
|
.* |
Any number of arbitrary characters (note this expression uses a dot and an asterisk together) |
41.5.11 How to Define Policies for Data
ADF entity objects in the data model project are security-aware, meaning that predefined resource-specific permissions exist that a developer can grant. Additionally, you can secure just the individual attributes of entity objects.
Entity objects that you secure restrict users from updating data displayed by any web page that renders a UI component bound by an ADF binding to the data accessed by the secured entity object. Additionally, when you secure an entity object, you effectively secure any view object in the data model project that relies on that entity object. As such, entity objects that you secure define an even broader access policy that applies to all UI components bound to this set of view objects.
To secure row data using ADF entity objects:
-
Define a permission map for the specific actions of the entity object or the attributes of the entity object that you want to secure.
-
Grant the permission to an application role that you have added to the policy store.
41.5.11.1 Defining Permission Maps on ADF Entity Objects
In the data model project, you use the overview editor for the entity object to define a permission map for the specific actions allowed by the entity object. The metadata consists of a permission class, a permission name, and a set of actions mapped to binding operations.
The list of available operations displayed by the overview editor is defined by the entity object permission class (oracle.adf.share.security.authorization.EntityPermission). The permission class maps the operations supported by the entity object to actions. Table 41-8 shows the securable operations of the entity object.
Table 41-8 Securable Operations of ADF Entity Objects
| Securable Operation | Expected Mapped Action | Corresponding Implementation |
|---|---|---|
|
|
|
View the rows of a result set that has been restricted by a |
|
|
|
Update any attribute of the bound collection. |
|
|
|
Delete a row from the bound collection. |
Note:
Unlikeread and update operations, the securable operation that maps to the delete action is defined with the unique identifier, removeCurrentRow. Because authorization checks in Fusion web applications rely on the operation name and not the action name, you must test the removeCurrentRow operation name rather than the delete privilege name. For details about the entity row API and EL expressions that allow you to test entity permissions, see Section 41.11.3, "How to Perform Authorization Checks for Entity Object Operations."To secure all row-level data that the entity object accesses, use the overview editor for the entity object.
It may be helpful to have an understanding of ADF security for entity objects. For more information, see Section 41.5.11, "How to Define Policies for Data."
You may also find it helpful to understand functionality that can be added using other Oracle ADF features. For more information, see Section 41.1.3, "Additional Functionality for ADF Security."
You will need to complete this task:
- Create entity objects in the data model project, as described in Chapter 4, "Creating a Business Domain Layer Using Entity Objects."
To secure an operation on an entity object:
-
In the Applications window, double-click the entity object that you want to secure.
-
In the overview editor, click the General navigation tab.
-
In the General page, expand the Security section and select the operations you want to secure for the entity object.
The Security section displays the securable operations that the
EntityPermissionclass defines. The class maps the entity object—specific actions to the entity object's operations, as described in Table 41-8.For example, to enable read permission, select it as shown in Figure 41-11. The permissions appear in the XML definition of the entity object.
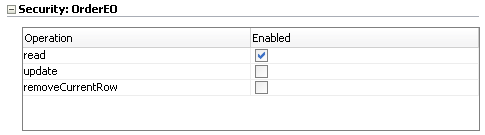
41.5.11.2 Defining Permission Maps on ADF Entity Object Attributes
In the data model project, you use the overview editor for the entity object to define a permission map for the specific actions allowed by the entity object attribute. The metadata consists of a permission class, a permission name, and a set of actions mapped to binding operations.
The list of available operations displayed by the overview editor is defined by the entity object permission class (oracle.adf.share.security.authorization.EntityPermission). The permission class maps the operations supported by entity object attributes to actions. Table 41-9 shows the securable operations of entity object attributes.
Table 41-9 Securable Operations of ADF Entity Object Attributes
| Securable Operation | Expected Mapped Action | Corresponding Implementation |
|---|---|---|
|
|
|
Update a specific attribute of the bound collection. |
To secure individual columns of data that the entity object accesses, use the Attributes page of the overview editor for the entity object.
It may be helpful to have an understanding of ADF security for entity objects. For more information, see Section 41.5.11, "How to Define Policies for Data."
You may also find it helpful to understand functionality that can be added using other Oracle ADF features. For more information, see Section 41.1.3, "Additional Functionality for ADF Security."
You will need to complete this task:
- Create entity objects in the data model project, as described in Chapter 4, "Creating a Business Domain Layer Using Entity Objects."
To secure an operation on an entity object attribute:
-
In the Applications window, double-click the entity object that defines the attribute you want to secure.
-
In the overview editor, click the Attributes navigation tab.
-
In the Attributes page, select the attribute to secure, and then click the Security tab and select the update operation.
The Security tab displays the securable operations that the
EntityAttributePermissionclass defines. The class maps the entity object-specific actions to the entity object's operations, as described in Table 41-9.For example, to enable update permission, select it as shown in Figure 41-12. The permission map appears in the XML definition of the entity object.

41.5.11.3 Granting Permissions on ADF Entity Objects and Entity Attributes
Once a permission target is configured, any data that derives from entity objects or their attributes remains unsecured until you explicitly define policy grants for the entity object's permission target.
To define the access policy for an existing entity object or entity attribute permission target, use the overview editor for security policies.
It may be helpful to have an understanding of ADF security for entity objects. For more information, see Section 41.5.11, "How to Define Policies for Data."
You may also find it helpful to understand functionality that can be added using other Oracle ADF features. For more information, see Section 41.1.3, "Additional Functionality for ADF Security."
You will need to complete these tasks:
-
Run the Configure ADF Security wizard, as described in Section 41.3, "Enabling ADF Security."
-
Create application roles, as described in Section 41.4, "Creating Application Roles."
-
Define the permission target for the entity object or the attributes of the entity object, as described in Section 41.5.11.1, "Defining Permission Maps on ADF Entity Objects."
To define the access policy for an entity object or entity attribute:
-
In the main menu, choose Application and then Secure > Resource Grants.
-
In the Resource Grants page of the overview editor for security policies, select ADF Entity Object or select ADF Entity Object Attribute from the Resource Type dropdown list.
The Resource Grants page of the overview editor displays all entity objects (or entity attributes) for which you previously defined permission targets.
-
In the Resources column, select the ADF entity object or entity attribute for which you want to grant access rights.
The first time you make a grant to an ADF entity object or entity attribute, the first column displays the Resource without any grants icon (represented by the "lock" icon) next to the method name, as shown in Figure 41-13. The editor displays the lock icons to indicate that a resource has no security policy defined and therefore is "locked"—which means it remains inaccessible to users until you define a grant.
-
In the Granted to Roles column, click the Add Grantee icon and select Add Application Role.
-
In the Select Application Roles dialog, select the application role that you want to make a grantee of the permission.
The Select Application Roles dialog displays application roles from the
jazn-data.xmlfile. It also displays the built-in OPSS application roles, anonymous-role and authenticated-role, as described in Section 41.5.3, "What Happens at Runtime: How the Built-in Roles Are Used,"If you do not see application roles that are specific to your application, create the role, as described in Section 41.4, "Creating Application Roles."
-
In the Select Application Roles dialog, click OK.
-
In the Resource Grants page of the overview editor, in the Actions column, select the action that you want to grant to a specific application role.
For entity objects, the overview editor shows read action selected by default. You may select the update action and delete action if you have configured their corresponding permission targets, as described in Table 41-8.
For entity object attributes, the overview editor shows the update action selected by default, corresponding to the permission target described in Table 41-9. No other actions are supported for entity object attributes.
Figure 41-14 shows the delete, read, and update privileges granted to the Application Employee Role application role for an entity object.
-
You can repeat these steps to make additional grants as desired.
The same ADF entity object or entity attribute can have multiple grants made for different application roles. The grants appear in the policy store definition of the
jazn-data.xmlfile, as described in Section 41.5.7, "What Happens When You Define the Security Policy."
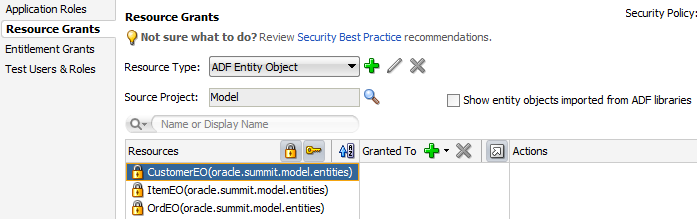
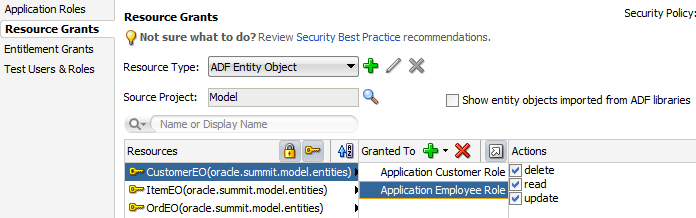
41.5.12 How to Aggregate Resource Grants as Entitlement Grants
You define end user access for individual securable Oracle ADF artifacts by creating resource grants. However, for ease of administration and maintenance, resource grants can also be defined as entitlement grants, in which case multiple securable application artifacts are aggregated into a named security group that can be granted to application roles using a single statement. For example, when you want to authorize access to the data exposed in the application by an ADF Business Components entity object, multiple entity objects may require the same security policy. Instead of individually granting access privileges to each entity object, you can group the privileges as a set in an entitlement and grant them all at once.
You create entitlement grants in the Entitlements Grants page of the overview editor for security policies. The grants you create will appear as metadata in the policy store section of the jazn-data.xml file. This metadata defines an entitlement (identified in the XML definition as <permission-set>) comprised of resource instance /action pairs that you select. This entitlement is a grantable entity that you then grant to an application role.
The list of resource types appears in the overview editor for security policies. The resource type you select filters the resource instances defined within the projects of your application's workspace. The resource type selection also determines the list of available actions displayed by the overview editor. For example, when you select the Task Flow Permission resource type, the overview editor will display all of the task flows in the user interface projects that you select and also displays the view action that you can associate with the available ADF bounded task flow resources.
Table 41-10 lists the resource types displayed in JDeveloper and identifies the associated resource and supported actions for each type.
Table 41-10 Resource Types of Securable Oracle ADF Artifacts
| Resource Type | Supports These Resources and Actions |
|---|---|
|
|
Defines view actions on ADF bounded task flows in a user interface project that you select. |
|
|
Defines view actions on regions and web pages backed by ADF page definition files in a user interface project that you select. |
|
|
Defines read, update, and delete actions on entity objects in a data model project that you select. |
|
|
Defines update actions on entity object attributes of a specific entity object in a data model project that you select. |
To define an entitlement grant for a securable Oracle ADF artifact, use the Entitlement Grants page of the overview editor for security policies.
It may be helpful to have an understanding of ADF security for entity objects. For more information, see Section 41.5.12, "How to Aggregate Resource Grants as Entitlement Grants."
You may also find it helpful to understand functionality that can be added using other Oracle ADF features. For more information, see Section 41.1.3, "Additional Functionality for ADF Security."
You will need to complete this task:
-
Create application roles, as described in Section 41.4, "Creating Application Roles."
To define an entitlement grant for an Oracle ADF artifact:
-
In the main menu, choose Application and then Secure > Entitlement Grants.
-
In the Entitlement Grants page of overview editor for security policies, click the Add Entitlements icon in the Entitlements section.
The overview editor displays all the resources that your application defines.
-
In the Entitlement Grants page, click the Resources tab and then click the Add Member Resource icon to add a member resource to the entitlement.
-
In the Select Resources dialog, select the resource from the Resource Type dropdown and then select the desired project in the Source Projects section.
The dialog displays all the projects in your application workspace.
-
In the Available Resources section, select the resource and click the Add icon.
The dialog displays all the resources define by your selected project.
-
In the Actions lists, select the desired action for the selected resource.
Figure 41-15 shows the overview editor with the View action selected for the task flow and added to MyEntitlement.
-
Add other desired resources to the list.
-
In the Entitlement Grants page, click the Grants tab and then click the Add Role Grants icon to grant the entitlement to an application role.
-
In the Select Application Roles dialog, select one or more custom application roles.
The dialog displays all the application roles from the
jazn-data.xmlfile. You must not add a grant to a predefined application role (also called duty roles in the terminology of Oracle Fusion Applications). Only select custom application roles that either you created in JDeveloper or that were created by an IT security manager for this purpose. -
Click OK.
-
You can repeat these steps to add other resources and make grants on those resources to the same entitlement for the same custom application role.
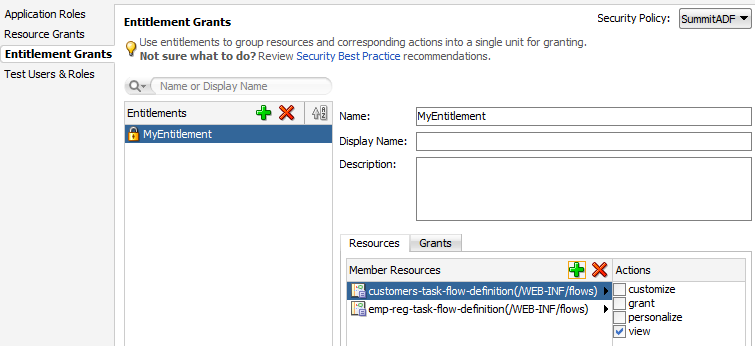
41.5.13 What Happens After You Create an Entitlement Grant
When you use the security policy editor in JDeveloper to create an entitlement grant, JDeveloper modifies the source for the application policy store in the jazn-data.xml file. The policy store section of the file contains a <resource-type> definition (that identifies the actions supported for resources of the selected type), a <resource> definition (to identify the resource instance that you selected from your application and mapped to a resource type), a <permission-set> definition (to define the resources and actions to be granted as an entitlement), and a <grant> definition with one or more entitlements (defined in the XML as a permission set) granted to the desired application roles (the grantee).
As Example 41-11 shows, entitlement-based security policies in the Oracle Fusion application are defined in the <jazn-policies> element and consist of one or more entitlements granted to a single application role.
Example 41-11 Entitlement-Based Policy Definition in the jazn-data.xml File
<?xml version="1.0" ?>
<jazn-data>
  <policy-store>
    <applications>
      <application>
        <name>MyApp</name>

      <app-roles>
        <app-role>
          <name>AppRole</name>
          <display-name>AppRole display name</display-name>
          <description>AppRole description</description>
          <guid>F5494E409CFB11DEBFEBC11296284F58</guid>
          <class>oracle.security.jps.service.policystore.ApplicationRole</class>
        </app-role>
      </app-roles>

      <role-categories>
        <role-category>
          <name>MyAppRoleCategory</name>
          <display-name>MyAppRoleCategory display name</display-name>
          <description>MyAppRoleCategory description</description>
        </role-category>
      </role-categories>

      <!-- resource-specific OPSS permission class definition -->
      <resource-types>
        <resource-type>
          <name>APredefinedResourceType</name>
          <display-name>APredefinedResourceType display name</display-name>
          <description>APredefinedResourceType description</description>
          <provider-name>APredefinedResourceType provider</provider-name>
          <matcher-class>oracle.security.jps.ResourcePermission</matcher-class>
          <actions-delimiter>,</actions-delimiter>
          <actions>write,read</actions>
        </resource-type>
      </resource-types>

      <resources>
        <resource>
          <name>MyResource</name>
          <display-name>MyResource display name</display-name>
          <description>MyResource description</description>
          <type-name-ref>APredefinedResourceType</type-name-ref>
        </resource>
      </resources>

      <!-- entitlement definition -->
      <permission-sets>
        <permission-set>
          <name>MyEntitlement</name>
          <display-name>MyEntitlement display name</display-name>
          <description>MyEntitlement description</description>
          <member-resources>
            <member-resource>
              <type-name-ref>APredefinedResourceType</type-name-ref>
              <resource-name>MyResource</resource-name>
              <actions>write</actions>
            </member-resource>
          </member-resources>
        </permission-set>
      </permission-sets>

      <!-- Oracle function security policies -->
      <jazn-policy>
        <!-- function security policy is a grantee and permission set -->
        <grant>
          <!-- application role is the recipient of the privileges -->
          <grantee>
            <principals>
              <principal>
                <class>
                   oracle.security.jps.service.policystore.ApplicationRole
                </class>
                <name>AppRole</name>
                <guid>F5494E409CFB11DEBFEBC11296284F58</guid>
              </principal>
            </principals>
          </grantee>

          <!-- entitlement granted to an application role -->
          <permission-set-refs>
            <permission-set-ref>
              <name>MyEntitlement</name>
            </permission-set-ref>
          </permission-set-refs>
        </grant>
      </jazn-policy>
    </application>
  </applications>
 </policy-store>
</jazn-data>
41.6 Creating Test Users
JDeveloper provides editors to help you create both the identity and the policy stores. You create both repositories in an application-specific jazn-data.xml file. The editor for the identity store section of the file lets you enter the list of valid user IDs and their assigned passwords. The same editor lets you create application roles and assign the test users or enterprise roles as members of the application roles. Once defined, this information appears in the policy store section of the jazn-data.xml file.
41.6.1 How to Create Test Users in JDeveloper
You seed the identity store of your application with a temporary set of users to simulate the actual users' experience in your production environment. When you run the application in Integrated WebLogic Server, you can log in as any test user and be conferred access rights to view the secure ADF resources of your application.
You can use the identity store to organize users into enterprise roles. Because you typically will configure JDeveloper's deployment options to prevent migrating the identity store to a staging environment, enterprise roles that you create in the jazn-data.xml file are for convenience only. For more details about the use of enterprise roles, see Section 41.4.3, "What You May Need to Know About Enterprise Roles and Application Roles."
Caution:
If you choose to deploy the identity store to your standalone server, you must not create users and enterprise roles in your local identity store that are already configured for Oracle WebLogic Server. For example, if you were to deploy the identity store with the userweblogic and enterprise role Administrators, you would overwrite the default administration configuration on the target server. For a complete list of global roles that Oracle WebLogic Server installs by default, see the "Users, Groups, and Security Roles" chapter in Securing Resources Using Roles and Policies for Oracle WebLogic Server.To enable the user to view resources, you make grants against application roles rather than against the users who are the members of those roles. Therefore, after you seed the identity store with test users, you must associate each user or enterprise role group with an application role. This association confers the access rights defined by ADF security policies to users. For details about conferring access rights to users, see Section 41.6.3, "How to Associate Test Users with Application Roles."
It may be helpful to have an understanding of the identity store. For more information, see Section 41.6, "Creating Test Users."
You may also find it helpful to understand functionality that can be added using other Oracle ADF features. For more information, see Section 41.1.3, "Additional Functionality for ADF Security."
To create test users and groups:
-
In the main menu, choose Application and then Secure > Users.
-
In the Users page of the overview editor for security policies, select the realm for your application from the Realm dropdown list and perform the following steps.
JDeveloper uses the realm
jazn.comby default.-
In the Users list, click the New User icon.
-
In the Name field, enter the user name.
You should avoid choosing a user name already configured for Oracle WebLogic Server (for example, do not enter
webcenter). For the list of user names installed by Oracle WebLogic Server, see the "Users, Groups, and Security Roles" chapter in Securing Resources Using Roles and Policies for Oracle WebLogic Server. -
In the Password field, enter the password for the user and click any other field to add the password to the identity store.
The password must contain at least eight characters and at least one of the characters must be a special character (such as !, %, ^, &, $ and so on).
-
-
Optionally, in the overview editor for security policies, click the Enterprise Roles navigation tab, select the realm for your application from the Realm dropdown list, and perform the following steps.
You create enterprise roles only when you want to organize users into groups that you will add to an application role. For the purpose of creating test users to run the application using Integrated WebLogic Server, you do not need to create enterprise role groups.
-
In the Enterprise Roles list, click the New Role icon.
-
In the Name field, enter the name of the enterprise role and click any other field to add the role to the identity store.
If you create enterprise role groups, you should avoid choosing a role name that is already configured for Oracle WebLogic Server (for example, do not enter
Administrators). For a complete list of the default group names installed by Oracle WebLogic Server, see the "Users, Groups, and Security Roles" chapter in Securing Resources Using Roles and Policies for Oracle WebLogic Server.
-
41.6.2 What Happens When You Create Test Users
When you provision the identity store with user identities and enterprise role groups, JDeveloper updates the jazn-data.xml file located in the /src/META-INF node relative to the web application workspace.
The dialog writes the user information to the <jazn-realm> section of the file corresponding to the identity store. Each user identity has a user name and a user login password. Each enterprise role contains one or more member users.
Example 41-12 shows the identity store in the jazn-data.xml file with two users and two enterprise roles. The user cmagee is a member of the Enterprise Employee Group enterprise role, while user 214 is a member of the Enterprise Customer Group enterprise role.
Example 41-12 Users and Enterprise Roles in the Application-Level Identity Store
<jazn-data>
   <jazn-realm default="jazn.com">
      <realm>
         <name>jazn.com</name>
         <users>
            <user>
               <name>cmagee</name>
               <display-name>Colin Magee</display-name>
               <description>Sales Rep</description>
               <credentials>{903}5AUHlE+qvDxxAhxIMoXJ/WLhMF0ynue7</credentials>
            </user>
            <user>
               <name>214</name>
               <display-name>Ojibway Retail</display-name>
               <description>Customer</description>
               <credentials>{903}rijN2KQCBSeBQ/JNZlv8GwwUiGWk5IQa</credentials>
            </user>
            ...
         </users>
         <roles>
            <role>
               <name>Enterprise Employee Group</name>
               <members>
                  <member>
                     <type>user</type>
                     <name>cmagee</name>
                  </member>
               </members>
            </role>
            <role>
               <name>Enterprise Customer Group</name>
               <members>
                  <member>
                     <type>user</type>
                     <name>214</name>
                  </member>
                  ...
               </members>
            </role>
            ...
         </roles>
      </realm>
      ...
   </jazn-realm>
</jazn-data>
41.6.3 How to Associate Test Users with Application Roles
Because the ADF Security framework enforces a role-based access control mechanism with permissions granted to application roles, you define a set of roles in the policy store that are specific to your application. For example, in the context of the work flow, there may be roles such as customer, product specialist, supervisor, and administrator.
After you create an application role, you can proceed to associate users that you created in the identity store with one or more roles. At runtime, users who are members of an application role will be conferred the access rights of their application roles. You can assign a user to more than one application role when you want to confer the right of multiple resource grants to a particular user.
For example, one authenticated user might belong to the supervisor role and an employee role, while another user might belong only to the employee role. The security policy for a bounded task flow that permits customer records to be browsed and edited may confer view permission to the supervisor role and limit view permission to the browse page for the employee role. Thus, grants to application roles support multiple levels of access. If the authenticated user is not a member of an application role with a view permission grant for the target ADF resource, the security framework will return an unauthorized user message.
It may be helpful to have an understanding of the identity store. For more information, see Section 41.6, "Creating Test Users."
You may also find it helpful to understand functionality that can be added using other Oracle ADF features. For more information, see Section 41.1.3, "Additional Functionality for ADF Security."
You will need to complete these tasks:
-
Run the Configure ADF Security wizard, as described in Section 41.3, "Enabling ADF Security."
-
Create application roles, as described in Section 41.4, "Creating Application Roles."
-
Define security policies for ADF security-aware resources, as described in Section 41.5, "Defining ADF Security Policies."
-
Create test users, and, optionally, create enterprise role groups, as described in Section 41.6.1, "How to Create Test Users in JDeveloper."
To associate users with application roles:
-
In the main menu, choose Application and then Secure > Application Roles.
-
In the Application Roles page of the overview editor for security policies, select the policy store for your application from the Security Policy dropdown list.
The policy store that JDeveloper creates in the
jazn-data.xmlfile are automatically based on the name of your application. -
In the Roles list, select an existing application role and complete these tasks as appropriate:
-
In the Mappings section, click the Add User or Role icon dropdown menu and choose Add User, then in the Select Users dialog select the previously created user from the list and click OK.
-
Optionally, if you have defined enterprise roles in the identity store, in the Mappings section, click the Add User or Role icon dropdown menu and choose Add Enterprise Role, then in the Select Enterprise Roles dialog select the previously created enterprise role from the list and click OK.
-
41.6.4 What Happens When You Configure Application Roles
When you associate users with application roles, JDeveloper updates the jazn-data.xml file located in the /src/META-INF node relative to the web application workspace.
The dialog writes the user information to the <policy-store> section of the file. Each application role contains one or more member users or enterprise roles.
Example 41-13 shows the policy store in the jazn-data.xml file with the Application Employee Role application role, which contains two members, Enterprise Employee Group and Enterprise Manager Group.
Example 41-13 Users Associated with Application Roles in the Application-Level Policy Store
<policy-store>
     <applications>
         <application>
            <name>SummitADF</name>
            <app-roles>
               <app-role>
                  <name>Application Employee Role</name>
                  <class>oracle.security.jps.service.policystore.ApplicationRole</class>
                  <display-name>Application Employee Role</display-name>
                  <members>
                     <member>
                        <class>oracle.security.jps.internal.core.principals.
                                                               JpsXmlEnterpriseRoleImpl</class>
                        <name>Enterprise Employee Group</name>
                     </member>
                     <member>
                        <class>oracle.security.jps.internal.core.principals.
                                                               JpsXmlEnterpriseRoleImpl</class>
                        <name>Enterprise Manager Group</name>
                     </member>
                     ...
                  </members>
               </app-role>
               ...
            </app-roles>
            <jazn-policy>
              ...
            </jazn-policy>
         </application>
    </applictions>
</policy-store>
41.7 Creating a Login Page
ADF Security allows for implicit and explicit authentication:
-
In an implicit authentication scenario, if a user who is not yet authenticated tries to access a web page associated with ADF security-aware resources that are not granted to
anonymous-role, then authentication is triggered dynamically. After the user successfully logs in, another check will be done to verify whether the authenticated user has view access granted on the requested page's ADF security-aware resource. -
In an explicit authentication scenario, your application has a public page that displays a login link, which, when clicked, triggers an authentication challenge to log in the user. The login link may optionally specify some other target page that should be displayed (assuming the authenticated user has access) after the successful authentication.
The implicit and explicit authentication scenarios are handled for you by default when you run the Configure ADF Security wizard, as described in Section 41.3.5, "What You May Need to Know About ADF Authentication." However, when you customize the default, generated login page (or supply your own page) to use ADF Faces components, you will need to configure the container-managed deployment descriptor (web.xml file).
To explicitly handle user authentication:
-
Create a login link component and add it to the public home web page for your application.
-
Create a managed bean using API specific to Servlet 3.0 to handle the login attempts by the user.
-
Create a JSF login page using ADF Faces components.
-
Ensure that the login page's resources are accessible.
For more information about implicit and explicit authentication, see Section 41.8.4, "What Happens at Runtime: How ADF Security Handles Authentication."
41.7.1 How to Create a Login Link Component and Add it to a Public Web Page for Explicit Authentication
You can create a standard login link component that can be added to any page in your application to enable users to authenticate or subsequently log off. This component keeps track of the authenticated state of the user and returns the appropriate login or logout URLs and icons. The login link component will redirect users back to a specific page once they are authenticated. Hence, using this login link component provides you with a single, consistent object.
To the unauthenticated user, the login link component will look similar to Figure 41-16.
Then when the user clicks the login link and logs in as a user with the appropriate credentials, the component will look similar to Figure 41-17.

It may be helpful to have an understanding of ADF authentication. For more information, see Section 41.7, "Creating a Login Page."
You may also find it helpful to understand functionality that can be added using other Oracle ADF features. For more information, see Section 41.1.3, "Additional Functionality for ADF Security."
You will need to complete this task:
- Copy your login and logout image files (GIF, JPG, or PNG files) to the
public_htmldirectory of your project.
Note:
The images used should reference the appropriate skin image if your application uses skins. For more information about skins, see the "Customizing the Appearance Using Styles and Skins" chapter in Developing Web User Interfaces with Oracle ADF Faces.To create the login link component and add it to a page:
-
In the Applications window, double-click the web page that will display the component.
-
In the ADF Faces page of the Components window, from the Common Components panel, drag a Link and drop it on the page.
-
In the Structure window, right-click af:link and choose Go to Properties.
-
In the Property window, to specify the label for the Link component, enter an Expression Language (EL) expression in the Text field.
For example, you can enter an EL expression similar to this to conditionally render the link text:
#{securityContext.authenticated ? "Click to log out" :
                                  "Click to log in"}
The
authenticatedproperty of thesecurityContextbean will evaluate to true and render the log out option if the current user is authenticated. Otherwise, the link is rendered with the login option. -
In the Property window, to specify the URL for the Link component, enter an EL expression in the Destination field.
For example, this EL expression conditionally renders a URL to forward the user depending on whether or not they are authenticated:
#{securityContext.authenticated ?
       "/adfAuthentication?logout=true&end_url=/faces/welcome" :
                "/adfAuthentication?success_url=/faces/welcome"}
When the user clicks the link, the URL parameters
end_urlandsuccess_urlforward the destination of the target page to the ADF authentication servlet. Note that the view activity name is passed on the URL parameters instead of the web page name. This ensures control flow rules are enforced for page navigation after login. Theauthenticatedproperty of thesecurityContextbean will evaluate to true and forward to the welcome page if the current user is authenticated. When the user is not authenticated, there is no need to forward to the login page because the ADF authentication servlet triggers log in, which is handled by the container-managed security configuration. Note that log out is handled by the ADF authentication servlet which invalidates the session. -
In the Property window, to specify the link component image for the Link component, enter an EL expression in the Icon field.
For example, this EL expression conditionally renders the link component image as the lock GIF if the user is not authenticated; otherwise, renders the image with the key GIF:
#{securityContext.authenticated ? '/images/lock.gif' : '/images/key.gif'}Figure 41-18 shows how the login link component appears when added to the global menu facet of the page.
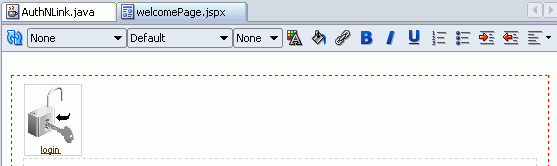
41.7.2 How to Create a Login Page Specifically for Explicit Authentication
The default login form that is generated for you when you run the Configure ADF Security wizard is provided as a convenience for testing your application within JDeveloper. The default form does not allow you to customize the page using ADF Faces components to match the user interface of the application. You can replace the default form with an ADF Faces-based login page that enables you to include customizable components, as shown in Figure 41-19.
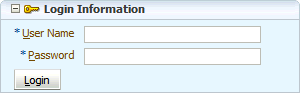
However, if designing a login page with ADF Faces components is not a requirement, then a simple JSP or HTML login page can be also used. For details about generating a simple login page when running the Configure ADF Security wizard, see Section 41.3.1, "How to Enable ADF Security."
41.7.2.1 Creating Login Code for the Backing Bean
Before you create the login page as an ADF Faces page, you need to create a managed bean to handle login attempts. In this login bean sample, authentication is handled programmatically using Servlet 3.0-specific API. The login bean handles the login action initiated from a login link with the doLogin() method. Upon successful login, this method invokes the ADF authentication servlet to redirect to a landing page. You will add this bean to the adfc-config.xml file and register it with request scope.
Note:
This backing bean example described in this section does not authenticate with Oracle Single Sign-On (Oracle SSO). The backing bean handles authentication using login and logout methods provided by Servlet 3.0, which provides generic support for programmatic login on application servers that support Java EE 6 or later.It may be helpful to have an understanding of the login page. For more information, see Section 41.7.2, "How to Create a Login Page Specifically for Explicit Authentication."
You may also find it helpful to understand functionality that can be added using other Oracle ADF features. For more information, see Section 41.1.3, "Additional Functionality for ADF Security."
You will need to complete this task:
- Run the Configure ADF Security wizard to enable ADF Authentication and Authorization.
To create and register a backing bean for login:
-
In the Applications window, right-click the project in which you want to create the backing bean and choose New and then From Gallery.
-
In the New Gallery, expand General, select Java and then Class, and click OK.
-
In the Create Java Class dialog, enter the name for the login page backing bean class file and disable the default options Constructors from Superclass and Implement Abstract Methods, and click OK.
For convenience, you might name the backing bean based on the name of your login page, for example, LoginPageName.java.
-
In the Applications window, expand Application Sources and double-click the new LoginPageName.java backing bean.
-
In the source editor, create two private fields by adding the following in the declaration section of the
LoginPageName.javafile:private String _username; private String _password;
-
Generate or create public accessors for both fields.
You can right-click in the source editor and choose Generate Accessors to add the following public accessors to the file:
public void setUsername(String _username) { this._username = _username; } public String getUsername() { return _username; } public void setPassword(String _password) { this._password = _password; } public String getPassword() { return _password; } -
Import the following classes:
javax.faces.application.FacesMessage
javax.faces.context.ExternalContext
javax.faces.context.FacesContext

javax.servlet.ServletException
javax.servlet.http.HttpServletRequest
javax.servlet.http.HttpSession
-
Add a
doLogin()method to this Java class to handle user attempts to log in:1 public String doLogin() { 2 FacesContext ctx = FacesContext.getCurrentInstance(); 3 if (_username == null || _password == null) { 4 showError("Invalid credentials", 5 "An incorrect username or password was specified.", null); 6 } else { 7 ExternalContext ectx = ctx.getExternalContext(); 8 HttpServletRequest request = (HttpServletRequest) 9 ctx.getExternalContext().getRequest(); 10 try { 11 request.login(_username, _password); // Servlet 3.0 login 12 _username = null; 13 _password = null; 14 HttpSession session = request.getSession(); 15 session.setAttribute("success_url", "/faces" + 16 ctx.getViewRoot().getViewId()); 17 redirect(ectx.getRequestContextPath() + "/adfAuthentication"); 18 } catch (ServletException fle) { 19 showError("ServletException", "Login failed. 20 Please verify the username and password and try again.", null); 21 } 22 } 23 return null; 24 }The
doLogin()method performs the following tasks:Line 2 and Lines 6-9 get an object encapsulating the HTTP request from the
ExternalContext.Lines 3-5 handle an error when credentials have not been provided. The
showError()method is a method which you will implement to deal with miscellaneous problems with the login process.Lines 11-13 attempt to log in the user issuing the request using the Servlet 3.0 API
login()method. In this programmatic login example, which relies on the Servlet API, Oracle Single Sign-On (Oracle SSO) is not supported.Lines 14-16 create an HTTP session and set the ADF authentication servlet parameters
success_urlas an attribute of the session. Settingsuccess_urlon the session ensures the destination page URL is not passed as a request parameter that would be subject to malicious redirects. In this example, the destination page is the current page obtained from the Faces context.Line 17 calls a method,
redirect()which you will implement later in this section to forward the user to the URL that the ADF authentication servlet gets from the HTTP session, as set in Line 15.Lines 18-21 handle a
ServletException, which can be thrown by many different problems with a login. For example, exceptions can result from incorrect credentials or attempts to log into a locked account or uses of an expired password. TheshowError()method is a method which you will implement to deal with miscellaneous problems with the login process.Line 23 returns null so that ADF Controller will not attempt to follow a control flow case.
-
Create stubs for the methods
redirect()andshowError(). -
Add a
redirect()method with its actions:1 private void redirect(String forwardUrl) { 2 FacesContext ctx = FacesContext.getCurrentInstance(); 3 ExternalContext ectx = ctx.getExternalContext(); 4 try { 5 ectx.redirect(forwardUrl); 6 } catch (IOException ie) { 7 showError("IOException", "An error occurred during redirecting. 8 Please consult logs for more information.", ie); 9 } 10 }The
redirect()method performs the following tasks:Line 2 gets the ADF Faces
ctx, which forwards a response to a particular URI.Lines 3-5 use the
ctxto redirect the current HTTP response to the URL.Lines 6-8 handle an
IOException, which is thrown when the request cannot be read or the response cannot be written to. -
Implement a
showError()method:private void showError(String errType, String message, Exception e){ FacesMessage msg = new FacesMessage(FacesMessage.SEVERITY_ERROR, errType, message); FacesContext.getCurrentInstance().addMessage("d2:it35", msg); if (e != null) { e.printStackTrace(); } }This
showError()method adds a summary error message to theFacesContext, and then prints the full stack trace of the exception to the console. -
Optionally, when you want to trigger logout programmatically from a task flow method call activity, create a stub for a
logoff()method and implement it as:public String logoff() { FacesContext ctx = FacesContext.getCurrentInstance(); ExternalContext ectx = ctx.getExternalContext(); HttpServletRequest httpRequest = (HttpServletRequest) ectx.getRequest(); try { httpRequest.logout(); // Servlet 3.0 logout HttpSession session = httpRequest.getSession(false); if (session != null) { session.invalidate(); } String logoutUrl = ectx.getRequestContextPath() + "/faces" + ctx.getViewRoot().getViewId(); redirect(logoutUrl); } catch (ServletException e) { showError("ServletException", "An error occurred during logout. Please consult logs for more information.", e); } return null; }This
logoff()method uses thelogout()method of Servlet 3.0 API to process a logoff action. This is as an alternative to using a logout link and the ADF authentication servlet to redirect the current HTTP response to the URL. For more information about handling logout non-programmatically, see Section 41.7.4.2, "Adding Login and Logout Links." -
Save the Java file.
-
In the Applications window, expand WEB-INF and double-click adfc-config.xml.
-
In the editor window, click the Overview tab.
-
In the overview editor, click the Managed Beans navigation tab.
-
In the Managed Beans page, in the Managed Beans section, click the Add icon and enter a name for the bean, enter the fully qualified class name, and select scope request.
For example, the class name might look like
oracle.summit.bean.LoginBean, as shown in Figure 41-20. -
Save all.

41.7.2.2 Creating an ADF Faces-Based Login Page Specifically for Explicit Authentication
A simple login page that utilizes ADF Faces layout components and ADF Faces user interface components includes two input fields and a button. You must bind the properties of these UI components to the login handler methods that you defined in the managed bean for the login page.
Note that the page that you can create with this procedure does not support implicit authentication. When you choose to implement implicit authentication, you can customize the default, wizard-generated login form which supports container-managed authentication. The Java EE container expects a form that relies on the j_security_check mechanism to handle user-submitted j_username, and j_password input. In the explicit authentication scenario documented here, Java EE container-managed authentication is not used.
It may be helpful to have an understanding of explicit authentication. For more information, see Section 41.7.2, "How to Create a Login Page Specifically for Explicit Authentication."
You may also find it helpful to understand functionality that can be added using other Oracle ADF features. For more information, see Section 41.1.3, "Additional Functionality for ADF Security."
You will need to complete this task:
- Create the managed bean to handle the user's login attempts, as described in Section 41.7.2.1, "Creating Login Code for the Backing Bean."
To create the ADF Faces-based login page for explicit authentication:
-
In the Applications window, right-click the project in which you want to create the login page and choose New and then New Gallery.
-
In the New Gallery, expand Web Tier, select JSF and then Page, and click OK.
-
In the Create JSF Page dialog, select JSP XML.
-
In the File Name field, specify a name for your login page. For example, enter
LoginPage.jspx.Select no other options and do not select the option to expose UI components in a managed bean. You will manually bind the components to the managed bean you created for the login page.
-
Click OK.
-
Save the page.
-
In the ADF Faces page of the Components window, from the Layout panel, drag a Panel Box and drop it on the Structure window below the af:form node.
-
In the Property window, enter values for the Text, Horizontal, Width, and Height fields.
For example, to create a basic login page, you can enter:
Text set to
Login InformationIcon set to
/images/key_ena.pngWidth/Height set to
300/200pixels -
From the Components window, drag a Panel Form Layout and drop it below the af:panelBox node in the Structure window, as shown in Figure 41-21.
-
From the Common Components panel, drag an Input Text and drop it on the Panel Form Layout node for the username field and another Input Text for the password field.
-
In the Property window for the input fields, enter
UsernameandPasswordin the Label fields and expand the Behavior section and select true from both fields' Required dropdown list. -
In the Property window, for the password field, expand the Appearance section select true from the Secret dropdown list.
-
To handle processing of the values for the two input fields, perform these steps for each field:
-
In the Structure window, select one of the input fields (for example, select the af:inputText - Username node), and then in the Property window click the Property Menu dropdown menu next to the Value field and choose Expression Builder.
-
In the Expression Builder, expand ADF Managed Beans and expand your login bean, and then select the expression value corresponding to your bean's handler method.
For example, if you selected the username input field in the Structure window, then you would select username from the Expression Builder dialog, as shown in Figure 41-22.
-
Click OK.
The expression shown in the Property window binds the field to the managed bean you created for the login page. For example, for the username input field, the expression is similar to
#{loginPageBean.username}as shown in Figure 41-23.
-
-
From the Components window, from the Layout panel, drag a Panel Border Layout and drop it inside the footer node of the af:panelBox node, as shown in Figure 41-24.
-
In the JSP/HTML visual editor, delete the panel border layout facets labeled End, Top, and Bottom. Leave only the Start facet.
-
In the Structure window, expand Panel Border Layout facets and select the start node, and then from the Components window drag and drop a Button.
-
In the Property window, enter
Loginin the button component's Text field. -
To handle processing of the login button action, perform these steps.
-
In the Structure window, select af:button under the start node, and then in the Property window, click the Property Menu dropdown menu next to the Action field and choose Expression Builder.
-
In the Expression Builder, expand ADF Managed Beans and expand your login bean, and then select the expression value corresponding to your login method.
For example, if you created a method in the login bean named
doLogin(), then you would select doLogin in the Expression Builder dialog. -
Click OK.
The expression shown in the Property window binds the button to the managed bean you created for the login page. For example, for the login button, the expression is similar to
#{loginPageBean.doLogin}as shown in Figure 41-25.
-
-
Save the page.

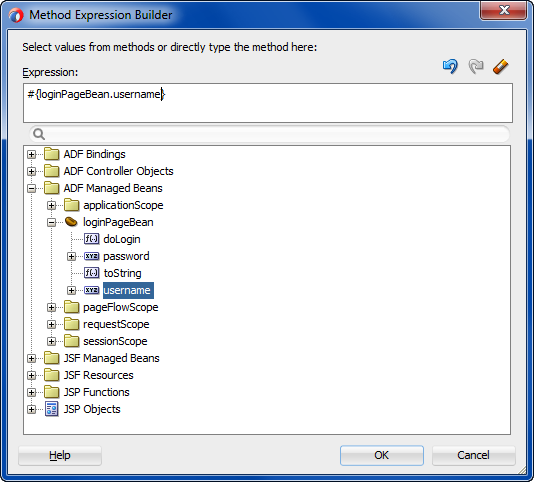
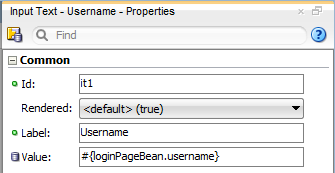

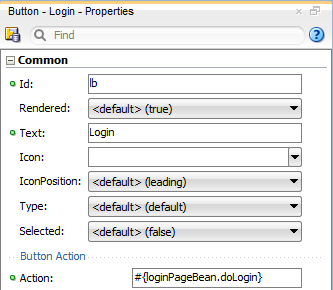
41.7.2.3 Ensuring That the Login Page Is Public
Because the application is secured by ADF Security, all web pages defined within bounded task flows and any web page defined by an ADF page definition will be inaccessible by default. Since all users must be allowed to log on, the login page should remain publicly accessible, and thus you should add no databound components to the page. As long as the login page uses no databound components, then it will be accessible by default.
No further steps are required to ensure that the container will always redirect to the defined authentication point before allowing access to the page (which in this case is the authentication page).
41.7.3 How to Ensure That the Custom Login Page's Resources Are Accessible for Explicit Authentication
When you run the ADF Security wizard and choose the ADF Authentication option (because you do not want to enable ADF authorization) and your application uses a custom login page or a custom error page, you may need to edit the default Java EE security constraint added to the web.xml file by ADF Security. As shown in Example 41-14, the default URL pattern (/*) defined in the allPages security constraint covers everything under the Java EE application root, meaning that the resource files (such as images, style sheets, or JavaScript library) used by the login page are also included.
Example 41-14 Java EE Security Constraint for ADF Authentication Only
<security-constraint>
   <web-resource-collection>
      <web-resource-name>allPages</web-resource-name>
      <url-pattern>/*</url-pattern>
   </web-resource-collection>
   <auth-constraint>
      <role-name>valid-users</role-name>
   </auth-constraint>
</security-constraint>
If the pages you create use resources, such as images, CSS files, or JavaScript libraries, the default allPages security constraint in the web.xml file will prevent those resources from loading at runtime. To allow your application to display those resources, you should save the resources in a folder of their own and then edit the allPages security constraint so that the resources folder is not contained in the URL pattern.
Note that this resource issue does not apply when you run the ADF Security wizard and choose the ADF Authentication and Authorization option (the default). Specifically, in that case, the default generated constraint is on the ADF Authentication servlet and the constraint (/adfAuthentication) excludes any resource files.
41.7.4 How to Create a Public Welcome Page
Because web applications are generally secured, there is always a need for a starting point or home page for unauthenticated users. To create this public welcome page, you create an ADF Faces page to act as the entry point for the application, which contains links to other pages within the application. However, only links to public pages should be rendered to unauthenticated users and, conversely, links to secured pages should be rendered only after the user has logged in and has the appropriate privileges to view the target page.
Best Practice:
When the user presses Ctrl-N or Ctrl-T to open a new browser window or tab and no welcome page is defined in the application'sweb.xml file, the browser will display a 403 or 404 error. To prevent this error, you must specify a welcome page definition in the application's web.xml file. You can create this definition when you run the Configure ADF Security wizard. For details about running the wizard, see Section 41.3.1, "How to Enable ADF Security."41.7.4.1 Ensuring That the Welcome Page Is Public
After you have created a regular ADF Faces page, the page will, by default, be public and accessible by unauthenticated users. If, however, you have associated the welcome page with an ADF resource, for example, by dropping databound ADF Faces components into the welcome page using the Data Controls panel, then ADF Security will secure the page by default. You can make any ADF resource publicly accessible using the overview editor for security policies to grant a view privilege on the resource to the provided anonymous-role. For details about the anonymous-role see, Section 41.5.2, "What Happens When You Make an ADF Resource Public."
41.7.4.2 Adding Login and Logout Links
You can add login and logout links to your public welcome page so that users can explicitly log in and out while they are in the application. While Java EE container-managed security supports the concept of authentication when accessing a secured resource, there is no standard way to log out and stay within a secured application. However, it is a common practice in web applications to allow the user to stay on the same page if that page is public or to return the user to the welcome page if that page is secured. While adding the login and logout links to each page would let the user end their login session anywhere within the application (and return to the welcome page), having these links on the welcome page enables users to explicitly authenticate on entering the application.
For example, you can create an ADF Faces panel group with three components, including an output text area, an image, and a link. To render the appropriate login or logout link, you can use an EL expression that evaluates the user's authentication status. Specifically, you can use securityContext.authenticated to access the ADF security context, as shown in Example 41-15. The expression evaluates to true or false and, in this example, the result determines which login/logout image and link to display. As Example 41-15 shows, the success_url and end_url parameters for the ADF authentication servlet are passed as the view activity welcome associated with the target page welcome.jspx. Passing the view activity name instead of the web page name for the URL parameters ensures the Fusion web application uses task flow control flow rules to handle page navigation.
Example 41-15 ADF Faces Components and EL Expressions to Render Login/Logout Link
<af:panelGroupLayout inlineStyle="width:100%; height:15px;" id="ptpgl3">
<af:spacer width="7" height="10" id="pts2"/>
<af:outputText value="Welcome #{securityContext.userName}!"
inlineStyle="font-weight:bold; width:100px" id="ptot2"
rendered="#{securityContext.authenticated}"/>
<af:image source="#{securityContext.authenticated ? '/images/lock.gif' : '/images/key.gif'}"
id="pti2" inlineStyle="width:16px; height:16px;" shortDesc="switchable icon"/>
<af:link text="#{securityContext.authenticated ? "Logout" : "Login"}"
destination="#{securityContext.authenticated ?
"/adfAuthentication?logout=true&end_url=/faces/welcome" :
"/adfAuthentication?success_url=/faces/welcome"}"
inlineStyle="color:Blue; font-size:14px; font-weight:bold;"/>
<f:facet name="separator">
<af:spacer width="5" height="10" id="pts1"/>
</f:facet>
</af:panelGroupLayout>
When your application requires redirecting to a web page that is external to the application, consider implementing a security bean that implements the logon and logoff methods and the ADF AuthenticationServiceUtil API to protect the application from malicious redirects. This achieves the level of protection afforded by invoking the ADF authentication servlet with null success_url and end_url parameters and then whitelisting these parameters in the web.xml file, but is considered a best practice in this scenario. For more details about redirecting to a host server that differs from the server hosting your Fusion web application, see Section 41.7.7, "What You May Need to Know About Redirecting to a Different Host Server."
As an alternative to rendering the link directly within a page, you can create a login link component with the login and logout links that you can add to a page template, as described in Section 41.7.1, "How to Create a Login Link Component and Add it to a Public Web Page for Explicit Authentication."
41.7.4.3 Hiding Links to Secured Pages
Since an anonymous user should not have access to any secured pages, any navigation component on the welcome page that points to a secured page should be hidden from view based on the following two criteria:
-
Is the user authenticated with a known user identity?
-
Does the specified user identity have permission to view the target?
If either of these criteria has not been met, the rendered attribute of any navigation component on a public page that points to a secured resource must have its rendered attribute set to false, thus hiding it from the anonymous user. To enforce these rules within your welcome page, see Section 41.11.1, "Using Expression Language (EL) with ADF Security."
41.7.5 How to Redirect a User After Authentication
When you have chosen to implement implicit authentication, after the user accesses a secured web page and logs in, the ADF authentication servlet will redirect back to the original page that initiated the login request. With ADF Security authentication enabled, the ADF authentication servlet automatically passes the original page as the ADF authentication success_url parameter on the URL. Typically, this is the desired behavior.
Additionally, when you have chosen to implement implicit authentication, you can protect the Fusion web application from malicious redirects by specifying the success_url parameter as an <init-param> within the web.xml file. Thus, for implicit authentication, when the user accesses the secured web page and gets redirected to log in, the ADF Security framework automatically passes the original page as the success_url parameter on the URL, which supersedes any web.xml setting. Therefore, in practice the only scenario in which an <init-param> setting in web.xml takes effect is when the user explicitly types the adfAuthentication URL into the browser.
However, when you choose to implement explicit authentication and display an explicit login link in your page, the ADF Security framework is not able to determine the originating page. In this case, your login link ensures the ADF Authentication servlet redirects to the desired page after authentication by passing the view activity name of the web page as the servlet success_url parameter, as shown in Example 41-16.
Example 41-16 Explicit Login Link with success_url Defined by Task Flow View Activity
<af:link text="Login" destination="/adfAuthentication?success_url=/faces/viewactivityname"/>
Best Practice:
For explicit authentication, to ensure that the Fusion web application handles the ADF authentication redirect as an ADF Controller navigation event, specify the redirect target by its view activity name. If you were to specify the web page name instead, after the user logs in, the ADF Controller handler may not find the control flow rule associated with the target page. Specifically, without specifying a view activity as the redirect target, command components, such as theaf:button component, will always return to the original page after login. Passing the view activity name as the redirect target of the ADF authentication servlet success_url and end_url parameters ensures the application handles navigation using control flow rules in all cases.In the case of explicit authentication, following the best practice of defining the success_url with a task flow view activity name protects the Fusion web application from malicious redirects by ensuring the ADF authentication servlet ignores any adfAuthentication URL that a user may attempt to type into the browser. Alternatively, Fusion web applications that omit the success_url from the explicit login link may be protected by specifying the success_url parameter as an <init-param> within the web.xml file.
In cases where the user is authenticated but not authorized to view a web page, you can redirect the ADF authentication servlet to an error page in your application. Error handling in Fusion web applications is under the control of the ADF Controller exception handler unless you have created an application that does not use a task flow in its design. For example, in an unbounded task flow, where you have defined an unbounded task flow with a top-level welcome page and a browse page (secured through its ADF page definition), you would see an error page from the application, named authorizationErrorPage.jspx, specified in the adfc-config.xml file, as shown in Example 41-17.
Example 41-17 Error Page Redirect for Applications That Use Task Flows
<adfc-config xmlns="http://xmlns.oracle.com/adf/controller" version="1.2">
  <exception-handler>authorizationErrorPage</exception-handler>
  <view id="welcomePage">
    <page>/welcomePage.jspx</page>
  </view>
  <view id="browse">
    <page>/browse.jspx</page>
  </view>
  <view id="authorizationErrorPage">
    <page>/authorizationErrorPage.jspx</page>
  </view>
  <control-flow-rule>
    <from-activity-id>welcomePage</from-activity-id>
    <control-flow-case>
      <from-outcome>goToSecuredPage</from-outcome>
      <to-activity-id>browse</to-activity-id>
    </control-flow-case>
  </control-flow-rule>
</adfc-config>
For details about how to specify an error page as a view activity for the ADF Controller exception handler, see Section 24.5, "Handling Exceptions in Task Flows."
In cases where the user is not authenticated and an authorization failure occurs, the framework redirects to the ADF authentication servlet, which in turn triggers a Java EE constraint that prompts for login. In this case, container-managed security relies on the login page and error page that you specify in the <login-config> element of the web.xml file.
If you create a Fusion web application without utilizing task flows, then you can specify an <init-param> setting in web.xml for the ADF binding filter, as shown in Example 41-18. In this case, when no task flow is present in the application, page authorization checking is handled by the ADF binding filter, and the unauthorizedErrorPage parameter will be passed to the ADF binding request handler.
Note:
TheunauthorizedErrorPage parameter feature is provided for compatibility with previous releases where ADF Controller was not available. In Fusion web applications, when you need to redirect users to an error page, you use the task flow exception handler to specify the error page, as shown in Example 41-17.Example 41-18 Error Page Redirect for Applications That Don't Use Task Flows
<filter>
    <filter-name>adfBindings</filter-name>
    <filter-class>oracle.adf.model.servlet.ADFBindingFilter</filter-class>
    <init-param>
        <param-name>unauthorizedErrorPage</param-name>
        <param-value>faces/authorizationErrorPage.jspx</param-value>
    </init-param>
</filter>
41.7.6 How to Trigger a Custom Login Page Specifically for Implicit Authentication
When you have chosen to implement implicit authentication to allow users to access protected resources (which may be by direct URL access or by navigating to an ADF Security protected resource), the ADF Security authentication servlet initiates the Java EE container to display the login form configured in the web.xml file. For implicit authentication, when you have customized the default, wizard-generated login form to use ADF Faces components, you must modify the URL pattern for the servlet mapping to reference the ADF Faces servlet.
You can accomplish this in the Authentication Type page of the Configure ADF Security wizard when you configure ADF Security, or in the web.xml file directly. If you have already run the Configure ADF Security wizard, you can use the following procedure to confirm that the web.xml file has been updated as described.
When you have chosen to implement explicit authentication and have created a public page to allow users to login to access protected resources, the login form you create will not be triggered by ADF Security. In the explicit authentication scenario, you do need to configure the web.xml file.
Caution:
Configuring theweb.xml file with the login page application path when your application implements explicit authentication programmatically, as described in Section 41.7.2.2, "Creating an ADF Faces-Based Login Page Specifically for Explicit Authentication", may produce unpredictable results and login may fail. Only modify the web.xml file when you are implementing implicit authentication and you have created a form that relies on the j_security_check action, as does the default, wizard-generated login form.It may be helpful to have an understanding of the login page. For more information, see Section 41.7.2, "How to Create a Login Page Specifically for Explicit Authentication."
You may also find it helpful to understand functionality that can be added using other Oracle ADF features. For more information, see Section 41.1.3, "Additional Functionality for ADF Security."
To reference an ADF Faces login page for implicit authentication:
-
In the Applications window, expand WEB-INF and double-click web.xml.
-
In the overview editor for the
web.xmlfile, click the Security navigation tab. -
In the Security page, expand the Login Authentication section, and set the login page to include a reference to the ADF Faces servlet such that the login page can be part of the ADF Faces lifecycle
/faces/ADFlogin.jspxpage.When you add a page using the file browser, the path entered in the
web.xmlfile will not specify/faces. Modify the entry so that the path references the servlet mapping path for the ADF Faces servlet. For example, if the URL pattern specified by the mapping is/faces/*, then your path should look like/faces/yourpage.jspx, as shown in Figure 41-26.
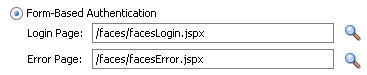
41.7.7 What You May Need to Know About Redirecting to a Different Host Server
During logout it may be necessary to redirect the user to an arbitrary web page or host server that differs from the originating server of the Fusion web application. In this scenario, the application should be protected from a malicious redirect by ensuring the destination page URL is not placed by the application on the Request. To accomplish this, your application can use the ADF class oracle.adf.share.security.authentication.AuthenticationServiceUtil which handles ADF-specific login and logout methods by placing the target destination on the Session map.
Example 41-19 illustrates how to use the logout() method of the AuthenticationService interface. This method will internally put the passed in URL on the Session map and will ignore the end_url parameter that might explicitly be set on the URL by a user. Similarly, the login() method places the login URL destination on the Session map. When you need logout to redirect to a web page on a different server, your method implementation may pass the URL of the desired web page and still be protected from a malicious redirect.
Example 41-19 Security Bean Methods That Get URL from Session Object
import javax.faces.context.ExternalContext;
import javax.faces.context.FacesContext;

import javax.servlet.http.HttpServletRequest;
import javax.servlet.http.HttpServletResponse;

import oracle.adf.share.security.AuthenticationService;
import oracle.adf.share.security.authentication.AuthenticationServiceUtil;

public class SecurityBean {
    public SecurityBean() {
        super();
    }

    public boolean isAuthenticated() {
        ExternalContext ectx =
                          FacesContext.getCurrentInstance().getExternalContext();
        return ectx.getUserPrincipal() != null;
    }

    public void logon() {
        if (!isAuthenticated())
        {
            FacesContext ctx = FacesContext.getCurrentInstance();
            AuthenticationServiceUtil.getAuthenticationService().login("/faces" +
                                       ctx.getViewRoot().getViewId(), null, null);
        }
    }

    public void logoff() {
        if (isAuthenticated())
        {
            AuthenticationServiceUtil.getAuthenticationService().
                                                 logout("/faces/index", null);
        }
    }
}
An alternative to the programmatic approach handles placing the destination URL on the Session map by invoking the ADF authentication servlet in an explicit link with null value success_url and end_url parameters. In this case, the ADF authentication servlet will try to obtain the redirect values from the web.xml file and will ignore any values that a user might attempt to enter on the URL. This approach requires configuring the adfAuthentication servlet definition in the web.xml by specifying an <init-param> setting for the success_url and end_url parameters. In effect, this is a declarative approach that results in a whitelist with a single destination for login and logout redirects.
Note:
Beginning in JDeveloper 12.1.3.0.0, Fusion web applications that have already implemented explicit login with the ADF authenticationsuccess_url and end_url parameters passed on the Request, will display an alert dialog that notifies the end user that the destination of the login or logout handled by the ADF authentication servlet is on a different host server. This alert gives the user the option to continue or return to the previous page.41.7.8 What You May Need to Know About Fusion Web Application Logout and Browser Caching
When basic type authentication is in effect as specified in the Fusion web application's web.xml file, the browser caches authentication credentials. This is a known issue with basic authentication that re-authenticates users after the logout redirect is performed by the ADF authentication servlet. In this scenario, in order to complete the logout session and prevent users from accessing resources, it is necessary to close the browser and restart a new browser session.
To ensure the ADF application completes logout and prevents a user from being able to access resources after logout, use form-based authentication instead of basic authentication. You can select form-based authentication when you run the Configure ADF Security wizard, as described in Section 41.3.1, "How to Enable ADF Security."
41.7.9 What You May Need to Know About Displaying Error Pages in Internet Explorer
When you enable ADF Security to display a custom error page, any HTTP errors that the application generates in response to a request to view a page, should result in the error page being displayed. However, in certain versions of Internet Explorer, the browser will display either the custom error page or an error message built into Internet Explorer. If Internet Explorer displays only an error message you can disable the option to display error message numbers in the Advanced settings of the Internet Options dialog. In Internet Explorer 10, this option is enabled by default. You should disable Show friendly HTTP error messages when you want to display a custom error page that you enabled with the Configure ADF Security wizard.
To ensure custom error pages display in Internet Explorer 10:
-
In Internet Explorer toolbar, click the Tools button.
-
In the Internet Options dialog, click the Advanced tab.
-
In the Advanced tab, scroll and locate Show friendly HTTP error messages.
-
Click the option to disable it and click OK.
41.8 Testing Security in JDeveloper
Integrated WebLogic Server enables you to run the application directly within JDeveloper and determine whether or not to migrate security objects, including the application policies, users, and credentials that your application defines. By default, all security objects are migrated to Integrated WebLogic Server each time you run the application.
41.8.1 How to Configure, Deploy, and Run a Secure Application in JDeveloper
JDeveloper is configured by default to deploy the security objects from your application repositories to Integrated WebLogic Server each time you run the application. You can change this behavior by selecting security deployment options in the Application Properties dialog to:
-
Decide whether to overwrite the domain-level policies with those from the application
jazn-data.xmlfile -
Decide whether to overwrite the system credentials from the application's
cwallet.ssofileThe
cwallet.ssofile (located in JDeveloper in the Application Resources panel of the Applications window under the Descriptors-META-INF node) stores credentials as securely kept objects that are presented to the authentication provider to be matched against identities. The file is encrypted and cannot be browsed or edited within JDeveloper. At design-time, different components make use ofcwallet.ssofile and are responsible for creating the necessary credentials in it. -
Decide whether to migrate the identity store portion of the
jazn-data.xmlfile to the domain-level identity store
If you make no changes to the deployment settings, each time you run the application, JDeveloper will overwrite the domain-level security policies and system credentials. Additionally, JDeveloper will migrate new user identities you create for test purposes and update existing user passwords in the embedded LDAP server that Integrated WebLogic Server uses for its identity store. However, if you prefer to run the application without updating the existing security objects in Integrated WebLogic Server, you have this option.
It may be helpful to have an understanding of using Integrated WebLogic Server. For more information, see Section 41.8, "Testing Security in JDeveloper."
You may also find it helpful to understand functionality that can be added using other Oracle ADF features. For more information, see Section 41.1.3, "Additional Functionality for ADF Security."
To configure security deployment and run the application in JDeveloper:
-
In the main menu, choose Application and then Secure > Configure Security Deployment.
-
In the Application Properties dialog, in the Deployment page, in the Security Deployment Options section, select the security objects that you want to deploy to Integrated WebLogic Server.
By default, each time you run the application, JDeveloper will overwrite the application policies and system credentials at the domain level with those from the application. If you prefer not to overwrite either of these repositories, deselect Application Policies or Credentials. When deselected, JDeveloper will merge only new polices or credentials into the domain-level stores.
By default, each time you run the application, JDeveloper will migrate new user identities you create for test purposes and update existing user passwords in the embedded LDAP server that Integrated WebLogic Server uses for its identity store. You can disable migration of the application identity store by deselecting Users and Groups.
-
Click OK.
-
In the Applications window, right-click the user interface project that contains the secured web pages and choose Run.
When you choose Run on the user interface project, JDeveloper will run the application using the default run target you configured for the project. For example, you can configure a task flow activity as the run target to start your application. To configure the default run target, see Section 20.5, "Testing Task Flows."
The Create Default Domain dialog appears the first time you run the application and start a new domain in Integrated WebLogic Server. Use the dialog to define an administrator password for the new domain. Passwords you enter can be eight characters or more and must have a numeric character.
41.8.2 What Happens When You Configure Security Deployment Options
When you run the application using Integrated WebLogic Server, JDeveloper migrates the security policies and credentials to the domain level based on security deployment configuration settings specified in the Application Properties dialog. During the deployment process, JDeveloper updates the weblogic-application.xml file that it adds to the deployment archive file with the Application Properties settings, as shown in Example 41-20. Note that these settings are not added to the weblogic-application.xml file in the application source directory and thus are not visible.
Example 41-20 Default Security Deployment Settings in the Archive weblogic-application.xml File
<application-param>
    <param-name>jps.credstore.migration</param-name>
    <param-value>OVERWRITE</param-value>
</application-param>
<application-param>
    <param-name>jps.policystore.migration</param-name>
    <param-value>OVERWRITE</param-value>
</application-param>
The OVERWRITE value allows you to modify the security policies and credentials in your application and redeploy either to Oracle WebLogic Server running in development mode or to Integrated WebLogic Server (set up to run in development mode by default).
Note:
When you eventually deploy to a production environment, the migration settings in theweblogic-application.xml file are ignored; it would be considered a security vulnerability to allow existing policies and credentials to be overwritten. For information about deploying to a production environment, see Section 41.9, "Preparing the Secure Application for Deployment."JDeveloper also updates the weblogic-application.xml file with OPSS lifecycle listeners, as shown in Example 41-21. To initiate the migration process before the application runs, the lifecycle listeners observe the migration settings for policies and credentials and overwrite the security objects at the domain level.
Example 41-21 Security Migration Listeners in the Archive weblogic-application.xml File
<listener>
    <listener-class>
        oracle.security.jps.wls.listeners.JpsApplicationLifecycleListener
    </listener-class>
</listener>
<listener>
    <listener-class>
        oracle.security.jps.wls.listeners.JpsAppVersionLifecycleListener
    </listener-class>
</listener>
During the migration process, JDeveloper maps the Oracle Platform Security Services (OPSS) application role member classes to the Integrated WebLogic Server member classes and migrates the users to WebLogic Server identity store users and migrates the roles to WebLogic Server identity store groups. In Oracle WebLogic Server, users is an implicit group equivalent to OPSS authenticated-role.
Identity store migration is not controlled by the application lifecycle listener settings in the weblogic-application.xml file. Instead, an Oracle WebLogic Mbean handles migrating the identities when running in Integrated WebLogic Server or when deploying from JDeveloper. If the user already exists, the Mbean will not migrate the entire user definition. Only the user password will be updated.
41.8.3 How to Use the Built-In test-all Application Role
When you run the Configure ADF Security wizard, you can enable the option to add the test-all application role to the policy store in the jazn-data.xml file. When you enable this option, you also specify the scope of grants to the application role for your application:
-
Select Grant to Existing Objects Only when you want JDeveloper to grant view rights to the
test-allapplication role and you want this policy to apply to all the ADF task flows and web pages that appear in your user interface project at the time you run the wizard. -
Select Grant to All Objects when you want JDeveloper to grant view rights to the
test-allapplication role and you want this policy to apply to all existing and future ADF task flows and web pages that developers will create in the user interface project. Note that the wizard displays the option Grant to New Objects after you run the wizard the first time with the Grant to All Objects option selected.
After you run the wizard, the test-all role appears in the jazn-data.xml file and is visible in the overview editor for security policies. You will not need to populate the test-all role with test users since the wizard assigns the built-in application role anonymous-role to the test-all role. In this case, all users will automatically have the anonymous-role principal and will be permitted to access the application.
Note:
Before you deploy the application, you must remove all occurrences of thetest-all role from the policy store, as described in Section 41.9.1, "How to Remove the test-all Role from the Application Policy Store." This will prevent unauthorized users from accessing the web pages of your application.You can rerun the wizard and disable automatic grants at any time. Once disabled, new ADF task flows and web pages that you create will not utilize the test-all role and will therefore require that you define explicit grants, as described in Section 41.5, "Defining ADF Security Policies."
41.8.4 What Happens at Runtime: How ADF Security Handles Authentication
When you test the application in JDeveloper using Integrated WebLogic Server, the identity store is migrated to the embedded LDAP server, with information stored in Oracle Internet Directory.
Figure 41-27 illustrates the authentication process when users attempt to access an ADF bounded task flow or any web page containing ADF bindings (such as mypage.jspx) without first logging in. Authentication is initiated implicitly because the user does not begin login by clicking a login link on a public page. In the case of the secured page, no grants have been made to the anonymous user.
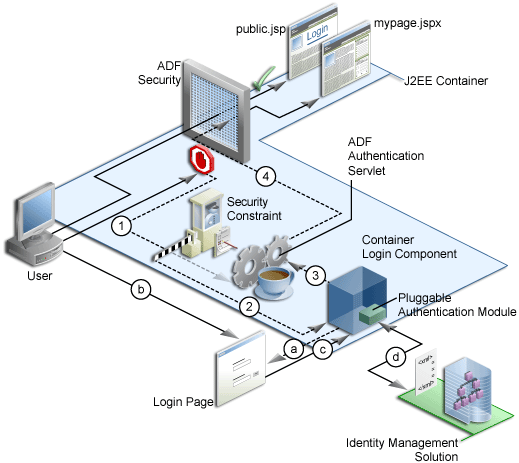
In Figure 41-27, the implicit authentication process assumes that the resource does not have a grant to anonymous-role, that the user is not already authenticated, and that the authentication method is Form-based authentication. In this case, the process is as follows:
-
When the bounded task flow or web page (with ADF bindings) is requested, the ADF bindings servlet filter redirects the request to the ADF authentication servlet (in the figure, Step 1), storing the logical operation that triggered the login.
-
The ADF authentication servlet has a Java EE security constraint set on it, which results in the Java EE container invoking the configured login mechanism (in the figure, Step 2). Based on the container's login configuration, the user is prompted to authenticate:
-
The appropriate login form is displayed for form-based authentication (in the figure, Step 2a).
-
The user enters their credentials in the displayed login form (in the figure, Step 2b).
-
The user posts the form back to the container's
j_security_check()method (in the figure, Step 2c). -
The Java EE container authenticates the user, using the configured pluggable authentication module (in the figure, Step 2d).
-
-
Upon successful authentication, the container redirects the user back to the servlet that initiated the authentication challenge, in this case, the ADF authentication servlet (in the figure, Step 3).
-
On returning to the ADF authentication servlet, the servlet subsequently redirects to the originally requested resource (in the figure, Step 4).
Whether or not the resource is displayed will depend on the user's access rights and on whether authorization for ADF Security is enforced, as explained in Section 41.8.5, "What Happens at Runtime: How ADF Security Handles Authorization."
Figure 41-28 illustrates the explicit authentication process when the user becomes authenticated starting with the login link on a public page.
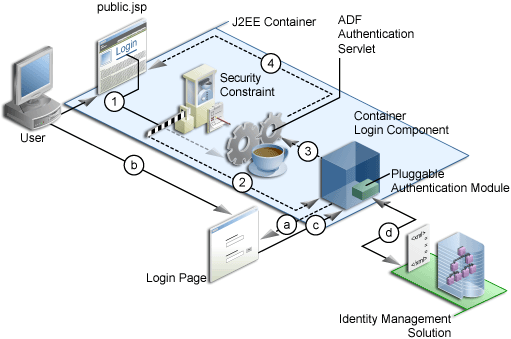
In an explicit authentication scenario, an unauthenticated user (with only the anonymous user principal and anonymous-role principal) clicks the Login link on a public page (in the figure, Step 1). The login link is a direct request to the ADF authentication servlet, which is secured through a Java EE security constraint in the web.xml file.
In this scenario, the current page is passed as a parameter to the ADF authentication servlet. As with the implicit case, the security constraint redirects the user to the login page (in the figure, Step 2). After the container authenticates the user, as described in Step a through Step d in the implicit authentication case, the request is returned to the ADF authentication servlet (in the figure, Step 3), which subsequently returns the user to the public page, but now with new user and role principals in place.
41.8.5 What Happens at Runtime: How ADF Security Handles Authorization
When ADF authorization is enabled, the ADF bounded task flows and web pages outside of a task flow that have an ADF page definition will be secure by default. When a user attempts to access these web pages, ADF Security checks to determine whether the user has been granted access in the policy store. If the user is not yet authenticated, and the page is not granted to the anonymous-role, then the application displays the login page or form. If the user has been authenticated, but does not have permission, a security error is displayed. If you do not configure the policy store with appropriate grants, the pages will remain protected and therefore stay unavailable to the authenticated user.
Figure 41-29 illustrates the authorization process.
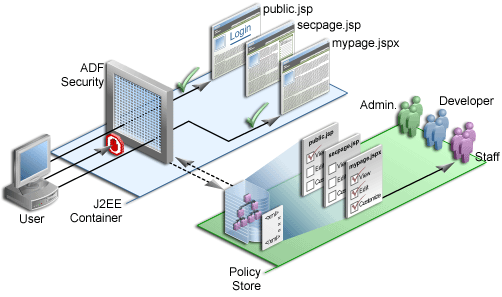
The user is a member of the application role staff defined in the policy store. Because the user has not yet logged in, the security context does not have a subject (a container object that represents the user). Instead, Oracle Platform Security Services provides ADF Security with a subject with the anonymous user principal (a unique definition of the user) and the anonymous-role principal.
With the anonymous-role principal, typically the user would be able to access only pages not defined by ADF resources, such as the public.jsp page, whereas all pages that are defined either by an ADF task flow or outside of a task flow using an ADF page definition file are secure by default and unavailable to the user. An exception to this security policy would be if you were to grant anonymous-role access to ADF resources in the policy store. In this case, the user would not be allowed immediate access to the page defined by an ADF resource.
When the user tries to access a web page defined by an ADF resource, such as mypage.jspx (which is specified by an ADF page definition, for example), the ADF Security enforcement logic intercepts the request and because all ADF resources are secured by default, the user is automatically challenged to authenticate (assuming that the anonymous-role is not granted access to the ADF resource).
After successful authentication, the user will have a specific subject. The security enforcement logic now checks the policy store to determine which role is allowed to view mypage.jspx and whether the user is a member of that role. In this example for mypage.jspx, the view privilege has been granted to the staff role and because the user is a member of this role, they are allowed to navigate to mypage.jspx.
Similarly, when the user tries to access secpage.jsp, another page defined by ADF resources, for which the user does not have the necessary view privilege, access is denied.
Users and roles are those already defined in the identity store of the resource provider. Application roles are defined in the policy store of the jazn-data.xml file.
41.9 Preparing the Secure Application for Deployment
After testing in JDeveloper using Integrated WebLogic Server, you will eventually want to deploy the application to a standalone server. Initially, the server you target will be your staging environment where you can continue development testing using that server's identity store before deploying to the production environment. Thus, you will typically not migrate the test users you created to run with Integrated WebLogic Server. The steps you perform to migrate credentials (in the cwallet.sso file) and security policies (in the jazn-data.xml file) to standalone Oracle WebLogic Server will depend on the configured mode of the target server and whether you deploy using JDeveloper or a tool outside of JDeveloper.
Note:
For details about deploying from JDeveloper to a development environment, see Section 49, "Deploying Fusion Web Applications."When the target server is configured for development mode, you can deploy directly from JDeveloper. In this case, JDeveloper automatically handles the migration of the policy store, system credentials, and identity store (users and groups) as part of the deployment process. Application security deployment properties are configured by default to allow the deployment process to overwrite the domain-level policy store and the system credentials. Additionally, the identity store deployment property is configured by default to migrate the identity store consisting of your test users. You can change this default deployment behavior in the Application Properties dialog, as described in Section 41.8.1, "How to Configure, Deploy, and Run a Secure Application in JDeveloper."
Note:
Note that migration of system credentials to Oracle WebLogic Server running in development mode will be performed only if the target server is configured to permit credential overwrite. For details about configuring Oracle WebLogic Server to support overwriting of system credentials, see the "Configuring the OPSS Security Store" chapter in Securing Applications with Oracle Platform Security Services.When the target server is configured for production mode, you typically handle the migration task outside of JDeveloper using tools like Oracle Enterprise Manager. For details about using tools outside of JDeveloper to migrate the policy store to the domain-level in a production environment, see the "Configuring the OPSS Security Store" chapter in Securing Applications with Oracle Platform Security Services. Note that Oracle WebLogic Server running in production mode does not support the overwriting of system credentials under any circumstances.
Before you deploy the application, you will want to remove the test-all application role if you enabled the automatic grants feature in the Configure ADF Security wizard. Because the test-all role makes all ADF resources public, its presence increases the risk that your application may leave some resources unprotected. You must therefore remove the role before you migrate application-level policy store.
Additionally, when you prepare to deploy the application to Oracle WebLogic Server, you will want to remove the test identities that you created in the jazn-data.xml file. This will ensure that users you created to test security policies are not migrated to the domain-level identity store.
Best Practice:
If you deploy your application to the standalone environment, you must not migrate users and enterprise roles in your local identity store that are already configured for Oracle WebLogic Server. For example, if you were to deploy the identity store with the userweblogic and enterprise role Administrators, you would overwrite the default administration configuration on the target server. To ensure you avoid all possible conflicts, you can disable migration of the identity store, as described in Section 41.9.2, "How to Remove Test Users from the Application Identity Store."41.9.1 How to Remove the test-all Role from the Application Policy Store
The overview editor for security policies provides the facility to display all resources with view grants made to ADF Security's built-in test-all role. You can use this feature in the overview editor to delete the test-all role grant and replace it with a grant to the roles that your application defines.
Alternatively, you could delete the test-all role using the overview editor for the jazn-data.xml file, by selecting the test-all role in the Application Roles page of the editor and clicking the Delete Application Role button. However, when you remove the test-all role this way, you will still need to create a grant to replace the ones that you delete. Because the overview editor lets you combine both of these tasks, the following procedure describes its usage.
It may be helpful to have an understanding of the Oracle WebLogic Server. For more information, see Section 41.9, "Preparing the Secure Application for Deployment."
You may also find it helpful to understand functionality that can be added using other Oracle ADF features. For more information, see Section 41.1.3, "Additional Functionality for ADF Security."
To remove the test-all application role and substitute custom application roles:
-
In the main menu, choose Application and then Secure > Resource Grants.
-
In the Resource Grants page of the overview editor for security policies, select Task Flow from the Resource Type dropdown list and then select the Show task flows with test-all grants only checkbox to view the list of task flows with grants to this built-in role.
If no grant exists for the
test-allrole, then the Resources list in the overview editor will appear empty. Thetest-allrole is defined only when enabled in the Configure ADF Security wizard. If it is enabled, you will see those task flows withtest-allgrants listed, as shown in Figure 41-30. -
In the Resources column, select the first task flow in the list.
-
In the Granted to column, select test-all and click the Remove Grantee icon.
-
In the Granted to column, click the Add Grantee icon and choose Add Application Role and then use the Select Application Roles dialog to add the desired role.
-
Repeat these steps to remove the
test-allrole and substitute your own application role for all remaining task flows. -
In the Resource Grants page of the overview editor, select Web Page from the Resource Type dropdown list and repeat these steps to remove the
test-allrole for all web pages and their ADF page definitions. -
With the Show task flows/web pages with test-all grants only checkbox selected, verify that the overview editor displays no resources with
test-allgrants.
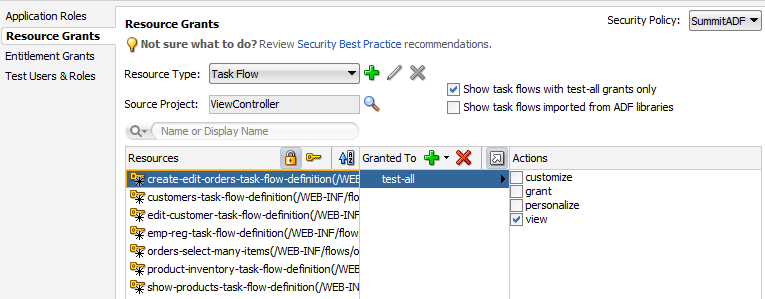
41.9.2 How to Remove Test Users from the Application Identity Store
The standalone Oracle WebLogic Server that you will deploy to will have its own identity stored already configured. To ensure that you do not migrate test users and enterprise role groups you created in JDeveloper to the domain level, you should remove the test user realm from the jazn-data.xml file.
Alternatively, if you are deploying from JDeveloper, you can disable the migration of users and groups by deselecting the Users and Groups option in the Application Properties dialog, as described in Section 41.8.1, "How to Configure, Deploy, and Run a Secure Application in JDeveloper."
It may be helpful to have an understanding of the Oracle WebLogic Server. For more information, see Section 41.9, "Preparing the Secure Application for Deployment."
You may also find it helpful to understand functionality that can be added using other Oracle ADF features. For more information, see Section 41.1.3, "Additional Functionality for ADF Security."
To remove test users and enterprise role groups from the identity store:
-
In the main menu, choose Application and then Secure > Users.
-
In the editor window for the
jazn-data.xmlfile, click the Source tab. -
In the source for the
jazn-data.xmlfile, click the - icon next to the <jazn-realm> element so the entire element appears collapsed as shown in Figure 41-31. -
With the element selected, press Delete and save the file.
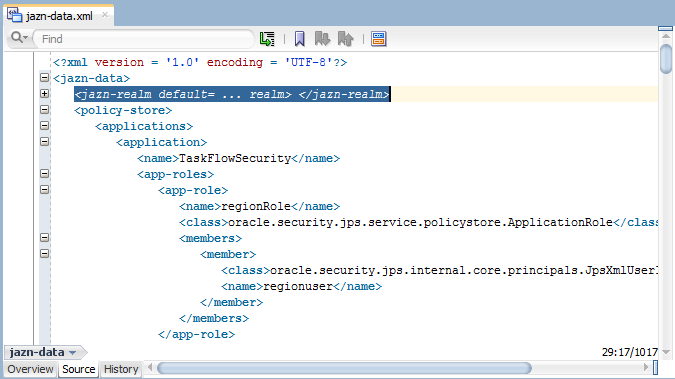
41.9.3 How to Secure Resource Files Using a URL Constraint
Resource files, including images, style sheets, and JavaScript libraries are files that the Fusion web application loads to support the individual pages of the application. ADF Security does not secure these files. Although securing such files is not a requirement for securing the web pages of the application, in some cases it may be desirable to protect resource files to fully harden your application. Please note that JavaScript files are downloaded to the browser and, as such, can be read at that time.
To serve up resource files, the ADF Faces framework relies on org.apache.myfaces.trinidad.webapp.ResourceServlet, which delegates to a resource loader. The Fusion web application's web.xml file contains a servlet mapping that maps the resource servlet to URL patterns. By default, JDeveloper uses the patterns /adf/* for MyFaces Trinidad Core, and /afr/* for ADF Faces.
Because ADF Security does not protect the resource servlet, you can protect the Java EE access paths for the resource servlet with a security constraint. To implement your own security for the resource files in the web.xml file, define a security constraint for the /adflib/*, /adf/* and /afr/* paths and assign a specific security role to them. This security constraint will require all users to be authenticated before they can access the first page of the Fusion web application.
Example 41-22 shows the security role resource_role and the constraint with the URL patterns mapped to this role. After you define the security role, the administrator for the target server must map this role to an Oracle WebLogic Server enterprise role (user group) or create an enterprise role with the same name (in which case no mapping is required).
Example 41-22 URL Constraint in web.xml File for Resource Files
<security-role>
    <description>Java EE role to map to an enterprise role. All users who will
      be allowed to run Fusion web app must be members of that role.
     </description>
    <role-name>resource_role</role-name>
</security-role>

<security-constraint>
    <web-resource-collection>
      <web-resource-name>resources</web-resource-name>
      <url-pattern>/adflib/*</url-pattern>
      <url-pattern>/adf/*</url-pattern>
      <url-pattern>/afr/*</url-pattern>
    </web-resource-collection>
    <auth-constraint>
      <role-name>resource_role</role-name>
    </auth-constraint>
</security-constraint>
41.10 Disabling ADF Security
JDeveloper allows you to disable ADF Security when you want to temporarily run the application without enforcing authorization checks against the application policy store. This will allow you to run the application and access all resources without the protection provided by existing security policies.
41.10.1 How to Disable ADF Security
To disable ADF Security at the level of your application, run the wizard and choose one of these options:
-
ADF Authentication disables ADF authorization but leaves the ADF authentication servlet enabled. For example, you may want to run your application in JDeveloper with authorization checking against security policies temporarily disabled. This option will require the user to log in the first time a page in the application is accessed by mapping the Java EE application root "/" to the
allPagesJava EE security constraint that will trigger user authentication. ADF resources will not be security-aware because authorization checking is not enforced. Thus, once the user is logged in, all web pages containing ADF resources will be available to the user. -
Remove ADF Security Configuration disables the ADF authentication servlet and disables authorization checking on ADF resources. In this case, you can run the application with no user authentication and no security for ADF resources in place.
You may select either option with the intention of reenabling ADF Security at any time. The wizard specifically does not alter the application policy store that contains the security policies that application developers defined for ADF resources. This means that you can return to the wizard at any time, select the ADF Authentication and Authorization option, and reenable ADF Security against your application's existing policy store and identity store.
It may be helpful to have an understanding of disabling ADF Security. For more information, see Section 41.10, "Disabling ADF Security."
You may also find it helpful to understand functionality that can be added using other Oracle ADF features. For more information, see Section 41.1.3, "Additional Functionality for ADF Security."
To disable ADF authorization checking:
-
In the main menu, choose Application and then Secure > Configure ADF Security.
-
In the ADF Security page, select either the ADF Authentication option or the Disable ADF Security Configuration option. Click Next.
After you run the wizard with either of these options, the ADF resources of your user interface projects will no longer be security-aware.
-
Click Finish.
41.10.2 What Happens When You Disable ADF Security
If you run the Configure ADF Security wizard with the Remove ADF Security Configuration option selected, it removes the ADF-specific metadata in the web.xml file and adf-config.xml file, as described in Table 41-2.
Similarly, running the wizard with the ADF Authentication option selected to disable only authorization checking performs the following updates:
-
Leaves the ADF-specific metadata in the
web.xmlfile unchanged and adds theallPagessecurity constraint.With the
allPagessecurity constraint present, users will be expected to authenticate when they first access the application. -
Sets the
authorizationEnforceparameter in the<JaasSecurityContext>element of theadf-config.xmlfile tofalse, as shown in Example 41-23.
Example 41-23 AuthorizationEnforce Flag Disabled in the adf-config.xml FIle
<JaasSecurityContext
  initialContextFactoryClass="oracle.adf.share.security.JAASInitialContextFactory"
  jaasProviderClass="oracle.adf.share.security.providers.jps.JpsSecurityContext"
                             authorizationEnforce="false"
                             authenticationRequire="true"/>
The adf-config.xml file is located in the /.adf/META_INF folder of your workspace. In JDeveloper, you can locate the file in the Application Resources panel of the Applications window by expanding the Descriptors-ADF META-INF node. Note that if you view the adf-config.xml file in an editor outside of JDeveloper, you must save the workspace to see the wizard-applied changes in the file.
41.11 Advanced Topics and Best Practices
After you have completed the process of enabling ADF Security, you may want to customize your application to work with ADF Security in the user interface. For example, you can use Expression Language (EL) to render UI components in the web page based on evaluation of custom permissions that you define just for a group of UI components. Additionally, you can define methods within a managed bean to expose information, such as the user name and role membership, in your application.
41.11.1 Using Expression Language (EL) with ADF Security
You can use Expression Language (EL) to evaluate the policy directly in the UI, while the use of Java enables you to evaluate the policy from within a managed bean. ADF Security implements several convenience methods for use in EL expressions to access ADF resources in the security context. For example, you can use the EL expression convenience methods to determine whether the user is allowed to access a particular task flow. Good security practice dictates that your application should hide resources and capabilities for which the user does not have access. And for this reason, if the user is not allowed access to a particular task flow, you would evaluate the user's permission grant to determine whether or not to render the navigation components that initiate the task flow.
Note:
The ability to evaluate a policy is limited to the current request. For this reason, it is important to understand where the policy evaluation occurs, because evaluating the policy at anything other than the request scope can lead to unexpected results.41.11.1.1 How to Evaluate Policies Using EL
The use of EL within a UI component allows for the component's attribute values to be defined dynamically, resulting in modification of the UI component at runtime. In the case of securing resources, the UI component attribute of interest is the rendered attribute, which allows you to show and hide components based on available permissions. By default, the rendered attribute is set to true. By dynamically changing this value based on the permission, you can set the UI component to be shown or hidden. For example, if the user has the appropriate permission, the rendered attribute should be set to true so that the UI component is shown. If they do not have permission, the attribute should be set to false and the UI component hidden from view.
To evaluate a policy using EL, you must use the ADF Security methods in the securityContext EL namespace. These methods let you access information in the ADF security context for a particular user or ADF resource.
Table 41-11 shows the EL expression that is required to determine whether a user has the associated permission. If the user has the appropriate permission, the EL expression evaluates to true; otherwise, it returns false.
Table 41-11 EL Expression to Determine View Permissions on ADF Resources
| Expression | Expression action |
|---|---|
#{securityContext.taskflowViewable['MyTaskFlow']}
For example:
#{securityContext.taskflowViewable
 ['/WEB-INF/audit-expense-report.xml#audit-expense-report']}
|
Where |
#{securityContext.regionViewable['MyPagePageDef']}
|
Where |
Note:
In the case of page permission, the value of the page definition can be specified dynamically by using late-binding EL within a managed bean, as described in Section 41.3.7, "What You May Need to Know About the valid-users Role."Table 41-12 shows the EL expression that lets you get general information from the ADF security context not related to a particular ADF resource. For example, you can access the current user name when you want to display the user's name in the user interface. You can also check whether the current user is a member of certain roles or granted certain privileges. Your application may use this result to dynamically hide or show menus.
Table 41-12 EL Expression to Determine User Information in the ADF Security Context
| Expression | Expression Action |
|---|---|
#{securityContext.userName}
|
Returns the user name of the authenticated user. |
#{securityContext.authenticated}
|
Returns |
#{securityContext.userInRole['roleList']}
|
Where |
#{securityContext.userInAllRoles['roleList']}
|
Where |
#{securityContext.userGrantedPermission['permission']}
|
Where Note that the convenience methods |
#{securityContext.userGrantedResource['resource']}
|
Where You can use this expression to test the permission grant in the display property of a resource that is not contained in a task flow (like an ADF Faces panel or a menu item). You first create a custom resource type for the UI component that you want to protect. For more details, see Section 41.11.2, "How to Protect UI Components Using OPSS Resource Permissions and EL." |
It may be helpful to have an understanding of using EL. For more information, see Section 41.11.1, "Using Expression Language (EL) with ADF Security."
You may also find it helpful to understand functionality that can be added using other Oracle ADF features. For more information, see Section 41.1.3, "Additional Functionality for ADF Security."
To associate the rendering of a navigation component with a user's granted permissions on a target task flow or page definition:
-
In the Applications window, double-click the page that contains the navigation component that you wish to conditionally render.
-
In the visual editor for the page, select the component that is used to navigate to the secured page.
-
In the Property window, click the Property Menu dropdown menu displayed menu next to the Rendered field and choose Expression Builder, as shown in Figure 41-32.
-
In the Expression Builder, expand the ADF Bindings - securityContext node and select the appropriate EL value, and then in the Expression field, enter the qualified name of the ADF resource that the user will attempt to access.
For example, as shown in Figure 41-33, to limit access to a task flow that your application displays, you would create an expression like:
#{securityContext.taskflowViewable
     ['/WEB-INF/audit-expense-report.xml#audit-expense-report']}
In this example, the expression determines the user's access rights to view the target task flow
audit-expense-report. If the user has the access rights, then the expression evaluates totrueand therenderedattribute receives the valuetrue.Tip:
In the Expression Builder dialog, expand Description for additional information about any security EL method you select. -
Click OK.

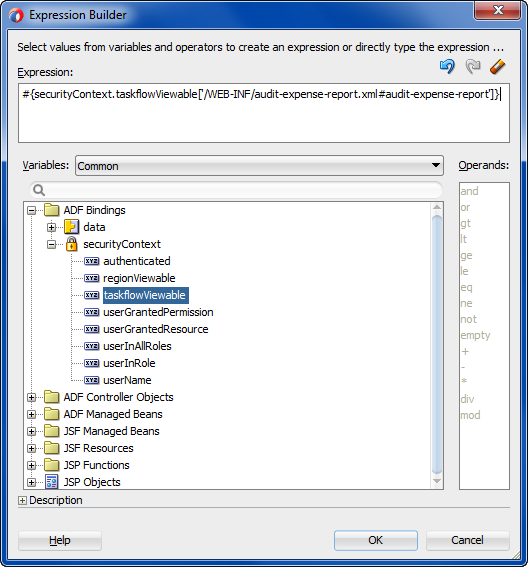
When you run the application, the component will be rendered or hidden based on the user's ability to view the target page.
41.11.1.2 What Happens When You Use the Expression Builder Dialog
When you use the Expression Builder to define an expression for the rendered attribute, JDeveloper updates the component definition in the open .jspx file. The component's rendered attribute appears with an expression that should evaluate to either true or false, as shown in Example 41-24. In this example, the component is a navigation link with the link text Checkout defined by another expression. The page that contains the navigation link renders the component only when the user has sufficient rights to access the checkout task flow.
41.11.1.3 What You May Need to Know About Delayed Evaluation of EL
The ability to evaluate a security permission is scoped to the request. If you want to evaluate permissions to access a target page from a managed bean that is scoped to a higher level than request (for example, a global menu that is backed by a managed bean), you must implement delayed EL evaluation (late-binding). By passing in the target page as a managed property of the bean, you ensure that the EL expression is evaluated only after the required binding information is available to the managed bean. Because EL is evaluated immediately when the page is executed, placing the EL expression directly in the properties of a UI component, backed by a managed bean, would result in an out-of-scope error.
Example 41-25 shows a property (authorized) of a managed bean that returns true or false based on a user's ability to view a named target page. In this case, the _targetPageDef variable is a managed property containing the name of the target page. Within the UI, the EL expression would reference the authorized property.
Example 41-25 Delayed EL Evaluation in a Managed Bean
public boolean isAuthorized()
{
 if (_targetPageDef != null) {
  FacesContext fctx = FacesContext.getCurrentInstance();
  ADFContext adfCtx = ADFContext.getCurrent();
  SecurityContext secCtx = adfCtx.getSecurityContext();
  boolean hasPermission = secCtx.hasPermission(new RegionPermission
     (_targetPageDef, RegionPermission.VIEW_ACTION));
     if (hasPermission) {
        return hasPermission;
     }
     else {
        fctx.addMessage(null, new FacesMessage (
        FacesMessage.SEVERITY_WARN, "Access Permission not defined! " , null));
        return false;
     }
}
41.11.2 How to Protect UI Components Using OPSS Resource Permissions and EL
Security expressions in the ADF Security EL namespace described in Table 41-12 let you check the user permission, authentication and role membership status before displaying UI components in your page. When you need fine-grained protection over UI components to secure functional parts of the application that are not part of task flow security or web page security, you use the EL value userGrantedResource and a resource grant that you define for a custom resource type. For instance, through a resource grant that you create for a menu item, the application may either enable or disable a Cancel Shipment menu item to limit who may perform customer order updates.
Resource grants for custom resources types rely on the ResourcePermission class, which is provided by Oracle Platform Security Services (OPSS) and packaged with the application.
You use the overview editor for security policies to create a security policy for the custom resource type. And, in your web page, you use the security expression to evaluate the user's access rights to the UI component projected by the resource grant.
Best Practice:
Custom resource types in combination with theResourcePermission matcher class let you extend ADF Security to define custom actions for use in grants. This gives you the flexibility to define security policies to manage the user's ability to view UI components without having to overload the built-in actions defined by the ADF resources' permission classes. Be aware that you do not need to create custom resource types to manage access to web pages. This level of access is provided by the default ADF Security view permission that you work with in the overview editor for security policies.To grant resource policies for a custom resource type:
-
Create the custom resource type for the UI component you want to protect.
-
Create the resource grant for the custom resource.
-
Associate the rendering of a UI component with a role's granted resource permission.
41.11.2.1 Creating the Custom Resource Type
You use the Create Resource Type dialog to create a resource type for the UI component that you want to protect. JDeveloper will match your resource type definition to the OPSS permission class oracle.security.jps.ResourcePermission. This class allows you to specify custom actions that you can grant to functional parts of your application that are not protected by task flow security or web page security. For example, you might want to create a resource type to protect sensitive parts of the application accessed by the user through a menu UI component.
The Create Resource Type dialog lets you identify the type of resource you wish to protect (for example, the name MenuProtection would identify the menu UI component), a display name visible in the security policy store (for example, Menu Protection), and a description of how the resource type will be used in the resource grant (for example, Resource permission to grant menu item permissions). The dialog also lets you enter one or more custom action names that you will use to grant permission. For example, you might name the action process for use in a security policy that grants access to a protected menu item.
It may be helpful to have an understanding of the ADF Permission class. For more information, see Section 41.11.2, "How to Protect UI Components Using OPSS Resource Permissions and EL."
You may also find it helpful to understand functionality that can be added using other Oracle ADF features. For more information, see Section 41.1.3, "Additional Functionality for ADF Security."
To create the custom resource type:
-
In the main menu, choose Application and then Secure > Resource Grants.
-
In the Resource Grants page of the overview editor for security policies, click New Resource Type.
-
In the Create Resource Type dialog, enter the name and display name that describes the UI component.
For example, to protect menu items, you might enter
MenuProtectionfor the name andMenu Protectionfor the display name. -
In the Actions list, click Add and enter the name of the actions that your permission will grant and click OK.
For example, when protecting a menu item, you might enter
processto signify that permission to process the menu selection is being granted. You can enter multiple action names when you intent to grant specific actions to individual users or roles. The overview editor displays the custom permission grant, as shown in Figure 41-34.
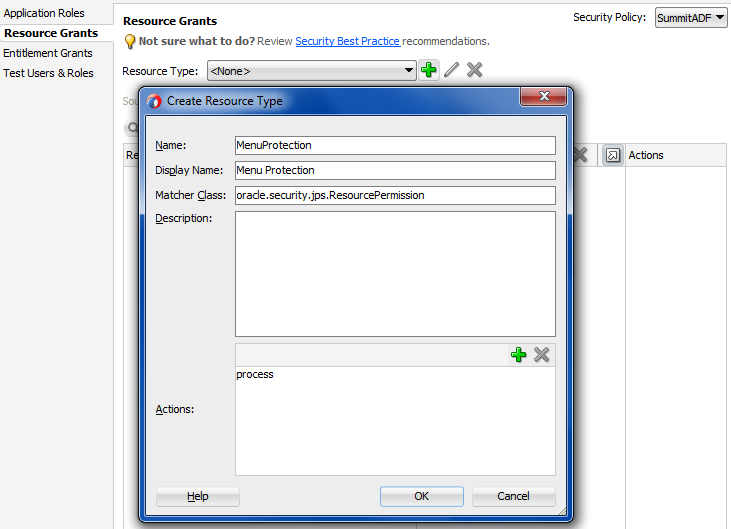
41.11.2.2 Creating a Resource Grant for a Custom Resource Type
You use the overview editor for the jazn-data.xml file to create the ADF Security policy for a custom resource. The finished source should look similar to the permission grant defined in the policy store, as shown in Example 41-26.
Example 41-26 Custom Resource Permission Grant Definition
<grant>
  <grantee>
    <principals>
      <principal>
         <name>AccountManagersadmin</name>
         <class>oracle.security.jps.service.policystore.ApplicationRole</class>
      </principal>
     </principals>
  </grantee>
  <permissions>
     <permission>
       <class>oracle.security.jps.ResourcePermission</class>
       <name>resourceType=MenuProtection,resourceName=CancelShipment</name>
       <actions>process</actions>
     </permission>
   </permissions>
</grant>
The <permission> target name identifies the custom resource type and name that you assigned the resource. For example, a resource name that lets users cancel shipments from a menu selection in their account might be named CancelShipment.
The actions are those that your custom resource type defines. For example, in the Menu Protection resource type defines the single action process to grant permission to process the menu selection.
It may be helpful to have an understanding of the ResourcePermission class. For more information, see Section 41.11.2, "How to Protect UI Components Using OPSS Resource Permissions and EL."
You may also find it helpful to understand functionality that can be added using other Oracle ADF features. For more information, see Section 41.1.3, "Additional Functionality for ADF Security."
You will need to complete this task:
- Create the custom resource type, as described in Section 41.11.2.1, "Creating the Custom Resource Type."
To create the resource grant for a custom resource type:
-
In the main menu, choose Application and then Secure > Resource Grants.
-
In the Resource Grants page of the overview editor for security policies, select the custom resource from the Resource Type dropdown list.
-
In the Resources column, click the Add Resource icon.
-
In the Create Resource dialog, enter the name, display name, and description for the resource that the security policy will specifically protect and then click OK.
-
In Resource Grants page of the overview editor, in the Granted to column, click the Add Grantee icon and choose Add Application Role.
-
In the Actions column, select action that you defined for the custom resource type.
The overview editor displays the resource grant, as shown in Figure 41-35.
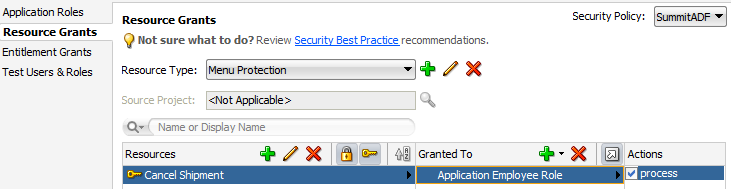
41.11.2.3 Associating the Rendering of a UI Component with a Resource Grant
You use the Expression Builder dialog for the UI component display property to define an EL expression that controls rendering the component. For example, to protect a menu item in an application that allows authorized users to cancel shipments, the application specifies a userGrantedResource expression on the disabled property of the menu item defined by af:commandMenuItem. As Example 41-27 shows, the expression tests whether the user has been granted the resource type and then either displays the menu item or, when the user has not been granted the resource, disables the menu item.
Example 41-27 Expression to Evaluate User's Resource Grant
#{!securityContext.userGrantedResource
       ['resourceName=CancelShipment;resourceType=MenuProtection;action=process']}
Figure 41-36 shows how the expression appears in the Expression Builder dialog.
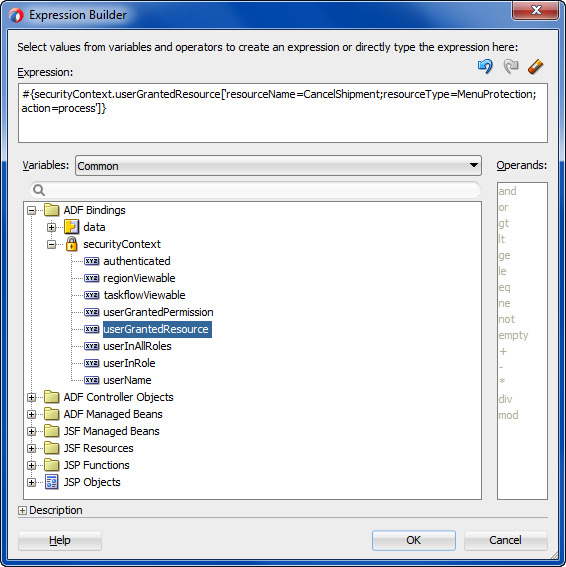
It may be helpful to have an understanding of the ResourcePermission class. For more information, see Section 41.11.2, "How to Protect UI Components Using OPSS Resource Permissions and EL."
You may also find it helpful to understand functionality that can be added using other Oracle ADF features. For more information, see Section 41.1.3, "Additional Functionality for ADF Security."
You will need to complete these tasks:
-
Create the custom resource type, as described in Section 41.11.2.1, "Creating the Custom Resource Type."
-
Create the ADF security policy using the custom permission, as described in Section 41.11.2.2, "Creating a Resource Grant for a Custom Resource Type."
To associate the rendering of a UI component with a user's granted resource:
-
In the Applications window, double-click the page that contains the UI component that you wish to conditionally render.
-
In the visual editor for the page, select the component that is used to navigate to the secured page.
-
In the Property window, click the Property Menu dropdown menu displayed menu next to the Rendered field and choose Expression Builder.
-
In the Expression Builder, expand the ADF Bindings - securityContext node and select userGrantedResource, and then, in the Expression field, enter a concatenated string that defines the permission.
Enter the permission string as a semicolon-separated concatenation of
resourceName=theResourceInstanceName;resourceType=customResourceTypeName;action=actionName. For example, to protect a menu item in an application that allows authorized users to cancel shipments, you would enter an expression similar to the one shown in Example 41-28, where the resource type foruserGrantedResourceidentifies the resource type used in the custom resource grant.Example 41-28 EL Expression to Evaluate User's Resource Grant
#{!securityContext.userGrantedResource
       ['resourceName=CancelShipment;resourceType=MenuProtection;action=process']}
In Example 41-28, the expression evaluates the permission based on the custom resource type named
MenuProtectionthat you added to the application policy store. -
Click OK.
41.11.3 How to Perform Authorization Checks for Entity Object Operations
In the Fusion web application, you can enable security for the data collection when you secure the operations of the entity object. The user must have sufficient privileges to view, update, or delete the data for the entire row set.
The oracle.jbo.ViewCriteriaRow API allows you to perform authorization checks for the standard operations (read, update, removeCurrentRow) at the level of entity rows. Example 41-29 shows how to use the authorization checking API, getSecurityHints() and allowsOperation(), on the entity row, to test whether the user has permission to delete data.
Example 41-29 Invoking the Authorization Checking API for Entity Rows
if(row.getSecurityHints().allowsOperation("removeCurrentRow").hasPermission())
        // code for the data
else
        // display error message
Note that the allowsOperation() method expects as input the secured operation name rather than the name of the action that secures it. The operation name for deleting an entity row is removeCurrentRow (where delete is the action name).
When you want to perform authorization checks for the entity object that underlies data bound components in a JSF page of the Fusion web application, you can use EL expressions. For example, the following EL expression returns true if the user has been granted the permission to perform the operation specified. The <operationName> used in the expression must be the read, update, or removeCurrentRow operation that you enabled for the entity object.
#{row.hints.allows.<operationName>}
Authorization checking expressions are evaluated in the context of a row collection. When you want to check entity permissions outside of the context of the row collection, you must use the userGrantedResource method as shown in Table 41-12.
41.11.4 Getting Information from the ADF Context
The implementation of security in a Fusion web application is by definition an implementation of the security infrastructure of the ADF Security framework. As such, the security context of the framework allows access to information that is required as you define the policies and the overall security for your application.
41.11.4.1 How to Determine Whether Security Is Enabled
Because the enforcement of ADF Security can be turned on and off at the container level independent of the application, you should determine whether ADF Security is enabled prior to making authorization checks. You can achieve this by calling the isAuthorizationEnabled() method of the ADF security context, as shown in Example 41-30.
41.11.4.2 How to Determine Whether the User Is Authenticated
As the user principal in a Fusion web application is never null (that is, it is either anonymous for unauthenticated users or the actual user name for authenticated users), it is not possible to simply check whether the user principal is null to determine if the user has logged on or not. As such, you must use a method to take into account that a user principal of anonymous indicates that the user has not authenticated. You can achieve this by calling the isAuthenticated() method of the ADF security context, as shown in Example 41-31.
Example 41-31 Using the isAuthenticated() Method of the ADF Security Context
// ============ User's Authenticated Status =============
private boolean _authenticated;
public boolean isAuthenticated() {
  _authenticated = ADFContext.getCurrent().getSecurityContext().isAuthenticated();
  return _authenticated;
}
41.11.4.3 How to Determine the Current User Name
Fusion web applications support the concept of public pages that, while secured, are available to all users. Furthermore, components on the web pages, such as portlets, require knowledge of the current user identity. As such, the user name in a Fusion web application will never be null. If an unauthenticated user accesses the page, the user name anonymous will be passed to page components.
You can determine the current user's name by evaluating the getUserName() method of the ADF security context, as shown in Example 41-32. This method returns the string anonymous for all unauthenticated users and the actual authenticated user's name for authenticated users.
Example 41-32 Using the getUserName() Method of the ADF Security Context
// ============ Current User's Name/PrincipalName =============
     public String getCurrentUser() {
      _currentUser = ADFContext.getCurrent().getSecurityContext().getUserName();
      return _currentUser;
     }
Because the traditional method for determining a user name in a Faces-based application (FacesContext.getCurrentInstance().getExternalContext().getRemoteUser()) returns null for unauthenticated users, you need to use additional logic to handle the public user case if you use that method.
41.11.4.4 How to Determine Membership of a Java EE Security Role
As Fusion web applications are JavaServer Faces-based applications, you can use the isUserInRole(roleName) method of the Faces external context, as shown in Example 41-33, to determine whether a user is in a specified role. Because ADF Security is based around JAAS policies, you should not need to use Java EE security roles to secure pages associated with ADF security-aware resources based on role membership. However, you might use the method to check the role for a page that is not associated with an ADF security-aware resource.
In this example, a convenience method (checkIsUserInRole) is defined. The use of this method within a managed bean enables you to expose membership of a named role as an attribute, which can then be used in EL.
Example 41-33 Using the isUserInRole(roleName)) Method of the Faces Context
public boolean checkIsUserInRole(String roleName){
        return
(FacesContext.getCurrentInstance().getExternalContext().isUserInRole(roleName));
}

public boolean isCustomer() {
        return (checkIsUserInRole("Application Customer Role"));
 }
41.11.4.5 How to Determine Permission Using Java
To evaluate the security policies from within Java, you can use the hasPermission method of the ADF security context. This method takes a permission object (defined by the resource and action combination) and returns true if the user has the corresponding permission.
In Example 41-34, a convenience function is defined to enable you to pass in the name of the page and the desired action, returning true or false based on the user's permissions. Because this convenience function is checking page permissions, the RegionPermission class is used to define the permission object that is passed to the hasPermission method.
Example 41-34 Using the hasPermission() Method to Evaluate Access Policies
private boolean TestPermission (String PageName, String Action)  {
  Permission p = new RegionPermission("view.pageDefs." + PageName + "PageDef",
                                         Action);
  if (p != null) {
     return ADFContext.getCurrent().getSecurityContext().hasPermission(p);
  }
  else {
     return (true);
}
As it is possible to determine the user's permission for a target page from within a backing bean, you can use this convenience method to dynamically alter the result of a Faces navigation action. In Example 41-35, you can see that a single command button can point to different target pages depending on the user's permission. By checking the view permission from the most secured page (the manager page) to the least secured page (the public welcome page), the command button's backing bean will apply the appropriate action to direct the user to the page that corresponds to their permission level. The backing bean that returns the appropriate action is using the convenience method defined in Example 41-34.
Example 41-35 Altering a Page Navigation Result Based on an Authorization Check
//Button Definition
<af:button text="Goto Your Group Home page"
  binding="#{backing_content.commandButton1}"
  id="commandButton1"
  action="#{backing_content.getSecureNavigationAction}"/>

//Backing Bean Code
    public String getSecureNavigationAction() {
      String ActionName;
      if (TestPermission("ManagerPage", "view"))
        ActionName = "goToManagerPage";
      else if (TestPermission("EmployeePage", "view"))
        ActionName = "goToEmployeePage";
      else
        ActionName = "goToWelcomePage";
      return (ActionName);
    }
41.11.5 Best Practices for Working with ADF Security
These best practices summarize the rules that govern enforcement of security by the ADF Security framework. Understanding these best practices will help you to secure the application to allow users to access the web pages you intend.
Do build your application with ADF Security enabled from the start.
When you enable security, you essentially lock down the application and you will be required to make explicit permission grants to specific ADF security-aware resources you create. Knowing about these resources and making grants on them as you build the application will enable you to iteratively test security to ensure that you structure your application in a way that achieves the desired result.
Do define permission grants for bounded task flows.
Pages that the user accesses within the process of executing a bounded task flow will not be individually permission-checked and will run under the permission grants of the task flow. This means that any page that you add to the task flow should not have its own page definition-level security defined. Upon requesting a flow, the user will be allowed either to view all the pages of the task flow or to view none of the pages, depending on their level of access.
Do not define permission grants for individual pages of a bounded task flow.
It is important to realize that task flows do not prevent users from accessing pages directly. Any web page that is located in a directory that is publicly accessible can be reached from a browser using a URL. To ensure that pages referenced by a bounded task flow cannot be accessed directly, remove all permission grants that exist for their associated page definition file. When pages require additional security within the context of a bounded task flow, wrap those pages in a sub-task flow with additional grants defined on the nested task flow.
Do use task flows to reduce the number of access points exposed to end users.
When you use task flows you can reduce the number of access points that you expose to end users. For example, configure an unbounded task flow to display one page that provides navigation to the remaining pages in your application. Use bounded task flows for the remaining pages in the application. By setting the URL Invoke property of these bounded task flows to url-invoke-disallowed, your application has one access point (the page on the unbounded task flow). For more information about the URL Invoke property, see Section 21.6.4, "How to Call a Bounded Task Flow Using a URL."
Do specify an alternative task flow for unauthorized users.
End users who attempt to invoke a bounded task flow in a region for which they do not have the necessary permission will see a region that renders as blank in place of the requested task flow. The region when left blank may confuse end users as it does not provide feedback as to why the requested task flow does not appear. Consider configuring an alternative task flow that does not require authorization when this scenario occurs. For more information configuring an alternative task flow, see Section 23.12, "Handling Access to Secured Task Flows by Unauthorized Users."
Do define permission grants for individual pages outside of a bounded task flow.
Page-level security is checked for pages that have an associated page definition binding file only if the page is directly accessed or if the page is accessed in an unbounded task flow. There is a one-to-one relationship between the page definition file and the web page it secures.
If you want to secure a page that uses no ADF bindings, you can create an empty page definition binding file for the page.
Do define custom permissions to render UI component based on the user's access rights.
Custom ADF permission classes let you extend ADF Security to define custom actions for use in grants. This gives you the flexibility to define security policies to manage the user's ability to view UI components without having to overload the built-in actions defined by the ADF resources' permission classes.
Do define entity object attribute permissions to manage the user's access rights to row-level data displayed by UI components.
Entity objects and entity object attributes both define permission classes that let you define permissions for the read, update, and delete operations that the entity object initiates on its data source. In the case of these data model project components, you must explicitly grant permissions to an application role in order to opt into ADF Security authorization. However, once you enable authorization for an entity object, all rows of data defined by the entity object will be protected by the grant. At this level of granularity, your table component would render in the web page either with all data visible or with no data visible—depending on the user's access rights. As an alternative to securing the entire collection, you can secure individual columns of data. This level of granularity is supported by permissions you set on the individual attributes of entity objects. When entity objects are secured, users may see only portions of the data that the table component displays.
Do use task flow or page-level permission grants to avoid exposing row-level create/insert operations to users with view-only permission.
The correct way to control access to a page that should allow only certain users to update new rows in a table is to use task flow or page-level permission grants. However, as an alternative, it is possible to secure table buttons corresponding to particular operations by specifying an EL expression to test the user's access rights to view the button. When the custom permission is defined and the userGrantedPermission expression is set on the Rendered property of the button, only users with sufficient privileges will see the button. This may be useful in a case where the user interface displays a page that is not restricted and view-only permission for row-level data is defined for the entity object. In this case, when viewed by the user, the Delete button for the editable table associated with the entity object will appear disabled. However, in the case of an input table, the user interface does not disable the button for the CreateInsert operation even though the user may not have update permission.
Do not use JDeveloper as a user identity provisioning tool.
JDeveloper must not be used as an identity store provisioning tool, and you must be careful not to deploy the application with user identities that you create for testing purposes. Deploying user identities with the application introduces the risk that malicious users may gain unintended access. Instead, always rely on the system administrator to configure user identities through the tools provided by the domain-level identity management system. You should delete all users and groups that you create in the jazn-data.xml file before deploying the application.
Do not allow users to access a web page by its file name.
When you deploy the Fusion web application, you should always permit users to access the web page from a view activity defined in the ADF Controller configuration file. Do not allow users to access the JSPX file directly by its physical name (for example, similar to the file name AllDepartments.jspx.
Assuming the view activity is named AllDepartments, then there are two ways to call the page:
-
localhost:7101/myapp/faces/AllDepartments -
localhost:7101/myapp/faces/AllDepartments.jspx
The difference is that the call 1) is in the context of the ADF Controller task flow, which means that navigation on the page will work and any managed beans that are referenced by the page will be properly instantiated. The call in 2) also serves the page, however, the page may not function fully. This may be considered a security breach.
To prevent direct JSPX file access, move the JSPX file under the /public_html/WEB-INF directory so that direct file access is no longer possible. To access a document, users will have to call its view activity name.
Note that this suggestion does not protect documents that are unprotected in ADF Security. It only helps to lock down access to the physical file itself.
Thus, the following security guidelines still apply:
-
Apply ADF Security permissions to all JSPX documents associated with view activities defined in the
adfc-config.xmlfile. -
Move all JSPX documents in the user interface project under the
/public_html/WEB-INFdirectory to prevent direct file access. -
Limit the pages in the
adfc-config.xmlto the absolute minimum and place all other pages into bounded task flows. -
Make bounded task flows inaccessible from direct URL access (which is the default configuration setting for new task flows).
-
Apply ADF Security permissions to bounded task flows.