25 Using Dialogs in Your Application
This chapter describes how to create dialogs in your Fusion web application. It describes how you can use ADF Controller and task flows to create dialogs or, alternatively, use the ADF Faces dialog framework.
This chapter includes the following sections:
25.1 About Using Dialogs in Your Application
Use dialogs if you want to show information to end users in a secondary browser window external to the browser window that displays the end user's current page. For example, you want to display help information to end users to assist them with a task in the primary browser window or you want end users to choose a value from a list of values. The help information example is a use case where a modeless dialog is appropriate. A modeless dialog allows end users work in both the primary window and the dialog at the same time. For the use case where you want an end user to choose a value, a modal dialog is more appropriate. A modal dialog prevents an end user accessing the page that invoked the dialog until they execute an action requested by the dialog (for example, choose a value).
Use the ADF Faces dialog framework if you want to configure modeless dialogs for your end users. If you plan to configure modal dialogs for your end users, configure an ADF Controller bounded task flow to invoke one or more dialogs.
25.1.1 Using Dialogs in Your Application Use Cases and Examples
Section 25.2, "Running a Bounded Task Flow in a Modal Dialog" describes how you can run a bounded task flow in a modal dialog to retrieve input from an end user, and return to a view activity that called the bounded task with the retrieved input. If your application does not use ADF Controller task flows or you want to use modeless dialogs, Section 25.3, "Using the ADF Faces Dialog Framework Instead of Bounded Task Flows," describes how you can use the ADF Faces dialog framework to render one or more pages in a dialog.
25.1.2 Additional Functionality for Using Dialogs in Your Application
You may find it helpful to understand other Oracle ADF features before you configure or use dialogs in your application. Additionally, you may want to read about what you can do with the dialogs you configure. Following are links to other functionality that may be of interest.
-
If your application uses ADF Controller task flows, you may find it helpful to understand more about the features that task flows offer. For more information, see Chapter 20, "Getting Started with ADF Task Flows."
-
For more information about ADF Faces components, see Developing Web User Interfaces with Oracle ADF Faces.
-
You can also write custom code for your dialogs using the APIs provided by Oracle ADF. Make sure when you write custom code that you do not import packages that are marked internal, as in this example:
import oracle.adfinternal.controller.*;For information about the APIs that you can use to write custom code, see the following reference documents:
25.2 Running a Bounded Task Flow in a Modal Dialog
You can configure a bounded task flow to run in a modal dialog, retrieve input from an end user, and return to the view activity that called the bounded task flow with the retrieved input. The bounded task flow that you configure must reference pages, not page fragments.
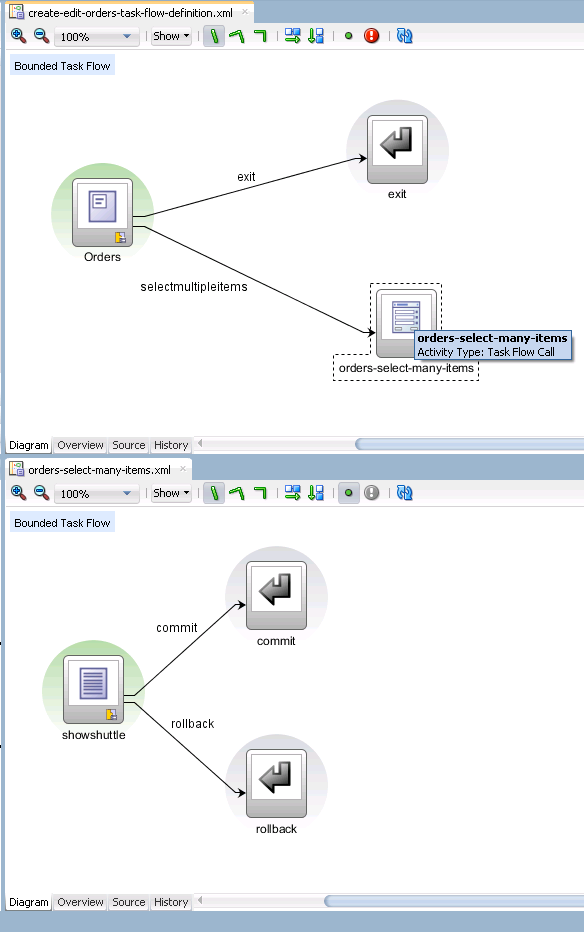
Figure 25-1 shows an example of the configuration required from the Summit sample application for ADF task flows. The task flow in create-edit-orders-task-flow-definition contains a view activity (Orders) from where the end user invokes the orders-select-many-items.xml task flow that renders a modal dialog. For more information, see Section 25.2.1, "How to Run a Bounded Task Flow in a Modal Dialog."
When the end user closes the dialog, control and any modified values return to the launch page in the calling task flow in create-edit-orders-task-flow-definition. For more information, see Section 25.2.2, "How to Return a Value From a Modal Dialog."
In addition, you can configure the application to refresh part of the launch page after the modal dialog returns control. For more information, see Section 25.2.3, "How to Refresh a Page After a Modal Dialog Returns."
25.2.1 How to Run a Bounded Task Flow in a Modal Dialog
You add a view activity and a task flow call activity to an existing task flow. The view activity invokes a page where an end user can invoke an action that, in turn, invokes the bounded task flow to appear in a modal dialog.
It may be helpful to have an understanding of how the attributes you configure affect the functionality of a bounded task flow in a modal dialog. For more information, see Section 25.2, "Running a Bounded Task Flow in a Modal Dialog."
You may also find it helpful to understand functionality that can be added using other Oracle ADF features. For more information, see Section 25.1.2, "Additional Functionality for Using Dialogs in Your Application."
To run a bounded task flow in a modal dialog box:
-
In the Applications window, double-click the existing task flow.
-
In the diagram for the task flow, double-click the view activity to open the associated page.
-
Select the command component that the end user clicks at runtime to invoke the bounded task flow as a modal dialog box (for example, a
buttoncomponent). -
In the Properties window, expand the Common section and enter the control flow case to invoke the bounded task flow in the Action field.
For example,
selectmultipleitemsin Figure 25-1. -
From the UseWindow dropdown list, select true to invoke the bounded task flow in a popup dialog.
-
In the diagram for the existing task flow, select the task flow call activity.
-
In the Properties window, expand the Behavior section and select true from the Run As Dialog dropdown list to run the bounded task flow as a dialog.
The bounded task flow that the task flow activity calls can now behave as a dialog; it can be invoked by the command component you configured in Steps 3 to 5 and can return a value to the view activity that renders the command component, as described in Section 25.2.2, "How to Return a Value From a Modal Dialog." Note that you need to make these other changes to run a bounded task flow in a modal dialog. Setting the
run-as-dialogattribute totrueis not sufficient. -
Select external-window (the default value) from the Display Type dropdown list if you want to render the dialog in an external browser window or inline-popup if you want to render the dialog in the same browser window.
25.2.2 How to Return a Value From a Modal Dialog
You can configure a bounded task flow that renders in a modal dialog to return a value to the view activity that invoked the bounded task flow when the end user dismisses the modal dialog. The returned value can, for example, be displayed in an input component on the page associated with the view activity.
You must configure the bounded task flow that is called by the task flow call activity to declare input parameters and return values. For more information, see Section 22.3, "Passing Parameters to a Bounded Task Flow."
You specify a method binding for a method with one argument (a return event) as the value for the returnListener attribute of the command component (for example, a button component). The returnListener attribute sets this value in the input component on the page associated with the view activity. Specify a backing bean for the input component and set the input component's partialTrigger attribute to the ID of the command component.
You also need to specify:
-
A return value definition on the called bounded task flow to indicate where to take the return value from upon exit of the called bounded task flow.
-
Return values on the task flow call activity in the existing task flow to indicate where the existing task flow can find return values.
For more information, see Section 22.4, "Configuring a Return Value from a Bounded Task Flow."
For more information about creating backing beans, input components, and command components, see the "Using Input Components and Defining Forms" chapter in Developing Web User Interfaces with Oracle ADF Faces.
It may be helpful to have an understanding of how the attributes you configure affect the functionality of bounded task flows in modal dialogs. For more information, see Section 25.2, "Running a Bounded Task Flow in a Modal Dialog."
You may also find it helpful to understand functionality that can be added using other Oracle ADF features. For more information, see Section 25.1.2, "Additional Functionality for Using Dialogs in Your Application."
You will need to complete this task:
- Configure a bounded task flow to run in a modal dialog. For more information, see Section 25.2.1, "How to Run a Bounded Task Flow in a Modal Dialog."
-
In the Applications window, double-click the task flow that contains the task flow call activity to invoke the bounded task flow to render in a modal dialog.
-
In the diagram editor, select the task flow call activity.
-
In the Properties window, expand the Behavior section and select true from the Run As Dialog dropdown list.
-
In the Dialog Return Value field, enter the name of the return value definition you specified for the target bounded task flow.
For information about how to specify the return value definition on a bounded task flow, see Section 22.4, "Configuring a Return Value from a Bounded Task Flow."
-
In the Applications window, double-click the page that launches the modal dialog.
-
In the design editor, select the input component and, in the Properties window, expand the Behavior section to specify an EL expression in the PartialTriggers field.
The EL expression you specify identifies the command component, accepts the return value of the command component, and specifies a backing bean. For example, enter an EL expression with syntax similar to the following:
#{pageFlowScope.backingBean.gotoModalDialog}where
gotoModalDialogidentifies the command component. -
In the design editor, select the command component and, in the Properties window, expand the Behavior section and enter an EL expression that references a return listener method in the page's backing bean as a value in the ReturnListener field.
The return listener method you specify processes the return event that is generated when an end user dismisses the modal dialog. In the Summit ADF task flow sample application, the command component in the
Orders.jsffpage fragment specifies the following EL expression:#{viewScope.OrdersBackingBean.onShuttleTaskFlowReturn}
25.2.3 How to Refresh a Page After a Modal Dialog Returns
You can configure the page from where end users invoke a modal dialog to refresh after end users close the modal dialog. You may want to configure this behavior if the modal dialog returns a value or end users edit existing data in the page through controls in the modal dialog.
You implement this functionality by configuring the command component that invokes the modal dialog to listen for a return event. When it receives the return event, it invokes a backing bean method that executes a partial page render event on your page. Example 25-1 shows a button component that invokes a modal dialog and listens for a return event.
Example 25-1 ReturnListener Attribute Referencing a Backing Bean Method
<af:button text="Edit"
    id="b1" binding="#{backingBeanScope.backing_launch_page.b1}"
    action="edit" useWindow="true"
    returnListener="#{backingBeanScope.backing_launch_page.backFromPopup}"/>
The button component's returnListener attributes listens for the return event from invoking the modal dialog. When it receives the return event, it invokes a backing bean method similar to Example 25-2:
Example 25-2 Backing Bean Method to Invoke a Partial Page Event
public void backFromPopup(ReturnEvent returnEvent) {
        AdfFacesContext adfFacesContext;
        adfFacesContext = AdfFacesContext.getCurrentInstance();
        adfFacesContext.addPartialTarget(this.getF1());
}
The backing bean method (backFromPopup) takes the return event as an argument and, in our example, invokes a partial page render event on a form in the page.
It may be helpful to have an understanding of how you configure other options for modal dialogs that you invoke from a page associated with a view activity in a task flow. For more information, see Section 25.2, "Running a Bounded Task Flow in a Modal Dialog."
You may also find it helpful to understand other functionality that can be added using other task flow and dialog framework features. For more information, see Section 25.1.1, "Using Dialogs in Your Application Use Cases and Examples."
To refresh a page after a modal dialog returns:
-
In the Applications window, double-click the task flow that invokes the bounded task flow that renders in a modal dialog.
-
In the diagram, double-click the view activity that references the page where your end user invokes a command component to launch the modal dialog.
-
In the design editor, select the command component.
-
In the Properties window, expand the Behavior section and, from the ReturnListener field under the Secondary Window label, select Edit from the icon that appears when you hover over the property field to specify the name of the backing bean method that you want JDeveloper to generate.
-
In the Edit Property: ReturnListener dialog, click New beside the Managed Bean field.
-
In the Create Managed Bean dialog, name the bean and the class, set the bean's scope, and click OK.
-
In the Edit Property: ReturnListener dialog, click New beside the Method field.
-
In the Create Method dialog, name the method and click OK.
-
In the Edit Property: ReturnListener dialog, click OK.
-
In the Applications window, expand Application Sources and then expand the package that contains the backing bean class and method that you created in Steps 3 to 9.
-
Write a method body similar to Example 25-2 to invoke a partial page render event on your page.
25.2.4 What You May Need to Know About Dialogs in an Application that Uses Task Flows
If your Fusion web application renders modeless dialogs (non modal dialogs without task flows) and also uses ADF Controller features, such as task flows, you specify the dialog:syntax in the control flow rules of the application's adfc-config.xml file rather than the faces-config.xml file. Specify dialog:syntax in navigation rules within the faces-config.xml file if your Fusion web application does not use ADF Controller features, as described in Section 25.3, "Using the ADF Faces Dialog Framework Instead of Bounded Task Flows."
Example 25-3 shows an example of what you can specify in the adfc-config.xml file.
Example 25-3 adfc-config.xml file with dialog:syntax
<?xml version="1.0" encoding="windows-1252" ?>
  <adfc-config xmlns="http://xmlns.oracle.com/adf/controller" version="1.2" id="__1">
    <view id="view1"
        <page>/view1.jsf</page>
    </view>
    <view id="dialog">
       <page>/dialog/untitled1.jsf</page>
   </view>
   <control-flow-rule>
        <from-activity-id>test</from-activity-id>
        <control-flow-case>
          <from-outcome>dialog:test</from-outcome
          <to-activity-id>dialog</to-activity-id>
         </control-flow-case>
</adfc-config>
25.3 Using the ADF Faces Dialog Framework Instead of Bounded Task Flows
You can use the ADF Faces dialog framework to create modal and modeless dialogs in an application that does not use ADF Controller and task flows. The dialog framework enables you to display a page or series of pages in a new browser window instead of displaying it in the same window (using the same view ID) as the current page. There may also be cases where you want to use a series of inline dialogs, that is, dialogs that are part of the parent page, but that have a flow of their own, but that do not use a separate view ID. This is important for applications that do not support popups such as, for example, applications that run on client devices or that use the Active Data Service described in Chapter 47, "Using the Active Data Service." Ordinarily, you would need to use JavaScript to open the dialog and manage the process. With the dialog framework, ADF Faces makes it easy to open a new browser window as well as manage dialogs and processes without using JavaScript.
Note:
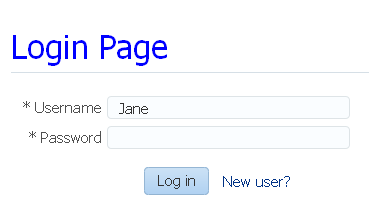
If your application uses the Fusion technology stack with ADF Controller, then you should use task flows to create dialogs launched in a separate window, or multiple dialog processes. For more information, see Section 25.2, "Running a Bounded Task Flow in a Modal Dialog."Consider a simple application that requires users to log in to see their orders. Figure 25-2 shows the page flow for the application, which consists of five pages: login.jspx, orders.jspx, new_account.jspx, account_details.jspx, and error.jspx.

When an existing user logs in successfully, the application displays the Orders page, which shows the user's orders, if any. When a user does not log in successfully, the Error page displays in a separate popup dialog window, as shown in Figure 25-3.
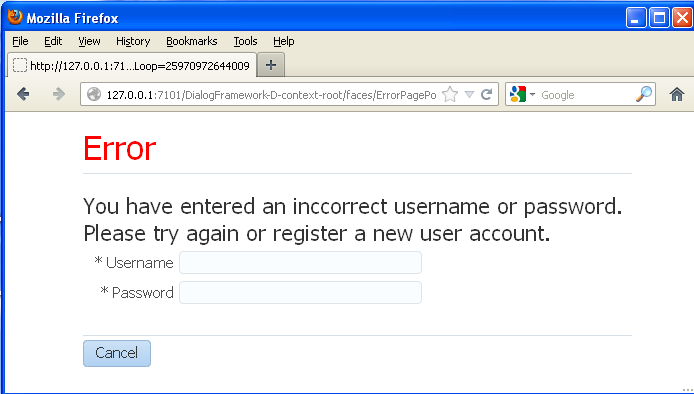
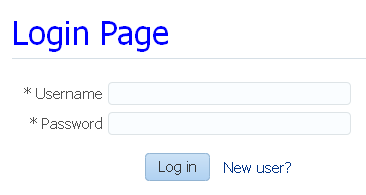
On the Error page there is a Cancel button. When the user clicks Cancel, the popup dialog closes and the application returns to the Login page and the original flow, as shown in Figure 25-4.
When a new user clicks the New User link on the Login page, the New Account page displays in a popup dialog in a new window, as shown in Figure 25-5.
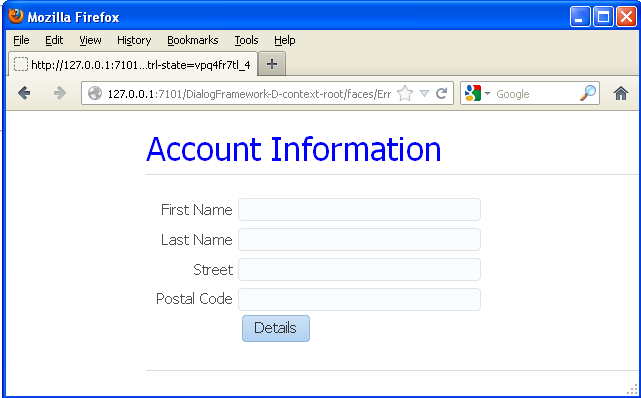
After entering information such as first name and last name, the user then clicks the Details button to display the Account Details page in the same popup dialog, as shown in Figure 25-6. In the Account Details page, the user enters other information and confirms a password for the new login account. There are two buttons on the Account Details page: Cancel and Done.
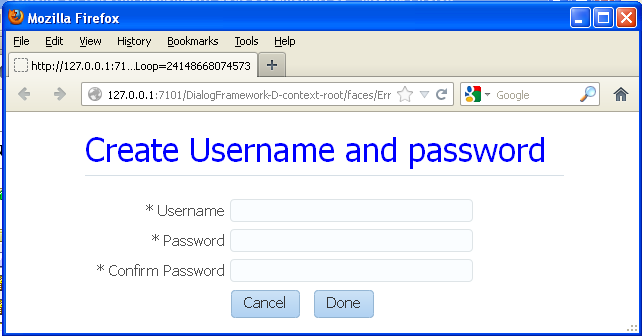
If the new user decides not to proceed with creating a new login account and clicks Cancel, the popup dialog closes and the application returns to the Login page. If the new user clicks Done, the popup dialog closes and the application returns to the Login page where the Username field is now populated with the user's first name, as shown in Figure 25-7. The new user can then proceed to enter the new password and log in successfully.
Note:
The dialog framework should not be used to have more than one dialog open at a time, or to launch dialogs that have a life span outside of the life span of the base page.To make it easy to support dialog page flows in your applications, ADF Faces has built in the dialog functionality to action components (such as commandMenuItem and button). For ADF Faces to know whether or not to open a page in a new flow from an action component, the following conditions must exist:
-
There must be a JSF navigation rule with an outcome that begins with
dialog:. -
The command component's action outcome must begin with
dialog:. -
The
useWindowattribute on the command component must betrue.
Note:
If theuseWindow attribute is false, or if you configure the popup to be a separate window (and not inline) and the client device does not support popups, ADF Faces automatically shows the page in the current window instead of using a popup window; code changes are not required to facilitate this action.The page that displays in a dialog is an ordinary JSF page, but for purposes of explaining how to implement external dialogs in this chapter, a page that displays in a popup dialog is called the dialog page, and a page from which the dialog is opened is called the originating page. A dialog process starts when the originating page opens a dialog (which can contain one dialog page or a series of dialog pages), and ends when the user dismisses the dialog and returns to the originating page.
To create a dialog page flow in an application:
-
Define a JSF navigation rule for opening a dialog.
-
Create the JSF page from which a dialog is opened.
-
Create the dialog page and return a dialog value.
-
Optional: Pass a value into a dialog.
-
Handle the return value.
The tasks can be performed in any order.
25.3.1 How to Define a JSF Navigation Rule for Opening a Dialog
You manage the navigation into a dialog flow by defining a standard JSF navigation rule with a special dialog: outcome.
To define a navigation rule to open a dialog:
-
In the Applications window, expand the WEB-INF node and double-click adfc-config.xml.
-
In the diagram editor, create a page flow for your originating page and dialog pages.
For more information, see Section 20.4.1, "How to Add a Control Flow Rule to a Task Flow."
-
When creating navigation rules to the dialog pages, the outcome must begin with
dialog:. For example, in the login sample application shown in Figure 25-2, the outcome from the Login page to the New Account dialog page isdialog:newAccount.
At runtime, the dialog navigation rules on their own simply show the specified pages in the originating page. But when used with command components with dialog: action outcomes and with useWindow attributes set to true, ADF Faces opens the pages in dialogs.
25.3.2 How to Create the JSF Page That Opens a Dialog
In the originating page, you need to use a command component to launch the dialog. The command component's action value needs to be the outcome to the dialog that is to be launched.
It may be helpful to have an understanding of how the attributes you configure affect the functionality of the ADF Faces dialog framework. For more information, see Section 25.1, "About Using Dialogs in Your Application."
You may also find it helpful to understand functionality that can be added using other Oracle ADF features. For more information, see Section 25.1.2, "Additional Functionality for Using Dialogs in Your Application."
You will need to complete this task:
- You also need to create the JSF page that opens a dialog. For more information, see the "Creating a View Page" section in Developing Web User Interfaces with Oracle ADF Faces.
To create the JSF Page that opens a dialog:
-
In the Applications window, double-click the JSF page.
-
In the ADF Faces page of the Components window, from the General Controls panel, drag and drop a command component (for example, a Button) onto the JSF page.
For more information about adding a command component to a page, see the "Using Buttons and Links for Navigation" section in Developing Web User Interfaces with Oracle ADF Faces.
Note the following when setting the attributes on the command component:
-
Action: Set the action attribute to the outcome that navigates to the dialog, as created in Section 25.3.1, "How to Define a JSF Navigation Rule for Opening a Dialog."
Tip:
The action value can be either a static string or the return of a method on a managed bean.For example, the action attribute on the command component of the Login page is bound to a method that determines whether to navigate to the Orders page or to the Error dialog page, based on the returned outcome. If the method returns
dialog:error, the error dialog opens. If the method returns success, the user navigates to the Orders page. -
ActionListener: As an alternative to setting the action attribute, configure the
actionListenerattribute to invoke thelaunchDialogmethod from an instance of the following class:oracle.adf.view.rich.context.AdfFacesContextFor more information about the
launchDialogmethod and theAdfFacesContextclass, see the Java API Reference for Oracle ADF Faces. -
UseWindow: Set to
trueto have the dialog open.Tip:
When set tofalse, ADF Faces shows the dialog page in the current window after preserving all of the state of the current page. You do not have to write any code to facilitate this. -
WindowHeight and WindowWidth: Set the desired size of the dialog window. These values will set the
contentWidthandcontentHeightattributes on the popup component for the dialog.Tip:
While the user can change the values of these attributes at runtime, the values will not be retained once the user leaves the page unless you configure your application to use change persistence. For information about enabling and using change persistence, see the "Allowing User Customization on JSF Pages" chapter in Developing Web User Interfaces with Oracle ADF Faces. -
PartialSubmit: Set to true. This prevents the originating page from reloading (and hence being visible only momentarily) when the popup dialog is displayed.
-
WindowEmbedStyle: Set to
inlineDocumentif you want the dialog to open in a popup that belongs to the originating page. Set towindowif you want the dialog to open in a separate browser. -
WindowModalityType: Set to
applicationModalif you want the dialog to be modal. Modal dialogs do not allow the user to return to the originating page until the dialog has been dismissed. Set tomodelessif you want the user to be able to go back and forth between the originating page and the dialog.
-
When a command component is about to open a dialog, it delivers a LaunchEvent event. The LaunchEvent event stores information about the component that is responsible for opening a popup dialog, and the root of the component tree to display when the dialog process starts. A LaunchEvent can also pass a map of parameters into the dialog. For more information, see Section 25.3.5, "How to Pass a Value into a Dialog."
25.3.3 How to Create the Dialog Page and Return a Dialog Value
A dialog page is just like any other JSF page, with one exception. In a dialog page, you must provide a way to tell ADF Faces when the dialog process finishes, that is, when the user dismisses the dialog or series of dialogs.
For example, the New Account page and Account Details page belong in the same dialog process. A dialog process can have as many pages as you desire, you only need to notify the framework that the dialog process has ended once.
You do this declaratively using the returnActionListener tag as a child to the command component used to close the dialog. However, if you need to provide a return value or other action event processing, you can bind the actionListener attribute on the command component to a method that calls the AdfFacesContext.returnFromDialog() method. This method lets you send back a return value in the form of a java.lang.Object or a java.util.Map of parameters. You do not have to know where you are returning the value to - ADF Faces automatically takes care of it.
At runtime, the AdfFacesContext.returnFromDialog() method tells ADF Faces when the user dismisses the dialog. This method can be called whether the dialog page is shown in a popup dialog or in the main window. If a popup dialog is used, ADF Faces automatically closes it.
It may be helpful to have an understanding of how the attributes you configure affect the functionality of the ADF Faces dialog framework. For more information, see Section 25.1, "About Using Dialogs in Your Application."
You may also find it helpful to understand functionality that can be added using other Oracle ADF features. For more information, see Section 25.1.2, "Additional Functionality for Using Dialogs in Your Application."
To close a dialog window and optionally return a value:
-
In the Applications window, double-click the dialog page.
-
In the ADF Faces page of the Components window, from the General Controls panel, drag and drop a command component (for example, a Button) onto the dialog page.
For more information about adding a command component to a page, see the "Using Buttons and Links for Navigation" section in Developing Web User Interfaces with Oracle ADF Faces.
-
If the command component will be used to close the window, in the Properties window, expand the Behavior section and select true from the Immediate dropdown list.
-
If the command component will be used to navigate to another page in the dialog process, configure the command component as though it were standard navigation. To do this, in the Properties window, expand the Common section and select false from the UseWindow dropdown list. This causes the next page to display in the same dialog window, preserving the state of the previous page.
-
If you need to end the dialog process and close the dialog, but do not need to return a value, in the Components window, from the Operations panel, in the Listeners group, drag a Return Action Listener and drop it as a child to the command component.
The
returnActionListenertag calls thereturnFromDialogmethod on theAdfFacesContextobject - no backing bean code is needed.No attributes are used with the
af:returnActionListenertag. Theimmediateattribute on theaf:buttoncomponent is set totrueif the user clicks Cancel without entering values in the required Password and Confirm Password fields, the default JSFActionListenercan execute during the Apply Request Values phase instead of the Invoke Application phase, thus bypassing input validation. For more information, see the "Using the JSF Lifecycle with ADF Faces" chapter in Developing Web User Interfaces with Oracle ADF Faces. -
If you need to end the dialog process and do need to return a value, create a method on a managed bean that handles the
actionevent and returns the needed values using thereturnFromDialogmethod on the current instance ofAdfFacesContext.Note:
TheAdfFacesContext.returnFromDialog()method returnsnull. This is all that is needed in the backing bean to handle the Cancel action event.For example, when the user clicks Done on the Account Details page, the process ends and returns the user input values. Example 25-4 shows the code for the event handler method to which the Done button binds. The method gets the customer information, then either creates a Faces message for an incorrect password, or sets the values on the new customer object and return that object.
Example 25-4 Action Listener Method for the Done Button in a Managed Bean
public void done(ActionEvent e)
{
  AdfFacesContext afContext = AdfFacesContext.getCurrentInstance();
  String firstname = afContext.getPageFlowScope().get("firstname").toString();
  String lastname = afContext.getPageFlowScope().get("lastname").toString();
  String street = afContext.getPageFlowScope().get("street").toString();
  String zipCode = afContext.getPageFlowScope().get("zipCode").toString();
  String country = afContext.getPageFlowScope().get("country").toString();
  String password = afContext.getPageFlowScope().get("password").toString();
  String confirmPassword =
   afContext.getPageFlowScope().get("confirmPassword").toString();
  if (!password.equals(confirmPassword))
  {
    FacesMessage fm = new FacesMessage();
    fm.setSummary("Confirm Password");
    fm.setDetail("You've entered an incorrect password. Please verify that you've
     entered a correct password!");
    FacesContext.getCurrentInstance().addMessage(null, fm);
  }
  else
  {
    //Get the return value
    Customer cst = new Customer();
    cst.setFirstName(firstname);
    cst.setLastName(lastname);
    cst.setStreet(street);
    cst.setPostalCode(zipCode);
    cst.setCountry(country);
    cst.setPassword(password);
    // And return it
    afContext.getCurrentInstance().returnFromDialog(cst, null);
  }
}
25.3.4 What Happens at Runtime: How to Raise the Return Event from the Dialog
When the dialog is dismissed, ADF Faces generates a return event (ReturnEvent). The AdfFacesContext.returnFromDialog() method sends a return value as a property of the return event. The return event is delivered to the return listener (ReturnListener) that is registered on the command component that opened the dialog (for example, the New User link on the Login page). How you handle the return value is described in Section 25.3.7, "How to Handle the Return Value."
25.3.5 How to Pass a Value into a Dialog
To pass a value into a dialog, you use a LaunchListener listener bound to a handler method for the LaunchEvent. You can use the getDialogParameters() method to add a parameter to a Map using a key-value pair.
It may be helpful to have an understanding of how the attributes you configure affect the functionality of the ADF Faces dialog framework. For more information, see Section 25.1, "About Using Dialogs in Your Application."
You may also find it helpful to understand functionality that can be added using other Oracle ADF features. For more information, see Section 25.1.2, "Additional Functionality for Using Dialogs in Your Application."
To pass a value into a dialog:
-
In the Applications window, double-click the JSF page that contains the command component used to navigate to the dialog page.
-
In the design editor, select the command component used to navigate to the dialog page.
-
In the Properties window, expand the Behavior section.
-
From the icon that appears when you hover over the LaunchListener property field, select Edit.
-
In the Edit Property: LaunchListener dialog, click New beside the Managed Bean field.
-
In the Create Managed Bean dialog, name the bean and the class, set the bean's scope, and click OK.
-
In the Edit Property: LaunchListener dialog, click New beside the Method field.
-
In the Create Method dialog, name the method and click OK and click OK to close the Edit Property: LaunchListener dialog.
-
In the Applications window, expand Application Sources and then expand the package that contains the bean class and method that you created in Steps 3 to 8.
-
In the source editor, write a handler method for the
LaunchEventthat uses thegetDialogParametersmethod to get the parameters from a dialog.For example, in the sample application, a new user can enter a name in the Username field on the Login page, and then click the New User? link. When the New Account dialog page displays in a popup dialog, the First Name input field is automatically populated with the name that was entered in the Login page. To accomplish this, you create a handler that uses the
getDialogParametersmethod to put the value of the username field into the dialog, as shown in Example 25-5.Example 25-5 LaunchEvent Listener Method for the New User Link in a Backing Bean
public void handleLaunch(LaunchEvent event) { //Pass the current value of the field into the dialog Object usr = username; event.getDialogParameters().put("firstname", getUsername()); } // Use by inputText value binding private String username; public String getUsername() { return username; } public void setUsername(String username) { this.username = username; } -
In the Applications window, double-click the dialog page.
-
On the dialog page, use the
pageFlowScopeobject to retrieve the key and value via a special EL expression in the format#{pageFlowScope.someKey}, as shown in Example 25-6
25.3.6 What Happens at Runtime: How the LaunchEvent is Handled
In ADF Faces, a process always gets a copy of all the values that are in the pageFlowScope of the page from which a dialog is launched. When the getDialogParameters() method has added parameters to a Map, those parameters also become available in pageFlowScope, and any page in the dialog process can get the values out of pageFlowScope by referring to the pageFlowScope objects via EL expressions.
Note:
UnlikesessionScope, pageFlowScope values are visible only in the current page flow or process. If the user opens a new window and starts navigating, that series of windows has its own process; values stored in each window remain independent. Clicking on the browser's Back button automatically resets pageFlowScope to its original state. When you return from a process the pageFlowScope is back to the way it was before the process started. To pass values out of a process you use AdfFacesContext.returnFromDialog(), sessionScope or applicationScope.25.3.7 How to Handle the Return Value
To handle a return value once the dialog is dismissed, you define a return listener on the command component that launched the dialog. For example, in the sample application, once a new user enters information, that information needs to be handled once the dialog process is complete.
It may be helpful to have an understanding of how the attributes you configure affect the functionality of the ADF Faces dialog framework. For more information, see Section 25.1, "About Using Dialogs in Your Application."
You may also find it helpful to understand functionality that can be added using other Oracle ADF features. For more information, see Section 25.1.2, "Additional Functionality for Using Dialogs in Your Application."
-
In the Applications window, double-click the JSF page that contains the command component used to navigate to the dialog page.
-
In the design editor, select the command component used to navigate to the dialog page.
-
In the Properties window, expand the Behavior section.
-
From the icon that appears when you hover over the ReturnListener property field, select Edit.
-
In the Edit Property: ReturnListener dialog, click New beside the Managed Bean field.
-
In the Create Managed Bean dialog, name the bean and the class, set the bean's scope, and click OK.
-
In the Edit Property: ReturnListener dialog, click New beside the Method field.
-
In the Create Method dialog, name the method and click OK and click OK to close the Edit Property: LaunchListener dialog.
-
In the Applications window, expand Application Sources and then expand the package that contains the bean class and method that you created in Steps 3 to 8.
-
In the source editor, write a handler method for the
returnEvent. You use thegetReturnValue()method to retrieve the return value, because the return value is automatically added as a property of theReturnEvent.Example 25-7 shows the code for the return listener method that handles the return value.
Example 25-7 Return Listener Method for the New User Link in a Backing Bean
public void handleReturn(ReturnEvent event)
{
  if (event.getReturnValue() != null)
  {
    Customer cst;
    String name;
    String psw;
    cst = (Customer)event.getReturnValue();
    name = cst.getFirstName();
    psw = cst.getPassword();
    CustomerList.getCustomers().add(cst);
    inputText1.setSubmittedValue(null);
    inputText1.setValue(name);
    inputText2.setSubmittedValue(null);
    inputText2.setValue(psw);
  }
}
25.3.8 What Happens at Runtime: How the Launching Component Handles the ReturnEvent
At runtime in the sample application, when ADF Faces delivers a ReturnEvent to the ReturnListener registered on the link component, the handleReturn() method is called and the return value is processed accordingly. The new user is added to a customer list, and as a convenience to the user any previously submitted values in the Login page are cleared and the input fields are populated with the new information.