12 Working with JCache
In this exercise, you learn how to use JCache, the Java standard APIs for caching on the Java platform. This exercise is similar to Chapter 3, "Accessing the Data Grid from Java" where you created a Java console-based application to access, update, and remove simple types of information from a Coherence clustered cache. However, instead of using NamedCache and the Coherence API, it uses Cache and the JCache API.
This chapter has the following sections:
12.1 Introduction
Coherence includes a JCache provider implementation. JCache is a common API for using caching in Java. You can use the JCache API and Coherence provides the underlying caching capabilities. The provider-based approach guarantees cross-provider portability and allows developers to focus on application logic rather than creating and managing complex cache subsystems.
The Coherence JCache provider is built upon the existing capabilities of Coherence. The provider relies on the Coherence infrastructure and can be thought of as a wrapper for the Coherence NamedCache API. This allows Coherence to reuse and expose many of its best-in-class technologies using JCache interfaces.
The key files which support JCache are cache-api.jar and coherence-jcache.jar. The cache-api.jar file contains the JCache libraries. The coherence-jcache.jar file contains the Coherence implementation which is built on top of the JCache library. Both of these files must appear on the classpath of the application.
The APIs in the coherence-jcache.jar file allow JCache to support the use of distributed, local, passthrough, and remote caches. It also supports the use of POF serialization, events, and entry processors.
For more information on the JCache provider implementation, see "Introduction to Coherence JCache" in Oracle Fusion Middleware Developing Applications with Oracle Coherence.
Oracle is a lead contributor of the JCache specification. See the following URL to obtain the JCache specification (JSR-107 "Java Caching API"):
12.2 Creating a JCache-Based Java Project
Follow these steps to create a project that uses JCache.
-
In the Eclipse IDE, select File, then New, then Application Client Project to create a new project called
JCache. Select CoherenceConfig from the Configuration drop-down list. Click Next. -
Click Next to accept the defaults in the Java page of the wizard. In the Application Client module page, deselect Create a default Main class. Click Next.
-
Click the Manage Libraries icon in the Coherence page to create a user library to contain the JCache and Coherence JCache libraries.
-
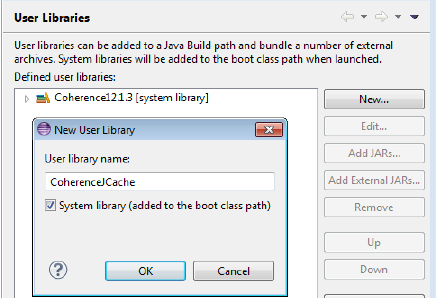
Click New in the User Libraries dialog box to name the user library. In the New User Library dialog box, enter CoherenceJCache and select the System Library checkbox as illustrated in Figure 12-1. Click OK.
Figure 12-1 Creating the CoherenceJCache User Library
Description of "Figure 12-1 Creating the CoherenceJCache User Library"
-
Select the CoherenceJCache library in the User Libraries dialog box and click Add External JARs.
-
Navigate to the location of the
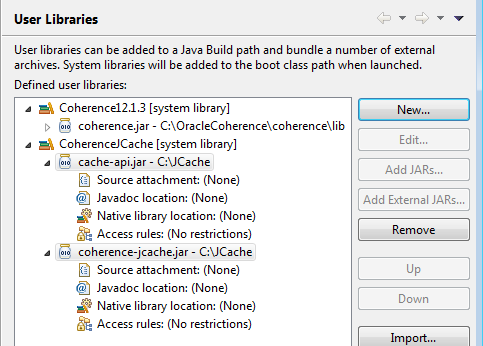
/coherence/libfolder in your Coherence distribution and select thecache-api.jarand thecoherence-jcache.jarfiles. When you are finished, the User Libraries dialog box should look similar to Figure 12-2. Click OK.Figure 12-2 Adding Coherence JCache JARS to the User Libraries
Description of "Figure 12-2 Adding Coherence JCache JARS to the User Libraries"
-
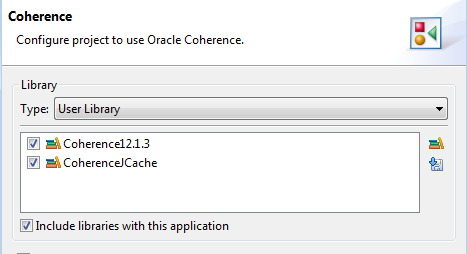
Select the CoherenceJCache library in the Coherence page. The Coherence page should look similar to Figure 12-3. Click Finish.
Figure 12-3 Coherence Configuration Page for a JCache Project
Description of "Figure 12-3 Coherence Configuration Page for a JCache Project"
12.3 Creating a JCache-Based Application to Put Values in the Cache
This section describes how to create a Java program that uses the JCache APIs to access and update simple types of information from a Coherence clustered cache.
To create a JCache-based application:
-
Create a new Application Client Project in Eclipse. Name the project JCache. Ensure that the folder is
C:\home\oracle\workspace\JCache.In the Configuration section of the New Application Client Project dialog box, click Modify. In the Project Facets dialog box, select CoherenceConfig from the Configuration drop down list.
See ""Creating a New Project in the Eclipse IDE" for detailed instructions.
-
Create your first Coherence JCache Java program. Name the class
MyFirstJCacheSampleand select the public static void main(String[] args) check box in the New Java Class dialog box. -
In the Eclipse editor, write the code to create a
Cacheobject, enter a value in the cache, and then verify the value that you entered.Notice that in JCache, as opposed to Coherence, you do need to write more code to create a cache. In JCache, you must first get the cache manager and set the cache configuration parameters before you can create the cache.
Example 12-1 illustrates a sample program.
Example 12-1 Creating a JCache Cache Object: Inserting and Verifying Values
package com.oracle.handson; import javax.cache.Cache; import javax.cache.CacheManager; import javax.cache.Caching; import javax.cache.configuration.MutableConfiguration; import javax.cache.spi.CachingProvider; public class MyFirstJCacheSample { public MyFirstJCacheSample() { } public static void main(String[] args) { // ensure we are in a cluster CacheFactory.ensureCluster(); //get cache manager CachingProvider cachingProvider = Caching.getCachingProvider(); CacheManager cacheManager = cachingProvider.getCacheManager(); //set configuration for the cache PassThroughCacheConfiguration<String, String> config = new PassThroughCacheConfiguration(); config.setTypes(String.class, String.class); //create and use the cache cacheManager.createCache("myCache", config); Cache<String, String> cache = cacheManager.getCache("myCache", String.class, String.class); // put key, value pair into the cache. cache.put("Name","Gene Smith"); System.out.println("Value in cache is " + cache.get("Name")); } } -
Stop any running cache servers. See "Stopping Cache Servers" for detailed information.
-
Run the program in the Eclipse IDE:
-
Right-click the
MyFirstJCacheSample.javaclass in the editor and select Run As then Run Configuration. Double-click Oracle Coherence to create a Coherence configuration. EnterMyFirstJCacheSamplein the Name field of the Run Configuration dialog box. -
In the Main tab, enter
JCachein the Project field andcom.oracle.handson.MyFirstJCacheSamplein the Main class field. -
In the Coherence tab, enter a unique value, such as 3155, in the Cluster port field to ensure that Coherence is limited to your own host. Select Enabled (cache server) under Local storage.
-
Note that in the Classpath tab, the CoherenceJCache library should appear before the Coherence12.1.3 library in the Bootstrap Entries list. Click Apply, then Run.
Messages similar to Example 12-2 are displayed:
Example 12-2 Output of MyFirstJCacheSample Program
2014-02-20 15:28:53.188/0.377 Oracle Oracle Coherence GE 12.1.3.0.0 <Info> (thread=main, member=n/a): Loaded operational configuration from "jar:file:/C:/OracleCoherence1/coherence/lib/coherence.jar!/tangosol-coherence.xml"
2014-02-20 15:28:53.303/0.492 Oracle Oracle Coherence GE 12.1.3.0.0 <Info> (thread=main, member=n/a): Loaded operational overrides from "jar:file:/C:/OracleCoherence1/coherence/lib/coherence.jar!/tangosol-coherence-override-dev.xml"
2014-02-20 15:28:53.383/0.572 Oracle Oracle Coherence GE 12.1.3.0.0 <Info> (thread=main, member=n/a): Loaded operational overrides from "file:/C:/home/oracle/workspace/JCache/build/classes/tangosol-coherence-override.xml"
...
2014-02-20 15:28:53.668/0.857 Oracle Coherence GE 12.1.3.0.0 <D5> <Info> (thread=main, member=n/a): Loaded cache configuration from "jar:file:/C:/OracleCoherence1/coherence/lib/coherence-jcache.jar!/coherence-jcache-cache-config.xml"
2014-02-20 15:28:53.848/1.037 Oracle Coherence GE 12.1.3.0.0 <D5> <Info> (thread=main, member=n/a): Created cache factory com.tangosol.net.ExtensibleConfigurableCacheFactory
2014-02-20 15:28:53.863/1.052 Oracle Coherence GE 12.1.3.0.0 <D5> <Info> (thread=main, member=n/a): Mapping general javax.cache.Configuration implementation to CoherenceBased JCacheConfiguration of com.tangosol.coherence.jcache.localcache.LocalCacheConfiguration
Value in cache is Gene Smith
-
12.4 Running a JCache Application in a Cluster
This section describes how to create and run an application that uses the JCache API in a cluster environment.
12.4.1 Configure an Example Cluster
Partitioned caches and pass-through caches use a Coherence cluster to distribute cached data. This task creates an operational override file to modify the out-of-box default cluster configuration. In particular, the default configuration is modified to create a private cluster which ensures that the JVM processes do not attempt to join an existing Coherence cluster that may be running on the network.
To configure an example cluster:
-
Edit the
tangosol-coherence-override.xmlfile. Double-click thetangosol-coherence-override.xmlfile in the Project Navigator to open it in the editor. -
Add the following override configuration and replace cluster_name and port with values that are unique for this cluster. For example, use
myClusterfor the cluster name and the last four digits of your telephone number for the port.<?xml version='1.0'?> <coherence xmlns:xsi="http://www.w3.org/2001/XMLSchema-instance" xmlns="http://xmlns.oracle.com/coherence/coherence-operational-config" xsi:schemaLocation="http://xmlns.oracle.com/coherence/ coherence-operational-config coherence-operational-config.xsd"> <cluster-config> <member-identity> <cluster-name>cluster_name</cluster-name> </member-identity> <multicast-listener> <address>224.3.6.0</address> <port>port</port> <time-to-live>0</time-to-live> </multicast-listener> </cluster-config> </coherence> -
Save and close the file.
12.4.2 Store the Object in a Pass-Through Cache
A pass-through cache is a cache that delegates to a pre-existing Coherence cache (a cache that is defined in a Coherence cache configuration file). Pass-through caches allow you to use all of the native features of Coherence and provide greater control over cache configuration. The use of pass-through caching requires Coherence-specific changes to the client code and is therefore not intended for JCache applications that are concerned about portability.
In this example, two separate Java processes form the cluster: a cache server process and the MyFirstJCacheSample application process. For simplicity, the two processes are collocated on a single computer. The cache server, by default, is configured to store cache data. A Coherence CacheFactory is used to verify that the MyFirstJCacheSample application successfully created and loaded the cache on the cluster.
12.4.2.1 Modify the Sample JCache Application
The PassThroughCacheConfiguration class is an implementation-specific configuration that provides a JCache interface to a native Coherence cache. The configuration is used instead of the standard MutableConfiguration class.
To configure a cache as a pass-through cache:
-
Open the
MyFirstJCacheSampleclass that you created from Example 12-1. -
Modify the class to use a
PassThroughCacheConfigurationconfiguration. For example:... //set configuration for the cache PassThroughCacheConfiguration<String, String> config = new PassThroughCacheConfiguration(); config.setTypes(String.class, String.class); //create and use the cache cacheManager.createCache("myCache", config); Cache<String, String> cache = cacheManager.getCache("myCache", String.class, String.class); ... -
Save the file.
12.4.2.2 Define the Sample Cache for JCache
For this example, a cache configuration is created that defines a distributed cache that is explicitly mapped to the myCache name.
In the Eclipse environment, the cache configuration for an application which uses the JCache APIs must be stored in the coherence-jcache-cache-config.xml file.
To define the example cache:
-
Obtain the
coherence-jcache-cache-config.xmlfile by using your favorite file compression utility to extract it from thecoherence-jcache.jarfile. Extract the file to theJCache\appClientModulefolder. -
Right-click the JCache project in the Project Explorer and select Refresh. The
coherence-jcache-cache-config.xmlfile should appear in the list of files under theJCache\appClientModulefolder. -
Double-click the
coherence-jcache-cache-config.xmlfile to open it in the editor.Notice that in addition to the namespaces for the XML schema instance and the Coherence cache configuration, the file also contains the definition for the namespace for the JCache namespace (illustrated in bold).
<cache-config xmlns:xsi="http://www.w3.org/2001/XMLSchema-instance" xmlns="http://xmlns.oracle.com/coherence/coherence-cache-config" xmlns:jcache="class://com.tangosol.coherence.jcache.JCacheNamespace" xsi:schemaLocation="http://xmlns.oracle.com/coherence/coherence-cache-config coherence-cache-config.xsd"> ... -
Copy the following distributed cache definition to the file:
<?xml version="1.0"?> <cache-config xmlns:xsi="http://www.w3.org/2001/XMLSchema-instance" xmlns="http://xmlns.oracle.com/coherence/coherence-cache-config" xmlns:jcache="class://com.tangosol.coherence.jcache.JCacheNamespace" xsi:schemaLocation="http://xmlns.oracle.com/coherence/coherence-cache-config coherence-cache-config.xsd"> <caching-scheme-mapping> <cache-mapping> <cache-name>myCache</cache-name> <scheme-name>distributed</scheme-name> </cache-mapping> </caching-scheme-mapping> <caching-schemes> <distributed-scheme> <scheme-name>distributed</scheme-name> <service-name>DistributedCache</service-name> <backing-map-scheme> <local-scheme/> </backing-map-scheme> <autostart>true</autostart> </distributed-scheme> </caching-schemes> </cache-config> -
Save and close the file.
12.4.3 Start the Example Cache Server
Create a run configuration for the Coherence default cache server.
-
Right click the JCache project in the Eclipse IDE. Select Run As then Run Configurations. In the Run Configurations dialog box, select Oracle Coherence then the New launch configuration icon. Enter
DefaultCacheServeras the name for the cache server configuration. -
Under Project, click Browse and select the name of the JCache project from the Project Selection dialog box.
-
Under Main class, select the Include system libraries when searching for a main class checkbox. Click the Search button and enter
DefaultCacheServerin the Select Main Type dialog box. Select com.tangosol.net.DefaultCacheServer and click OK. Click Apply. -
In the Coherence tab, select the General tab. Click the Browse icon to navigate to the cache configuration file
coherence-jcache-cache-config.xml. Select local storage to be Enabled (cache server). Enter a unique value, such as3155for the Cluster port. Click Apply. -
Open the Arguments tab. Enter
-showversionin the VM Arguments field. Click Apply. -
Open the Classpath tab of the dialog box. Click Advanced, then Add Folders to add the
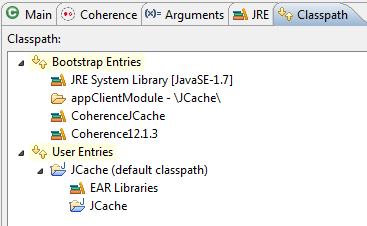
JCache\appClientModulefolder (which contains thetangosol-coherence-override.xmloverride file that you configured in Section 12.4.1, "Configure an Example Cluster") to the Bootstrap Entries section of the classpath. Use the Up and Down buttons to positionappClientModeulebefore theCoherenceJCacheandCoherenc12.1.3libraries. This is because the compiler must encounter thetangosol-coherence-override.xmloverride file before thecoherence.jarlibrary. The Classpath tab should look similar to Figure 12-4.Figure 12-4 Classpath for the DefaultCacheServer
Description of "Figure 12-4 Classpath for the DefaultCacheServer"
-
Open the Common tab of the dialog box. Click the Shared file radio button and click Browse to navigate to the project. Click Apply.
-
Click Run to start the cache server. The cache server should start and display output similar to Example 12-3.
Example 12-3 Output of the DefaultCacheServer
java version "1.7.0_25"
Java(TM) SE Runtime Environment (build 1.7.0_25-b17)
Java HotSpot(TM) 64-Bit Server VM (build 23.25-b01, mixed mode)
...
2014-02-24 15:44:27.381/0.615 Oracle Oracle Coherence GE 12.1.3.0.0 <Info> (thread=main, member=n/a): Loaded operational overrides from "file:/C:/home/oracle/workspace/JCache/appClientModule/tangosol-coherence-override.xml"
...
2014-02-24 15:44:27.710/0.944 Oracle Coherence GE 12.1.3.0.0 <Info> (thread=main, member=n/a): Loaded cache configuration from "file:/C:/home/oracle/workspace/JCache/appClientModule/coherence-jcache-cache-config.xml"
...
2014-02-24 15:44:34.557/7.791 Oracle Coherence GE 12.1.3.0.0 <D5> (thread=DistributedCache, member=1): Service DistributedCache joined the cluster with senior service member 1
2014-02-24 15:44:34.598/7.832 Oracle Coherence GE 12.1.3.0.0 <Info> (thread=main, member=1):
Services
  (
  ClusterService{Name=Cluster, State=(SERVICE_STARTED, STATE_JOINED), Id=0, Version=12.1.3, OldestMemberId=1}
  InvocationService{Name=Management, State=(SERVICE_STARTED), Id=2, Version=12.1.3, OldestMemberId=1}
  PartitionedCache{Name=DistributedCache, State=(SERVICE_STARTED), LocalStorage=enabled, PartitionCount=257, BackupCount=1, AssignedPartitions=0, BackupPartitions=0, CoordinatorId=1}
  )

Started DefaultCacheServer...
 ...
12.4.4 Run the Application
To create a run configuration for the MyFirstJCacheSample class:
-
Right-click the JCache project in the Eclipse IDE. Select Run As then Run Configurations. In the Run Configurations dialog box, select Oracle Coherence then the New launch configuration icon. Enter
MyFirstJCacheSampleas the name for the cache server configuration. Ensure thatJCacheappears in the Project field andcom.oracle.handson.MyFirstJCacheSampleappears in the Main class field. Click Apply. -
In the Coherence tab, navigate to the
coherence-jcache-cache-config.xmlJCache cache configuration file in the Cache configuration descriptor field. Select Disabled (cache client) in the Local storage field. Enter a unique value such as3155in the Cluster port field.Note:
The value for the Cluster port must match the value you provided for the
<port>attribute in thetangosol-coherence-override.xmlfile. -
In the Arguments tab, enter the
-Dtangosol.coherence.jcache.configuration.urisystem property in the VM arguments field to specify the path to the JCache cache configuration filecoherence-jcache-cache-config.xml. For example:-Dtangosol.coherence.jcache.configuration.uri=C:\home\oracle\workspace\JCache\appClientModule\coherence-jcache-cache-config.xml
-
Open the Classpath tab of the dialog box. Click Advanced, then Add Folders to add the
JCache\appClientModulefolder (which contains thetangosol-coherence-override.xmloverride file that you configured in Section 12.4.1, "Configure an Example Cluster") to the Bootstrap Entries section of the classpath. Use the Up and Down buttons to positionappClientModeulebefore theCoherenceJCacheandCoherenc12.1.3libraries. This is because the Coherence compiler must encounter thetangosol-coherence-override.xmloverride file before thecoherence.jarlibrary. The Classpath tab should look similar to Figure 12-4. -
Open the Common tab of the dialog box. Click the Shared file radio button and click Browse to navigate to the JCache project. Click Apply.
-
Click Run to start the
MyFirstJCacheSampleapplication.Notice that the
tangosol-coherence-override.xmlandcoherence-jcache-cache-config.xmlfiles were loaded from theappClientModulefolder. The application process connects to the cluster that contains the cache server process and both processes are running theDistributedCacheservice. The application places the valueGeneSmithin the cache, prints it to standard output, then exits the cluster.Example 12-4 Output of the MyFirstJCacheSample Application
...
2014-02-25 11:09:24.145/0.630 Oracle Oracle Coherence GE 12.1.3.0.0 <Info> (thread=main, member=n/a): Loaded operational overrides from "file:/C:/home/oracle/workspace/JCache/appClientModule/tangosol-coherence-override.xml"
...
2014-02-25 11:09:27.078/3.563 Oracle Coherence GE 12.1.3.0.0 <D5> (thread=Invocation:Management, member=2): Service Management joined the cluster with senior service member 1
...
2014-02-25 11:09:27.833/4.323 Oracle Coherence GE 12.1.3.0.0 <Info> (thread=main, member=2): Loaded cache configuration from "file:/C:/home/oracle/workspace/JCache/appClientModule/coherence-jcache-cache-config.xml"
2014-02-25 11:09:27.986/4.471 Oracle Coherence GE 12.1.3.0.0 <Info> (thread=main, member=2): Created cache factory com.tangosol.net.ExtensibleConfigurableCacheFactory
2014-02-25 11:09:28.070/4.555 Oracle Coherence GE 12.1.3.0.0 <D5> (thread=DistributedCache, member=2): Service DistributedCache joined the cluster with senior service member 1
Value in cache is Gene Smith
12.4.5 Verify the Cache
The cache server in this example is configured, by default, to store the cache's data. The data is available to all members of the cluster and persists even after members leave the cluster. For example, the application exits after it loads and displays a key in the cache. However, the cache and key are still available for all cluster members.
To complete this step, you first save the application to an archive file, then place it on the classpath. You can then use the cache factory command-line tool to connect to the myCache cache and list all items in the cache.
12.4.5.1 Create a JAR file for the Application
To create a JAR file for the MyFirstJCacheSample application:
-
In the Eclipse project Explorer, right-click the build folder under JCache project and select Export.
-
In the Select screen of the Export wizard, open the General node and select Archive File. Click Next.
-
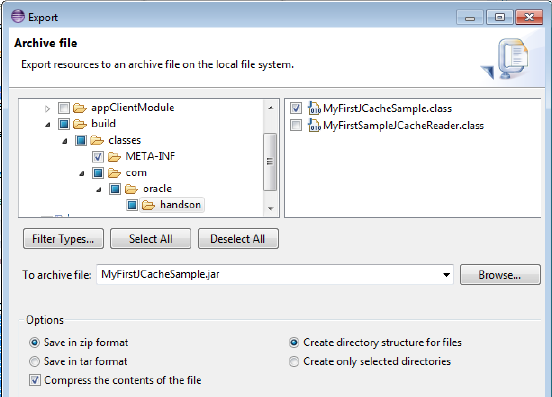
In the Archive file screen of the Export Wizard, open the build node and navigate down to the handson node. Select the handson node in the left pane and select the MyFirstJCacheSample.class file in the right pane. Enter
MyFirstJCacheSample.jarin the To archive file field, as illustrated in Figure 12-5. -
Click Finish to create the JAR file.
12.4.5.2 Verify the Cache Contents Using a Cache Factory Instance
Start a cache factory instance to verify the contents of the cache.
To verify the cache:
-
Create a run configuration for the CacheFactory command line tool. Right click the JCache project in the Eclipse IDE. Select Run As then Run Configurations. In the Run Configurations dialog box, select Oracle Coherence then the New launch configuration icon. Enter
CacheFactoryas the name for the cache server configuration. -
Under Project, click Browse and select the name of the JCache project from the Project Selection dialog box.
-
Under Main class, select the Include system libraries when searching for a main class checkbox. Click the Search button and enter
CacheFactoryin the Select Main Type dialog box. Select com.tangosol.net.CacheFactory and click OK. Click Apply. -
In the Coherence tab navigate to the
coherence-jcache-cache-config.xmlfile in the Cache configuration descriptor field. Select Disabled (cache client) in the Local storage field. Enter a unique value such as3155in the Cluster port field. -
Open the Classpath tab of the dialog box. Click Advanced, then Add External Jars to add the
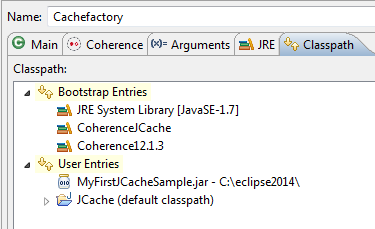
MyFirstJCacheSample.jarfile to the User Entries section of the classpath. Use the Up and Down buttons to positionMyFirstJCacheSample.jarfile before theJCacheproject folder. The Classpath tab should look similar to Figure 12-6.Figure 12-6 Classpath for the Cache Factory Instance
Description of "Figure 12-6 Classpath for the Cache Factory Instance"
-
Open the Common tab of the dialog box. Click the Shared file radio button and click Browse to navigate to the JCache project. Click Apply.
-
Click Run to start the cache factory instance.
The cache factory instance starts and becomes a member of the cluster and returns a command prompt for the command-line tool. Use the cache command at the command-line tool command prompt to get the myCache cache, for example:
cache myCache
At the command-line tool command prompt, use the list command to retrieve the contents of the cache:
list
The command returns and displays:
Name = Gene Smith
Example 12-5 displays the output of the cache factory instance.
Example 12-5 Output of the CacheFactory Instance
...
2014-02-24 15:58:26.240/0.610 Oracle Oracle Coherence GE 12.1.3.0.0 <Info> (thread=main, member=n/a): Loaded operational overrides from "file:/C:/home/oracle/workspace/JCache/build/classes/tangosol-coherence-override.xml"
...
2014-02-24 15:58:29.303/3.673 Oracle Coherence GE 12.1.3.0.0 <D5> (thread=Invocation:Management, member=7): Service Management joined the cluster with senior service member 1
...
Map (?): cache myCache
2014-02-24 16:03:13.374/287.744 Oracle Coherence GE 12.1.3.0.0 <Info> (thread=main, member=7): Loaded cache configuration from "file:/C:/home/oracle/workspace/JCache/appClientModule/coherence-jcache-cache-config.xml"
...
Map (myCache): list
Name = Gene Smith

Map (myCache):
