4 Upgrading a Clustered SOA Environment
This chapter describes the process of upgrading to a clustered SOA environment and performing post-upgrade configuration tasks.
-
Section 4.1, "Understanding the SOA Cluster Upgrade Topology"
-
Section 4.2, "Using Secured Task Forms in a Clustered Topology"
4.1 Understanding the SOA Cluster Upgrade Topology
Figure 4-1 shows a sample topology of a clustered Oracle SOA Suite deployment with SOA, Oracle Web Services Manager (OWSM), Oracle Service Bus (OSB) and Oracle Business Activity Monitoring (Oracle BAM) in separate clusters across two application hosts, SOAHOST1 and SOAHOST2. The Oracle HTTP Server, Administration Server, Oracle Enterprise Manager Fusion Middleware Control and database are shared with both hosts.
Specifically, this chapter describes the steps required to upgrade a WebLogic domain that contains multiple WebLogic Server clusters that are scaled out to multiple host computers. You can apply the concepts and procedures in this chapter to your own specific Oracle SOA Suite environment.
The steps required to upgrade this sample topology are described in the next section in Table 4-1.
Note:
If you are upgrading Oracle BAM with SOA, see Section 5.3, "Upgrading a SOA with Oracle BAM Domain to 12c".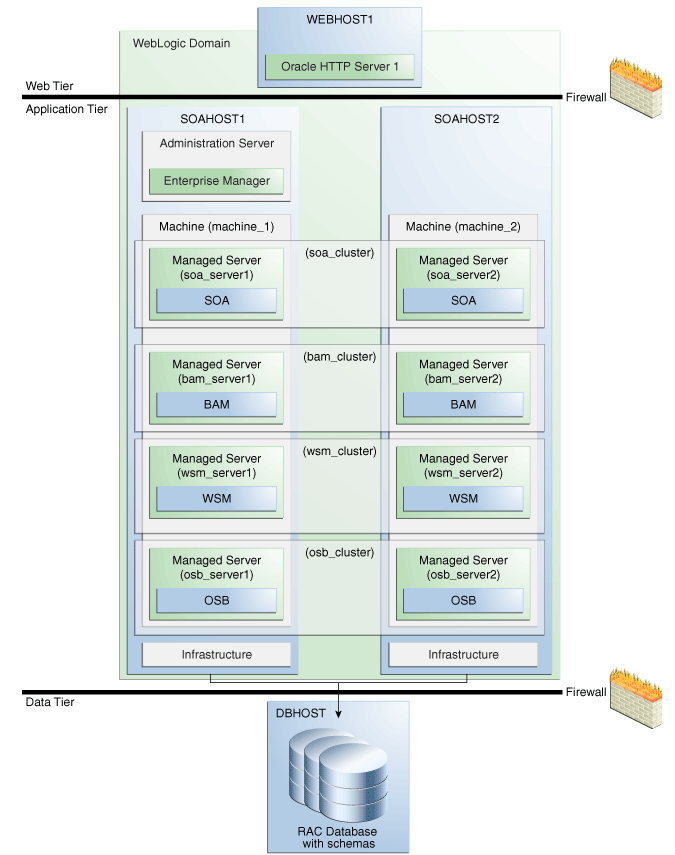
4.2 Using Secured Task Forms in a Clustered Topology
If your SOA composite includes a human task form, or if task forms are deployed on non-SOA servers, then you must secure the task form after the upgrade.
The task form is a Java Server Page XML (.jspx) file that you create in the Oracle JDeveloper designer where you created the SOA composite containing the human task. See Administering Oracle SOA Suite and Oracle Business Process Management Suite.
4.3 Upgrading a Clustered Topology
Table 4-1 lists the steps required to upgrade the example clustered, multi-host Oracle SOA Suite topology illustrated in Figure 4-1.
Table 4-1 Oracle SOA Suite and BPM Cluster Upgrade Roadmap
| Task Number | Task | For More Information |
|---|---|---|
|
1 |
Review the upgrade topology, and identify |
|
|
2 |
Shut down the Administration Server, all the Managed Servers, and the Node Managers running on |
|
|
3 |
Back up the existing environment. |
See, Backing Up Your Existing Oracle Fusion Middleware 11g Environment |
|
4 |
Install 12.1.3 Infrastructure (WebLogic Server, OWSM, and JRF), SOA, OSB, and BAM on |
See, Installing the 12c (12.1.3) Infrastructure Distributions Before Upgrade and Installing SOA Integrated Distributions |
|
5 |
Perform a complete upgrade of your 11g deployment on |
See, Upgrading to SOA Suite and Business Process Management 12c (12.1.3) See Also: If BAM is part of your domain, see Upgrading a SOA with Oracle BAM Domain to 12c If OSB is part of your domain, see Upgrading Oracle Service Bus Without Oracle SOA |
|
6 |
Propagate the domain configuration of To do this, you must pack the domain on |
|
|
7 |
Start the Administration Server and the Managed Servers on |
|
|
8 |
Perform the necessary post-upgrade tasks. |
4.4 Propagating Domain Configuration on SOAHOST2
After you have completed your single node upgrade on SOAHOST1, use these steps to propagate the newly upgraded files to another node (SOAHOST2).
-
Task 2, "Copy the template file created in the previous step to SOAHOST2."
-
Task 3, "Execute the unpack command from the 12c Oracle Home on SOAHOST2."
- Task 1 Execute the pack command on the server where the Admin Server and one of the Managed Servers is installed.
-
In our sample topology, you would execute the following on
SOAHOST1:cd/12c_ORACLE_HOME/oracle_common/common/bin./pack.sh -domain=/11g_DOMAIN_HOME-template=domainupgradetemplate.jar -template_name=domainupgradetemplate -managed=trueIn this example:
-
12c_ORACLE_HOME refers the actual path to the 12c Oracle Home directory (the installation directory for the 12.1.3 bits).
-
Replace 11g_DOMAIN_HOME with the actual path to the upgraded domain directory.
-
domainupgradetemplate.jaris a sample name for the jar file you are creating, which will contain the domain configuration files. -
domainupgradetemplateis the name assigned to the domain template file. -
By default, the
domainupgradetemplateis created in the current directory where you ran the pack command. In this example, it would be created in the following directory, but you can specify a full path for the template jar file as part of the-templateargument to the pack command:ORACLE_COMMON_HOME/common/bin/
The
packcommand creates a template archive (.jar) file that contains a snapshot of either an entire domain or a subset of a domain. You can use a template that contains a subset of a domain to create a Managed Server domain directory hierarchy on a remote machine.For more information on using the pack command, see "Overview of the Pack and Unpack Commands" in Creating Templates and Domains Using the Pack and Unpack Commands.
-
- Task 2 Copy the template file created in the previous step to SOAHOST2.
-
Use the following command to copy domainupgradetemplate.jar file to SOAHOST2:
scp soadomaintemplate.jar company@SOAHOST2:12c_ORACLE_HOME/oracle_common/common/bin
- Task 3 Execute the unpack command from the 12c Oracle Home on SOAHOST2.
-
Make sure that the Admin and Managed Servers are still stopped and then execute the following
unpackcommand to create a full domain or a subset of a domain used for a Managed Server domain directory on the remote machine. You may use unpack only with a template compatible with your current installation.A sample unpack command code snippet is shown below. Use this as an example only. Note that you must specify the "
-overwrite_domain=true" flag on unpack.cd /12c_ORACLE_HOME/
oracle_common/common/bin./unpack.sh -template=domainupgradetemplate.jar - domain=11g_DOMAIN_HOME-overwrite_domain=trueIn this example:
-
12c_ORACLE_HOME refers the actual path to the 12c Oracle Home directory (the installation directory for the 12.1.3 bits).
-
Replace 11g_DOMAIN_HOME with the actual path to the upgraded domain directory.
-
domainupgradetemplate.jaris a sample name for the jar file you are creating, which will contain the domain configuration files. -
domainupgradetemplateis the name assigned to the domain template file.
-
After the unpack, complete the following:
-
Verify that WL_HOME, SOA_ORACLE_HOME, UMS_ORACLE_HOME in setDomainEnv.sh script from 11g domain are pointing to 12c.
-
Start the Node Manager, WebLogic Administration Server, and the Managed Servers on SOAHOST1 and SOAHOST2 in the following order:
-
On SOAHOST1 and SOAHOST2, start the Node Manager.
-
On SOAHOST1, start the WebLogic Administration Server.
-
On SOAHOST1 and SOAHOST2, start the Managed Servers.
-
For more information, see Starting and Stopping Servers. Carefully review the order in which Managed Servers should be started.
If you cannot start the servers or experience other technical issues, see Appendix A, "Troubleshooting the Upgrade"
Note:
During the upgrade, the Node Manager configuration files (nodermanager.properties, for example) are moved from 11g_DOMAIN_HOME/wlserver_10.3/ location to the 11g_ORACLE_HOME/ domains/DOMAIN_HOME/nodemanager location. Therefore, the node manager in 12c has to be started from the 11g_DOMAIN_HOME domain directory.4.5 Performing Post-Upgrade Tasks for Clusters
After a successful cluster upgrade, you may need to perform additional post-upgrade configurations tasks. Perform only those tasks that pertain to your clustered environment.
-
Configuring Oracle HTTP Server for the WLS_OSB Managed Servers
-
Reapplying an EDNTopic to SOA JMS Module After Cluster Upgrade
-
Preventing Duplicate Messages When Using JMS Transport Proxy Service
4.5.1 Configuring Oracle HTTP Server for the WLS_OSB Managed Servers
To enable Oracle HTTP Server to route to Oracle Service Bus console and Oracle Service Bus service, set the WebLogicCluster parameter to the list of nodes in the cluster.
For more information, see "Configuring Oracle HTTP Server for the Oracle Service Bus" in the Enterprise Deployment Guide for Oracle SOA Suite.
4.5.2 Removing OWSM Targets from SOA and OSB Clusters
If your 12c domain includes an Oracle Web Services Manager (OWSM) in its own cluster and you have extended that domain with a SOA cluster and an OSB cluster, then post upgrade you must manually untarget the wsm-pm from the SOA and OSB clusters.
To remove the owsm-pm target from the SOA and OSB clusters:
-
Log in to the WebLogic Server Administration Console 12c.
Enter the following URL in a browser:
http://host name:port_number/console
The port number is the port number of the Administration Server. By default, the port number is 7001.
The login page is displayed.
-
Select Deployments from Domain Structure.
-
Select wsm-pm under Deployments.
-
In the settings for wsm-pm, select Targets.
-
Select wsm-pm component of type Enterprise Application and select Change Targets.
-
Uncheck SOA cluster and OSB cluster.
-
When prompted, click Yes to apply the changes.
-
REQUIRED: Once the wsm-pm is targeted only to the OWSM cluster, you must rewire the components as described in "Updating OWSM Cross-Component Wiring".
4.5.3 Updating OWSM Cross-Component Wiring
After you have removed OWSM targets from SOA and OSB clusters as described in Removing OWSM Targets from SOA and OSB Clusters, you must rewire the OWSM Policy Manager components as described below:
-
Start the Administration (admin) server and one OWSM server.
For more information, see Starting and Stopping Servers.
-
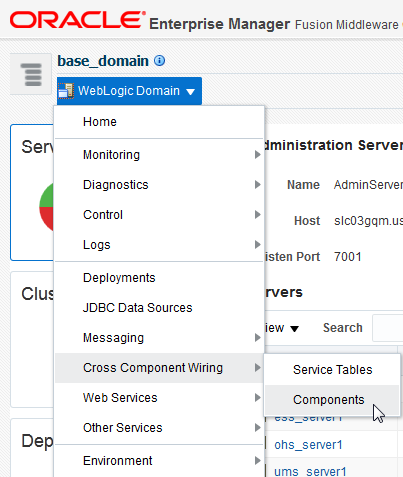
Log in to the Oracle Enterprise Manager Fusion Middleware Control 12c console and navigate to the Cross Components Wiring > Components option.
-
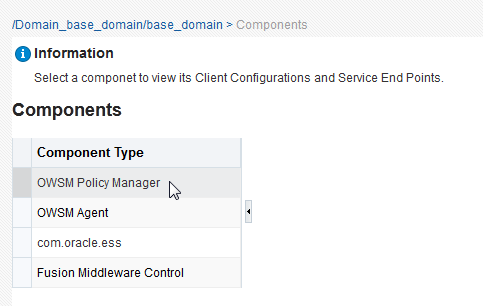
Select OWSM Policy Manager from the list of available components:
-
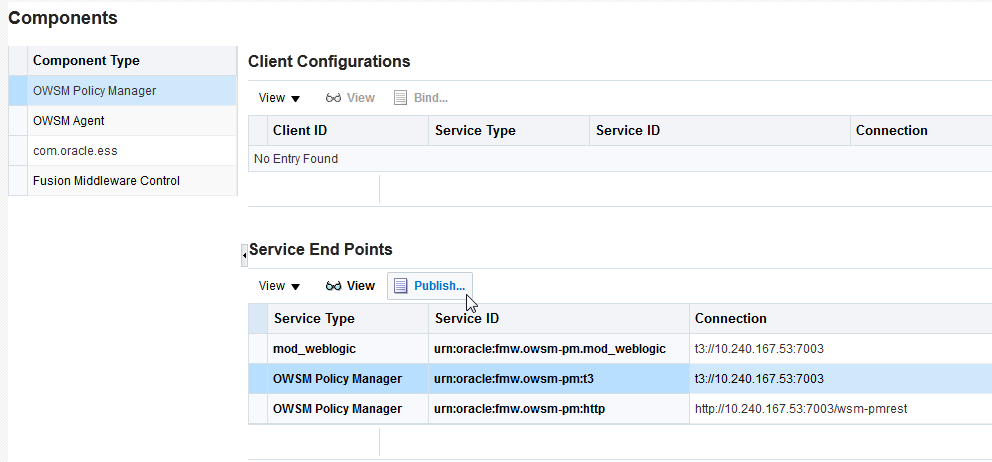
From the Service End Points table, select the OWSM Policy Manager t3 connection entry and click Publish. The status will change from Out of Sync to Published.
-
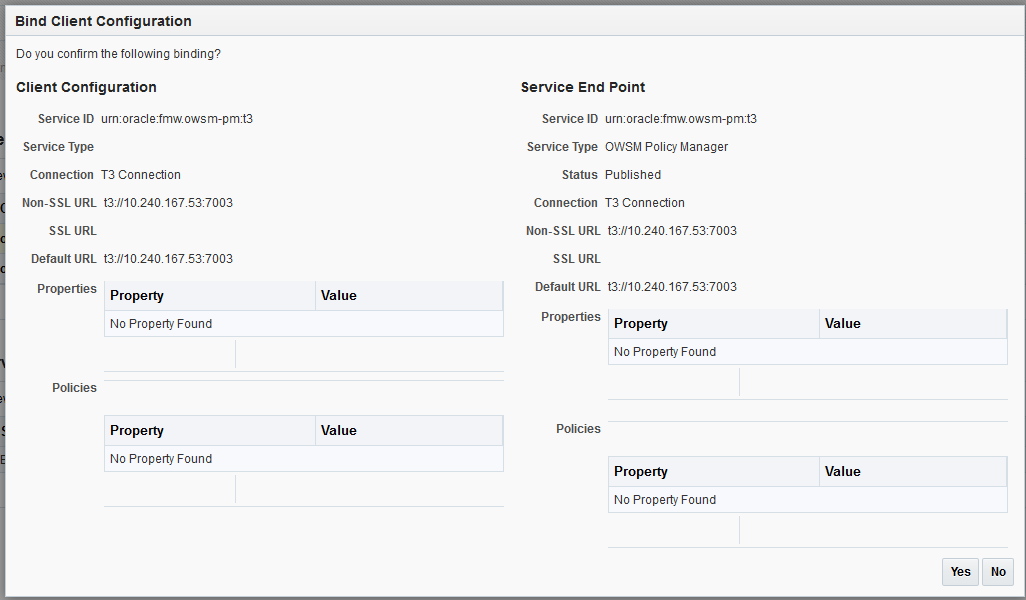
Select OWSM Agent from the Component Type list. Select the t3 connection entry and click Bind.
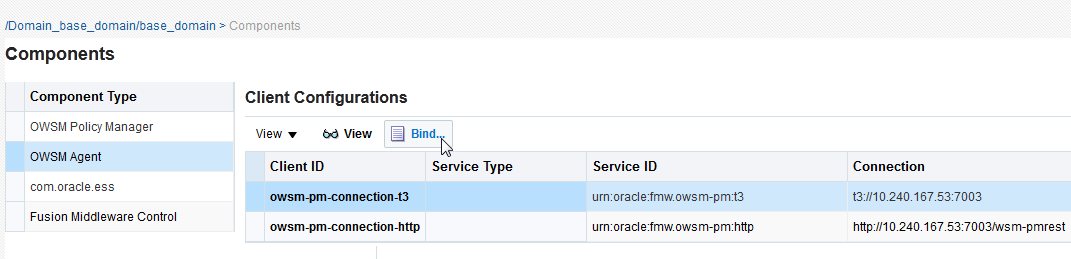
Description of the illustration bind.png
-
Verify that the Service Type for the service end point is OWSM Policy Manager.
-
Repeat steps 5 and 6 to Bind the remaining component types. In this example, you will select com.oracle.ess and Fusion Middleware Control.
4.5.4 Removing MDS-OWSM Data Sources from SOA and OSB Clusters
Prior to the upgrade, mds-owsm data sources were targeted only to OWSM cluster and Admin Server. Post upgrade, however, the mds-owsm data source is targeted to all clusters, including SOA, OSB and OWSM.
-
Log in to the WebLogic Server Administration Console 12c.
Enter the following URL in a browser:
http://host name:port_number/console
The port number is the port number of the Administration Server. By default, the port number is 7001.
The login page is displayed.
-
Click Lock and Edit and to edit the targets.
-
Select Services and choose Data Sources from Domain Structure.
-
Select the mds-owsm data source and select Targets.
-
Uncheck SOA cluster and OSB cluster to remove the data source.
-
When prompted, click Yes to apply the changes.
4.5.5 Reapplying an EDNTopic to SOA JMS Module After Cluster Upgrade
After upgrading a SOA Cluster domain to 12.1.3, the upgraded SOA JMS module may be missing the EDNTopic. If the JMS module is missing the EDNTopic, you must manually add the topic or UDD for this topic using the Administration Console or WLST.
See the Administration Console online help for more information on reapplying the EDNTopic.
4.5.6 Preventing Duplicate Messages When Using JMS Transport Proxy Service
In a 12c cluster domain, jmsServers are targeted to migratable targets, which is different from the default behavior in 11g where jmsServers were targeted to an individual server.
When you configure a 12c proxy service based on the JMS transport, set the topic distribution mode to One-Copy-Per-Application or One-Copy-Per-Server. To prevent duplicate messages, do not use Compatibility mode in a clustered environment.