A Understanding the Secondary Topologies for Oracle SOA Suite and Business Process Management
This chapter provides alternate topologies for Oracle SOA Suite and Business Process Management.
The following topologies are covered in this appendix:
-
Section A.1, "Oracle Business Process Management Standalone Topology"
-
Section A.2, "Oracle SOA Suite and Enterprise Scheduler Topology"
-
Section A.4, "Oracle SOA Suite and Business Activity Monitoring (BAM) Topology"
A.1 Oracle Business Process Management Standalone Topology
This section contains the following topics:
-
Understanding the Oracle Business Process Management Standalone Topology
-
Roadmap for Installing and Configuring the Oracle Business Process Management Standalone Topology
A.1.1 Understanding the Oracle Business Process Management Standalone Topology
Figure A-1 illustrates the Oracle Business Process Management standalone topology.
Use this topology when you require a simple domain that offers only the Oracle Business Process Management software capabilities and no cluster.
Note that there might be licensing implications for domains where you deploy Oracle Business Process Management to a cluster. For more information, see the Oracle Fusion Middleware Licensing Information.
This topology consists of an Administration Server and one Managed Server in a Oracle WebLogic Server domain on a single host (SOAHOST1). Both the Oracle SOA Suite software and Oracle Business Process Management software are targeted to the Managed Server.
The required product database schemas are installed in a supported Oracle database on a separate host (DBHOST1).
Figure A-1 Oracle Business Process Management Standalone Topology
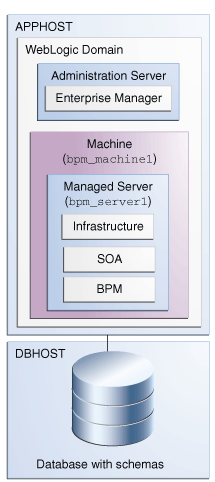
Description of "Figure A-1 Oracle Business Process Management Standalone Topology"
A.1.2 Roadmap for Installing and Configuring the Oracle Business Process Management Standalone Topology
Table A-1 describes the roadmap needed to configure this topology on your system.
Table A-1 Installation and Configuration Steps for Standalone Oracle Business Process Management
| Task | Description | More Information | Special instructions |
|---|---|---|---|
|
Verify your system environment |
Before beginning the installation, verify that the minimum system and network requirements are met. |
See Section 1.5. |
None. |
|
Obtain the appropriate distribution |
Both Oracle SOA Suite and Business Process Management require an existing Oracle Fusion Middleware Infrastructure installation; Oracle SOA Suite and Business Process Management must be installed in the same Oracle Home as Oracle Fusion Middleware Infrastructure. |
See Section 1.6. |
You must obtain both Oracle Infrastructure and Oracle SOA Suite and Business Process Management distributions. |
|
Determine your installation directories |
Verify that the directories that will need to be created can be created or accessed by the installer, and exist on systems that meet the minimum requirements. Both Oracle SOA Suite and Oracle Business Process Management must be installed into an existing Oracle home directory containing Oracle Fusion Middleware Infrastructure. |
See "What are the Key Oracle Fusion Middleware Directories?" in Understanding Oracle Fusion Middleware. |
None. |
|
Install Oracle Fusion Middleware Infrastructure |
Install Oracle Fusion Middleware Infrastructure to create the Oracle home directory for Oracle Business Process Management. |
See Installing and Configuring the Oracle Fusion Middleware Infrastructure. |
None. |
|
Install the Oracle Business Process Management software |
Install the Oracle Business Process Management software into the existing Infrastructure Oracle home. |
See Chapter 2. |
Select BPM on the Installation Type screen. |
|
Create a WebLogic domain |
Use the configuration wizard to create and configure the WebLogic domain. Ensure that you select the appropriate options on the configuration screens. |
See Chapter 4. |
On the Managed Servers screen (Task 12), create only one managed server, |
|
Start the servers |
Once you complete the domain creation, start the administration and managed servers. |
See Section 4.3. |
Start the Administration Server and the Managed Servers. |
|
Verify the configuration |
Verify to ensure that the domain is configured properly. |
See Section 4.4. |
None. |
|
Next steps after installing and configuring Business Process Management in a standalone mode |
You can perform administrative as well as management tasks for the domain that you have just configured. |
See Chapter 5. |
None. |
A.2 Oracle SOA Suite and Enterprise Scheduler Topology
This section contains the following topics:
-
Understanding the Oracle SOA Suite and Oracle Enterprise Scheduler Topology
-
Roadmap for Installing and Configuring the Oracle SOA Suite and Oracle Enterprise Scheduler Topology
A.2.1 Understanding the Oracle SOA Suite and Oracle Enterprise Scheduler Topology
Figure A-2 shows the Oracle SOA Suite and Enterprise Schedule Services (ESS) topology.
Use this topology to integrate the capabilities of Oracle Enterprise Scheduler with Oracle SOA Suite.
The topology is similar to the Oracle SOA Suite standard installation topology, described in Section 1.3.1; however, in this topology, the Oracle Enterprise Scheduler software is targeted to the Oracle WebLogic Server cluster, in addition to the Oracle Fusion Middleware Infrastructure and Oracle SOA Suite software.
Figure A-2 Oracle SOA Suite and Enterprise Schedule Services Topology

Description of "Figure A-2 Oracle SOA Suite and Enterprise Schedule Services Topology"
A.2.2 Roadmap for Installing and Configuring the Oracle SOA Suite and Oracle Enterprise Scheduler Topology
Table A-2 describes the roadmap needed to configure this topology on your system.
Table A-2 Installation and Configuration Steps for Oracle SOA Suite and Oracle Enterprise Scheduler
| Task | Description | More Information | Special Instructions |
|---|---|---|---|
|
Verify your system environment |
Before beginning the installation, verify that the minimum system and network requirements are met. |
See Section 1.5. |
None. |
|
Obtain the appropriate distribution |
Both Oracle SOA Suite and Enterprise Schedule Services require an existing Oracle Fusion Middleware Infrastructure installation; when you install Oracle SOA Suite, Enterprise Schedule Services gets installed, too, and Oracle SOA Suite must be installed in the same Oracle Home as Oracle Fusion Middleware Infrastructure. |
See Section 1.6. |
You must obtain both Oracle Infrastructure and Oracle SOA Suite and Business Process Management distributions. |
|
Determine your installation directories |
Verify that the directories that will need to be created can be created or accessed by the installer, and exist on systems that meet the minimum requirements. |
See "What are the Key Oracle Fusion Middleware Directories?" in Understanding Oracle Fusion Middleware. |
None. |
|
Install Oracle Fusion Middleware Infrastructure |
Install Oracle Fusion Middleware Infrastructure to create the Oracle home directory for Oracle SOA Suite. |
See Installing and Configuring the Oracle Fusion Middleware Infrastructure. |
None. |
|
Install the software |
Install the Oracle SOA Suite software into the existing Oracle Infrastructure home. When you install Oracle SOA suite, Enterprise Schedule Services gets installed too. |
See Chapter 2. |
Select SOA on the Installation Type screen. |
|
Create a WebLogic domain |
Use the configuration wizard to create and configure the WebLogic domain. Ensure that you select the appropriate options on the configuration screens. |
See Chapter 3. |
Follow the instructions provided for specific screens in Section A.2.2.1. |
|
Start the servers |
Once you complete the domain creation, start the administration and managed servers. |
See Section 3.3. |
Start the Managed server on which wsm-pm is targeted before you start the Manager Server on which Oracle Enterprise Scheduler is deployed. |
|
Verify the configuration |
Verify to ensure that the domain is configured properly. |
See Section 3.4. |
None. |
|
Next steps after installing and configuring Oracle SOA Suite and Enterprise Schedule Services |
You can perform administrative as well as management tasks for the domain that you have just configured. |
See Chapter 5. |
None |
A.2.2.1 Configuration Options to Select for the Oracle SOA Suite and Oracle Enterprise Scheduler
Almost all of the screens and options that you must select while configuring Oracle SOA Suite and Enterprise Schedule Services are identical to the ones provided in Chapter 3. However, there are a couple of screens on which you must select different options and Table A-3 lists the key screens and options. Ensure that you select the configuration options as provided on this table.
Table A-3 Key Screens and Configuration Options for Oracle SOA Suite and Enterprise Schedule Services Topology
| Screen | Description |
|---|---|
|
Select Components |
This screen appears when you run the RCU to create schemas. In addition to the schema list provided in Task 4, select Oracle Enterprise Scheduler. |
|
Templates |
This screen appears after you start the configuration wizard to create your domains. In addition to the templates listed in Task 2, select the following templates:
|
|
Managed Servers |
On the Managed Servers screen (Task 12), two managed servers, In the Server Groups drop-down list, ensure that |
|
Assign Servers to Clusters |
On this screen (Task 14), assign both |
|
Assign Servers to Machine |
On this screen (Task 17), assign the |
A.3 Oracle Business Process Management and Application Development Framework (ADF) Topology
This section contains the following topics:
A.3.1 Understanding the Oracle Business Process Management and Application Development Framework Topology
Figure A-3 shows the Oracle Business Process Management and Application Development Framework topology.
Use this topology if you are deploying applications that take advantage of both the Oracle Business Process Management software and a custom user interface developed using Oracle Application Development Framework (Oracle ADF). This topology allows you to target the Oracle Business Process Management sofware to one cluster and the Oracle Application Development Framework software to another cluster, so there is no resource contention between the two products.
Figure A-3 Oracle Business Process Management and Application Development Framework Topology
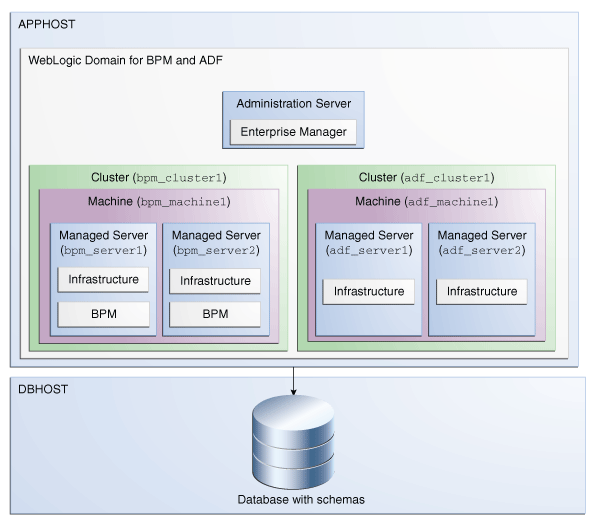
Description of "Figure A-3 Oracle Business Process Management and Application Development Framework Topology"
A.3.2 Roadmap for Installing and Configuring the Oracle Business Process Management and Application Development Framework Topology
Table A-4 describes the roadmap needed to configure this topology on your system.
Table A-4 Installation and Configuration Steps for Oracle Business Process Management and Application Development Framework
| Task | Description | More Information | Special Instructions |
|---|---|---|---|
|
Verify your system environment |
Before beginning the installation, verify that the minimum system and network requirements are met. |
See Section 1.5. |
None. |
|
Obtain the appropriate distribution |
Both Oracle SOA Suite and Business process Management require an existing Oracle Fusion Middleware Infrastructure installation; Oracle SOA Suite must be installed in the same Oracle Home as Oracle Fusion Middleware Infrastructure. |
See Section 1.6. |
You must obtain both Oracle Infrastructure and Oracle SOA Suite and Business Process Management distributions. |
|
Determine your installation directories |
Verify that the directories that will need to be created can be created or accessed by the installer, and exist on systems that meet the minimum requirements. |
See "What are the Key Oracle Fusion Middleware Directories?" in Understanding Oracle Fusion Middleware. |
None. |
|
Install Oracle Fusion Middleware Infrastructure |
Install Oracle Fusion Middleware Infrastructure to create the Oracle home directory for Oracle SOA Suite. |
See Installing and Configuring the Oracle Fusion Middleware Infrastructure. |
None. |
|
Install the software |
Install the Oracle Business Process Management software into the existing Oracle Infrastructure home. |
See Chapter 2. |
Select BPM on the Installation Type screen. |
|
Create a WebLogic domain |
Use the configuration wizard to create and configure the WebLogic domain. Ensure that you select the appropriate options on the configuration screens. |
See Chapter 4. |
Follow the instructions provided for specific screens in Section A.3.2.1. |
|
Start the servers |
Once you complete the domain creation, start the administration and managed servers. |
See Section 4.3. |
None. |
|
Verify the configuration |
Verify to ensure that the domain is configured properly. |
See Section 4.4. |
None. |
|
Next steps after installing and configuring Business Process management and Application Development Framework |
You can perform administrative as well as management tasks for the domain that you have just configured. |
See Chapter 5. |
None. |
A.3.2.1 Configuration Options to Select for Oracle Business Process Management and Application Development Framework
Almost all of the screens and options that you must select while configuring Oracle Business Process Management and Application Development Framework are identical to the ones provided in Chapter 4. However, there are a couple of screens on which you must select different options and Table A-5 lists the key screens and options. Ensure that you select the configuration options as provided in this section.
Table A-5 Key Screens and Configuration Options for Oracle Business Process Management and Application Development Framework Topology
| Screen | Description |
|---|---|
|
Managed Servers |
On the Managed Servers screen (Task 12), do the following:
|
|
Clusters |
On the Clusters screen (Task 13), create two clusters, |
|
Assign Servers to Clusters |
On this screen (Task 14), assign the servers as given below:
|
|
Machines |
On this screen (Task 16), create two machines, |
|
Assign Servers to Machine |
On this screen (Task 17), assign the servers as follows:
|
A.4 Oracle SOA Suite and Business Activity Monitoring (BAM) Topology
This section contains the following topics:
A.4.1 Understanding the Oracle SOA Suite and Business Activity Monitoring Topology
Figure A-4 shows the Oracle SOA Suite and Business Activity Monitoring topology.
Use this topology to implement Oracle Business Activity Monitoring in your Oracle SOA Suite domain. The Oracle Business Activity Monitoring software is targeted to its own cluster; this ensures that there is no resource contention between the Oracle SOA Suite and Oracle Business Activity Monitoring software.
Figure A-4 Oracle SOA Suite and Business Activity Monitoring Topology
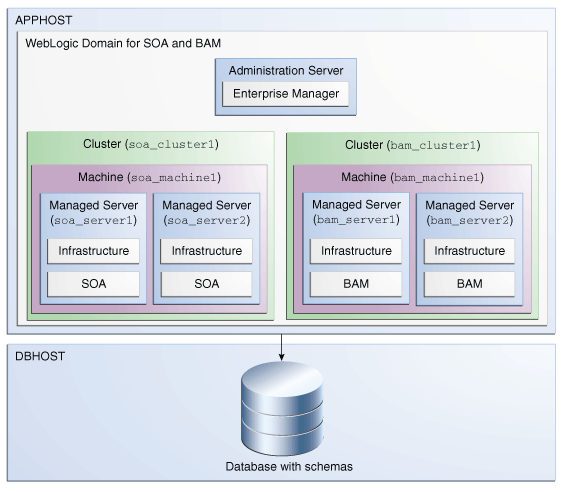
Description of "Figure A-4 Oracle SOA Suite and Business Activity Monitoring Topology"
A.4.2 Roadmap for Installing and Configuring the Oracle SOA Suite and Business Activity Monitoring Topology
Table A-6 describes the roadmap needed to configure this topology on your system.
Table A-6 Overview of the Installation and Configuration Steps for Oracle SOA Suite and Business Activity Monitoring
| Task | Description | More Information | Special Instructions |
|---|---|---|---|
|
Verify your system environment |
Before beginning the installation, verify that the minimum system and network requirements are met. |
See Section 1.5. |
None. |
|
Check for any mandatory patches that will be required before or after the installation |
Review the Oracle Fusion Middleware Infrastructure release notes to see if there are any mandatory patches required for the software products you are installing. |
See "Install and Configure" in Release Notes for Oracle Fusion Middleware Infrastructure. |
None. |
|
Obtain the appropriate distribution |
Both Oracle SOA Suite and Business Activity Monitoring require an existing Oracle Fusion Middleware Infrastructure installation; When you install Oracle SOA Suite, Business Activity Monitoring gets installed, too, and Oracle SOA Suite must be installed in the same Oracle Home as Oracle Fusion Middleware Infrastructure. |
See Section 1.6. |
You must obtain both Oracle Infrastructure and Oracle SOA Suite and Business Process Management distributions. |
|
Determine your installation directories |
Verify that the directories that will need to be created can be created or accessed by the installer, and exist on systems that meet the minimum requirements. |
See "What are the Key Oracle Fusion Middleware Directories?" in Understanding Oracle Fusion Middleware. |
None. |
|
Install Oracle Fusion Middleware Infrastructure |
Install Oracle Fusion Middleware Infrastructure to create the Oracle home directory for Oracle SOA Suite. |
See Installing and Configuring the Oracle Fusion Middleware Infrastructure. |
None. |
|
Install the software |
Install the Oracle SOA Suite software into the existing Oracle Infrastructure home. |
See Chapter 2. |
Select SOA on the Installation Type screen. |
|
Create a WebLogic domain |
Use the configuration wizard to create and configure the WebLogic domain. Ensure that you select the appropriate options on the configuration screens. |
See Chapter 3. |
Follow the instructions provided for specific screens in Section A.4.2.1. |
|
Start the servers |
Once you complete creating the domain, start the administration and managed servers. |
See Section 3.3. |
None. |
|
Verify the configuration |
Verify to ensure that the domain is configured properly. |
See Section 3.4. |
None. |
|
Next steps after installing and configuring Oracle SOA Suite and Business Activity Monitoring |
You can perform administrative as well as management tasks for the domain that you have just configured. |
See Chapter 5. |
None. |
A.4.2.1 Configuration Options to Select for Oracle SOA Suite and Business Activity Monitoring
Almost all of the screens and options that you must select while configuring Oracle SOA Suite and Business Activity Monitoring are identical to the ones provided in Chapter 3. However, there are a couple of screens on which you must select different options and Table A-7 lists the key screens and options. Ensure that you select the configuration options as provided in this section.
Table A-7 Key Screens and Configuration Options for Oracle SOA Suite and Business Activity Monitoring Topology
| Screen | Description |
|---|---|
|
Templates |
This screen appears after you start the configuration wizard to create your domain. In addition to the templates listed in Task 2, select Business Activity Monitoring - 12.1.3.0 [soa] |
|
Managed Servers |
On the Managed Servers screen (Task 12), two managed servers, Ensure that in the Listen Address drop-down list, you select the IP address of the host on which the Managed Server will reside. Do not use "All Local Addresses." In the Server Groups drop-down list, ensure that |
|
Clusters |
On the Clusters screen (Task 13), create two clusters, |
|
Assign Servers to Clusters |
On this screen (Task 14), assign the servers as given below:
|
|
Machines |
On this screen (Task 16), create two machines, |
|
Assign Servers to Machine |
On this screen (Task 17), assign the servers as follows:
|