6 Upgrading the Existing Oracle Data Integrator 11g Environment
This chapter provides specific instructions for the tasks involved in upgrading the existing Oracle Data Integrator 11g environment to Oracle Data Integrator 12c (see Section 1.1 for valid 11g starting points).
If you are upgrading an existing 11g environment to a newer 11g version of Oracle Data Integrator, see the Oracle Fusion Middleware Patching Guide in the 11g documentation library.
This chapter contains the following sections:
-
Upgrading the Standalone Agent Environment (no WebLogic Domain)
-
Upgrading the Standalone Agent Environment (with WebLogic Domain)
6.1 Preparing to Upgrade Oracle Data Integrator
This section contains important tasks that should be performed before you begin your upgrade to Oracle Data Integrator 12c (12.1.3).
-
Section 6.1.3, "Upgrading the Database Containing the ODI Repository"
-
Section 6.1.5, "Cloning Existing Master and Work Repositories"
-
Section 6.1.7, "Verifying that Work Repositories are Attached to the Correct Schemas"
-
Section 6.1.8, "Creating a Backup of the ODI Repositories to be Upgraded"
6.1.1 Planning the Upgrade
Before you begin, you should read Planning an Upgrade of Oracle Fusion Middleware, which provides a high-level overview of how to plan and prepare for the upgrade to Oracle Fusion Middleware 12c.
6.1.2 Backing Up the Existing 11g Environment
Before you begin, you should make a complete backup of the 11g environment. For details, see "Backup and Recovery Strategies for Upgrade" in the Planning an Upgrade of Oracle Fusion Middleware.
6.1.3 Upgrading the Database Containing the ODI Repository
The database that contains the Oracle Data Integrator repositories must be supported by Oracle Fusion Middleware 12c. For the latest list of certified databases, see System Requirements and Supported Platforms for Oracle Fusion Middleware 12c (12.1.3) on the Oracle Fusion Middleware Supported System Configurations page.
For instructions on verifying that your Oracle database meets the requirements of Oracle Fusion Middleware 11g, see "Upgrading and Preparing Your Oracle Databases for 12c (12.1.3)" in Planning an Upgrade of Oracle Fusion Middleware. Oracle recommends that you refer to your database-specific upgrade documentation for additional information.
Note:
If your database was supported in Oracle Data Integrator 11g but is no longer supported in Oracle Data Integrator 12c, use the ODI 11g version to do the following before you upgrade:-
Export the ODI 11g repositories from the unsupported database systems/versions.
-
Import Master and Work Repositories into new repositories created with the 11g version into supported database systems/versions.
For additional information, see "Repository-Level Export/Import" in the Developer's Guide for Oracle Data Integrator.
6.1.4 Re-Associating a File-Based Security Store
If you are using a file-based security store in your existing 11g environment, you must perform the following tasks before you begin the upgrade process.
- Task 1 Creating 11g OPSS and IAU Schemas
-
Create new 11g Oracle Platform Security Services (OPSS) and Audit Schemas (IAU) schemas in a supported Database using the 11g Repository Creation Utility.
For more information about creating 11g schemas, see "Obtaining and Running Repository Creation Utility" in the Oracle Fusion Middleware Repository Creation Utility User's Guide for 11g Release 1 (11.1.1.7.0).
- Task 2 Reassociating the 11g Security Store with the Database-Based Security Store and OPSS Schema
-
If you are using a file-based security store in your 11g environment, then reassociate the file-based store with the database-based repository and OPSS schema.
For information about reassociating OPSS schema with Database-based repository, see "Using a DB-Based OPSS Security Store" in the Oracle Fusion Middleware Application Security Guide in the 11g Release 1 (11.1.1.7.0) documentation library.
- Task 3 Configuring the Audit Data Store
-
If the audit data store is file based, then you must enable audit loading on the database to change from storing audit records in a file to using a database audit data store.
For information about enabling audit loading, see "Configure the Audit Data Store and Bus-Stop Storage" in Securing Applications with Oracle Platform Security Services.
6.1.5 Cloning Existing Master and Work Repositories
Oracle recommends that you clone (copy) each original ODI Master and Work repository before beginning the upgrade process. During the Master Repository upgrade process, the Upgrade Assistant will prompt you for the location and credentials of the cloned Master Repository and Work Repositories.
The following sections provide basic schema cloning procedures for databases that are supported to host ODI repositories. For detailed information, refer to your database-specific documentation.
Note:
The goal of this section is to stress the importance of creating a clone (or copy) of each of the 11g repositories before you begin the upgrade process. The cloning procedures documented in this section are sample procedures for each of the 11g supported databases. You are not restricted to using these procedures. Always use the cloning procedures that suit your specific needs.6.1.5.1 Schema Cloning Process for Oracle Database
To clone Oracle Database schemas for ODI:
-
Export ODI 11g Master and Work schemas using the Oracle Export Utility (
exp). For example:exp userid=odi_master_11g/odi_master_11g file=/tmp/odi_master_11g.dmp exp userid=odi_work_11g/odi_work_11g file=/tmp/odi_work_11g.dmp exp userid=odi_work1_11g/odi_work1_11g file=/tmp/odi_work1_11g.dmp
Export ODI 11g Master and Work schemas using the Datapump Utilities (
expdp). For example:expdp odi_tmp/odi_tmppwd schemas=odiw11117 dumpfile=odiw11117.dmp
-
Using SQL*Plus, create Master and Work clone schemas and grant connect/resource privileges. For example:
create user odi_master_11g_cp identified by odi_master_11g_cp;
create user odi_work_11g_cp identified by odi_work_11g_cp;
create user odi_work1_11g_cp identified by odi_work1_11g_cp;
grant connect,resource to odi_master_11g_cp, odi_work_11g_cp, odi_work1_11g_cp;
-
Using Oracle Import (
imp), import the ODI 11g Master and Work schema dump into the cloned Master and Work schemas. For example:imp userid='system/manager' touser=odi_master_11g_cp fromuser=odi_master_11g file=/tmp/odi_master_11g.dmp imp userid='system/manager' touser=odi_work_11g_cp fromuser=odi_work_11g file=/tmp/odi_work_11g.dmp imp userid='system/manager' touser=odi_work1_11g_cp fromuser=odi_work1_11g file=/tmp/odi_work1_11g.dmp
Import ODI 11g Master and Work schemas using the Datapump Utilities (
impdp). For example:impdp ODI_TMP/ODI_TMPPWD dumpfile=odim11117 remap_tablespace=repo11117:odi11g remap_schema=odim11117:odim1113
Note that with
impdpit is also possible to modify the schema name and tablespace for data storage. Theremap_xxparameters are optional.
6.1.5.2 Schema Cloning Process for MySQL Database
The following steps can be used to clone MySQL database schemas:
-
Export the ODI 11g Master and Work schemas using
mysqldump. For example:mysqldump -h localhost -u root -p DEV_ODI_REPO > /scratch/dump.sql
-
Restore the ODI schema into a new schema using
mysql. For example:First, create a cloned schema:
mysql -h localhost -u root -p
create schema NEW_ODI_REPO default character set=utf8 default collate=utf8_bin;
Then, import the ODI schema into the cloned schema.
mysql -h localhost -u root -p NEW_ODI_REPO < /scratch/dump.sql
-
Create a login for the cloned schema using
mysql. For example:mysql -h localhost -u root -p grant all on NEW_ODI_REPO.* to NEW_ODI_REPO1@'localhost' identified by 'password'; grant process on *.* to NEW_ODI_REPO1@'localhost'
6.1.5.3 Schema Cloning Process for Microsoft SQL Server Database
To clone Microsoft SQL 2005/2008 database schemas:
-
Export the ODI 11g Master and Work schemas using SQL Management Studio.
Example:
BACKUP DATABASE [odi_11g] TO DISK = N'C:\Program Files\Microsoft SQL Server\MSSQL.1\MSSQL\Backup\odi_11g.bak' WITH INIT, NOSKIP;
-
Restore Master and Work schemas into the new database using SQL Management Studio.
Using SQL Management Studio Express perform the following:
-
Restore the Master and Work schemas.
-
Print logical names of files used to store the database.
-
Move the files used to store database.
Example:
RESTORE DATABASE [odi_11g_cp] FROM DISK = N'C:\Program Files\Microsoft SQL
Server\MSSQL.1\MSSQL\Backup\odi_11g.bak'
WITH FILE = 1, MOVE N'odi_11g' TO N'C:\Program Files\Microsoft SQL
Server\MSSQL.1\MSSQL\DATA\odi_11g_cp.mdf',
MOVE N'odi_11g_log' TO N'C:\Program Files\Microsoft SQL
Server\MSSQL.1\MSSQL\DATA\odi_11g_cp_log.ldf', NOUNLOAD;
go
-
-
Create login and user for cloned Master and Work schemas using SQL Management Studio.
Using SQL Management Studio Express, create logins and users to access cloned Master and Work schemas. Be sure to select the correct database instance in SQL Management Studio Express, as these commands are applied to the selected database instance.
Example:
create login odi_11g_cp with password=N'odi_11g_cp',
default_database=odi_11g_cp,  check_expiration = off, check_policy = off;
go
USE odi_11g_cp
go
create user odi_11g_cp  for login odi_11g_cp;
go
USE odi_11g_cp
go
-
To move the old schema to the new schema location, run the following SQL script:
NOTE: In the example below, the old schema name is
odi_11gand the new schema name isodi_11g_cp.CREATE SCHEMA [odi_11g_cp] AUTHORIZATION odi_11g_cp go . DECLARE @OldSchema AS varchar(255) DECLARE @NewSchema AS varchar(255) . SET @OldSchema = 'odi_11g' SET @NewSchema = 'odi_11g_cp' . DECLARE @sql AS varchar(MAX) SET @sql = CHAR(13) + CHAR(10) . SELECT @sql = @sql + 'ALTER SCHEMA [' + @NewSchema + '] TRANSFER [' + TABLE_SCHEMA + '].[' + TABLE_NAME + ']' + CHAR(13) + CHAR(10) FROM INFORMATION_SCHEMA.TABLES WHERE TABLE_SCHEMA = @OldSchema . EXEC (@sql) go
-
To finalize the schema move, run the following SQL query:
DROP SCHEMA [odi_11g]
go
drop user odi_11g;
go
alter user odi_11g_cp with default_schema = odi_11g_cp;
go
grant create table, create view, create procedure,create function to
odi_11g_cp;
go
6.1.5.4 Schema Cloning Process for IBM DB2 Universal Database
Chose one of the following procedures to clone IBM's DB2 Universal Database schemas:
-
Same Host Cloning Process for ODI 11g Master and Work Schemas
-
Different Host Cloning Process for ODI 11g Master and Work Schemas
Note:
The Page size for database has to be 32768 (32k) and operating system usersODI_MASTER_11G_CP and ODI_WORK_11G_CP have to be created manually.6.1.5.4.1 Same Host Cloning Process for ODI 11g Master and Work Schemas
Use the following steps to clone IBM DB2 schemas on the same host or platform:
-
Create DB2 Database using Command Line Processor.
Example:
db2 CREATE DATABASE ODI12 AUTOMATIC STORAGE YES ON 'C:\' DBPATH ON 'C:\' USING CODESET IBM-1252 TERRITORY US COLLATE USING SYSTEM PAGESIZE 32768
-
Copy ODI 11g Master and Work schemas using DB2 Database Movement Tool to new schema.
Master Schema Example:
db2move ODI11G COPY -sn odi_master_11g -co TARGET_DB ODI11GCP USER db2admin USING welcome SCHEMA_MAP ((odi_master_11g,odi_master_11g_cp)) TABLESPACE_MAP ((USERSPACE1,USERSPACE1),SYS_ANY) owner odi_master_11g_cp
Work Schema Example:
db2move ODI11G COPY -sn odi_work_11g -co TARGET_DB ODI11GCP USER db2admin USING welcome SCHEMA_MAP ((odi_work_11g,odi_work_11g_cp)) TABLESPACE_MAP ((USERSPACE1,USERSPACE1),SYS_ANY) owner odi_work_11g_cp
6.1.5.4.2 Different Host Cloning Process for ODI 11g Master and Work Schemas
Use the following steps to clone IBM DB2 schemas on different hosts or platforms:
-
Export DDL and Data from Master and Work schemas using DB2 Database Movement Tool and DDL Extracting Tool.
DB2 Database Movement Tool produces PC/IXF files with data and
db2move.lstfile with list of tables, Files are produced in the folder where the tool was called. The DDL Extracting Tool producesdb2master.sqlanddb2work.sqlwith SQL queries to recreate database structure.Example:
db2move ODI11G export -sn odi_master_11g,odi_work_11g
db2look -d ODI11G -z odi_master_11g -e -o c:/db2master.sql
db2look -d ODI11G -z odi_work_11g -e -o c:/db2work.sql
-
Transfer exported files to new location.
-
Ensure that the PC/IXF files were transferred in binary mode, and that the
db2move.lstfile and thedb2master.sqlanddb2work.sqlfiles were transferred in ASCII mode. -
Place the PC/IXF files where the DB2 Database Movement Tools is located.
-
-
Create DB2 database using Command Line Processor.
Example:
db2 CREATE DATABASE ODI11G AUTOMATIC STORAGE YES ON 'C:\' DBPATH ON 'C:\' USING CODESET IBM-1252 TERRITORY US COLLATE USING SYSTEM PAGESIZE 32768
-
Import the exported DDL to the new database using the Command Line Processor.
Example:
db2 -tvf c:/db2backup/db2master.sql
db2 -tvf c:/db2backup/db2work.sql
-
Import exported data to new database using DB2 Database Movement Tool.
Example:
db2move ODI11G load
-
Verify that cloned schemas are intact; some tables may be in "check pending" state (because of check constraint).
Use command
set integrityto move to the normal state.Example:
db2 set integrity for table_name immediate checked
6.1.6 Updating the Work Repository JDBC URL
When you clone an Oracle Data Integrator repository, the cloned master repository has embedded in it the work repository connection details of the original source repository. When cloning, always connect to the Master Repository of the cloned repository. Open each work repository and change the schema name and password and/or the JDBC URL
Without these procedures, the original schemas may be upgraded unintentionally.
Example 1: A source repository schema named CUST1, a work repository schema named CUST1 (workrep1), and a work repository schema named CUST2 (workrep2) are all being restored to the same database instance.
To update the work repository JDBC URL:
-
Run a simple clone using Oracle Datapump by exporting the schemas CUST1 and CUST2 using the following commands:
Expdb System/Password Directory=Dumpdir Schemas=cust1,cust2 Dumpfile=Filename.dmp
-
Clone CUST1 and CUST2 to create new schemas NEWCUST1, NEWCUST2:
Impdp System/Password Directory=Dumpdir Schemas=cust1,cust2 Remap_schemas=cust1:newcust1, cust2:newcust2 Dumpfile=Filename.dmp
-
Connect to the master repository only of NEWCUST1.
-
Open
workrep1and update theschema_namefromCUST1toNEWCUST1. -
Open
workrep2and update theschema_namefromCUST2toNEWCUST2.
Example 2: The source repository schema named CUST1, a work repository schema named CUST1 (workrep1),and a work repository schema named CUST2 (workrep2). In this example there is no renaming of schemas. All schemas are restored to a different database instance.
To restore the schemas to new database instance:
-
Run the following command:
Impdp System/Password Directory=Dumpdie Schemas=cust1,cust2 Dumpfile=Filename.dmp
-
Connect to the master repository only of CUST1.
-
Open
workrep1and update the JDBC URL to point to the new database instance. -
Open
workrep2and update the JDBC URL to point to the new database instance.
If you restore schemas to a new database instance and also rename them, update both the schema_names and JDBC_URL.
6.1.7 Verifying that Work Repositories are Attached to the Correct Schemas
After cloning the repositories, you should check the repository connections to see verify that the cloned master repository points to the correct cloned work repository schema. The upgrade process retrieves the work repository information from its master repository; in order to have a successful upgrade of the work repositories, you must ensure that the repositories are attached to the correct schema and host before you upgrade.
To verify this:
Note:
The documentation links in this section refer to 11g Release 1 (11.1.1.7.0) documentation.-
Connect to the ODI master repository using your existing ODI client (pre-upgraded version).
For information, see "Connecting to the Master Repository" in the Developer's Guide for Oracle Data Integrator.
-
Validate that the work repositories are attached to the correct work repository schema and host.
For more information, see: "Connecting to a Work Repository" and "Attaching and Deleting a Work Repository" in the Developer's Guide for Oracle Data Integrator.
6.1.8 Creating a Backup of the ODI Repositories to be Upgraded
Oracle recommends that you create a backup for each ODI Master and Work repository. The backup enables you to restore to a pre-upgrade state if necessary. For more information, see "Backup Strategies for Upgrade," in Planning an Upgrade of Oracle Fusion Middleware.
If an upgrade fails you also need to restore the contents of schema_version_registry table back to its pre-upgrade state; therefore, the SYSTEM.SCHEMA_VERSION_REGISTRY$ table must be included as part of any backup.
The Upgrade Assistant Prerequisite screen prompts you to indicate whether the backup of the ODI repositories has been completed. It is important to note, however, that the Upgrade Assistant will not validate that a backup has been created.
Caution:
This is a critical step of the upgrade process; especially if the repositories were not cloned. In the event that upgrade results are unsatisfactory, the repository is locked and unable to be used.Having a backup copy of the ODI repositories not only ensures that you will not lose important data, but it is the only way to restore after a failed upgrade; there is no capability to restart the upgrade from a failed state.
For more information on creating a backup, refer to your database backup and recovery documentation.
6.2 Installing Oracle Fusion Middleware 12c Products
Before beginning your upgrade, use the Oracle Universal Installer to install the 12c version of your Oracle Fusion Middleware products. Follow the instructions in the following section in Installing and Configuring Oracle Data Integrator:
-
"Planning Your Oracle Data Integrator Installation" to understand important information about the 12c Java EE agent installation topology.
This chapter introduces some important 12c concepts and also provides information for where to obtain the necessary product distributions. Note that for Java EE agent environment, Oracle Fusion Middleware Infrastructure is also required as a prerequisite for installing Oracle Data Integrator.
-
"Installing Oracle Data Integrator" to install Oracle Data Integrator for your environment.
Note:
If you are upgrading from 12.1.2, you must install Oracle Data Integrator into a new ORACLE_HOME.Be sure to follow the installation instructions for your particular environment.
-
"Creating the Oracle Data Integrator Master and Work Repository Schema" to run RCU and create the schemas that are new in 12c (for example, the Service Table schema).
You do not need to run the configuration wizard to configure a new domain; the Upgrade Assistant will take care of this for you in an upgrade scenario.
6.3 Upgrading the Master and Work Repository Schema
Follow the instructions in this section to use the Upgrade Assistant to upgrade your Master and Work Repository schema.
6.3.1 Stopping the Servers and Processes
Before running the Upgrade Assistant to upgrade your schemas, make sure all servers and processes in the domain are stopped.
For more information, see "Starting and Stopping Oracle Fusion Middleware" in Administering Oracle Fusion Middleware.
6.3.2 Starting the Upgrade Assistant
To start the Upgrade Assistant, go to the ORACLE_HOME/oracle_common/upgrade/bin directory, and enter the following command:
On UNIX operating systems:
./ua
On Windows operating systems:
ua.bat
6.3.3 Navigating the Upgrade Assistant Screens
After the Upgrade Assistant is started (Section 6.3.2), follow the instructions in this section to navigate through the screens in the Upgrade Assistant to upgrade your product schemas.
Note:
The Upgrade Assistant uses the data and structure of the ODI Master repository to determine if a repository has already been upgraded. The Upgrade Assistant will return a message stating that the repository has already been upgraded if the following conditions exist:-
The schema version registry has valid state and version for the repository
-
The repository is 12c
-
The version of the repository is equal to or greater than the version of ODI SDK used by the Upgrade Assistant
To debug or view the repository catalog information, use the following query on the schema_version_registry table, which is stored in the Admin user (not in the ODI schema/repository).
In Oracle databases, the name of this table is SYSTEM.SCHEMA_VERSION_REGISTRY$ and it is stored in the SYSTEM schema. There is also a view named SYSTEM.SCHEMA_VERSION_REGISTRY and a public synonym SCHEMA_VERSION_REGISTRY that points to the view:
SELECT COMP_ID,COMP_NAME,MRC_NAME,OWNER,VERSION,STATUS,UPGRADED FROM schema_version_registry;
On DB2/400 operating systems, the Admin user is QSECOFR, and the schema_version_registry table is located in the schema 'NULLID'.
Rows with the component "ODI" are used to track ODI repositories.
- Task 1 Introducing the Upgrade Assistant
-
The Welcome screen contains important reminders to consider before proceeding with your upgrade. Make sure you read these and verify that you are ready to proceed.
- Task 2 Selecting an Upgrade Operation
-
Select Schemas. The Upgrade Assistant will list the schemas available for upgrade on the next screen.
The title of the screen will change to "Schemas" when you select Schemas.
- Task 3 Selecting Component Schemas
-
The Available Components screen lists the schemas that are available for upgrade.
Select Oracle Data Integrator to upgrade the Master and Work Repository schema. Note that any dependent schema will be automatically selected.

Description of the illustration ''ua_schema_components.gif''
Tip:
More information about this screen can be found in Available Components in Upgrading with the Upgrade Assistant. - Task 4 Specifying the Weblogic Directory
-
In the Domain Directory screen enter the WebLogic directory for the domain to be upgrade.
- Task 5 Verifying Prerequisites
-
The Prerequisites screen lists items that you must check and verify before you can proceed.
You must check the boxes before you can continue. The Upgrade Assistant will not verify that the prerequisites have been met.
- Task 6 Specifying Database and Schema Credentials
-
On the Select Schemas screen, enter the connection credentials for the database containing the schema you want to upgrade. Click Connect to connect to your database.
Then, specify the schema user name and password for the Master and Work Repository.
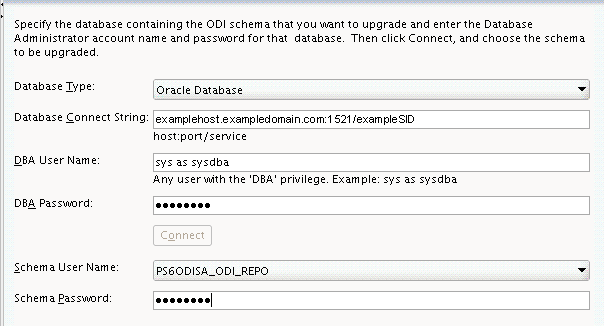
Description of the illustration ''ua_db_schema_creds.png''
Tip:
More information about this screen can be found in Select Schemas in Upgrading with the Upgrade Assistant. - Task 7 Selecting the ODI Upgrade Option
-
On the ODI Options screen, select all of the options on this screen.
Each option is described in the following table.
Option Description Replace Knowledge Modules with mandatory updates This selection replaces standard Knowledge Modules with the newest version. Customizations to Oracle installed Knowledge Modules will be overwritten. But if you copy an installed Knowledge Module and customize the Knowledge Module, the customizations are not lost. If you do not wish to go through the ODI upgrade, see "Using Compatibility Mode" in Developing Integration Projects with Oracle Data Integrator.
Upgrade topology and security metadata This selection replaces topology and security artifacts such as Technologies, Datatypes, Security Profiles and others with the newest version. Customizations of installed objects will be overwritten. If the object is copied and customized, then the customizations are not lost. For more information on how to upgrade manually, see Developing Integration Projects with Oracle Data Integrator.
Upgrade repository to use GUIDs This selection sets the repository to 12c full mode. All objects are referenced using 12c GUID rather than the internal ID. You should leave this option checked in order to take advantage of the truly universally unique identification scheme in Oracle data Integrator 12c.
Note: This option only applies when upgrading from 11g repository. For the 12.1.2 repository, the option is ignored, and the repository stays in the same mode as before the upgrade.
If you have custom Knowledge Modules and procedures that use
odiRefsubstitution APIs, which take internal identifiers as parameters such asgetFlexFieldValue(), you may choose to not select this option, leaving your repository in "11g compatibility mode." Scenarios generated from objects using such Knowledge Modules and procedures continue to work in "11g compatibility mode" but will not work in 12c full mode. "11g compatibility mode" can be used to smoothly transition the custom Knowledge Modules and procedures to use the newodiRefsubstitution APIs (the ones that take GUIDs as parameters). After all custom Knowledge Modules and procedures have been modified to use the newodiRefsubstitution APIs, the repository can be switched to 12c full mode.To change the repository to full GUID mode after upgrade (in case you did not choose the option in Upgrade Assistant during upgrade), go to Studio, in the ODI drop down menu, select the option Switch Repository Compatibility Mode. This brings up the option to switch to full GUID mode.If the repository is already in full GUID mode, then that option is greyed out.
Upgrade interfaces to use 12c mappings - losing 11g SDK compatibility This selection converts all 11g interfaces to 12c mappings. Once converted to 12c mappings, all of the existing scenarios must be regenerated before use. There is no ability to use existing 11g SDK applications; they must be upgraded to use the 12c SDK. Some conversion is performed, but the resulting mappings are left in 11g compatible mode, which allows them to be modified using 11g Java SDK. But they can only be modified using 11g SDK; in Studio UI they are read-only.
If this option is not selected, some conversion to 12c mappings are performed but the resulting mappings are left in "11g compatibility mode."After these interfaces are modified using the 11g SDK, they can then be converted to 12c mappings using the ODI Studio graphical interface or the 12c SDK.
Oracle recommends leaving this option checked, unless you have significant amount of Java code that uses the 11g SDK to read or update existing interfaces. This option only applies when upgrading from 11g repository. For 12.1.2 repository the option is ignored, and the repository stays in the same mode as before upgrade.
NOTE: In order for this migration to work properly, all interfaces in 11g repository must be valid (for example, they should not return any errors when validating from 11g Studio, for example). If an 11g interface is not valid, the Upgrade Assistant will try to migrate it into a 12c mapping, but there are no guarantees about the result: the migration of that interface may fail, or exceptions may printed out the in log file. In any case the resulting mapping will be invalid. The best way to ensure a smooth upgrade is to make sure all interfaces in 11g repository as valid to start with.
The upgrade process does not stop even if some 11g interfaces fail during the migration; the upgrade will continue until all interfaces are processed.
Use AES-128 encryption algorithm AES with 128-bit keys provides adequate protection for sensitive information. AES with 256-bit keys is required to protect classified information of higher importance. If the option is unchecked, then AES-256 encryption will be used Tip:
For more information about this screen, see "ODI Options" in Upgrading with the Upgrade Assistant.Table 6-1 contains descriptions of the combinations of options that may or may not be selected on this screen.
Table 6-1 Possible ODI Options screen combinations
Replace Knowledge Modules with mandatory updates Upgrade repository to use GUIDs Upgrade interfaces to use 12c mappings X
X
X
This is the most common combination and is the configuration with which the new 12c repositories are created. With this combination, all objects use the new GUID identification, and all interfaces are converted into full 12c mappings, which can be modified in ODI Studio editors.
X
X
With this combination, the repository stays in ID compatibility mode, which means that odiRef APIs that use legacy numeric identifiers continue to work. Use this combination if you have significant number of custom Knowledge Modules or procedures that use odiRef APIs with numeric IDs as arguments.
X
With this selection, the Knowledge Modules existing in the repository are preserved and are not overwritten with the new 12c updates. Also, the repository stays in ID compatibility mode. Use this combination if you have modified default Knowledge Modules but would like to use full 12c mappings.
X
X
With combination, the 11g interfaces are converted to 11g compatible mappings, which can be accessed and modified through 11g interface SDK. These mappings are read-only in ODI Studio editors. Use this combination if you have significant investment in programs or scripts that use the 11g interface SDK.
X
With this selection, the repository stays in ID compatibility mode, which means that odiRef APIs that use legacy numeric identifiers continue to work. Also, the 11g interfaces are converted to 11g compatible mappings, which can be accessed and modified through the 11g SDK. However, they are read-only in ODI Studio editors. Use this combination if you have significant number of custom Knowledge Modules or procedures that use odiRef APIs with numeric IDs as arguments, and you have significant investment in programs or scripts that use 11g interface SDK.
If you do not select any options, the Knowledge Modules existing in the repository are going to be preserved and not overwritten with the new 12c updates. Use this combination if you have existing applications that use the ODI 11g SDK to read or modify these mappings, but you do not have modified Oracle supplied Knowledge Modules for your own purpose.
Table 6-2 describes the Invalid ODI Options screen combinations.
Table 6-2 Invalid ODI Options screen combinations
Replace Knowledge Modules with mandatory updates Upgrade repository to use GUIDs Upgrade interfaces to use 12c mappings X
With this selection, most Knowledge Modules will not function correctly since they will be using deprecated odiRef APIs, which use legacy numeric IDs.
X
X
With this combination, most Knowledge Modules will not function correctly since they will be using deprecated odiRef APIs, which use legacy numeric IDs.
Note:
The Upgrade topology and security metadata option can be selected or not selected independently of all the other options and has no affect on the other options.Also Use AES-128 encryption algorithm option can be selected or not selected independently of all the other options and has no affect on the other options.
- Task 8 Specifying Supervisor Account Credentials
-
On the ODI Supervisor screen, enter the Supervisor account credentials for the ODI repository to be upgraded.
The installed Supervisor account is
SUPERVISOR(all CAPS). Check with your ODI administrator for proper account name and password.
Description of the illustration ''ua_supervisor_credentials.gif''
Tip:
For more information about this screen, see "ODI Supervisor" in Upgrading with the Upgrade Assistant. - Task 9 Selecting the ODI Upgrade Key
-
The upgrade key is used to convert 11g IDs for repository objects into unique GUIDs.
Note:
This task does not apply to an upgrade from ODI 12.1.2. to ODI 12.1.3.ODI objects exist in ODI repositories and also in XML files exported from such repositories, which can be used, for example, in metadata exchanges between repositories. As such, there may be multiple copies of the same object, in different repositories and XML files.
In 12c, ODI uses GUIDs instead of internal numeric IDs for object identification.In order to make sure the object identity is preserved after upgrade, a deterministic algorithm is applied to calculate GUIDs from the internal IDs for existing objects (note that for new objects, ODI will generate random GUIDs).
Because of the fact that the internal numeric IDs were not really universally unique, and were dependent on the repository ID to achieve a "pseudo-uniqueness," ODI allows the user to specify the upgrade key in order to reduce the likelihood of generating duplicated GUIDs. The upgrade key is fed into the GUID generation algorithm together with the internal numeric ID, to calculate the GUID.
Thus, choosing different upgrade keys protects from getting duplicated GUIDs for objects that accidentally have the same internal numeric IDs. However, when multiple copies of the same object exists (in a repository or exported in XML files), the same GUID should be produced for all copies of the object. For this reason, the same upgrade key must be used for all upgrade operations involving the copies of that particular object.
For example, suppose you have a product with
1001as the ID in the 11g repository, and you also have a file exported from the same repository, which contains the same project (ID =1001). In this case, the upgrade key used to upgrade the repository should be the same as the upgrade key used to import the XML file into the upgraded 12c repository. This ensures that the project object in the import file will be properly matched with the project object in the repository (when using one ofSYNONYMimport modes). However, if there is an 11g XML export file provided from a source containing objects created in another repository of which you have no information, there is a chance that it may contain a project that accidentally has the same internal ID (1001). In this case, to protect from erroneous object matching, which may corrupt the metadata, a different, custom upgrade key should be used when importing that file into the repository. - Task 10 Completing the Upgrade Validation
-
On the Examine screen, the Upgrade Assistant performs a series of validations before upgrading the selected components. Ensure that all validations have succeeded.
Tip:
More information about the options on this screen can be found in Examine in Upgrading with the Upgrade Assistant. - Task 11 Beginning and Completing the Upgrade
-
Click Upgrade on the Upgrade Summary screen to begin the upgrade. The Upgrade Progress screens shows information about the progress of the upgrade, and the Upgrade Success screen summarizes the upgrade.
- Task 12 Verifying the Schema Version
-
To verify that the schema has been upgraded, run SQL*Plus from the database host and use the following command:
select owner, version, status from schema_version_registry where owner = 'prefix_ODI_REPO';Replace
prefixwith the custom prefix of your repository schema created in RCU. Below is an example:select owner, version, status from schema_version_registry where owner = DEV1213_ODI_REPO OWNER VERSION STATUS ------------------------------ ------------------------------ ----------- DEV1213_ODI_REPO 12.1.3.0.0 VALID
In the output, verify that the schema version number is "12.1.3.0.0" in the "VERSION" column.
6.4 Upgrading the Java EE Agent Environment
After the repository schemas are upgraded, run the reconfiguration wizard to complete the upgrade of the Java EE agent environment.
6.4.1 Starting the Reconfiguration Wizard
To start the reconfiguration wizard:
-
Log in to the system where the 12c Oracle Data Integrator software was installed.
-
Go to the following directory location:
On UNIX operating systems:
ORACLE_HOME/oracle_common/common/binOn Windows operating systems:
ORACLE_HOME\oracle_common\common\binwhere
ORACLE_HOMEis the location where Oracle Data Integrator is installed. -
Start the reconfiguration wizard.
On UNIX operating systems:
./reconfig.sh -log=log_fileOn Windows operating systems:
reconfig.cmd -log=log_fileSpecify the full path and file name in place of
log_file; creating this log file can be very helpful if you need to troubleshoot the reconfiguration process.Note:
When you run the reconfiguration wizard, the following error message might be displayed to indicate that the default cache directory is not valid:*sys-package-mgr*: can't create package cache dir
You can change the cache directory by setting the environment variable
CONFIG_JVM_ARGS. For example:CONFIG_JVM_ARGS=-Dpython.cachedir=valid_directory
6.4.2 Navigating the Reconfiguration Wizard Screens to Reconfigure the Domain
Follow the instructions in this section to navigate through the screens in the reconfiguration wizard.
- Task 1 Selecting the 11g Domain
-
Use the Select Domain screen to specify the full path to the domain location of your 11g Oracle Data Integrator domain. You can also click Browse and use the file manager window to help you select the domain location.
- Task 2 Viewing the Reconfiguration Setup Progress
-
The Reconfiguration Setup Progress screen shows you the progress of the application of reconfiguration templates.
- Task 3 Selecting the Domain Mode and JDK
-
Domain mode cannot be changed.
Select the JDK to use in the domain or click Browse to navigate to the JDK you want to use.
Note:
Oracle Fusion Middleware 12c requires Java SE 7. For more information, see "Verifying Certification and System Requirements" in Planning an Installation of Oracle Fusion Middleware. - Task 4 Configuring JDBC Data Sources
-
The JDBC Data Sources screen is displayed if you created custom data sources for a database-based OPSS security store or Audit Data store in 11g.
Use this screen to configure the JDBC data sources defined in your domain source.
For information about the fields on this page, click Help, or refer to "JDBC Data Sources" in Upgrading Oracle WebLogic Server.
- Task 5 Testing the JDBC Data Sources
-
Use the JDBC Data Sources Test screen to test the data source connections you configured.
For information about the fields on this page, click Help, or refer to "JDBC Data Sources Test" in Upgrading Oracle WebLogic Server.
- Task 6 Selecting the Database Configuration Type
-
If not already selected, select RCU Data.
Provide the database credentials to retrieve the schema information for the upgradable schemas that are included in the domain. If you select this option, the fields on this screen are activated. Fill in each field using the connection information that you specified for the STB component in the Repository Creation Utility (RCU).
Note:
If in the earlier installation you created an ODI repository using ODI Studio you do not have the STB schema created. Go to "Starting the Repository Creation Utility" in Installing and Configuring Oracle Data Integrator. Create the dependent schema for ODI by first selecting the ODI schema in RCU so that all the dependent schemas get selected. Deselect the ODI schema and provide the custom ODI repository connectivity from this step.When you have provided the connection information, click Get RCU Configuration to retrieve the schema information.
For more information, click Help, or refer to "Database Configuration Type" in Upgrading Oracle WebLogic Server.
- Task 7 Configuring JDBC Component Schema
-
Specify the data source settings for each of the schemas listed on the JDBC Component Schema screen by selecting the check box adjacent to each schema name.
Note:
You must specify the 11g schema details for those schemas that you upgraded in Section 6.3. For the others, specify the 12c schema details.For information about the fields on this page, click Help, or refer to "JDBC Component Schema" in Upgrading Oracle WebLogic Server.
- Task 8 Configuring Node Manager
-
The Node Manager screen is displayed only if the domain you are reconfiguring is currently using a Per Domain Default Location Node Manager.
Select Migrate Existing Configuration and provide the location of the per domain default location.
Enable Apply Oracle Recommended Defaults.
Provide Node Manager Credentials. This is a new User that is being created to administer the Node Manager. The password is required during start-up, for any components now handled by the Node Manager (including OHS).
Note: When upgrading a domain and changing from a per-host Node Manager configuration to a per-domain Node Manager configuration, if you are using custom scripts to start and stop the WebLogic Server environment, you must manually update the scripts to change the Node Manager home location to the new domain-based location.
For more information on configuring the Node Manager, see "Default Node Manager Configuration" in Administering Node Manager for Oracle WebLogic Server.
- Task 9 Configuring Credentials
-
Use this screen to provide credentials for each key in the domain. Credentials that have been previously defined in the domain are already included in the table.
For more information on credentials, see "Understanding Identities, Policies, Credentials, Keys, Certificates, and Auditing" in Securing Applications with Oracle Platform Security Services.
- Task 10 Configuring the Keystore
-
Use the Keystore screen to specify the path to the trusted certificate for each keystore, the path to each keystore's private key, the password for the private key, and the path to the Identity Certificate for the private key.
When you click in the Trusted Certificate, Private Key, or Identity Certificate fields, a browse icon appears on the right of the field. Click this icon to browse for the appropriate file.
- Task 11 Configuring the ODI Server
-
Use the ODI Server Configuration screen to configure the colocated ODI agents in your domain.
Table 6-3 Fields for ODI Server Configuration screen
Field Description System Component
From this drop-down list, select the ODI agent to configure.
Server Listen Address
Enter the host name or IP address of the host system on which this agent resides. Do not use localhost.
Server Listen port
Enter the listen port to be used for the ODI agent.
Supervisor Name
Enter the ODI username that has Supervisor privileges.
Supervisor Password
Enter the Supervisor user's password.
Preferred Data Source
From this drop-down list, select the data source to be used for the selected ODI agent.
- Task 12 Completing Domain Reconfiguration
-
Review the configuration summary on the Configuration Summary screen, then click Reconfig to reconfigure the domain.
When reconfiguration is finished, click Finish to dismiss the reconfiguration wizard.
6.5 Upgrading the Standalone Agent Environment (no WebLogic Domain)
After the repository schemas are upgraded, follow the instructions in this section to upgrade the standalone agent (no WebLogic domain) environment.
6.5.1 Starting the Upgrade Assistant
To start the Upgrade Assistant, go to the ORACLE_HOME/oracle_common/upgrade/bin directory, and enter the following command:
On UNIX operating systems:
./ua
On Windows operating systems:
ua.bat
6.5.2 Upgrading the Standalone System Component Configurations
After the Upgrade Assistant is started (Section 6.5.1), follow the instructions in this section to navigate through the Upgrade Assistant screens and upgrade the standalone system component configurations.
- Task 1 Introducing the Upgrade Assistant
-
The Welcome screen contains important reminders to consider before proceeding with your upgrade. Make sure you read these and verify that you are ready to proceed.
- Task 2 Selecting an Upgrade Operation
-
Beginning with 12c (12.1.2), standalone system components will have their own standalone domain. When you are upgrading your 11g standalone system components (which had no previous domain associations), you must first create a new standalone domain for your system components.
On the Standalone Components screen, select Standalone System Component Configurations, then select Create a New Domain.
In the Domain Directory field, specify the full path of the Domain you are creating. It is recommended that you locate your Domain home in accordance with the directory structure summarized in "Understanding the Recommended Directory Structure" in Planning an Installation of Oracle Fusion Middleware, where the Domain home is located outside the Oracle home directory. This directory structure will help you avoid issues when you need to upgrade or reinstall your software.
Tip:
The Update an Existing Domain option might be used in a situation where an upgrade was already performed and the domain created, either from another system component upgrade, or from a partial previous Oracle Data Integrator upgrade. These are examples of a situation where you would not need to create a new domain.More information about this screen can be found in Standalone Components in Upgrading with the Upgrade Assistant.
- Task 3 Viewing Components to be Upgraded
-
The Component List screen lists the components that will be upgraded:
-
System Components Infrastructure
-
Oracle Data Integrator
-
- Task 4 Verifying Prerequisites
-
The Prerequisites screen lists items that you must check and verify before you can proceed.
You must check the boxes before you can continue. The Upgrade Assistant will not verify that the prerequisites have been met.
- Task 5 Specifying 11g Instance Directories
-
On the Instance Directories screen, specify the location of one or more 11g Oracle instance directories to be upgraded.

Description of the illustration ''ua_instance_directories.gif''
- Task 6 Creating a Node Manager
-
On the Node Manager screen, specify the credentials of the Node Manager that will be used to create a domain during the upgrade of standalone system components.
Tip:
More information about the options on this screen can be found in Node Manager in Upgrading with the Upgrade Assistant. - Task 7 Completing the Upgrade Validation
-
Ensure that all validations have succeeded.
Tip:
More information about the options on this screen can be found in Examine in Upgrading with the Upgrade Assistant. - Task 8 Beginning and Completing the Upgrade
-
Click Upgrade on the Upgrade Summary screen to begin the upgrade. The Upgrade Progress screens shows information about the progress of the upgrade, and the Upgrade Success screen summarizes the upgrade.
6.6 Upgrading the Standalone Agent Environment (with WebLogic Domain)
After your repository schemas are upgraded, follow the instructions in this section to upgrade the standalone agent (with WebLogic domain) environment.
-
Section 6.6.1, "Reconfiguring the Domain Using the Reconfiguration Wizard"
-
Section 6.6.3, "Upgrading the WebLogic Domain Component Configurations"
6.6.1 Reconfiguring the Domain Using the Reconfiguration Wizard
Follow the instructions in Section 6.4 to reconfigure the 11g or 12.1.2 domain using the reconfiguration wizard.
6.6.2 Starting the Upgrade Assistant
To start the Upgrade Assistant, go to the ORACLE_HOME/oracle_common/upgrade/bin directory, and enter the following command:
On UNIX operating systems:
./ua
On Windows operating systems:
ua.bat
6.6.3 Upgrading the WebLogic Domain Component Configurations
After the upgrade assistant is started (Section 6.6.2), follow the instructions in this section to navigate through the Upgrade Assistant screens and upgrade the WebLogic domain component configurations.
- Task 1 Introducing the Upgrade Assistant
-
The Welcome screen contains important reminders to consider before proceeding with your upgrade. Make sure you read these and verify that you are ready to proceed.
- Task 2 Selecting an Upgrade Operation
-
Select the WebLogic Component Configurations option to upgrade component configurations for your managed WebLogic Server domain. You will be prompted to supply the connection details required to connect to the WebLogic Administration Server that is managing the domain.
Tip:
More information about this screen can be found in WebLogic Component Configurations in Upgrading with the Upgrade Assistant. - Task 3 Viewing Components to be Upgraded
-
The Component List screen lists the components that will be upgraded.
- Task 4 Verifying Prerequisites
-
The Prerequisites screen lists items that you must check and verify before you can proceed.
You must check the boxes before you can continue. The Upgrade Assistant will not verify that the prerequisites have been met.
- Task 5 Completing the Upgrade Validation
-
On the Examine screen, the Upgrade Assistant performs a series of validations before upgrading the selected components. Ensure that all validations have succeeded.
Tip:
More information about the options on this screen can be found in Examine in Upgrading with the Upgrade Assistant. - Task 6 Beginning and Completing the Upgrade
-
Click Upgrade on the Upgrade Summary screen to begin the upgrade. The Upgrade Progress screens shows information about the progress of the upgrade, and the Upgrade Success screen summarizes the upgrade.
6.7 Troubleshooting the Upgrade
If the upgrade process fails, you must close the Upgrade Assistant, correct the issue, and then restart the Upgrade Assistant.
If the upgrade process fails after the upgrade process has started, you must drop the cloned repository and start from a freshly cloned repository in addition to correcting the underlying issue. There is no way to restart the failed upgrade process.
For more troubleshooting information, see "Troubleshooting Your Upgrade" in Upgrading with the Upgrade Assistant.
Troubleshooting Upgrade Log Errors
If the Upgrade Assistant log file contains <#>, 11g interfaces are converted with errors., check for the interface name and ID in the Upgrade Assistant log and correct the issue using ODI Studio in the 11g repository. An error during interface conversion can be caused by a validation failure for the 11g interface, such as an unmatched parenthesis in an expression. The conversion error can cause the resulting mapping to be incomplete, but has no effect on other conversions.
How to proceed when you encounter such interface upgrade errors:
-
If the interfaces highlighted by Upgrade Assistant log file are not used and can be ignored. You can continue to use the upgraded 12c repository.
-
If the interface is converted to a valid 12c mapping, each erroneous interface needs to be fixed in the 11g environment and re-converted using one of these two methods:
-
Export only those interfaces, import them into upgraded 12c repository. The import process internally upgrades the 11g interfaces into 12c mappings. For more information on the importing an interface into 12c repository, see Administering Oracle Data Integrator.
-
Repeat the entire upgrade with fixed interfaces. This is recommended if the number of erroneous interfaces is large.
-