A Understanding Repository Creation Utility Screens
This appendix contains screenshots and descriptions for all of the Repository Creation Utility screens.
The following sections are included:
A.1 Welcome

Description of the illustration welcome.gif
This is the first screen that appears when RCU is started. Note the navigation pane on the left that summarizes the tasks that RCU will help you complete. Each item in the navigation pane represents a specific screen that will prompt you for information required to create or drop your schemas.
Click Skip This Page Next Time if you do not want to see the Welcome screen the next time you start RCU.
A.2 Create Repository
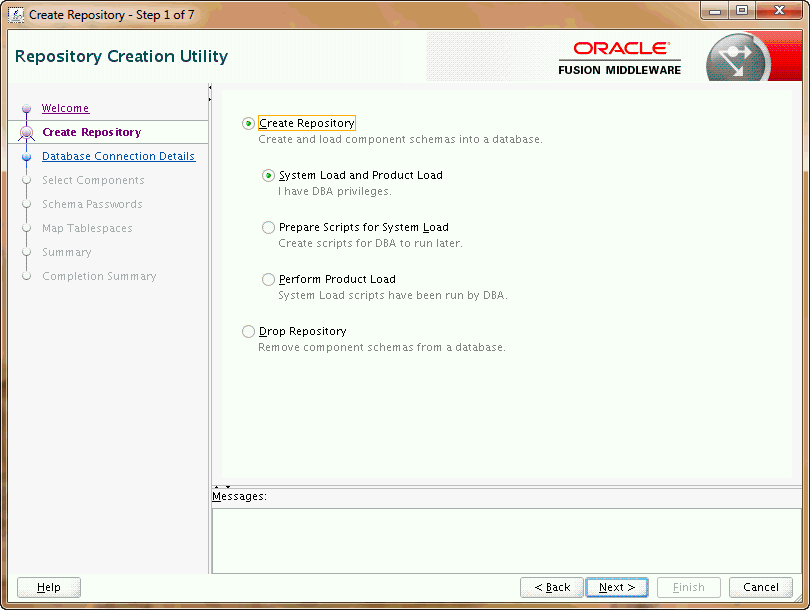
Description of the illustration create_repository.gif
Use this screen to select the action you want to perform.
A.2.1 Create Repository
Select Create Repository to create component schemas in the database. The following table describes the options available:
| Option | Description |
|---|---|
|
System Load and Product Load Concurrently |
Select this option to perform both System Load and Product Load operations. Users must have DBA or SYSDBA permissions to select this option. This option can be performed on any certified database. |
|
Prepare Script for System Load |
Select this option to perform actions that require DBA or SYSDBA permissions:
This option is only supported on Oracle and Oracle EBR databases. |
|
Perform Product Load Only |
Select this option to load and create procedures, functions, tables, indexes and other objects within schemas and run any action that does not require DBA access. Any non-DBA user or the REGISTRYOWNER user can select this option. |
A.2.2 Drop Repository
Select Drop Repository to remove component schemas from the database.
A.3 Database Connection Details
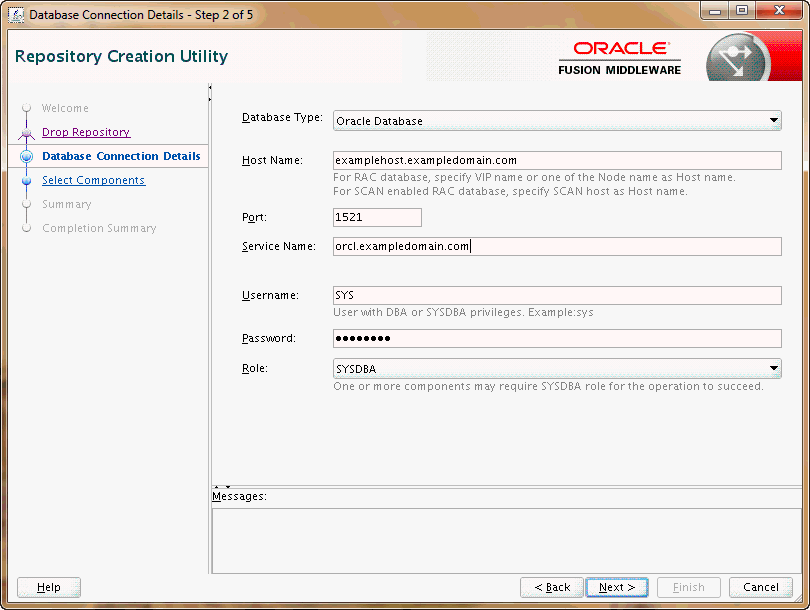
Description of the illustration database_details.gif
Use this screen to specify the connection credentials to the database in which you will be creating or dropping your schemas. Select one of the following depending on your database:
Click Next when you are finished entering the connection credentials for your database. The following screen appears, indicating the progress of the installer establishing the connection with the specified database:
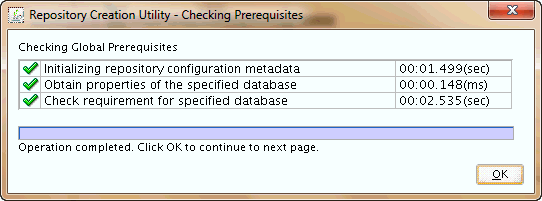
Description of the illustration database_prereqs.gif
If an error occurs while the connection is being established, the error message(s) appear in the Messages field on the Database Connection Details screen.
Specific database requirements for the various schemas can be found in the Oracle Fusion Middleware System Requirements and Specifications document.
For certified database versions, see the System Requirements and Supported Platforms for Oracle Fusion Middleware 11gR1 document, which is available on the Oracle Fusion Middleware Supported System Configurations page.
A.3.1 Specifying Connection Credentials for Oracle Databases and Oracle Databases with Edition-Based Redefinition
For Oracle databases and Oracle databases with edition-based redefinition, specify the following connection credentials:
| Field | Description |
|---|---|
|
Host Name |
Enter the name of the server where your database is running. Use the following format: examplehost.exampledomain.com For Oracle RAC databases, specify the VIP name or one of the node names in this field. |
|
Port |
Enter the port number for your database. The default port number for Oracle databases is 1521. |
|
Service Name |
Specify the service name for the database. Typically, the service name is the same as the global database name. If you are unsure what the service name for your database is, you can obtain it from the For Oracle RAC databases, specify the service name of one of the nodes in this field. For example: examplehost.exampledomain.com |
|
Username |
Enter the user name for your database. The default user name is |
|
Password |
Enter the password for your database user. |
|
Role |
Select the database user's role from the drop-down list:
|
A.3.2 Specifying Connection Credentials for MySQL Databases
For MySQL databases, specify the following connection credentials:
| Field | Description |
|---|---|
|
Host Name |
Enter the host name, IP address, or complete server name in host\server format of the server where your database is running. |
|
Port |
Enter the port number for your database. |
|
Database Name |
Specify the name of your database. |
|
Username |
Specify the name of a user with administrator privileges. |
|
Password |
Enter the password for your database user. |
A.3.3 Specifying Connection Credentials for Microsoft SQL Server Databases
For Microsoft SQL Server databases, specify the following connection credentials:
| Field | Description |
|---|---|
|
Unicode Support |
Select Yes or No from the drop-down list. |
|
Server Name |
Enter the host name, IP address, or complete server name in host\server format of the server where your database is running. |
|
Port |
Enter the port number for your database. |
|
Database Name |
Specify the name of your database. |
|
Username |
Specify the name of a user with administrator privileges. |
|
Password |
Enter the password for your database user. |
A.3.4 Specifying Connection Credentials for IBM DB2 Databases
For IBM DB2 databases, specify the following connection credentials:
| Field | Description |
|---|---|
|
Server Name |
Enter the host name, IP address, or complete server name in host\server format of the server where your database is running. |
|
Port |
Enter the port number for your database. |
|
Database Name |
Specify the name of your database. |
|
Username |
Specify the name of a user with DB Owner privileges. The default user name for IBM DB2 databases is |
|
Password |
Enter the password for your database user. |
A.4 Select Components (for Create Operation)
Below is the Select Components screen if you selected Create on the Create Repository screen.
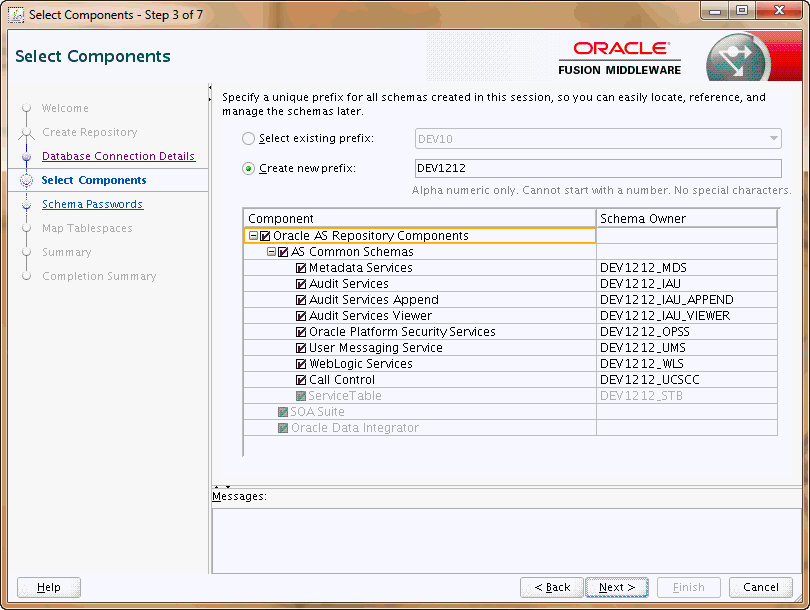
Description of the illustration select_component_create.gif
The following table describes the fields on this screen.
| Field | Description |
|---|---|
|
Select existing prefix |
Use this option to create schemas using an existing prefix which you can select from the drop-down list. If you select this option, you can only create schemas that do not already have this prefix in the database (for example, if |
|
Create new prefix |
Use this option to create a new custom prefix that can be used to group your schema together. The prefix name must be a minimum of one character in length and cannot exceed 12 alphanumeric characters (0-9, a-z, or A-Z) in length (not including the underscore character). Prefixes should not start with a number. No whitespace or special characters are allowed. You can edit the schema name or prefix by clicking the item you want to change in the "Schema Owner" column and editing the table cell directly. For more information about custom prefixes, see Section 1.2.3. |
|
Component |
Use the "Component" column in the table to select the component schema you want to create. When you select a component, any other components that may be required by the component you select are also selected. For example, if you select Oracle Platform and Security Services, then the Audit Services schema is also automatically selected if it has not already been selected. The Audit Services schema is required by the Oracle Platform and Security Services schema. If a component has a plus sign (+) next to its name, then there are sub components available. Click on the plus sign (+) to expand the category to view all sub components. If you want to select a component with all its subcomponents, click on the top-most box with the plus sign (+). If you are creating component schemas on an IBM DB2 database, see important information in Section 1.1.4. |
|
Schema Owner |
This column shows the name of the schema owner for each component (custom prefix and schema name). You can edit the schema owner value by clicking the item you want to change in this column and editing the table cell directly. |
Note:
You must remember the Schema Owner name for the components you are installing; you will need this information during the configuration phase of your Oracle Fusion Middleware product installation. Oracle recommends that you write this value down.
Click Next when you are finished specifying your prefix, schema names, and selecting components. The following screen appears, indicating the progress of component prerequisite checking before the schemas are created.
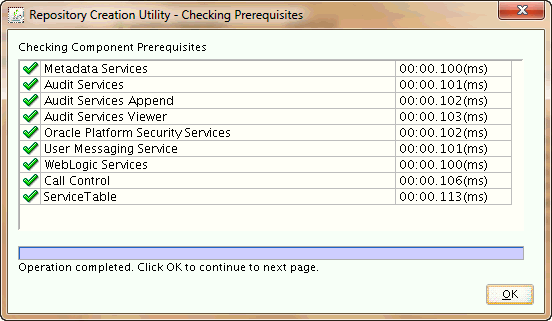
Description of the illustration select_component_prereqs.gif
If an error occurs during the prerequisite checking, the error message(s) appear in the Messages field on the Select Components screen.
Click OK to dismiss this screen.
A.5 Select Components (for Drop Operation)
Below is the Select Components screen if you selected Drop on the Create Repository screen.
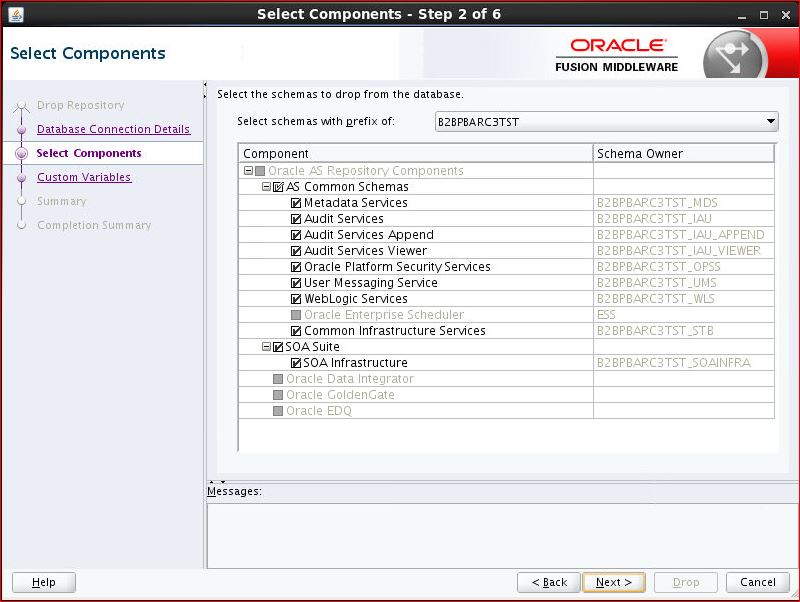
The following table describes the fields on this screen:
| Field | Description |
|---|---|
|
Select schemas with prefix of |
Use the drop-down list in this field to select an existing custom prefix - all schemas associated with this prefix will be removed. |
|
Component |
Select the component schemas you want to remove. NOTE: Unlike create operations, schema dependencies are not handled automatically by RCU for drop operations. When you remove a schema, you must also remove the schemas which depend on the schema you are removing. For example, the Audit Services schema is required by the Oracle Platform Security Services schema; if you remove the Audit Services schema, the Oracle Platform Security Services schema will no longer work. |
|
Schema Owner |
This column shows the schema owner (custom prefix and schema name). For drop operations, this column cannot be edited. |
Click Next when you are finished. The following screen appears:
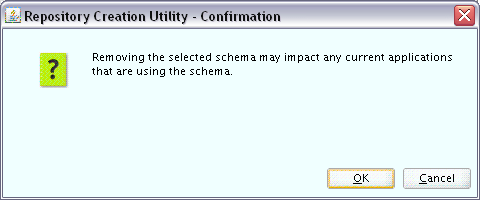
Description of the illustration select_component_drop_conf.gif
Click OK to continue. The following screen appears:

Description of the illustration select_component_prereqs.gif
If an error occurs during the prerequisite checking, the error message(s) appear in the Messages field on the Select Components screen.
Click OK to dismiss this screen.
A.6 Schema Passwords
Below is the Schema Passwords screen.
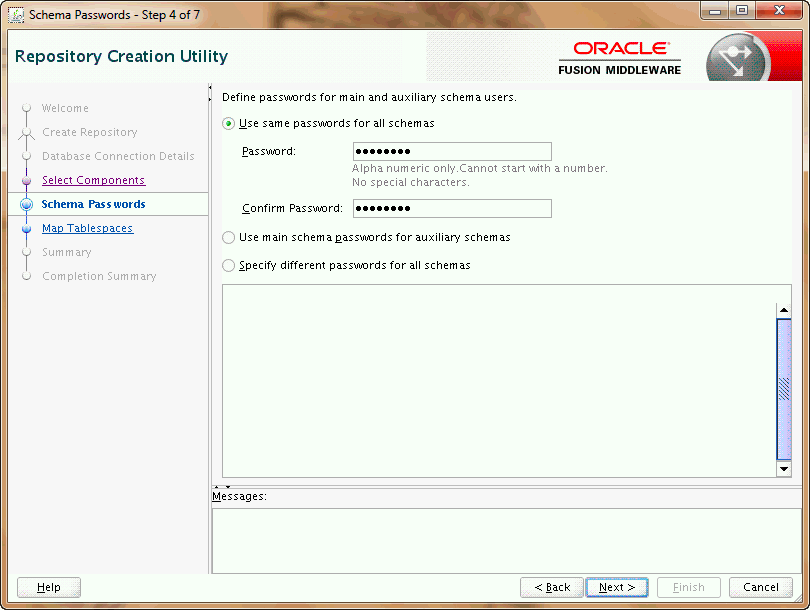
Description of the illustration schema_password.gif
There are three ways to specify schema passwords on this screen; they are described in the following table:
| Option | Description |
|---|---|
|
Use same password for all schemas |
Select this option if you want to use a single password for all schemas and their auxiliary schemas. In the Password field, enter your password. Enter your password again in the Confirm Password field. |
|
Use main schema passwords for auxiliary schemas |
Select this option if you want to specify different passwords for the main schemas, but still have the same password used for their respective auxiliary schemas. If you select this option, only the main schemas will be visible in the table. For each schema, you must enter each schema's password in the Schema Password column in the table, and enter the same password in the Confirm Password column. |
|
Specify different passwords for all schemas |
Select this option if you want to specify unique passwords for the main schemas and auxiliary schemas. If you select this option, all main schemas and auxiliary schemas will be visible in the table. For each schema and auxiliary schema, you must enter the password in the Schema Password column in the table, and enter the same password in the Confirm Password column. |
Note:
You must remember the passwords you enter on this screen; you will need this information during the configuration phase of your Oracle Fusion Middleware product installation. Oracle recommends that you write these values down.
A.7 Custom Variables
Custom variables are required by some products for additional product configuration information. This screen only appears if Oracle Data Integrator or Oracle SOA Suite are detected in the Oracle home in which RCU was started.
-
If Oracle Data Integrator is detected, the Custom Variables for Oracle Data Integrator will be visible.
-
If Oracle SOA Suite is detected, the Custom Variables for Oracle SOA Suite will be visible.
-
If both Oracle Data Integrator and Oracle SOA Suite are detected in the Oracle home, both sets of custom variables will appear on this screen.
A.7.1 Custom Variables for Oracle Data Integrator
Below is the Custom Variables screen for Oracle Data Integrator:
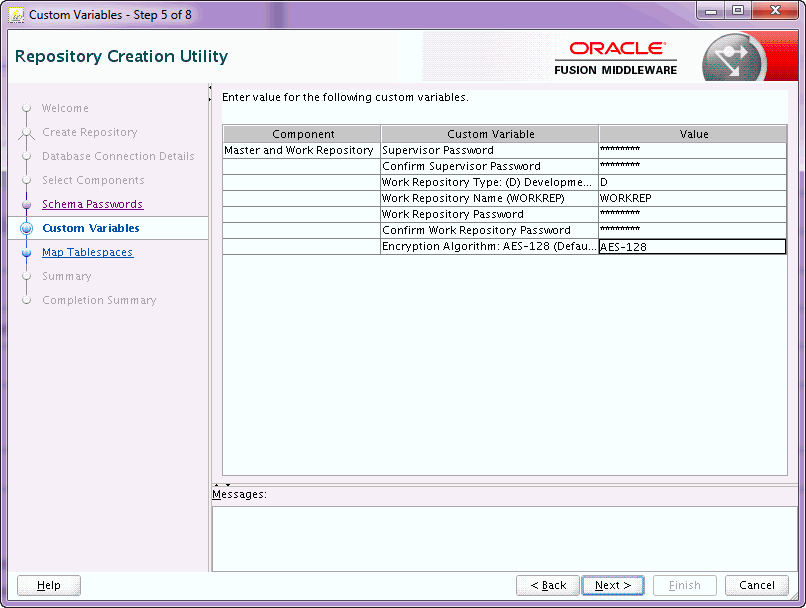
Description of the illustration custom_variables_odi.gif
The custom variables for Oracle Data Integrator are described in the following table:
| Variable | Description |
|---|---|
|
Supervisor Password |
Password of the supervisor user. You must confirm this password on the following line. |
|
Work Repository Type |
Specify how the Work Repository will be used:
|
|
Work Repository Name |
A unique name for the Work Repository (for example: |
|
Work Repository Password |
Provide a password for the Work Repository. If you provide a password, you must confirm the password on the following line. |
|
Encryption Algorithm |
Select the encryption algorithmm, either The default is |
A.7.2 Custom Variables for Oracle SOA Suite
Below is the Custom Variables screen for Oracle SOA Suite:
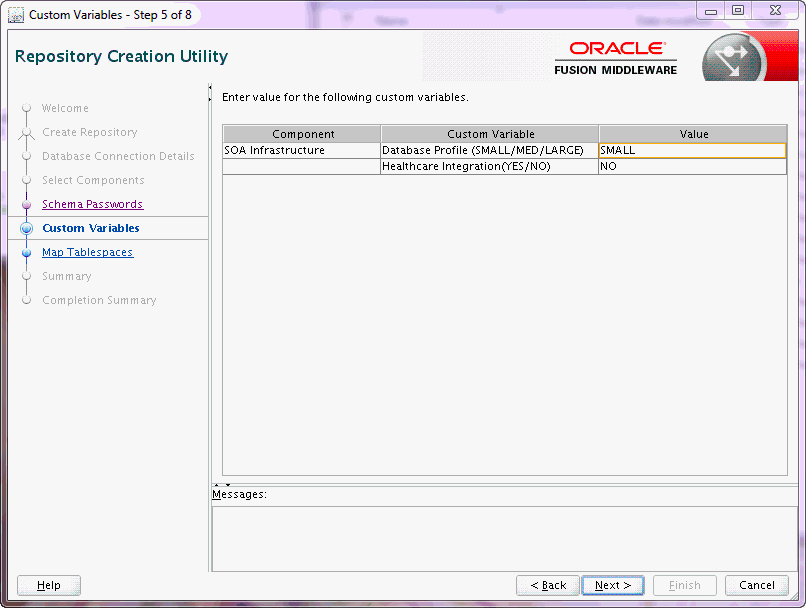
Description of the illustration custom_variables_soa.gif
The custom variables for Oracle SOA Suite are described in the following table:
| Variable | Description |
|---|---|
|
Database Profile |
Specify the database profile you want to use for Oracle SOA Suite. This determines the size of the SOA database. The default value is SMALL. |
|
Healthcare Integration |
Specify whether or not you want to enable Healthcare Integration for Oracle SOA Suite. The default value is NO. |
A.8 Map Tablespaces
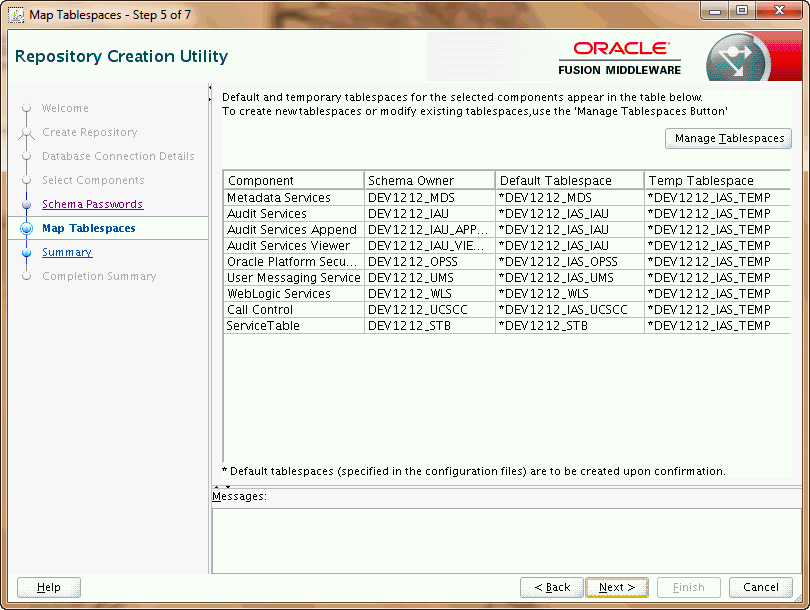
Description of the illustration map_tablespace.gif
This screen only appears if you selected the Create option on the Create Repository screen. The following topics are covered:
Click Next when you are finished with your tablespace information. The following screen appears, asking you to confirm the creation of tablespaces for any new schemas.
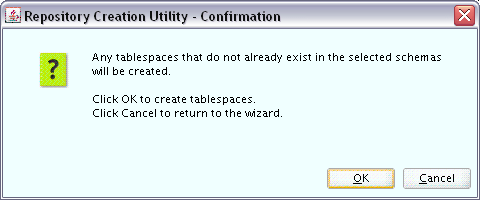
Description of the illustration map_tablespace_confirm.gif
Note:
RCU only creates tablespaces for those components associated with RCU.
Click OK to continue. The following screen appears, indicating the progress of the tablespace creation.
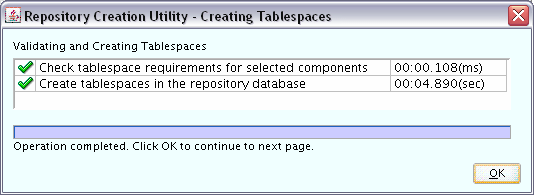
Description of the illustration map_tablespace_creating.gif
Click Stop to cancel tablespace creation. When the tablespaces are created, click OK to dismiss this window.
A.8.1 Default Tablespace Mappings
The default tablespace mapping for each component are shown in Appendix B.
In the "Default Tablespace" and "Temp Tablespace" columns, you can click on the tablespace cell to select from a list of available additional tablespace names.
A.8.2 Changing Default and Temporary Tablespaces
To change the default tablespace for a component, select the tablespace name in the Default Tablespace column, then select the tablespace name you want to use from the drop-down list. You can have your components use as many or as few tablespaces as desired to suit your configuration.
To change the temporary tablespace for a component, select the tablespace name in the Temp Tablespace column, then select the tablespace name you want to use from the drop-down list.
A.8.3 Viewing and Changing Additional Tablespaces
Some components have additional tablespaces associated with their schemas. If this is the case, the Additional Tablespaces button will appear on this screen. If none of the selected components have additional tablespaces, then this button will not appear.
To view additional tablespaces associated with the selected components, click the Additional Tablespaces button. Only those components with additional tablespaces as defined in the configuration files will appear on this screen.
To change the tablespace you want to use for a component, click in the "Tablespace Name" column and select the tablespace you want to use from the drop-down list.
Click OK when you are finished.
A.8.4 Managing Tablespaces and Datafiles
To manage your tablespaces and datafiles, click the Manage Tablespaces button. You will see a screen similar to the following:
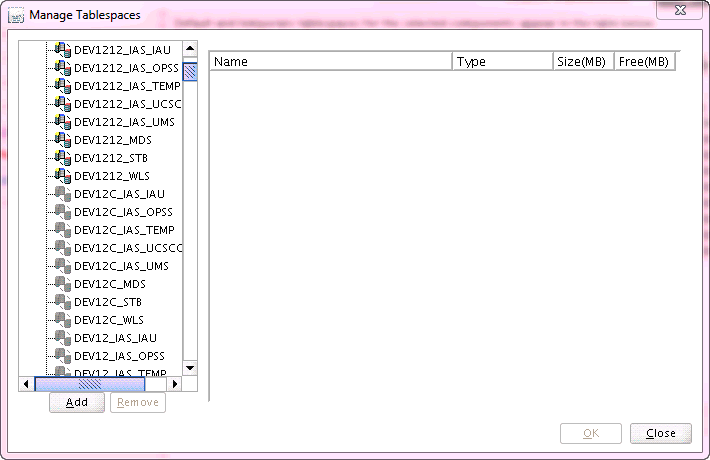
Description of the illustration map_tablespace_manage.gif
The following topics are covered in this section:
-
Section A.8.4.1, "Adding, Modifying, and Removing Tablespaces"
-
Section A.8.4.2, "Adding, Modifying, and Removing Datafiles"
A.8.4.1 Adding, Modifying, and Removing Tablespaces
Only tablespaces that will be created by RCU can be modified or removed. Tablespaces that existed before RCU was launched are visible on this screen but are grayed out and cannot be modified or removed.
Only tablespaces that are used by a component are created. You can specify a new tablespace here, but unless it is actually used by a component it will not be created.
To modify a tablespace, select the tablespace name on the left-hand portion of the screen, and edit the fields as described in the following table:
| Field | Description |
|---|---|
|
Name |
Edit the tablespace name this field to change the name of your tablespace. |
|
Type |
Specify whether you want this tablespace to be a temporary tablespace or permanent tablespace. |
|
Block Size (KB) |
Specify the block size (in Kilobytes) to be used for data retrieval. |
|
Storage Type |
Select Use Bigfile Tablespace if you want to create a bigfile tablespace; this is typically used if you have single large files instead of multiple small files. Select Use Automatic Segment Space Management if you want to use bitmaps to manage the free space within segments. |
To add a tablespace, click Add and specify the same details as above (for modifying a tablespace) for your new tablespace.
To remove a tablespace, select the tablespace name from the navigation tree, then click Remove. This tablespace will not get created.
A.8.4.2 Adding, Modifying, and Removing Datafiles
In the Datafiles section, specify the datafiles that make up the selected tablespace.
To add a datafile, click the icon with the plus sign (+):
Description of the illustration icon_add_datafile.gif
The Add Datafile screen appears:
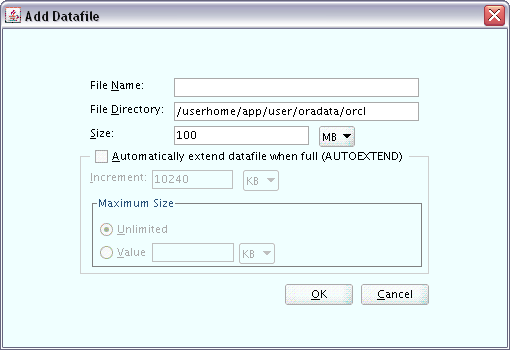
Description of the illustration map_tablespace_add_dfile.gif
Provide the information described in the following table:
| Field | Description |
|---|---|
|
File Name |
Specify the name of the datafile. NOTE: Datafile names with a dash or hyphen (-) character are not permitted. |
|
File Directory |
Specify the location where this datafile will reside. |
|
Size |
Specify the initial size of the datafile. Use the drop-down list to specify the size in kilobytes (KB), megabytes (MB), or gigabytes (GB). |
|
Automatically extend datafile when full (AUTOEXTEND) |
Select Automatically extend datafile when full (AUTOEXTEND) if you want to automatically extend the size of your datafile when it becomes full. In the "Increment" field, specify the size by which your datafile should be increased each time it becomes full. Use the drop-down list to specify the size in kilobytes (KB), megabytes (MB), or gigabytes (GB). If you want to limit maximum size of the datafile, specify this value in the "Maximum Size" field. |
Similarly, to modify or edit a datafile, select the icon next to the datafile name you want to edit, then click the icon with the pencil:
Description of the illustration icon_edit_datafile.gif
To delete a datafile, select the icon next to the datafile name you want to delete, then click the icon with the "X":
Description of the illustration icon_remove_datafile.gif
A.9 Summary (for Create Operation)
Below is the Summary screen if you selected Create on the Create Repository screen.
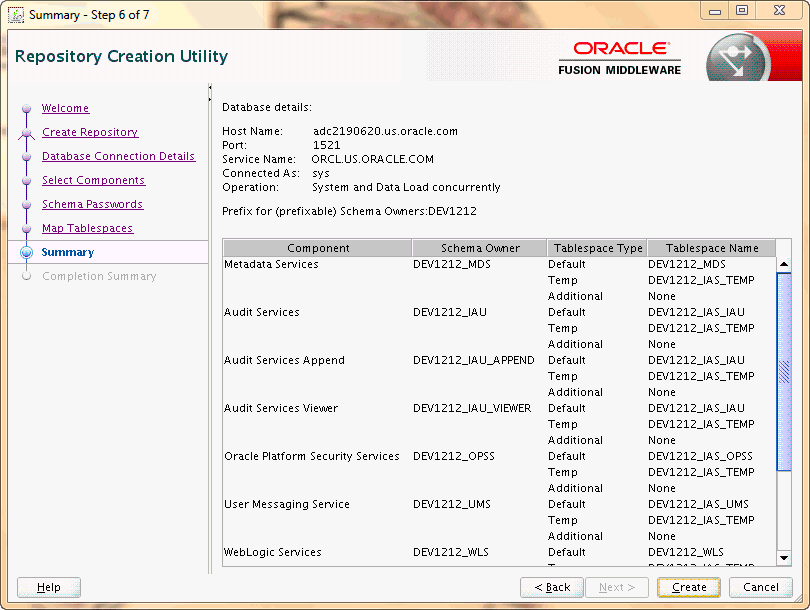
Description of the illustration summary_create.gif
Review the information on this screen, and click Create to begin schema creation. The operations summarized on this page will be performed when you click Create.
While the schemas are being created, you will see the following progress screen:
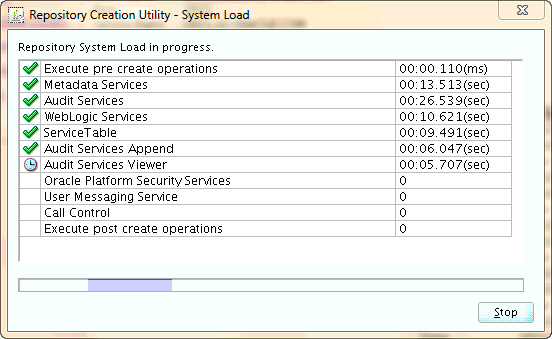
Description of the illustration summary_create_progress.gif
Click Stop if you want to stop creating the schemas.
A.10 Summary (for Drop Operation)
Below is the Summary screen if you selected Drop on the Create Repository screen.

Description of the illustration summary.jpg
Review the information on this screen, and click Drop to begin the operations summarized on this page.
While the schema(s) are being dropped, you will see the following progress screen:
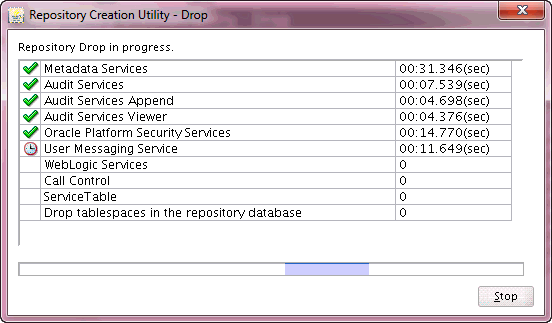
Description of the illustration summary_drop_progress.gif
Click Stop if you want to cancel the operation.
A.11 Completion Summary (for Create Operation)
Below is the Completion Summary screen if you selected Create on the Create Repository screen.
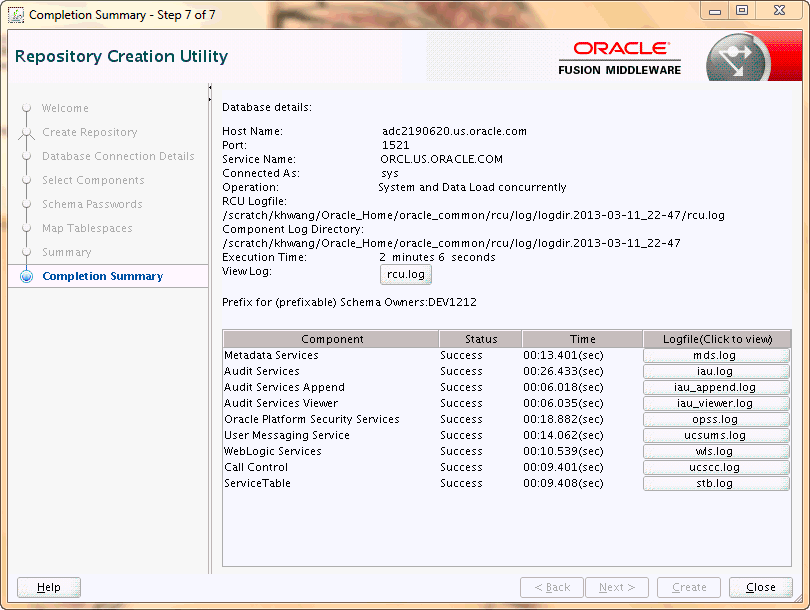
Description of the illustration completion_summary_create.gif
This screen contains information about the log files that were created from this RCU operation. You can click on the name of a particular log file to view the contents of that file.
If there were any problems encountered during schema creation, you can troubleshoot the issue using the log files. For more information, refer to Section D.2.
If errors are encountered during a Create operation, or if a Create operation fails for any component, the Cleanup for failed components checkbox appears on this page and is selected by default. If selected, RCU will perform cleanup operations for the component that failed during the Create operation. If you choose not to select this checkbox, you can cleanup the failed component at a later time by performing a Drop operation for the failed component(s).
Review the information on this screen, then click Close to dismiss this screen.
A.12 Completion Summary (for Drop Operation)
Below is the Completion Summary screen if you selected Drop on the Create Repository screen.
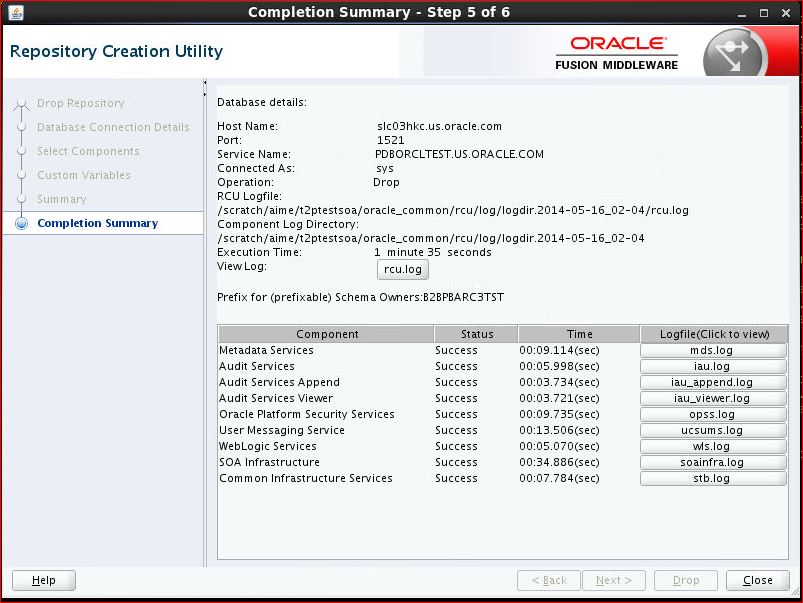
Description of the illustration comsummary.jpg
Note the log file names for each component that are visible in the "Logfile" column.
The main RCU log (rcu.log) and component log files are written to the following directory on UNIX operating systems:
ORACLE_HOME/oralce_common/rcu/log/logdir.date_timestamp
On Windows operating systems:
ORACLE_HOME\oracle_common\rcu\log\logdir.date_timestamp
Click rcu.log to view the contents of the main RCU log in a separate window.
If there were any problems encountered during schema creation, you can troubleshoot the issue using the log files. For more information, see Appendix D, "Troubleshooting Repository Creation Utility".
Review the information on this screen, then click Close to dismiss this screen.