2 Installing Oracle SOA Suite Quick Start for Developers
This chapter will guide you through an Oracle SOA Suite Quick Start installation and introduce you to using the Integrated WebLogic Server's default domain or creating a standalone domain.
By the end of this chapter, you will be able to develop Oracle SOA Suite applications using Oracle JDeveloper and test those applications using the Integrated WebLogic Server and Java DB.
This chapter contains the following sections:
2.1 Preparing to Use Quick Start
This section will help you verify that Quick Start can run on your system.
Before using Quick Start, you need to prepare your system by completing the following tasks:
- Task 1 Verifying Your System
-
-
Make sure that you are installing your product on supported hardware or software configuration. See the certification document for 12c (12.1.3) on the Oracle Fusion Middleware Supported System Configurations page.
-
Verify that your user account has the required privileges for installing Oracle Fusion Middleware. For more information, see "Selecting an Installation User" in Planning an Installation of Oracle Fusion Middleware.
-
Check the Oracle Fusion Middleware System Requirements and Specifications to see if your system meets the requirements for 12c (12.1.3).
-
- Task 2 Downloading the Installers
-
Log into the host computer where you want to install Oracle SOA Suite.
Find and download the following files:
-
The SOA Suite Quick Start installer zip file, labeled fmw_12.1.3.0.0_soaqs_Disk1_1of1.zip. This is located on the Oracle Technology Network, under the Oracle SOA Suite Downloads.
You may find the installer, after accepting the OTN Free Developer License Agreement, at the following URL:
http://www.oracle.com/technetwork/middleware/soasuite/downloads/index.htmlIf you cannot find the installer at the above location, verify the download location with the Oracle Fusion Middleware Download, Installation, and Configuration Readme File.
-
The latest supported Java Development Kit (JDK) for your operating system. As of its release, Oracle Fusion Middleware 12c (12.1.3) requires a minimum of JDK 7.0 Update 55 or later.
You can find the latest JDK at the following URL:
http://www.oracle.com/technetwork/java/javase/downloads/index.htmlYou should always verify the recommended version number and download location with the "Downloading a Supported Java Development Kit (JDK)" in the Oracle Fusion Middleware 12c (12.1.3) Download, Installation, and Configuration Readme File.
-
- Task 3 Installing the JDK
-
Install the JDK. The installation path must not contain any spaces.
You can find more information on installing a certified JDK under "Installing a Certified JDK" in Planning an Installation of Oracle Fusion Middleware.
- Task 4 Setting
JAVA_HOME -
Set the environment variable
JAVA_HOMEto point to the location of your JDK. Note thatJAVA_HOMEmust be in all caps. Your path definition should be formatted something like the following:Environment Run Command UNIX JAVA_HOME=$HOME/Java/jdk1.7.0_xx export JAVA_HOMEWindows Search for cmd.exe in the Start menu. Right-click the cmd.exeand select Run as Administrator.SET JAVA_HOME="C:\Program Files\Java\jdk1.7.0_xx"WARNING:
Your JDK folder may not be named the same or located at the destination in the above example. Make sure you point to the actual destination.
2.2 Launching the Quick Start Installer
This section will help you launch the Quick Start installer.
After you have done all the items in Section 2.1, you can launch the Quick Start installer using the following instructions:
-
Unzip the contents into a location you can find easily. You may have several .jar files.
-
Using the command prompt, navigate to the directory where you unzipped the jar files.
Launch the installation wizard with the appropriate command.
Installer Run Command Generic Installer for UNIX JAVA_HOME/bin/java -jar fmw_12.1.3.0.0_soa_quickstart.jarGeneric Installer for Windows JAVA_HOME\bin\java.exe -jar fmw_12.1.3.0.0_soa_quickstart.jarNote:
You can also launch the installer in silent mode to ensure that no configuration options are displayed during the installation process. For more information about silent or command line installation, see "Using the Oracle Universal Installer in Silent Mode" in Installing Software with the Oracle Universal Installer. -
The installation wizard should launch. If you have any problems getting the installer to run, double-check your system preparations, covered in Section 2.1.
Note:
Though you may have multiple jar files, you do not need to run the install command on all of them. You only need to run the above command on fmw_12.1.3.0.0_soa_quickstart.jar.
2.3 Navigating the Quick Start Installation Screens
This section will guide you through the Quick Start installation.
Once you have launched the Quick Start installer, the installation wizard displays the screens listed and described sequentially in Table 2-1.
Table 2-1 Oracle SOA Suite Quick Start Install Screens
| Screen | Description |
|---|---|
|
This screen introduces you to the product installer. |
|
|
Use this screen to specify the location of your Oracle home directory. Ensure that the name of the directory that you choose does not contain spaces. For more information about Oracle Fusion Middleware directory structure, see "Selecting Directories for Installation and Configuration" in Planning an Installation of Oracle Fusion Middleware. |
|
|
This screen verifies that your system meets the minimum necessary requirements. |
|
|
Use this screen to verify the installation options you selected. If you want to save these options to a response file, click Save Response File and provide the location and name of the response file. Response files can be used later in a silent installation situation. |
|
|
This screen allows you to see the progress of the installation. |
|
|
This screen appears when the installation is complete. Review the information on this screen. At the bottom of this screen, there is a checkbox to launch Oracle JDeveloper upon closing the installation wizard.  Description of the illustration ''startjdev.gif'' This guide recommends that you uncheck this box. Click Finish. |
For more information about the installation screens, see "A Oracle Universal Installer Installation Screens" in Installing with Oracle Universal Installer.
You should now see Section 2.5 to prepare your environment to launch the Integrated WebLogic Server. Then see Section 2.5 for the two supported methods to launch the Integrated WebLogic Server. You can find a tutorial for creating and launching an application in Section 7.1.
2.4 Preparing to Launch the Integrated WebLogic Server
This section explains how to prepare your environment before launching the Integrated WebLogic Server.
This section contains the following tasks:
2.4.1 Setting the JDEV_USER_DIR Variable
Set the JDEV_USER_DIR environment variable to define the location of your user home directory. This should be a unique location for your distribution. The user home directory will contain subdirectories for your domain files and your user-generated application files.
Note:
This step is crucial if you are planning to install and run multiple distributions of JDeveloper on the same machine. Assign a unique user home directory for each distribution you install. See Section 2.7 for more information.Oracle recommends a directory structure similar to the one shown in Figure 2-1, where config shows the location of the user home directory.
Figure 2-1 Recommended Oracle Fusion Middleware Directory Structure
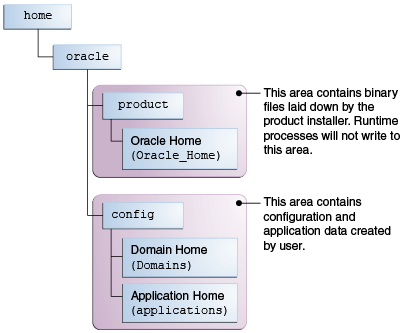
Description of ''Figure 2-1 Recommended Oracle Fusion Middleware Directory Structure''
If you do not define JDEV_USER_DIR, your domain home and application home will be created at two different locations.
On an UNIX host, the default domain home will be created at $HOME/.jdeveloper/system12.1.3.x.x.x.xxxx/DefaultDomain. The default application home will be created at $HOME/jdeveloper/mywork.
On a Windows host, the default domain home will be created at %USERPROFILE%\AppData\Roaming\JDeveloper\system12.1.3.x.x.x.xxxx\DefaultDomain. Your default application home will be created at C:\JDeveloper\mywork.
Once you have defined JDEV_USER_DIR, the domain home and application home will be co-located as subdirectories under the defined location. For example, on a UNIX system, the domain home will be located in JDEV_USER_DIR\system12.1.3.x.x.x.xxx. The application home will be located in JDEV_USER_DIR\mywork.
2.4.2 Setting ORACLE_HOME
You can also set ORACLE_HOME. While this step is not necessary, it will simplify the process of navigating to the various directories when you are running installation and configuration commands.
The path definition should look something like this:
| Environment | Run Command |
|---|---|
| UNIX |
ORACLE_HOME=$HOME/Oracle/Middleware/Oracle_Home export ORACLE_HOME |
| Windows |
SET ORACLE_HOME=C:\Oracle\Middleware\Oracle_Home |
2.4.3 Checking entropy for Oracle Linux
If you are installing on an Oracle Linux (formally Oracle Enterprise Linux) machine, you should ensure that you have sufficient entropy. You need at least 500 for the Integrated WebLogic Server to start up in a timely manner.
To check for entropy, run the following command:
cat /proc/sys/kernel/random/entropy_avail
If you have less than 500, use the following command to replenish bytes to /dev/random using /dev/urandom as the source:
rngd -r /dev/urandom -o /dev/random -b
You can configure this command by editing /etc/sysconfig/rngd and add the following line:
EXTRAOPTIONS="-i -r /dev/urandom -o /dev/random -b -t 60 -W 2048"
2.5 Configuring a Domain
This section will help you configure a domain that uses Java DB by launching the Integrated WebLogic Server.
Launching the Integrated WebLogic Server automatically generates a domain, designated as the default domain. However, you also have the option of launching the WebLogic server outside of JDeveloper and configuring a standalone domain.
The advantages and disadvantages of each method is detailed in the following table.
| Method | Description | Next Steps |
|---|---|---|
| Configure the Integrated WebLogic Server's default domain in JDeveloper. | Launching the Integrated WebLogic Server from inside JDeveloper will create the default domain.
In this case, the server is tethered to your current JDeveloper session. When you quit JDeveloper, the Integrated WebLogic Server shuts down as well. Every time you start a new JDeveloper session, you need to relaunch the Integrated WebLogic Server. |
See Section 2.5.1. |
| Configure a standalone domain. | You can create a standalone version of the Integrated WebLogic Server. The server and domain run independently of JDeveloper.
This will you save you startup time if you plan on developing an application in JDeveloper over a series of separate sessions, or if you plan to develop applications in the Oracle Service Bus browser-based console. |
See Section 2.5.2 |
| Configure a compact domain. | You can configure your Quick Start installation to use an Oracle database with an external compact domain.
You should only choose this option if you know you want your domain to be compatible with Enterprise Scheduler, Managed File Transfer, B2B, Heathcare, or BAM components. |
See Chapter 3. |
Any other method of creating a domain is not recommended.
2.5.1 Configuring JDeveloper's default domain
This section explains how to configure JDeveloper's default domain by launching the Integrated WebLogic Server. Complete the following tasks:
- Task 1 Launching the Integrated WebLogic Server
-
-
Launch JDeveloper with the following command:
Environment Run Command UNIX cd $ORACLE_HOME/jdeveloper/jdev/bin ./jdevWindows CD %ORACLE_HOME%\jdeveloper jdeveloper.exeAs Oracle JDeveloper launches, you will get three prompts.
When prompted, select Studio Developer as your role and press OK.
Description of the illustration ''selectrole.gif''
When prompted, say No to import preferences from a previous JDeveloper installation.
Description of the illustration ''importprefs.gif''
When prompted about Oracle Usage Tracking, check whether or not you want Oracle JDeveloper to send automated usage reports to Oracle and press OK.
JDeveloper has fully launched at this point.
-
Launch the Integrated WebLogic Server by choosing Run from top menu bar. Select Start Server Instance from the drop-down menu, as seen in Figure 2-2.
Figure 2-2 Starting the Integrated WebLogic Server
Description of ''Figure 2-2 Starting the Integrated WebLogic Server''
-
The first time you launch the server instance, you will be prompted to enter a password for your default domain, as seen in Figure 2-3.
Figure 2-3 Specifying a Password for Default Domain
Description of ''Figure 2-3 Specifying a Password for Default Domain''
The Administrator ID, Listen Address, Listen Port, and SSL Listen Port should already have values. Review them and make any appropriate changes.
-
Launching the integrated server will take several minutes.
You can track the server's launch in the Messages window pane. This window should automatically open at the bottom of the JDeveloper screen. If it is not there, you can open it by selecting Window from the top bar menu and Log from the drop-down menu. You can also activate it with the keyboard shortcut
Ctrl+Shift+L.Note:
If the creation of the Integrated WebLogic Server domain fails with the following error:Failed to query contents of table SERVICETABLE. - Schema 'DEMODB' does not existMake sure to shut down all running servers, even if they are not using Java DB, and try the domain creation again.
VPN Issue:
If your machine is connected through a VPN, Coherence may be confusing the local and VPN IP addresses. Change the Coherence cluster to multicast. -
When you see the following messages appear in the log, the Integrated WebLogic Server has launched successfully.
[SOA Platform is running and accepting requests [IntegratedWebLogicServer started.]
-
- Task 2 Verifying your domain
-
Your default domain is already configured with Oracle SOA Suite and Oracle Service Bus runtime components. You should now verify your installation.
-
Access the Enterprise Manager Fusion Middleware Control, which is located at an URL following this format:
http://hostname.domain:7101/em
Note:
The default port for the Integrated WebLogic Server should always be 7101 unless you changed it during configuration.Log in using the username and password that you specified when launching the Integrated Weblogic Server.
For more information on using Fusion Middleware Control, see "Getting Started Using Oracle Enterprise Manager Fusion Middleware Control" in Administering Oracle Fusion Middleware.
-
Alternatively, if you plan to develop projects using the Oracle Service Bus console, you can check to see if Oracle Service Bus is running.
The Oracle Service Bus console is located at an URL with the following format:
http://hostname.domain:7101/servicebus
Log in using the username and password that you specified when creating your standalone domain.
For more information on using the Oracle Service Bus console, see "Getting Started with the Oracle Service Bus Console" in Developing Services with Oracle Service Bus.
-
- Task 3 Disabling Secure Sockets Layer (SSL)
-
This is an optional task. SSL is enabled by default in the Integrated WebLogic Server. If you do not have stringent design time requirements, you can disable SSL by doing the following:
-
Go to the Administrator Console at
http://localhost:7101/console -
Log in with your credentials.
-
Navigate the menus with the following options: Environments -> Servers -> Admin Server.
-
Uncheck SSL Listen Port Enabled.
-
Restart the Integrated WebLogic Server.
-
- Task 4 Considering Your Next Steps
-
Go to Section 2.8, "Next Steps" to see what steps you can take next.
2.5.2 Configuring a Standalone Domain
If using JDeveloper's Integrated WebLogic Server and default domain fulfills your needs, you can skip this section.
This section describes how to launch a standalone version of the Integrated WebLogic Server and domain. You will complete the following tasks:
-
Task 1, "Launching the standalone domain configuration wizard"
-
Task 3, "Launching the Application Server Connection Wizard"
-
Task 4, "Navigating through the Create Application Server Connection wizard."
- Task 1 Launching the standalone domain configuration wizard
-
Make sure no other servers are running on your system.
From the command prompt, use the appropriate commands to do the following:
-
Navigate to ORACLE_HOME
/soa/common/bin -
Set the
QS_TEMPLATESenvironment variable to either the SOA domain template or to both SOA and OSB domain template. -
Launch the standalone domain configuration wizard.
If you have defined the
ORACLE_HOMEvariable, the command sequence for this task should resemble one of the following:Environment Run Command UNIX cd $ORACLE_HOME/soa/common/bin QS_TEMPLATES="$ORACLE_HOME/soa/common/templates/wls/oracle.soa_template_12.1.3.jar, $ORACLE_HOME/osb/common/templates/wls/oracle.osb_template_12.1.3.jar" export QS_TEMPLATES ./qs_config.sh
Windows CD %ORACLE_HOME%\soa\common\bin set QS_TEMPLATES=%ORACLE_HOME%\soa\common\templates\wls\oracle.soa_template_12.1.3.jar, %ORACLE_HOME%\osb\common\templates\wls\oracle.osb_template_12.1.3.jar qs_config.cmd
-
- Task 2 Navigating the domain configuration wizard
-
Navigate through the following screens:
Table 2-2 Quick Start WebLogic Server Configuration Screens
Screen Description Configuration
Specify a password for your default domain.
Edit the Domain Location. By default, the domain will be created at ORACLE_HOME
/user_projects/domains/base_domain. To prevent confusion in the future, replacebase_domainin the Domain Location path withstandalone_domain.Replace
base_domainwithstandalone_domainin the Application Location path as well.Review the port numbers.
Press Create.
Configuration Progress
This screen allows you to see the progress of the configuration.
End of Configuration
This screen appears when the installation is complete. Take note of the information on this screen.
You can leave the option to launch your new domain unchecked if you want to launch it manually from the domain location listed on this screen.
Click Finish to exit the wizard.
If you chose not to launch the domain automatically after creation, you can launch your standalone manually by using the command line to navigate to the domain home and to launch the
startWebLogic.shorstartWebLogic.cmdfile.Domain configuration will take several minutes. When you see the following message appear in the terminal, the WebLogic Server has launched and your standalone domain has been created successfully.
SOA Platform is running and accepting requests
Your standalone domain is already configured with Oracle SOA Suite runtime components.
- Task 3 Launching the Application Server Connection Wizard
-
Launch Oracle JDeveloper with the appropriate command.
Environment Run Command UNIX cd ORACLE_HOME/jdeveloper/jdev/bin ./jdevWindows CD %ORACLE_HOME%\jdeveloper jdeveloper.exeSelect Window from the top menu, and then choose Application Server from the drop-down menu. Alternatively, use the keyboard shortcut
Ctrl-Shift-G. This will open the Application Server Navigator in the left-hand pane.
Description of the illustration ''launchapplicationserver.gif''
Right-click on Application Server in the Application Server Navigator. Select New Application Server from the drop-down menu to launch the Create Application Server Connection wizard.
Description of the illustration ''newapplicationserver.gif''
- Task 4 Navigating through the Create Application Server Connection wizard.
-
The Create Application Server Connection wizard consists of the following screens:
Table 2-3 Application Server Connection Creation Screens
Screen Description Usage
Select Standalone Server.
Click Next.
Name and Type
Specify an intuitive Connection Name for your server.
Leave WebLogic 12.x selected as the Connection Type.
Click Next.
Authentication
Input the Username and Password you created during domain configuration.
Click Next.
Connections
Input the standalone domain's name. Then click Next without changing anything else on the screen.
Test
Click the Test Connection button at the top. If any of the tests fail, you should press Back to the Connections or Authentication screens to make sure you inputted everything correctly.
If everything passes, click Next.
Finish
The Finish screen tells you how to launch your new connection, covered in the following task. Click Finish.
- Task 5 Verifying Your Connection
-
Expand the connection node beside Application Servers in the Application Server Navigator. You should see your standalone domain listed by the Connection Name you specified on the Name and Type screen.
Right-click on your standalone domain's name and choose Launch Administrative Console.
Description of the illustration ''standalonelaunchconsole.gif''
Log into your administrative console. If you log in successfully, then you can begin creating applications. See Section 2.8 for the next steps you can take.
2.6 Knowing Basic JDeveloper Functions
This section contains a few basic things you need to know in order to manage Oracle JDeveloper. This includes the following:
You can learn more about using Oracle JDeveloper by referring to "Working with Oracle JDeveloper" in Developing Applications with Oracle JDeveloper.
2.6.1 Stopping the Integrated WebLogic Server
If you started the Integrated WebLogic Server from inside Oracle JDeveloper, you can simply close out of Oracle JDeveloper to end a running server.
If you do not want to close out of JDeveloper for any reason, you can also click the red stop button in the ribbon menu.
Description of the illustration ''terminateserver.gif''
If you have launched an independent WebLogic Server, you should do the following:
| Environment | Run Command |
|---|---|
| UNIX |
cd DOMAIN_HOME/bin
./stopWebLogic.sh
|
| Windows |
CD %DOMAIN_HOME%\bin
stopWebLogic.cmd
|
2.6.2 Re-launching JDeveloper
If you have closed Oracle JDeveloper and need to reopen it, you can use the following commands:
| Environment | Run Command |
|---|---|
| UNIX |
cd ORACLE_HOME/jdeveloper/jdev/bin
./jdev
|
| Windows |
CD %ORACLE_HOME%\jdeveloper
jdeveloper.exe
|
2.7 Managing Multiple Installations on the Same Machine
When you install multiple Quick Start distributions on the same machine, each distribution has its own JDeveloper that runs its own unique instance of Java DB. All Java DB instances on the same machine initialize on the same port. For these reasons, you cannot perform the following actions:
-
You cannot simultaneously launch two Integrated WebLogic Servers from different distributions.
-
You cannot access your Oracle SOA Suite runtime environment by launching the WebLogic Server from your Oracle Business Process Management Suite Quick Start Oracle home.
-
You cannot access your Oracle Business Process Management Suite runtime environment by launching the WebLogic Server from your Oracle SOA Suite Quick Start Oracle home.
If you want to switch between different servers using Java DB on the same machine, you need to take the following steps to ensure you are launching the desired development environment:
-
If you have not done so already, decide on separate user directory home locations for each of your JDeveloper distributions. The user home directory will contain subdirectories for your domain files and your user-generated application files.
For example, you may want to install and use both an Oracle Business Process Management Suite JDeveloper and an Oracle SOA Suite JDeveloper on the same machine. You could designate the user home directory for your Oracle SOA Suite JDeveloper to be located at
C:/jdev12cworkarea/soa, while your Oracle Business Process Management Suite user home directory could be located atC:/jdev12cworkarea/bpm. -
Set the environment variable
JDEV_USER_DIRto the location of the user directory home for the JDeveloper distribution that you want to use.For the example given in the previous step, set
JDEV_USER_DIR=C:/jdev12cworkarea/soaif you want to use the Oracle SOA Suite environment.Note:
RedefiningJDEV_USER_DIRwill also change the default save location for your application projects. If you already launched and used JDeveloper without definingJDEV_USER_DIR, you may have saved applications in the default application home. The default application home is located at the user's root directory underJDeveloper/mywork. -
Go to the JDeveloper home of the distribution you want to use.
For example, if you want to use your Oracle SOA Suite environment, go to your Oracle SOA Suite Oracle home and navigate to
/jdeveloper/jdev/bin. -
Launch the JDeveloper executable from there.
You must reset the JDEV_USER_DIR variable every time you switch between distributions using Java DB.
2.8 Next Steps
Once you have verified your installation, you can then perform any of the following tasks:
| Action | Resource |
|---|---|
| Configure your installation for Enterprise Scheduler, Managed File Transfer, B2B, Heathcare, or Business Activity Monitoring. | You will have to create an Oracle database and standalone compact domain in order to use these components. See Chapter 3 of this book for detailed instructions. |
| Deploy a sample application. | See Chapter 7 of this book. |
| Make or test an application of your own. | See "Working with Oracle JDeveloper" in Developing Applications with Oracle JDeveloper. |
| Delete your installation. | If you have tested your installation out and are done, see Chapter 8 of this book. |