2 Installing Oracle JDeveloper
This chapter describes how to install the Oracle JDeveloper software. You will not be able to use the software described in this chapter to develop SOA or Business Process Management applications.
To install a version of JDeveloper pre-configured for SOA Suite or Business Process Management Suite applications, see "Introducing the Quick Start Distributions" in Installing SOA Suite and Business Process Management Suite Quick Start for Developers.
This chapter contains the following sections:
2.1 Understanding the Oracle JDeveloper Installation Types
Note:
The installation types described in this chapter do not support SOA extensions. To install a version of JDeveloper pre-configured for SOA Suite or Business Process Management Suite applications, see "Introducing the Quick Start Distributions" in Installing SOA Suite and Business Process Management Suite Quick Start for Developers.You should have obtained the appropriate installer for your operating system as described in Section 1.6. Depending on what distribution and installer you are using, you should take note of the following JDK prerequisites.
If you are installing the Oracle JDeveloper Java distribution, all you need to do is unzip the files. This process is covered in Section 2.4.
If you are using a platform-specific installer for Oracle JDeveloper Studio, the JDK version specific to this Oracle JDeveloper installation is installed automatically.
If you are going to run the generic installer for Oracle JDeveloper Studio, ensure that the following prerequisites are met:
-
You must have the required JDK installed on your system.
Identify what JDK versions are certified for JDeveloper 12c (12.1.3) on your operating system using this site:
http://www.oracle.com/technetwork/developer-tools/jdev/documentation/121300-cert-2164864.html#OperatingSystemsandJavaSEYou can then obtain a certified version of the JDK from the following location on OTN:
http://www.oracle.com/technetwork/java/javase/downloads/index.html -
To streamline your installation process, the JDK you wish to use with the product should be the one you use to start the installer program. In that case, be sure the desired JDK is the first one in your system
PATH, or reference it explicitly on the command line.
2.2 Installing Oracle JDeveloper Studio on Various Platforms
This section describes how to install Oracle JDeveloper Studio on various platforms.
Warning:
The Oracle JDeveloper Studio installations described in this section cannot be used to develop SOA Suite or Business Process Management Suite applications. See Section 2.1 for details.It contains the following topics:
2.2.1 Starting the Installation Program
Depending on the type of installer you are using, you can launch the Oracle JDeveloper Studio installation program in one of the following ways:
-
Launching the Generic Installer on Linux, UNIX, and Mac OS X
-
Launching the Platform-specific Installer for Linux, UNIX, and Mac OS X
Launching the Generic Installer on Linux, UNIX, and Mac OS X
To launch the platform-independent installer on your hosted Linux, UNIX, or Mac OS X machine, follow these steps:
-
Log into the host computer where you want to install Oracle JDeveloper.
Be sure the user account you use for installing Oracle JDeveloper has the required privileges. For more information, see "Selecting an Installation User" in Planning an Installation of Oracle Fusion Middleware.
-
Ensure that a certified JDK exists on the system on which you are about to install Oracle JDeveloper. If you checked the prerequisites for generic installers as described in Section 2.1, you should have already obtained and installed a certified JDK on your system.
You can double-check your JDK version by running
java -versionfrom the command line. This command will return the JDK version that you have installed on your machine. Make sure the outputted version is certified for 12c (12.1.3) JDeveloper by checking here:http://www.oracle.com/technetwork/developer-tools/jdev/documentation/121300-cert-2164864.html#OperatingSystemsandJavaSE -
Go to the directory where you downloaded the installation program.
-
Launch the installation program by invoking
java -jarfrom the JDK directory on your system, as shown in the example below:/home/Oracle/jdk7_15/jdk1.7.0_15/bin/java -jar jdev_suite_121300.jar
Be sure to replace
/home/Oracle/jdk7_15/jdk1.7.0_15in this example with the location of the JDK on your system.
When the installation program appears, you are ready to begin the installation. See Section 2.2.2 for a description of each installation program screen.
Launching the Generic Installer on Windows
To launch the platform-independent installer on your Windows machine, do the following:
-
Log into the host computer where you want to install Oracle JDeveloper.
Be sure the user account you use for installing Oracle JDeveloper has the required privileges. For more information, see "Selecting an Installation User" in Planning an Installation of Oracle Fusion Middleware.
-
Ensure that a certified JDK exists on the system on which you are about to install Oracle JDeveloper. If you checked the prerequisites for generic installers as described in Section 2.1, you should have already obtained and installed a certified JDK on your system.
You can double-check your JDK version using one of the methods described here:
https://www.java.com/en/download/help/version_manual.xml. Make sure your JDK version is certified for 12c (12.1.3) JDeveloper by checking here:http://www.oracle.com/technetwork/developer-tools/jdev/documentation/121300-cert-2164864.html#OperatingSystemsandJavaSE -
Navigate to the directory where you downloaded the installation program.
-
Launch the installation program by invoking
java -jarfrom the JDK directory on your system, as shown in the example below:\home\Oracle\jdk7_15\jdk1.7.0_15\bin\java -jar jdev_suite_121300.jar
Be sure to replace
\home\Oracle\jdk7_15\jdk1.7.0_15in this example with the location of the JDK on your system.
You can also navigate to the folder where you downloaded the Oracle JDeveloper installer and double-click on the icon to launch the installation wizard.
When the installation program appears, you are ready to begin the installation. See Section 2.2.2 for a description of each installation program screen.
Launching the Platform-specific Installer for Linux, UNIX, and Mac OS X
To launch the platform-specific installer on Linux, UNIX, or Mac OS X, follow these steps:
-
Log into the host computer where you want to install Oracle JDeveloper.
Be sure the user account you use for installing Oracle JDeveloper has the required privileges. For more information, see "Selecting an Installation User" in Planning an Installation of Oracle Fusion Middleware.
-
Navigate to the location where the platform-specific installer is located.
-
Launch the installer by running the following command:
./jdev_suite_121300_linux64.bin
You can also navigate to the folder where you downloaded the Oracle JDeveloper installer and double-click on the icon to launch the installation wizard.
When the installation program appears, you are ready to begin the installation. See Section 2.2.2 for a description of each installation program screen.
Launching the Windows-specific Installer
To launch the platform-specific installer on Windows, follow these steps:
-
Log into the host computer where you want to install Oracle JDeveloper.
Be sure the user account you use for installing Oracle JDeveloper has the required privileges. For more information, see "Selecting an Installation User" in Planning an Installation of Oracle Fusion Middleware.
-
Navigate to the location where the platform-specific installer is located.
-
Launch the installer. You launch it from the command line by running the following command:
jdev_suite_121300_win64.exe
You can also navigate to the folder where you downloaded the Oracle JDeveloper installer and double-click on the icon to launch the installation wizard.
When the installation program appears, you are ready to begin the installation. See Section 2.2.2 for a description of each installation program screen.
Launching the Installer in Silent Mode
You can also launch the installer in silent mode to ensure that no configuration options are displayed during the installation process. For more information, see Section A.1.
2.2.2 Navigating the Installation Screens to Install Oracle JDeveloper
The installation program for the Oracle JDeveloper Studio edition displays a series of screens, in the order listed in Table 2-1.
If you need additional help with any of the installation screens, click the screen name.
Table 2-1 Oracle JDeveloper Install Screens
| Screen | Description |
|---|---|
|
This screen appears if this is the first time you are installing any Oracle product on this host. Specify the location where you want to create your central inventory. Make sure that the operating system group name selected on this screen has write permissions to the central inventory location.For more information about the central inventory, see "Understanding the Oracle Central Inventory" in Installing Software with the Oracle Universal Installer. |
|
|
This screen introduces you to the product installer. |
|
|
Use this screen to specify the location of your Oracle home directory. Ensure that the name of the directory that you choose does not contain spaces. For more information about Oracle Fusion Middleware directory structure, see "Selecting Directories for Installation and Configuration" in Planning an Installation of Oracle Fusion Middleware. |
|
|
This screen verifies that your system meets the minimum necessary requirements. If there are any warning or error messages, refer to Section 1.5. |
|
|
Use this screen to verify the installation options you selected. If you want to save these options to a response file, click Save and provide the location and name of the response file. Response files can be used later in a silent installation situation. For more information about silent or command line installation, see "Using the Oracle Universal Installer in Silent Mode" in Installing Software with the Oracle Universal Installer. |
|
|
This screen allows you to see the progress of the installation. |
|
|
This screen appears when the installation is complete. Review the information on this screen. You can use this screen to customize Oracle JDevleoper. For more information about customizing Oracle JDeveloper using the Installation Completed screen, see Section 2.2.3. |
For more information about the installation screens that appear while installing Oracle Jdeveloper, see "Oracle Fusion Middleware Infrastructure Installation Screens" in Installing with Oracle Universal Installer.
2.2.3 Customizing Oracle JDeveloper on Startup
On completing the Oracle JDeveloper Studio installation, the installer displays a list of options that you can use to proceed with the product that you have installed. You can customize Oracle JDeveloper using the options listed on the Installation Complete screen of the installer. See Figure 2-1.
Figure 2-1 Options to Customize Oracle JDeveloper Installer
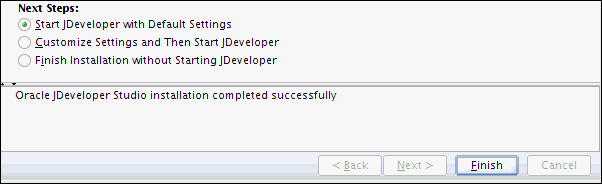
Description of ''Figure 2-1 Options to Customize Oracle JDeveloper Installer''
To customize Oracle JDeveloper using the installation wizard, select one of the options listed in the Next Steps section of the Installation Complete screen. Table 2-2 describes the options that you see on the Installation Complete screen of the wizard:
Table 2-2 Options to Customize Oracle JDeveloper on Startup
| Option | Description and Action |
|---|---|
|
Start JDeveloper with Default Settings |
Select this option if you want to start Oracle JDeveloper using the default settings. All your Oracle JDeveloper projects will be saved in this default location. |
|
Customize Settings and Then Start JDeveloper |
Select this option to do the following:
|
|
Finish Installation without Starting JDeveloper |
If the box to launch JDeveloper after quitting the installation wizard is checked, uncheck it. Press Finish to quit the installation wizard without starting Oracle JDeveloper. |
Note:
-
During installation, a file called
product.confis created in your home directory by default. This will contain your JDeveloper preferences. Old preferences will carry over to new installations of JDeveloper unless you delete this file. -
On Windows systems, if you are deinstalling your current version of Oracle JDeveloper to install a newer version, Oracle recommends that you reboot your system after you deinstall the software and before you begin a new installation of the software.
2.3 Verifying Your Installation
To verify that Oracle JDeveloper Studio installed successfully, you can compare your directory structure to the one described in Table 2-3.
Table 2-3 describes the directory structure that will be created on your system at the end of your Oracle JDeveloper installation.
Table 2-3 Directory Description for Oracle JDeveloper Home
| Directory or File | Description |
|---|---|
|
JDeveloper Home |
This directory is the Oracle home that contains the binary files and configuration files that are required to run Oracle JDeveloper. |
|
coherence |
This directory contains the Coherence product files. |
|
em |
This directory contains files used by Oracle Enterprise Manager Fusion Middleware Control. |
|
inventory |
This directory contains information about the components, feature sets, and patches installed in this Oracle JDeveloper home directory. |
|
registry.xml |
This file is located in the |
|
jdeveloper |
This directory contains the files that are needed to run the Oracle JDeveloper application. It also contains files that can be used to modify the application settings. |
|
OPatch |
This directory contains OPatch and supported files. OPatch is a tool used to patch Oracle Fusion Middleware software. |
|
oracle_common |
This directory contains the binary and library files required for Oracle Enterprise Manager Fusion Middleware Control and Java Required Files (JRF). |
|
oraInst.loc |
You may not see this file on an Windows installation. This file contains information about the inventory location of the installation. |
|
oui |
This directory contains files used by the Oracle Universal Installer, including the deinstaller program. If you need to run the Oracle Universal Installer again after the product is installed, you should do so from this directory. |
|
wlserver |
This directory contains the WebLogic Server product files. |
For Windows distributions with the MAF extension installed, you may also see a folder called cfgtoollogs. This directory contains the log files for your installation and configuration transactions.
2.4 Installing the JDeveloper Java Distribution
Warning:
The Oracle JDeveloper Studio installations described in this section cannot be used to develop SOA Suite or Business Process Management Suite applications. See Section 2.1 for details.JDeveloper Java does not require an installer. To install the Oracle JDeveloper Java distribution, all you need is an unzip tool. You can download a free, cross-platform unzip tool, Info-Zip, available at: http://www.info-zip.org/.
Caution:
Ensure that the directory that you install Oracle JDeveloper in does not contain spaces. For example, do not useC:\Program Files as the installation directory.To install JDeveloper from jdev-java-121300.zip:
-
Obtain the required JDK.
Identify what JDK versions are certified for 12c (12.1.3) JDeveloper on your operating system using this site:
http://www.oracle.com/technetwork/developer-tools/jdev/documentation/121300-cert-2164864.html#OperatingSystemsandJavaSEYou can then obtain a certified version of JDK from the following location on OTN:
http://www.oracle.com/technetwork/java/javase/downloads/index.html -
Unzip
jdev-java-121300.zipto the target directory.Note:
In this document, in the context of the Java Edition,JDEV_HOMEis used to represent the directory of the installation. For example, if you unzippedjdev-java-121300.zipintoC:\jdev_install\, thenJDEV_HOMErefers toC:\jdev_install.
2.4.1 Specifying the JDK Location for JDeveloper Java
When you start the Java edition of Oracle JDeveloper for the first time, the jdev script prompts you to provide the location of your JDK installation if it cannot locate it. When prompted, enter the path to the Java executable file.
For Windows, your path definition may look like this: D:\jdk1.7.0_15\bin
For Linux, UNIX, and Mac OS X, your path may look like this: /home/jdk1.7.0_15/bin.