12 Using Load Plans
This chapter gives an introduction to Load Plans. It describes how to create a Load Plan and provides information about how to work with Load Plans.
This chapter includes the following sections:
Introduction to Load Plans
Oracle Data Integrator is often used for populating very large data warehouses. In these use cases, it is common to have thousands of tables being populated using hundreds of scenarios. The execution of these scenarios has to be organized in such a way that the data throughput from the sources to the target is the most efficient within the batch window. Load Plans help the user organizing the execution of scenarios in a hierarchy of sequential and parallel steps for these type of use cases.
A Load Plan is an executable object in Oracle Data Integrator that can contain a hierarchy of steps that can be executed conditionally, in parallel or in series. The leaf nodes of this hierarchy are Scenarios. Packages, mappings, variables, and procedures can be added to Load Plans for executions in the form of scenarios. For more information, see "Creating a Load Plan".
Load Plans allow setting and using variables at multiple levels. See "Working with Variables in Load Plans" for more information. Load Plans also support exception handling strategies in the event of a scenario ending in error. See "Handling Load Plan Exceptions and Restartability" for more information.
Load Plans can be started, stopped, and restarted from a command line, from Oracle Data Integrator Studio, Oracle Data Integrator Console or a Web Service interface. They can also be scheduled using the run-time agent's built-in scheduler or an external scheduler. When a Load Plan is executed, a Load Plan Instance is created. Each attempt to run this Load Plan Instance is a separate Load Plan Run. See "Running Load Plans" for more information.
A Load Plan can be modified in production environments and steps can be enabled or disabled according to the production needs. Load Plan objects can be designed and viewed in the Designer and Operator Navigators. Various design operations (such as create, edit, delete, and so forth) can be performed on a Load Plan object if a user connects to a development work repository, but some design operations will not be available in an execution work repository. See "Editing Load Plan Steps" for more information.
Once created, a Load Plan is stored in the work repository. The Load Plan can be exported then imported to another repository and executed in different contexts. Load Plans can also be versioned. See "Exporting, Importing and Versioning Load Plans" for more information.
Load Plans appear in Designer Navigator and in Operator Navigator in the Load Plans and Scenarios accordion. The Load Plan Runs are displayed in the Load Plan Executions accordion in Operator Navigator.
Load Plan Execution Lifecycle
When running or scheduling a Load Plan you provide the variable values, the contexts and logical agents used for this Load Plan execution.
Executing a Load Plan creates a Load Plan instance and a first Load Plan run. This Load Plan instance is separated from the original Load Plan, and the Load Plan Run corresponds to the first attempt to execute this instance. If a run is restarted a new Load Plan run is created under this Load Plan instance. As a consequence, each execution attempt of the Load Plan Instance is preserved as a different Load Plan run in the Log.
See "Running Load Plans" for more information.
For a load plan instance, only one run can be running, and it must be the last load plan instance run. However, as with Scenarios, it is possible to run multiple instances of the same load plan (determined by the load plan's internal ID) concurrently, depending on the Concurrent Execution Control settings for the load plan.
For more information about how ODI handles concurrent execution, and about using the Concurrent Execution Control, see "Controlling Concurrent Execution of Scenarios and Load Plans",
Differences between Packages, Scenarios, and Load Plans
A Load Plan is the largest executable object in Oracle Data Integrator. It uses Scenarios in its steps. When an executable object is used in a Load Plan, it is automatically converted into a scenario. For example, a package is used in the form of a scenario in Load Plans. Note that Load Plans cannot be added to a Load Plan. However, it is possible to add a scenario in form of a Run Scenario step that starts another Load Plan using the OdiStartLoadPlan tool.
Load plans are not substitutes for packages or scenarios, but are used to organize at a higher level the execution of packages and scenarios.
Unlike packages, Load Plans provide native support for parallelism, restartability and exception handling. Load plans are moved to production as is, whereas packages are moved in the form of scenarios. Load Plans can be created in Production environments.
The Load Plan instances and Load Plan runs are similar to Sessions. The difference is that when a session is restarted, the existing session is overwritten by the new execution. The new Load Plan Run does not overwrite the existing Load Plan Run, it is added after the previous Load Plan Runs for this Load Plan Instance. Note that the Load Plan Instance cannot be modified at run-time.
Load Plan Structure
A Load Plan is made up of a sequence of several types of steps. Each step can contain several child steps. Depending on the step type, the steps can be executed conditionally, in parallel or sequentially. By default, a Load Plan contains an empty root serial step. This root step is mandatory and the step type cannot be changed.
Table 12-1 lists the different types of Load Plan steps and the possible child steps.
| Type | Description | Possible Child Steps |
|---|---|---|
|
Serial Step |
Defines a serial execution of its child steps. Child steps are ordered and a child step is executed only when the previous one is terminated. The root step is a Serial step. |
|
|
Parallel Step |
Defines a parallel execution of its child steps. Child steps are started immediately in their order of Priority. |
|
|
Run Scenario Step |
Launches the execution of a scenario. |
This type of step cannot have a child steps. |
|
Case Step When Step Else Steps |
The combination of these steps allows conditional branching based on the value of a variable. Note: If you have several When steps under a Case step, only the first enabled When step that satisfies the condition is executed. If no When step satisfies the condition or the Case step does not contain any When steps, the Else step is executed. |
Of a Case Step:
Of a When step:
Of an Else step:
|
|
Exception Step |
Defines a group of steps that is executed when an exception is encountered in the associated step from the Step Hierarchy. The same exception step can be attached to several steps in the Steps Hierarchy. |
|
Figure 12-1 shows a sample Load Plan created in Oracle Data Integrator. This sample Load Plan loads a data warehouse:
-
Dimensions are loaded in parallel. This includes the LOAD_TIME_DIM, LOAD_PRODUCT_DIM, LOAD_CUSTOMER_DIM scenarios, the geographical dimension and depending on the value of the ODI_VAR_SESS1 variable, the CUST_NORTH or CUST_SOUTH scenario.
-
The geographical dimension consists of a sequence of three scenarios (LOAD_GEO_ZONE_DIM, LOAD_COUNTRIES_DIM, LOAD_CITIES_DIM).
-
After the dimensions are loaded, the two fact tables are loaded in parallel (LOAD_SALES_FACT and LOAD_MARKETING_FACT scenarios).
Introduction to the Load Plan Editor
The Load Plan Editor provides a single environment for designing Load Plans. Figure 12-2 gives an overview of the Load Plan Editor.
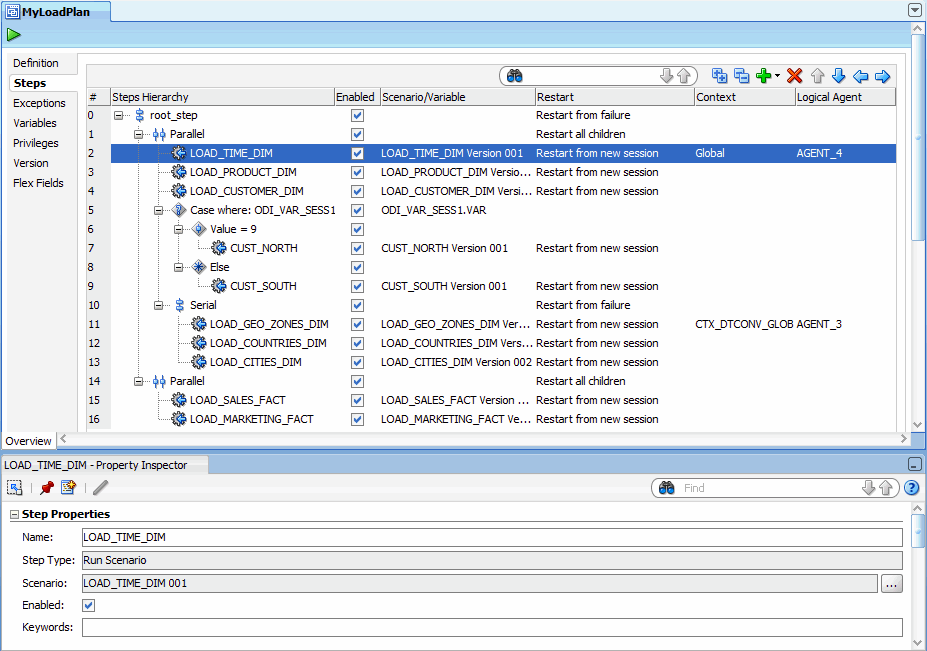
Figure 12-2 Steps Tab of the Load Pan Editor

Description of "Figure 12-2 Steps Tab of the Load Pan Editor"
The Load Plan steps are added, edited and organized in the Steps tab of the Load Plan Editor. The Steps Hierarchy table defines the organization of the steps in the Load Plan. Each row in this table represents a step and displays its main properties.
You can drag components such as packages, integration mappings, variables, procedures, or scenarios from the Designer Navigator into the Steps Hierarchy table for creating Run Scenario steps for these components.
You can also use the Add Step Wizard or the Quick Step tool to add Run Scenario steps and other types of steps into this Load Plan. See "Adding Load Plan Steps" for more information.
The Load Plan Editor toolbar, located on top of the Steps Hierarchy table, provides tools for creating, organizing, and sequencing the steps in the Load Plan. Table 12-2 details the different toolbar components.
Table 12-2 Load Plan Editor Toolbar
| Icon | Name | Description |
|---|---|---|
|
Search |
Searches for a step in the Steps Hierarchy table. |
|
|
Expand All |
Expands all tree nodes in the Steps Hierarchy table. |
|
|
Collapse All |
Collapses all tree nodes in the Steps Hierarchy table. |
|
|
Add Step |
Opens a Add Step menu. You can either select the Add Step Wizard or a Quick Step tool to add a step. See "Adding Load Plan Steps" for more information. |
|
|
Remove Step |
Removes the selected step and all its child steps. |
|
|
Reorder arrows: Move Up, Move Down, Move Out, Move In |
Use the reorder arrows to move the selected step to the required position. |
The Properties Panel, located under the Steps Hierarchy table, displays the properties for the object that is selected in the Steps Hierarchy table.
Creating a Load Plan
This section describes how to create a new Load Plan in ODI Studio.
-
Define a new Load Plan. See "Creating a New Load Plan" for more information.
-
Add Steps into the Load Plan and define the Load Plan Sequence. See "Defining the Load Plan Step Sequence" for more information.
-
Define how the exceptions should be handled. See "Handling Load Plan Exceptions and Restartability" for more information.
Creating a New Load Plan
Load Plans can be created from the Designer or Operator Navigator.
To create a new Load Plan:
-
In Designer Navigator or Operator Navigator, click New Load Plan in the toolbar of the Load Plans and Scenarios accordion. The Load Plan Editor is displayed.
-
In the Load Plan Editor, type in the Name, Folder Name, and a Description for this Load Plan.
-
Optionally, set the following parameters:
-
Log Sessions: Select how the session logs should be preserved for the sessions started by the Load Plan. Possible values are:
-
Always: Always keep session logs (Default)
-
Never: Never keep session logs. Note that for Run Scenario steps that are configured as Restart from Failed Step or Restart from Failed Task, the agent will behave as if the parameter is set to Error as the whole session needs to be preserved for restartability.
-
Error: Only keep the session log if the session completed in an error state.
-
-
Log Session Step: Select how the logs should be maintained for the session steps of each of the session started by the Load Plan. Note that this applies only when the session log is preserved. Possible values are:
-
By Scenario Settings: Session step logs are preserved depending on the scenario settings. Note that for scenarios created from packages, you can specify whether to preserve or not the steps in the advanced step property called Log Steps in the Journal. Other scenarios preserve all the steps (Default).
-
Never: Never keep session step logs. Note that for Run Scenario steps that are configured as Restart from Failed Step or Restart from Failed Task, the agent will behave as if the parameter is set to Error as the whole session needs to be preserved for restartability.
-
Errors: Only keep session step log if the step is in an error state.
-
-
Session Tasks Log Level: Select the log level for sessions. This value corresponds to the Log Level value when starting unitary scenarios. Default is 5. Note that when Run Scenario steps are configured as Restart from Failed Step or Restart From Failed Task, this parameter is ignored as the whole session needs to be preserved for restartability.
-
Keywords: Enter a comma separated list of keywords that will be set on the sessions started from this load plan. These keywords improve the organization of ODI logs by session folders and automatic classification. Note that you can overwrite these keywords at the level of the child steps. See "Managing the Log" in Administering Oracle Data Integrator for more information.
-
-
Optionally, modify the Concurrent Execution Controller options:
-
Enable the Limit Concurrent Executions check box if you do not want to allow multiple instances of this load plan to be run at the same time. If Limit Concurrent Executions is disabled (unchecked), no restriction is imposed and more than one instance of this load plan can be running simultaneously.
-
If Limit Concurrent Executions is enabled, set your desired Violation Behavior:
-
Raise Execution Error: if an instance of the load plan is already running, attempting to run another instance will result in a session being created but immediately ending with an execution error message identifying the session that is currently running which caused the Concurrent Execution Control error.
-
Wait to Execute: if an instance of the load plan is already running, additional executions will be placed in a wait status and the system will poll for its turn to run. The session's status is updated periodically to show the currently running session, as well as all concurrent sessions (if any) that are waiting in line to run after the running instance is complete.
If you select this option, the Wait Polling Interval sets how often the system will check to see if the running instance has completed. You can only enter a Wait Polling Interval if Wait to Execute is selected.
If you do not specify a wait polling interval, the default for the executing agent will be used: in ODI 12.1.3, the default agent value is 30 seconds.
-
-
-
Select the Steps tab and add steps as described in "Defining the Load Plan Step Sequence".
-
If your Load Plan requires conditional branching, or if your scenarios use variables, select the Variables tab and declare variables as described in "Declaring Load Plan Variables".
-
To add exception steps that are used in the event of a load plan step failing, select the Exceptions tab and define exception steps as described in "Defining Exceptions Flows".
-
From the File menu, click Save.
The Load Plan appears in the Load Plans and Scenarios accordion. You can organize your Load Plans by grouping related Load Plans and Scenarios into a Load Plan and Scenarios folder.
Defining the Load Plan Step Sequence
Load Plans are an organized hierarchy of child steps. This hierarchy allows conditional processing of steps in parallel or in series.
The execution flow can be configured at two stages:
-
At Design-time, when defining the Steps Hierarchy:
-
When you add a step to a Load Plan, you select the step type. The step type defines the possible child steps and how these child steps are executed: in parallel, in series, or conditionally based on the value of a variable (Case step). See Table 12-1, "Load Plan Steps" for more information on step types.
-
When you add a step to a Load Plan, you also decide where to insert the step. You can add a child step, a sibling step after the selected step, or a sibling step before the selected step. See "Adding Load Plan Steps" for more information.
-
You can also reorganize the order of the Load Plan steps by dragging the step to the wanted position or by using the arrows in the Step table toolbar. See Table 12-2, "Load Plan Editor Toolbar" for more information.
-
-
At design-time and run-time by enabling or disabling a step. In the Steps hierarchy table, you can enable or disable a step. Note that disabling a step also disables all its child steps. Disabled steps and all their child steps are not executed when you run the load plan.
This section contains the following topics:
Adding Load Plan Steps
A Load Plan step can be added by using the Add Step Wizard or by selecting the Quick Step tool for a specific step type. A load plan step can be also createdby dragging an object (such as a scenario, package, etc.) and dropping it onto a container step. The step will be created as a child of the selected step. See Table 12-1, "Load Plan Steps" for more information on the different types of Load Plan steps. To create Run Scenario steps, you can also drag components such as packages, mappings, variables, procedures, or scenarios from the Designer Navigator into the Steps Hierarchy table. Oracle Data Integrator automatically creates a Run Scenario step for the inserted component.
When a Load Plan step is added, it is inserted into the Steps Hierarchy with the minimum required settings. See "Editing Load Plan Steps" for more information on how to configure Load Plan steps.
Adding a Load Plan Step with the Add Step Wizard
To insert Load Plan step with the Add Step Wizard:
-
Open the Load Plan Editor and go to the Steps tab.
-
Select a step in the Steps Hierarchy table.
-
In the Load Plan Editor toolbar, select Add Step > Add Step Wizard.
-
In the Add Step Wizard, select:
-
Step Type. Possible step types are: Serial, Parallel, Run Scenario, Case, When, and Else. See Table 12-1, "Load Plan Steps" for more information on the different step types.
-
Step Location. This parameter defines where the step is added.
-
Add a child step to selection: The step is added under the selected step.
-
Add a sibling step after selection: The step is added on the same level after the selected step.
-
Add a sibling step before selection: The step is added on the same level before the selected step.
-
Note:
Only values that are valid for the current selection are displayed for the Step Type and Step Location. -
-
Click Next.
-
Follow the instructions in Table 12-3 for the step type you are adding.
Table 12-3 Add Step Wizard Actions
Step Type Description and Action Required Serial or Parallel step
Enter a Step Name for the new Load Plan step.
Run Scenario step
-
Click the Lookup Scenario button.
-
In the Lookup Scenario dialog, you can select the scenario you want to add to your Load Plan and click OK.
Alternately, to create a scenario for an executable object and use this scenario, select this object type in the Executable Object Type selection box, then select the executable object that you want to run with this Run Scenario step and click OK. Enter the new scenario name and version and click OK. A new scenario is created for this object and used in this Run Scenario Step.
Tip: At design time, you may want to create a Run Scenario step using a scenario that does not exist yet. In this case, instead of selecting an existing scenario, enter directly a Scenario Name and a Version number and click Finish. Later on, you can select the scenario using the Modify Run Scenario Step wizard. See "Change the Scenario of a Run Scenario Step" for more information.
Note that when you use the version number
-1, the latest version of the scenario will be used, based on the string's lexical sorting order. -
The Step Name is automatically populated with the name of the scenario and the Version field with the version number of the scenario. Optionally, change the Step Name.
-
Click Next.
-
In the Add to Load Plan column, select the scenario variables that you want to add to the Load Plan variables. If the scenario uses certain variables as its startup parameters, they are automatically added to the Load Plan variables.
See "Working with Variables in Load Plans" for more information.
Case
-
Select the variable you want to use for the conditional branching. Note that you can either select one of the load plan variables from the list or click Lookup Variable to add a new variable to the load plan and use it for this case step.
See "Working with Variables in Load Plans" for more information.
-
The Step Name is automatically populated with the step type and name of the variable. Optionally, change the Step Name.
See "Editing Load Plan Steps" for more information.
When
-
Select the Operator to use in the WHEN clause evaluation. Possible values are:
-
Less Than (<)
-
Less Than or Equal (<=)
-
Different (<>)
-
Equals (=)
-
Greater Than (>)
-
Greater Than or Equal (>=)
-
Is not Null
-
Is Null
-
-
Enter the Value to use in the WHEN clause evaluation.
-
The Step Name is automatically populated with the operator that is used. Optionally, change the Step Name.
See "Editing Load Plan Steps" for more information.
Else
The Step Name is automatically populated with the step type. Optionally, change the Step Name.
See "Editing Load Plan Steps" for more information.
-
-
Click Finish.
-
The step is added in the steps hierarchy.
Note:
You can reorganize the order of the Load Plan steps by dragging the step to the desired position or by using the reorder arrows in the Step table toolbar to move a step in the Steps Hierarchy.Adding a Load Plan Step with the Quick Step Tool
To insert Load Plan step with the Quick Step Tool:
-
Open the Load Plan editor and go to the Steps tab.
-
In the Steps Hierarchy, select the Load Plan step under which you want to create a child step.
-
In the Steps toolbar, select Add Step and the Quick Step option corresponding to the Step type you want to add. Table 12-4 lists the options of the Quick Step tool.
Quick Step tool option Description and Action Required 
Adds a serial step as a child of the selected step. Default values are used. You can modify these values in the Steps Hierarchy table or in the Property Inspector. See "Editing Load Plan Steps" for more information.

Adds a parallel step as a child of the selected step. Default values are used. You can modify these values in the Steps Hierarchy table or in the Property Inspector. See "Editing Load Plan Steps" for more information.

Adds a run scenario step as a child of the selected step. Follow the instructions for Run Scenario steps in Table 12-3.

Adds a Case step as a child of the selected step. Follow the instructions for Case steps in Table 12-3.

Adds a When step as a child of the selected step. Follow the instructions for When steps in Table 12-3.

Adds an Else step as a child of the selected step. Follow the instructions for Else steps in Table 12-3.
Note:
Only step types that are valid for the current selection are enabled in the Quick Step tool.
Editing Load Plan Steps
To edit a Load Plan step:
-
Open the Load Plan editor and go to the Steps tab.
-
In the Steps Hierarchy table, select the Load Plan step you want modify. The Property Inspector displays the step properties.
-
Edit the Load Plan step properties according to your needs.
The following operations are common tasks when editing steps:
Change the Scenario of a Run Scenario Step
To change the scenario:
-
In the Steps Hierarchy table of the Steps or Exceptions tab, select the Run Scenario step.
-
In the Step Properties section of the Properties Inspector, click Lookup Scenario. This opens the Modify Run Scenario Step wizard.
-
In the Modify Run Scenario Step wizard, click Lookup Scenario and follow the instructions in Table 12-3 corresponding to the Run Scenario step.
Set Advanced Options for Run Scenario Steps
You can set the following properties for Run Scenario steps in the Property Inspector:
-
Priority: Priority for this step when the scenario needs to start in parallel. The integer value range is from 0 to 100 (100 being the highest priority). Default is 0. The priority of a Run Scenario step is evaluated among all runnable scenarios within a running Load Plan. The Run Scenario step with the highest priority is executed first.
-
Context: Context that is used for the step execution. Default context is the Load Plan context that is defined in the Start Load Plan Dialog when executing a Load Plan. Note that if you only specify the Context and no Logical Agent value, the step is started on the same physical agent that started the Load Plan, but in this specified context.
-
Logical Agent: Logical agent that is used for the step execution. By default, the logical agent, which is defined in the Start Load Plan Dialog when executing a Load Plan, is used. Note that if you set only the Logical Agent and no context, the step is started with the physical agent corresponding to the specified Logical Agent resolved in the context specified when starting the Load Plan. If no Logical Agent value is specified, the step is started on the same physical agent that started the Load Plan (whether a context is specified for the step or not).
Open the Linked Object of Run Scenario Steps
Run Scenario steps can be created for packages, mappings, variables, procedures, or scenarios. Once this Run Scenario step is created, you can open the Object Editor of the original object to view and edit it.
To view and edit the linked object of Run Scenario steps:
-
In the Steps Hierarchy table of the Steps or Exceptions tab, select the Run Scenario step.
-
Right-click and select Open the Linked Object.
The Object Editor of the linked object is displayed.
Change the Test Variable in Case Steps
To change the variable that is used for evaluating the tests defined in the WHEN statements:
-
In the Steps Hierarchy table of the Steps tab or Exceptions tab, select the Case step.
-
In the Step Properties section of the Properties Inspector, click Lookup Variable. This opens the Modify Case Step Dialog.
-
In the Modify Case Step Dialog, click Lookup Variable and follow the instructions in Table 12-3, "Add Step Wizard Actions" corresponding to the Case step.
Define the Exception and Restart Behavior
Exception and Restart behavior can be set on the steps in the Steps Hierarchy table. See "Handling Load Plan Exceptions and Restartability" for more information.
To regenerate all the scenarios of a given Load Plan step, including the scenarios of its child steps:
-
From the Steps Hierarchy table of the Steps tab or Exceptions tab, select the Load Plan step.
-
Right-click and select Regenerate. Note that this option is not available for scenarios with the version number
-1. -
Click OK.
Caution:
Regenerating a scenario cannot be undone. For important scenarios, it is better to generate a scenario with a new version number.Refresh Scenarios to Latest Version
To modify all the scenario steps of a given Load Plan step, including the scenarios of its child steps, and set the scenario version to the latest version available for each scenario:
-
From the Steps Hierarchy table of the Steps tab or Exceptions tab, select the Load Plan step.
-
Right-click and select Refresh Scenarios to Latest Version. Note that the latest scenario version is determined by the Scenario Creation timestamp. While during the ODI agent execution, the latest scenario is determined by alphabetical ascending sorting of the Scenario Version string value and picking up the last from the list.
Note:
This option is not available for scenarios with the version number-1. -
Click OK.
Deleting a Step
To delete a step:
-
Open the Load Plan Editor and go to the Steps tab.
-
In the Steps Hierarchy table, select the step to delete.
-
In the Load Plan Editor toolbar, select Remove Step.
The step and its child steps are removed from the Steps Hierarchy table.
Note:
It is not possible to undo a delete operation in the Steps Hierarchy table.Duplicating a Step
To duplicate a step:
-
Open the Load Plan Editor and go to the Steps tab.
-
In the Steps Hierarchy table, right-click the step to duplicate and select Duplicate Selection.
-
A copy of this step, including its child steps, is created and added as a sibling step after the original step to the Step Hierarchy table.
You can now move and edit this step.
Working with Variables in Load Plans
Project and Global Variables used in a Load Plan are declared as Load Plan Variables in the Load Plan editor. These variables are automatically available in all steps and their value passed to the Load Plan steps.
The variables values are passed to the Load Plan on startup as startup parameters. At a step level, you can overwrite the variable value (by setting it or forcing a refresh) for this step and its child steps.
Note:
Load plan variables are copies of Project and Global variables. Thus, changes to the definition of the original project and global variables are not automatically propagated to corresponding variables that are already created in a load plan. You can use the Refresh Variable Definition option on the right-click context menu to update the definition of a load plan variable with the current value from the corresponding Project or Global variable.Because a load plan variable is a copy of the original project or global variable, at startup, Load Plans do not take into account the default value of the original project or global variable, or the historized/latest value of the variable in the execution context. The value of the variable is either the one specified when starting the Load Plan, or the value set/refreshed within the Load Plan.
You can use variables in Run Scenario steps - the variable values are passed as startup parameters to the scenario - or in Case/When/Else steps for conditional branching.
This section contains the following topics:
Declaring Load Plan Variables
To declare a Load Plan variable:
-
Open the Load Plan editor and go to the Variables tab.
-
From the Load Plan Editor toolbar, select Add Variable. The Lookup Variable dialog is displayed.
-
In the Lookup Variable dialog, select the variable to add your Load Plan.
-
The variable appears in the Variables tab of the Load Plan Editor and in the Property Inspector of each step.
Setting Variable Values in a Step
Variables in a step inherit their value from the value from the parent step and ultimately from the value specified for the variables when starting the Load Plan.
For each step, except for Else and When steps, you can also overwrite the variable value, and change the value used for this step and its child steps.
Variable values overwritten or refreshed at a given step are available to all the step's descendants, until the value is overwritten or refreshed again for a descendant branch. Similarly, a variable value overwritten or refreshed at a given step does not affect the value for sibling or parent steps.
To override variable values at step level:
-
Open the Load Plan editor and go to the Steps tab.
-
In the Steps Hierarchy table, select the step for which you want to overwrite the variable value.
-
In the Property Inspector, go to the Variables section. The variables that are defined for this Load Plan are listed in this Variables table. You can modify the following variable parameters:
Select Overwrite, if you want to specify a variable value for this step and all its children. Once you have chosen to overwrite the variable value, you can either:
-
Set a new variable value in the Value field.
-
Select Refresh to refresh this variable prior to executing the step. The Refresh option can be selected only for variables with a Select Query defined for refreshing the variable value.
Note:
If the refresh SQL of a Global or Project variable has changed, the variable refresh SQL of the corresponding load plan variable is not updated automatically. You can update the load plan variable refresh SQL by selecting the Refresh Variable Definition option from the right-click context menu for a load plan variable on the Variables tab of the load plan editor.
-
Handling Load Plan Exceptions and Restartability
Load Plans provide two features for handling error cases in the execution flows: Exceptions and Restartability.
An Exception Step contains a hierarchy of steps that is defined on the Exceptions tab of the Load Plan editor.
You can associate a given exception step to one or more steps in the Load Plan. When a step in the Load Plan errors out, the associated exception step is executed automatically.
Exceptions can be optionally raised to the parent step of the failing step. Raising an exception fails the parent step, which can consequently execute its exception step.
When a Load Plan Run is restarted after a failure, the failed Load Plan steps are restarted depending on the Restart Type parameter. For example, you can define whether a parallel step should restart all its child steps or only those that have failed.
This section contains the following topics:
Defining Exceptions Flows
Exception steps are created and defined on the Exceptions tab of the Load Plan Editor.
This tab contains a list of Exception Steps. Each Exception Step consists in a hierarchy of Load Plan steps.The Exceptions tab is similar to the Steps tab in the Load Plan editor. The main differences are:
-
There is no root step for the Exception Step hierarchy. Each exception step is a separate root step.
-
The Serial, Parallel, Run Scenario, and Case steps have the same properties as on the Steps tab but do not have an Exception Handling properties group. An exception step that errors out cannot raise another exception step.
An Exception step can be created either by using the Add Step Wizard or with the Quick Step tool by selecting the Add Step > Exception Step in the Load Plan Editor toolbar. By default, the Exception step is created with the Step name: Exception. You can modify this name in the Steps Hierarchy table or in the Property Inspector.
To create an Exception step with the Add Step Wizard:
-
Open the Load Plan Editor and go to the Exceptions tab.
-
In the Load Plan Editor toolbar, select Add Step > Add Step Wizard.
-
In the Add Step Wizard, select Exception from the Step Type list.
Note:
Only values that are valid for the current selection are displayed for the Step Type. -
Click Next.
-
In the Step Name field, enter a name for the Exception step.
-
Click Finish.
-
The Exception step is added in the steps hierarchy.
You can now define the exception flow by adding new steps and organizing the hierarchy under this exception step.
Using Exception Handling
Defining exception handling for a Load Plan step consists of associating an Exception Step to this Load Plan step and defining the exception behavior. Exceptions steps can be set for each step except for When and Else steps.
To define exception handling for a Load Plan step:
-
Open the Load Plan Editor and go to the Steps tab.
-
In the Steps Hierarchy table, select the step for which you want to define an exception behavior. The Property Inspector displays the Step properties.
-
In the Exception Handling section of the Property Inspector, set the parameters as follows:
-
Timeout (s): Enter the maximum time (in seconds) that this step takes before it is aborted by the Load Plan. When a time-out is reached, the step is marked in error and the Exception step (if defined) is executed. In this case, the exception step never times out. If needed, a timeout can be set on a parent step to safe guard such a potential long running situation.
If the step fails before the timeout and an exception step is executed, then the execution time of the step plus the execution time of the exception step should not exceed the timeout, otherwise the exception step will fail when the timeout is reached.
Note that the default value of zero (
0) indicates an infinite timeout. -
Exception Step: From the list, select the Exception step to execute if this step fails. Note that only Exception steps that have been created and defined on the Exceptions tab of the Load Plan Editor appear in this list. See "Defining Exceptions Flows" for more information on how to create an Exception step.
-
Exception Behavior: Defines how this step behaves in case an exception is encountered. Select one of the following:
-
Run Exception and Raise: Runs the Exception Step (if any) and raises the exception to the parent step.
-
Run Exception and Ignore: Runs the Exception Step (if any) and ignores the exception. The parent step is notified of a successful run. Note that if an exception is caused by the exception step itself, the parent step is notified of the failure.
-
For Parallel steps only, the following parameters may be set:
Max Error Child Count: Displays the maximum number of child steps in error that is accepted before this step is to be considered in error. When the number of failed child steps exceeds this value, the parallel step is considered failed. The currently running child steps are continued or stopped depending on the Restart Type parameter for this parallel step:
-
If the Restart type is Restart from failed children, the Load Plan waits for all child sessions (these are the currently running sessions and the ones waiting to be executed) to run and complete before it raises the error to the parent step.
-
If the Restart Type is Restart all children, the Load Plan kills all running child sessions and does not start any new ones before it raises the error to the parent.
-
Defining the Restart Behavior
The Restart Type option defines how a step in error restarts when the Load Plan is restarted. You can define the Restart Type parameter in the Exception Handling section of the Properties Inspector.
Depending on the step type, the Restart Type parameter can take the values listed in Table 12-5.
Table 12-5 Restart Type Values
| Step Type | Values and Description |
|---|---|
|
Serial |
|
|
Parallel |
|
|
Run Scenario |
The same limitation as those described in "Restarting a Session" in Administering Oracle Data Integrator apply to the sessions restarted from a failed step or failed task. |
Running Load Plans
You can run a Load Plan from Designer Navigator or Operator Navigator in ODI Studio.
Caution:
Unless concurrent execution has been limited by using the Concurrent Execution Controller options on the Definition tab of a load plan, no restriction is imposed to prevent multiple instances of a load plan from running simultaneously. It is possible for two or more instances of a load plan to perform data read/write operations on the same data sources and targets simultaneously. Use the Limit Concurrent Executions option to disallow this behavior programmatically if concurrent execution would be undesirable.See "Creating a New Load Plan" for details.
To run a Load Plan in Designer Navigator or Operator Navigator:
-
In the Load Plans and Scenarios accordion, select the Load Plan you want to execute.
-
Right-click and select Execute.
-
In the Start Load Plan dialog, select the execution parameters:
-
Select the Context into which the Load Plan will be executed.
-
Select the Logical Agent that will run the Load Plan.
-
In the Variables table, enter the Startup values for the variables used in this Load Plan.
-
-
Click OK.
-
The Load Plan Started dialog is displayed.
-
Click OK.
The Load Plan execution starts: a Load Plan instance is created along with the first Load Plan run. You can review the Load Plan execution in the Operator Navigator.
For more information, see "Monitoring Integration Processes" in Administering Oracle Data Integrator, and see also "Running Integration Processes" in Administering Oracle Data Integrator for more information on the other run-time operations on Load Plans.
Using Load Plans in Production
Using Load Plans in production involves the following tasks:
-
Scheduling, starting, monitoring, stopping and restarting Load Plans. See "Scheduling and Running Load Plans in Production" for information.
-
Moving Load Plans across environments. See "Exporting, Importing and Versioning Load Plans"
Scheduling and Running Load Plans in Production
"Running Integration Processes" in Administering Oracle Data Integrator describes how to schedule and run load plans, including executing, restarting, and stopping load plan runs.
Exporting, Importing and Versioning Load Plans
A Load Plan can be exported and then imported into a development or execution repository. This operation is used to deploy Load Plans in a different repository, possibly in a different environment or site.
The export (and import) procedure allows you to transfer Oracle Data Integrator objects from one repository to another.
Exporting Load Plans
It is possible to export a single Load Plan or several Load Plans at once.
Exporting one single Load Plan follows the standard procedure described in "Exporting one ODI Object".
For more information on exporting several Load Plans at once, see "Export Multiple ODI Objects".
Note that when you export a Load Plan and you select Export child objects, all its child steps, schedules, and variables are also exported.
Note:
The export of a Load Plan does not include the scenarios referenced by the Load Plan. Scenarios used in a Load Plan need to be exported separately. How to export scenarios is described in "Exporting Scenarios".Importing Load Plans
Importing a Load Plan in a development repository is performed via Designer or Operator Navigator. With an execution repository, only Operator Navigator is available for this purpose.
The Load Plan import uses the standard object import method. See "Importing Objects" for more information.
Note:
The export of a Load Plan does not include the scenarios referenced by the Load Plan. Scenarios used in a Load Plan need to be imported separately.Versioning Load Plans
Load Plans can also be deployed and promoted to production using versions and solutions. See Chapter 17, "Using Version Control," for more information.