9 Managing Update Maps
This chapter describes how to manage update maps. This chapter contains the following sections:
9.1 Understanding Update Maps
An update map allows you to easily update your logical entity data service without having to write Java or XQSE code. This overview provides a foundation for understanding what an update map is and how you can use one.
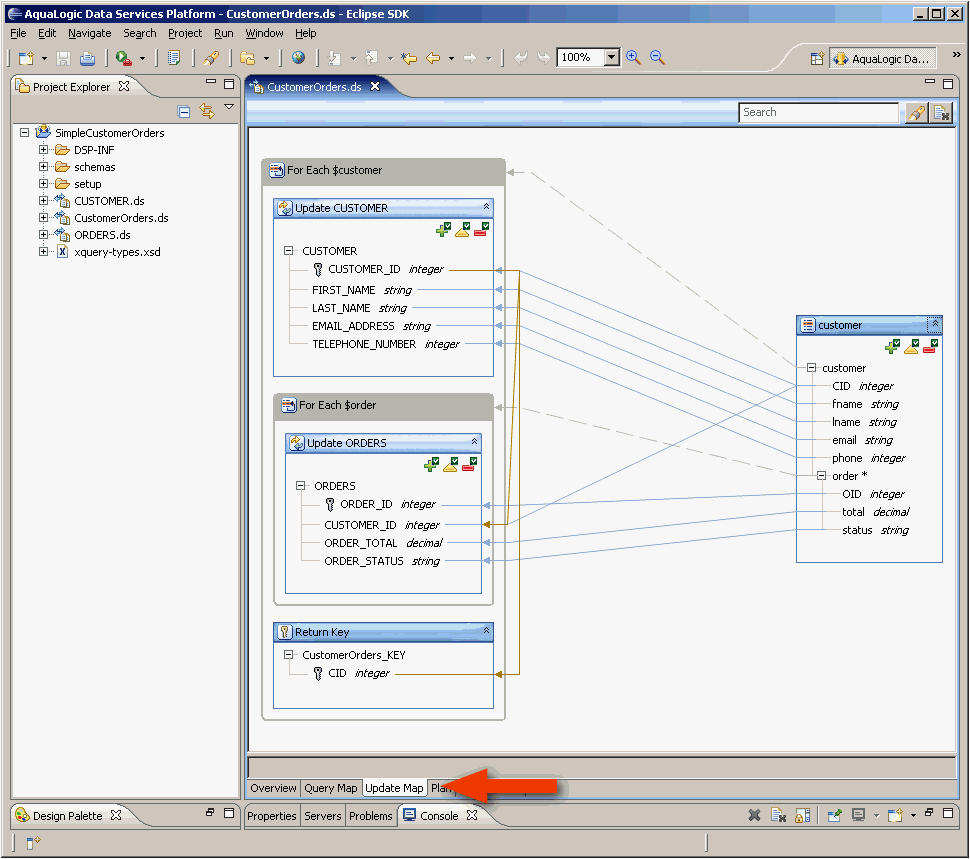
Oracle Data Service Integrator generates a default update map automatically when you create a logical entity data service with a primary read function. You can see the update map associated with a data service by clicking the "Update Map" tab at the bottom of the screen (see the example that follows).
In this overview, as a running example we use an update map for a data service that joins together customers and orders.The image to the left shows the update map for the data service (CustomerOrders.ds). The orange arrow identifies the location of the "Update Map" tab.
An update map procedure is a create, update, or delete procedure that is implemented by an update map. The update map maps values from the input to the update map procedure to the inputs of the procedures in the underlying data services. These underlying data services that the logical entity data service is composed of are referred to as the source data services. In the previous example, the input is mapped to the two source data services CUSTOMER and ORDERS. The blue arrows in the update map show how the values are mapped.
A logical entity data service has a target type that describes the entity that the data service is about. All read functions in the data service must return instances of the target type and all update map procedures must accept instances of the target type as input. For example, say that we have an entity data service about customers. The read functions of this data service must return customers and update map procedures must take customers as input.
9.1.1 The Target Box
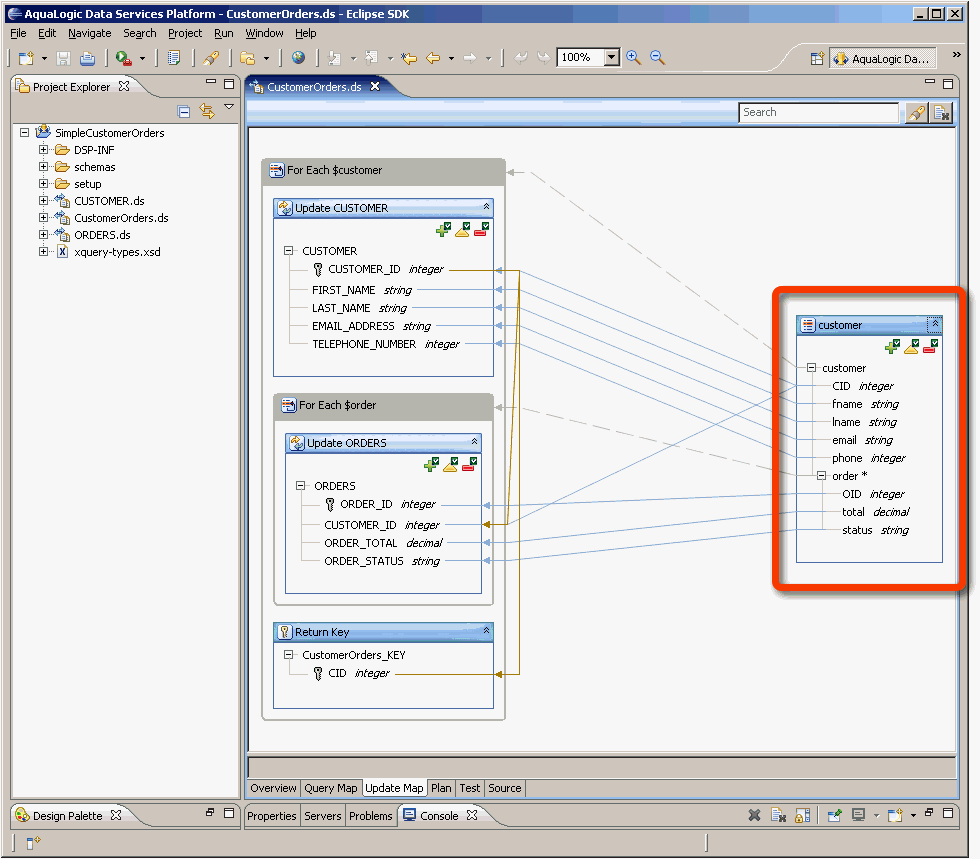
The target box displays the data type of the input to the update map procedures, and the procedure icons. There is exactly one target block in an update map and it is displayed on the right.
9.1.1.1 The Input Type
The input type (or, target type) is the type of the data that is passed to the update map procedures. Elements and attributes from the input type are mapped to the update blocks on the left.
9.1.1.2 Procedure Icons
The Create, Update, and Delete procedure icons indicate the status of the corresponding update map procedures. They appear in the upper-right corner of the target box. Each icon may have a green check, a yellow exclamation or a red 'X'. A green check indicates that the update map is fully capable of implementing the procedure. A yellow exclamation indicates that you can invoke the procedure, but there may be problems at runtime. A red 'X' indicates there is a serious problem that needs to be addressed. Any time that there is a red 'X' or a yellow exclamation on the icon, you can hover the mouse pointer over the icon to get a tool tip providing more information (see Figure 9-3).
9.1.1.3 For Each Blocks
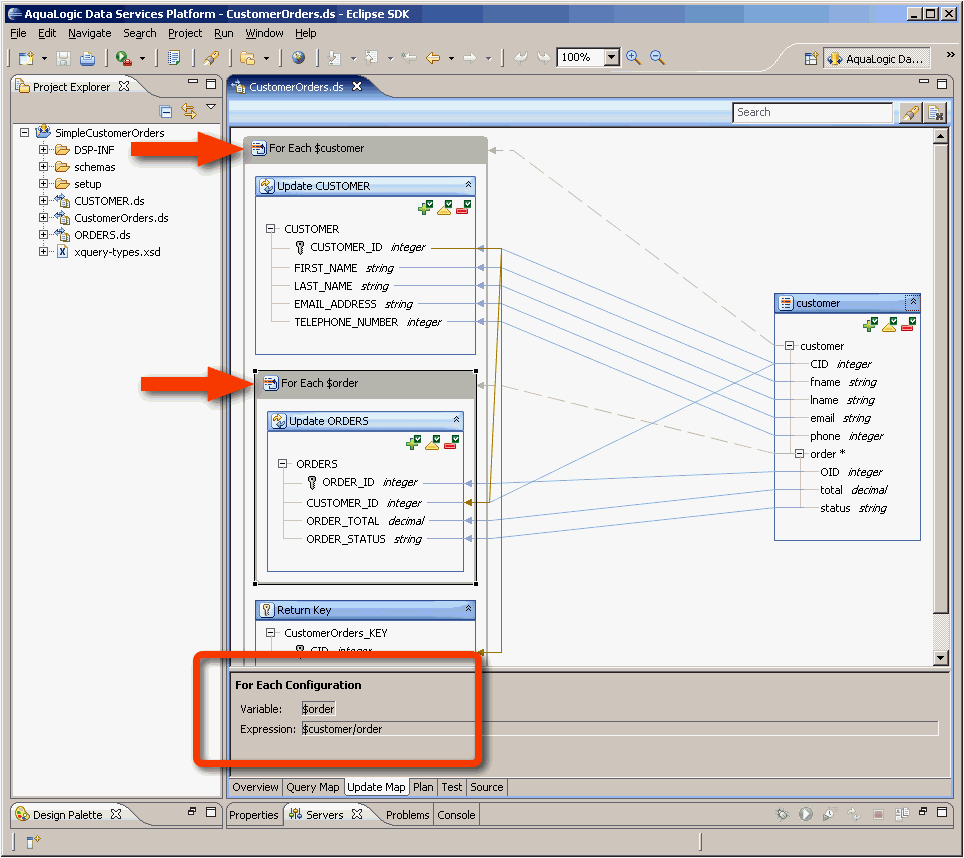
A for each block loops over elements in the input to the update map procedure. A for each block is associated with a variable and a path expression. The path expression defines the sequence to iterate over and the variable binds to elements in the sequence. The variable may be referenced by expressions inside the for each block.
9.1.1.4 Update Blocks
An update block invokes the primary create, update, or delete procedure of a source data service. It will invoke a procedure every iteration of the for each block that contains it. The contents of the update block represent the type of the input given to the procedure. Each element and attribute in the update block is assigned a mapping expression that determines what its value will be when the procedure is invoked. You can select an element or attribute to view or change the expression that determines what value it receives when the procedure is invoked (see the example below).
9.1.1.4.1 Procedure icons
Like the target box, an update block also has a procedure status icon. Here the icons indicate the ability of the update block to propagate creates, updates, and deletes to the underlying data service. Otherwise, the meaning of the icons is the same as it is for the target box.
9.1.1.4.2 Output variable
A primary create procedure may return a key. If the update block invokes a primary create procedure, it will bind the returned key to the output variable (also referred to as the key variable). The purpose of having the output variable available is for cases when the key value is generated automatically by an external source but is not part of the input. For example, your source data service is a wrapper for a customers relational database table. Say that the key of this table is an attribute CUSTOMER_ID which is an auto-generated number. If you are inserting a customer and some orders at the same time, you may need the auto-generated value for CUSTOMER_ID to pass to the input of the create procedure for ORDERS. When an update block results in the underlying update or delete procedure being invoked, the output variable will bind to the empty sequence.
9.1.1.4.3 Condition
An update block can optionally have a condition. The condition is a Boolean expression that determines if the update block should be invoked or not. If there is no condition, then the update block will always be invoked (see the example below).
9.1.1.4.4 Dependencies
When two or more update blocks appear as siblings within the same for-each block, it may be desirable to specify dependencies between them (e.g., due to referential constraints), so an update block can also include a list of dependencies. If update block A depends on update block B, update block B will execute before update block A in the case of a create or update operation (and in the opposite order in the case of a delete). Dependencies between update blocks that are not within the same for each block are not necessary, as the execution of an update map is implicitly outside-in.
9.1.1.4.5 Disabling an update block
An update block can be disabled so that it will never be invoked at runtime. You can disable an update block by right clicking on it and selecting "Disable" The update block should then appear yellow instead of white to indicate that it has been disabled. Disabling an update block is effectively the same as adding a condition that is always false.
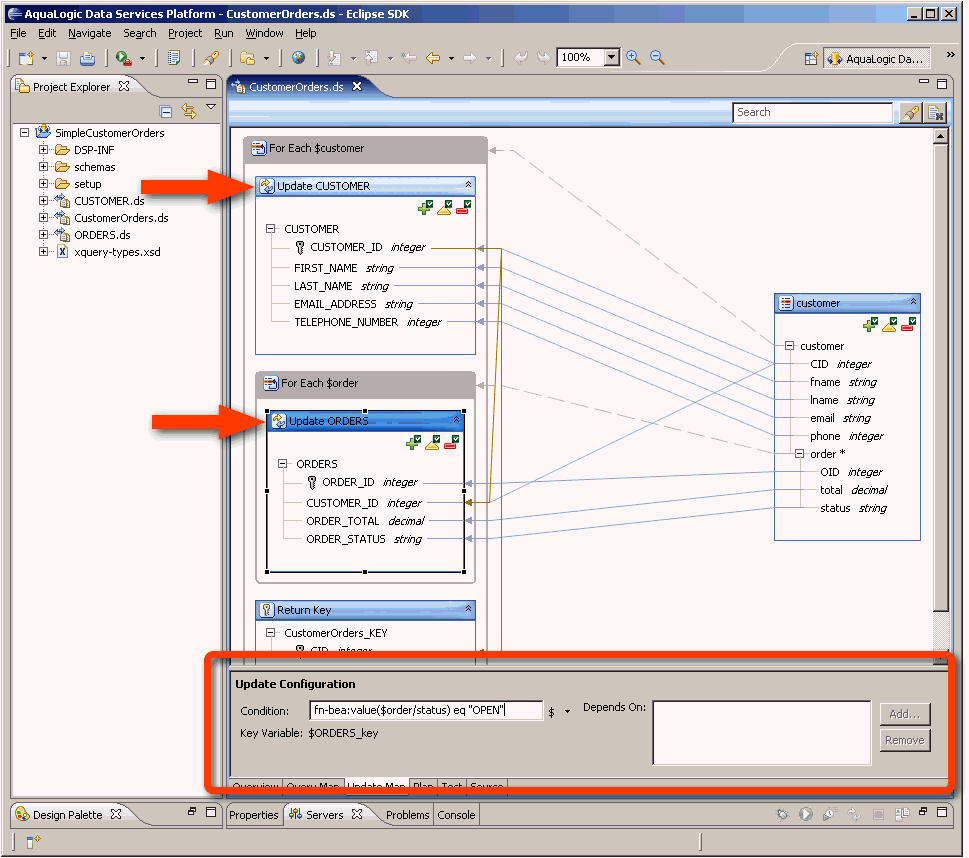
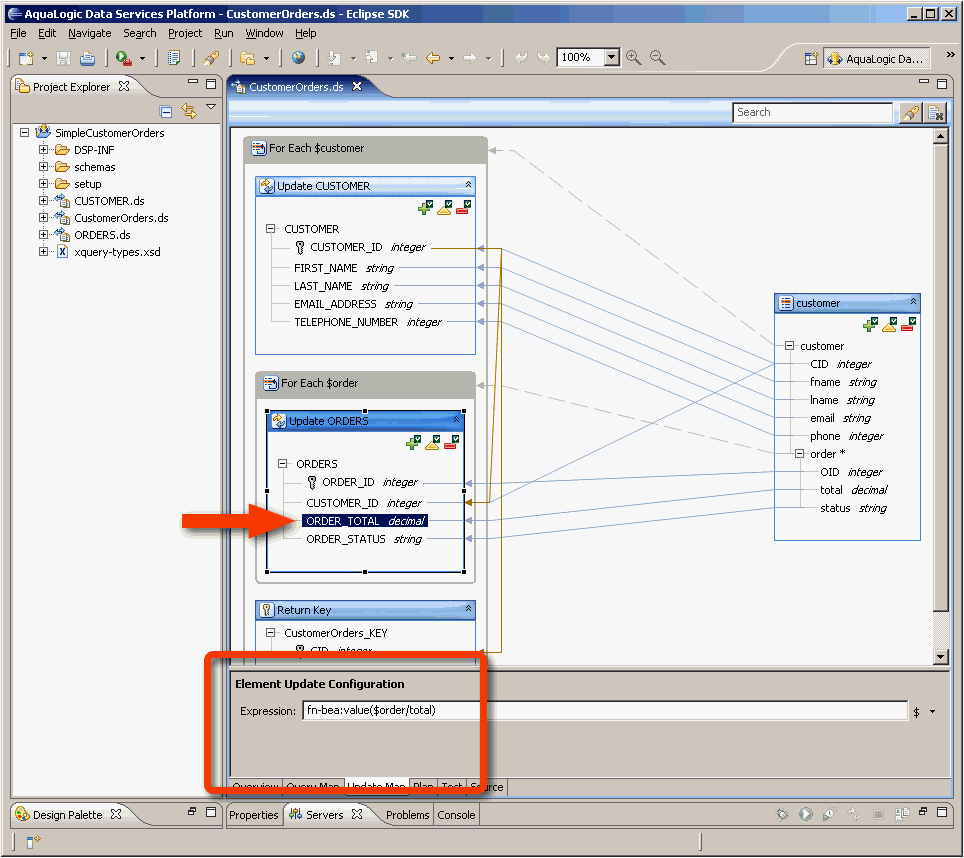
The images to the left show the update map for the data service CustomerOrders.ds. In the first image, the two orange arrows identify the two update blocks in the map. One update map is for the source data service CUSTOMER and the other is for ORDERS.
In this case, the ORDERS update block is selected and its details are identified by the orange rectangle (select an update block by clicking on it). We can see that the output variable for this update operation is $ORDERS_key. The condition is set to fn-bea:value($order/status) eq "OPEN" which means that this update block will only be executed when the input element status has the value "OPEN". $order is a variable that is defined by the for each block containing the update block ("For Each $order").
In the second image, the orange arrow identifies the ORDER_TOTAL element of the ORDERS update block. The orange rectangle identifies the mapping expression ($fn-bea:value($order/total)) for ORDER_TOTAL which is displayed because ORDER_TOTAL is currently selected. The ORDER_TOTAL element will receive the value of the total element when the source data service procedure is invoked.
9.1.1.5 The Return Key Block
The key block describes what will be returned by the update map create procedure. If the data service does not have a key specified, then there will not be a key block and there will never be more than one key block for an update map.
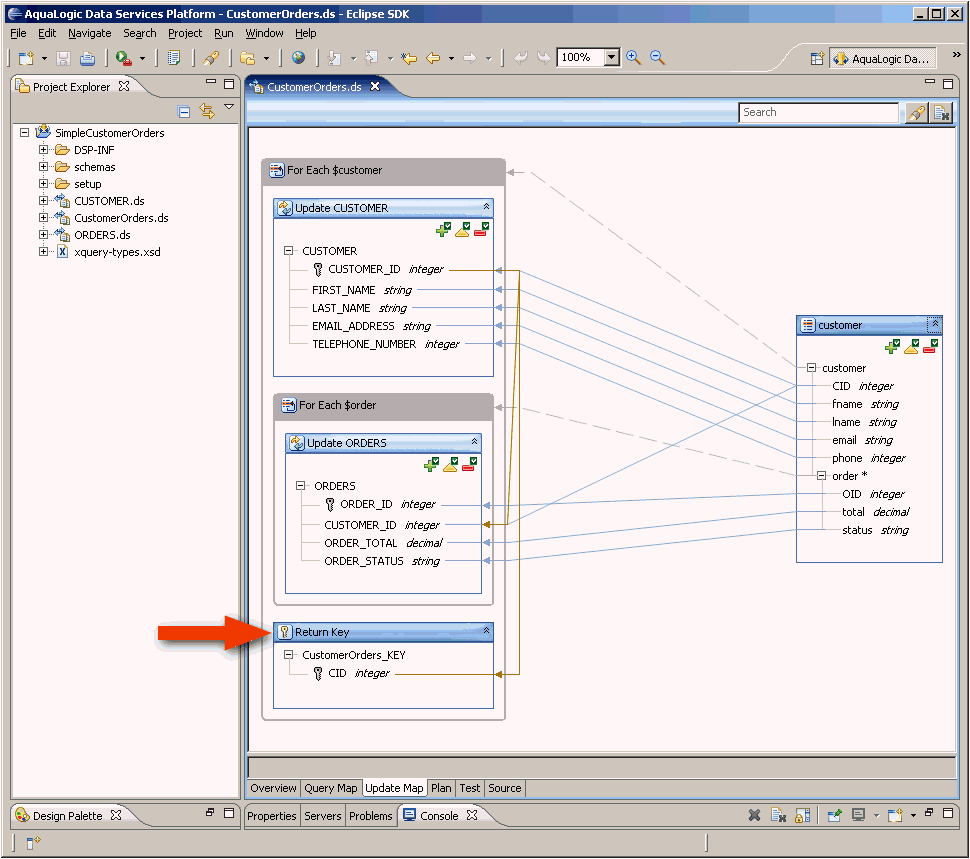
The image to the left shows the update map for the data service CustomerOrders.ds. The orange arrow identifies the key block in the update map. The key specified for the CustomerOrders data service is the element CID so the key block constructs the CID element to be returned and uses the output variable of the CUSTOMER update block to get the value.
9.1.1.6 Customization
Oracle Data Service Integrator generates a default update map automatically when you create a logical entity data service with a primary read function. This default update map is generated based on the primary read function of the data service. As you change the primary read function, the update map will be regenerated automatically.
There are several ways to customize an update map. See the following topics for more information:
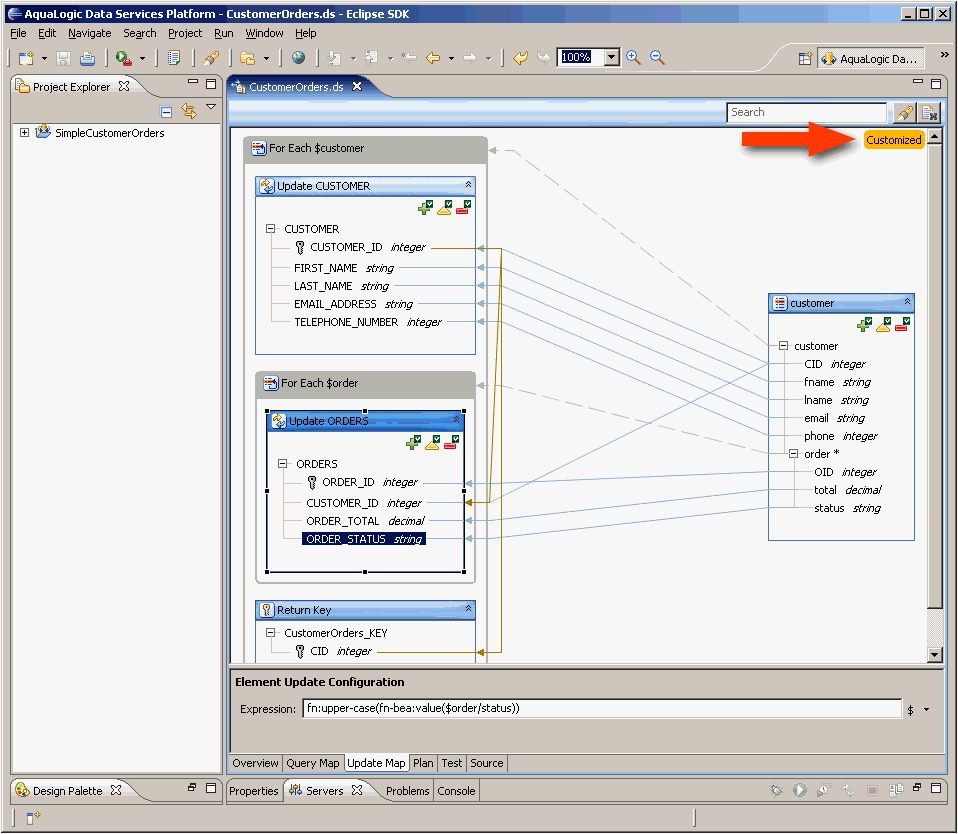
The image to the left shows the update map for the data service CustomerOrders.ds. The orange arrow identifies the "customized" symbol that appears after something in the update map has been changed. In this case, it is the mapping expression for ORDER_STATUS that has been modified.
Clicking the Customized icon and choosing View Customization from the menu displays a dialog showing the current customizations to the update map, including the enabling of update blocks, any conditions that have been set, and any changes to the mappings. This can help you to identify potential problems with the update map that might occur after you make a change to the primary read function, for example. If a problem has been identified, clicking OK accepts the correction and generates a new update map.
Note that in previous versions of Oracle Data Service Integrator, customizing the update map and then changing the primary read function resulted in the update map no longer being automatically regenerated. In the current version of Oracle Data Service Integrator, the update map is updated incrementally after customizations, as required.
9.2 Changing a Mapping
This section describes how to change a mapping in a default update map generated in Eclipse for WebLogic.
Once you have generated an update map, you can customize it by adding or removing mappings, changing an XQuery expression, adding dependencies, or changing the return type--all in Eclipse for WebLogic.
Initially, an update map is generated from the primary read function of a logical data service and changes with the read function.
Once you customize an update map, it is no longer linked to the primary read function. If you change the primary read function after customizing the update map, either in a dialog box or in the Source tab, the update map does not change as a result. To re-link the update map to the primary read function, you must revert customizations.
9.2.1 Example
To change a mapping:
-
Click the Update Map tab.
-
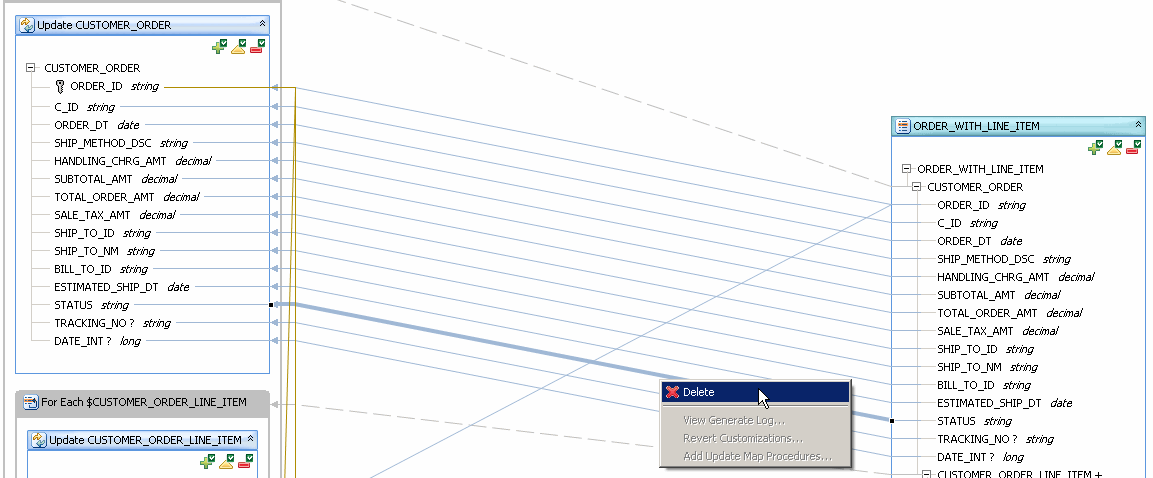
Right-click an existing mapping line, and choose Delete.
-
Drag from an element in the return type on the right to a new element in a data source on the left.
-
Make sure that the Create, Update, and Delete procedure icons (on both the right and left sides) are still enabled and not disabled.
-
Test the new mapping in the Test tab.
The CustomerOrderLineItem Service
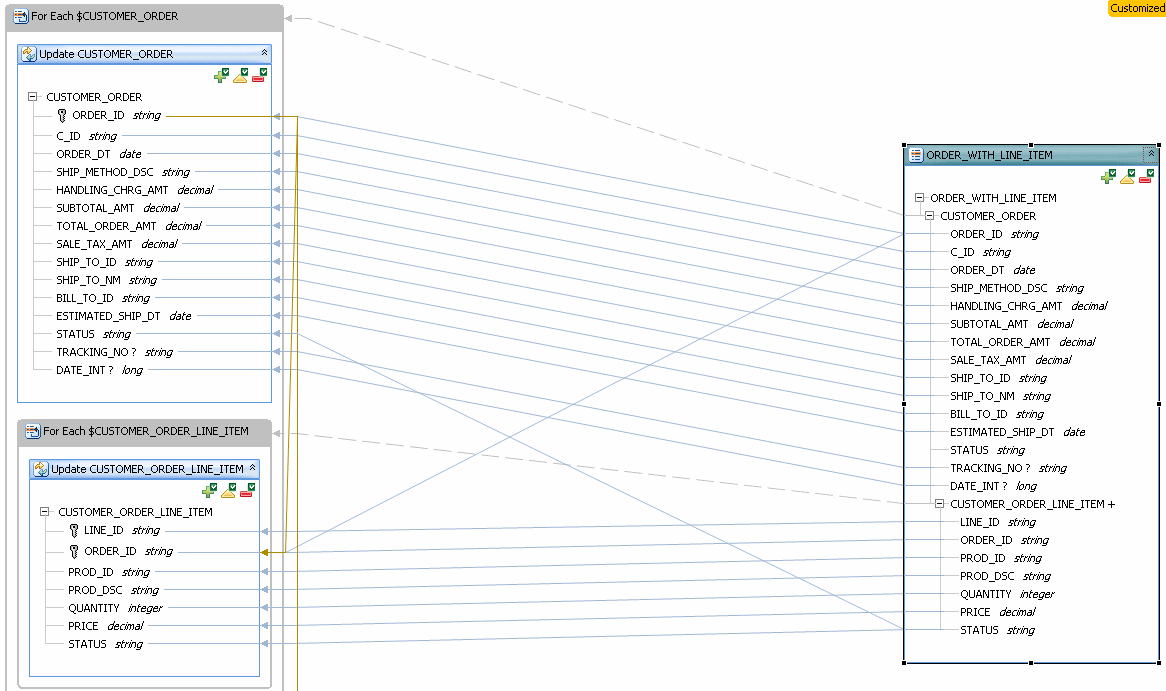
In this service, you can draw a new mapping between elements of the same type.
-
Click the Update Map tab.
-
Right-click the mapping line between CUSTOMER_ORDER/STATUS in the return type and CUSTOMER_ORDER/STATUS in the update block, and choose Delete.
-
Drag a new mapping from CUSTOMER_ORDER_LINE_ITEM/STATUS, the child element in the return type, to CUSTOMER_ORDER/STATUS in the update block. These elements have the same data type.
-
Make sure that the procedure icons are enabled.
-
Click CUSTOMER_ORDER/STATUS on the left, and check the new mapping in the expression editor.
-
Click the Test tab.
-
Run a read function, then click Edit.
-
Choose a CUSTOMER_ORDER element, then change the value of the first CUSTOMER_ORDER_LINE_ITEM/STATUS child element.
-
Click Submit.
-
Run the read function again, then check that the value of CUSTOMER_ORDER/STATUS has changed.
In this example, the child element (CUSTOMER_ORDER_LINE_ITEM) has a multiple cardinality, while the parent element (CUSTOMER_ORDER/STATUS) has a single cardinality. You can see this by checking the XML return type in the Overview tab. By default, the first child element value is read to update the data source. You can override this behavior by adding a dependency or writing a custom update function.
When you map one element to another, be sure that the elements have the same or compatible data types. To be compatible, data types must be in the same type hierarchy in the XML Schema DataTypes specification, such as xs:integer and xs:decimal. These types are cast automatically. If you draw a mapping between two elements of different types and hierarchies, you must cast one data type to the other, using a built-in cast function or a custom cast function.
9.3 Removing a Mapping
This section describes how to remove a mapping from an update map.
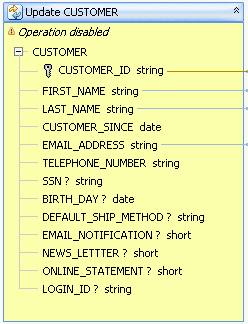
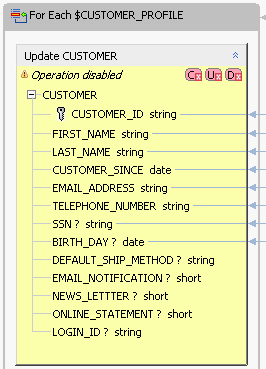
An update map shows mappings for required, optional, and key elements. In an update map, optional elements are displayed with a question mark, and key elements with a key symbol. A key element is usually required. If you remove a mapping from a key element, it becomes disabled with a warning icon.
Figure 9-12 Mappings to LINE_ID and PROD_ID Deleted
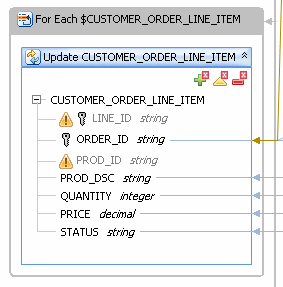
Description of "Figure 9-12 Mappings to LINE_ID and PROD_ID Deleted"
Removing a mapping might also cause create, update, or delete procedures to become disabled. However, you can correct either of these conditions, by handling unmapped required values.
If you need to remove a mapping, you can do so in either the update map or query map.
To remove a mapping in the update map:
-
Click the Update Map tab.
-
Right-click the mapping line, then choose Delete.
-
If the element becomes disabled in the update block on the left, resolve it.
To remove a mapping in the query map:
-
In the Query Map tab, right-click the mapping, then choose Delete.
-
Handle any required unmapped values in the update map.
9.4 Reverting Customizations
This section describes how remove anything you have changed in an update map, regenerating the update map from the primary read function.
You can undo all changes you have made to an update map. Undoing changes creates a new update map, generating it from the primary read function. When you choose Revert Customizations, all changes you have made to the update map are lost, even changes that you have previously saved.
If the update map had errors or warnings that your changes corrected, the errors or warnings will reappear.
To undo changes and generate a new update map:
-
Click the Update Map tab.
-
Right-click and choose Revert Customizations.
-
Correct any warnings, errors, or disabled procedure icons that appear.
9.5 Adding a Condition to an Update Block
This section describes how to add a condition to an update block in an update map.
In the update map, you can override an Update block by defining conditions in the expression editor that determine when the block is updated.
A condition is a Boolean expression based on XQuery functions and values defined in the update map, for example:
fn-bea:value($CUSTOMER/CUSTOMER_ORDER/TOTAL_ORDER_AMT) > 1000
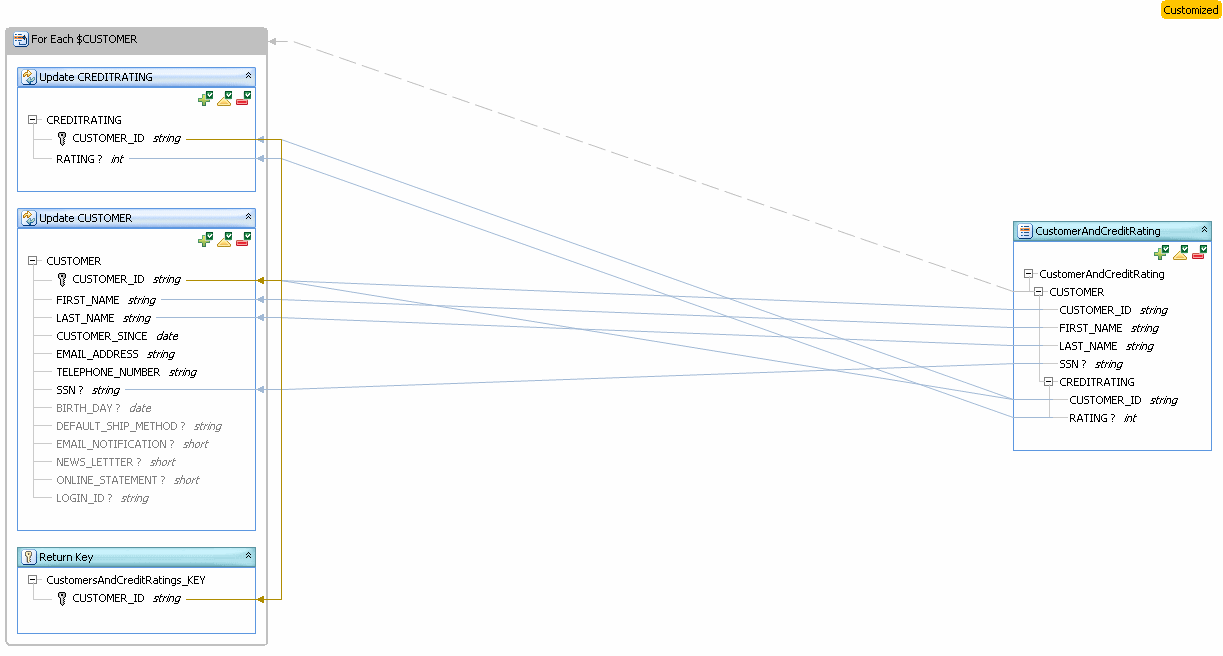
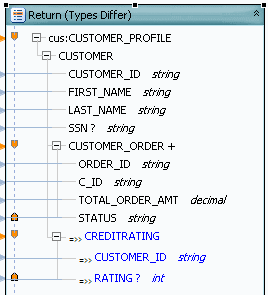
For example, you might have a logical data service with a return type that combines Customer, Order, and CreditRating data. Each customer can have multiple orders and one credit rating.
Figure 9-13 Return Type with Customer, Order, and CreditRating Data
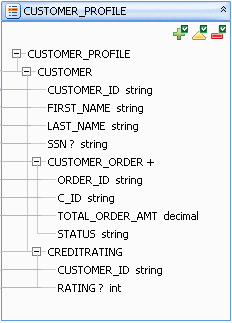
Description of "Figure 9-13 Return Type with Customer, Order, and CreditRating Data"
9.5.1 Example
In the update map, you may want to set a condition that a customer's credit rating can only be updated if the customer places an order with an amount greater than 1000.00.
To set an update map condition:
-
Click the Update Map tab.
-
Click the update block on the left that contains the element for which you want to set the condition (for example, the CREDITRATING box for the CREDITRATING/RATING element).
You can now enter a condition in the expression editor.
-
Enter a condition in the Condition box, for example:
fn-bea:value($CUSTOMER/CUSTOMER_ORDER/TOTAL_ORDER_AMT) > 1000.00
-
Save the data service.
-
Click the Test tab.
The logical data service returns the data in Figure 9-14:
Figure 9-14 Data Returned from Logical Data Service
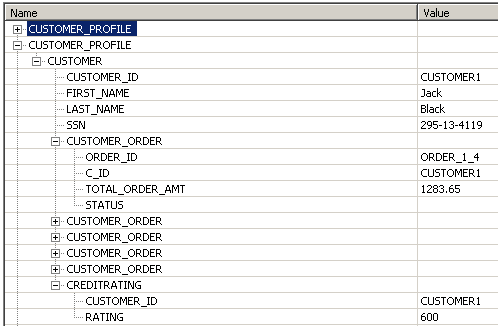
Description of "Figure 9-14 Data Returned from Logical Data Service"
-
Run a read function, then click Edit and attempt to submit a value for the element that has the condition.
When you test the update map, you can only update the CREDITRATING data source if TOTAL_ORDER_AMT for any of the customer's orders is greater than 1000.00.
9.6 Editing XQuery Expressions
The following sections describe how to edit XQuery expressions in the expression editor in Eclipse for WebLogic:
9.6.1 Overview
You can edit the generated XQuery expressions in an update map using the expression editor.
The update map expression language is a subset of XQuery syntax. In an update map, you can use any of the following XQuery constructs.
Table 9-1 Editing XQuery Expressions
| Type | Description | Example |
|---|---|---|
|
Variable |
A variable already defined in a For Each or Update block in the update map. $$root is a special predefined variable that refers to the root of the service's XML type. |
$ORDER_WITH_LINE_ITEM $CUSTOMER |
|
Constant |
A numeric, string, or other constant. |
"a" "12345" |
|
Constant Cash |
A constant cast to another XSD data type using the parentheses operator. |
xsd:date("2007-01-01") |
|
Function |
A call to any XQuery function. You can see the built-in and Oracle-provided functions in the Design Palette. You can use a variable, path, or constant as an argument to a function. |
fn-bea:value($CUSTOMER/FIRST_NAME) |
|
Path |
An expression that locates an XML element in a tree using variables, elements, and attributes. The syntax is: $VARIABLE_NAME /elementName @attributeName |
$ORDER_WITH_LINE_ITEM/CUSTOMER_ORDER/ORDER_ID |
Namespace prefixes are declared in the data service's XQuery source, which you can see in the Source tab. If a namespace is only used in the update map, and not in the logical data service, you must declare it. If a namespace cannot be resolved, it is shown with the prefix ns?.
The most common ways you use the expression editor are to:
-
Add a constant to an unmapped element
-
Cast a constant to an XSD data type, especially to resolve update block elements with no mappings
-
Use an XQuery function available in the Design Palette to cast a value
-
Use a custom XQuery cast function you have written
9.6.2 The fn-bea:value Function
A mapping between an element in a return type and an element in an update block uses the fn-bea:value function with a path name, for example:
fn-bea:value($CUSTOMER/CUSTOMER_ID)
An update mapping should always use fn-bea:value, whether Oracle Data Service Integrator auto-generates the mapping or you draw it. If you remove the fn:bea:value function from the expression and simply use an XQuery path expression ($CUSTOMER/CUSTOMER_ID), the element becomes disabled in the update map and you see this error message:
The expression does not match the expected type for this element
The expression assigned to this element is not valid
Hint: did you forget to use the value function?
The fn-bea:value function is required, because an update map updates a Service Data Object (SDO) and requires a special XML structure called a datagraph that includes a change summary showing both the old and new values. The fn-bea:value function handles the update to the SDO correctly.
If you do not use fn-bea:value, Oracle Data Service Integrator throws an exception when you attempt to update the value.
9.7 Adding an Update Map Procedure
This section describes how to add a create, update, or delete procedure to a logical entity service.
9.7.1 Overview
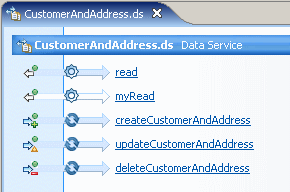
In a logical entity service, you can add create, update, and delete procedures (called update map procedures) that act on underlying data sources. A procedure is an operation that can have side effects, for example, a create procedure that adds a new record to a database table and returns a key value.
You can create update map procedures visually in Eclipse for WebLogic and have the framework generate XQuery pragma statements and source code, or you can write the source code directly in XQuery or XQSE.
The XQuery pragma statement looks something like this:
(::pragma  function <f:function kind="create" visibility="public" isPrimary="true"
xmlns:f="urn:annotations.ld.bea.com">
This statement defines a create procedure, with public visibility, that is primary. Even though the pragma statement uses the keyword function, the operation you define is a procedure, as you can see from the declaration:
declare procedure cus:createCustomerAndAddress($arg as
element(cus:CustomerAndAddress)*) as element(cus:CustomerAndAddress_KEY)\*
external;
This line declares the procedure with the name createCustomerAndAddress, defines one argument with the service's return type, and specifies a key as a return value.
9.7.2 Generating Default Procedures
When you generate default update map procedures, they have these parameters and return values:
Table 9-2 Parameters and Return Values
| Type | Parameters | Return Value |
|---|---|---|
|
Create |
The service's Return type |
The current key, empty if no key is defined |
|
Update |
The service's Return type using a changed-element kind |
Empty |
|
Delete |
The service's Return type |
Empty |
Before you create update map procedures, especially create procedures, add a key to your service. A primary create procedure must return a key. Primary update and delete procedures require the Return type as an argument; their non-primary equivalents can be written to accept a key instead.
To generate a default update map procedure:
-
Create a key for your service.
-
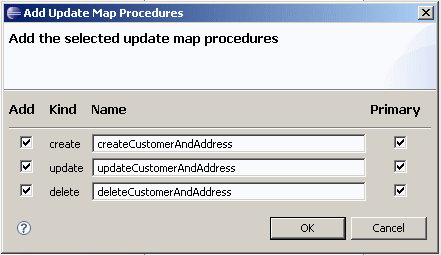
In the Overview tab, right-click at the left, right, or top, and choose Add Update Map Procedures.
-
Select Add to indicate which procedures to add.
-
Add names in the Name fields.
-
Mark Primary to indicate if each procedure should be primary.
-
Click OK.
-
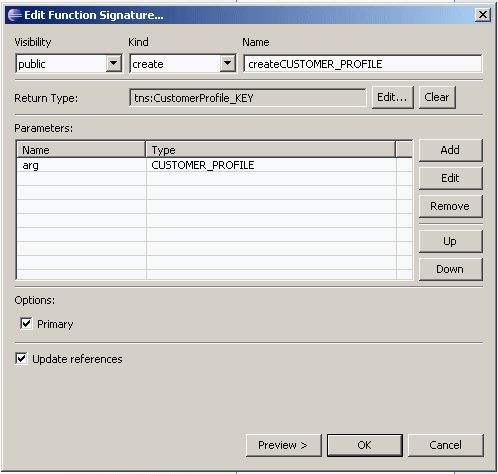
In the Overview tab, right-click a procedure name and choose Edit Signature.
Figure 9-17 Creating a Procedure Signature
Description of "Figure 9-17 Creating a Procedure Signature"
-
Make any necessary changes to the procedure signature in the dialog box.
9.7.3 Designing Custom Procedures
You can also create procedures with the arguments and return types you choose. This is useful for procedures in addition to the primary create, update, and delete procedures.
To design custom procedures:
-
Click Overview.
-
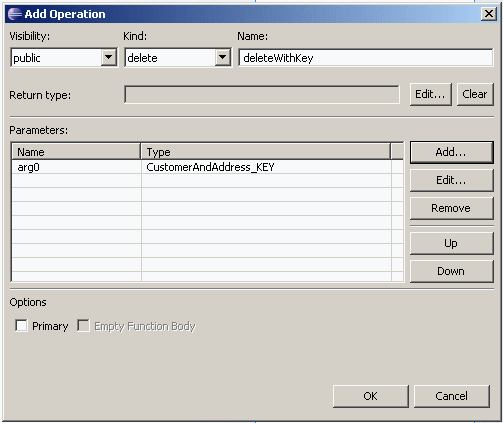
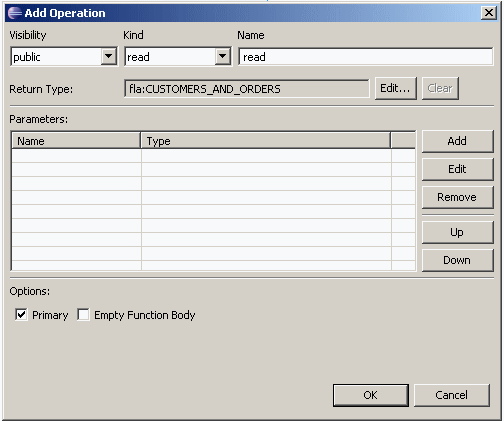
Right-click at the top, left, or right, and choose Add Operation.
-
Choose a value for Visibility.
-
In the Kind field, choose create, update, or delete.
-
In the Name field, enter a procedure name.
-
(Optional) At Return Type, click Edit. Choose a primitive or complex type, then click OK.
-
Click Add in the Parameters pane.
-
Choose a primitive or complex type from an XML or XSD file, then click OK.
-
In the Kind field, choose a value.
Choose element to use the exact XML element you selected as a parameter; changed-element, if values in the element must be updated; schema-element, if the element must be validated according to an XML schema.
-
Choose a value for Occurrence.
-
Click OK in both dialog boxes.
9.8 Determining the Scope of a Variable
This section describes how variables may be used when customizing an update map expression. If you are new to update maps, it is recommended that you first read Understanding Update Maps.
9.8.1 Variable Types and Scoping Rules
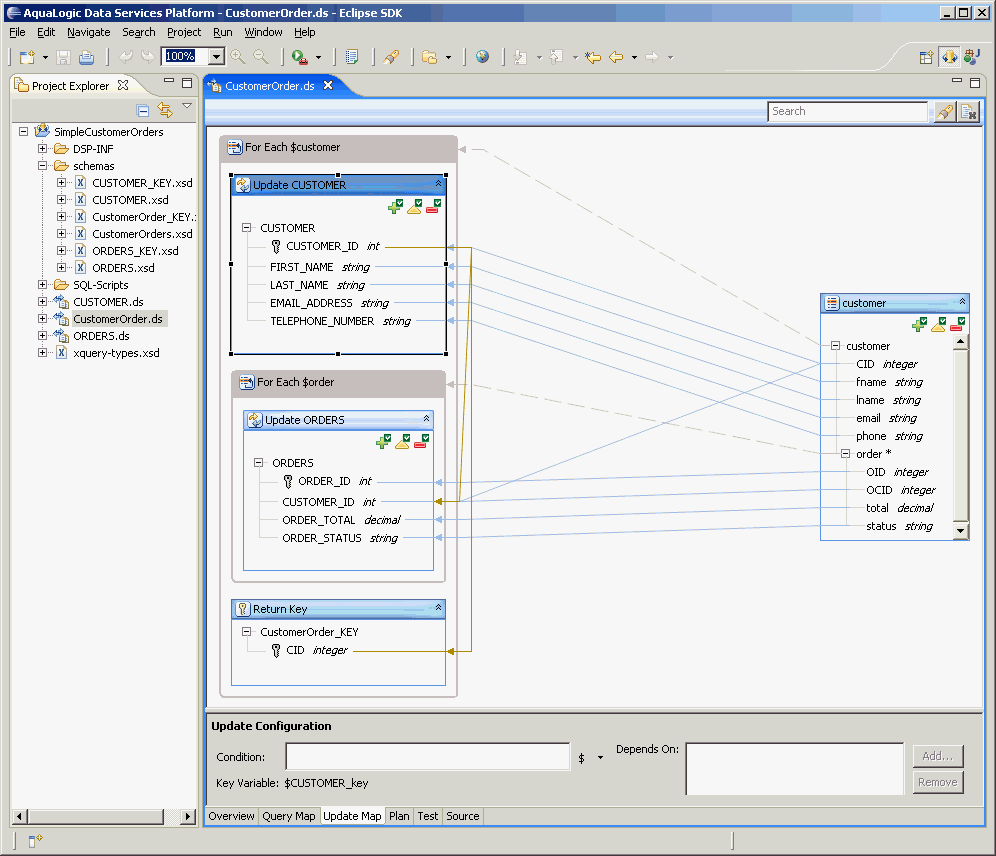
Variables may be defined by a for-each block or by an update block (as an output variable). An output variable may be used in an expression if the expression is contained within an update block that depends on the update block that defines the variable. A for each block variable may be used by an expression if the expression is immediately inside the for-each block that defines the variable. However, if the defining for-each block contains any other for each blocks which also contain the expression, the variable may not be used in the expression.
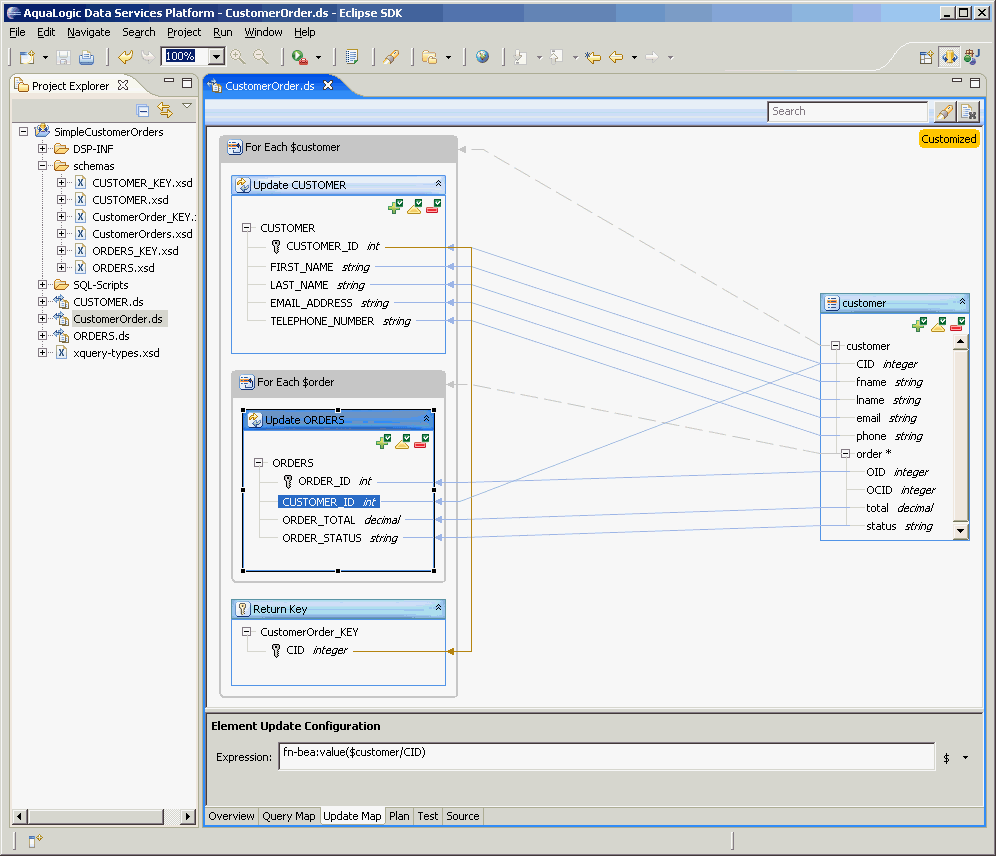
9.8.1.1 Example: an update map for a customer-orders data service
The image to the left shows an update map for a logical data service about customers and orders (see Understanding Update Maps for more info). Notice that the update block for customers is selected and the name of its output variable $CUSTOMER_key is shown at the bottom of the screen (the output variable is also referred to as the key variable). In this case, $CUSTOMER_key can be referenced anywhere from within the update block for orders (e.g. in a mapping expression or in the condition for the update block).
Figure 9-19 Using Variables for Customizing Maps
Description of "Figure 9-19 Using Variables for Customizing Maps"
Also notice that we have two for-each blocks that define the variables $customer and $order. Within the update block for customers, only the $customer variable is visible and within the update block for orders only the $order variable is visible (with one exception which will be discussed next).
These restrictions are in place to prevent unintuitive or complicated behavior by the update map at runtime. If these rules are too restrictive for your application, you may want to consider using XQSE. However, there is one exception to the for each block variable usage rule. If the variable is used as part of a path expression that references a key value, then usage is valid as long as the expression is within the defining block. It is important to note that updates will be effectively disabled for such "outside" mappings (creates and deletes will still work).
9.8.1.2 Example: an outside mapping to a key value
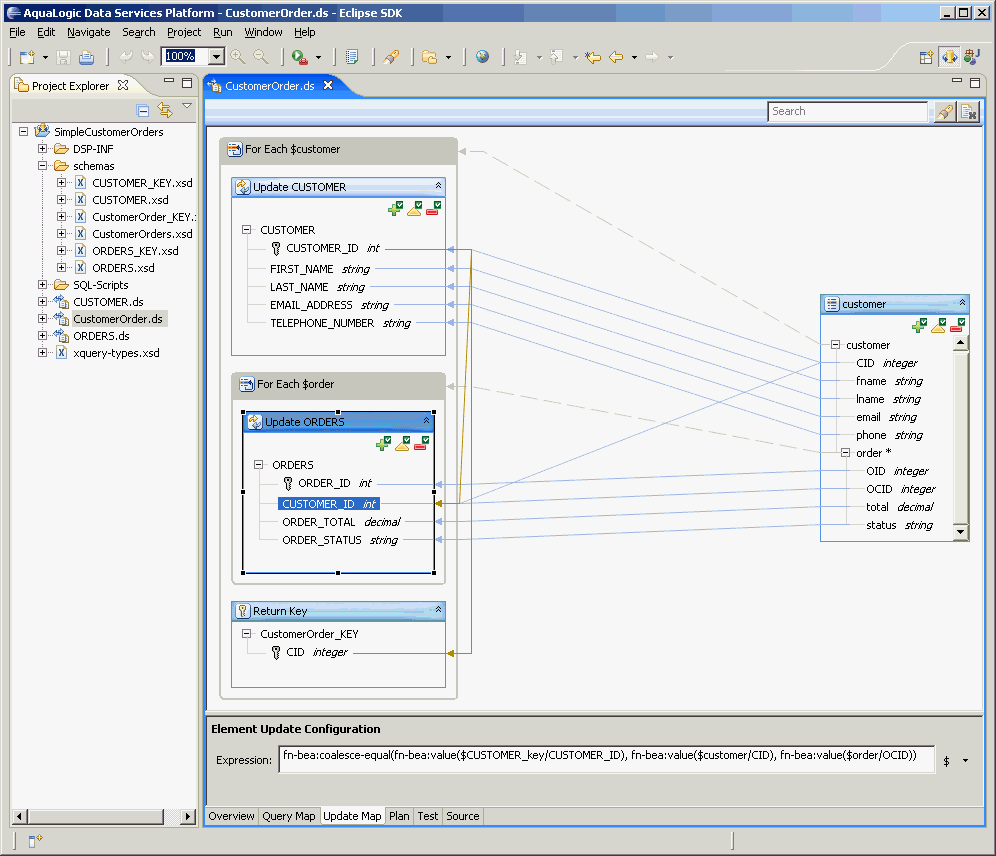
In the image on the left, the CUSTOMER_ID element in the update block for orders is selected and its mapping expression (fn-bea:value($customer/CID)) is shown at the bottom of the screen. Normally, the variable $customer could not be used within the orders update block since it is not directly contained within the corresponding for-each block. However, since it is being used to reference CID it is allowed because CID is equivalent to the key value of the customer data service. Updates for this outside mapping will be disabled. That is, if customer/CID is modified in the input to the update map procedure, the CUSTOMER_ID element in the orders update block will not have the modified value.
9.8.2 Updating Foreign Key Values
The function fn-bea:coalesce takes 1 or more arguments and simply returns the first argument that is not empty. The function fn-bea:coalesce-equal works the same way except that it additionally checks that all non empty arguments are equal. If it finds that any two non empty arguments are not equal, it will throw an exception at runtime. The automatically generated update map may use fn-bea:coalesce-equal for the mapping expression for foreign key values if it can be inferred from the target data service that the values should always be equal.
If an argument to fn-bea:coalsece-equal contains an a path expression that falls under the exception to the for each block variable rule mentioned above, then updates will be disabled for the entire expression containing fn-bea:coalsece-equal. If your automatically generated update map is in this situation and you wish to be able to update the foreign key value, you can simply remove the argument that contains the offending mapping. (See the example that follows)
9.8.2.1 Example: coalesce-equal
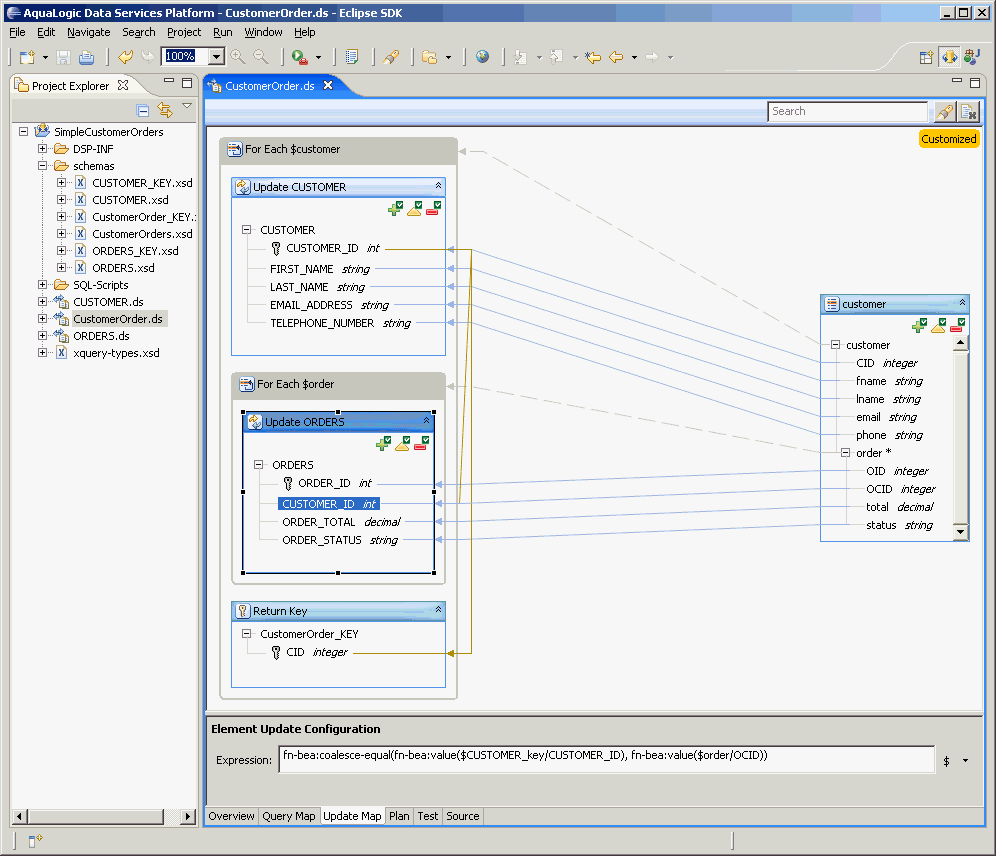
In the first image on the left, the CUSTOMER_ID element in the update block for orders is selected and its mapping expression (fn-bea:coalesce-equal(...)) is shown at the bottom of the screen. When the update map is used to create a customer with orders, the value for CID may not be known as it may be auto generated by an underlying relational database. This means that $customer/CID and $order/OCID may be empty. In this case the generated key value will be returned and the orders will get the value for CUSTOMER_ID via fn-bea:value($CUSTOMER_key/CUSTOMER_ID). If the update map is used to update or delete customers and orders, $CUSTOMER_key/CUSTOMER_ID will be empty but $customer/CID and $order/OCID should not be.
Figure 9-21 Updating Foreign Key Values: Customer ID
Description of "Figure 9-21 Updating Foreign Key Values: Customer ID"
This mapping contains an outside reference to the variable $customer so updates will be disabled for customer/order/OCID in the input to the update map procedure. To enable updates to OCID, we can remove the outside mapping. The second image on the left shows what the update map looks like after this modification.
9.9 Reference
This section provides reference information for managing update maps.
9.9.1 Update Map Functions
The following functions are useful in update map expressions (e.g. update block conditions and mapping expressions).
fn-bea:coalesce($arg ... as xdt:anyAtomicType) as xdt:anyAtomicType?
The function fn-bea:coalesce takes 1 or more arguments and returns the first that is not empty.
fn-bea:coalesce-equal($arg ... as xdt:anyAtomicType) as xdt:anyAtomicType?
The function fn-bea:coalesce-equal takes 1 or more arguments and returns the first that is not empty. If any of its non empty arguments are not equal then it will throw an exception at runtime. (see also How to update a foreign key values mapped using fn-bea:coalesce-equal)
fn-bea:value($arg as item()?) as xdt:anyAtomicType?
The function fn-bea:value is essentially the same as fn:data except that it additionally indicates to the Oracle Data Service Integrator runtime that the variable $arg may bind to a changed-element() depending on the context (like in the case of an update procedure driven by the update map). As a general rule, fn-bea:value should always be used in place of fn:data in update map expressions since they should be written to support all three flavors of update procedures (create, update, and delete).
fn-bea:ambiguous($arg ... as xdt:anyAtomicType) as xdt:anyAtomicType?
The function fn-bea:ambiguous may appear in the default update map when there are multiple target values (on the right) that map to the same source value (on the left). For example, if the same value is projected (that is, returned) more than once in the primary read function, this may result in fn-bea:ambiguous being used in the corresponding update map by default. It is expected that the user will manually remove the call to fn-bea:ambiguous when resolving the ambiguous mapping. For example, the user may choose to pick one of the arguments in the fn-bea:ambiguous call to be the new mapping expression and disregard the others.
9.10 How To
This section describes procedures for managing update maps.
9.10.1 How To Recognize When Something is Wrong
The following sections describe why an update map might appear disabled and point you to solutions:
9.10.1.1 Understand the Symptoms
The signs of a disabled update map appear on the update map itself, in the Generate Log, and in the Problems tab.
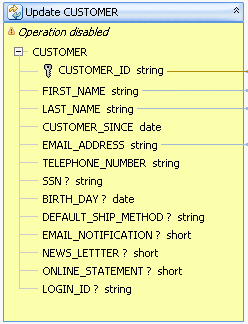
In the update map, you may see disabled (or yellow) update blocks. When an update block is completely or partially disabled, updates do not occur in the data source the block maps to.
9.10.1.1.1 A Disabled Update Block
An update map procedure that is disabled has a yellow or red status indicator at the upper right.
9.10.1.1.2 Disabled Procedure Icons
You might also see a message with a link to view the Generate Log.
9.10.1.1.3 A View Generate Log Message
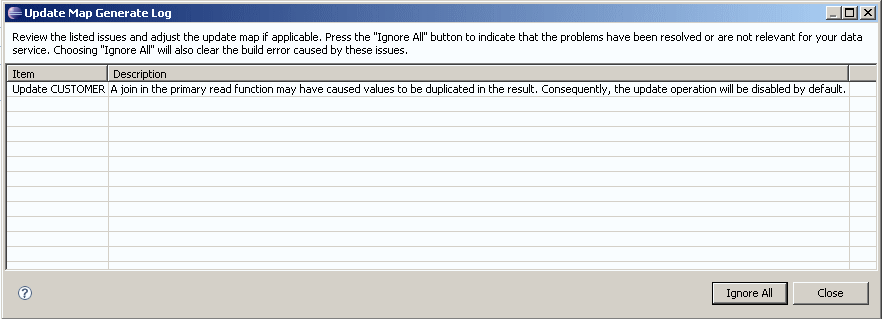
Clicking the link displays the Update Map Generate Log window.
9.10.1.2 Check the Problems Tab
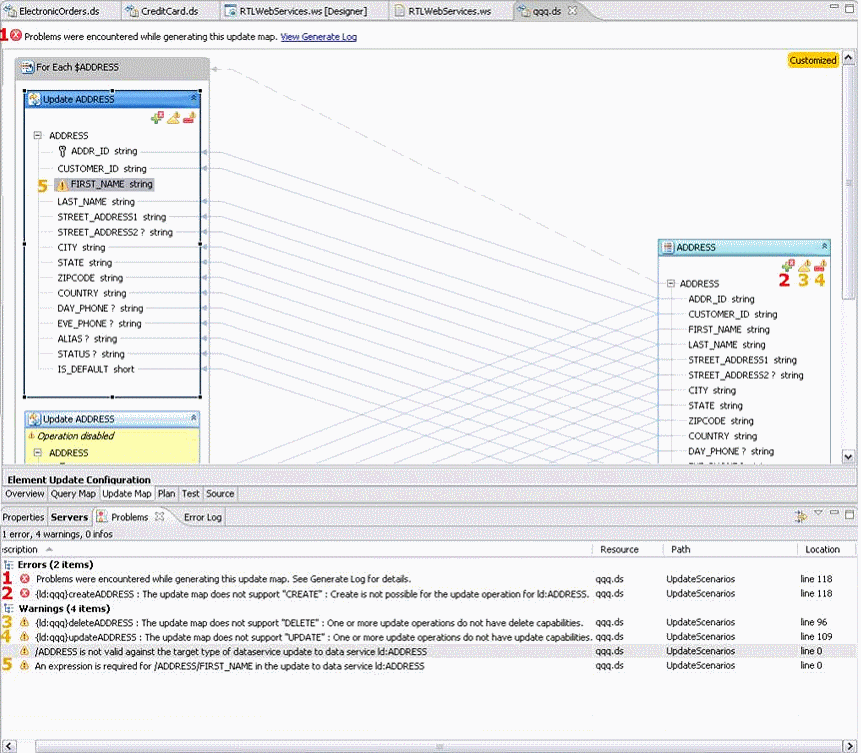
If you see disabled procedure icons or other symptoms, you should also check the Problems tab for detailed Error and Warning messages. The Problems tab shows errors and warnings that the View Generate Log message does not. For example, this update map shows two errors and three warnings.
Figure 9-25 Check the Problems Tab for a Disabled Update Map
Description of "Figure 9-25 Check the Problems Tab for a Disabled Update Map"
Errors prevent you from deploying the update map to the Oracle Data Service Integrator server and testing it. Warnings tell you that something is not supported in the update map, but the update will proceed.
To sort the Problems tab, as shown above:
-
Click the Problems tab.
-
Click the triangle icon at the upper right, and choose Sorting.
-
Sort first by Resource, then by Severity and Description.
9.10.1.3 Resolve Errors and Warnings
You may have a valid reason to use a certain logical data service design that initially generates an update map with constraints. This is fine. You can find workarounds and resolve most disabled update map conditions.
9.10.1.3.1 Disabled Update Blocks
When you encounter a disabled, or yellow, update block, you can right-click it and choose Enable. The most likely reasons an update block is disabled are shown below.
Once you enable the update block, you will likely see:
-
Elements that have warnings or are completely disabled
-
Disabled Create-Update-Delete procedure icons
9.10.1.3.2 Disabled Procedure Icons
When you see disabled procedure icons, check the update blocks on the left. The procedure icons in the return type on the right naturally result from those on the left.
In general, the status indicators for update map procedures are:
-
Green if the update map will work at run time as you have designed it, even if parts of it are disabled
-
Yellow if some parts of the update map will work at run time, but you might see run-time errors on other parts
-
Red if the update map will not work at run time
If you want to correct an update map before run time, a red or yellow status indicator on the left can have any of the following meanings.
| Status | Type of Procedure | Meaning | Solution |
|---|---|---|---|
|
Red |
Create, Update, Delete |
The data service does not have a primary procedure of that type. |
Create a primary procedure (Overview tab, right-click, Add Update Map Procedures, select Primary) |
|
Red |
Update, Delete |
The data service does not have a key. |
Create Logical Data Service Keys |
|
Red |
Create |
The update block has missing mappings or mappings of the wrong data type |
Understand Mappings with Different Data Types Handle Unmapped Required Values |
|
Red |
Create |
The return type contains non-element or non-attribute XML items that are not allowed. |
Handle an Unsupported Node Constructor Error |
|
Red |
Create, Update, Delete |
The update block references a variable from another disabled update block. |
Right-click the disabled block, and choose Enable. |
|
Red |
Update, Delete |
The data service has a key, but one or more key fields have missing mappings, mappings of the wrong data type, or mappings to invalid items in the return type. |
Handle Unmapped Required Values |
|
Yellow |
Update, Delete |
The update block has missing mappings, mappings of the wrong data type, or mappings to invalid items in the return type. |
Understand Mappings with Different Data Types Handle Unmapped Required Values |
9.10.2 How To Understand Mappings with Different Data Types
The following sections describe casts between elements of different data types in an update map:
9.10.2.1 Overview
In an update map, you may need to map elements of different data types between a return type and an underlying data source.
For example, a return type might contain an xsd:dateTime element that maps to an xs:date element in the data source. When data types differ, you need to cast between them in order to enable the update map. Type differences occur because a logical data service design can differ from actual physical data sources or because data types used by an underlying data source are unknown at design time.
When the update map is first generated, the element in the data source has no mapping and a warning icon.
If you draw a mapping line in Update Map view, from the xsd:dateTime value in the return type to the xsd:date value in the update block, the element becomes disabled.
Figure 9-26 An Error Due to Data Type Mismatch

Description of "Figure 9-26 An Error Due to Data Type Mismatch"
You can fix this type of error by using different techniques to cast, according to the data types you are casting.
First, review the built-in datatypes chart in the XML Schema Datatypes specification to understand the hierarchies of data types used in XML Schema. The type xs:string and its subtypes belong to one type hierarchy, and the type xs:decimal and its subtypes belong to another.
Casts between elements of different types are handled in one of three ways:
-
Type promotion. If both data types are in the same type hierarchy and the cast moves up the hierarchy, Oracle Data Service Integrator casts them implicitly. This is known as type promotion. For example,
xs:tokenis promoted toxs:stringandxs:integeris promoted toxs:decimal. Implicit casts are implemented in Oracle Data Service Integrator according to the XQuery 1.0 specification. -
Built-in cast function. If the types do not use a cast up the same type hierarchy and type promotion does not occur, you can use a built-in XQuery function available from the Design Palette.
-
Custom cast function. If a built-in XQuery function is not available, you can write your own custom cast function in the Source tab of your primary logical data service or in a specialized library data service that performs casting.
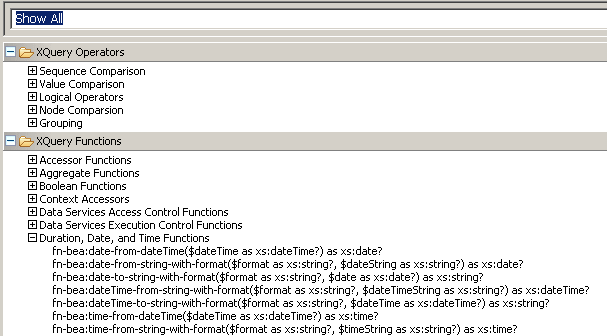
9.10.2.2 Built-In Cast Functions
If a built-in function provides the cast you need, you can simply drag it from the Design Palette to the expression editor and enter argument values.
Figure 9-27 Built-in XQuery Casting Functions
Description of "Figure 9-27 Built-in XQuery Casting Functions"
9.10.2.3 Custom Cast Functions
Before you write a custom XQuery cast function, make sure that XQuery allows the cast you want to perform. Check the casting section in the XQuery 1.0 specification to understand the rules for casting between types in XQuery, especially the chart that describes casting between primitive types.
Remember these general guidelines:
-
The primitive type chart shows which casts can be performed between primitive types. For example, an integer (such as 44) can always be cast to a string ("44"). However, a string can only be cast to an integer in some cases. The string "55" can be cast to the integer 55, but the string "hello" cannot be cast to an integer.
-
If both the source and target types are derived from the same primitive type, you can cast between them.
-
If the source and target types are derived from different primitive types, you are casting across the type hierarchy. In general, you need to cast the source type up the hierarchy to its primitive type; then, cast from the primitive type of the source to the primitive type of the target; and last, cast from the primitive type of the target to the target type (see the rules in the XQuery 1.0 specification).
Once you write the cast function, you can test it in Eclipse for WebLogic, before you run it with a client application.
9.10.3 How to Cast Using a Built-in XQuery Function
The following sections describe how to use a built-in XQuery function to cast values of different data types in an update map.
9.10.3.1 Example
You can cast an element from one data type to another using a built-in XQuery cast function when:
-
Type promotion does not occur.
-
The data comes from a variable or an other source that is not a constant
-
A built-in function that performs the cast you want is available in the Design Palette.
To cast using a built-in XQuery function:
-
Click the Update Map tab.
-
Click the disabled element in an update block on the left.
In the expression editor, you see an expression that uses fn-bea:value() to map from the return type on the right, for example:
fn-bea:value($CUSTOMER/CUSTOMER_SINCE)This expression represents a dateTime value coming from the return type.
-
Open the Design Palette
Window > Show View > Design Palette
-
Expand XQuery Functions, then a category (for example, Duration, Date, and Time Functions).
-
Drag the function you want to the expression editor (for example, fn-bea:date-from-dateTime), leaving the existing expression there.
-
If feasible, use the existing expression as an argument to the function, for example:
fn-bea:date-from-dateTime( fn-bea:value($CUSTOMER/CUSTOMER_SINCE) )Here the original value is used as the
$dateTimeargument tofn-bea:date-from-dateTime(). -
Test the update map cast to make sure it works as you expect.
9.10.4 How To Cast Using a Custom XQuery Function
This section describes how to write a custom XQuery function to cast between elements of different data types in an update map.
9.10.4.1 Example
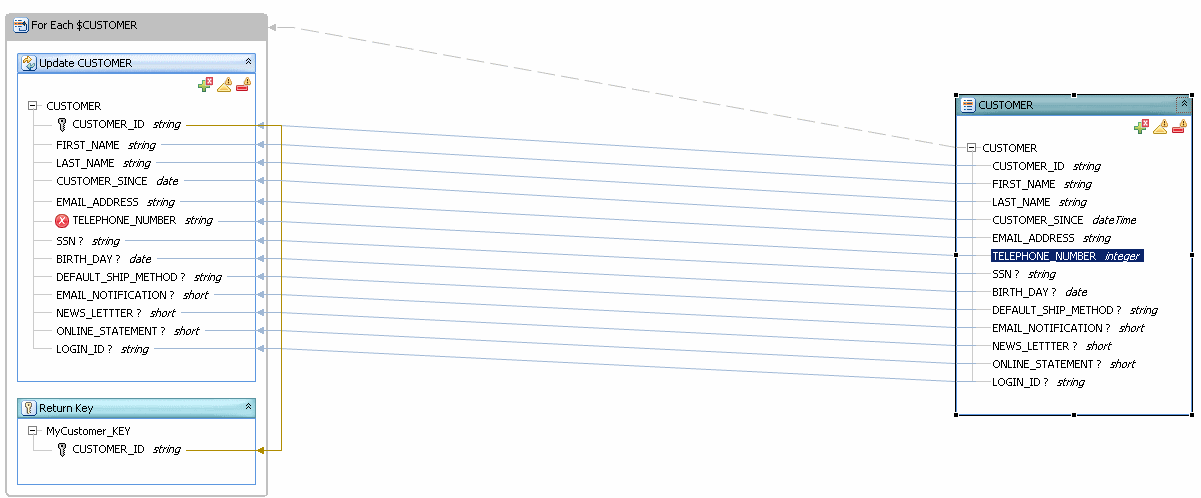
An example of a custom XQuery cast function is one that casts from integer to string. Suppose the logical data service's return type uses xsd:integer for the TELEPHONE_NUMBER element, while the underlying data source uses xsd:string.
Figure 9-28 Mapping from Integer to String
Description of "Figure 9-28 Mapping from Integer to String"
The mapping between the two TELEPHONE_NUMBER elements is initially disabled. The value from the return type is something like 4155551212, which can easily be converted between xsd:integer and xsd:string. Check the type casting chart in the XQuery 1.0 specification to make sure the cast you want to perform is allowed.
Caution:
When you test the cast function, you also need to perform the opposite cast (in this case, xsd:string to xsd:integer).
To write a custom XQuery cast function:
-
Click the Source tab.
-
Write an XQuery function that takes an argument of the data type you are casting from and returns a value of the data type you are casting to, for example:
declare function tns:intToString($theint as xs:integer) as xs:string {
xs:string($theint)
};
Assign your function to an XML namespace your logical data service uses. Be sure both the parameter and return type are valid XML Schema data types. Then, write a statement that performs the cast.
-
In the Update Map tab, click the element in the data source on the left.
At this point, the element is disabled: . Its value is taken from the return type, so its XQuery expression looks something like this:
fn-bea:value($CUSTOMER/TELEPHONE_NUMBER)
Remember that the value from the return type is an
xs:integer. -
Add your new cast function, using the existing expression as its argument, for example:
tns:intToString(fn-bea:value($CUSTOMER/TELEPHONE_NUMBER))
At this point, the update map should be completely enabled.
-
If the disabled icon on the element does not disappear immediately, click another element in the update map.
-
Test the update map cast to make sure it works as you expect.
9.10.5 How To Test an Update Map Cast
This section describes how to test a cast between elements of different data types in an update map.
9.10.5.1 Example
The easiest way to test an update map cast function is to use Read-Edit-Submit from the Test tab in Eclipse for WebLogic.
Suppose you are casting from xs:integer to xs:string. To test the cast function, you need to retrieve data from the data source as xs:string and display it in the Test tab as xs:integer, so you also need to cast in the reverse direction. The primitive types casting chart in the XQuery 1.0 specification shows that you can always cast from xs:integer to xs:string, but you can only cast from xs:string to xs:integer in some cases.
To test an update map cast using Read-Edit-Submit, you first edit the source code of the primary Read function to do a comparable cast when the data is read from the data source. For example, suppose you want to cast from dateTime to date during an update. To test, you must first cast the date value to dateTime when you read it from the data source.
Before you use this test method, check the casting chart in the XQuery specification to make sure the XQuery cast you want to perform works in both directions. In the example given here, the cast is from xs:dateTime to xs:date in the update map and from xs:date to xs:dateTime in the primary Read function. Both casts must be valid in XQuery.
-
Click the Source tab.
-
Locate the primary Read function, which looks something like this:
declare function tns:read() as element(cus:CUSTOMER)*{ for $CUSTOMER in cus1:CUSTOMER() return <cus:CUSTOMER> <CUSTOMER_ID>{fn:data($CUSTOMER/CUSTOMER_ID)}</CUSTOMER_ID> <FIRST_NAME>{fn:data($CUSTOMER/FIRST_NAME)}</FIRST_NAME> <LAST_NAME>{fn:data($CUSTOMER/LAST_NAME)}</LAST_NAME> <CUSTOMER_SINCE>{fn:data($CUSTOMER/CUSTOMER_SINCE}</CUSTOMER_SINCE> <EMAIL_ADDRESS>{fn:data($CUSTOMER/EMAIL_ADDRESS)}</EMAIL_ADDRESS> <TELEPHONE_NUMBER>{fn:data($CUSTOMER/TELEPHONE_NUMBER)} </TELEPHONE_NUMBER> <SSN?>{fn:data($CUSTOMER/SSN)}</SSN> <BIRTH_DAY?>{fn:data($CUSTOMER/BIRTH_DAY)}</BIRTH_DAY> <DEFAULT_SHIP_METHOD?>{fn:data($CUSTOMER/DEFAULT_SHIP_METHOD)}</DEFAULT_SHIP_METHOD> <EMAIL_NOTIFICATION?>{fn:data($CUSTOMER/ EMAIL_NOTIFICATION)}</EMAIL_NOTIFICATION> <NEWS_LETTTER?>{fn:data($CUSTOMER/NEWS_LETTTER)}</NEWS_LETTTER> <ONLINE_STATEMENT?>{fn:data($CUSTOMER/ONLINE_STATEMENT)} </ONLINE_STATEMENT> <LOGIN_ID?>{fn:data($CUSTOMER/LOGIN_ID)}</LOGIN_ID> </cus:CUSTOMER> }; -
Locate the element you want to cast and add a XQuery cast expression to it. For example, this casts an xs:date to an
xs:dateTimein the CUSTOMER_SINCE element:<CUSTOMER_SINCE>{ xs:dateTime(fn:data($CUSTOMER/CUSTOMER_SINCE)) } </CUSTOMER_SINCE>To cast an
xs:stringto anxs:integerin TELEPHONE_NUMBER, enter this:<TELEPHONE_NUMBER>{xs:integer( fn:data($CUSTOMER/TELEPHONE_NUMBER)) }</TELEPHONE_NUMBER> -
Click the Test tab.
-
At Select Operation, choose the service's primary Read function and click Run.
In the Result pane, you might see that the values have been cast, if the new type looks different.
-
Click a customer record, then Edit.
-
Change one of the values you have just cast.
If you are working with
xs:dateandxs:dateTime, change the date portion of the value, rather than the time. The time is truncated when you store the value in the data source as anxs:date. When you read it back as anxs:dateTime, it looks like 00:00:00. -
Click Submit.
You should see this message:
Data has been submitted
-
Click Run again to verify the change.
9.10.6 How To Handle Disabled Procedures in Underlying Data Sources
This section explains how to enable an update map for a logical data service when an underlying data source has disabled procedures.
9.10.6.1 Check the Data Sources
If a Create, Update, or Delete procedure is disabled in a data source that your logical data service uses, part of the update map is disabled as well. Specifically, the update block that maps to the data source is disabled.
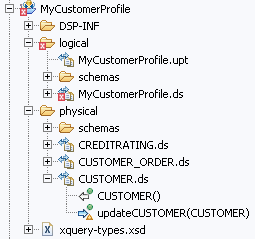
For example, you might have a physical data service that is missing a Create, Update, or Delete procedure.
Figure 9-29 Physical Data Service with No Create or Delete Procedure
Description of "Figure 9-29 Physical Data Service with No Create or Delete Procedure"
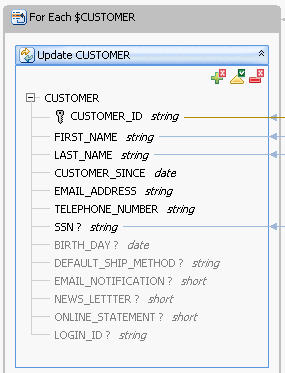
As a result, the update block that maps to this data source has its Create and Delete procedures disabled.
Figure 9-30 Update Block with Disabled Create and Delete Procedures
Description of "Figure 9-30 Update Block with Disabled Create and Delete Procedures"
9.10.6.2 Resolve the Disabled Procedures
If you do not need to use the procedures that are disabled in the underlying data source, you can disable the entire update block:
-
Click Update Map.
-
Right-click the update block, and choose Disable.
Disabling the block might also disable procedures or key elements in other blocks.
-
Resolve any mappings that become disabled.
9.10.6.3 Add or Enable Procedures in the Underlying Data Source
You can also enable procedures in or add them to the underlying data source. For example, to add a procedure to a physical data service:
-
Open the physical data service, and click the Overview tab.
-
Right-click near the top, and choose Add Operation.
-
Choose the Visibility and Kind of the procedure, then enter a name.
-
Click Add to add a parameter. Enter a Parameter Name, then choose a Type, Kind, and Occurrence. Click OK.
-
Select Primary if you want the procedure to be primary for its type.
-
Click the Update Map tab.
-
Right-click in the update map, then choose Revert Customizations.
Be sure that the procedures in the update block that maps to the underlying data source is enabled.
9.10.6.4 Change the XML Return Type
You can also change the XML schema the logical data service uses for its return type. For example, you might remove the element that attempts to update the disabled data source. You can even do this dynamically from Eclipse for WebLogic.
To change the return type from Eclipse for WebLogic:
-
Open the logical data service, and click the Overview tab.
-
Right-click the schema, then choose Edit Schema.
-
Remove the entire element, between the
<xs:element>and</xs:element>tags. -
Click the Query Map tab.
-
Right-click the return type, then choose Show Type Difference.
You should see the removed elements in blue.
-
Right-click the removed element, and choose Remove Element.
-
Click the Update Map tab.
-
Resolve any disabled elements or procedures.
9.10.7 How To Handle Non-Unique Joins
This section shows how to enable an update map when a logical data service uses a non-unique join between relational data sources.
9.10.7.1 Understand the Join
In a logical data service, you can join tables visually in the Query Map by dragging from a key element in one data source to a corresponding key element in another data source.
Figure 9-34 Joining tables in the Query Map
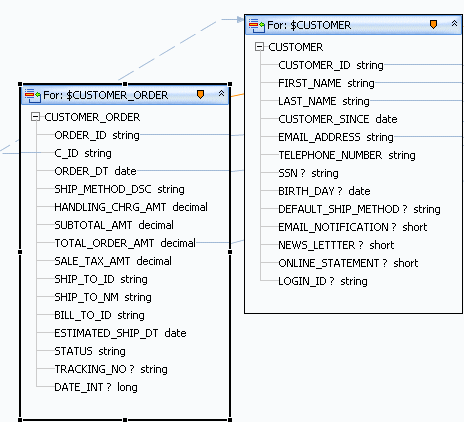
Description of "Figure 9-34 Joining tables in the Query Map"
You can also create a join by adding an XQuery WHERE statement in the expression editor or the Source tab:
where $CUSTOMER/CUSTOMER_ID eq $CREDIT_CARD/CUSTOMER_ID
If both tables are in the same database, the XML return type is nested, and you are joining on a unique key, Oracle Data Service Integrator creates a left outer join. You can see the SQL in the query plan for the service (click the Plan tab, then Show Query Plan):
SELECT ...
FROM "RTLCUSTOMER"."CUSTOMER" t1
LEFT OUTER JOIN "RTLCUSTOMER"."ADDRESS" t2
ON (t1."CUSTOMER_ID" = t2."CUSTOMER_ID")
If the XML return type is flat, Oracle Data Service Integrator creates an inner join, and the SQL looks like this:
SELECT ...
FROM "RTLAPPLOMS"."CUSTOMER_ORDER" t1
JOIN "RTLCUSTOMER"."CUSTOMER" t2
ON (t2."CUSTOMER_ID" = t1."C_ID")
A left outer join returns rows from the left (meaning, the first) table, even if they do not match any rows in the right (second) table.
An inner join requires that a value in the left table match a value in the right table in order for the left values to be included in the result. For example, you might match one customer to many orders, creating a joined table like this:
Table 9-4 Inner Join Value Requirements
| CUSTOMER_ID | FIRST_NAME | LAST_NAME | EMAIL_ADDRESS | ORDER_ID | ORDER_DT | TOTAL_ORDER_AMT |
|---|---|---|---|---|---|---|
|
CUSTOMER1 |
Jack |
Black |
jack@yahoo.com |
ORDER_1_0 |
2001-10-01 |
156.39 |
|
CUSTOMER1 |
Jack |
Black |
jack@yahoo.com |
ORDER_1_1 |
2002-02-17 |
596.65 |
|
CUSTOMER1 |
Jack |
Black |
jack@yahoo.com |
ORDER_1_2 |
2002-07-07 |
656.65 |
Here, CUSTOMER_ID is a unique key and has one row in the relational source. However, in the joined table, CUSTOMER1 has three orders and three rows. If you update information for CUSTOMER1 such as FIRST_NAME in the joined table, where each customer has multiple rows, the value to use to update the underlying data source is ambiguous.
With a non-unique join, all or part of the update map is temporarily disabled and looks like this:
When you click View Generate Log in the update map, you see a message like this one:
The primary read function has a non-unique join involving this data source.
In your function or procedure code, in the Source tab, you might see for statements directly nested within each other, without an intervening WHERE clause:
for $CUSTOMER in ns1:CUSTOMER()
for $CREDIT_CARD in ns2:CREDIT_CARD()
return
Or, you might see XML elements directly nested within each other without intervening SQL statements:
<ns7:CUSTOMER_PROFILE>
      <CUSTOMER>
        ...
      {
           <CREDIT_CARD>
              ...
           </CREDIT_CARD>
      }
      </CUSTOMER>
</ns7:CUSTOMER_PROFILE>
These are all symptoms of a non-unique join. You need to enable the update map so that you can deploy the service, test it, and make it available to client applications.
In an update map, the most common causes of a non-unique join are:
-
A logical data service with a flat (non-nested) return type.
-
An incorrect block scope in the query map.
-
An incorrect table join, or no table join, in the query map.
-
An attempt to join on a field other than a key field.
9.10.7.2 Correct the Block Scope
If your logical data service has a nested XML return type, scope the data sources to XML blocks within the return type.
-
In Query Map, click the zone icon of a data source.
-
Drag the zone icon from the data source to the nested element in the return type.
-
Mouse over the zone icon in the data source. Verify that only the nested element is highlighted in the return type.
Figure 9-36 Checking the Scope in the Return Type
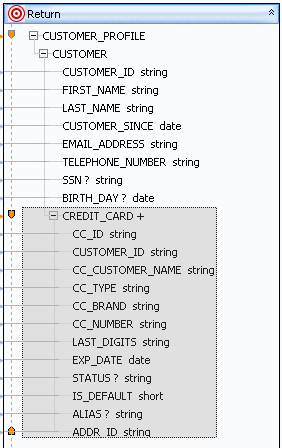
Description of "Figure 9-36 Checking the Scope in the Return Type"
9.10.7.3 Correct the Table Join
You might also get a non-unique join if the data sources are not joined correctly. You can join the tables either visually in the Query Map or by entering a WHERE clause in the expression editor or the Source tab. Be sure to join tables on a key element, marked like this:
ORDER_ID string-
To join tables visually:
-
Click the Query Map tab.
-
Drag from a key element in one data source to the same key element in another data source (for example,
$CUSTOMER/CUSTOMER_IDto$ADDRESS/CUSTOMER_ID). -
Click the Source tab and expand the read function to check the location of the WHERE clause. For example, if your XML return type is nested, the XQuery code should also be nested:
for $CUSTOMER in ns1:CUSTOMER()
return
      ...
      for $CREDIT_CARD in ns2:CREDIT_CARD()
      where $CUSTOMER/CUSTOMER_ID eq $CREDIT_CARD/CUSTOMER_ID
      return
      ...
To use the expression editor:
-
Click the Query Map tab.
-
Click the For block of the data source you are joining to.
-
In the expression editor, click Add Where Clause.
-
After the Where keyword, add the elements to be joined (for example,
$CUSTOMER/CUSTOMER_ID eq $CREDIT_CARD/CUSTOMER_ID). -
Click Save.
-
Check the
WHEREclause in the Source tab, as described above.
Remember that Oracle Data Service Integrator creates a left outer join if both tables are in the same database and the XML return type is nested. If the XML return type is flat, Oracle Data Service Integrator creates an inner join.
9.10.7.4 Enable Update Blocks and Procedures
If your service has a return type with a flat structure, you may get a non-unique join, even if the join is correct in the Query Map and the Source tab.
If this happens, or if all or part of the update map is disabled for any reason, you can enable an update block or the Create-Update-Delete procedures within the block.
To enable a disabled (yellow) update block:
-
Right-click in the block, and choose Enable.
The update block should now have a white (enabled) background. The Create, Update, or Delete procedure icons might still appear red or yellow, if they are disabled. However, you should be able to test the primary read function.
-
Click the Test tab.
-
At Select Operation, choose the primary read function, and click Run.
To enable an update map procedure:
-
If an element is marked with a Warning icon indicating that a mapping is required, select it.
-
In the expression editor, give the element a value with the correct data type.
-
Continue for all disabled elements.
-
In the Test tab, test an update procedure to ensure that the value overrides you have entered do what you want.
9.10.7.5 Test a Non-Unique Join
Let's go back to the sample joined table data (which we can see in the Test tab, by choosing the primary read function and clicking Run):
Table 9-5 Testing a Non-Unique Join
| CUSTOMER_ID | FIRST_NAME | LAST_NAME | EMAIL_ADDRESS | ORDER_ID | ORDER_DT | TOTAL_ORDER_AMT |
|---|---|---|---|---|---|---|
|
CUSTOMER1 |
Jack |
Black |
jack@yahoo.com |
ORDER_1_0 |
2001-10-01 |
156.39 |
|
CUSTOMER1 |
Jack |
Black |
jack@yahoo.com |
ORDER_1_1 |
2001-02-17 |
596.65 |
|
CUSTOMER1 |
Jack |
Black |
jack@yahoo.com |
ORDER_1_2 |
2001-07-07 |
656.65 |
In this case, the XML return type is flat, and Oracle Data Service Integrator has created an inner join between the CUSTOMER and CUSTOMER_ORDER tables in underlying relational data sources. In the joined table view, one customer has many orders. The CUSTOMER_ID can appear multiple times, but the ORDER_ID is unique.
Once the update map is enabled, you can update data in either the CUSTOMER or CUSTOMER_ORDER table in the data sources:
-
Click a row in the joined table data, then click Edit.
-
Locate the correct node in the XML tree data, and expand it.
-
Click the value you want to change, then edit it.
-
Click Submit.
If you update TOTAL_ORDER_AMT, from the CUSTOMER_ORDER table, the amount changes in one row of the joined table view.
However, if you update EMAIL_ADDRESS, the email address changes in one row of the data source table and in all rows for that customer in the joined table view.
9.10.8 How To Handle Non-Unique Values
This section describes how to handle an update map that is disabled because two values in a return type map to one value in a data source.
9.10.8.1 Example
In a query map, you might attempt to map one value in a data source to two values in an XML return type. When the update map is generated and the flow is reversed, two values map from the return type to one in the data source, which creates an update error.
Figure 9-37 An Error from a Non-Unique Value
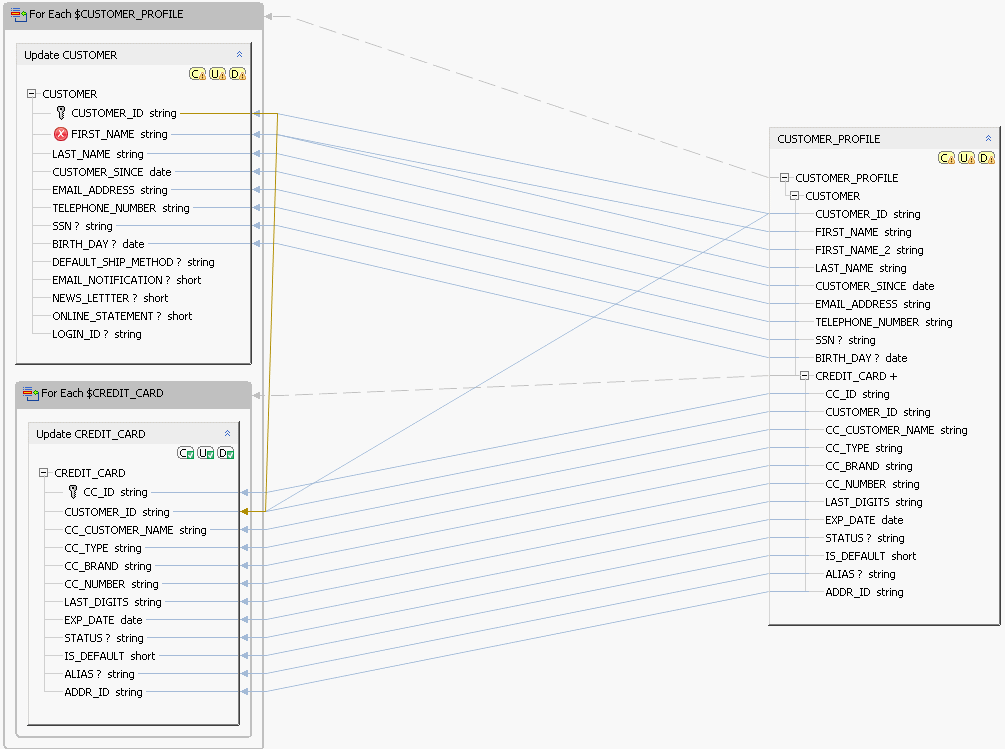
Description of "Figure 9-37 An Error from a Non-Unique Value"
The cause of the error is that two values are attempting to update one in the data source. This creates a build error in the logical data service, and you cannot deploy or test it. You cannot right-click and enable the update block either. The update doesn't work unless you write a custom update function in XQSE.
The best solution is to disable the multiple mapping in the Query Map tab:
-
Click Query Map.
-
Delete the mapping line from the data source to the second, duplicate element in the return type. This should reverse the error.
-
Save the data service and click Update Map to check the change.
-
If the error still exists, right-click and choose Revert Customizations.
9.10.9 How To Handle Unmapped Required Values
This section describes how to enable an update map when the data sources on the left have required elements that are not mapped from the return type on the right.
9.10.9.1 Overview
When required mappings are missing, the Create-Update-Delete procedures for the update block are disabled. That means you cannot create, update, or delete the underlying data sources. In Eclipse for WebLogic, the update map looks like this.
Figure 9-38 Required Mappings Are Missing
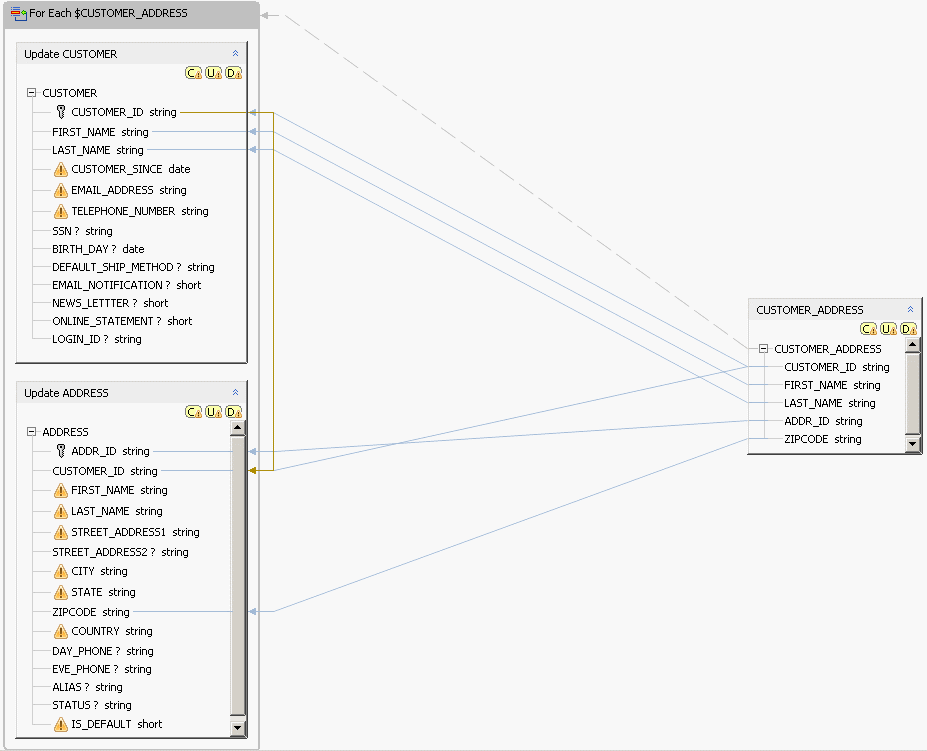
Description of "Figure 9-38 Required Mappings Are Missing"
-
A mapping that was deleted from or did not exist in the query map.
-
An XML return type that does not contain all required elements. This can be valid, especially if you do not want to expose all elements in your data sources to a client application.
If an element is required but does not have a value, it is marked with a Warning icon.
In either case, the Create, Update, or Delete procedures do not work, so you need to resolve the error. You can do either of these:
-
Draw the mapping in Query Map view.
-
Enter an override value (either an expression or a constant) in the expression editor.
9.10.9.2 Draw the Mapping
To draw the mapping in the Query Map tab:
-
Click Query Map.
-
Drag from an element in a data source on the left to the matching element in a return type on the right.
Make sure the elements have the same data types or similar data types that are cast implicitly.
9.10.9.3 Cast a Constant
If you enter a constant to override the missing mapping, it is only used with Create procedures, to insert data into the data source. Update procedures ignore the override values you enter and leave the data source unchanged. (Of course, Delete procedures delete a record from the data source, so override values are not relevant to them.)
When you enter an override value, make sure the value you enter has the data type the element in the physical data source requires. You can enter a constant like "44" or "2007-01-01" and cast it to an XML Schema data type such as xs:integer or xs:date, using either of these:
-
A built-in XQuery cast function
-
The parentheses cast operator, as in xs:date("string"), to invoke an XML Schema type constructor function
The parentheses cast operator uses any XML Schema data type outside the parentheses and a string that is appropriate for the data type you are casting to within the parentheses. For example, you can perform these casts:
xs:date("2007-01-01")
xs:dateTime("2007-01-01T16:44:44")
xs:integer("44")
But you cannot perform these:
xs:date("2007-01-01T16:44:44")
xs:dateTime("date")
xs:integer("text")
To cast a constant in the expression editor:
-
Click the Update Map tab.
-
Click an unmapped element in a data source on the left.
-
In the expression editor, enter a constant that has the data type the element requires. For example, for an element of type xs:string, you might enter:
"Bob"
If the element has another data type, enter a string within a cast expression, for example:
xs:integer("44") xs:dateTime("2007-07-17T09:00:00") -
Continue for all disabled elements.
-
In the Test tab, test an update using Run - Edit - Submit to make sure the value overrides work as you expect.
9.11 Testing Update Maps
This section describes how to test an Update procedure in Test view in Eclipse for WebLogic.
9.11.1 Configure Audit Properties
To test an Update procedure in Eclipse for WebLogic, you must submit a data graph in the Parameters box in Test view. A data graph is an XML structure with a root element of <sdo:datagraph> and a <changesummary> element. The easiest way to submit a data graph is to capture one from an audit.
First, configure audit properties in the Oracle Data Service Integrator Console.
Figure 9-39 Configuring Audit Properties in the Oracle Data Service Integrator Console
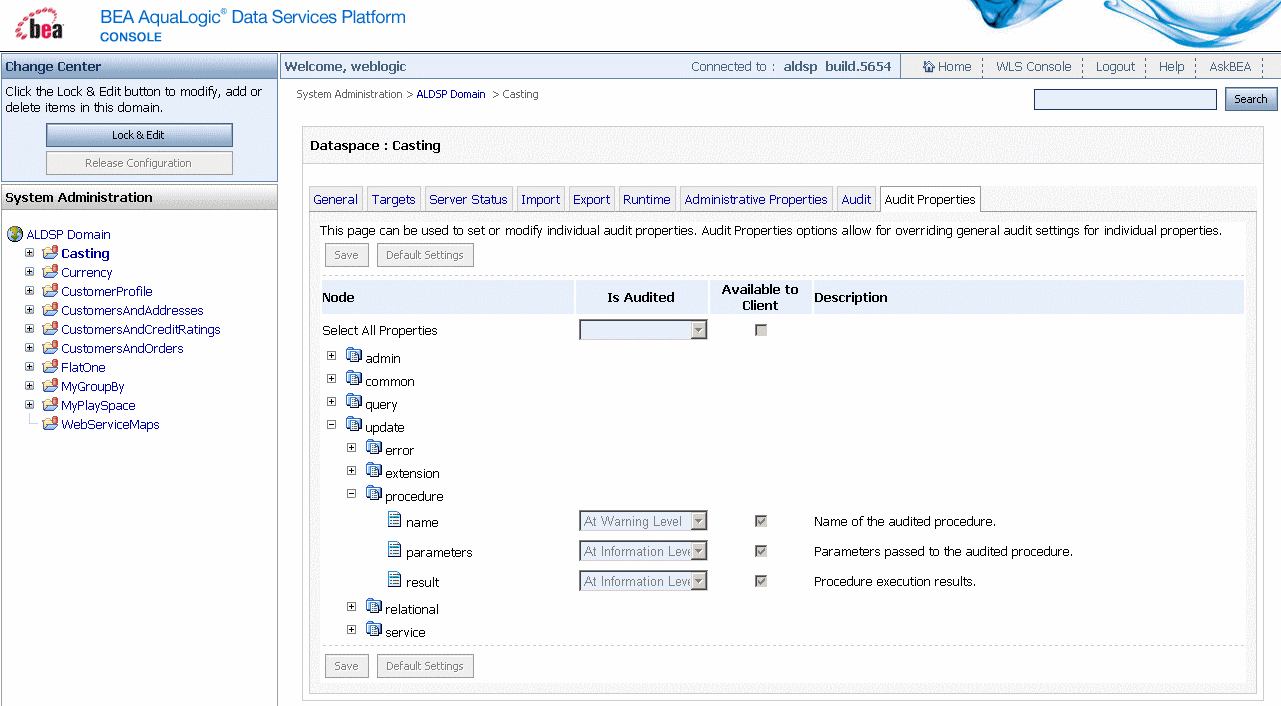
Description of "Figure 9-39 Configuring Audit Properties in the Oracle Data Service Integrator Console"
To configure audit properties so that Oracle Data Service Integrator generates data graphs:
-
Open the Oracle Data Service Integrator Console and log in.
-
Click the name of a data space project.
-
Click the Audit Properties tab.
-
Click Lock & Edit in the upper left pane.
-
Navigate to the Update > Service node (be careful not to move to Update > Error > Procedure).
-
For Name, Parameters, and Result, choose Always from the Is Audited menu.
-
Click Save.
-
Click Activate Changes in the upper left pane.
9.11.2 Capture the Data Graph
You can then capture a data graph from the audit messages displayed in the Eclipse for WebLogic Console tab, and edit the data graph to submit to the Update procedure in Test view.
Figure 9-40 Viewing a Data Graph in the Eclipse for WebLogic Console Tab

Description of "Figure 9-40 Viewing a Data Graph in the Eclipse for WebLogic Console Tab"
To capture the data graph:
-
Open a logical data service in Eclipse for WebLogic.
-
Click the Test tab.
-
Choose the service's primary Read function, then click Run.
-
Click Edit, edit a value, then click Submit.
-
(Optional) Check the Eclipse for WebLogic Console tab.
If you see the Oracle WebLogic Server console data, not the Oracle Data Service Integrator console data, click the drop-down arrow next to the console icon, and choose Oracle Data Service Integrator Console.
-
Scroll up in the Eclipse for WebLogic Console tab until you locate the data graph, right-click, and copy it.
9.11.3 Submit the Update
When you update relational sources, the SDO update mechanism uses optimistic locking to avoid change conflicts. With optimistic locking, the data source is not locked when the SDO client acquires the data. Later, when the client wants to update, the data in the source is compared to a copy of the data at a time when it was acquired. If there are discrepancies, the update is not committed. Before you submit the data graph to the Update procedure, be sure that optimistic locking is enabled in the underlying data source you are updating.
You can then submit the data graph to the Update procedure. However, you may need to edit it, as the data graph you captured from the Eclipse for WebLogic Console tab reflected the last change you made, not the change you are presently submitting to the Update procedure.
Figure 9-41 Submitting the Data Graph to the Update Procedure

Description of "Figure 9-41 Submitting the Data Graph to the Update Procedure"
The data graph you submit to the Update procedure takes the place of the return type as an argument, even if you are updating only some of the elements in the return type.
To submit the data graph to an Update procedure:
-
Enable optimistic locking on any physical relational data sources the data graph is updating.
-
Open a data service in Eclipse for WebLogic, and click the Test tab.
-
At Select Operation, choose an Update procedure.
-
Copy a data graph you have captured from the Eclipse for WebLogic Console tab to the Parameters box.
-
Edit the data graph for the change you want to make.
The data graph you captured applies to a change made in the visual interface. Update the change summary to the values the object presently has, and the remaining elements to the new values you want to set. For example, this is a change summary captured from the Eclipse for WebLogic Console tab:
<sdo:datagraph xmlns:sdo="commonj.sdo">
  <changeSummary>
      <sim:SIMPLE_CUSTOMER sdo:ref="#/sdo:datagraph/sim:SIMPLE_CUSTOMER"
xmlns:sim="ld:logical/SimpleCustomer">
      <CUSTOMER_SINCE>1999-01-01T00:00:00</CUSTOMER_SINCE>
      </sim:SIMPLE_CUSTOMER>
  </changeSummary>
  <sim:SIMPLE_CUSTOMER xmlns:sim="ld:logical/SimpleCustomer">
      <CUSTOMER_ID>CUSTOMER7</CUSTOMER_ID>
      <CUSTOMER_SINCE>2007-11-11T00:00:00</CUSTOMER_SINCE>
  </sim:SIMPLE_CUSTOMER>
</sdo:datagraph>
This version has been updated in the Parameters box (note the difference in the CUSTOMER_SINCE dates):
<sdo:datagraph xmlns:sdo="commonj.sdo"> <changeSummary> <sim:SIMPLE_CUSTOMER sdo:ref="#/sdo:datagraph/sim:SIMPLE_CUSTOMER" xmlns:sim="ld:logical/SimpleCustomer"> <CUSTOMER_SINCE>2007-11-11T00:00:00</CUSTOMER_SINCE> </sim:SIMPLE_CUSTOMER> </changeSummary> <sim:SIMPLE_CUSTOMER xmlns:sim="ld:logical/SimpleCustomer"> <CUSTOMER_ID>CUSTOMER7</CUSTOMER_ID> <CUSTOMER_SINCE>2008-04-04T00:00:00</CUSTOMER_SINCE> </sim:SIMPLE_CUSTOMER> </sdo:datagraph> -
Click Run. You should see this message in Test view:
Operation was successful.
9.12 How To Test an Update Procedure
This section describes how to test an Update procedure in Test view in Eclipse for WebLogic.
9.12.1 Configure Audit Properties
To test an Update procedure in Eclipse for WebLogic, you must submit a data graph in the Parameters box in Test view. A data graph is an XML structure with a root element of <sdo:datagraph> and a <changesummary> element. The easiest way to submit a data graph is to capture one from an audit.
First, configure audit properties in the Oracle Data Service Integrator Console.
To configure audit properties so that Oracle Data Service Integrator generates data graphs:
-
Open the Oracle Data Service Integrator Console and log in.
-
Click the name of a data space project.
-
Click the Audit Properties tab.
-
Click Lock & Edit in the upper left pane.
-
Navigate to the Update > Service node (be careful not to move to Update > Error > Procedure).
-
For Name, Parameters, and Result, choose Always from the Is Audited menu.
-
Click Save.
-
Click Activate Changes in the upper left pane.
9.12.2 Capture the Data Graph
You can then capture a data graph from the audit messages displayed in the Eclipse for WebLogic Console tab, and edit the data graph to submit to the Update procedure in Test view.
To capture a data graph:
-
Open a logical data service in Eclipse for WebLogic.
-
Click the Test tab.
-
Choose the service's primary Read function, then click Run.
-
Click Edit, edit a value, then click Submit.
-
(Optional) Check the Eclipse for WebLogic Console tab.
If you see the Oracle WebLogic Server console data, not the Oracle Data Service Integrator console data, click the drop-down arrow next to the console icon, and choose Oracle Data Service Integrator Console.
-
Scroll up in the Eclipse for WebLogic Console tab until you locate the data graph, right-click, and copy it.
9.12.3 Submit the Update
When you update relational sources, the SDO update mechanism uses optimistic locking to avoid change conflicts. With optimistic locking, the data source is not locked when the SDO client acquires the data. Later, when the client wants to update, the data in the source is compared to a copy of the data at a time when it was acquired. If there are discrepancies, the update is not committed. Before you submit the data graph to the Update procedure, be sure that optimistic locking is enabled in the underlying data source you are updating.
You can then submit the data graph to the Update procedure. However, you may need to edit it, as the data graph you captured from the Eclipse for WebLogic Console tab reflected the last change you made, not the change you are presently submitting to the Update procedure.
The data graph you submit to the Update procedure takes the place of the return type as an argument, even if you are updating only some of the elements in the return type.
To submit the data graph to an Update procedure:
-
Enable optimistic locking on any physical relational data sources the data graph is updating.
-
Open a data service in Eclipse for WebLogic, and click the Test tab.
-
At Select Operation, choose an Update procedure.
-
Copy a data graph you have captured from the Eclipse for WebLogic Console tab to the Parameters box.
-
Edit the data graph for the change you want to make.
The data graph you captured applies to a change made in the visual interface. Update the change summary to the values the object presently has, and the remaining elements to the new values you want to set. For example, this is a change summary captured from the Eclipse for WebLogic Console tab:
<sdo:datagraph xmlns:sdo="commonj.sdo">
  <changeSummary>
      <sim:SIMPLE_CUSTOMER sdo:ref="#/sdo:datagraph/sim:SIMPLE_CUSTOMER"
xmlns:sim="ld:logical/SimpleCustomer">
      <CUSTOMER_SINCE>1999-01-01T00:00:00</CUSTOMER_SINCE>
      </sim:SIMPLE_CUSTOMER>
  </changeSummary>
  <sim:SIMPLE_CUSTOMER xmlns:sim="ld:logical/SimpleCustomer">
      <CUSTOMER_ID>CUSTOMER7</CUSTOMER_ID>
      <CUSTOMER_SINCE>2007-11-11T00:00:00</CUSTOMER_SINCE>
  </sim:SIMPLE_CUSTOMER>
</sdo:datagraph>
This version has been updated in the Parameters box (note the difference in the CUSTOMER_SINCE dates):
<sdo:datagraph xmlns:sdo="commonj.sdo"> <changeSummary> <sim:SIMPLE_CUSTOMER sdo:ref="#/sdo:datagraph/sim:SIMPLE_CUSTOMER" xmlns:sim="ld:logical/SimpleCustomer"> <CUSTOMER_SINCE>2007-11-11T00:00:00</CUSTOMER_SINCE> </sim:SIMPLE_CUSTOMER> </changeSummary> <sim:SIMPLE_CUSTOMER xmlns:sim="ld:logical/SimpleCustomer"> <CUSTOMER_ID>CUSTOMER7</CUSTOMER_ID> <CUSTOMER_SINCE>2008-04-04T00:00:00</CUSTOMER_SINCE> </sim:SIMPLE_CUSTOMER> </sdo:datagraph> -
Click Run. You should see this message in Test view:
Operation was successful.
