1 Getting Started with the Oracle Enterprise Repository Console
This chapter describes how to use the Oracle Enterprise Repository console.
This chapter includes the following sections:
1.1 Getting Started
This section describes the following processes:
1.1.1 Logging in to Oracle Enterprise Repository
To log in to Oracle Enterprise Repository, perform the following steps:
-
Using a browser, open Oracle Enterprise Repository.
-
On the login screen, enter the appropriate information in the Username and Password boxes.
-
Click Login. The Login Status dialog displays a welcome message that includes the date and time of your login.
-
In the Login Stats dialog, click Close.
1.1.2 The Default View
After you have logged in, you will see the Oracle Enterprise Repository home page, as shown in Figure 1-1. This page can be customized by the system administrator to display resources, assets, and news relevant to your company.
Figure 1-1 Oracle Enterprise Repository Home Page
Description of "Figure 1-1 Oracle Enterprise Repository Home Page"
The Oracle Enterprise Repository Menu Bar
The Oracle Enterprise Repository menu bar runs across the top of the console, and enables you to navigate to the various tools and features within Oracle Enterprise Repository.
The actual links that appear in the menu bar are determined by the permissions granted to your specific role. These links point to corresponding Oracle Enterprise Repository screens, each with specific features and functionality, including:
-
Assets
Click to use, submit, edit, and manage assets, as determined by the access settings for your assigned role.
-
Projects
Visible and accessible only to users in the appropriate role.
Click to create, manage, and search for projects, and to assign users to projects.
-
My Stuff
Click to view information about assets you have produced or consumed, assets that are assigned to you for review and approval, projects to which you are assigned, your saved searches, or assets to which you have subscribed.
-
Reports
Click to view a number of standard reports based on asset usage, value, and compliance. You can create your own custom reports using the reporting tool of your choice. Custom reports can be added to the Reports page.
-
Admin
-
Visible and accessible only to users in the appropriate role.
-
Enables system configuration after installation, and is used to create users, assign roles, configure access settings, configure system and email settings, and monitor system use.
-
-
Custom Links
-
No longer displayed by default.
-
You can configure these additional custom links using the following method:
-
Open the Oracle Enterprise Repository home page.
-
Click the Admin menu, then System Settings option.
-
Enter link in the Search field. The Functional Settings pane is displayed with a list of all the custom links that you can configure.
-
Click True to enable the display of the custom links.
-
-
-
Repository Request
Click to submit requests to the designated registrar, such as a request for an asset that is unavailable in the registry.
-
Help
Provides general information about using Oracle Enterprise Repository.
The Oracle Enterprise Repository Home page can be customized to highlight your company's news and policies. This page includes embedded features that display information about new additions to the repository, the most frequently used assets, and a list of users who have achieved the highest levels of asset reuse. As an alternative, your company can substitute its own home page. In addition, you can create different Home pages that can be displayed based on the user's role. In this way, Business Analysts can see a different set of information than Architects or Development resources. Think of this page as a configurable portal that enables your organization to promote initiatives to all Oracle Enterprise Repository users.
Note:
These custom home pages require users to have some exposure to JSP or HTML development as well as the application server's deployment and properties files in order to effectively configure this feature.1.1.3 Logging Out of Oracle Enterprise Repository
The login indicator, located in the bottom right corner of any Oracle Enterprise Repository page, indicates the user name under which you are currently logged in. A logout link is also provided.
To log out:
-
Click Logout. A confirmation message appears.
-
Exit the browser, or click Log back in.
1.2 User Role Descriptions
Oracle Enterprise Repository users are defined by roles. Each role has certain permissions that enable users to fulfill specific tasks.
The default roles shipped with Oracle Enterprise Repository are described below. (The Admin page, visible only to users with the appropriate access settings, enables the names of these roles to be changed to suit organizational needs. The Admin page also provides the means to change Access Settings.)
-
User
-
Anyone with an Oracle Enterprise Repository user name and password is considered to be a user. This role can be assigned as the default role for any new users at the time the user is created. All Oracle Enterprise Repository users can:
-
View news about the company's reuse initiatives
-
Locate, evaluate, use, and download assets
-
View projects
-
Generate reports
-
Submit assets to the registrar
-
-
-
Access Administrator
-
The access administrator creates all Oracle Enterprise Repository users and assigns permissions to them. The access administrator must be familiar with the functions of the Admin page. Typically, access administrators can:
-
Create, view, and edit users and permissions
-
Generate reports
-
-
-
Advanced Submitter
-
The advanced submitter role is typically assigned to asset builders and harvesters.
-
Asset builders focus on building the asset content base. They respond to organization-wide asset needs as well as individual project needs.
-
Harvesters study deployed projects for asset reuse potential and package and submit these assets to the repository.
-
-
Typically, advanced submitters can:
-
Locate, evaluate, and use and download assets
-
View projects that are associated with assets
-
Generate reports
-
Submit assets to the registrar
-
Edit asset metadata before asset registration
-
-
-
Registrar
-
The registrar is the single point of acceptance or rejection for any asset. There may be more than one person functioning as a repository registrar, depending on the functions addressed. Typically, registrars can:
-
Locate, evaluate, and use or download assets
-
View projects that are associated with assets
-
Generate reports
-
Submit assets to the registrar
-
Edit asset metadata before asset registration
-
Accept assets for the registration process
-
Approve tabs
-
Register assets
-
Apply access settings
-
Edit artifact stores
-
-
-
Registrar Administrator
-
The registrar administrator can use the Type Manager to create and edit asset types, compliance templates, and policy types within the Oracle Enterprise Repository. Typically, registrar administrators can:
-
Locate, evaluate, and use or download assets
-
View projects that are associated with assets
-
Generate reports
-
Submit assets to the registrar
-
Edit asset metadata before asset registration
-
Accept assets for the registration process
-
Approve tabs
-
Register assets
-
Apply access settings
-
Edit artifact stores
-
-
-
Project Administrator
-
Oracle Enterprise Repository tracks asset use at the project level to maintain a history for impact analysis and reporting purposes. Typically, project administrators can:
-
Create, edit, and view projects
-
Generate reports
-
-
-
System Administrator
-
The system administrator configures Oracle Enterprise Repository for use, including, possibly, installation as well as the post-installation configurations. The system administrator typically can:
-
Enable and edit system settings
-
Generate reports
-
-
1.3 Exploring the Asset Lifecycle
This section describes how you can work with assets in Oracle Enterprise Repository. This section includes the following topics:
1.3.1 Performing a Standard Asset Submission
This procedure is performed on the Assets page.
-
Click Submit an Asset in the sidebar. The Asset Submission page is displayed, as shown in Figure 1-2.
-
Select the appropriate Type template to apply to the asset from the list in the Overview section, as shown in Figure 1-3.
-
Enter the appropriate information in the Name, Version, and Description text boxes in the Overview section. (Required)
-
Enter the appropriate information in the Comments section. (Optional)
-
As necessary, designate the project that produced the asset by using the >> and << icons to move the appropriate item from the Available Projects to the Selected Projects columns, as shown in Figure 1-4.
-
Enter the URL of the file containing the asset to be submitted in the File's Location URL text box in the File Information section in Figure 1-5.
-
Click Test to validate that the file location URL is correct.
-
(Optional) Alternatively, you can browse for the file to send to the server by clicking the Browse button that appears at the end of the File Upload field. Then, click the Add Attachment Now button.
Note:
You can disable this requirement by enteringcmee.submission.file.required.enableinto the Admin System Settings Search box and set the value to False and click Save. -
When finished, click Submit. The Asset Submission confirmation dialog is displayed, confirming that the asset has entered the asset registration queue.
-
Click Close.
Note:
For information about advanced asset submission and the use of the Asset Editor and the Type Manager, see the Oracle Fusion Middleware Administrator's Guide for Oracle Enterprise Repository.
1.3.2 Finding Assets
You can find assets in Oracle Enterprise Repository using various methods. This section includes some of the methods to find assets in Oracle Enterprise Repository:
1.3.2.1 Navigating the Asset Tree
This procedure is performed on the Oracle Enterprise Repository Assets page.
Note:
You must set the following system setting to True to enable the Browse Tree:cmee.jws.pass-all-cookies
See "System Settings Overview" in Oracle Fusion Middleware Administrator's Guide for Oracle Enterprise Repository for more information about system settings.
-
Click the Browse button in the Assets sidebar to open the Browse Tree, as shown in Figure 1-6.
-
Use the list to filter the results, as shown in Figure 1-7.
-
Click any folder in the tree to display its contents in the main pane.
The detail of the first item in the results list automatically opens in the lower frame, as shown Figure 1-8.

1.3.2.2 Performing Standard Searches
This procedure is performed in the Search box in the sidebar of the Assets page.
-
Enter a keyword in the Enter Search String text box.
-
Use the Type and Asset Function lists to refine the search.
-
Click Search. The search results are listed in the main pane, as shown in Figure 1-10.
-
If necessary, save the search.
1.3.2.2.1 Searching For a Specific Field
This procedure is also performed in the Search box on the Assets page by entering the appropriate search terms in the text box, as shown in Figure 1-11. You can search for specific fields, such as Name, Description, and WSDL. However, you cannot search for custom data fields.
You can search specific fields, such as Name and Description.
Note:
Thecmee.search.specific.field system setting must be enabled to search specific fields. See "System Settings Overview" in the Oracle Fusion Middleware Administrator's Guide for Oracle Enterprise Repository for more information about system settings.-
Use the following syntax to perform a search on myAsset in the name field only:
name:myAsset -
Use the following syntax to perform a search on myAsset in the description field only:
description:myAsset or desc:myAsset -
The prefix wsdl: limits the search to the WSDL binding, port type, or port name.
Example: wsdl:myService
Search results appear in the upper section of the main pane.
Note:
When changes are made to a custom data field, a log is created indicating that a field has changed. However, the specific details of that change are empty.1.3.2.3 Using the More Search Options Feature
Using the More Search Options feature involves a cascading series of selections and features to create a refined set of search parameters. Selections made at each step in the process determines the specific features and functions displayed in the More Search Options dialog.
1.3.2.3.1 Performing a Search Using the More Search Options Feature
This procedure is performed in the Search box in the sidebar of the Assets page.
-
Click the More Search Options link. The More Search Options dialog is displayed, as shown in Figure 1-12.
-
Enter an appropriate search string in the Enter Search String text box.
-
Click Search to run the search without further refinement. The search results are listed in the upper frame of the main pane of the Assets page, as shown in Figure 1-13.
The More Search Options dialog remains open to allow search refinement. The More Search Options dialog contains the Consumption Method list, as shown in Figure 1-14, which gets displayed only if you install the Harvester Solution Pack.
For more information about using the Consumption Method list, see "Using Consumption Method" in the Oracle Fusion Middleware Administrator's Guide for Oracle Enterprise Repository.
Figure 1-14 Assets Pane - Consumption Method
Description of "Figure 1-14 Assets Pane - Consumption Method"
1.3.2.3.2 Filtering More Search Options by Type and/or Registration Status
This procedure is performed in the More Search Options dialog.
Note:
Registration Status is available as a search filtering option only if the Oracle Enterprise Repository Assets in Progress option is activated.-
Select an appropriate type from the Type list.
-
As necessary, select the appropriate registration status from the Registration Status list.
-
Click Search to run the search without further filtering. Search results are listed in the upper frame of the main pane of the Assets page.
The More Search Options dialog remains open to allow search refinement.
1.3.2.3.3 Filtering More Search Options by Categorizations
This procedure is performed in the More Search Options dialog.
-
Select the appropriate option in the Filter by Categorizations section to locate the search string in Any or All of the selected Categorizations, as shown in Figure 1-15.
-
Select the appropriate check box to determine the categorizations to be searched.
-
Click the + next to any categorization to expand the sub-categorization tree to further refine the search, as shown in Figure 1-16.
-
Click Search to run the search without further filtering. The search results are listed in the upper frame of the main pane of the Assets page.
The More Search Options dialog remains open to allow search refinement.
1.3.2.3.4 Filtering More Search Options by Additional Criteria
This procedure is performed in the More Search Options dialog.
-
Select the Filter by Additional Criteria option. The Filter by Additional Criteria section is displayed, as shown in Figure 1-17.
Figure 1-17 More Search Options Dialog - Filter by Additional Criteria
Description of "Figure 1-17 More Search Options Dialog - Filter by Additional Criteria"
Note that the available options in the Select a Field list are determined by the selections made in Filtering More Search Options by Type and/or Registration Status, as shown in Figure 1-17.
-
Select one of the options listed in the Select a Field list, as shown in Figure 1-18. This action determines the visibility and contents of subsequent lists in the Filter by Additional Criteria section.
Figure 1-18 Filter by Additional Criteria - Asset Functions
Description of "Figure 1-18 Filter by Additional Criteria - Asset Functions"
-
Select the appropriate additional parameter from the available lists. This selection determines whether an additional list or a text box appears to the left of the Add button.
-
As necessary, enter text in the text box, or select an item from the list.
-
Click Add. The search parameter appears in the large text box.
-
Add additional parameters as necessary.
-
To remove a parameter:
-
Select (single-click) the parameter.
-
Click Remove.
-
-
When the all search parameters have been added, click Search.
Search results appear in the upper frame of the main pane of the Assets page. The More Search Options dialog remains open in the background.
Note:
-
Search criteria remain intact as long as the More Search Options dialog remains open, even when navigating to other areas in Oracle Enterprise Repository.
-
Click the More Search Options link in the sidebar on the Assets page at any time to move the open More Search Options dialog to the foreground, with no change to the criteria established in the current search session.
-
Click Search in the More Search Options dialog at any time to refresh the search results and move the search results display to the foreground.
-
-
If necessary, save the search.
1.3.2.3.5 Searching for Extended Metadata Fields
Certain fields are available for searching on all asset types. These fields are identified by a unique field name, and can be included in criteria for searching for assets of any type. This procedure is performed in the More Search Options dialog.
-
Select the Filter by Additional Criteria option.
-
Select an extended metadata field name, such as
import.informationorinternal.import.summaryfrom the Select a Field list, as shown in Figure 1-19.The optional Enter an XPath field is displayed.
Figure 1-19 Filter by Additional Criteria
Description of "Figure 1-19 Filter by Additional Criteria"
-
An Auto Complete feature assists in the entry of XPaths that correspond to the selected extended metadata field.
For example, an XPath of /
properties/sourcesearches for assets that were submitted to the Repository from Workspace Studio. And an XPath of/properties/sync-datesearches for the date that submission from Workspace Studio occurred. -
When the all search parameters have been added, click Search.
-
If necessary, save the search.
1.3.2.4 Saving Searches
This procedure is performed on the Assets page.
The Saved Searches feature must be activated before searches can be saved.
For more information, see the Oracle Fusion Middleware Administrator's Guide for Oracle Enterprise Repository.
-
Perform a standard or More Search Options search. The search results appear in the upper frame of the main pane, as shown in Figure 1-20.
-
Click Save This Search. The Save This Search dialog is displayed, as shown in Figure 1-21.
-
Enter the appropriate information in the Name and Description text boxes.
-
Click Submit. The saved search is displayed in the Saved Searches list, as shown in Figure 1-22.
The saved searches are also listed in the Saved Searches section in the My Stuff page, as shown in Figure 1-23.
Figure 1-23 Saved Searches Pane in My Stuff Page
Description of "Figure 1-23 Saved Searches Pane in My Stuff Page"
1.3.2.4.1 Executing a Saved Search
From the Assets page:
-
Select the search to be executed from the Saved Searches list.
-
Click Run Saved Search. The search results are listed in the upper frame of the main pane.
1.3.2.4.2 Managing Saved Searches
These procedures are performed in the Saved Searches section in the My Stuff page.
-
Click the text link for the search to be executed. The search results appear in the upper frame of the main pane on the Assets page.
-
Click Edit next to the saved search. The Save this Search dialog is displayed.
-
Make changes as appropriate to the text in the Name and Description fields. (Search parameters cannot be edited.)
-
Click Save.
-
Select the search option that you want to delete. (Select the Name check box to select ALL saved searches.)
-
Click Delete. The selected search is deleted.
-
Right-click the text link and copy the URL. The browser's dialog is displayed.
-
Use the copied link information to create a direct link to the saved search. The correct syntax is: http://servername/appname/index.jsp?savedsearchid=SEARCHID, where SEARCHID is the ID number of the saved search.
Factors Affecting Search Results
-
Search results may change over time as assets are added to/removed from Oracle Enterprise Repository.
-
Individual search results are subject to user permission settings.
-
Activation of the Assets-in-Progress feature may affect the results of existing Saved Searches.
1.3.2.5 Using EasyLinks
The EasyLink icon is displayed on assets and saved searches, as shown in Figure 1-24. These icons are standard HTML image links that can copied to the clipboard and pasted into documents or email messages as pointers to specific registry artifacts.
To add a link to this detail page, click and drag the EasyLink into an email or other document to create a link to the currently displayed asset.
1.3.3 Evaluating Assets
The Asset Detail can be viewed in tabular or frame format. The Asset Detail page provides a wide variety of information on the use, functionality, and history of an asset, as shown in Figure 1-25. Typically, asset metadata is provided by the asset producer and is reviewed by the registrars before presentation through Oracle Enterprise Repository. The information that is captured and displayed can be customized by your organization through the Asset Editor and Type Manager.
After performing an asset search, click any asset listed in the search results to open its Asset Detail in the bottom frame.
Search results on the Asset Search in the Web Console are now limited by default, to improve initial search performance. The number of results is configurable on the Admin | System Properties screen: "cmee.search.assets.maxresults". If a search exceeds the maximum number of results, the search results screen shows a result count like "Results (1000 of 2345)", and a link "Show All" that brings back all of the results.
There are navigation icons in the title area of the asset detail. These icons offer a variety of viewing and navigation options to aid in the evaluation of assets.
-
Click the Hide/Display Search Results icon to expand the Asset Detail, as shown in Figure 1-26. (Click again to restore the search results list in the upper frame.)
-
Click the View Details of This Item in Tabs icon to toggle the Tabbed View mode, as shown in Figure 1-27.
The Tabbed View places the information from each element in the default asset detail on its own tab. When viewing assets of the same type in Tabbed View mode, the selected tab appears for each asset selected from the search results, facilitating easy comparison of asset information. When viewing assets of different types, the selected tab appears only if the assets have the tab in common. Otherwise, the system defaults to the first tab listed in the asset detail.
-
Click the View Next/Previous Item in Search Results icon to navigate to the next or previous asset in the search results.
Within the context of Oracle Enterprise Repository, Affinity is the condition that occurs when two or more assets are deployed in the same project. The Affinity element appears in the asset detail for each asset that meets this condition, and lists other assets that have (deployed) projects in common.
Affinity provides valuable contextual information on asset use.
1.3.3.1 Using the Navigator
The Navigator provides a dynamic graphical representation of the inter-relationships among assets and projects.
For information about activating the Oracle Enterprise Repository Navigator, see the "Projects and Navigator" section in the Oracle Fusion Middleware Administrator's Guide for Oracle Enterprise Repository.
Click the Launch the Navigator icon in the detail display of any asset or project. The Navigator page is displayed, as shown in Figure 1-29.
The upper area of the Navigator presents a dynamic, graphical display of the selected asset and all related assets and projects. The selected asset appears in the center of the upper area of the Navigator display, as indicated by the asset icon within a blue circle. Any related assets and producing (the Producing Projects feature must be enabled) and/or consuming projects are displayed as nodes branching off the center. When a Project is centered, all parent and child projects are displayed, as are all assets produced or consumed by the project.
The lower frame of the Navigator presents the asset's detail, similar to the display on the Assets page.
The Select Relationship menu displays a list of relationships relevant to the in-focus asset, as shown in Figure 1-30.
Click any relationship in the Select Relationship list to view a list of assets or projects bearing the specified relationship to the focus asset. Click any item in that list to move that item to the center of the Navigator display.
Right-click any node in the display to open a menu of display options. The available options are determined by the type of node and its current display state.
-
Enable All Motion
Enables items in the display to be dragged around the window to aid viewing.
-
View Detail
-
Displays the item's detail in the bottom pane.
-
Action can also be toggled by double-clicking the node icon.
-
If you right-click the any node other the node in the centre, the following options are visible to you:
-
Center
Shifts the focus to the selected item, and displays any available related assets or projects. (Does not change the detail display in the bottom pane.) Action can also be toggled by single-clicking the node icon.
-
View Detail
-
Displays the item's detail in the bottom pane.
-
Action can also be toggled by double-clicking the node icon.
-
Double-clicking any relationship node (Depends on, Producing Projects, and so on) expands or collapses the node.
1.3.4 Using/Downloading Assets
Using/Downloading an asset enables users to obtain the payload files associated with an asset. For Service assets, the WSDL file might be included as the asset payload. Using/Downloading an asset also initiates asset usage tracking. You have to select the project on which you are using the asset, and the usage is attributed to that project. Email notifications can be initiated after a configurable period of time that ask the user to indicate whether they are still evaluating the asset, have tentatively accepted it for use, or have rejected it.
Perform the following steps to download an asset and its associated files for evaluation.
-
Use Search or other means to locate the asset to be used.
-
Click Use / Download in the asset detail, as shown in Figure 1-31.
The Use - Download page is displayed, as shown in Figure 1-32.
-
Use the Please Choose a Project list to assign the asset to a project (mandatory).
-
Make the appropriate selection in the Subscription check box.
-
As necessary, select any available related assets for inclusion in the download and/or subscription.
-
Click Next. A new dialog is displayed to display the downloadable files in the asset payload.
-
Click the Get File icon. The File Download dialog is displayed.
-
Proceed with the download as necessary.
-
Repeat Steps 7 and 8 as necessary to download other files in the asset payload.
-
When finished, click Close to close the Use - Download dialog.
-
After evaluating the asset, be sure to update the asset's status on the My Stuff page.
1.3.5 Reviewing Assets
Individuals who have used an asset can provide a written review and a rating for the asset. These reviews are useful to other users, as well as to those who manage the assets. It provides an opportunity for users to share their experiences with others in the community.
Follow these steps to rate an asset and to submit a review.
-
Use Search or other means to locate the asset to be reviewed.
-
Click Submit a Review in the Reviews section of the asset detail. The Submit a Review dialog is displayed, as shown in Figure 1-34.
-
Select the appropriate rating from the Rating list.
-
Enter the appropriate review information in the Comments text box.
-
Click Submit. A confirmation message appears.
-
Close the window, or click click here to display the review. The review is now listed on the Reviews tab in the asset detail.
1.3.6 Subscribing to Asset Information
Users subscribed to an asset are automatically notified by email if a new version has been created or registered. Manual notification can also be used to communicate any metadata changes to the asset.
-
Use Search or other means to locate an asset.
-
In the Asset window, double-click the asset to display the details of the asset.
-
In the asset details section that appears below the list of assets, click the Subscribe option that appears in the extreme right corner. The Subscribe dialog is displayed.
-
Click the Subscribe button. The asset subscription dialog with the following message is displayed:
Send me information updates about this asset.
-
This option is selected by default, click Close. The asset is added to the list of asset subscriptions on the My Stuff page.
1.3.7 Exporting Asset Details
The Asset Detail frame on the Assets page provides a wide variety of information on the use, functionality, and history of an asset. The asset details on an asset can be exported in any one of the following forms:
1.3.7.1 Exporting Detail to Excel
You can export details to an Excel file using the following methods:
-
Section 1.3.7.1.1, "Export an Excel File from Search Results"
-
Section 1.3.7.1.2, "Export an Excel file from the Detail Page"
Note:
The export will fail if a field containing a hyperlink (for instance, the Endpoint URI or WADL URL fields) contains more than 128 characters.1.3.7.1.1 Export an Excel File from Search Results
This procedure is performed on the Assets page.
-
Perform an asset search by entering keywords in the Enter Search String text box in the Search section. Use the Type and Asset Function list as necessary to refine the search.
-
Select one or more assets from the search results by placing a check in the check box that appears to the left of assets listed in the Search Results pane.
-
Select Export to Excel in the list at the top of the pane.
Note:
The Export to Excel option is displayed, only when thecmee.asset.registry.export.excelproperty is enabled. This is enabled by default, but if you are migrating, then you might face an issue if this property is not enabled. -
Click Go. Export progress is indicated in the progress window, with the following options:
-
Click Terminate Job to end the export.
-
Click View Audit Log to open a log of the export process.
-
-
When the export is complete, click View Excel Spreadsheet in the progress window. The spreadsheet opens in Microsoft Excel.
Assets are listed horizontally; Asset Detail elements are indicated by the light-green background.
When assets of multiple types are exported, each type is assigned to a different worksheet tab. Note the following:
-
The specific configuration of each asset type template determines the asset detail elements that are exported to the spreadsheet.
-
System limitations prevent the export of the Relationships, Keywords, Contacts, Reviews, and Usage elements, and of tables, images, or HTML formatting.
-
Limitations in Excel restrict export to no more than 250 assets of the same type during the same export.
-
Note:
To use Export Policies To Excel from Asset Search Results Page, perform the following steps:-
Log in to
https://support.oracle.com. -
Click the Knowledge tab. The Knowledge Home page is displayed.
-
In the top-right corner of the screen, select Article ID from the Sources list.
-
Enter 952047.1 in the space for entering the article ID number, and click the Browse icon.
The Knowledge Browser window is displayed with this article - Unable to Export Policies To Excel from Asset Search Results Page [ID 952047.1].
1.3.7.1.2 Export an Excel file from the Detail Page
This procedure is performed on the Assets page.
-
Locate the appropriate asset.
-
Click the Excel icon in the detail page. Export progress is indicated in the progress window.
-
When the export is complete, click View Excel Spreadsheet in the progress window to open the spreadsheet in Microsoft Excel.
Note:
The specific configuration of each asset type template determines the asset detail elements that are exported to the spreadsheet.
1.3.7.2 Exporting Detail to PDF
This procedure is performed on the Assets page.
Note:
-
Only assets of Types to which an XSLT printing template is associated are available for export to PDF.
-
In the event that the asset selected for export is of a Type to which no printing template is associated, you are notified through a dialog that the export cannot proceed. If multiple assets are selected for export, the dialog lists the Types that cannot be exported. You can then: (a) proceed with the export of any assets of Types with associated printing template, or (b) cancel the export.
-
Notify the registrar of any assets that cannot be exported to PDF.
1.3.7.2.1 Exporting from the Detail Page
You can export the asset details to PDF from the Asset Detail pane.
-
Use Search or other means to locate the appropriate asset.
-
Click the PDF icon in the asset detail.
-
If prompted to do so, select a printing template from the list.
If the Adobe Acrobat plug-in is installed, the browser opens the PDF. Otherwise, you are prompted to save or open the file.
1.3.7.2.2 Exporting from the Search Results List
-
Perform an asset search by entering keywords in the Enter Search String text box in the Search section.
Use the Type and Asset Function list as necessary to refine the search.
-
Select one or more assets from the search results by placing a check in the check box that appears to the left of assets listed in the Search Results pane.
-
Select Export to PDF from the list above the list of assets.
-
Click Go.
-
If the Adobe Acrobat plug-in is installed, the browser opens the PDF. Otherwise, you are prompted to save or open the file.
1.3.7.3 Exporting Asset Search Results to ZIP
When enabled, the Export to ZIP feature allows the export of asset information to a ZIP file, through a menu selection on the asset search results screen.
-
The Export to ZIP feature is available only to users with Administrator permissions.
-
Import/Export must be enabled. For more information, see the "System Settings Overview" chapter in the Oracle Fusion Middleware Administrator's Guide for Oracle Enterprise Repository.
-
The exported file contains all asset metadata in XML format, including relationships.
This procedure is performed on the Assets page.
-
Perform an asset search by entering keywords in the Enter Search String text box in the Search section. Use the Type and Asset Function list as necessary to refine the search.
-
Use the check boxes in the search results list to select the assets to be exported to ZIP.
-
Select Export to ZIP from the list.
-
Click Go. The Export to ZIP progress dialog is displayed.
-
When the export is complete, click Download to download the exported zip file. The File Download dialog is displayed.
-
Select Open, Save, or Cancel, as appropriate.
1.3.7.4 Exporting API Assets to API Catalog
After installing the optional Export to API Catalog feature patch, you can export API assets from Oracle Enterprise Repository directly to a running Oracle API Catalog instance, or you can create a zip file containing API assets that can be imported into API Catalog using the Import/Export tool.
-
The Export to API Catalog feature is available only to users with Administrator permissions.
-
Import/Export must be enabled in both OER and OAC. For more information, see the "System Settings Overview" chapter in the Oracle Fusion Middleware Administrator's Guide for Oracle Enterprise Repository and the "System Settings Overview" chapter in the Oracle Fusion Middleware Administrator's Guide for Oracle API Catalog.
See "Installing the Export to API Catalog Feature Patch" in Oracle Fusion Middleware Installation Guide for Oracle Enterprise Repository for prerequisites and information about installing the Export to API Catalog feature patch. Section 1.3.7.4.1 describes the API asset metadata that will be imported into API Catalog.
Note:
You can export only API assets into API Catalog. Selected assets of other types will not be exported.1.3.7.4.1 API Asset Metadata Exported to API Catalog
The following metadata associated with API Assets is exported to API Catalog:
Note:
Metadata not discussed in this section is not imported with the API assets into API Catalog.| Metadata Element | Supported in API Catalog |
|---|---|
| Name | Yes |
| Version | Yes |
| Keywords | Yes |
| API Status | Set to Draft for all exported assets |
| Description | Yes |
| Documentation URL | Yes. Only the first Documentation item in OER will be displayed in API Catalog.
Note: Documents stored in an artifact store will not be exported. Only documents with an associated URL will be exported. Note: the Documentation reference may not appear in API Catalog until the API is edited and saved. |
| Icon | Yes. See Section 1.3.7.4.2 for details. |
1.3.7.4.2 Exporting Icons with API Assets
You can also export an icon for an API asset by completing the following task before export:
-
In the Asset Editor, select the API asset to which you want to add an icon.
-
From the Miscellaneous tab, click Add in the File Information section.
-
Enter
iconinto the Name field. -
Enter the URL at which the icon is located into the URL field.
1.3.7.4.3 Exporting API Assets to API Catalog Using the Export to API Catalog Feature
To export API assets to API Catalog:
Note:
API Assets that have already been exported to API Catalog are not overwritten. Exporting these assets again will have no effect. If you want to export updated API assets to API Catalog, you must first remove the assets from API Catalog, as described in "Deleting an Asset" in the Oracle Fusion Middleware Administrator's Guide for Oracle API Catalog, and then export the assets again.-
Perform an asset search by entering keywords in the Enter Search String text box in the Search section. Select API from the Type list to display only API asset types in the search results.
-
Use the check boxes in the search results list to select the assets to be exported to API Catalog.
-
Select Export to API Catalog from the list, as shown in the following figure.
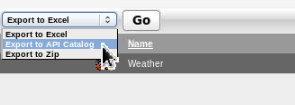
Description of the illustration imp_to_oac_select.png
-
Click Go.
-
To export the API assets to a running API Catalog Instance:
-
Select the API Catalog server to which you want to export the selected API assets.
Note:
If no API assets are selected, Export to API Catalog and Export to Zip buttons are not clickable and the following message is displayed:No assets of the type API have been selected. -
Click Export to API Catalog to export the API assets directly to a running API Catalog server, as shown in the following figure.
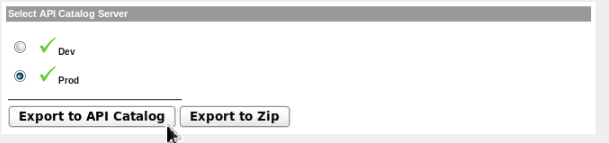
Description of the illustration export_to_oac_button.png
-
Wait until the Import to API Catalog dialog displays Complete, as shown in the following figure.
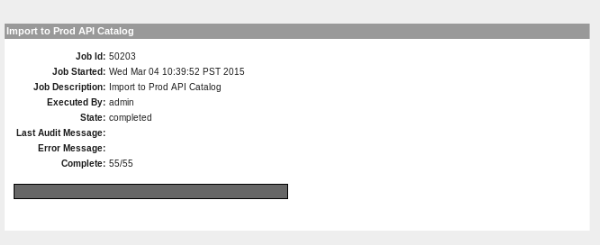
Description of the illustration import_to_oac_complete.png
-
Confirm that the selected assets now appear on the API Catalog server.
-
-
To export the API assets into a zip file you can later import into API Catalog using the Import/Export tool:
-
Click Export to Zip to export the API assets to a zip file that can later be imported into an API Catalog instance using the Import/Export utility.
Note:
If no API assets are selected, Export to API Catalog and Export to Zip buttons are not clickable and the following message is displayed:No assets of the type API have been selected. -
When the export is complete, click Download to download the exported zip file. The File Download dialog is displayed.
-
Select Open, Save, or Cancel, as appropriate.
-
As a user with administrative privileges, import the zip file into API Catalog, as described in "Importing Items into Oracle API Catalog" in Oracle Fusion Middleware Administrator's Guide for Oracle API Catalog, to import the API assets into API Catalog.
-
1.4 Projects
Projects are the primary means of gathering metrics in Oracle Enterprise Repository. Oracle Enterprise Repository tracks assets produced by projects, as well as assets consumed by projects. Oracle Enterprise Repository users are assigned to projects, and when a user submits a new asset, they are prompted for the producing project. Likewise, when a user wants to reuse an asset, they are prompted for the project on which the asset is reused. This enables Oracle Enterprise Repository to generate reports on the reuse savings per project. It also enables Oracle Enterprise Repository to report on the savings generated by asset production teams. Projects are also hierarchical, which enables organizations to, for example, establish a program that can spawn many projects.
Projects are also a channel for governance practices. Oracle Enterprise Repository Compliance Templates (usually taking the form of Architecture Blueprints or Project Profiles) can be applied to projects.
The Oracle Enterprise Repository Projects page provides access to tools for creating and managing projects, as shown in Figure 1-35.
Figure 1-35 Oracle Enterprise Repository Projects Page
Description of "Figure 1-35 Oracle Enterprise Repository Projects Page"
1.4.1 Viewing Project Details
Project information can be displayed as a series of portlets or tabs.
Project information includes a project description, and indicates the assigned department, start date, estimated hours, and project status.
Displays the Compliance Template(s) assigned to the project, as shown in Figure 1-36.
Lists any assets used in (or under consideration for use in) the project, as shown in Figure 1-37.
Click the Zoom icon next to any listed asset to display its Reported Asset Value.
-
Project members can view the Asset Usage Detail.
-
Project leaders can view/edit the Reported Asset Value.
Figure 1-38 Reported Asset Value of Asset
Description of "Figure 1-38 Reported Asset Value of Asset"
-
Reported Asset Value represents the hours saved by reusing assets on their projects. This value is derived from either the Predicted Value, Consumer Value, or a completely new value determined by the project leader. Only the project leader can set this value.
Lists any assets produced by the project, as shown in Figure 1-39.

Lists all users associated with the project, and each user's role on the project (leader/members), as shown in Figure 1-40. Project leaders have the ability to assign a Reported Asset Value value to assets consumed by the project.

When enabled, lists any related projects, and defines the relationships in parent/child terms.
1.5 My Stuff
The My Stuff page provides each user with a personalized Oracle Enterprise Repository home page.
Figure 1-41 Oracle Enterprise Repository Assets Home Page
Description of "Figure 1-41 Oracle Enterprise Repository Assets Home Page"
The My Stuff page includes several elements, as described below:
1.5.1 Assigned Assets
Lists all the assets assigned to a user for review and processing as part of the asset registration process. You can base your search for assets by selecting Assignee depending on the options below:
-
Me - Asset that I am assigned to
-
Unassigned - Asset that nobody is assigned to
-
Any Assignee - Asset that somebody is assigned to
You can also base your search for assets on the registration status of an asset. The registration status that can assigned to any asset are as follows:
-
Registered
-
Unregistered
-
All Assets
After you select the values in the Assignee and Registration Status fields, enter a search string in the Enter Search String field and click Search. The result of your search is displayed on right-side of the screen.
1.5.2 Produced Assets
Lists assets that you submitted.
Click any listed asset to:
-
View an asset overview (the asset detail).
-
Edit an asset.
-
If the asset submission was rejected, then you can also resubmit the asset by clicking the Edit button.
The left pane options available are:
-
Submit an Asset: Enables you to submit an asset.
-
Edit / Manage Assets: Enables you to edit or manage an asset that already exists. When you click the Edit / Manage Assets option, the Asset Editor window opens, enabling you to perform the following actions:
-
Configure Acceptable Value Lists
-
Configure Artifact Stores
-
Configure Categorizations
-
Configure Relationships
-
Configure Rejection Reasons
-
Configure Vendors
The Search My Assets pane enables you to list assets according to Registration status. For more information, see the Oracle Fusion Middleware Administrator's Guide for Oracle Enterprise Repository.
-
1.5.3 Consumed Assets
Lists In-Process assets with a survey status of Still Evaluating and the project to which the asset is associated.
Click any listed asset to:
-
View an asset overview.
-
Submit a review for an asset.
-
Update the status of the survey.
1.5.4 Projects
Lists Closed and Open projects to which the user is assigned. The options available on the left pane are as follows:
-
Create New: Enables the user to create a new project.
-
List All: Lists all the projects that are currently available.
Click any listed project to view the following details:
-
Overview: Describes the general overview of the project that covers Description, the Department it belongs to, other details such as Start Date, Estimated Hours, and Status.
-
Applied Compliance Templates: Describes the compliance templates currently applied to the project.
-
Consumed Assets: Describes the assets consumed or downloaded for this project.
-
Produced Assets: Describes the assets produced for this project.
-
Users: Describes the users assigned for this project. You can also reassign the users by clicking the Reassign Users / Usage option.
-
Related Projects: Describes the projects that are currently related to this project.
1.5.5 Subscriptions
Lists all the asset subscriptions for user notification of updates.
To unsubscribe to an asset, select the asset that you want to unsubscribe and then click the Unsubscribe button. A confirmation dialog opens, click OK.
Click any listed asset to view the asset details. The names and descriptions of the various tabs available are as follows:
-
Apply Policies: Enables you to apply or remove policies from this asset.
-
Notify Subscribers: Enables you to send an email notification to the subscribers of this asset.
-
View Access: Enables you to view the access settings for an asset.
-
Subscribe: Enables you to subscribe to this asset to be notified of any updates.
-
Use - Download: Enables you to use this asset and download any available files.
-
Edit: Enables you to edit the details of this asset.
1.5.6 Saved Searches
Lists all saved searches. This option enables you to search for a particular search and save it for future use.
Click any listed search to display the search results, as shown in Figure 1-42.
To delete a saved search, you must select the saved search, and then click the Delete button.
1.5.7 Configuration Options
Lists all members of the distribution list.
-
Click the Update List button to add or remove list members.
-
Click the Send Email to List button to open an email that is addressed to the list members.
Enables you to change the password to Oracle Enterprise Repository. This has the following fields:
-
Old Password
-
New Password
-
Verify Password
Enter the credentials and click the Change Password button.