11 Configuring Authorization
This chapter describes how to configure authorization. Authorization (also referred to as access control) enables you to determine what operations authenticated clients can access.
This chapter includes the following sections:
-
Configuring Fine-Grained Authorization Using Oracle Entitlements Server
-
Configuring the Oracle HTTP Server to Specify the Request Origin
11.1 Overview of Authorization
Frequently, authentication is the first step of determining whether a user should be given access to a web service. After the user is authenticated, the second step is to verify that the user is authorized to access the web service. This is accomplished using an authorization policy. You can create an authorization policy using the binding_authorization_template or the component_authorization_template assertion template.
Policies created with these templates perform role- or permission-based access control (RBAC) and check that the authenticated user has been granted one of the roles or permissions allowed to access the web service.
For summaries of the authorization policies available in the current release, see "Authorization Policies" in Chapter 3, "Determining Which Predefined Policies to Use." Chapter 17, "Predefined Policies," summarizes the security policies that enforce authorization, and indicates whether the policy is enforced at the transport layer or SOAP header.
For more information about authorization, see "Understanding Authorization" in Understanding Oracle Web Services Manager.
Note:
The authorization polices can follow any authentication policy where the subject is established.You cannot attach both a permitall and denyall policy to the same web service.
11.2 Determining Which Resources to Protect
The authorization policies provide the following properties that you can use to specify which resources you want the policy to protect. Not all of the predefined policies feature all of the properties.
Note:
The predefined policies are read-only and cannot be edited. You can, however, create new policies using the predefined policies as a base. For information about creating a new policy, see "Creating and Editing Web Service Policies". Once you have created the new policy, you can edit the policy and modify the settings or set the configuration properties as desired.-
Constraint Match -- Expression that represents the constraints against which authorization checks are performed. The constraints expression is specified using the following two
messageContextproperties:-
messageContext.authenticationMethod—Determines the authentication method used to authenticate the user. The only valid value isSAML_SV. -
messageContext.requestOrigin—Determines whether the request originated from an internal or external network. This property is valid only when using Oracle and the Oracle HTTP server administrator has added a customVIRTUAL_HOST_TYPEheader to the request. For details about adding this header to a request, see "Configuring the Oracle HTTP Server to Specify the Request Origin".
Note the following:
-
The Constraint Match properties and their values are case sensitive.
-
The constraint expression uses the following standard supported operators:
==,!=,&&,||and!.
In the following example, the role-based authorization assertion will be executed only if the current message does not contain a SAML_SV token OR the request origin is not internal.
${!(messageContext.authenticationMethod =='SAML_SV'|| messageContext.requestOrigin == 'internal')}Note:
This property is valid for authorization policies based on thebinding_authorization_templateonly. For policies based on other authorization assertion templates, this property is reserved for future use. -
-
Action Match -- The web service operation for which permission-based checks are performed. This value can be a comma-separated list of values. This field accepts wildcards. * means all web service operations.
The valid values for Action Match are determined by the web service methods. For example, if the web service method is
validate(amountAvailable), enter the Action Pattern asvalidate. -
Resource Match -- The name of the resource for which permission-based checks are performed. This field accepts wildcards, and the default is * for all resources in the web services protected by the policy.
By convention you enter the Resource Pattern as (namespace of web service + web service name).
For example, if the namespace of the web service is
http://project11and the web service name isCreditValidation, you would enter the Resource Name ashttp://project11/CreditValidation.If you specify a specific Resource Match, the policy is enforced only for those web services that match the criteria. That is, entering a specific value in the Resource Match field limits the scope of the authorization policy. The default of * protects all resources (namespace of web service + web service name) of the bulk-attached web services.
-
Permission Class -- By default, it is
oracle.wsm.security.WSFunctionPermission. The class must be in the classpath. -
Roles -- Possible values are Permit All, Deny All, and Selected Roles. If you choose Selected Roles, you must then select from the enterprise (Global) roles defined in WebLogic Server, which may include the following:
-
AdminChannelUser
-
Anonymous
-
AppTester
-
CrossDomainConnector
-
Deployer
-
Monitor
-
Operator
-
OracleSystemRole
-
11.3 Determining Authorization Permissions
Conceptually, determining whether an authenticated subject is authorized to access a particular resource protected by a web service policy has two parts that work in tandem.
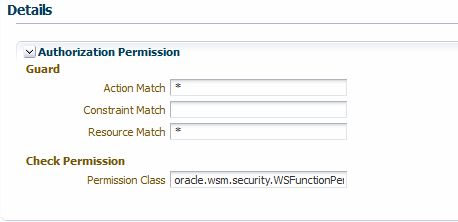
-
The Resource Match, and Action Match parameters on the Assertions details page for the authorization policy determine what resources are being protected by the policy, as shown in Figure 11-1.
The
oracle/binding_permission_authorization_policyalso contains resource and action configuration properties that you can use to set a different action and resource. If you set these properties, or override them, the new values are used in the attached web service instead of the action and resource you configure using the Resource Match and Action Match parameters. For details about using configuration overrides, see Chapter 5, "Overriding Policy Configuration Properties."You have the option to change the Permission Class setting for the policy, which identifies the permission class as per JAAS standards. The permission class must be available in the application or server classpath.
The custom permission class must extend the abstract
Permissionclass and implement theSerializableinterface. See the Javadoc athttp://docs.oracle.com/javase/7/docs/api/java/security/Permission.html. The default isoracle.wsm.security.WSFunctionPermission.Figure 11-1 The Permission Settings for a Policy
Description of "Figure 11-1 The Permission Settings for a Policy"
-
The OPSS Application Policies page specifies whether the authenticated subject has invoke access to the Resource Name listed there, as shown in Figure 11-2.
Figure 11-2 Adding a Permission on the OPSS Create Application Grant Page
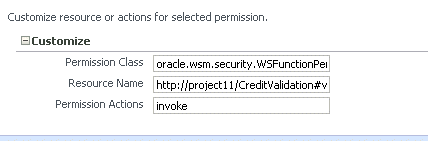
Description of "Figure 11-2 Adding a Permission on the OPSS Create Application Grant Page"
OPSS uses the authorization policy's Assertions details page for the web service to determine which resources require an authorization check. Then, access to the resource is allowed if the authenticated subject has been granted WSFunctionPermission (or other permission) for that resource via OPSS.
Note:
If you changed thePermission Check Class configuration property for the policy to a custom class, use the custom class here as well.Consider further the example shown in Figure 11-1 and Figure 11-2.
On the Assertions details page for the authorization policy, assume that you specify the following to protect the validate method of the http://project11/CreditValidation web service:
Action Match:        validate
Resource Match:       http://project11/CreditValidation
Permission Class  oracle.wsm.security.WSFunctionPermission
Then, on the OPSS Application Policies page, you would use http://project11/CreditValidation#validate for the Resource Name to specify that the authenticated subject has permission to invoke this resource:
Permission Class: oracle.wsm.security.WSFunctionPermission
Resource Name:    http://project11/CreditValidation#validate
Permissions Action:  invoke
You can grant the WSFunctionPermission permission to a user, a group, or an application role. If you grant WSFunctionPermission to a user or group it will apply to all applications that are deployed in the domain.
11.4 Determining the OPSS Resource Name
Note:
The OPSS resource name can include the operation name.In previous releases of Fusion Middleware Control, the Resource Name on the OPSS Application Policies page was determined by name-space-of-webservice/ServiceName. For example, if the name space of a web service was http://project1/ and the service name was CreditValidation, the Resource Name would have been http://project1/CreditValidation. You could also use an asterisk (*) wildcard for providing permission to all the actions or all resources.
In this release, the resource target of the WSFunctionPermission is enhanced to include the actual web service operation name. The syntax for the Resource Name is now name-space-of-webservice/servicename#[operation name].
(For a component it is compositename/componentname#[operation name].)]
You must now include at least the name-space-of-webservice/service name. That is, you can no longer use an asterisk (*) wildcard for providing permission to all the actions or all resources.
Instead, to specify all operations for a web service, simply leave the operation name blank. For example, name-space-of-webservice/servicename#
Permission Action is always invoke.
11.5 Configuring Fine-Grained Authorization Using Oracle Entitlements Server
As described in "Understanding Oracle Entitlements Server Integration" in Understanding Oracle Web Services Manager, Oracle Entitlements Server (OES) is a fine-grained authorization service you can use to secure applications and services end-to-end across the enterprise. OES is integrated with OWSM, and you can use OES together with OWSM for fine-grained authorization.
"Understanding Oracle Entitlements Server Integration" describes the conceptual information you will need to configure OES integration, including a description of how resources are handled. That section also describes the division of labor: you configure the OES policies and Obligations from the OES console, and the OWSM OES policies from Fusion Middleware Control, WLST, or a tool such as JDeveloper. If you have not already done so, read that section first.
This section describes how to configure OES integration, and includes the following topics:
11.5.1 Prerequisites for Configuring OES Integration
In addition to your OWSM installation, you must also have an existing OES console configured, version 11.1.2.2.0 or later. OES must be installed on the same machine and to the same Oracle Middleware home as OWSM.
OES is a part of the Oracle Identity and Access Management Suite, and is covered in the following documentation. This section assumes that you are already familiar with this content and with configuring and administering OES.
-
See "Installing and Configuring Oracle Entitlements Server" in Installation Guide for Oracle Identity and Access Management for installation information.
-
See Administrator's Guide for Oracle Entitlements Server for configuration and management information.
11.5.2 Determine Attributes for Obligations
As described in "How Attributes Are Processed", OES allows you to create an Obligation in the OES console and provide multiple attribute name/value pairs. The attributes can be obtained from an XPath, an HTTP header, a message context, and constants (name/value), plus the set of static attributes (serviceURL, and so forth) that are always passed in authorization requests.
The easiest way to determine the information for the attributes is to deploy the application. Then, examine the SOAP request or the WSDL and determine what attributes you want. There are two approaches:
-
Deploy the application and use JDeveloper (or another mechanism) to look at the SOAP messages and determine what you need.
-
Deploy the application and look at the WSDL of the deployed application to determine what you need.
You can display the WSDL document for the web service endpoint as described in "Viewing the Web Service WSDL Document" in Administering Web Services with Oracle Fusion Middleware.
11.5.3 Configure the OES Policies For Fine-Grained Authorization
As described in "OES Integration: The Big Picture" in Understanding Oracle Web Services Manager, there are two ways to contact OES for the authorization decision: a two-step (fine-grained) method and a single-step (coarse-grained) method. This section describes how to configure the OES policies for fine-grained authorization.
You specify which method to use via the use.single.step attribute in the oracle/binding_oes_authorization_policy and oracle/component_oes_authorization_policy policies when you later attach the OWSM policy, as described in "Attach the OWSM OES Policy". However, you need to decide on the method you plan to use so that you can configure the OES authorization policy accordingly.
The two-step method is the more common scenario, and you therefore typically configure two OES authorization policies: one for defining Obligations and another for the actual authorization decision.
You use the OES console to create the basic artifacts (application, resource type, and so forth) and to add actions to the resource type and define the resource.
This section describes the following topics:
11.5.3.1 Configure the OES Resource
As described in "Resource Mapping and Naming", you must map the OES resource name to the OWSM resource name. When making an authorization call from OWSM, the resource name is passed to OES, and this name must exactly match the one defined in the OES policy.
For the purpose of example, assume that you have a deployed SOAP web service with the following characteristics:
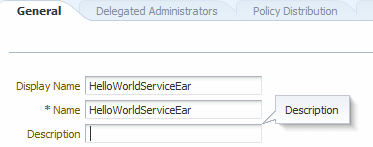
-
The deployed application is named
HelloWorldServiceEar. -
The resource type is
WS_SERVICE. -
The web service name is
HelloWorldService. -
The web service port name is
SayHelloPort. -
The operations in the web service are
sayHelloandsayHelloBytes.
Perform the following steps to configure the OES resource:
-
Create the OES application name. The application name must match that of the deployed application. For example,
HelloWorldServiceEar. -
Create the OES resource type. The resource type must be
WS_SERVICE. -
Add actions for the
WS_SERVICEresource type. The actions must berequest.lookupandauthorize. -
Set the Supports Resource Hierarchy control.
By using the hierarchy, you can define the policy at the resource level or at the sub-resource (operation) level.
The OWSM resource name includes the service name/port name/operation name. However, you do not have to define the resource to this granular level in the OES console. For example, you can define a policy with the service name that applies to all resources that start with that service. Or, you can define a policy for a resource name with the service name and port name and this policy would apply to all operations of that service.
Setting the Supports Resource Hierarchy control is described in "Creating a Resource Type" in Administrator's Guide for Oracle Entitlements Server.
-
Create the resource. The resource name can include the service name/port name/operation name.
11.5.3.2 Create Authorization Policy to Return Obligations
-
Create a new OES authorization policy for the application you created in "Configure the OES Resource".
Add the principals (roles and users) who should have access to the resource.
Add the targets (with actions) to be protected by this policy.
Figure 11-4 shows an example screen.
Figure 11-4 Adding Authorization Policy for Obligations
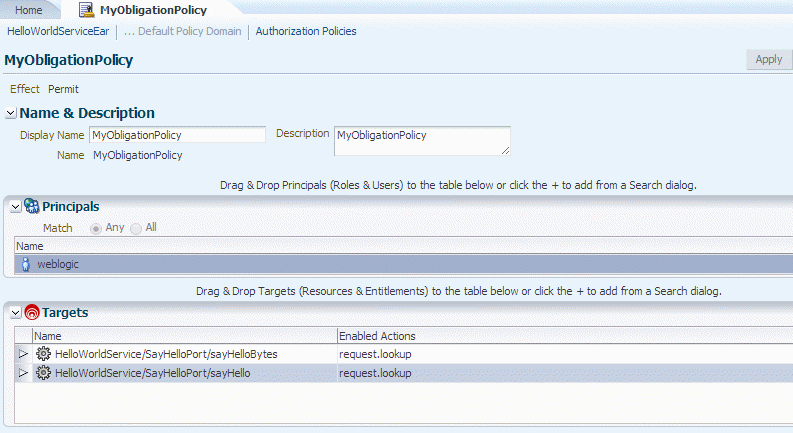
Description of "Figure 11-4 Adding Authorization Policy for Obligations"
-
From the Obligations tab, add Obligations.
As described in "How Attributes Are Processed", OES allows you to create an Obligation in the OES console and provide multiple attribute name/value pairs.
The attributes can be obtained from an XPath, an HTTP header, a message context, and constants (name/value), plus the set of static attributes (serviceURL, and so forth) that are always passed in authorization requests. These attributes must follow a specific naming convention, as described in "Attribute Types Supported for OES Policies" in Understanding Oracle Web Services Manager.
For the purpose of example, consider how Figure 11-5 is derived from and reflects the sample obligations shown in Table 11-1.
Remember that you must use these specific Obligation names, and case is insensitive. You can choose your own attribute names. The attribute values must match those of the request.
Note:
The OES console requires that Obligation names be unique across an application. If you want to define more than one OES policy for the same application to return Obligations of the same type, you cannot use the same name. For example, if you add thexpathObligation inpolicy1, you cannot also add it topolicy2of the same application.To make the Obligation name unique, use this naming convention:
<
attribute_type>:<obligation_name>where
attribute_typeis one of the supported types such as XPath, HTTPHeader or MessageContext.obligation_namecan be any name to make it unique.If an application has only a single OES policy to return Obligations and there is no chance of conflict, you can use the attribute type alone as the Obligation name.
Table 11-1 Sample Obligations for the Policy
Obligation Name Attribute Name Attribute Value xpath
input
//env:Envelope//env:Body/ns3:sayHello/arg0/text()
namespace
saml=urn:oasis:names:tc:SAML:1.0:assertion
env=http://schemas.xmlsoap.org/soap/envelope/
ns3=http://helloworldservice.jaxws.wsmtest/
Separate each attribute name with a comma (,). For example,
saml=... ,env=.. ,ns3=.saml_issuer
//saml:Assertion/@Issuer
Httpheaderproxy_auth
Proxy-Authorization
authHeader
Authorization
messageContextauthMethod
oracle.wsm.internal.authentication.method
endpoint
oracle.j2ee.ws.runtime.endpoint-url
MyStaticOborg
oracle
country
US
Figure 11-5 Sample Obligations For Authorization Policy
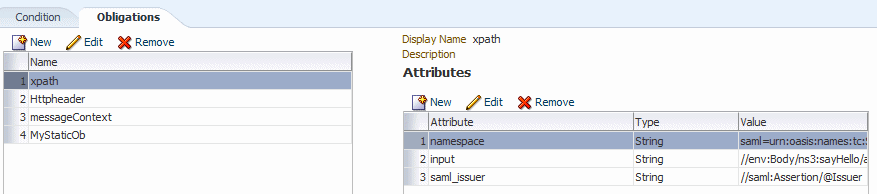
Description of "Figure 11-5 Sample Obligations For Authorization Policy"
11.5.3.3 Create the Actual OES Authorization Policy
Create the OES authorization policy to perform the actual authorization.
This policy uses the Obligations provided by OWSM to make the real authorization decision.
In addition, OWSM passes to OES the authenticated subject, the target resource and requested action, as well as a set of implicit attributes (as described in "Attribute Types Supported for OES Policies") that are always passed in authorization requests. Your authorization policy can use these values in the authorization decision. You can also use OES predefined attributes such as time, date, and so forth.
Perform the following steps to create the OES authorization policy for the actual authorization:
-
Add the attributes that you plan to use in your authorization condition. They must match the Obligations you created in "Create Authorization Policy to Return Obligations".
For example, to match the Obligations you created in "Create Authorization Policy to Return Obligations" you would need to add the following attributes:
-
saml_issuer
-
input
-
authHeader
-
endpoint
-
country
Notes:
If you plan to use any of the implicit attributes (as described in "Attribute Types Supported for OES Policies"), you must add them as well.All Attributes and Functions (both custom and predefined) are created, collected and further managed under the Extensions node of the Application. For more information, see "Managing Attributes and Functions as Extensions" in Administrator's Guide for Oracle Entitlements Server.
In the OES navigation pane, expand the application for which you are creating the authorization policy. Expand Extensions, then select Attributes and click the icon to create the new attributes.
You can choose Save and create another from the drop-down control to create multiple attributes from the single page.
-
-
Add all of the new attributes to your resource type.
-
Create a new OES authorization policy for the application you created in "Configure the OES Resource".
Add the principals (roles and users) who should have access to the resource.
Add the targets (with actions) to be protected by this policy.
Figure 11-7 shows an example screen. The policy is set up to evaluate the authorization of user
weblogicupon access to thesayHelloandsayHelloBytesresources ofHelloWorldService.Figure 11-7 Adding Actual Authorization Policy
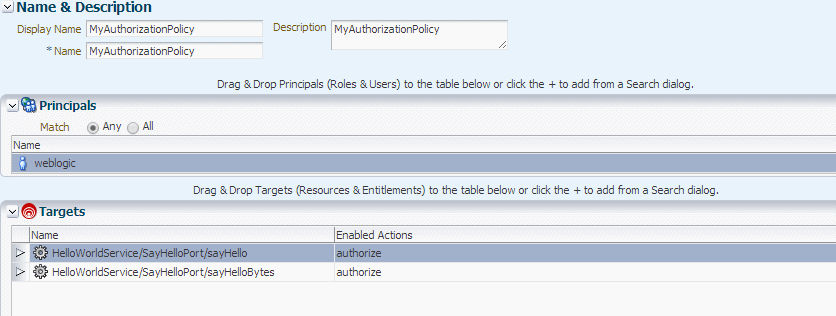
Description of "Figure 11-7 Adding Actual Authorization Policy"
-
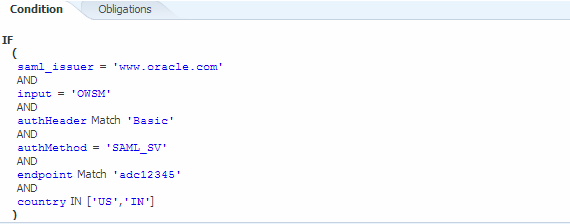
From the Conditions tab for this policy, click Edit to create a new condition.
Complete the condition based on the attributes you added in Step 1, as shown in Figure 11-8.
In this example, the policy returns PERMIT if:
-
The user is
weblogic. -
The resource is
HelloWorldServiceEar/ HelloWorldService/SayHelloPort. -
The SAML issuer is
www.oracle.com. -
The request SOAP message has "OWSM" at
//env:Body/ns3:sayHello/arg0. -
Other conditions are met.
-
-
Attach the OWSM OES policy, as described in "Attach the OWSM OES Policy".

11.5.4 Configure the OES Policies For Coarse-Grained Authorization
As described in "OES Integration: The Big Picture" in Understanding Oracle Web Services Manager, there are two ways to contact OES for the authorization decision: a two-step (fine-grained) method and a single-step (coarse-grained) method. This section describes how to configure the OES policies for coarse-grained authorization.
You specify which method to use via the use.single.step attribute in the oracle/binding_oes_authorization_policy and oracle/component_oes_authorization_policy policies when you later attach the OWSM policy, as described in "Attach the OWSM OES Policy". However, you need to decide on the method you plan to use so that you can configure the OES authorization policy accordingly.
This section describes the following topics for coarse-grained authorization:
11.5.4.1 Configure the OES Resource
As described in "Resource Mapping and Naming", you must map the OES resource name to the OWSM resource name. When making an authorization call from OWSM, the resource name is passed to OES, and this name must exactly match the one defined in the OES policy.
For the purpose of this example, assume that you have a deployed SOAP web service with the following characteristics:
-
The deployed application is named
HelloWorldServiceEar. -
The resource type is always
WS_SERVICE. -
The web service name is
HelloWorldService. -
The web service port name is
SayHelloPort. -
The operations in the web service are
sayHelloandsayHelloBytes.
Perform the following steps to configure the OES resource:
-
Create the OES application name. The application name must match that of the deployed application. For example,
HelloWorldServiceEar. -
Create the OES resource type. The resource type must be
WS_SERVICE. -
Add the action for the resource type. The action must be
authorize. -
Set the Supports Resource Hierarchy control.
By using the hierarchy, you can define the policy at the resource level or at the sub-resource (operation) level.
The OWSM resource name includes the service name/port name/operation name. However, you do not have to define the resource to this granular level in the OES console. For example, you can define a policy with the service name that applies to all resources that start with that service. Or, you can define a policy for a resource name with the service name and port name and this policy would apply to all operations of that service.
Setting the Supports Resource Hierarchy control is described in "Creating a Resource Type" in Administrator's Guide for Oracle Entitlements Server.
-
Create the resource. The resource name must be of the form
service name/port name/operation name, depending on how you want to utilize the resource hierarchy.
11.5.4.2 Create the Actual OES Authorization Policy
Create the OES authorization policy to perform the actual authorization.
OWSM passes to OES the authenticated subject, the target resource and requested action, as well as a set of implicit attributes (as described in "Attribute Types Supported for OES Policies") that are always passed in authorization requests.
Your authorization policy can use these values in the authorization decision. You can also use OES predefined attributes such as time, date, and so forth.
Perform the following steps to create the OES authorization policy for the actual authorization:
-
If you plan to use any of the implicit attributes (as described in "Attribute Types Supported for OES Policies"), you must add them.
Note:
All Attributes and Functions (both custom and predefined) are created, collected and further managed under the Extensions node of the Application. For more information, see "Managing Attributes and Functions as Extensions" in Administrator's Guide for Oracle Entitlements Server.In the OES navigation pane, expand the application for which you are creating the authorization policy. Expand Extensions, then select Attributes and click the icon to create the new attributes.
You can choose Save and create another from the drop-down control to create multiple attributes from the single page.
-
Add all of the implicit attributes you plan to use to your resource type, as shown in Figure 11-10.
Figure 11-10 Add Implicit Attributes Needed for Conditions
Description of "Figure 11-10 Add Implicit Attributes Needed for Conditions"
-
Create a new OES authorization policy for the application you created in "Configure the OES Resource".
Add the principals (roles and users) who should have access to the resource.
Add the targets (with actions) to be protected by this policy.
Figure 11-11 shows an example screen.
Figure 11-11 Adding Actual Authorization Policy
Description of "Figure 11-11 Adding Actual Authorization Policy"
-
Attach the OWSM OES policy, as described in "Attach the OWSM OES Policy".
11.5.5 Configure the OES Policy For Masking
This section describes the following topics:
11.5.5.1 Configure the OES Resource
As described in "Resource Mapping and Naming", you must map the OES resource name to the OWSM resource name. When making a masking call from OWSM, the resource name is passed to OES, and this name must exactly match the one defined in the OES policy.
For the purpose of example, assume that you have a deployed SOAP web service with the following characteristics:
-
The deployed application is named
HelloWorldServiceEar. -
The resource type is always
WS_SERVICE. -
The web service name is
HelloWorldService. -
The web service port name is
SayHelloPort. -
The operations in the web service are
sayHelloandsayHelloBytes.
Perform the following steps to configure the OES resource:
-
If you have not already done so, create the OES application name. The application name must match that of the deployed application. For example,
HelloWorldServiceEar. -
If you have not already done so, create the OES resource type. The resource type must be
WS_SERVICE. -
If you have not already done so, add actions for the resource type. The actions must be
response.lookupandmask. -
If you have not already done so, set the Supports Resource Hierarchy control.
Setting the Supports Resource Hierarchy control is described in "Creating a Resource Type" in Administrator's Guide for Oracle Entitlements Server.
-
If you have not already done so, create the resource. The resource name must be of the form
service name/port name/operation name, depending on how you want to utilize the resource hierarchy.
11.5.5.2 Create Masking Policy to Return Obligations
-
Create a new OES policy for the application you created in "Configure the OES Resource".
Add the principals (roles and users) who should have access to the resource.
Add the targets (with action
response.lookup) to be protected by this policy. -
From the Obligations tab, add Obligations.
As described in "How Attributes Are Processed", OES allows you to create an Obligation in the OES console and provide multiple attribute name/value pairs.
For this masking use case, create a set of XPath queries to get the attributes you may want to mask.
As a result of these Obligations, OWSM gets all of defined attributes and Xpath queries and runs them on the current response SOAP message. (If nothing is returned in this call then execution stops and no masking is performed.) OWSM uses the result of this query to call the actual masking policy described in "Create the Actual OES Masking Policy".
You use the attribute names from this Obligation when you create the Obligation for the actual masking policy.
11.5.5.3 Create the Actual OES Masking Policy
Create the OES authorization policy to perform the actual masking.
This policy uses the Obligations provided by OWSM to make the real masking decision.
Perform the following steps to create the OES policy for the actual masking:
-
Add the attributes that you plan to use in your condition.
If you plan to use any of the implicit attributes (as described in "Attribute Types Supported for OES Policies"), you must add them as well.
Note:
All Attributes and Functions (both custom and predefined) are created, collected and further managed under the Extensions node of the Application. For more information, see "Managing Attributes and Functions as Extensions" in Administrator's Guide for Oracle Entitlements Server.In the OES navigation pane, expand the application for which you are creating the authorization policy. Expand Extensions, then select Attributes and click the icon to create the new attributes.
You can choose Save and create another from the drop-down control to create multiple attributes from the single page.
-
Add all of the new attributes to your resource type.
-
Create a new OES authorization policy for the application you created in "Configure the OES Resource".
Add the principals (roles and users) who should have access to the resource.
Add the targets (with action
mask) to be protected by this policy. -
From the Obligations tab, add Obligations.
These Obligations specify whether the attribute should be passed as-is or masked. OWSM honors the Obligation returned by OES and masks attributes marked sensitive by OES.
Return the value with which you want to replace an attribute.
For example, if in the obligation policy you added an XPath as
name=//env:Envelope//env:Body/ns3:sayHelloResponse/return/text(), in the masking policy you might add the Obligation in an XPath asname=xxxxxorname=****, wherenamematches in both policies. -
Attach the OWSM OES policy, as described in "Attach the OWSM OES Policy".
11.5.6 Attach the OWSM OES Policy
Make a copy of the preconfigured oracle/binding_oes_authorization_policy, oracle/component_oes_authorization_policy or oracle/binding_oes_masking_policy and then attach the copy to your web service. Perform the following steps:
-
In the navigator pane, expand WebLogic Domain to show the domain for which you need to configure OES integration. Select the domain.
-
In the content pane, click WebLogic Domain, then Web Services, and then Policies.
-
Select the
oracle/binding_oes_authorization_policy,oracle/component_oes_authorization_policyororacle/binding_oes_masking_policypolicy and make a copy. -
Edit the attributes of the copy. (You can instead choose to override the attributes, as described in a subsequent step.)
The
use.single.stepattribute controls the way in which you contact OES for the authorization decision: a two-step (fine-grained) method and a single-step (coarse-grained) method. The default is false, which uses the two-step (fine-grained) method. In the one-step method you do not use Obligations but you can use the implicit attributes in the conditions.You can set this attribute in the
oracle/binding_oes_authorization_policyandoracle/component_oes_authorization_policypolicies. Theoracle/binding_oes_masking_policyis always two-step.The OES Based Authorization setting uses the guard element (see orawsp:guard) to define resource, action, and constraint match values. These values allow the assertion execution only if the result of the guard is true. That is, if the accessed resource name and action match, only then is the assertion allowed to execute. By default, resource name and action use the wildcard asterisk "*" and everything is allowed.
If you followed the resource naming convention when creating the OES policy, you do not need to explicitly set the resource name.
-
Attach the policy at design time or post-deployment, as described in Chapter 4, "Attaching Policies".
Attach the OWSM
oracle/binding_oes_authorization_policyororacle/component_oes_authorization_policypolicy, alone or combination with theoracle/binding_oes_masking_policypolicy. -
Optionally, use Fusion Middleware Control, WLST, or JDeveloper (or another mechanism) to override attributes. If you followed the resource naming convention when creating the OES policy, overriding resource properties is not required.
See "Configuration Properties and Overrides" for a description of the attributes you can override.
See Chapter 5, "Overriding Policy Configuration Properties" for information on overriding configuration policies.
-
Also attach any of the authentication policies at design time or post-deployment, as described in Chapter 4, "Attaching Policies".
11.5.6.1 Configuration Properties and Overrides
You can set the configuration properties shown in Table 11-2 for the policies when you attach the policy, or override them.
If you followed the resource naming convention when creating the OES policy, the resource names are derived and overriding the properties is not required.
If you override some but not all values, the remainder are derived.
Table 11-2 OWSM OES Configuration Properties
| Name | Description |
|---|---|
|
|
The deployed application name defined in OES. (For SOA, the composite name is used as the application name.) Value can be static or dynamic that uses ${} notation. |
|
|
Resource type defined in OES. Value can be static or dynamic that uses ${} notation.
|
|
|
Resource name defined in OES. Value can be static or dynamic that uses ${} notation.
|
|
|
Action that will be used during attributes lookup. Can be Value can be static or dynamic that uses ${} notation. |
|
|
Action that will be used during real authorization or masking. Default values are Value can be static or dynamic that uses ${} notation. |
|
|
Set value to true to skip lookup phase. Does not apply to masking policy. |
|
|
Optional property that specifies the priority of the policy attachment. |
These properties allow both static and dynamic values. Dynamic values use one or more ${} operators and allow separator characters such as a period or slash. For example, if you specify the value of resource.name as ${PORT}/${OPERATION}, then it could resolve to myPort/operation. As another example, ${MODULE}.${SERVICE} could resolve to myModule.myService.
The possible dynamic values are as follows:
-
APPLICATION
-
MODULE
-
SERVICE (For SOAP and SOA reference, it is WSDL web service name.
-
PORT (WSDL service port name)
-
OPERATION (web service operation for SOAP.)
-
COMPOSITE (SOA composite name)
-
COMPONENT (SOA component name)
-
NAMESPACE
11.6 Configuring the Oracle HTTP Server to Specify the Request Origin
The Constraint Match property setting contains a requestOrigin field that specifies whether the request originated from an internal or external network. This property is valid only when using Oracle HTTP Server and the Oracle HTTP Server administrator has added a custom VIRTUAL_HOST_TYPE header to the request.
To configure the Oracle HTTP Server to specify the request origin, the administrator must modify the httpd.conf file as follows:
-
Verify that the module
mod_headersis loaded. -
Set the
VIRTUAL_HOST_TYPEheader name in theRequestHeader. Valid values areinternalandexternal. Use the following command syntax:RequestHeader set|append|add|unset header [value [env=[!]variable]]
For example, to configure the virtual host for internal requests:
<VirtualHost *:7777>
RequestHeader set VIRTUAL_HOST_TYPE  "internal"
</VirtualHost>
To configure the virtual host for external requests:
<VirtualHost *:8888>
RequestHeader set VIRTUAL_HOST_TYPE "external"
</VirtualHost>
In these examples, all the requests coming from outside of the private network are routed through
virtual host:8888and all the requests coming from the internal private network are routed throughvirtual host:7777.Note that you must also add these ports in the
httpd.conffile as listen ports so that the applications are available on the ports externally. -
Restart the Oracle HTTP Server.