10 Creating the Initial Infrastructure Domain for an Enterprise Deployment
This chapter describes how to install and configure an initial domain, which can be used as the starting point for an enterprise deployment. Later chapters in this guide describe how to extend this initial domain with the various products and components that comprise the enterprise topology you are deploying.
This chapter contains the following sections:
-
Installing the Oracle Fusion Middleware Infrastructure in Preparation for an Enterprise Deployment
-
Configuring the Domain Directories and Starting the Servers on SOAHOST1
-
Modifying the Upload and Stage Directories to an Absolute Path
10.1 Variables Used When Creating the Infrastructure Domain
As you perform the tasks in this chapter, you will be referencing the following directory variables, which are defined in Section 7.4, "File System and Directory Variables Used in This Guide".
-
ORACLE_HOME
-
ASERVER_HOME
-
MSERVER_HOME
-
APPLICATION_HOME
-
JAVA_HOME
In addition, you'll be referencing the following virtual IP (VIP) addresses and host names defined in Section 5.2.3, "Physical and Virtual IP Addresses Required by the Enterprise Topology":
-
ADMINVHN
-
SOAHOST1
-
SOAHOST2
-
DBHOST1
-
DBHOST2
-
SCAN Address for the Oracle RAC Database (DB-SCAN.examle.com)
10.2 Understanding the Initial Infrastructure Domain
Before you being creating the initial Infrastructure domain, be sure to review the following key concepts:
10.2.1 About the Infrastructure Distribution
You create the initial Infrastructure domain for an enterprise deployment, using the Oracle Fusion Middleware Infrastructure distribution. This distribution contains both the Oracle WebLogic Server software and the Oracle JRF software in one distribution.
The Oracle JRF software consists of Oracle Web Services Manager, Oracle Application Development Framework (Oracle ADF), Oracle Enterprise Manager Fusion Middleware Control, the Repository Creation Utility (RCU), and other libraries and technologies required to support the Oracle Fusion Middleware products.
Later in this guide, you can then extend the domain to support the Oracle Fusion Middleware products required for your enterprise deployment.
For more information, see "Understanding Oracle Fusion Middleware Infrastructure" in Understanding Oracle Fusion Middleware.
10.2.2 Characteristics of the Initial Infrastructure Domain
Table 10-1 lists some of the key characteristics of the initial Infrastructure domain. By reviewing and understanding these characteristics, you can better understand the purpose and context of the procedures used to configure the domain.
Many of these characteristics are described in more detail in Chapter 2.
Table 10-1 Characteristics of the Initial Infrastructure domain
| Characteristic of the Domain | More Information |
|---|---|
|
Uses a separate virtual IP (VIP) address for the Administration Server. |
Section 2.2.5.1, "Configuration of the Administration Server and Managed Servers Domain Directories" |
|
Uses separate domain directories for the Administration Server and the Managed Servers in the domain. |
Section 2.2.5.1, "Configuration of the Administration Server and Managed Servers Domain Directories" |
|
Includes a dedicated cluster for Oracle Web Services Manager |
Section 2.2.5.2, "Using Oracle Web Services Manager in the Application Tier" |
|
Uses Per Domain Node Manager and separate Node Manager processes for the Administration Server and Managed Servers on each host. |
Section 2.2.5.4, "About the Node Manager Configuration in a Typical Enterprise Deployment" |
|
Requires a separately installed LDAP-based authentication provider. |
Section 2.2.5.6, "Understanding OPSS and Requests to the Authentication and Authorization Stores" |
10.3 Installing the Oracle Fusion Middleware Infrastructure in Preparation for an Enterprise Deployment
Use the following sections to install the Oracle Fusion Middleware Infrastructure software in preparation for configuring a new domain for an enterprise deployment:
-
Section 10.3.2, "Starting the Oracle Fusion Middleware Installer on SOAHOST1"
-
Section 10.3.4, "Installing Oracle Fusion Middleware Infrastructure on the Other Host Computers"
10.3.1 Installing a Supported JDK
Oracle Fusion Middleware requires that a certified Java Development Kit (JDK) is installed on your system. See the following sections for more information:
10.3.1.1 Locating and Downloading the JDK Software
To find a certified JDK, see the certification document for your release on the Oracle Fusion Middleware Supported System Configurations page.
After you identify the Oracle JDK for the current Oracle Fusion Middleware release, you can download an Oracle JDK from the following location on Oracle Technology Network:
http://www.oracle.com/technetwork/java/index.html
Be sure to navigate to the download for the Java SE JDK.
10.3.1.2 Installing the JDK Software
Install the JDK in the following locations:
-
On the shared storage device, where it will be accessible from each of the application tier host computers.
-
On the local storage device for each of the Web tier host computers.
The Web tier host computers, which reside in the DMZ, do not necessarily have access to the shared storage on the application tier.
For more information about the recommended location for the JDK software, see Section 7.3, "Understanding the Recommended Directory Structure for an Enterprise Deployment".
The following example describes how to install a recent version of JDK 1.7:
-
Change directory to the location where you downloaded the JDK archive file.
-
Unzip the archive into the JDK home directory, and then
$ cd download_dir $ tar -xzvf jdk-7u55-linux-x64.tar.gz -
Define the JAVA_HOME and PATH environment variables for running Java on the host computer.
For example:
$ export JAVA_HOME=download_dir/jdk1.7.0_55 $ export PATH=$JAVA_HOME/bin:$PATH -
Run the following commands to verify that the appropriate java executable is in the path and your environment variables are set correctly:
$ java -version
$ java version "1.7.0_55"
Java(TM) SE Runtime Environment (build 1.7.0_55-b13)
Java HotSpot(TM) 64-Bit Server VM (build 24.55-b03, mixed mode)
10.3.2 Starting the Oracle Fusion Middleware Installer on SOAHOST1
To start the installation program, perform the following steps.
-
Log in to SOAHOST1.
-
Go to the directory where you downloaded the installation program.
-
Launch the installation program by invoking the
javaexecutable from the JDK directory on your system, as shown in the example below.JAVA_HOME/bin/java -d64 -jar distribution_file_name.jar
In this example:
-
Replace JAVA_HOME with the environment variable or actual JDK location on your system.
-
Replace distribution_file_name with the actual name of the distribution jar file.
Note that if you download the distribution from the Oracle Technology Network (OTN), then the jar file is typically packaged inside a downloadable ZIP file.
To install the software required for the initial Infrastructure domain, the distribution you want to install is fmw_12.1.3.0.0_infrastructure.jar.
For more information about the actual file names of each distribution, see Section 5.3, "Identifying and Obtaining Software Downloads for an Enterprise Deployment".
-
When the installation program appears, you are ready to begin the installation. See Section 10.3.3 for a description of each installation program screen.
10.3.3 Navigating the Installation Screens
The installation program displays a series of screens, in the order listed in Table 10-2.
If you need additional help with any of the installation screens, click the screen name.
Table 10-2 Oracle Fusion Middleware Infrastructure Install Screens
| Screen | Description |
|---|---|
|
On UNIX operating systems, this screen will appear if this is the first time you are installing any Oracle product on this host. Specify the location where you want to create your central inventory. Make sure that the operating system group name selected on this screen has write permissions to the central inventory location. For more information about the central inventory, see "Understanding the Oracle Central Inventory" in Installing Software with the Oracle Universal Installer. |
|
|
This screen introduces you to the product installer. |
|
|
Use this screen to specify the location of your Oracle home directory. For the purposes of an enterprise deployment, enter the value of the ORACLE_HOME variable listed in Table 7-2. |
|
|
Use this screen to select the type of installation and consequently, the products and feature sets you want to install. For this topology, select Fusion Middleware Infrastructure. Note: The topology in this document does not include server examples, Oracle strongly recommends that you do not install the examples into a production environment. |
|
|
This screen verifies that your system meets the minimum necessary requirements. If there are any warning or error messages, refer to the Oracle Fusion Middleware System Requirements and Specifications document on the Oracle Technology Network (OTN). |
|
|
If you already have an Oracle Support account, use this screen to indicate how you would like to receive security updates. If you do not have one and are sure you want to skip this step, clear the check box and verify your selection in the follow-up dialog box. |
|
|
Use this screen to verify the installation options you selected. If you want to save these options to a response file, click Save and provide the location and name of the response file. Response files can be used later in a silent installation situation. For more information about silent or command line installation, see "Using the Oracle Universal Installer in Silent Mode" in Installing Software with the Oracle Universal Installer. |
|
|
This screen allows you to see the progress of the installation. |
|
|
This screen appears when the installation is complete. Review the information on this screen, then click Finish to dismiss the installer. |
10.3.4 Installing Oracle Fusion Middleware Infrastructure on the Other Host Computers
After you install the Infrastructure on SOAHOST1, then you must also install it on the local storage device for WEBHOST1 and for WEBHOST2. The host computers in the Web tier reside in the DMZ, and do not necessarily have access to the shared storage device in the application tier, so the software must be installed locally.
In addition, if you have configured a separate shared storage volume or partition for SOAHOST2, then you should also install the Infrastructure on SOAHOST2. For more information, see Section 7.2, "Shared Storage Recommendations When Installing and Configuring an Enterprise Deployment".
To install the software on the other host computers in topology, log in to each host, and use the instructions in Section 10.3.2 and Section 10.3.3 to create the Oracle home on the appropriate storage device.
10.3.5 Checking the Directory Structure
The contents of your installation vary based on the options you selected during the installation.
After you install the Oracle Fusion Middleware Infrastructure and create the Oracle home, you should see the following directory and sub-directories:
/u01/oracle/products/fmwnnnn/soa

adr
BC4J
ccr
communications configuration
internal
jlib
modules
owsm
rcu
sysman
upgrade
webcenter
atgpf
bin
common
config
external
jdk
lib oracle.xdb_12.1.0.jar plugins
rda
ucs
util
webservices
For more information about the directory structure you should see after installation, see "What are the Key Oracle Fusion Middleware Directories?" in Understanding Oracle Fusion Middleware.
10.4 Creating the Database Schemas
Before you can configure a Fusion Middleware Infrastructure domain, you must install the following schemas on a certified database for use with this release of Oracle Fusion Middleware:
-
Metadata Services (MDS)
-
Audit Services (IAU)
-
Audit Services Append (IAU_APPEND)
-
Audit Services Viewer (IAU_VIEWER)
-
Oracle Platform Security Services (OPSS)
-
User Messaging Service (UMS)
-
WebLogic Services (WLS)
-
Common Infrastructure Services (STB)
You use the Repository Creation Utility (RCU) to create the schemas. This utility is installed in the Oracle home for each Oracle Fusion Middleware product. For more information about RCU and how the schemas are created and stored in the database, see "Preparing for Schema Creation" in Creating Schemas with the Repository Creation Utility.
Follow the instructions in this section to install the required schemas:
-
Section 10.4.1, "Installing and Configuring a Certified Database"
-
Section 10.4.2, "Starting the Repository Creation Utility (RCU)"
-
Section 10.4.3, "Navigating the RCU Screens to Create the Schemas"
10.4.1 Installing and Configuring a Certified Database
Make sure you have installed and configured a certified database, and that the database is up and running.
For more information, see the following resources:
-
Chapter 10, which includes information about creating database services, using SecureFiles for Large Objects (LOBs), and other topics important in an enterprise deployment.
-
"Installing and Configuring a Certified Database" in Planning an Installation of Oracle Fusion Middleware.
10.4.2 Starting the Repository Creation Utility (RCU)
To start the Repository Creation Utility (RCU):
-
Set the JAVA_HOME environment variable so it references the location where you installed supported JDK.
For more information, see Section 7.4, "File System and Directory Variables Used in This Guide".
-
Navigate to the following directory on SOAHOST1:
ORACLE_HOME/oracle_common/bin -
Start RCU:
./rcu
10.4.3 Navigating the RCU Screens to Create the Schemas
Follow the instructions in this section to create the schemas for the Oracle Fusion Middleware Infrastructure domain:
- Task 1 Introducing RCU
-
Click Next.
- Task 2 Selecting a Method of Schema Creation
-
If you have the necessary permission and privileges to perform DBA activities on your database, select System Load and Product Load Concurrently on the Create Repository screen. The procedure in this document assumes that you have the necessary privileges.
If you do not have the necessary permission or privileges to perform DBA activities in the database, you must select Prepare Scripts for System Load on this screen. This option will generate a SQL script, which can be provided to your database administrator. See "Understanding System Load and Product Load" in Creating Schemas with the Repository Creation Utility.
Tip:
For more information about the options on this screen, see "Create repository" in Creating Schemas with the Repository Creation Utility. - Task 3 Providing Database Credentials
-
On the Database Connection Details screen, provide the database connection details for RCU to connect to your database.
In the Host Name field, enter the SCAN address of the Oracle RAC Database.
Click Next to proceed, then click OK on the dialog window confirming that connection to the database was successful.
Tip:
For more information about the options on this screen, see "Database Connection Details" in Creating Schemas with the Repository Creation Utility. - Task 4 Specifying a Custom Prefix and Selecting Schemas
-
-
Specify the custom prefix you want to use for to identify the Oracle Fusion Middleware schemas.
The custom prefix is used to logically group these schemas together for use in this domain. For the purposes of this guide, use the prefix
FMW1213.Tip:
Make a note of the custom prefix you choose to enter here; you will need this later, during the domain creation process. -
Select AS Common Schemas.
When you select AS Common Schemas, all of the schemas in this section are automatically selected.
A schema called Common Infrastructure Services is also automatically created; this schema is grayed out and cannot be selected or deselected. This schema (the STB schema) enables you to retrieve information from RCU during domain configuration. For more information, see "Understanding the Service Table Schema" in Creating Schemas with the Repository Creation Utility.
Tip:
For more information about custom prefixes, see "Understanding Custom Prefixes" in Creating Schemas with the Repository Creation Utility.For more information about how to organize your schemas in a multi-domain environment, see "Planning Your Schema Creation" in Creating Schemas with the Repository Creation Utility.
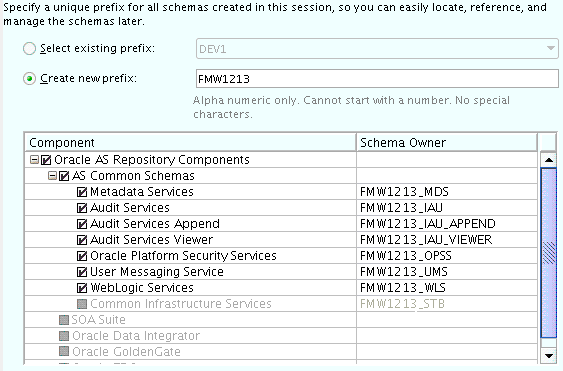
Description of the illustration ''rcu_select_schema.gif''
Click Next to proceed, then click OK on the dialog window confirming that prerequisite checking for schema creation was successful.
-
- Task 5 Specifying Schema Passwords
-
Specify how you want to set the schema passwords on your database, then specify and confirm your passwords.
Tip:
You must make a note of the passwords you set on this screen; you will need them later on during the domain creation process. - Task 6 Completing Schema Creation
-
Navigate through the remainder of the RCU screens to complete schema creation.
For the purposes of this guide, you can accept the default settings on the remaining screens, or you can customize how RCU creates and uses the required tablespaces for the Oracle Fusion Middleware schemas.
For more information about RCU and its features and concepts, see Creating Schemas with the Repository Creation Utility.
When you reach the Completion Summary screen, click Close to dismiss RCU.
10.5 Configuring the Initial Enterprise Deployment Domain
This section provides instructions for creating a WebLogic domain using the configuration wizard. For more information on other methods available for domain creation, see "Additional Tools for Creating, Extending, and Managing WebLogic Domains" in Creating WebLogic Domains Using the Configuration Wizard.
The following topics are covered in this section:
10.5.1 Starting the Configuration Wizard
To begin domain configuration, run the following command in the Oracle Fusion Middleware Oracle home:
ORACLE_HOME/oracle_common/common/bin/config.sh
10.5.2 Navigating the Configuration Wizard Screens to Configure the Domain
Follow the instructions in this section to create and configure the domain for the topology.
-
Task 1, "Selecting the Domain Type and Domain Home Location"
-
Task 8, "Providing the GridLink Oracle RAC Database Connection Details"
-
Task 11, "Configuring the Administration Server Listen Address"
-
Task 20, "Reviewing Your Configuration Specifications and Configuring the Domain"
-
Task 21, "Writing Down Your Domain Home and Administration Server URL"
- Task 1 Selecting the Domain Type and Domain Home Location
-
On the Configuration Type screen, select Create a New Domain.
In the Domain Location field, specify the value of the ASERVER_HOME variable, as defined in Section 7.4, "File System and Directory Variables Used in This Guide".
Tip:
More information about the other options on this screen of the Configuration Wizard, see "Configuration Type" in Creating WebLogic Domains Using the Configuration Wizard. - Task 2 Selecting the Configuration Templates
-
On the Templates screen, make sure Create Domain Using Product Templates is selected, then select the following templates:
-
Oracle Enterprise Manager - 12.1.3.0 [em]
Selecting this template automatically selects the following dependencies:
-
Oracle JRF - 12.1.3.0 [oracle_common]
-
WebLogic Coherence Cluster Extension - 12.1.3.0 [wlserver]
-
-
Oracle WSM Policy Manager - 12.1.3.0 [oracle_common]
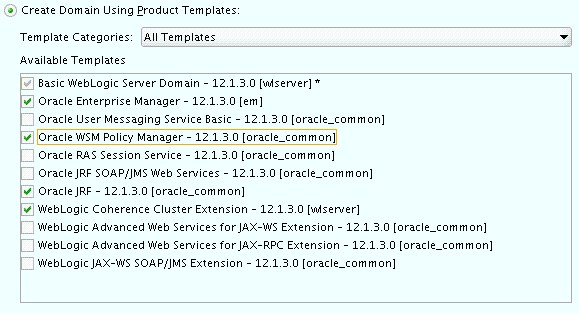
Description of the illustration ''config_templates.gif''
Tip:
More information about the options on this screen can be found in Templates in Creating WebLogic Domains Using the Configuration Wizard. -
- Task 3 Selecting the Application Home Location
-
On the Application Location screen, specify the value of the APPLICATION_HOME variable, as defined in Section 7.4, "File System and Directory Variables Used in This Guide".
Tip:
More information about the options on this screen can be found in Application Location in Creating WebLogic Domains Using the Configuration Wizard. - Task 4 Configuring the Administrator Account
-
On the Administrator Account screen, specify the user name and password for the default WebLogic Administrator account for the domain.
Make a note of the user name and password specified on this screen; you will need these credentials later to boot and connect to the domain's Administration Server.
- Task 5 Specifying the Domain Mode and JDK
-
On the Domain Mode and JDK screen:
-
Select Production in the Domain Mode field.
-
Select the Oracle Hotspot JDK in the JDK field.
Selecting Production Mode on this screen gives your environment a higher degree of security, requiring a user name and password to deploy applications and to start the Administration Server.
Tip:
More information about the options on this screen, including the differences between development mode and production mode, can be found in Domain Mode and JDK in Creating WebLogic Domains Using the Configuration Wizard.In production mode, a boot identity file can be created to bypass the need to provide a user name and password when starting the Administration Server. For more information, see Section 10.6.2, "Creating the boot.properties File".
-
- Task 6 Specifying the Database Configuration Type
-
Select RCU Data to activate the fields on this screen.
The RCU Data option instructs the Configuration Wizard to connect to the database and Service Table (STB) schema to automatically retrieve schema information for the schemas needed to configure the domain.
Note:
If you choose to select Manual Configuration on this screen, you will have to manually fill in the parameters for your schema on the JDBC Component Schema screen.After selecting RCU Data, fill in the fields as shown in the following table. Refer to Figure 10-1 for a partial screen shot of a sample Database Configuration Type screen.
Field Description DBMS/Service Enter the service name for the Oracle RAC database where you will install the product schemas. For example: orcl.example.com
Be sure this is the common service name that is used to identify all the instances in the Oracle RAC database; do not use the host-specific service name.
Host Name Enter the Single Client Access Name (SCAN) Address for the Oracle RAC database, which you entered in the Enterprise Deployment Workbook. Port Enter the port number on which the database listens. For example, 1521.Schema Owner Schema Password
Enter the user name and password for connecting to the database's Service Table schema. This is the schema user name and password that was specified for the Service Table component on the "Schema Passwords" screen in RCU (see Section 10.4, "Creating the Database Schemas").
The default user name is
prefix_STB, whereprefixis the custom prefix that you defined in RCU.Figure 10-1 Setting the Database Configuration Type for an Enterprise Deployment
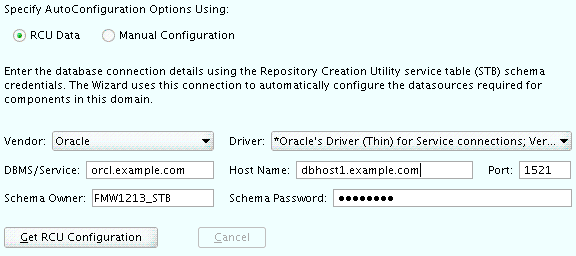
Description of ''Figure 10-1 Setting the Database Configuration Type for an Enterprise Deployment''
Click Get RCU Configuration when you are finished specifying the database connection information. The following output in the Connection Result Log indicates that the operating succeeded:
Connecting to the database server...OK
Retrieving schema data from database server...OK
Binding local schema components with retrieved data...OK

Successfully Done.
Tip:
More information about the RCU Data option can be found in "Understanding the Service Table Schema" in Creating Schemas with the Repository Creation Utility.More information about the other options on this screen can be found in Datasource Defaults in Creating WebLogic Domains Using the Configuration Wizard
- Task 7 Specifying JDBC Component Schema Information
-
Verify that the values on the JDBC Component Schema screen are correct for all schemas and click Next.
The schema table should be populated, because you selected Get RCU Data on the previous screen. As a result, the Configuration Wizard was able to locate the database connection values for all the schemas required for this domain.
At this point, the values are configured to connect to a single-instance database. However, for an enterprise deployment, you should use a highly available Real Application Clusters (RAC) database, as described in Chapter 9, "Preparing the Database for an Enterprise Deployment".
In addition, Oracle recommends that you use an Active GridLink datasource for each of the component schemas. For more information about the advantages of using GridLink data sources to connect to a RAC database, see "Database Considerations" in the High Availability Guide.
To convert the data sources to GridLink:
-
Select all the schemas by selecting the checkbox at in the first header row of the schema table.
-
Click Convert to GridLink and click Next.
-
- Task 8 Providing the GridLink Oracle RAC Database Connection Details
-
On the GridLink Oracle RAC Component Schema screen, provide the information required to connect to the RAC database and component schemas, as shown in Table 10-3 and in Figure 10-2.
Table 10-3 Recommended Values for Selected Fields on the GridLink Oracle RAC Component Schema Screen
Element Description and Recommended Value Service Name
Enter the service name for the database; for example,
orcl.example.com.Service Listener, Port, and Protocol
In the Service Listener field, enter the Single Client Access Name (SCAN) Address for the Oracle RAC database.
In the Port field, enter the listening port for the database (for example,
1521).In the Protocol field, enter
TCP.ONS Host and Port
In the ONS Port field, enter the SCAN address for the Oracle RAC database.
In the Port field, enter the ONS Remote port (typically,
6200).Enable Fan
Select the Enable Fan check box to receive and process FAN events,
Figure 10-2 Sample Values for the GridLink Oracle RAC Component Schema Scree
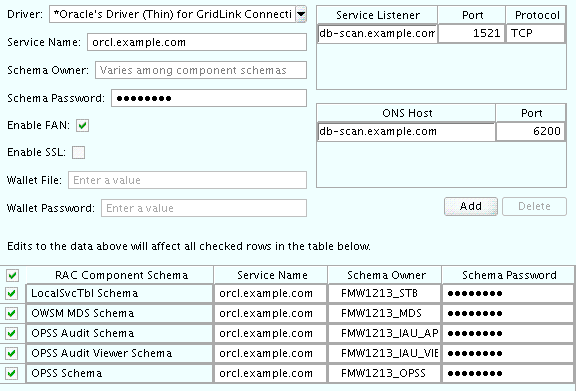
Description of ''Figure 10-2 Sample Values for the GridLink Oracle RAC Component Schema Scree''
For more information about specifying the information on this screen, as well as information about how to identify the correct SCAN address, see "Configuring Active GridLink Data Sources with Oracle RAC" in the High Availability Guide.
You can also click Help to display a brief description of each field on the screen.
- Task 9 Testing the JDBC Connections
-
Use the JDBC Component Schema Test screen to test the data source connections you have just configured.
A green check mark in the Status column indicates a successful test. If you encounter any issues, see the error message in the Connection Result Log section of the screen, fix the problem, then try to test the connection again.
Tip:
More information about the other options on this screen can be found in Test Component Schema in Creating WebLogic Domains Using the Configuration Wizard - Task 10 Selecting Advanced Configuration
-
To complete domain configuration for the topology, select the following options on the Advanced Configuration screen:
-
Administration Server
This is required to properly configure the listen address of the Administration Server.
-
Node Manager
This is required to configure Node Manager.
-
Managed Servers, Clusters and Coherence
This is required to configure the Managed Servers and cluster, and also for configuring the machine and targeting the Managed Servers to the machine.
-
JMS File Store
This is required to configure the appropriate shared storage for JMS persistent stores.
Note:
When using the Advanced Configuration screen in the Configuration Wizard:-
If any of the above options are not available on the screen, then return to the Templates screen, and be sure you selected the required templates for this topology.
-
Do not select the Domain Frontend Host Capture advanced configuration option. You will later configure the frontend host property for specific clusters, rather than for the domain.
-
- Task 11 Configuring the Administration Server Listen Address
-
On the Administration Server screen:
-
In the Server Name field, retain the default value - AdminServer.
-
In the Listen Address field, enter the virtual host name that corresponds to the VIP of the ADMINVHN that you procured in Chapter 5 and enabled in Chapter 8.
For more information on the reasons for using the ADMINVHN virtual host, see Section 5.2, "Reserving the Required IP Addresses for an Enterprise Deployment".
-
Leave the other fields at their default values.
In particular, be sure that no server groups are assigned to the Administration Server.
-
- Task 12 Configuring Node Manager
-
Select Per Domain Default Location as the Node Manager type, then specify the Node Manager credentials you will use to connect to the Node Manager.
Tip:
For more information about the options on this screen, see "Node Manager" in Creating WebLogic Domains Using the Configuration Wizard.More information about the types of Node Manager can be found in "Node Manager Overview" in Administering Node Manager for Oracle WebLogic Server.
- Task 13 Configuring Managed Servers
-
Use the Managed Servers screen to create two new Managed Servers:
-
Click the Add button to create a new Managed Server.
-
Specify
WLS_WSM1in the Server name column. -
In the Listen Address column, enter SOAHOST1.
Be sure to enter the host name that corresponds to SOAHOST1; do not use the IP address.
-
In the Listen Port column, enter
7010. -
In the Server Groups drop-down list, select JRF-MAN-SVR, WSM-CACHE-SVR, and WSMPM-MAN-SVR. (See Figure 10-3.)
These server groups ensure that the Oracle JRF and Oracle Web Services Manager (OWSM) services are targeted to the Managed Servers you are creating.
Server groups target Fusion Middleware applications and services to one or more servers by mapping defined groups of application services to each defined server group. Any application services that are mapped to a given server group are automatically targeted to all servers that are assigned to that group. For more information, see "Application Service Groups, Server Groups, and Application Service Mappings" in Domain Template Reference.
A Note About the WSM-CACHE-SVR Server Group:
Nonce caching for Oracle Web Services is configured automatically by the WSM-CACHE-SVR server group and is suitable for most applications. Nonce is a unique number that can be used only once in a SOAP request and is used to prevent replay attacks. Nonce caching will naturally scale with the number of added Managed Servers running Web service applications.For advanced caching configurations, see "Caching the Nonce with Oracle Coherence" in Securing Web Services and Managing Policies with Oracle Web Services Manager, which provides additional guidance for the use of nonce caching and the WSM-CACHE-SVR server-group.
-
Repeat this process to create a second Managed Server named
WLS_WSM2.For the Listen Address, enter SOAHOST2. For the Listen Port, enter 7010. Apply the same server groups you applied to the first managed server to the WLS_WSM2.
The Managed Server names suggested in this procedure (WLS_WSM1 and WLS_WSM2) will be referenced throughout this document; if you choose different names then be sure to replace them as needed.
Figure 10-3 Using the Configuration Wizard to Define Managed Servers for an Enterprise Deployment
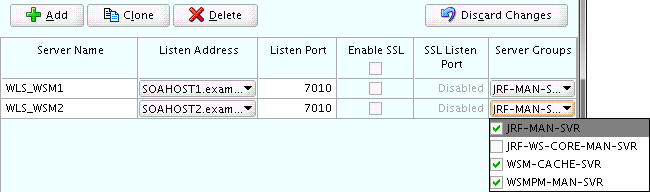
Description of ''Figure 10-3 Using the Configuration Wizard to Define Managed Servers for an Enterprise Deployment''
Tip:
More information about the options on this screen can be found in Managed Servers in Creating WebLogic Domains Using the Configuration Wizard. -
- Task 14 Configuring a Cluster
-
Use the Clusters screen to create a new cluster:
-
Click the Add button.
-
Specify
WSM-PM_Clusterin the Cluster Name field. -
Leave the other fields empty.

Description of the illustration ''config_clusters.gif''
Tips:
For more information about the options on this screen, see "Clusters" in Creating WebLogic Domains Using the Configuration Wizard. -
- Task 15 Assigning Managed Servers to the Cluster
-
Use the Assign Servers to Clusters screen to assign
WLS_WSM1andWLS_WSM2to the new clusterWSM-PM_Cluster:-
In the Clusters pane, select the cluster to which you want to assign the servers; in this case,
WSM-PM_Cluster. -
In the Servers pane, assign
WLS_WSM1toWSM-PM_Clusterby doing one of the following:-
Click once on
WLS_WSM1to select it, then click on the right arrow to move it beneath the selected cluster (WSM-PM_Cluster) in the Clusters pane.OR
-
Double-click on
WLS_WSM1to move it beneath the selected cluster (WSM-PM_Cluster) in the clusters pane.
-
-
Repeat these steps to assign the WLS_WSM2 Managed Server to the WSM-PM_Cluster.

Description of the illustration ''config_servers_to_clusters.gif''
Tip:
More information about the options on this screen can be found in Assign Servers to Clusters in Creating WebLogic Domains Using the Configuration Wizard. -
- Task 16 Configuring Coherence Clusters
-
Use the Coherence Clusters screen to configure the Coherence cluster that is automatically added to the domain.
In the Unicast Listen Port, enter
9991.Notes about Coherence:
For more information about how Coherence is configured in the Infrastructure domain and about how you can modify the Coherence configuration, see Section 2.2.5.7, "About Coherence Clusters In a Typical Enterprise Deployment".For Coherence licensing information, refer to "Oracle Coherence" in Oracle Fusion Middleware Licensing Information.
- Task 17 Creating Machines
-
Use the Machines screen to create three new machines in the domain. A machine is required in order for the Node Manager to be able to start and stop the servers.
-
Select the Unix Machine tab.
-
Click the Add button to create three new Unix machines.
Use the values in Table 10-4 to define the Name and Node Manager Listen Address of each machine. Figure 10-4 shows a portion of the Machines screen, with example values for each machine.
-
Verify the port in the Node Manager Listen Port field.
The port number
5556, shown in this example, may be referenced by other examples in the documentation. Replace this port number with your own port number as needed.
Table 10-4 Values to Use When Creating Unix Machines
Name Node Manager Listen Address Node Manager Listen Port SOAHOST1
The value of the SOAHOST1 host name variable. For example,
soahost1.example.com.5556
SOAHOST2
The value of the SOAHOST2 host name variable. For example,
soahost2.example.com.5556
ADMINHOST
Enter the value of the ADMINVHN variable.
5556
Figure 10-4 Example Values for the Configuration Wizard Unix Machines Screen
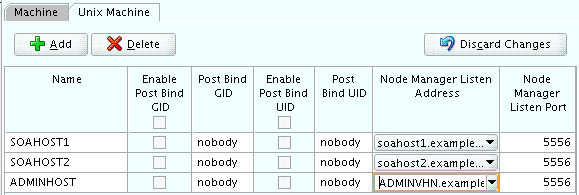
Description of ''Figure 10-4 Example Values for the Configuration Wizard Unix Machines Screen''
Tip:
More information about the options on this screen can be found in Machines in Creating WebLogic Domains Using the Configuration Wizard. -
- Task 18 Assigning Servers to Machines
-
Use the Assign Servers to Machines screen to assign the Administration Server and the two Managed Servers to the appropriate machine.
The Assign Servers to Machines screen is similar to the Assign Managed Servers to Clusters screen. Select the target machine in the Machines column, select the Managed Server in the left column, and click the right arrow to assign the server to the appropriate machine.
Assign the servers as follows:
-
Assign the AdminServer to the ADMINHOST machine.
-
Assign the WLS-WSM1 Managed Server to the SOAHOST1 machine.
-
Assign the WLS-WSM2 Managed Server to the SOAHOST2 machine.
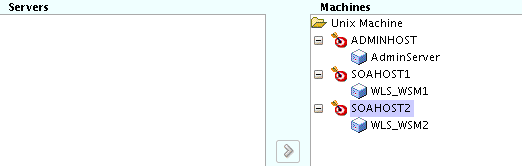
Description of the illustration ''config_servers_to_machines.gif''
Tip:
More information about the options on this screen can be found in Assign Servers to Machines in Creating WebLogic Domains Using the Configuration Wizard. -
- Task 19 Configuring the JMS File Store
-
When you configure a domain using the Oracle WSM Policy Manager configuration template, you should select the proper location of the Metadata Services (MDS) JMS File Store, especially when you are configuring an enterprise deployment.
Enter the following location in the Directory column of the JMS File Store screen:
ASERVER_HOME/WSM-PM_ClusterReplace ASERVER_HOME with the actual value of the ASERVER_HOME variable, as defined in Section 7.4, "File System and Directory Variables Used in This Guide".
- Task 20 Reviewing Your Configuration Specifications and Configuring the Domain
-
The Configuration Summary screen contains the detailed configuration information for the domain you are about to create. Review the details of each item on the screen and verify that the information is correct.
You can go back to any previous screen if you need to make any changes, either by using the Back button or by selecting the screen in the navigation pane.
Domain creation will not begin until you click Create.
Tip:
More information about the options on this screen can be found in Configuration Summary in Creating WebLogic Domains Using the Configuration Wizard. - Task 21 Writing Down Your Domain Home and Administration Server URL
-
The Configuration Success screen will show the following items about the domain you just configured:
-
Domain Location
-
Administration Server URL
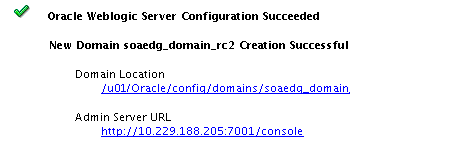
Description of the illustration ''config_success.png''
-
You must make a note of both items as you will need them later; the domain location is needed to access the scripts used to start the Node Manager and Administration Server, and the URL is needed to access the Administration Server.
Click Finish to dismiss the configuration wizard.
10.6 Configuring the Domain Directories and Starting the Servers on SOAHOST1
After the domain is created, you can then perform the following tasks on SOAHOST1:
-
Section 10.6.1, "Starting the Node Manager in the Administration Server Domain Home on SOAHOST1"
-
Section 10.6.5, "Creating a Separate Domain Directory for Managed Servers on SOAHOST1"
-
Section 10.6.6, "Starting the Node Manager in the Managed Server Domain Directory"
-
Section 10.6.7, "Starting and Validating the WLS_WSM1 Managed Server on SOAHOST1"
10.6.1 Starting the Node Manager in the Administration Server Domain Home on SOAHOST1
To start the per-domain Node Manager for the ASERVER_HOME domain directory:
-
Navigate to the following directory:
ASERVER_HOME/bin -
Use the following command to start the Node Manager:
nohup ./startNodeManager.sh > nm.out&
For more information about additional Node Manager configuration options, see Administering Node Manager for Oracle WebLogic Server.
10.6.2 Creating the boot.properties File
This section explains how to create a boot.properties file for the Administration Server on SOAHOST1. This is a required step that enables you to start the Administration Server using Node Manager.
To create a boot.properties file for the Administration Server:
-
Create the following directory structure:
mkdir -p ASERVER_HOME/servers/AdminServer/security -
In a text editor, create a file called
boot.propertiesin the security directory created in the previous step, and enter the Administration Server credentials that you defined when you ran the Configuration Wizard to create the domain.:username=adminuser password=password
Note:
When you start the Administration Server, the username and password entries in the file get encrypted.For security reasons, minimize the amount of time the entries in the file are left unencrypted; after you edit the file, you should start the server as soon as possible so that the entries get encrypted.
-
Save the file and close the editor.
10.6.3 Starting the Administration Server
To start the Administration Server using the Node Manager:
-
Start WLST:
cd ORACLE_COMMON_HOME/common/bin ./wlst.sh -
Connect to Node Manager using the Node Manager credentials you defined in when you created the domain in the Configuration Wizard:
wls:/offline>nmConnect('nodemanager_username','nodemanager_password',
            'ADMINVHN','5556','domain_name',
            'ASERVER_HOME')
Note:
This username and password are used only to authenticate connections between Node Manager and clients. They are independent of the server admin ID and password and are stored in thenm_password.propertiesfile located in the following directory:ASERVER_HOME/config/nodemanager -
Start the Administration Server:
nmStart('AdminServer') -
Exit WLST:
exit()
10.6.4 Validating the Administration Server
To validate that the Administration Server is started and running successfully, open a browser window and navigate to the Oracle WebLogic Server Administration Console and Oracle Enterprise Manager Fusion Middleware Control, which both are installed and configured on the Administration Server.
To navigate to Fusion Middleware Control, enter the following URL, and log in with the Oracle WebLogic Server administrator credentials:
ADMINVHN:7001/em
To navigate to the Oracle WebLogic Server Administration Console, enter the following URL, and log in with the same administration credentials:
ADMINVHN:7001/console
10.6.5 Creating a Separate Domain Directory for Managed Servers on SOAHOST1
At this point in the Enterprise Deployment Guide, you have created a domain, and the domain directory resides on a shared disk. The domain directory on the shared disk will be used to run the Administration Server.
You can now create a copy of the domain on the local storage for both SOAHOST1 and SOAHOST2. The domain directory on the local (or private) storage will be used to run the Managed Servers. Placing the MSERVER_HOME on local storage is recommended to eliminate the potential contention and overhead cause by servers writing logs to shared storage. It is also faster to load classes and jars need from the domain directory, so any tmp or cache data that Managed Servers use from the domain directory is processed quicker.
As described in Chapter 7, the path to the Administration Server domain home is represented by the ASERVER_HOME variable, and the path to the Managed Server domain home is represented by the MSERVER_HOME variable.
To create the Managed Server domain directory:
-
Log in to SOAHOST1 and run the
packcommand to create a template as follows:cd ORACLE_COMMON_HOME/common/bin ./pack.sh -managed=true -domain=ASERVER_HOME -template=soadomaintemplate.jar -template_name=soa_domain_template
In this example:
-
Replace ASERVER_HOME with the actual path to the domain directory you created on the shared storage device.
-
soadomaintemplate.jaris a sample name for the jar file you are creating, which will contain the domain configuration files. -
soa_domain_templateis the name assigned to the domain template file.
-
-
Make a note of the location of the
soadomaintemplate.jarfile you just created with the pack command.By default, the domain template is created in the current directory where you ran the pack command. In this example, it would be created in the following directory, but you can specify a full path for the template jar file as part of the
-templateargument to the pack command:ORACLE_COMMON_HOME/common/bin/Tip:
For more information about the pack and unpack commands, see "Overview of the Pack and Unpack Commands" in Creating Templates and Domains Using the Pack and Unpack Commands. -
If you haven't already, create the recommended directory structure for the Managed Server domain on the SOAHOST1 local storage device.
Use the examples in Section 7.4, "File System and Directory Variables Used in This Guide" as a guide.
-
Run the
unpackcommand to unpack the template in the domain directory onto the local storage, as follows:cd ORACLE_COMMON_HOME/common/bin ./unpack.sh -domain=MSERVER_HOME -overwrite_domain=true -template=soadomaintemplate.jar -log_priority=DEBUG -log=/tmp/unpack.log -app_dir=APPLICATION_HOME
Note:
The-overwrite_domainoption in the unpack command, allows unpacking a managed server template into an existing domain and existing applications directories. For any file that is overwritten, a backup copy of the original is created. If any modifications had been applied to the start scripts and ear files in the managed server domain directory, they must be restored after this unpack operation.Additionally, to customize server startup parameters that apply to all servers in a domain, you can create a file called setUserOverrides.sh and configure it to, for example, add custom libraries to the WebLogic Server classpath, specify additional java command line options for running the servers, or specify additional environment variables. Any customizations you add to this file are preserved during domain upgrade operations, and are carried over to remote servers when using the pack and unpack commands.
In this example:
-
Replace MSERVER_HOME with the complete path to the domain home to be created on the local storage disk. This is the location where the copy of the domain will be unpacked.
-
soadomaintemplate.jaris the directory path and name of the template you created when you ran the pack command to pack up the domain on the shared storage device.
Tip:
For more information about the pack and unpack commands, see "Overview of the Pack and Unpack Commands" in Creating Templates and Domains Using the Pack and Unpack Commands. -
-
Change directory to the newly created Managed Server directory and verify that the domain configuration files were copied to the correct location on the SOAHOST1 local storage device.
10.6.6 Starting the Node Manager in the Managed Server Domain Directory
After you create the Managed Server domain directory, there are two Domain home directories on SOAHOST1. One is used for the Administration Server; the other is used for the Managed Servers on SOAHOST1.
Similarly, there are two Node Managers on SOAHOST1. One Node Manager is used to control and monitor the Administration Server, which is running from the Administration Server domain home; the other is used to control the Managed Servers running from the Managed Server domain home.
You must start the two Node Managers independently. However, before you can start the Node Manager for the Managed Server directory, you must first edit the nodemanager.properties file that was copied from the Administration Server domain home.
This step is necessary because the unpack command copies the nodemanager.properties file and all its values from the Administration Server domain directory.
As a result, you must edit the nodemanager.properties file in the Managed Server directory so it uses a unique listen address; otherwise, the startup of the Managed Server Node Manager will fail due to an address and port conflict.
Follow these steps to edit the nodemanager.properties file and start the Managed Server Node Manager:
-
Locate and edit the
nodemanager.propertiesfile in the following location:MSERVER_HOME/nodemanager -
Locate the following entries in the
nodemanager.propertiesfile:ListenAddress=ADMINVHNBefore you make any changes, the value of the
ListenAddressproperty should be the value of the ADMINVHN virtual IP address. This value was set when you configured the Node Manager in the Configuration Wizard in Task 11, "Configuring the Administration Server Listen Address". -
Change the value of the
ListenAddressproperty to the following value:ListenAddress=SOAHOST1The Node Manager for the Managed Server home will now listen on the physical IP address of SOAHOST1.
-
Save the file.
-
Start the Node Manager from the Managed Server home:
-
Navigate to the following directory:
MSERVER_HOME/bin -
Use the following command to start the Node Manager:
nohup ./startNodeManager.sh > nm.out&
-
For information about additional Node Manager configuration options, see Administering Node Manager for Oracle WebLogic Server.
10.6.7 Starting and Validating the WLS_WSM1 Managed Server on SOAHOST1
Use Oracle Enterprise Manager Fusion Middleware Control to start the Managed Server on SOAHOST1. Fusion Middleware Control is available because you already started the Node Manager and Administration Server in a previous step:
-
Enter the following URL into a browser to display the Fusion Middleware Control login screen:
http://ADMINVHN:7001/emIn this example:
-
Replace ADMINVHN with the host name assigned to the ADMINVHN Virtual IP address in Section 5.3, "Identifying and Obtaining Software Downloads for an Enterprise Deployment".
-
Port 7001 is the typical port used for the Administration Server console and Fusion Middleware Control. However, you should use the actual URL that was displayed at the end of the Configuration Wizard session when you created the domain.
Tip:
For more information about managing Oracle Fusion Middleware using Oracle Enterprise Manager Fusion Middleware, see "Getting Started Using Oracle Enterprise Manager Fusion Middleware Control" in Administering Oracle Fusion Middleware.
-
-
Log in to Fusion Middleware Control using the Administration Server credentials.
-
In the Target Navigation pane, expand the domain. Under the domain, expand WSM-PM_Cluster to view the Managed Servers in the domain.
-
Select only the WLS_WSM1 Managed Server and click Start Up on the Oracle WebLogic Server tool bar.
-
When the startup operation is complete, navigate to the Domain home page and verify that the WLS_WSM1 Managed Server is up and running.
-
To verify that the Managed Server is working correctly, open your browser and enter the following URL:
SOAHOST1:7010/wsm-pm/Enter the domain admin user name and password when prompted.
10.7 Propagating the Domain and Starting the Servers on SOAHOST2
After you start and validate the Administration Server and WLS_WSM1 Managed Server on SOAHOST1, you can then perform the following tasks on SOAHOST2:
-
Section 10.7.1, "Propagating the Domain Configuration to SOAHOST2"
-
Section 10.7.3, "Starting and Validating the WLS_WSM2 Managed Server on SOAHOST2"
10.7.1 Propagating the Domain Configuration to SOAHOST2
Now that you have the Administration Server and the first WLS_WSM1 Managed Server running on SOAHOST1, you can now configure the domain on SOAHOST2, as follows.
This procedure assumes you have copied the soadomaintemplate.jar file that you created earlier in a location that is accessible from both SOAHOST1 and SOAHOST2; such as the ASERVER_HOME directory, which is located on the shared storage filer:
-
Log in to SOAHOST2.
-
If you haven't already, create the recommended directory structure for the Managed Server domain on the SOAHOST2 local storage device.
Use the examples in Section 7.4, "File System and Directory Variables Used in This Guide" as a guide.
-
Run the
unpackcommand to unpack the template in the domain directory onto the local storage, as follows:cd ORACLE_COMMON_HOME/common/bin ./unpack.sh -domain=MSERVER_HOME -overwrite_domain=true -template=soadomaintemplate.jar -log_priority=DEBUG -log=/tmp/unpack.log -app_dir=APPLICATION_HOME
In this example:
-
Replace MSERVER_HOME with the complete path to the domain home to be created on the local storage disk. This is the location where the copy of the domain will be unpacked.
-
soadomaintemplate.jaris the directory path and name of the template you created when you ran the pack command to pack up the domain on the shared storage device.Note that if you are using a separate shared storage volume or partition for SOAHOST2 (and redundant Oracle homes), then you must first copy the template to the volume or partition mounted to SOAHOST2.
-
Replace APPLICATION_HOME with the complete path to the Application directory for the domain on shared storage. For more information, see Section 7.4, "File System and Directory Variables Used in This Guide".
Tip:
For more information about the pack and unpack commands, see "Overview of the Pack and Unpack Commands" in Creating Templates and Domains Using the Pack and Unpack Commands. -
-
Change directory to the newly created MSERVER_HOME directory and verify that the domain configuration files were copied to the correct location on the SOAHOST2 local storage device.
10.7.2 Starting Node Manager on SOAHOST2
After you have propagated the domain configuration to SOAHOST2, start the Node Manager for the MSERVER_HOME domain directory:
-
Change directory to the following directory on SOAHOST2:
MSERVER_HOME/bin
-
Use the following command to start the Node Manager:
nohup ./startNodeManager.sh > nm.out&
For more information about additional Node Manager configuration options, see Administering Node Manager for Oracle WebLogic Server.
10.7.3 Starting and Validating the WLS_WSM2 Managed Server on SOAHOST2
Use the procedure in Section 10.6.7, "Starting and Validating the WLS_WSM1 Managed Server on SOAHOST1" to start and validate the WLS_WSM2 Managed Server on SOAHOST2.
10.8 Modifying the Upload and Stage Directories to an Absolute Path
After creating the domain and unpacking it to the Managed Server domain directory, verify and update the upload and stage directories for the Managed Servers.
This step is necessary to avoid potential issues when performing remote deployments and for deployments that require the stage mode.
To update these directory paths for all the Managed Servers in the Managed Server domain home directory:
-
Log in to the Oracle WebLogic Server Administration Console.
-
In the left navigation tree, expand Domain, and then Environment.
-
Click Lock & Edit.
-
Click Servers.
-
For each Managed Server in the Managed Server domain home directory:
-
Click the name of the Managed Server.
-
Click the Configuration tab, and then click the Deployment tab.
-
Verify that the Staging Directory Name is set to the following:
MSERVER_HOME/servers/server_name/stage
Replace MSERVER_HOME with the directory path for the MSERVER_HOME directory; replace server_name with the name of the Server you are editing.
-
Update the Upload Directory Name to the following value:
ASERVER_HOME/servers/AdminServer/uploadReplace ASERVER_HOME with the directory path for the ASERVER_HOME directory.
-
Click Save.
-
Return the Summary of Servers screen.
-
-
When you have modified these values for each Managed Server, click Activate Changes.
-
Restart both WLS_WSM1 and WLS_WSM2 Managed Servers.
10.9 Creating a New LDAP Authenticator and Provisioning a New Enterprise Deployment Administrator User and Group
When you configure an Oracle Fusion Middleware domain, the domain is configured by default to use the WebLogic Authentication provider (DefaultAuthenticator).
However, for an enterprise deployment, you must use a dedicated, centralized LDAP-compliant authentication provider.
The following sections describe how to use the Oracle WebLogic Server Administration Console to create a new authentication provider for the enterprise deployment domain. This procedure assumes you have already installed and configured a supported LDAP directory, such as Oracle Unified Directory or Oracle Internet Directory.
It also provides instructions for provisioning an enterprise deployment administrator user and group that can be used to administer the deployment.
-
Section 10.9.1, "About the Supported Authentication Providers"
-
Section 10.9.2, "About the Enterprise Deployment Administrator User and Group"
-
Section 10.9.5, "Provisioning an Enterprise Deployment Administration User and Group"
-
Section 10.9.6, "Adding the New Administration User to the Administration Group"
-
Section 10.9.7, "Updating the boot.properties File and Restarting the System"
10.9.1 About the Supported Authentication Providers
Oracle Fusion Middleware supports a variety of LDAP authentication providers. For more information, see "Identity Store Types and WebLogic Authenticators" in Securing Applications with Oracle Platform Security Services.
The instructions in this guide assume you will be using one of the following providers:
-
Oracle Unified Directory
-
Oracle Internet Directory
-
Oracle Virtual Directory
Using LibOVD to Support Multiple LDAP Identity Stores:
By default, the instructions here describe how to configure the identity service instance to support querying against a single LDAP identity store.However, you can configure the service to support a virtualized identity store, which queries multiple LDAP identity stores, using LibOVD.
For more information about configuring a Multi-LDAP lookup, refer to "Configuring the Identity Store Service" in Securing Applications with Oracle Platform Security Services.
10.9.2 About the Enterprise Deployment Administrator User and Group
The following sections provide important information on the purpose and characteristics of an enterprise deployment administrator user and group:
-
Section 10.9.2.1, "About Using Unique Administration Users for Each Domain"
-
Section 10.9.2.2, "About Product-Specific Roles and Groups for Oracle SOA Suite"
-
Section 10.9.2.3, "Example Users and Roles Used in This Guide"
10.9.2.1 About Using Unique Administration Users for Each Domain
When you use a central LDAP user store, you can provision users and groups for use with multiple Oracle WebLogic Server domains. As a result, there is a possibility that one WebLogic administration user can have access to all the domains within an enterprise.
Such an approach is not recommended. Instead, it is a best practice to assign a unique distinguished name (DN) within the directory tree for the users and groups you provision for the administration of your Oracle Fusion Middleware domains.
For example, if you plan to install and configure an Oracle SOA Suite enterprise deployment domain, then create a user called weblogic_soa and an administration group called SOA Administrators.
10.9.2.2 About Product-Specific Roles and Groups for Oracle SOA Suite
Each Oracle SOA Suite product (Oracle SOA Suite, Oracle Business Process Management, Oracle Business Activity Monitoring) implements its own predefined roles and groups for administration and monitoring.
As result, as you extend the domain to add addition Oracle SOA Suite products, you can add these product-specific roles to the SOA Administrators group. After they are added to the SOA Administrators group, each product administrator user can administer the domain with the same set of privileges for performing administration tasks. For example, for Oracle B2B Administration, you can add the B2BAdmin role to the SOA Administrators group.
Instructions for adding additional roles to the SOA Administrators group are provided in Chapter 18, "Common Configuration and Management Tasks for an Enterprise Deployment". The roles you must add for each product is included in each product configuration chapter.
10.9.2.3 Example Users and Roles Used in This Guide
In this guide, the examples assume that you provision the following administration user and group with the DNs shown below:
-
Admin User DN:
cn=weblogic_soa,cn=Users,dc=us,dc=example,dc=com
-
Admin Group DN:
cn=SOA Administrators,cn=Groups,dc=us,dc=example,dc=com
10.9.3 Prerequisites for Creating a New Authentication Provider and Provisioning a new Administration User and Group
Before you create a new LDAP authenticator, back up the relevant configuration files:
ASERVER_HOME/config/config.xml
ASERVER_HOME/config/fmwconfig/jps-config.xml
ASERVER_HOME/config/fmwconfig/system-jazn-data.xml
In addition, back up the boot.properties file for the Administration Server in the following directory:
DOMAIN_HOME/servers/AdminServer/security
10.9.4 Creating the New Authentication Provider
To configure a new LDAP-based authentication provider:
-
Log in to the WebLogic Server Console.
-
Click Security Realms in the left navigational bar.
-
Click the myrealm default realm entry.
-
Click the Providers tab.
Note that there is a
DefaultAuthenticatorprovider configured for the realm. This is the default WebLogic Provider.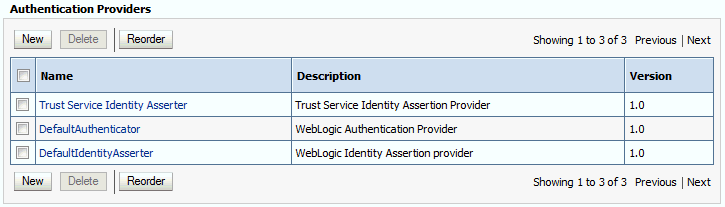
Description of the illustration ''edg_default_authenticator.gif''
-
Click Lock & Edit in the Change Center.
-
Click the New button below the list of Authentication Providers.
-
Enter a name for the provider.
Use one of the following names, based on the LDAP directory service you are planning to use as your credential store:
-
OUDAuthenticatorfor Oracle Unified Directory -
OIDAuthenticatorfor Oracle Internet Directory -
OVDAuthenticatorfor Oracle Virtual Directory
-
-
Select the authenticator type from the Type drop-down list.
Select one of the following types, based on the LDAP directory service you are planning to use as your credential store:
-
IPlanetAuthenticatorfor Oracle Unified DirectoryNote that you must select IPlanetAuthenticator when creating a new Oracle Unified Directory authentication provider.
-
OracleInternetDirectoryAuthenticatorfor Oracle Internet Directory -
OracleVirtualDirectoryAuthenticatorfor Oracle Virtual Directory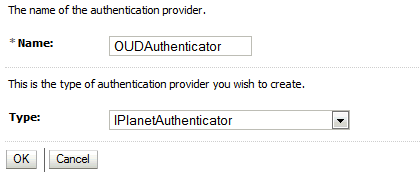
Description of the illustration ''cr_oud_auth_provider.gif''
-
-
Click OK to return to the Providers screen.
-
On the Providers screen, click the newly created authenticator in the table.
-
Select SUFFICIENT from the Control Flag drop-down menu.
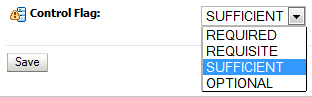
Description of the illustration ''edg_provider_control_flag.gif''
Setting the control flag to SUFFCIENT indicates that if the authenticator can successfully authenticate a user, then the authenticator should accept that authentication and should not continue to invoke any additional authenticators.
If the authentication fails, it will fall through to the next authenticator in the chain. Make sure all subsequent authenticators also have their control flag set to SUFFICIENT; in particular, check the
DefaultAuthenticatorand make sure that its control flag is set to SUFFICIENT. -
Click Save to save the control flag settings.
-
Click the Provider Specific tab and enter the details specific to your LDAP server, as shown in the following table.
Note that only the required fields are discussed in this procedure. For information about all the fields on this page, consider the following resources:
-
To display a description of each field, click Help on the Provider Specific tab .
-
For more information on setting the User Base DN, User From Name Filter, and User Attribute fields, see "Configuring Users and Groups in the Oracle Internet Directory and Oracle Virtual Directory Authentication Providers" in Administering Security for Oracle WebLogic Server.
Parameter Sample Value Value Description Host For example: oud.example.comThe LDAP server's server ID. Port For example: 1689The LDAP server's port number. Principal For example: cn=orcladminThe LDAP user DN used to connect to the LDAP server. Credential Enter LDAP password. The password used to connect to the LDAP server SSL Enabled Unchecked (clear) Specifies whether SSL protocol is used when connecting to LDAP server. User Base DN For example: cn=users,dc=us,dc=example,dc=comSpecify the DN under which your Users start. User From Name Filter For example: cn=%u, objectclass=person
If the User Name Attribute for the user object class in the LDAP directory structure is a type other than cn, change that type in the settings for the User From Name Filter. For example, if the User Name Attribute type is uid, then this field should be set to:
(&(uid=%u)(objectclass=person))).User Name Attribute For example: cnThe attribute of an LDAP user object that specifies the name of the user. Group Base DN For example: cn=groups,dc=us,dc=example,dc=comSpecify the DN that points to your Groups node. Use Retrieved User Name as Principal Checked Must be turned on. GUID Attribute entryUUID Enter this value if you are using Oracle Unified Directory as your authentication provider. -
-
Click Save to save the changes.
-
Return to the Providers page by clicking Security Realms in the right navigation pane, clicking the default realm name (myrealm), and then Providers.
-
Click Reorder, and then use the resulting page to make the Provider you just created first in the list of authentication providers.
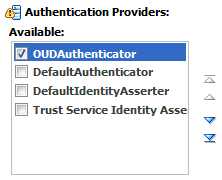
Description of the illustration ''edg_provider_order.gif''
-
Click OK.
-
In the Change Center, click click Activate Changes .
-
Restart the Administration Server and all managed servers.
To stop the Managed Servers, log in to Fusion Middleware Control, select the Managed Servers in the Target Navigator and click Shut Down in the toolbar.
To stop and start the Administration Server using the Node Manager:
-
Start WLST:
cd ORACLE_COMMON_HOME/common/bin ./wlst.sh -
Connect to Node Manager using the Node Manager credentials you defined in when you created the domain in the Configuration Wizard:
wls:/offline>nmConnect('nodemanager_username','nodemanager_password', 'ADMINVHN','5556','domain_name', 'ASERVER_HOME') -
Stop the Administration Server:
nmKill('AdminServer') -
Start the Administration Server:
nmStart('AdminServer') -
Exit WLST:
exit()
To start the Managed Servers, log in to Fusion Middleware Control, select the Managed Servers, and click Start Up in the toolbar.
-
-
After the restart, review the contents of the following log file:
ASERVER_HOME/servers/AdminServer/logs/AdminServer.logVerify that no LDAP connection errors occurred. For example, look for errors such as the following:
The LDAP authentication provider named "OUDAuthenticator" failed to make connection to ldap server at ...
If you see such errors in the log file, then check the authorization provider connection details to verify they are correct and try saving and restarting the Administration Server again.
-
After you restart and verify that no LDAP connection errors are in the log file, try browsing the users and groups that exist in the LDAP provider:
In the Administration Console, navigate to the Security Realms > myrealm > Users and Groups page. You should be able to see all users and groups that exist in the LDAP provider structure.
10.9.5 Provisioning an Enterprise Deployment Administration User and Group
Your next step is to provision an administration user and group, which can be used to manage the enterprise deployment you are configuring.
This example shows how to create a user called weblogic_soa and a group called SOA Administrators.
To provision the administration user and group in LDAP provider:
-
Create an ldif file named
admin_user.ldifwith the contents shown below and then save the file:dn: cn=weblogic_soa, cn=Users, dc=us, dc=example, dc=com orclsamaccountname: weblogic_soa givenname: weblogic_soa sn: weblogic_soa userpassword: password mail: weblogic_soa objectclass: top objectclass: person objectclass: organizationalPerson objectclass: inetorgperson objectclass: orcluser objectclass: orcluserV2 uid: weblogic_soa cn: weblogic_soa description: Admin User for the SOA Domain
-
Provision the user in the LDAP directory.
For example, for an Oracle Unified Directory LDAP provider:
OUD_INSTANCE_HOME/bin/ldapmodify -a \
                                 -D "cn=oudadmin" \
                                 -w password \
                                 -p 1389 \
                                 -f admin_user.ldif
For Oracle Internet Directory:
OID_ORACLE_HOME/bin/ldapadd -h oidhost.example.com \
                             -p 389 \
                             -D cn="orcladmin" \
                             -w password \
                             -c \
                             -v \
                             -f admin_user.ldif
-
Create an
ldiffile namedadmin_group.ldifwith the contents shown below and then save the file:dn: cn=SOA Administrators, cn=Groups, dc=us, dc=example, dc=com displayname: SOA Administrators objectclass: top objectclass: groupOfUniqueNames objectclass: orclGroup uniquemember: cn=weblogic_soa,cn=users,dc=us,dc=example,dc=com cn: SOA Administrators description: Administrators Group for the SOA Domain
-
Provision the group in the LDAP Directory.
For Oracle Unified Directory:
OUD_INSTANCE_HOME/bin/ldapmodify -a \
                                 -D "cn=oudadmin" \
                                 -w password \
                                 -p 1389 \
                                 -f admin_group.ldif
For Oracle Internet Directory:
OID_ORACLE_HOME/bin/ldapadd -h oid.example.com -p 389 -D cn="orcladmin" -w <password> -c -v -f admin_group.ldif -
Verify that the changes were made successfully:
-
Log in to the Oracle WebLogic Server Administration Console.
-
In the left pane of the console, click Security Realms.
-
Click the default security realm (myrealm).
-
Click the Users and Groups tab.
-
Verify that the admin user and group you provisioned are listed on the page.
-
10.9.6 Adding the New Administration User to the Administration Group
After adding the users and groups to Oracle Internet Directory, the group must be assigned the Administration role within the WebLogic domain security realm. This enables all users that belong to the group to be administrators for the domain.
To assign the Administration role to the new enterprise deployment administration group:
-
Log in to the WebLogic Administration Server Console using the Administration credentials that you provided in the Configuration Wizard.
Do not use the credentials for the administration user you created and provided for the new Authentication Provider.
-
In the left pane of the console, click Security Realms.
-
Click the default security realm (myrealm).
-
Click the Roles and Policies tab.
-
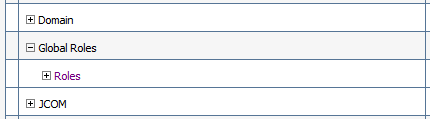
Expand the Global Roles entry in the table and click Roles.
Description of the illustration ''edg_providers_global_roles.gif''
-
Click the Admin role.

Description of the illustration ''prov_global_admin_role.gif''
-
Click Add Conditions button.
-
Select Group from the Predicate List drop down menu, and then click Next.
-
Enter
SOA Administratorsin the Group Argument Name field, and then click Add.SOA Administratorsis added to the list box of arguments.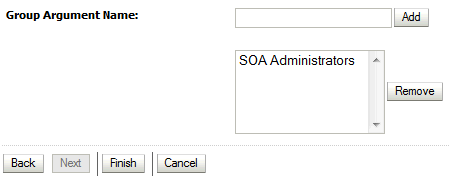
Description of the illustration ''prov_edit_arguments.gif''
-
Click Finish to return to the Edit Global Role page.
The SOA Administrators group is now listed.
-
Click Save to finish adding the Admin Role to the SOA Administrators Group.
-
Validate that the changes by logging in to the WebLogic Administration Server Console using the new
weblogic_soauser credentials.If you can log in to the Oracle WebLogic Server Administration Console and Fusion Middleware Control with the credentials of the new administration user you just provisioned in the new Authentication Provider, then you have configured the provider successfully.
10.9.7 Updating the boot.properties File and Restarting the System
After you create the new administration user and group, you must update the Administration Server boot.properties file with the administration user credentials that you created in LDAP directory:
-
On SOAHOST1, go the following directory:
DOMAIN_HOME/servers/AdminServer/security -
Rename the existing
boot.propertiesfile:mv boot.properties boot.properties.backup
-
Use a text editor to create a file called
boot.propertiesunder the security directory. -
Enter the following lines in the file:
username=weblogic_soa password=password -
Save the file.
-
Restart the Administration Server.
10.9.8 Adding the wsm-pm Role to the SOA Administrators Group
After you configure a new LDAP-based Authorization Provider and restart the Administration Server, update the new Provider so that the Oracle Web Services Manager wsm-pm administration role is a member of the enterprise deployment administration group (SOA Administrators).
To perform this task, refer to Section 18.2.1, "Configuring Roles for Administration of Oracle SOA Suite Products".