6 Common Configuration Tasks
This chapter describes tasks that are common across all the web servers for configuring the plug-ins provided by Oracle. It contains the following sections:
6.1 Use SSL with Plug-Ins
You can use the Secure Sockets Layer (SSL) protocol to protect the connection between the plug-in and Oracle WebLogic Server. The SSL protocol provides confidentiality and integrity to the data passed between the plug-in and WebLogic Server.
The plug-in does not use the transport protocol (HTTP or HTTPS) specified in the HTTP request (usually by the browser) to determine whether to use SSL to protect the connection between the plug-in and WebLogic Server; that is, the plug-in is in no way dependent on whether the HTTP request (again, usually from the browser) uses HTTPS (SSL).
Instead, the plug-in uses SSL parameters that you configure for the plug-in, as described in Section 7.2, "SSL Parameters for Web Server Plug-Ins", to determine when to use SSL:
-
WebLogicSSLVersion—Specifies the SSL protocol version to use for communication between the plug-in and the WebLogic Server. -
WLSSLWallet—The version 12.1.3 plug-ins use Oracle wallets to store SSL configuration information. The plug-ins introduce a new SSL configuration parameterWLSSLWalletto use Oracle wallets. The orapki utility is provided in the plug-in distribution for this purpose.The orapki utility manages public key infrastructure (PKI) elements, such as wallets and certificate revocation lists, on the command line so the tasks it performs can be incorporated into scripts. This enables you to automate many of the routine tasks of maintaining a PKI.
For more information, see "Using the orapki Utility for Certificate Validation and CRL Management".
-
SecureProxy—TheSecureProxyparameter determines whether SSL is enabled.
Note:
For more information on valid security protocols and ciphers for the current release, see "SSLCipherSuite" and "SSLProtocol" in Oracle Fusion Middleware Administering Oracle HTTP Server.In the case of two-way SSL, the plug-in (the SSL client) automatically uses two-way SSL when Oracle WebLogic Server is configured for two-way SSL and requests a client certificate.
If a client certificate is not requested, the plug-ins default to one-way SSL.
Note:
If an Oracle Fusion Middleware 12c (12.1.3) product is installed on the same system as the Apache (including Oracle HTTP Server) plug-in, the ORACLE_HOME variable must point to a valid installation; otherwise, the plug-in fails to initialize SSL.For example, if ORACLE_HOME is invalid because the product was not cleanly removed, the plug-in fails to initialize SSL.
6.1.1 Configure Libraries for SSL
The plug-ins use Oracle libraries (NZ) to provide SSL support. Because the libraries are large, they are loaded only when SSL is needed. You must ensure that the library files, located in lib/*.so*, are available at the proper locations so that they can be dynamically loaded by the plug-in.
To configure the libraries for the plug-ins for Apache HTTP Server, you have a few options:
-
Windows: Specify the
libdirectory that contains the .dll files in the PATH variable or copy the *.dll files in thebindirectory. -
UNIX: Configure LD_LIBRARY_PATH to point to the folder containing the libraries or copy the libraries to the
libdirectory.
If you copy the libraries instead of updating the PATH (Windows) or LD_LIBRARY_PATH (UNIX) variables, you must copy the libraries afresh each time you install a new version of the plug-in.
6.1.2 Configuring a Plug-In for One-Way SSL
Perform the following steps to configure one-way SSL.
In these steps, you run the keytool commands on the system on which WebLogic Server is installed, and you run the orapki commands on the system on which the version 12.1.3 plug-ins are installed.
Note:
The examples in this section use the WebLogic Server demo CA. If you are using the plug-in a production environment, ensure that trusted CAs are properly configured for the plug-in and for Oracle WebLogic Server.-
Configure Oracle WebLogic Server for SSL. For more information, see "Configuring SSL" in Securing Oracle WebLogic Server.
-
Create an Oracle Wallet, by using the orapki utility.
orapki wallet create -wallet mywallet -auto_login_only
For more information, see "Using the orapki Utility for Certificate Validation and CRL Management" in the Oracle Fusion Middleware Administrator's Guide.
Note:
Only the user who creates the wallet (or for Windows, the account SYSTEM) has access to the wallet.This is typically sufficient for the Oracle WebLogic Server Proxy Plug-In for Apache HTTP Server because Apache runs as the account SYSTEM on Windows, and as the user who creates it on UNIX. However, for IIS the wallet will not work because the default user is IUSR_<Machine_Name>(IIS6.0 and below) or IUSR (IIS7.0 and above).
If the user who runs the Oracle WebLogic Server Proxy Plug-In for Apache HTTP Server or Microsoft IIS Web Server is different from the user who creates the wallet (or for Windows, the account SYSTEM), you must grant the user access to the wallet by running the command
cacls(Windows) orchmod(UNIX) after you create the wallet. For example:cacls <wallet_path>\cwallet.sso /e /g IUSR:R -
Import the WLS trust certificate into the Oracle Wallet.
orapki wallet add -wallet mywallet -trusted_cert -cert <cert_file_name> -auto_login_only
-
Configure the web server configuration files as follows:
-
For Oracle HTTP Server, edit the
mod_wl_ohs.conffile as follows:<IfModule mod_weblogic.c> WebLogicHost host WebLogicPort port SecureProxy ON WLSSLWallet path_to_wallet </IfModule>
-
For Microsoft IIS, edit the
iisproxy.inifile as follows:WebLogicHost=host WebLogicPort=port SecureProxy=ON WLSSLWallet=path_to_wallet
-
For iPlanet Web Server, edit the
config/obj.conforconfig/<vs>-obj.conffile as follows:<Object ppath="*/weblogic/*">> Service fn=wl-proxy WebLogicHost=myserver.com WebLogicPort=7001 PathTrim="/weblogic" SecureProxy=ON WLSSLWallet=path_to_wallet </Object>
For more information about the parameters in these examples, see Chapter 7, "Parameters for Web Server Plug-Ins."
-
-
If the version of the Oracle WebLogic Server instances in the back end is 10.3.4 (or a later release), do the following:
-
Log in to the Oracle WebLogic Server administration console.
-
In the Domain Structure pane, expand the Environment node.
-
If the server instances to which you want to proxy requests from Oracle HTTP Server are in a cluster, select Clusters.
-
Otherwise, select Servers.
-
-
Select the server or cluster to which you want to proxy requests from Oracle HTTP Server.
The Configuration: General tab is displayed.
-
Scroll down to the Advanced section, expand it.
-
Do one of the following:
To... Select... Enable one-way SSL WebLogic Plug-In Enabled Enable two-way SSL where client certificates are used to authenticate Client Cert Proxy Enabled Enable two-way SSL with client certificates. Both -
If you selected Servers in step b, repeat steps c and d for the other servers to which you want to proxy requests from Oracle HTTP Servers.
-
Click Save.
For the change to take effect, you must restart the server instances.
-
-
Send a request to
http://host:port/mywebapp/my.jsp from the browser and validate the response.
6.1.3 Configure Two-Way SSL Between the Plug-In and Oracle WebLogic Server
When Oracle WebLogic Server is configured for two-way SSL, the plug-in forwards the user certificate to WebLogic Server. As long as WebLogic Server can validate the user certificate, two-way SSL can be established.
In addition to the steps described in Section 6.1.2, "Configuring a Plug-In for One-Way SSL", perform the following steps:
In these steps, you run the keytool commands on the system on which WebLogic Server is installed. You run the orapki commands on the system on which the version 12.1.3 plug-ins are installed.
-
From the Oracle wallet, generate a certificate request.
-
Use this certificate request to create a certificate by using a CA or some other mechanism.
-
Import the user certificate as a trusted certificate in the WebLogic trust store. Oracle WebLogic Server needs to trust the certificate.
keytool -file user.crt -importcert -trustcacerts -keystore DemoTrust.jks -storepass <passphrase>
-
Set the WebLogic Server SSL configuration options that require the presentation of client certificates (for two-way SSL). For more information, see "Configure two-way SSL" in the Oracle WebLogic Server Administration Console Help.
6.2 Use IPv6 With Plug-Ins
The version 12.1.3 plug-ins support IPv6. Specifically, the WebLogicHost and WebLogicCluster configuration parameters (see Table 7-1) now support IPv6 addresses. For example:
<IfModule mod_weblogic.c>
 WebLogicHost [a:b:c:d:e:f]
 WebLogicPort 7002
 ...
</IfModule>
or
<IfModule mod_weblogic.c>
 WebLogicCluster [a:b:c:d:e:f]:<port>, [g:h:i:j:k:l]:<port>

 ....
</IfModule>
You can also use the IPv6 address mapped host name.
Note:
As of Windows 2008, the DNS server returns the IPv6 address in preference to the IPv4 address. If you are connecting to a Windows 2008 (or later) system using IPv4, the link-local IPv6 address format is tried first, which may result in a noticeable delay and reduced performance. To use the IPv4 address format, configure your system to instead use IP addresses in the configuration files or add the IPv4 addresses to theetc/hosts file.
In addition, you may find that setting the DynamicServerList property to OFF in the mod_wl_ohs.conf/mod_wl.conf/iisproxy.ini file also improves performance with IPv6. When set to OFF, the plug-in ignores the dynamic cluster list used for load balancing requests proxied from the plug-in and uses the static list specified with the WebLogicCluster parameter.
6.3 Set Up Perimeter Authentication
Use perimeter authentication to secure WebLogic Server applications that are accessed by using the plug-in.
A WebLogic Identity Assertion Provider authenticates tokens from outside systems that access your WebLogic Server application, including users who access your WebLogic Server application through the plug-in. Create an Identity Assertion Provider that will safely secure your plug-in as follows:
-
Create a custom Identity Assertion Provider on your WebLogic Server application. See "How to Develop a Custom Identity Assertion Provider" in Developing Security Providers for Oracle WebLogic Server.
-
Configure the custom Identity Assertion Provider to support the Cert token type and make Cert the active token type. See "How to Create New Token Types" in Developing Security Providers for Oracle WebLogic Server.
-
Set clientCertProxy to True in the web.xml deployment descriptor file for the Web application (or, if using a cluster, optionally set the
Client Cert Proxy Enabledattribute to true for the whole cluster on the Administration Console Cluster then Configuration then General tab).The
clientCertProxyattribute can be used with a third party proxy server, such as a load balancer or an SSL accelerator, to enable 2-way SSL authentication. For more information about theclientCertProxyattribute, see context-param in Developing Web Applications, Servlets, and JSPs for Oracle WebLogic Server. -
Once you have set
clientCertProxy, be sure to use a connection filter to ensure that WebLogic Server accepts connections only from the machine on which the plug-in is running. See "Using Network Connection Filters" in Programming Security for Oracle WebLogic Server. -
Web server plug-ins require a trusted Certificate Authority file to use SSL between the plug-in and WebLogic Server. See Section 6.1, "Use SSL with Plug-Ins" for the steps you must perform to configure SSL.
See "Identity Assertion Providers" in Developing Security Providers for Oracle WebLogic Server.
6.4 Understanding Connection Errors and Clustering Failover
When the plug-in attempts to connect to WebLogic Server, the plug-in uses several configuration parameters to determine how long to wait for connections to the WebLogic Server host and, after a connection is established, how long the plug-in waits for a response. If the plug-in cannot connect or does not receive a response, the plug-in attempts to connect and send the request to other WebLogic Server instances in the cluster. If the connection fails or there is no response from any WebLogic Server in the cluster, an error message is sent.
Figure 6-1 demonstrates how the plug-in handles failover.
6.4.1 Possible Causes of Connection Failures
Failure of the WebLogic Server host to respond to a connection request could indicate the following problems:
-
Physical problems with the host machine
-
Network problems
-
Other server failures
Failure of all WebLogic Server instances to respond could indicate the following problems:
-
WebLogic Server is not running or is unavailable
-
A hung server
-
A database problem
-
An application-specific failure
6.4.2 Tips for reducing Connection_Refused Errors
Under load, a plug-in may receive CONNECTION_REFUSED errors from a back-end WebLogic Server instance. Follow these tuning tips to reduce CONNECTION_REFUSED errors:
-
Increase the
AcceptBackLogsetting in the configuration of your WebLogic Server domain. -
Decrease the time wait interval. This setting varies according to the operating system you are using. For example:
-
On Windows, set the
TcpTimedWaitDelayon the proxy and WebLogic Server servers to a lower value. Set the TIME_WAIT interval in Windows by editing the registry key under HKEY_LOCAL_MACHINE:SYSTEM\CurrentControlSet\Services\Tcpip\Parameters\TcpTimedWaitDelay
If this key does not exist you can create it as a DWORD value. The numeric value is the number of seconds to wait and may be set to any value between 30 and 240. If not set, Windows defaults to 240 seconds for TIME_WAIT.
-
On Windows 2000, lower the value of the
TcpTimedWaitDelayby editing the registry key under HKEY_LOCAL_MACHINE:SYSTEM\CurrentControlSet\Services\Tcpip\Parameters
-
On Solaris, reduce the setting
tcp_time_wait_intervalto one second (for both the WebLogic Server machine and the Apache machine, if possible):$ndd /dev/tcp param name to set - tcp_time_wait_interval value=1000
-
-
Increase the open file descriptor limit on your machine. This limit varies by operating system. Using the limit (.csh) or ulimit (.sh) directives, you can make a script to increase the limit. For example:
#!/bin/sh
ulimit -S -n 100
exec httpd
-
On Solaris, increase the values of the following tunables on the WebLogic Server machine:
tcp_conn_req_max_q tcp_conn_req_max_q0
6.4.3 Failover with a Single, Non-Clustered WebLogic Server
If you are running only a single WebLogic Server instance the plug-in only attempts to connect to the server defined with the WebLogicHost parameter. If the attempt fails, an HTTP 503 error message is returned. The plug-in continues trying to connect to that same WebLogic Server instance for the maximum number of retries as specified by the ratio of ConnectTimeoutSecs and ConnectRetrySecs.
6.4.4 The Dynamic Server List
The WebLogicCluster parameter is required to proxy to a list of back-end servers that are clustered, or to perform load balancing among non-clustered managed server instances.
In the case of proxying to clustered managed servers, when you use the WebLogicCluster parameter to specify a list of WebLogic Servers, the plug-in uses that list as a starting point for load balancing among the members of the cluster. After the first request is routed to one of these servers, a dynamic server list is returned containing an updated list of servers in the cluster. In the case of proxying to clustered managed servers, when you use the WebLogicCluster parameter to specify a list of WebLogic Servers, the plug-in uses that list as a starting point for load balancing among the members of the cluster. After the first request is routed to one of these servers, a dynamic server list is returned containing an updated list of servers in the cluster. The updated list adds any new servers in the cluster and deletes any that have been shut down, or are being suspended, or are no longer part of the cluster or that have failed to respond to requests. This feature can be controlled by using DynamicServerList. For example, to disable this feature, set DynamicServerList to OFF. This feature can be controlled by using DynamicServerList. For example, to disable this feature, set DynamicServerList to OFF.
DynamicServerList ON is a preferred performance tuning parameter. It is useful, for example, if a member of a cluster is temporarily down for maintenance or if administrators decided they want to add another member on the fly and not need to restart Oracle HTTP Server.
Note:
IfDynamicServerList only works when set to OFF when using clustered WebLogic Servers using WebLogicCluster, WebLogic Server is encountering a problem obtaining or delivering the dynamic list.6.4.5 Failover, Cookies, and HTTP Sessions
When a request contains session information stored in a cookie or in the POST data, or encoded in a URL, the session ID contains a reference to the specific server instance in which the session was originally established (called the primary server). A request containing a cookie attempts to connect to the primary server. If that attempt fails, the plug-in attempts to make a connection to the next available server in the list in a round-robin fashion. That server retrieves the session from the original secondary server and makes itself the new primary server for that same session. See Figure 6-1.
Note:
If the POST data is larger than 64K, the plug-in will not parse the POST data to obtain the session ID. Therefore, if you store the session ID in the POST data, the plug-in cannot route the request to the correct primary or secondary server, resulting in possible loss of session data.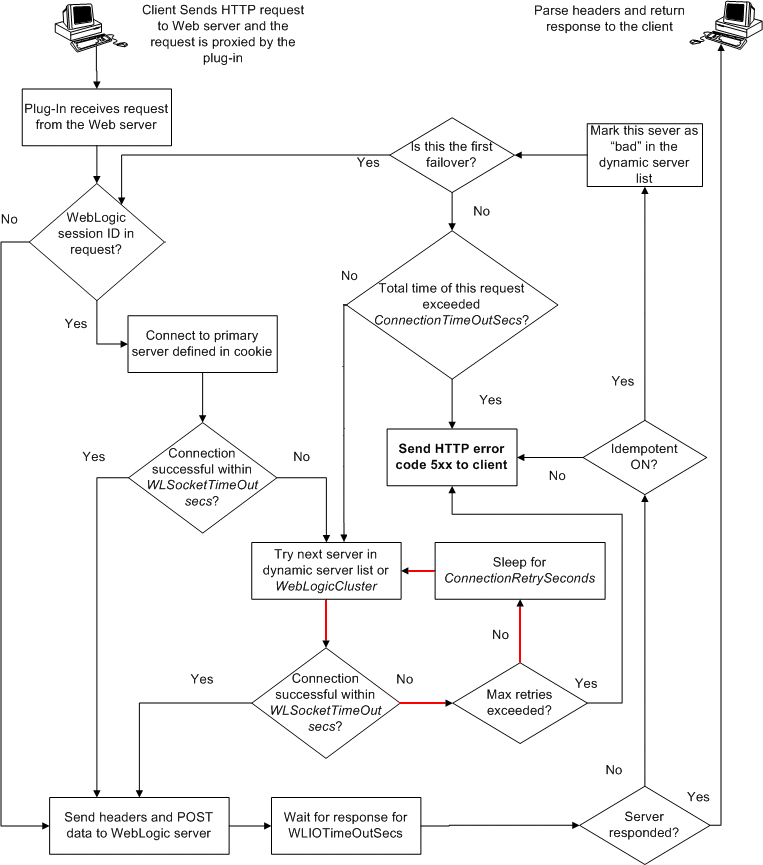
In this figure, the Maximum number of retries allowed in the red loop is equal to ConnectTimeoutSecs/ConnectRetrySecs.
6.4.6 Using SSL with the Plug-In for iPlanet Web Server
You can use the Secure Sockets Layer (SSL) protocol to protect the connection between the Oracle WebLogic Server Proxy Plug-In 12.1.3 for iPlanet Web Server plug-in and Oracle WebLogic Server. The SSL protocol provides confidentiality and integrity to the data passed between the Oracle iPlanet Web Server plug-in and Oracle WebLogic Server.
The Oracle WebLogic Server Proxy Plug-In 12.1.3 for iPlanet Web Server plug-in does not use the transport protocol (http or https) specified in the HTTP request (usually by the browser) to determine whether the SSL protocol will be used to protect the connection between the Oracle WebLogic Server Proxy Plug-In 12.1.3 for iPlanet Web Server and Oracle WebLogic Server.
To use the SSL protocol between Oracle iPlanet Web Server plug-in and Oracle WebLogic Server:
-
Configure Oracle WebLogic Server for SSL. For more information, see "Configuring SSL" in Securing Oracle WebLogic Server.
-
Set the
WebLogicPortparameter in theServicedirective in the obj.conf file to the listen port configured in step 1. -
Set the
SecureProxyparameter in theServicedirective in the obj.conf file file toON. -
Set additional parameters, as required, in the
Servicedirective in theobj.conffile that define information about the SSL connection. For the list of parameters, see Section 7.2, "SSL Parameters for Web Server Plug-Ins."
6.4.7 Failover Behavior When Using Firewalls and Load Directors
In most configurations, the Oracle WebLogic Server Proxy Plug-In 12.1.3 for iPlanet Web Server sends a request to the primary instance of a cluster. When that instance is unavailable, the request fails over to the secondary instance. However, in some configurations that use combinations of firewalls and load-directors, any one of the servers (firewall or load-directors) can accept the request and return a successful connection while the primary instance of WebLogic Server is unavailable. After attempting to direct the request to the primary instance of WebLogic Server (which is unavailable), the request is returned to the plug-in as "connection reset."
Requests running through combinations of firewalls (with or without load-directors) are handled by WebLogic Server. In other words, responses of connection reset fail over to a secondary instance of WebLogic Server. Because responses of connection reset fail over in these configurations, servlets must be idempotent. Otherwise duplicate processing of transactions may result.
6.5 Tuning OHS and Apache HTTP Server for High Throughput for WebSocket Upgrade Requests
WebLogic Server 12.1.3 supports deploying WebSocket applications. WebLogic Web Server Plug-In 12.1.3 for Oracle HTTP Server 12.1.3 and Apache HTTP Server 2.2.x and 2.4.x can now handle such WebSocket connection upgrade requests and effectively proxy to WebSocket applications hosted within WebLogic Server 12.1.3 and later. As a result of adding this support, a new configuration parameter WLMaxWebSocketClients is introduced.
WLMaxWebSocketClients limits the number of active WebSocket connections at any instant of time. The maximum value you can set for this parameter is 75 percent of ThreadsPerChild (Windows) or 75 percent of MaxClients (non-Windows). Hence, to tune your HTTP Server for maximum WebSocket connection upgrade requests, set MaxClients/ThreadsPerChild to a value that can accommodate WebSocket connections as well. Also, ensure that WLMaxWebSocketClients is set to 75 percent of MaxClients/ThreadsPerChild.