5 Configuring the Plug-In for Microsoft IIS Web Server
The following sections describe how to install and configure the Oracle WebLogic Server Proxy Plug-In 12.1.3 for Microsoft IIS Web Server:
Download the Oracle WebLogic Server Proxy Plug-In for IIS Web Server, as described in Section 1.2, "Availability of Oracle WebLogic Server Proxy Plug-In 12.1.3." The zip file contains these files:
Table 5-1 Files Included in the Microsoft IIS Plug-In Zip
| (path)/filename | Description |
|---|---|
|
README.txt |
Information specific to the distribution, late-breaking updates, and other errata. |
|
bin/orapki.bat |
orapki tool for configuring Oracle wallets |
|
jlib/*.jar |
orapki helper Java libraries |
|
iisproxy.dll |
WebLogic proxy module |
|
lib/*.dll |
Helper libraries |
5.1 Working with the Microsoft IIS 7.0 Plug-In
This section describes how to install and configure the plug-in for Microsoft IIS 7.0.
-
Section 5.1.1, "Installing and Configuring the Microsoft IIS 7.0 Plug-In"
-
Section 5.1.3, "Using Wildcard Application Mappings to Proxy by Path"
-
Section 5.1.4, "Proxying Requests from Multiple Virtual Websites to WebLogic Server"
5.1.1 Installing and Configuring the Microsoft IIS 7.0 Plug-In
This section describes differences in how you set up the Microsoft Internet Information Server plug-in for IIS 7.0.
To set up the Microsoft Internet Information Server plug-in for IIS 7.0, follow these steps:
-
Download and install Microsoft IIS 7.0.
-
Ensure that all of the necessary features of Microsoft IIS 7.0 are enabled.
-
Download and install the latest Oracle WebLogic Server Proxy Plug-In zip file.
-
Create a web application in IIS Manager by right clicking Web Sites then Add Web Site.
Fill in the Web Site Name with the name you want to give to your web application; for example,
MyApp. Select the physical path of your web application Port (any valid port number not currently in use).Click OK to create the web application.
If you can see the name of your application under Web Sites it means that your application has been created and started running. Click the MyApp node under Web Sites to see all of the settings related to the MyApp application, which you can change, as shown in Figure 5-1.
-
Click Handler Mappings to set the mappings to the handler for a particular MIME type.
-
Click the StaticFile and change the Request path from * to *.*. Click OK.
Figure 5-3 Editing the Request Path for Module
Description of ''Figure 5-3 Editing the Request Path for Module''
-
Click MyApp and then click Add Script Map on the right-hand side menu options. Enter * for the Request path.
Browse to the iisproxy.dll file and add it as the executable. Name it
proxy.Figure 5-4 Editing the Request Path for Script
Description of ''Figure 5-4 Editing the Request Path for Script''
-
Click Request Restrictions and deselect Invoke handler only if the request is mapped to.
Figure 5-5 Editing the Request Restrictions

Description of ''Figure 5-5 Editing the Request Restrictions''
-
Click OK to add this Handler mapping. Click Yes on the Add Script Map dialog box.
-
To configure proxying by path, see Section 5.1.3, "Using Wildcard Application Mappings to Proxy by Path".
-
Click the Root node of the IIS Manager tree and click the ISAPI and CGI Restrictions. Make sure to check Allow unspecified ISAPI modules.
Figure 5-7 Editing ISAPI and CGI Restrictions

Description of ''Figure 5-7 Editing ISAPI and CGI Restrictions''
-
Create a file called iisproxy.ini with the following contents and place it in the directory with the plug-in:
WebLogicHost= @hostname@
WebLogicPort= @port@
ConnectRetrySecs=5
ConnectTimeoutSecs=25
Debug=ALL
DebugConfigInfo=ON
KeepAliveEnabled=true

WLLogFile=@Log file name@
SecureProxy=OFF
-
Open the Internet Explorer browser and enter
http://<hostname>:<port>. You should be able to see the Medrec Sample Application from your Oracle WebLogic Server.To run the plug-in SSL mode, change the value of WeblogicPort to the SSL port of your application, change the
SecureProxyvalue to ON, and setWLSSLWalletto the location of the wallet. For more information on SSL parameters, see Section 7.2, "SSL Parameters for Web Server Plug-Ins".
5.1.2 Serving Static Files from the Web Server
In order to have IIS serve all static content that could be included on a web application that is to be served by WebLogic Server, do the following:
-
Configure your application by setting up Oracle WebLogic Server Proxy Plug-In 12.1.3 for Microsoft IIS Web Server on IIS Web Server as described in Section 5.1.1, "Installing and Configuring the Microsoft IIS 7.0 Plug-In."
Assume that you created a Handler Mapper named proxy as described on the Oracle documentation.
Important:
Do not useWLEXCLUDEPATHORMIMETYPEproperty inside your proxy setup. It is not required neither useful here and can only confuse the understanding of the flow. -
On IIS Manager, display the home page by clicking the Virtual Directory or Application created on step 1.
-
Double-click the Handling Mappers and then click View Ordered List on the right side pane. An ordered list of Handler Mappings appears.
-
Select proxy and drag it below StaticFile handler mapping (in other words the StaticFile handler mapping should be above the proxy handler mapping.)
-
Edit the Static File and change the request path to: *.jpg. Save the file.
-
Configure IIS to serve types of static files, for example, PNGs, GIFs, or CSS, do the following:
-
On IIS Manager, display the home page by clicking the Virtual Directory or Application created on step 1.
-
Double click the Handling Mappers and then click Add Module Mapping on the right side pane.
-
Choose a Request Path of desired type: for PNGs use *.png, for GIFs use *.gif and so on. For Module, choose StaticFileModule, enter a name, and click OK.
-
Ensure that as stated on step 4, the newly created HandlerMapping is ordered before the proxy Handler Mapping defined on step 1.
-
5.1.3 Using Wildcard Application Mappings to Proxy by Path
You can configure a website or virtual directory to run an Internet Server API (ISAPI) application at the beginning of every request to that website or virtual directory, regardless of the extension of the requested file. You can use this feature to insert a mapping to iisproxy.dll and thereby proxy requests by path to WebLogic Server.
For more information, see "Add a Wildcard Script Map" for IIS 7.5 (http://technet.microsoft.com/en-us/library/cc754606(WS.10).aspx).
5.1.3.1 Adding a Wildcard Script Map for IIS 7.0 and Above
The following steps summarize the instructions available at "Add a Wildcard Script Map" for IIS (http://technet.microsoft.com/en-us/library/cc754606(WS.10).aspx) to add a wildcard script map to do proxy-by-path with ISAPI in IIS:
-
Open IIS Manager and navigate to the level you want to manage. For information about opening IIS Manager, see "Open IIS Manager" at
http://technet.microsoft.com/en-us/library/cc770472(WS.10).aspx. For information about navigating to locations in the UI, see "Navigation in IIS Manager" athttp://technet.microsoft.com/en-us/library/cc732920(WS.10).aspx. -
In Features View, on the server, site, or application Home page, double-click Handler Mappings.
-
On the Handler Mappings page, in the Actions pane, click Add Wildcard Script Map.
-
In the Executable box, type the full path or browse to the
iisproxy.dllthat processes the request. For example, typesystemroot\system32\inetsrv\iisproxy.dll. -
In the Name box, type a friendly name for the handler mapping.
-
Click OK.
-
Optionally, on the Handler Mappings page, select a handler to lock or unlock. When you lock a handler mapping, it cannot be overridden at lower levels in the configuration. Select a handler mapping in the list, and then in the Actions pane, click Lock or Unlock.
-
After you add a wildcard script map, you must add the executable to the ISAPI and CGI Restrictions list to enable it to run. For more information about ISAPI and CGI restrictions, see "Configuring ISAPI and CGI Restrictions in IIS 7" at
http://technet.microsoft.com/en-us/library/cc730912(WS.10).aspx.
Note:
If you are proxying a request to multiple IIS applications within the same IIS site, to prevent the subsequent request from proxying to the first website only, create each IIS application and assign a unique application pool to each IIS application.With IIS 7.x, you cannot assign application pools to virtual directories.
5.1.4 Proxying Requests from Multiple Virtual Websites to WebLogic Server
To proxy requests from multiple websites (defined as virtual directories in IIS) to WebLogic Server:
-
Create a new directory for the virtual directories. This directory will contain .dll and .ini files used to define the proxy.
-
Extract the contents of the plug-in .zip file to a directory.
-
For each virtual directory you configured, copy the contents of the plug-in \lib folder to the directory you created in step 1.
-
Create an iisproxy.ini file for the virtual websites, as described in Section 1.1.2, "Proxying Requests". Copy this iispoxy.ini file to the directory you created in step 1.
-
Copy iisproxy.dll to the directory you created in step 1.
-
Create a separate application pool for each virtual directory.
As described in "Creating Application Pools (IIS 6.)" (
http://www.microsoft.com/technet/prodtechnol/WindowsServer2003/Library/IIS/93275ef2-2f85-4eb1-8b92-a67545be11b4.mspx?mfr=true), you can isolate different Web applications or websites in pools, which are called application pools. In an application pool, process boundaries separate each worker process from other worker processes so that when an application is routed to one application pool, applications in other application pools do not affect that application.
Note:
Step 6 only applies to IIS 6.0 as there is no Application Protection option with IIS 7.0. The above step will work with IIS 7.0, except that exactly one IIS virtual directory exists within a particular IIS site. The limitation exists because, with IIS 7.0, it is impossible to assign a unique application pool to each virtual directory, thus the subsequent requests are always proxied to the firstwebsite(virtual directory).5.1.4.1 Sample iisproxy.ini File
Here is a sample iisproxy.ini file for use with a single, non-clustered WebLogic Server. Comment lines are denoted with the "#" character.
# This file contains initialization name/value pairs
# for the IIS/WebLogic plug-in.
WebLogicHost=localhost
WebLogicPort=7001
ConnectTimeoutSecs=20
ConnectRetrySecs=2
Here is a sample iisproxy.ini file with clustered WebLogic Servers. Comment lines are denoted with the "#" character.
# This file contains initialization name/value pairs
# for the IIS/WebLogic plug-in.
WebLogicCluster=myweblogic.com:7001,yourweblogic.com:7001
ConnectTimeoutSecs=20
ConnectRetrySecs=2
Note:
If you are using SSL between the plug-in and WebLogic Server, the port number should be defined as the SSL listen port.5.1.5 Creating ACLs Through IIS 7.0
ACLs will not work through the Oracle WebLogic Server Proxy Plug-In 12.1.3 for Microsoft IIS Web Server if the Authorization header is not passed by IIS. Use the following information to ensure that the Authorization header is passed by IIS.
When using Basic Authentication, the user is logged on with local log-on rights. To enable the use of Basic Authentication, grant each user account the Log On Locally user right on the IIS server. Two problems may result from Basic Authentication's use of local logon:
-
If the user does not have local logon rights, Basic Authentication does not work even if the FrontPage, IIS, and Windows configurations appear to be correct.
-
A user who has local log-on rights and who can obtain physical access to the host computer running IIS will be permitted to start an interactive session at the console.
To enable Basic Authentication, in the Directory Security tab of the console, ensure that the Allow Anonymous option is "on" and all other options are "off".
5.1.6 Testing the Installation
After you install and configure the Microsoft IIS plug-in, follow these steps for deployment and testing:
-
Make sure WebLogic Server and IIS are running.
-
Save a JSP file into the document root of the default Web Application.
-
Open a browser and set the URL to the IIS plus filename.jsp, as shown in this example:
http://myiis.server.com/filename.jsp
If filename.jsp is displayed in your browser, the plug-in is functioning.
5.2 Working with the Microsoft IIS 7.5 Plug-In
This section describes how to install and configure the plug-in for Microsoft IIS 7.5.
-
Section 5.2.1, "Installing and Configuring the Microsoft IIS 7.5 Plug-In"
-
Section 5.2.3, "Serving Static Files and Dynamic Content From the Same Request with IIS 7.5"
5.2.1 Installing and Configuring the Microsoft IIS 7.5 Plug-In
Follow these steps to install and configure the Microsoft IIS 7.5 Plug-In.
-
Install Microsoft IIS 7.5.
-
Ensure that all of the necessary features of Microsoft IIS 7.5 are enabled.
-
From the Start menu, choose Control Panel, then Programs and Features. Select Internet Information Services (IIS) 7+ Manager. Click Turn Windows features on or off.
-
Expand the entire tree beneath Internet Information Services and ensure all of the subfeatures are selected.
Figure 5-9 Windows Features for Internet Information Services
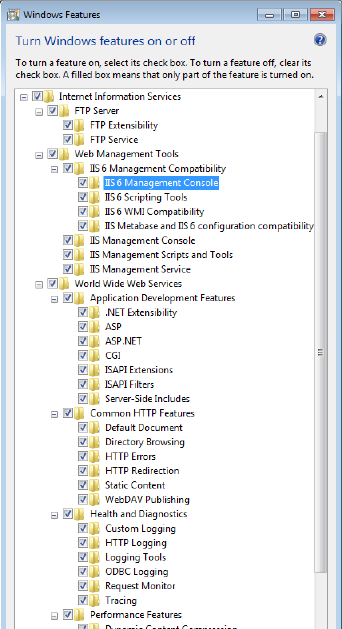
Description of ''Figure 5-9 Windows Features for Internet Information Services''
-
-
Download and install the latest Oracle WebLogic Server Proxy Plug-In zip file.
-
Create an
iisproxy.inifile with the following content in the%PLUGIN_HOME%\lib\folder:WebLogicHost=URL_of_WebLogic_Host WebLogicPort=WebLogic_Port Debug=ALL DebugConfigInfo=ON WLLogFile=C:\Temp\wl-proxy.log -
Ensure that the
%PLUGIN_HOME%\libfolder is included in the systemPATH(select Control Panel, then System, then System Properties, then Environment Variables, then System Properties, then PATH). -
Open IIS Manager (select Start, then All Programs, then Administrative tools, then Internet Information Services Manager).
Figure 5-10 Internet Information Services Manager Window
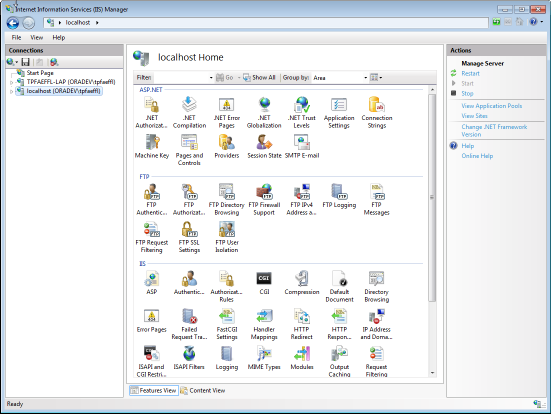
Description of ''Figure 5-10 Internet Information Services Manager Window''
-
Create a new Web Site in IIS. See the IIS Help system for more information.
-
Click the site name, open Handler Mappings and add a script map (set the Extension to a value such as
.jsp, set Executable to%PLUGIN_HOME%\lib\iiproxy.dll, and assign a value to Name). -
Click MIME Types and ensure a MIME type has been defined for the extension. Add the MIME type and its definition if it is not present.
-
Click the site name, open Directory browsing and enable the feature.
-
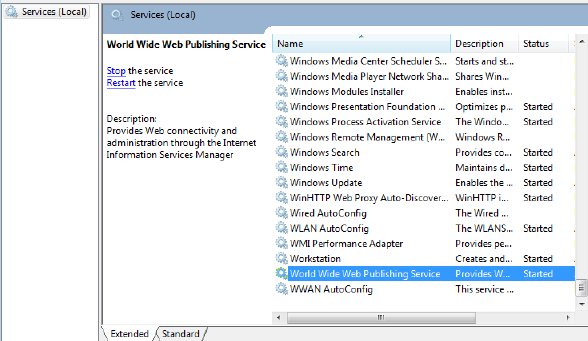
Start IIS (enter
services.mscat the command prompt and go to "World Wide Web Publishing Services" at the bottom and restart it. Also restart the web site). -
Test your configuration by sending a request to
http://iishost:iisport/application_name/from the browser and validate the response.Here,
iishostis the URL of the IIS server andiisportis the port number. Note that the iisport number should be different from the port number of the WebLogic Server.
5.2.2 Serving Static Files with IIS 7.5
After configuring the WLS plug-in and confirming it works (see Section 5.2.1, "Installing and Configuring the Microsoft IIS 7.5 Plug-In") follow these steps to serve static files.
-
Right click Default web site and then click Add Virtual Directory.
-
In the Alias field enter
staticand set the physical path to the location of the static files, for examplec:\inetpub\wwwroot\static. Click OK. A static folder will appear under Default Web Site.Note: The physical path may be different in your case if the files are in a different location. Modify the path accordingly.
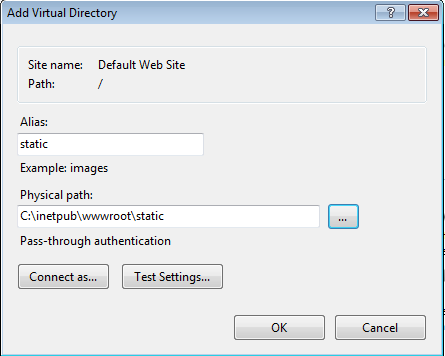
Description of the illustration ''add_vir_dir.png''
-
Click static under Default Web Site to open the static Home page.
-
On the static Home page click Handler Mappings and then click View Ordered List on the right-side pane. You will see an ordered list of Handler Mappings.
-
Click Add Script Map. Set Request Path to "*", set Executable to
%PLUGIN_HOME%\lib\iiproxy.dll, and assign the valueproxyto Name). Click OK. -
Click View Ordered List to re-order the list of handlers.
-
Click the proxy script map and move it down below the StaticFile handler mapping. (That means the StaticFile handler mapping should appear above the proxy handler mapping.)
-
Create a
staticfolder underc:\inetpub\wwwrootand copy an HTML file into it, for exampleindex.html. -
Restart IIS 7.5 by restarting the "World Wide Web Publishing Service" under services.
-
Test your work. Access the
index.htmlfile by accessing:http://localhost:80/static/index.html
5.2.3 Serving Static Files and Dynamic Content From the Same Request with IIS 7.5
Suppose you want to serve the static files such as *.gif , *.png images for the request "http://localhost:80/console" from the IIS and other dynamic content from the backend WebLogic Server. Follow these steps in addition to Section 5.2.2, "Serving Static Files with IIS 7.5."
-
Complete the steps described in the Section 5.2.2, "Serving Static Files with IIS 7.5."
-
Right-click the "Default web site", then click "Add Virtual Directory", and then enter the following in the Add Virtual Directory dialog box.
-
Alias—
console -
Physical Path—
C:\path_to_the_wls_plug-in\console
In this example, the physical path to the console is
C:\OHS_Plugin_IIS\console.
Description of the illustration ''vir_dir_console.png''
Click OK. You will see a "
console" entry in the left pane under the Default Web Site. -
-
Click "console" under "Default Web Site". A "console Home" will open on the right side.
-
Click "Handler Mappings" on the "console Home" pane
-
Right-click StaticFile and select Edit.... Update the fields as follows in the Edit Module Mapping dialog box:
-
Request Path—*.png (that is, change "*" to "*.png")
-
Module— StaticFileModule, DefaultDocumentModule, DirectoryListingModule (should be the default)
-
Executable—not required. Leave it blank.
-
Name—StaticFile (it is not possible to change Name here)

Description of the illustration ''edit_module_map.png''
-
-
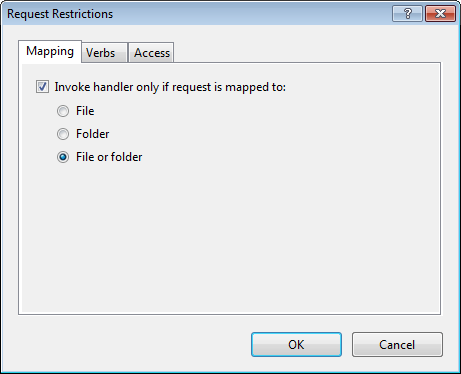
Click Request Restrictions. In the Mapping tab of the Request Restrictions dialog box, ensure that Invoke Handler only if the request is mapped to is selected, then select File or Folder. Click OK and OK to dismiss the dialog boxes.
The above step is to serve the *.png from the IIS server.
-
To serve other image files, such as *.gif files, do the following.
-
Under "Console Home" click "Handler Mappings", then click on "Add Module Mapping" on the right side and then enter the following.
Request Path—*.gif
Module—StaticFileModule, DefaultDocumentModule, DirectoryListingModule
Executable—not required. Keep it blank
Name—StaticFileForGIF
-
Click "Request Restrictions". Under "Mapping" make sure the "Invoke Handler only if the request is mapped to" is selected and then select the "File or Folder" and then click "OK" and "OK"
-
-
Arrange the order of the handlers.
-
Click on "console" under "Default web site" and then click on "Handler Mappings" and then "View Ordered List" on the right side
-
Select "proxy" and move it down till the "proxy" is below the "StaticFile" and "StaticFileForGIF. That is, the order should be like below.
StaticFile
StaticFileForGIF
proxy
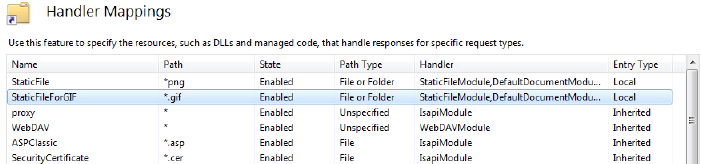
Description of the illustration ''handler_arrange.png''
-
-
Copy all of the static files that belong to
http://loclhost:<iis-port>/consolerequest from WebLogic Server to IIS. -
Restart the service, then restart the web site.
The images (*.png and *.gif) are now served by IIS and dynamic content by Weblogic server.
For example, for the request http://localhost:80/console the images for console are served by the IIS and all other requests other than *.png and *.gif are served by Weblogic Server.