3 Node Manager Tutorial
This chapter provides a basic example of using the default per domain Node Manager. This tutorial shows the steps to create and use Java-based Node Manager to start and stop WebLogic Server 12.1.3 instances in a single-machine domain that hosts both an Administration Server and a Managed Server.
For more information about per domain Node Manager, see Default Node Manager Configuration.
This tutorial includes the following steps:
Create Node Manager in a New Domain
To create an instance of per domain, Java-based Node Manager in a new domain, complete the following steps:
-
Start the Configuration Wizard:
-
From a command window, change to the
ORACLE_HOME/oracle_common/common/bindirectory, whereORACLE_HOMErepresents the directory you specified as the Oracle Home when you installed WebLogic Server. -
Execute the
config.cmdcommand for Windows or theconfig.shcommand for UNIX.
-
-
Use the Configuration Wizard to create a new, basic domain:
-
On the Create Domain screen, select Create a new domain and select a domain directory location. This is your
DOMAIN_HOMEdirectory. Click Next. -
On the Templates screen, accept the default Create Domain Using Product Templates. Click Next.
-
On the Administrator Account screen, enter the credentials of the WebLogic Server administrator. Click Next.
-
On the Domain Mode and JDK screen, accept the default Domain Mode and JDK. Click Next.
-
-
Create a Node Manager instance, a Managed Server, and a machine in your domain:
-
On the Advanced Configuration screen, select the Node Manager and Managed Servers, Clusters and Coherence options. Click Next.
-
On the Node Manager screen, accept Per Domain Default Location as the default Node Manager type and enter the credentials of the Node Manager administrator. Click Next.
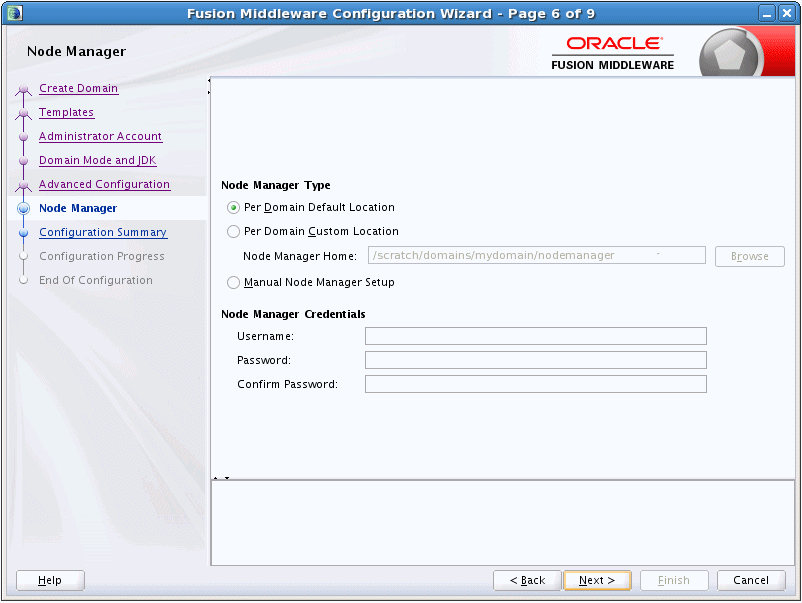
Description of the illustration ''nodemanager.gif''
-
On the Managed Servers screen, click Add. Accept the default server name, listen address, and listen port (7003). Click Next.
-
On the Clusters screen, click Next.
-
On the Machines screen, click Add. Accept the default machine name, Node Manager listen address, and Node Manager listen port. Click Next.
-
-
Assign the Administration Server and Managed Server to your machine:
-
On the Assign Servers to Machines screen, select your Administration Server and Managed Server in the left column.
-
Use the right arrow button to assign the Administration Server and Managed Server to your machine in the right column.
-
Click Next.
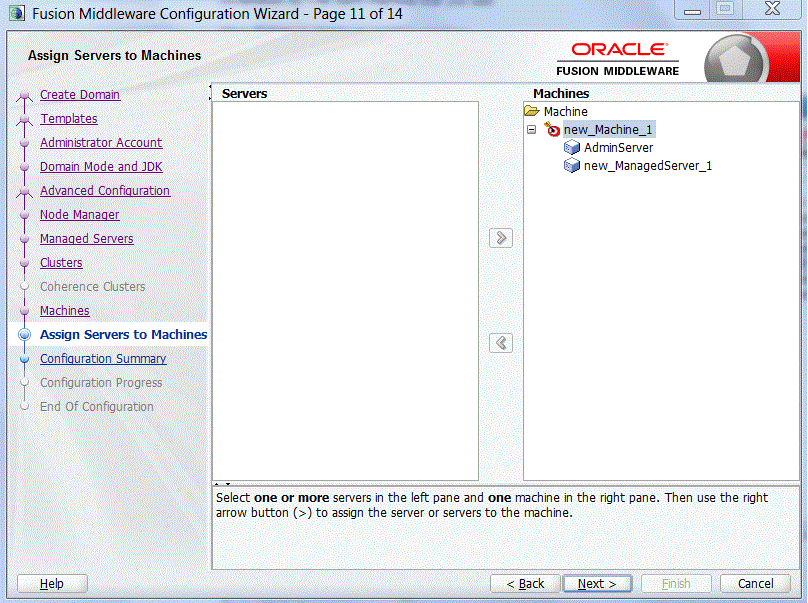
Description of the illustration ''assign_machine.gif''
-
-
Complete your domain configuration:
-
On the Configuration Summary screen, review your configuration and click Create.
-
When the Configuration Process screen shows that your domain has been created successfully, click Next.
-
On the Configuration Success screen, select Start Admin Server to start your domain. Click Finish.
-
Start Node Manager
To start Node Manager in your domain, complete the following steps:
-
From a command window, change to the
DOMAIN_HOME/bindirectory, whereDOMAIN_HOMErepresents the directory in which your WebLogic Server domain is configured. -
To set your environment, execute the
setDomainEnv.cmdcommand for Windows or thesetDomainEnv.shcommand for UNIX. -
Return to the
DOMAIN_HOME/bindirectory. -
To start Node Manager in your domain, execute the
startNodeManager.cmdcommand for Windows or thestartNodeManager.shcommand for UNIX.If Node Manager starts successfully, you will see output similar to the following:
<DATE TIME> <INFO> <WebLogic Server 12.1.3.0.0  DATE TIME YEAR 1599985 >
<DATE TIME> <INFO> <Secure socket listener started on port 5556, host localhost/127.0.01>
Use Node Manager to Start a Managed Server
To start a Managed Server in your domain using Node Manager, complete the following steps:
-
Start the WebLogic Server Administration Console:
-
Ensure the Administration Server is running.
If you selected the Start Admin Server option in the Configuration Wizard, the Administration Server should be running.
If the Administration Server is not running, change to the
DOMAIN_HOME/bindirectory and execute thestartWebLogic.cmdcommand for Windows or thestartWebLogic.shcommand for UNIX. -
Launch a Web browser and enter the following URL:
http://hostname:port/consolewhere
hostnameis the DNS name or IP address of the Administration Server andportis the listen port on which the Administration Server is listening for requests (port 7001 by default). -
When the login page appears, enter the user name and the password you entered when creating your domain in the Configuration Wizard.
-
-
Ensure Node Manager is running.
-
In the left pane of the WebLogic Server Administration Console, select Environment > Machines.
-
In the Machines table, select the name of your machine.
-
Select Monitoring > Node Manager Status.
-
If Node Manager is running, Status will be Reachable.
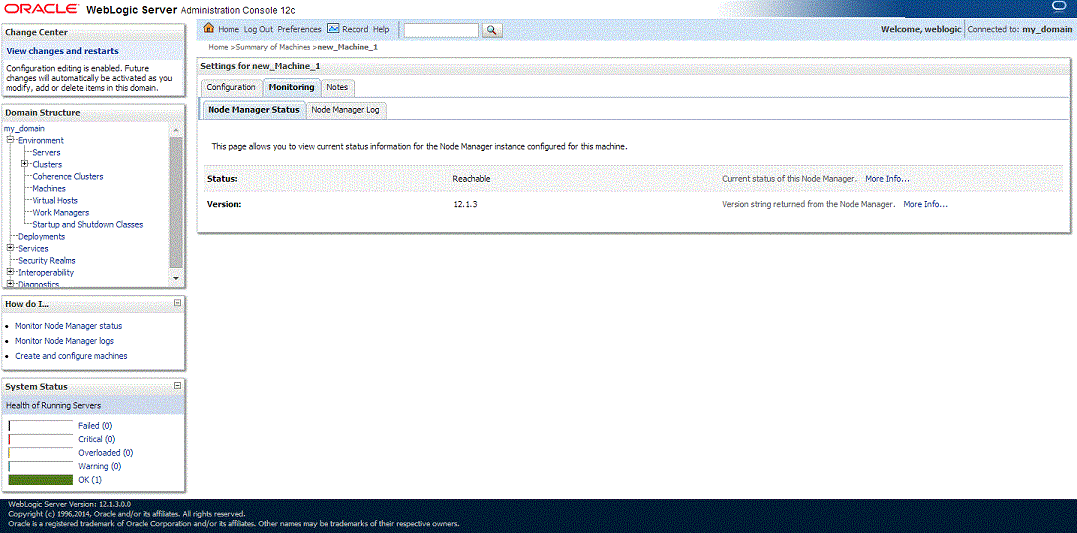
Description of the illustration ''nmconsole.gif''
Note:
To configure Node Manager settings in the WebLogic Server Administration Console, navigate to the following page: Environment > Machines > machine_name > Configuration > Node Manager. -
-
In the left pane of the WebLogic Server Administration Console, select Environment > Servers.
-
Select the Control page.
-
In the Servers table, select the checkbox next to your Managed Server.
-
Click Start.
A message appears confirming that Node Manager will start the selected server instance. Refresh the WebLogic Server Administration Console page, and the Managed Server state changes from
SHUTDOWNtoRUNNING.Your Managed Server is now running in your domain.

Description of the illustration ''serverstable.gif''