47 Creating Visitor Data Assets
Oracle WebCenter Sites: Engage lets you design online sites that gather information about your site visitors and customers, and then use that information to personalize the product placements and promotional offerings for each visitor. The information about visitors is stored in visitor data assets. There are three kinds of visitor data assets: visitor attributes, history attributes, and history types. The definitions of visitor data types are treated as assets in the WebCenter Sites database.
Topics:
47.1 About Visitor Data Assets
Do you want to group your site visitors into segments? You can do this with the three types of visitor data assets: Visitor attributes, History attributes, and History types.
To create visitor data assets, you create entries in the visitor data tables in the WebCenter Sites database and reserve a place in the database to store information of that kind for your site visitors.
See these topics:
47.1.1 Visitor Attributes
Visitor attributes hold types of information that specify one characteristic only (scalar values). For example, you can create visitor attributes named years of experience, job description, or number of children.
When the visitor changes the data, the new data overwrites the old data. Engage does not assign a timestamp to the data that is stored as a visitor attribute and does not store revisions. For example, if a visitor changes his entry for job description from butcher to baker, the information that the visitor was once a butcher is overwritten. You cannot, for example, create a segment based on bakers who used to be butchers.
For historical data, you must use history types.
47.1.2 History Attributes and History Definitions
History attributes are individual information types that you group together to create a vector of information that Engage treats as a single record. This record is the history definition. For example, a history definition called purchases can consist of the history attributes SKU, itemname, quantity, and price.
Engage references data stored as a history definition as a whole or an aggregate. It assigns a timestamp to each instance of the recorded definition and keeps each of those records. This means that you can sum or count history definitions and you can determine the first time or the last time a history definition was recorded for a visitor. Using the example in the preceding paragraph, you can create a segment based on the amount of money a visitor spends on specific items during a set period of time.
History definitions store historical data.
47.1.3 Segments
Segments are assets that divide visitors into groups based on common characteristics. Segments are built by determining which visitor data assets to base them on and then setting qualifying values for those criteria.
To create visitor data assets, you create fields that can be used in two places:
-
As criteria for segments. That is, as configuration options in the Engage Segment Filtering forms (because you define segments with the visitor data assets). In other words, the choices you make about the data types for the attributes determine their appearance and behavior in the Segment forms. When you create these assets, you are customizing the Segment forms.
-
On your public site pages. That is, as form fields or hidden fields on registration pages and other pages.
Segments are the key to personalizing merchandising messages with Engage. When visitors browse your site, the information they submit is used to qualify them for segment membership. When the site opens a page with a recommendation or promotion, Engage determines which segments a visitor belongs to and opens the product recommendations or promotional messages that are designated for those segments.
47.1.4 Developing Visitor Data Assets: Process Overview
There are five general steps for creating and using visitor data assets (fields):
-
A cross-functional design team including developers and marketers determines what kind of data you want to gather about your site visitors.
-
You (the developers) create and define the necessary visitor attributes, history attributes, and history definitions by using the forms in Engage.
-
The marketers use the Segment Filtering forms in Engage to categorize groups of visitors based on these visitor attributes, history attributes, and history definitions.
-
You program the appropriate site pages with the Engage XML or JSP object methods to collect and store the data, using either server-side validation or Javascript to validate the input on the pages. For example, you can create an online registration form for visitors to fill out by using JavaScript to validate the input and the Engage XML or JSP tags to process and store that information in the WebCenter Sites database.
-
When visitors browse your site, the information they submit is used to qualify them for segment membership. If your site is using promotions and recommendations based on segments, the message displayed for the visitor is personalized based on the segments that he or she qualifies for.
47.2 Creating Visitor Data Assets
Before you begin creating visitor data assets, meet with the marketing and design teams to determine the kinds of data that you want to collect about visitors. And, examine the Segment Filtering forms to understand the context in which the visitor data assets that you create are used by the marketers.
Additionally, note that the visitor data assets are listed by their descriptions rather than by their names in the Segment Filtering forms.
You can use the following data definitions for your visitor and history attributes:
Note:
When you're using thevdm:setscalar API, keep in mind that it doesn't validate the size limit that you’ve specified for each data type. Therefore, Oracle recommends that you follow these ranges when you're specifying values for scalar attributes for each type.-
String: Can hold up to 255 characters.
-
Boolean: True and false are the only legal values.
-
Short: Valid range of values is 0 through 255.
-
Integer: Valid range of values is 0 through 65,535.
-
Long: Valid range of values is 0 through 65,535.
-
Double: Valid range of values is 0 through 4,294,967,295.
-
Date: format is
yyyy-mm-dd hh:mm:ss.s -
Money: Format is currency; valid range of values is unlimited.
-
Binary: For visitor attributes only; used for binary data such as image files or cart objects.
Note:
Binary visitor attributes can record binary data for individual visitors. Visitor attributes of this type are not displayed in the Segment Filtering forms and cannot be used to define a segment. Creating an attribute of type binary reserves space in the WebCenter Sites database that you use to store objects by using the XML object method
VDM.SAVESCALAROBJECTor its JSP equivalentvdm:savescalarobjectto convert an object from the WebCenter Sites name space into a binary form.
This section includes the following topics:
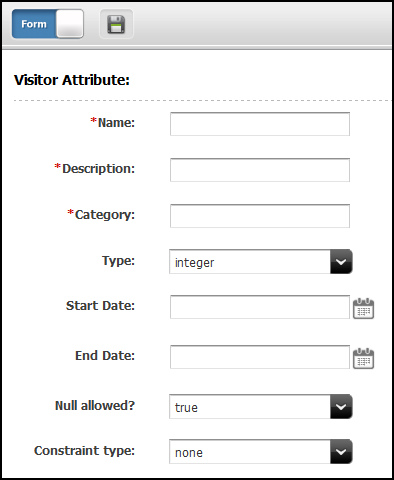
47.2.1 Creating Visitor Attributes
Create visitor attributes with the Engage forms.
To create a new visitor attribute:
47.2.1.1 Configure the Data Type
To configure the data type:
- From the Type drop-down list, choose a data type.
- If you chose string, then in the Length field enter the maximum number of characters allowed for input in the attribute (field). You can enter a value up to 255.
- From the Null allowed drop-down list, choose true to allow null values or false to require input for the attribute when it is used. For example, an attribute with a Boolean data type cannot allow a null value.
- If you chose false from the Null allowed drop-down list, then in the Default Value field enter a default value that is appropriate for the attribute's data type. For example, for the integer datatype, the default value must be a number.
Note:
If you selected binary as the data type, you cannot specify a default value for the attribute.
47.2.1.2 Configure the Constraint Criteria
The constraint options that are available for validating input into the attribute depend on the data type that you designated for the attribute.
Option 1: Configure the Attribute to Accept Free-Form Text
From the Constraint type drop-down list, choose none. For example, a visitor attribute named residence of type string might accept unconstrained text as input.
Option 2: Configure the Attribute to Accept Input from a Range of Values
To configure the attribute to accept a specific range of values, the data type must be integer, short, long, double, or money.
-
From the Constraint type drop-down list, choose range.
The form displays range fields.
-
In the Lower range limit field, specify the smallest possible value that can be accepted in the attribute when it is used as a field. This value cannot be a negative number.
-
In the Upper range limit field, enter the largest possible value that can be accepted in the attribute when it is used as a field. (For a short data type, you can enter a value up to 255; for integer, up to 65,535; for double, up to 4,294,967,295; for money, unlimited.)
For example, an attribute named
Agecan be restricted to accept values between 1 and 110 only.
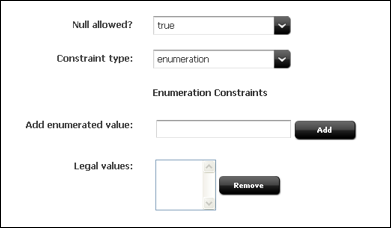
Option 3: Configure the Attribute to Offer a Set List of Values in a Drop-Down List
47.2.2 Creating History Attributes
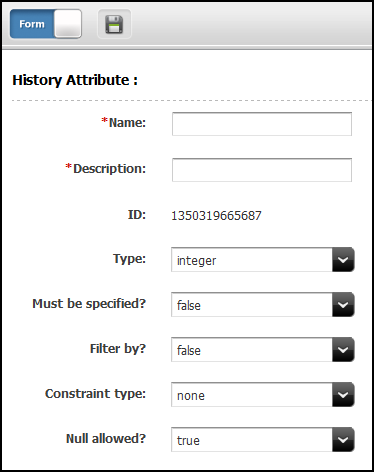
The purpose of history attributes is different from the purpose of visitor attributes: you create history attributes to be used by history definitions. You cannot use them in the Segment Filtering forms until they are used to define a history definition.
Perform the procedures in this section to create history attributes by using the Engage forms.
Note:
You cannot edit or delete a history attribute after it has been used to define a history definition. You also cannot remove it from the history definition. Therefore, stop using the history definition whose history attribute has been changed. Create a new history attribute, create a new history definition, and then start using the new history definition.
To create a new history attribute:
47.2.2.1 Configure the Constraint Criteria
The constraint options available for validating input into the attribute depend on the data type you designated for the attribute.
Configure the Attribute to Accept Free-Form Text
From the Constraint type drop-down list, choose none. For example, a history attribute named Street Name of type string might accept unconstrained text as input.
Configure the Attribute to Accept Input from a Range of Values
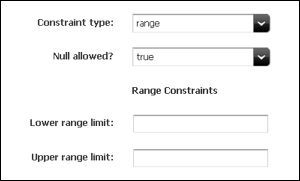
To configure the attribute to accept a specific range of values, the data type must be integer, short, long, double, or money. This figure shows the range constraints and related fields.
Figure 47-4 Range Constraints and Related Fields
Description of "Figure 47-4 Range Constraints and Related Fields"
-
From the Constraint type drop-down list, choose range.
The form displays range fields.
-
In the Lower range limit field, specify the smallest possible value that can be accepted in the attribute when it is used as a field. This value cannot be a negative number.
-
In the Upper range limit field, enter the largest possible value that can be accepted in the attribute when it is used as a field. (For a short data type, you can enter a value up to 255; for integer, up to 65,535; for double, up to 4,294,967,295; for money, unlimited.)
For example, an attribute named Number of Items can be restricted to accept values between 1 and 50 only.
Configure the Attribute to Offer a Drop-Down List of Specific Values
47.2.2.2 Save the History Attribute
When you are finished configuring the history attribute, click Save.
Engage creates an entry for this attribute in the visitor data asset tables in the WebCenter Sites database and reserves a place in the database to store information of that type for your site visitors.
You can now use this history attribute to define a history definition.
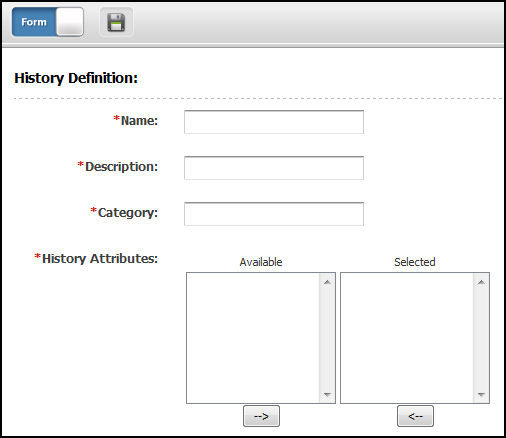
47.2.3 Creating History Definitions
History definitions are made up of history attributes. Therefore, there must be at least one history attribute created before you can create a history definition.
To create history definitions using the Engage forms:
You can now use this history definition in a segment.
47.3 Verifying Visitor Data Assets
To determine that the visitor attributes, history attributes, and history definitions are properly set up, examine the Segment Filtering forms and check whether the visitor assets that you created were configured correctly.
-
Create segments that use each of the visitor attributes and history definitions that you created.
-
Determine that the constraint definitions are correct and that the input ranges are accepting the correct range of input.
47.4 Approving Visitor Data Assets
To correctly publish a history definition, you must also approve its history attributes for publishing.
When your visitor data assets are ready, approve them so that they can be published to the delivery system.
To approve any asset, choose Approve for Publish from the drop-down list in the icon bar in the asset's Edit or Inspect form.
