5 Reconfiguration Wizard Screens
This chapter describes the screens that are displayed for the Reconfiguration Wizard when reconfiguring a domain during upgrade.
This chapter includes the following sections:
Select Domain
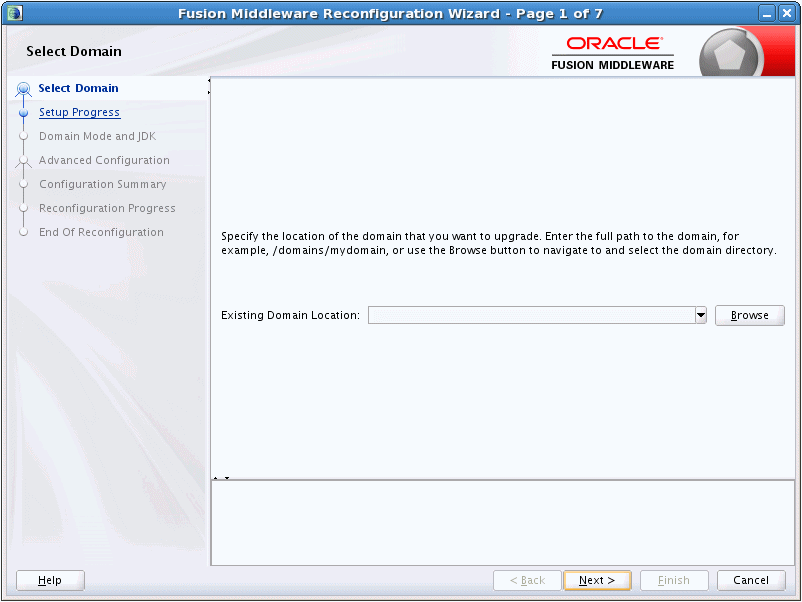
Description of the illustration ''reconfigdomain.gif''
From this screen, you specify the location of the domain that you want to upgrade.
| Option/Field | Description |
|---|---|
|
Enter Domain Location |
Enter the full path to the domain that you want to reconfigure, for example, C:\domains\mydomain. You can also use the Browse button to navigate to the domain directory. |
Reconfiguration Setup Progress
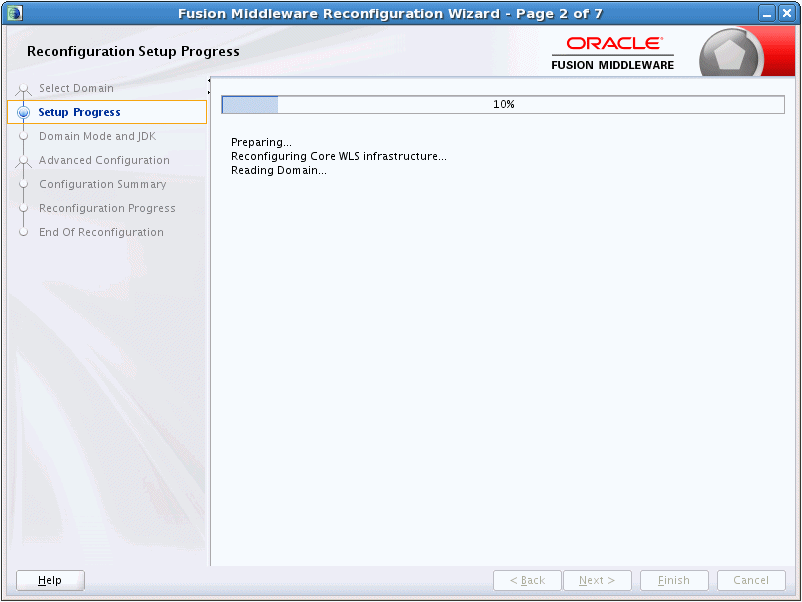
Description of the illustration ''setupprogress.gif''
This screen displays the progress of the setup process. During this process:
-
WLS core infrastructure files are updated
-
The WebLogic domain configuration is read
-
Reconfiguration templates for your installed products, including Fusion Middleware products, are automatically applied. This updates various domain configuration files such as config.xml, config-groups.xml, and security.xml (among others).
-
Schemas, scripts, and other such files that support your Fusion Middleware products are updated.
-
The domain upgrade is validated.
Click Next to continue. The Domain Mode and JDK screen is displayed.
After configuring the domain mode and selecting the JDK, subsequent screens depend on the contents of the domain, and differ for each domain.
Domain Mode and JDK
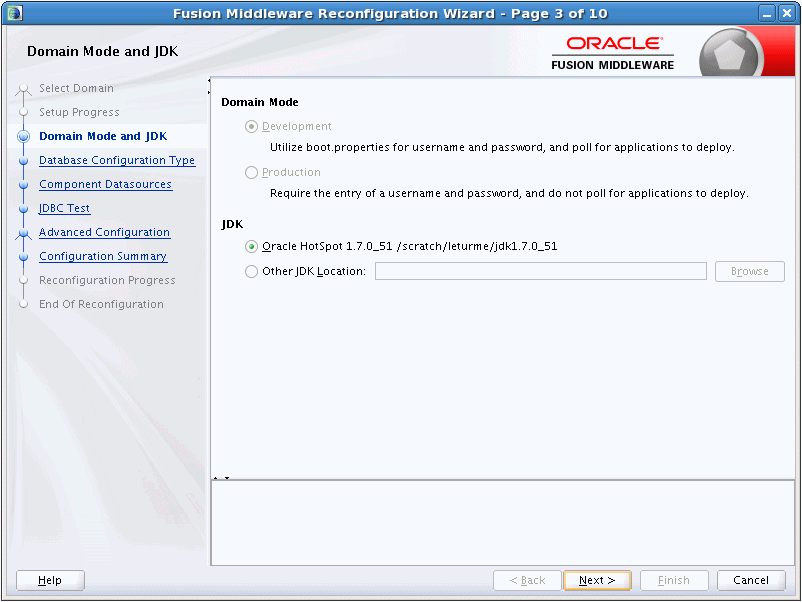
Description of the illustration ''domainmode.gif''
The domain mode cannot be changed during reconfiguration. It is inherited from the original domain.
Use the JDK section to select the JDK for the domain. Select only a JDK that is supported on the platform you are using. For a list of the JDKs that are supported for a specific platform, see "Oracle Fusion Middleware Supported System Configurations" on Oracle Technology Network.
| Option | Description |
|---|---|
| JDK | Lists the JDK that was used when you installed WebLogic Server. The default JDK is Oracle HotSpot SDK version, but you may have installed and used another JDK during installation. |
| Other JDK | Select this option to use a JDK other than the one that you used when you installed WebLogic Server. Use the Browse button to navigate to the directory where the JDK resides.
If you select the JDK that you used when you installed WebLogic Server, the Reconfiguration Wizard creates server startup scripts to invoke that JDK. If you select a JDK that you did not use when you installed WebLogic Server, the Reconfiguration Wizard does not configure the startup scripts; you must change the startup scripts manually. For more information about startup scripts, see Tuning Performance of Oracle WebLogic Server. |
Database Configuration Type
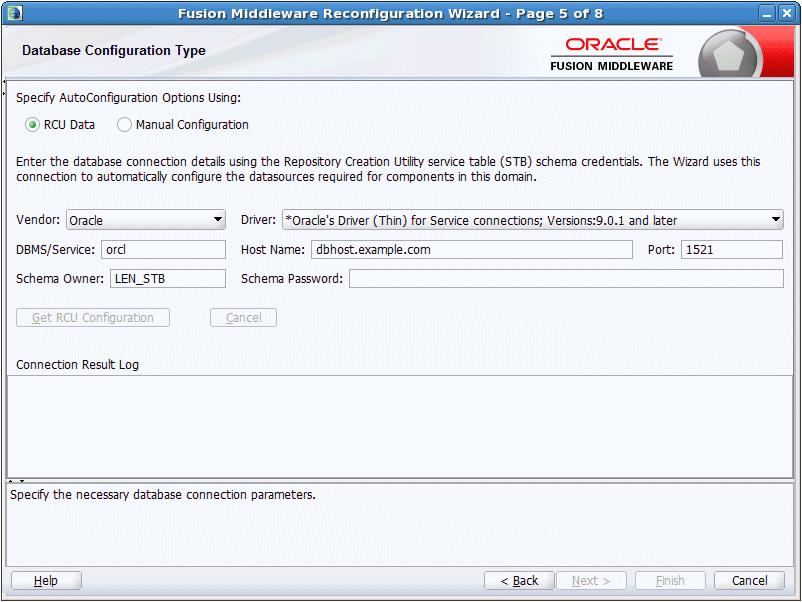
Description of the illustration ''dsconnect.gif''
You can use this screen to specify the information for connecting to the database to retrieve schema information that will be used to populate the schema fields on subsequent component schema screens (JDBC Component Schema, GridLink Oracle RAC Component Schema, or Oracle RAC Multi Data Source Component Schema). You also have the option to skip this step and manually configure each component schema on the component schema screen.
Select one of the following options.
| Field | Description |
|---|---|
|
RCU Data |
Select this option if you want to connect to the database to retrieve schema information for all schemas that are included in the domain. If you select this option, the fields on this screen are activated. Fill in each field, using the connection information that you specified for the STB component in the Repository Creation Utility (RCU). When done, click Get RCU Configuration to retrieve the schema information.
For information about Service Tables, see "Understanding Service Tables" in Administering Oracle Fusion Middleware. After successfully retrieving the schema information, click Next to continue. Note: The only JDBC connections that are supported are the Oracle service type JDBC connections that are supported by RCU. |
|
Manual Configuration |
If you select this option, you must manually configure the settings for each schema. Note that some of the fields in the schema table on the component schema screen are populated with default Java DB values, for example, Host Name is set to dbhost.example for all schemas.
After selecting this option, click Next to continue. |
Complete the following fields for the RCU Data option, and then click Get RCU Configuration.
See "Database Connection Details" in Creating Schemas with the Repository Creation Utility for more information.
| Field | Description |
|---|---|
|
Vendor |
Select the database vendor. |
|
Driver |
Select the JDBC driver that is configured for the database. The list includes common JDBC drivers for the selected database vendor. |
|
DBMS/Service |
Enter the database DBMS name or, if you selected a service type driver, service name. |
|
Host Name |
Enter the name of the server hosting the database. |
|
Port |
Enter the port number to be used to connect to the server that hosts the database. |
|
Schema Owner Schema Password |
Enter the username and password for connecting to the database's service table schema. This is the schema username and password that was specified for the STB component on the "Schema Passwords" screen of the Repository Creation Utility (RCU). The default username is prefix_STB, where prefix is the prefix that you defined in RCU. The schema you specify must be unique for the domain (not being used by any other domains).
See "Schema Passwords" in Creating Schemas with the Repository Creation Utility for more information. Note: When you click Get RCU Configuration, the schema passwords that were specified when you created the schemas via RCU are retrieved. If schema passwords were changed from the original passwords that were set via RCU, you must manually enter the new passwords in the Schema Password field or column on the JDBC Component Schema, GridLink Oracle RAC Component Schema, or Oracle RAC Multi Data Source Component Schema screens. |
JDBC Component Schema
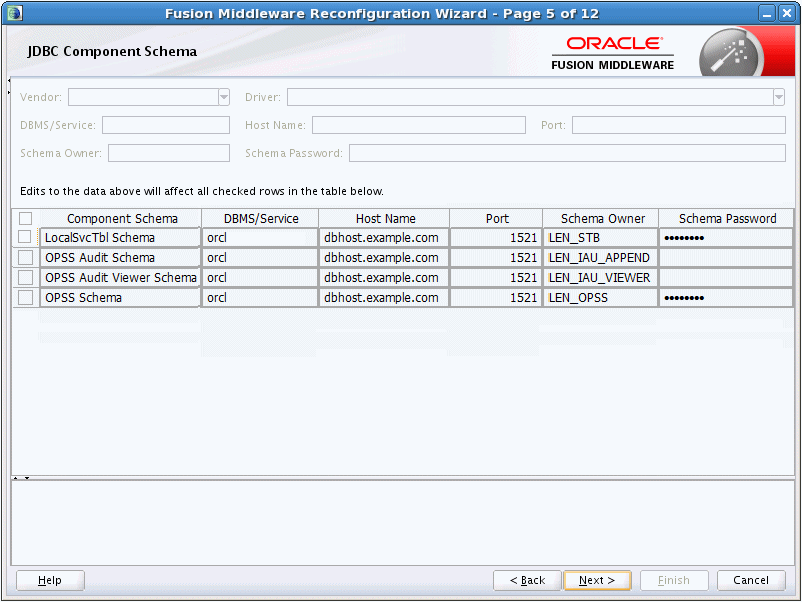
Description of the illustration ''jdbc_comp_schema_gl.gif''
For some Fusion Middleware components, JDBC data sources might be defined as part of the component's database schema, which are loaded during installation of the component by using the Repository Creation Utility (RCU).
When you reconfigure a WebLogic domain for such components by using the Reconfiguration Wizard, you can configure the JDBC component schema settings, such as database driver, schema owner, password, and so on.
-
If you selected the Get RCU Configuration option on the Database Configuration Type screen, the schema table has already been populated appropriately and you can click Next to continue.
If, however, schema passwords were changed from the original passwords that were set via RCU, you must manually enter the new password(s) in the Schema Password field or column.
Note:
When upgrading from an 11g release, see "Upgrading Security to 12.1.3" in Securing Applications with Oracle Platform Security Services for important information about OPSS schema upgrade. -
If you selected the Manual Configuration option on the Database Configuration Type screen, you must configure the schemas listed in this table manually before continuing.
The JDBC component schemas associated with the products for which you are creating the domain are listed in the lower half of the screen.
Select the schemas for which you want to specify data source settings by selecting the check box adjacent to each schema name.
Note:
When you select multiple component schemas, the text "Varies among component schemas" might be displayed in certain fields, indicating that the current values of those fields are different across the selected component schemas. If you change the values in such fields, the new values are applied uniformly across the selected component schemas.The default values of component schema parameters such as vendor, driver, host name, and port number depend on the values that are specified in the application templates.
| Field | Description |
|---|---|
|
Vendor |
Select the database vendor. |
|
Driver |
Select the JDBC driver to use to connect to the database. The list includes common JDBC drivers for the selected database vendor. |
|
DBMS/Service |
Enter a database DBMS name, or service name if you selected a service type driver. |
|
Host Name |
Enter the name of the server hosting the database. |
|
Port |
Enter the port number to be used to connect to the server that hosts the database. |
|
Schema Owner |
Enter the username for connecting to the database. |
|
Schema Password |
Enter the password for this username. |
The values that you specify are displayed in the appropriate columns in the schema list, for the selected schemas.
To convert one or more schemas to GridLink RAC schemas, select the check boxes for those schemas, and then select the Convert to GridLink option. Click Next when done. When you click Next, the GridLink Oracle RAC Component Schema screen is displayed.
For more information, see "Using ActiveLink GridLink Data Sources" in Administering JDBC Data Sources for Oracle WebLogic Server
To convert one or more of the schemas to Oracle RAC multi data source schemas, select the check boxes adjacent to the name of the those schemas, and select the Convert to RAC multi data source option. Click Next when done. When you click Next, the Oracle RAC Multi Data Source Component Schema screen is displayed.
For more information, see "Using WebLogic Server with Oracle RAC" in Administering JDBC Data Sources for Oracle WebLogic Server.
GridLink Oracle RAC Component Schema
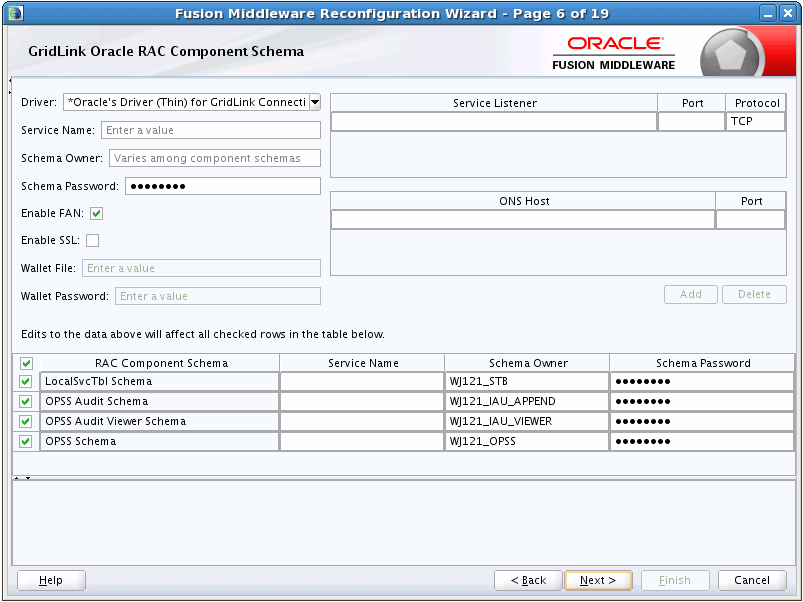
Description of the illustration ''cfggridlink.gif''
Use this screen to configure the component schemas that are included in your WebLogic domain as GridLink RAC data sources. A GridLink data source is a single data source that represents a service that responds to Fast Application Notification (FAN) events.
For more information on GridLink RAC data sources, see "Using ActiveLink GridLink Data Sources" in Administering JDBC Data Sources for Oracle WebLogic Server.
The component schemas that you opted to configure as GridLink RAC data sources in the JDBC Component Schema screen of the wizard are listed in the lower half of the screen.
-
If you selected the RCU Data option on the Database Configuration Type screen, the schema table has already been populated appropriately and you can click Next to continue.
If, however, schema passwords were changed from the original passwords that were set via RCU, you must manually enter the new password(s) in the Schema Password field or column.
Note:
When upgrading from an 11g release, see "Upgrading Security to 12.1.3" in Securing Applications with Oracle Platform Security Services for important information about OPSS schema upgrade. -
If you selected the Manual Configuration option on the Database Configuration Type screen, you must configure the schemas listed in this table manually before continuing.
In the schema list in the lower half of the screen, select the schemas to configure as GridLink RAC data sources by selecting the check box adjacent to each schema name.
Note:
When you select multiple data source schemas, the text "Varies among component schemas" might be displayed in certain fields, indicating that the current values of those fields are different across the selected schemas. If you go ahead and change the values in such fields, the new values are applied uniformly across the selected schemas.| Field | Description |
|---|---|
|
Driver |
Select the appropriate driver. Some or all of the following drivers are listed:
|
|
Service Name |
Enter a database Oracle RAC service name. |
|
Schema Owner |
Enter the username for connecting to the database. |
|
Schema Password |
Enter the password for this username. |
|
Enable FAN |
When selected, the data source will register for and process FAN notifications. |
|
Enable SSL |
When selected, SSL is enabled, and you must specify a wallet file, wallet password, and at least one Oracle Notification Service (ONS) host/port. |
|
Wallet File |
If SSL is enabled, specify the full path to the wallet file that contains the credentials for ONS/SSL. A wallet file is an Oracle credential file that stores keys and certificates. |
| Wallet Password | Specify the password for the wallet file. The password will be encrypted in the module configuration file. |
| Service Listener | Enter the name of the GridLink database Service Listener. You must configure the Service Listener for at least one database instance. |
|
Port |
This is the listen port for the database service listener. It defaults to 1521 and typically does not need to be changed. |
|
Protocol |
Click in this field and select the protocol to use for communication between WebLogic Server and the database service listener. |
|
ONS Host |
Specify the Oracle Notification Service (ONS) host name. If SSL is enabled, you must specify at least one ONS host and port. |
|
Port |
Specify the listen port to use on the ONS host. |
The values that you specify are displayed in the appropriate columns in the schema list, for the selected schemas.
To add another row to the Service Listener table, click anywhere in the table, and then click Add.
To add another row to the ONS Host table, click anywhere in the table, and then click Add.
To delete a row from the Service Listener table, click anywhere in the row, and then click Delete.
To delete a row from the ONS Host table, click anywhere in the row, and then click Delete.
Oracle RAC Multi Data Source Component Schema
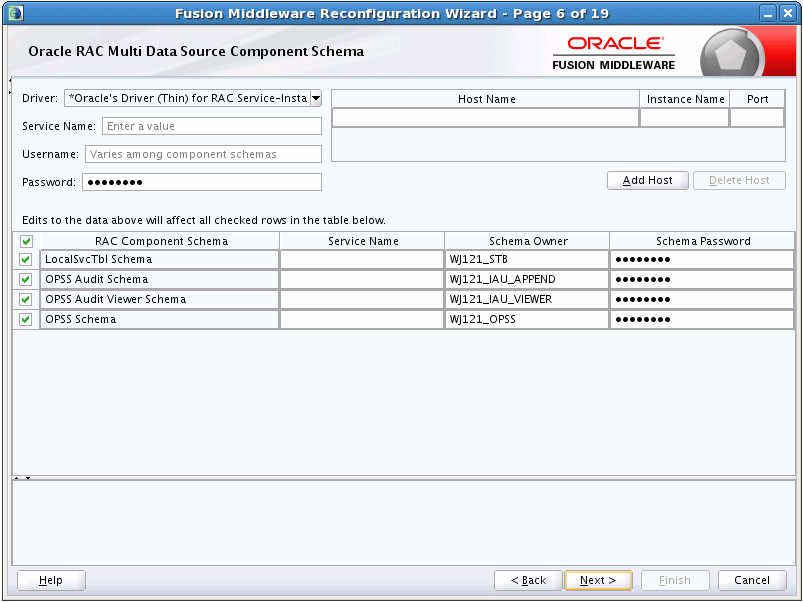
Description of the illustration ''rac_comp_schema.gif''
Use this screen to configure the component schemas that are included in the WebLogic domain as Oracle RAC multi data sources.
For more information, see "Using WebLogic Server with Oracle RAC" in Administering JDBC Data Sources for Oracle WebLogic Server.
The component schemas that you opted to configure as Oracle RAC multi data sources in the JDBC Component Schema screen of the wizard are listed in the lower half of the screen.
-
If you selected the RCU Data option on the Database Configuration Type screen, the schema table has already been populated appropriately and you can click Next to continue.
If, however, schema passwords were changed from the original passwords that were set via RCU, you must manually enter the new password(s) in the Schema Password field or column.
Note:
When upgrading from an 11g release, see "Upgrading Security to 12.1.3" in Securing Applications with Oracle Platform Security Services for important information about OPSS schema upgrade. -
If you selected the Manual Configuration option on the Database Configuration Type screen, you must configure the schemas listed in this table manually before continuing.
In the schema list in the lower half of the screen, select the schemas to configure as Oracle RAC multi data sources by selecting the check box adjacent to each schema name.
Note:
When you select multiple data source schemas, the text "Varies among component schemas" might be displayed in certain fields, indicating that the current values of those fields are different across the selected schemas. If you go ahead and change the values in such fields, the new values are applied uniformly across the selected schemas.| Field | Description |
|---|---|
| Driver | Select the JDBC driver to use to connect to the database. |
| Service Name | Enter a database Oracle RAC service name. |
| Username | Enter the username for connecting to the database. |
| Password | Enter the password for the specified username. |
| Host Name | Enter the name of the server hosting the Oracle RAC database instances. |
| Instance Name | Enter the name of each Oracle database instance. |
| Port | Enter the port number to use to connect to the server that hosts the database. |
Note:
You must specify the host name, instance name, and port number of at least one database instance.To add another database instance for the currently selected schemas, click Add Host.
To delete a database instance, click anywhere in that row in the Host Name table, and then click Delete.
The values that you specify for the schema are displayed in the appropriate columns in the schema list, for the selected schemas.
JDBC Component Schema Test
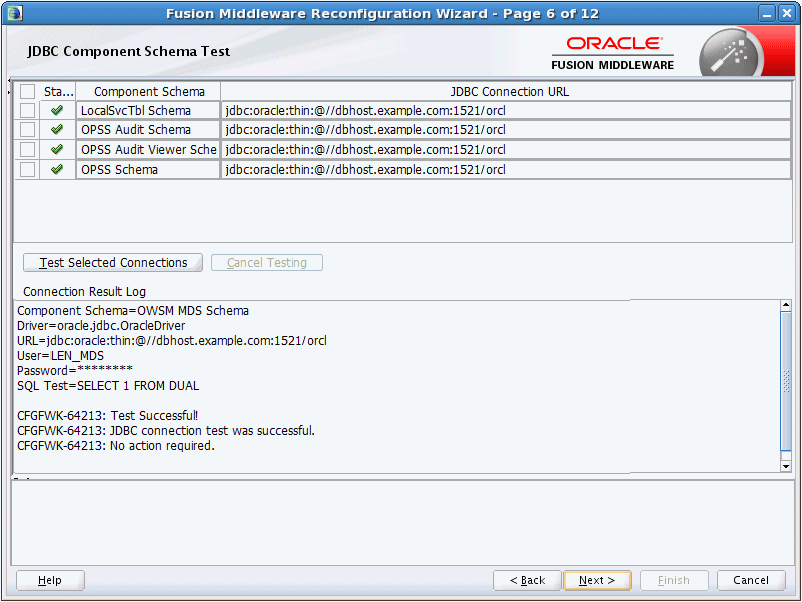
Description of the illustration ''jdbc_comp_schema_test.gif''
Use this screen to test the configurations that you specified for the data sources in the previous screen.
Select the check boxes adjacent to the names of the schemas to test, and then click Test Selected Connections.
The wizard tests the configuration for each schema by attempting to connect to a URL that is constructed by using the driver, host, port, and other information that you specified while configuring the schema.
The result of the test is indicated in the Status column. Details are displayed in the Connection Result Log section.
JDBC Data Sources
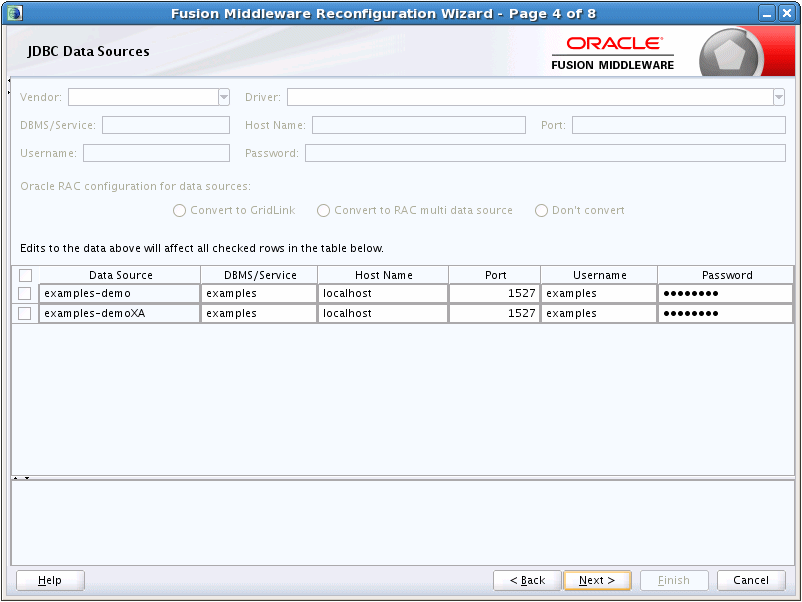
Description of the illustration ''jdbc_ds_grid.gif''
A JDBC data source contains a pool of database connections that are created when the data source instance is created—when it is deployed or targeted, or at server startup. Applications look up a data source on the JNDI tree, and then request a connection. When the applications no longer need the connections, they return the connections to the connection pool in the data source.
Use this screen to configure the JDBC data sources defined in your domain source.
The JDBC data sources associated with the products for which you are creating the domain are listed in the lower half of the screen.
Select the data source(s) for which you want to specify settings by selecting the check box adjacent to each data source name. The values that you specify are displayed in the appropriate columns in the data source list, for the selected data source.
Notes:
When you select multiple data sources, the text "Varies among component schemas" might be displayed in certain fields, indicating that the current values of those fields are different across the selected data sources. If you change the values in such fields, the new values are applied uniformly across the selected data sources.The default values of data source parameters such as vendor, driver, host name, and port number depend on the values that are specified in the application templates.
| Field | Description |
|---|---|
|
Vendor |
Select the database vendor. |
|
Driver |
Select the JDBC driver to use to connect to the database. The list includes common JDBC drivers for the selected database vendor. |
|
DBMS/Service |
Enter a DBMS SID or service name. The value that you enter depends on the driver that you selected.
If the name of the Oracle driver that you selected contains the words "for Instance connections," you must enter the SID. If the name of the Oracle driver contains the words "for Service connections," you must enter the service name. For information about configuring a DataDirect driver, see the DataDirect documentation. |
|
Host Name |
Enter the name of the server hosting the database. |
|
Port Name |
Enter the port number to be used to connect to the server. |
|
Username |
Enter the username for connecting to the database. |
|
Password |
Enter the password for the specified username. |
To convert one or more data sources to GridLink Oracle RAC data sources, select the check boxes for those schemas, and then select the Convert to GridLink option. Click Next when done. When you click Next, the GridLink Oracle RAC Data Sources screen is displayed.
For more information, see "Using ActiveLink GridLink Data Sources" in Administering JDBC Data Sources for Oracle WebLogic Server
To convert one or more of the data sources to Oracle RAC multi data sources, select the check box adjacent to the name of the required data source, and select the Convert to RAC multi data source option. When you click Next, the Oracle RAC Multi Data Sources screen is displayed.
For more information, see "Using WebLogic Server with Oracle RAC" in Administering JDBC Data Sources for Oracle WebLogic Server.
GridLink Oracle RAC Data Sources
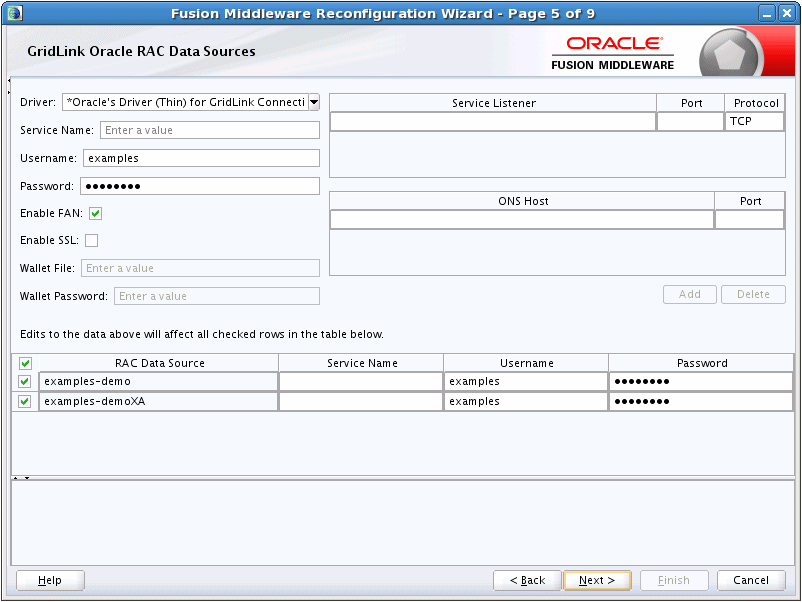
Description of the illustration ''cfg_gridlink_ds.gif''
Use this screen to configure the data sources that are included in your WebLogic domain as GridLink Oracle RAC data sources. A GridLink data source is a single data source that represents a service that responds to Fast Application Notification (FAN) events.
For more information, see "Using ActiveLink GridLink Data Sources" in Administering JDBC Data Sources for Oracle WebLogic Server
The data sources that you opted to configure as GridLink RAC data sources in the JDBC Data Sources screen of the wizard are listed in the lower half of the screen.
In the data source list in the lower half of the screen, select the data sources to configure as GridLink RAC data sources by selecting the check box adjacent to each data source name.
Note:
When you select multiple data sources, the text "Varies among data sources" might be displayed in certain fields, indicating that the current values of those fields are different across the selected data sources. If you go ahead and change the values in such fields, the new values are applied uniformly across the selected data sources.| Field | Description |
|---|---|
|
Driver |
Some or all of the following drivers are listed:
|
|
Service Name |
Enter a database Oracle RAC service name. |
|
Username |
Enter the username for connecting to the database. |
|
Password |
Enter the password for the specified username. |
|
Enable FAN |
When selected, the data source will register for and process FAN notifications. |
|
Enable SSL |
When selected, SSL is enabled, and you must specify a wallet file, wallet password, and at least one Oracle Notification Service (ONS) host/port. |
|
Wallet File |
If SSL is enabled, specify the full path to the wallet file that contains the credentials for ONS/SSL. A wallet file is an Oracle credential file that stores keys and certificates. |
|
Wallet Password |
Specify the password for the wallet file. The password will be encrypted in the module configuration file. |
|
Service Listener |
Enter the name of the GridLink database Service Listener. You must configure the Service Listener for at least one database instance. |
|
Port |
This is the listen port for the database service listener. It defaults to 1521 and typically does not need to be changed. |
|
Protocol |
Click in this field and select the protocol to use for communication between WebLogic Server and the database service listener. |
|
ONS Host |
Specify the Oracle Notification Service (ONS) host name. If SSL is enabled, you must specify at least one ONS host and port. |
|
Port |
Specify the listen port to use on the ONS host. |
The values that you specify are displayed in the appropriate columns in the data source list, for the selected schemas.
To add another row to the Service Listener table, click anywhere in the table, and then click Add.
To add another row to the ONS Host table, click anywhere in the table, and then click Add.
To delete a row from the Service Listener table, click anywhere in the row, and then click Delete.
To delete a row from the ONS Host table, click anywhere in the row, and then click Delete.
Oracle RAC Multi Data Sources
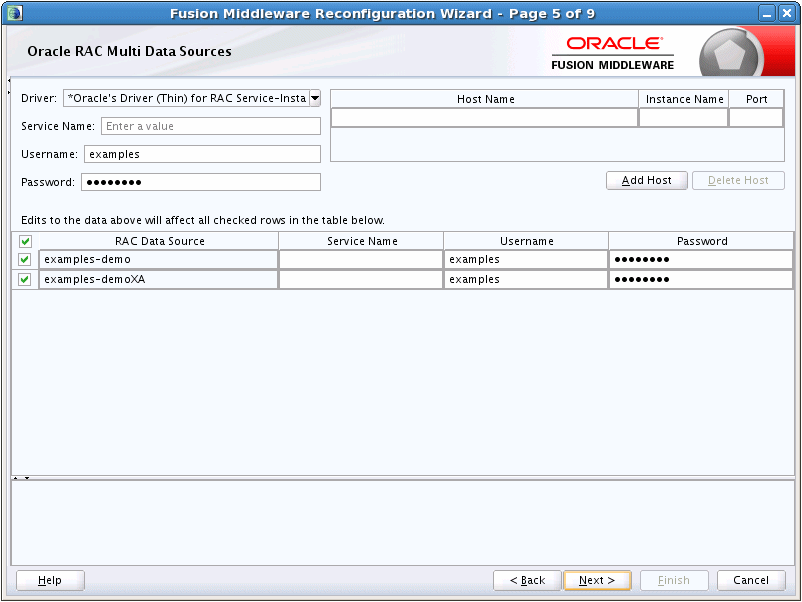
Description of the illustration ''rac_multi_data_source.gif''
Use this screen to configure the data sources that are included in the domain as Oracle RAC data sources.
The data sources that you opted to configure as Oracle RAC data sources on the JDBC Data Sources screen are listed in the lower half of the screen.
Select the data source(s) for which you want to specify settings by selecting the check box adjacent to each data source name.
For information about Oracle RAC data sources, see "Using WebLogic Server with Oracle RAC" in Administering JDBC Data Sources for Oracle WebLogic Server.
Note:
When you select multiple data sources, the text "Varies among data sources" might be displayed in certain fields, indicating that the current values of those fields are different across the selected data sources. If you change the values in such fields, the new values are applied uniformly across the selected data sources.| Field/Column | Description |
|---|---|
|
Driver |
Select the JDBC driver to use to connect to the database. |
|
Service Name |
Enter an Oracle RAC database service name. |
|
Username |
Enter the username for connecting to the database. |
|
Password |
Enter the password for the specified user account. |
| Host Name | Enter the name of the server hosting the Oracle RAC database instances. |
|
Instance Name |
Enter the name of each Oracle database instance. |
| Port | Enter the port numbers to be used to connect to the server that hosts the database. |
To add a new database instance, click Add, and then specify the host name, instance name and port number.
JDBC Data Sources Test
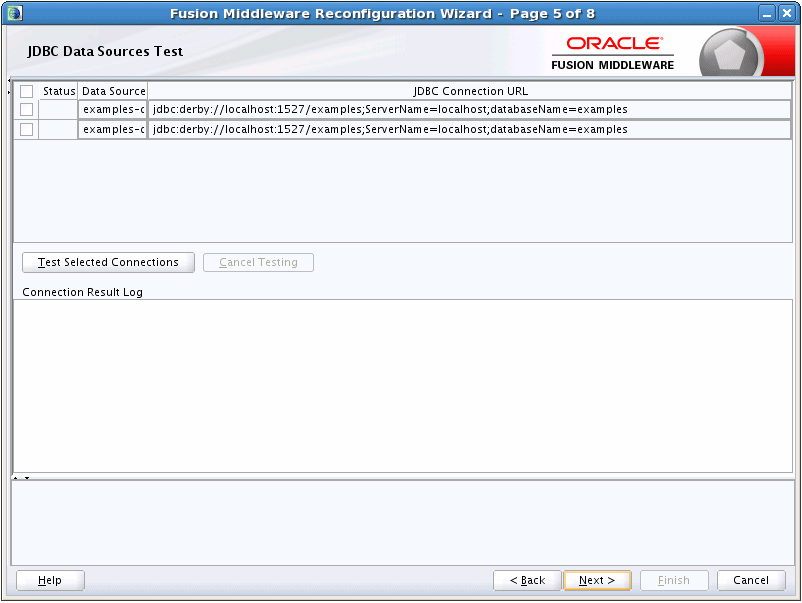
Description of the illustration ''test_jdbc_ds.gif''
Use this screen to test the data source connections you configured on the JDBC Data Sources and Oracle RAC Multi Data Sources screens.
Notes:
In order to test the database connections, the database to which you are connecting must be running.If you do not want to test the connections at this time, do not select any data sources. Click Next to continue.
Select the check box for each data source you want to test, and then click Test Connections.
The wizard tests the configuration for each selected data source by attempting to connect to a URL that is constructed by using the driver, host, port, and other information that you specified while configuring the data source.
The result of the test is indicated in the Status column. Details are displayed in the Connection Result Log section.
Database Scripts
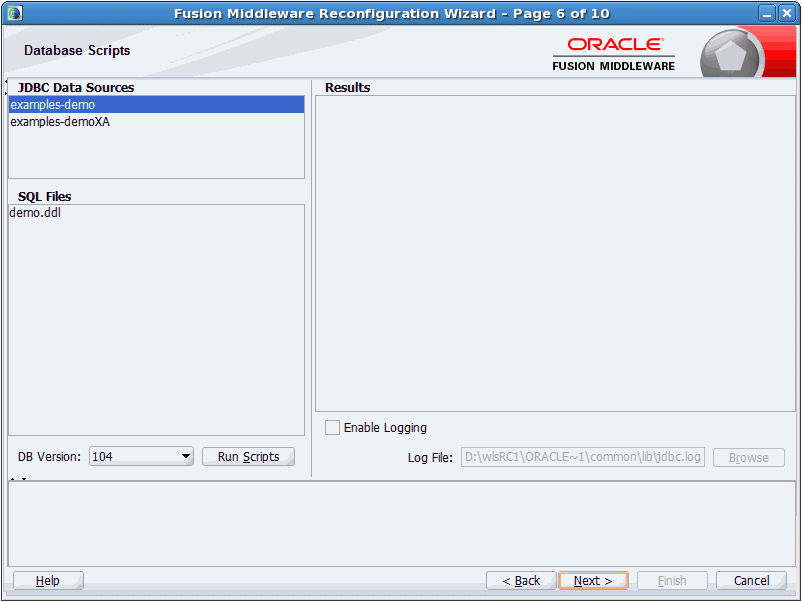
Description of the illustration ''run_db_scripts.gif''
A domain template might contain a set of SQL files organized by database type. If the domain template contains SQL files, you can run them while creating the WebLogic domain, on the Database Scripts screen. Database content for each of the data sources defined in your WebLogic domain is set up by using pre-existing SQL or database loading files.
-
In the JDBC Data Sources section, select the data source for which you want to run the scripts. The scripts that can be executed are displayed in the SQL Files section.
-
Select the database version from the DB Version drop-down list.
-
Click Run Scripts.
All the scripts displayed in the SQL Files section for the selected data source are executed, and the results are displayed in the Results section. To capture test output in a log file, select the Enable Logging check box and specify the full path for the log file in the Log File field.
-
Repeat steps 1 through 3 for each data source for which you want to execute SQL scripts.
-
Click Next once you have executed all scripts.
Node Manager
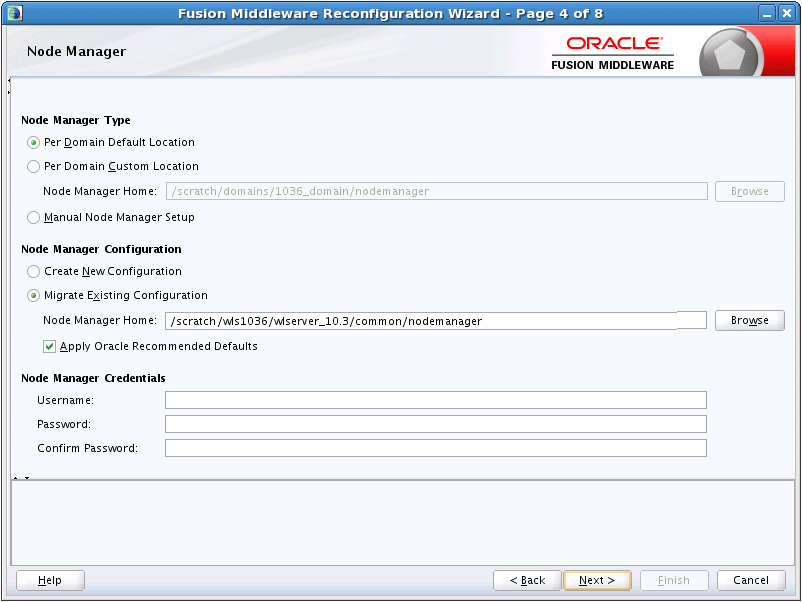
Description of the illustration ''nodemanager.gif''
This screen is displayed only if the domain you are reconfiguring is currently using a per host Node Manager. Use this screen to select the Node Manager configuration to use for the reconfigured domain. The resulting configuration depends on the combination of options you select for Node Manager Type and Node Manager Configuration.
For information on per domain and per host Node Manager configurations, see "Default Node Manager Configuration" in Administering Node Manager for Oracle WebLogic Server.
Note:
When upgrading a domain and changing from a per host Node Manager configuration to a per domain Node Manager configuration, if you are using custom scripts to start and stop the WebLogic Server environment, you must manually update the scripts to change the Node Manager home location to the new domain-based location.| Option/Field | Description |
|---|---|
| Node Manager Type | Select one of the following Node Manager types. |
|
Per Domain Default Location |
If you select this option, the Node Manager home is redefined to <domain_name>/nodemanager and you cannot edit the Node Manager home. |
|
Per Domain Custom Location |
Select this option if you want the per domain Node Manager configuration files to be created in a specific location for this domain. Specify the directory in the Node Manager Home field, or click Browse to navigate to the location. The specified directory must be empty. The nodemanager.properties and nodemanager.domains files will be created in this directory. |
|
Node Manager Home |
If you selected the Per Domain Custom Location option, click Browse to navigate to the directory location that you want to use to store the per domain Node Manager configuration. |
|
Manual Node Manager Setup |
If you select this option, creation of the Node Manager configuration for the domain is skipped (all remaining fields cannot be modified), and if you want to use Node Manager in the domain, you must manually configure Node Manager as described in "Completing the Node Manager Configuration". The reconfigured domain will still use a per host Node Manager configuration.
You should also select this option if your existing domain is not configured to use Node Manager and you do not want to use Node Manager in the reconfigured domain. For more information about Node Manager configuration, see Administering Node Manager for Oracle WebLogic Server. |
| Node Manager Configuration | Select one of the following two options. These fields are not available if you selected Manual Node Manager Setup. |
|
Create New Configuration |
A per domain Node Manager configuration will be automatically created for the reconfigured domain using default settings in nodemanager.properties. If necessary, you can modify nodemanager.properties after the domain has been successfully reconfigured. |
|
Migrate Existing Configuration |
The existing per host Node Manager configuration will be migrated to a per domain configuration for the reconfigured domain. This does not include environment-specific settings for ListenAddress, ListenPort, StartScriptName, JavaHome, and LogFile. |
|
Node Manager Home |
If you selected the Migrate Existing Configuration option, enter or browse to the Node Manager home directory that you want to migrate to the reconfigured domain. |
|
Apply Oracle Recommended Defaults |
If you selected the Migrate Existing Configuration option, select this check box if you want to use Oracle-recommended defaults in the nodemanager.properties file. Deselect this check box if you want to continue using the settings in the nodemanager.properties file being migrated.
Oracle-recommended properties with defaults are as follows: LogLimit=0 AuthenticationEnabled=true LogLevel=INFO DomainsFileEnabled=true NativeVersionEnabled=true LogToStderr=true SecureListener=true LogCount=1 StopScriptEnabled=false QuitEnabled=false LogAppend=true StateCheckInterval=500 CrashRecoveryEnabled=false StartScriptEnabled=true LogFormatter=weblogic.nodemanager.server.LogFormatter ListenBacklog=50 |
| Node Manager Credentials | Provide appropriate Node Manager credentials in the following fields. |
|
Username Password Confirm Password |
The username and password that you want to use to start Node Manager in the reconfigured domain. |
Advanced Configuration
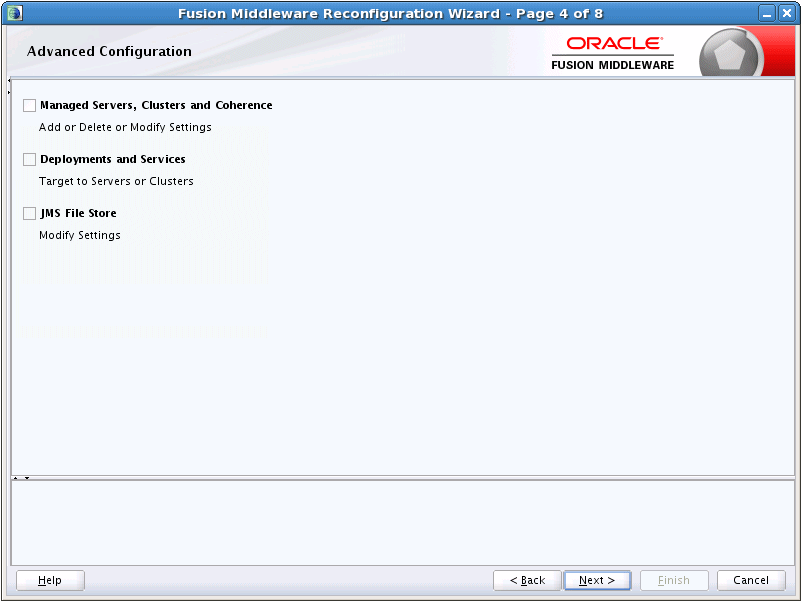
Description of the illustration ''optional_config.gif''
Select all categories (if any) for which you want to perform advanced configuration. For each category you select, the appropriate configuration screen is displayed to allow you to perform advanced configuration. If you do not select any items on this screen, the Configuration Summary screen is displayed next.
Notes:
The categories that are listed on this screen depend on the resources defined in the templates you selected for the domain.| Option | Description |
|---|---|
| Node Manager | This option is available only if you are reconfiguring a domain that is currently using a per host Node Manager configuration. It enables you to switch to a per domain Node Manager or continue using the existing per host Node Manager.
Note: If this option is available and you do not select it, you must manually configure Node Manager as described in "Completing the Node Manager Configuration". See Node Manager. |
| Managed Servers, Clusters, and Coherence | Select this option to
See Managed Servers, through Assign Servers to Machines. |
| Domain Frontend Host Capture | Configure the domain-wide frontend host HTTP and HTTPS URLs, and whether HTTP or HTTPS is the default. This option is available only if at least one selected template defines ConfigMapping. |
| Deployments and Services | Select this option to customize how application deployments and services are targeted to servers and clusters. |
| JMS File Store | Select this option to change the settings for your JMS file stores. You can change the name, directory, and synchronous write policy for each file store.
See JMS File Stores. |
Credentials
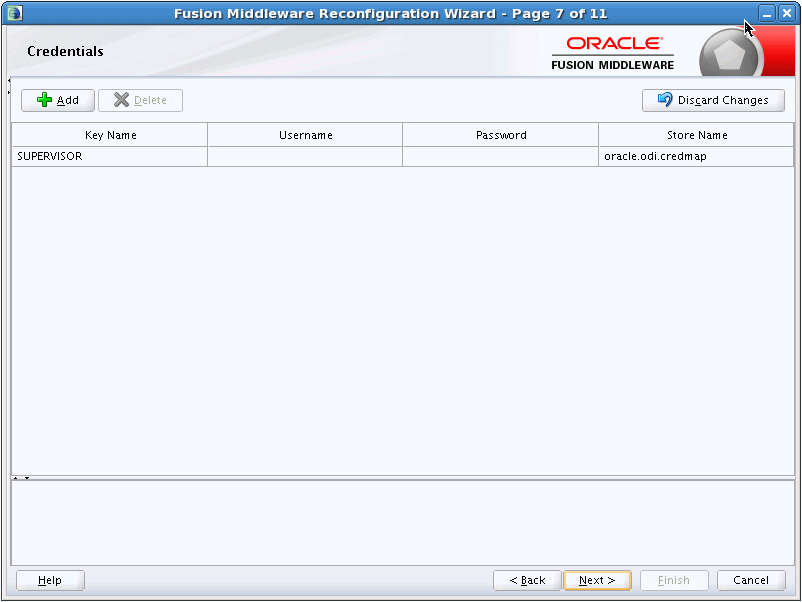
Description of the illustration ''credentials.gif''
Use this screen to provide credentials for each key in the domain. Credentials that have been previously defined in the domain are already included in the table.
For more information on credentials, see "Understanding Identities, Policies, Credentials, Keys, Certificates, and Auditing" in Securing Applications with Oracle Platform Security Services.
| Column | Description |
|---|---|
| Key Name | This column displays the name of each key in the domain. |
| Username | On each row, enter the username to use for each key. |
| Password | On each row, enter the password to use for each key. |
| Store Name | This column displays the credential store that is associated with each key. |
Keystore

Description of the illustration ''keystore.gif''
Use this screen to specify:
-
the path to the trusted certificate for each keystore
-
the path to each keystore's private key, the password for the private key and the path to the Identity Certificate for the private key.
When you click in the Trusted Certificate, Private Key, or Identity Certificate fields, a browse icon appears to the right of the field. Click this icon to browse to the appropriate file.
| Option/Field | Description |
|---|---|
| Store Key Name | From this drop-down list, select the store/key that you want to configure. |
| Trusted Certificate table | The Trusted Certificate table contains the following two columns. |
|
Alias |
A read-only field that displays the alias for the trusted certificate as defined in the product template. |
|
Trusted Certificate |
Enter the full path and file name for the trusted certificate to use for the selected store/key, or click the icon on the far right of the row to navigate to and select the trusted certificate file. |
| Private Key table | The Private Key table contains the following four columns. |
|
Alias |
A read-only field that displays the alias for the private key as defined in the product template. |
|
Private Key |
Enter the full path and file name for the private key file to use for the selected store/key, or click the icon to the right of the field to navigate to and select the private key file. |
|
Password |
Enter the password to use for the private key. |
|
Identity Certificate |
Enter the full path and file name for the identity certificate to associate with the private key, or click the icon to the right of the field to navigate to and select the identity certificate file. |
Managed Servers
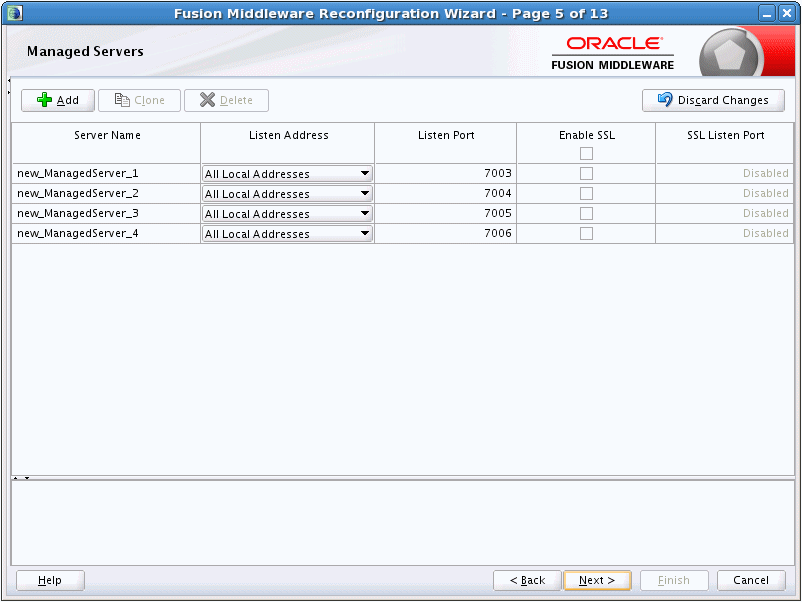
Description of the illustration ''managed_servers.gif''
From this screen, you can add, delete, or clone Managed Servers. You can also change the settings for an existing Managed Server.
Note:
You can create Managed Servers on remote machines by using thepack and unpack commands.
For more information, see "Creating and Starting a Managed Server on a Remote Machine" in Creating Templates and Domains Using the Pack and Unpack Commands.
| Column | Description |
|---|---|
|
Server Name |
Valid server names are a string of characters (alphabetic and numeric). The name must be unique in the domain. |
|
Listen Address |
From the drop-down list, select a value for the listen address. |
|
Listen port |
Enter a valid value for the listen port to be used for regular, nonsecure requests (through protocols such as HTTP and T3). The valid listen port range is from 1 to 65535. |
|
Enable SSL |
Select this check box to enable the SSL listen port. By default, SSL is disabled for all new servers. |
|
SSL listen port |
This field is enabled only if you selected the SSL enabled check box for the server.
Enter a valid value to be used for secure requests (through protocols such as HTTPS and T3S). The valid listen port range is from 1 to 65535. |
|
Server Groups |
If any of the templates you selected to create or update your domain contain a user-expandable server group definition, the Server Groups column is displayed. For each Managed Server, select the check box for each server group you want to assign to the server. Only server groups that are defined as user-selectable are displayed in the list. Typically, you should accept the defaults for Fusion Middleware product servers.
Note: If you clone a Managed Server, the server group assignments are identical to the original server. Cloning is recommended for creating additional Fusion Middleware product servers. The selected server group determines the applications and services that are mapped to a given Managed Server. For example, if you select the OVAB_MAN_SVR group for a server, all applications and services that are mapped to that server group in the config-groups.xml file for the domain are automatically targeted to the server. For more information on server groups, see "config-groups.xml and startup-plan.xml" in Domain Template Reference. |
To add a server, click Add and configure the settings for the new server. The default name for a new server is new_ManagedServer_n, where n starts at 1 and increments for each new server you add.
To clone a server, click in the row for the server you want to clone, and then click Clone. The default name for the new clone is original_server_name_clonen, where n starts at 1 and increments for each new server that you clone from that server. When you create a Managed Server that is a clone of an existing Managed Server, all applications and libraries that are targeted to the source server are also deployed to the clone. The cloned server is also assigned to all server groups to which the source server is assigned (if any). In addition, any of the following services that are targeted to the source server are automatically targeted to the clone:
-
connectionFactory
-
queueConnectionFactory
-
topicConnection
-
Queue
-
Topic
-
activationSpec
-
Data source
-
URLProvider
-
workManager
-
busMember
-
customService
-
resourceAdapter
To delete a server, select the server and click Delete. You can delete only one server at a time.
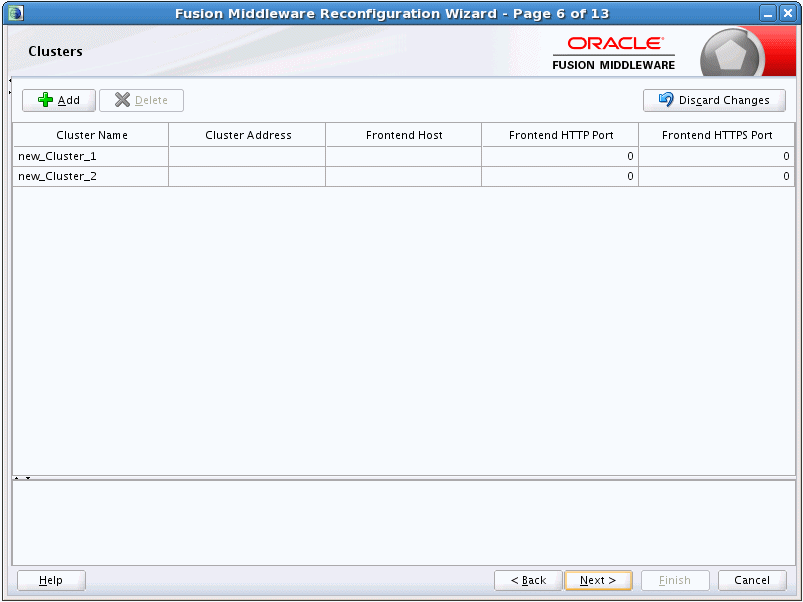
Clusters
Description of the illustration ''clusters.gif''
A cluster is a group of WebLogic Server instances that work together to provide scalability and high-availability for applications. By creating clusters, you can group Managed Servers such that they operate as a single unit for hosting applications and resources.
Use this screen to add or delete clusters. You can also change the settings for an existing cluster.
| Column | Description |
|---|---|
|
Cluster Name |
Enter a valid name. The name of the cluster must be unique among all component names within the WebLogic domain. |
|
Cluster address |
Enter the addresses for identifying the Managed Servers in the cluster. A cluster address can be one of the following:
|
|
Frontend Host Frontend HTTP Port Frontend HTTPS Port |
Enter the IP address, plain port (HTTP), and secure port (HTTPS) of the frontend host for the cluster, which may be a hardware load balancer, an Oracle HTTP Server (OHS) instance, or frontend host that has already been defined in the WebLogic Server configuration.
You can leave these fields empty, in which case the domain-wide frontend host values that are specified on the Domain Frontend Host screen are used for the cluster. If you enter these values for the cluster, they override the values, if any, that are specified on the Domain Frontend Host screen. |
To delete a cluster, select the server and click Delete. When you delete a cluster, you do not delete the servers assigned to it; the servers are merely removed from the cluster and can then be added to another cluster. You can delete only one cluster at a time.
To add a cluster, click Add and configure the settings for the new server. The default name for a new cluster is new_Cluster_n, where n starts at 1 and increments for each new cluster you add. To change the default, type the desired name in the Name column.
For more information about clusters, see "Setting Up WebLogic Clusters" in Administering Clusters for Oracle WebLogic Server.
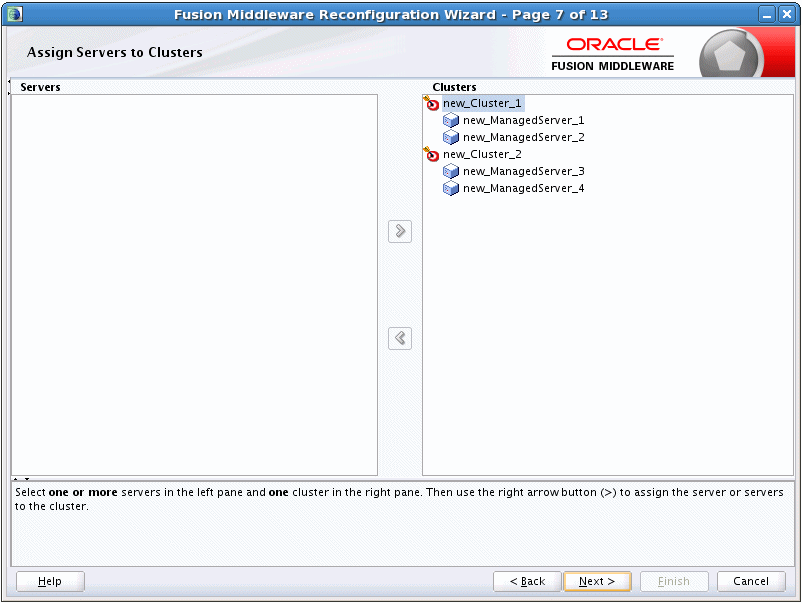
Assign Servers to Clusters
Description of the illustration ''assign_srv_to_clust.gif''
Use this screen to assign Managed Servers to clusters.
Note:
Only Managed Servers are displayed in the Server list box. The Administration Server is not listed because it cannot be assigned to a cluster.To assign one or more servers to a cluster:
-
In the Clusters list box, select the cluster to which you want to assign a Managed Server.
-
Assign Managed Servers to the selected cluster in one of the following ways:
-
Double-click the name of the Managed Server in the Servers list box.
-
Select the Managed Server and click the right arrow.
-
Shift+click to select multiple Managed Servers; then, click the right arrow.
The name of the Managed Server is removed from the Servers list box and added below the name of the target cluster in the Clusters list box.
-
-
Repeat steps 1 and 2 for each Managed Server to assign to a cluster.
-
Review the cluster assignments.
If necessary, you can remove a Managed Server from a cluster in one of the following ways:
-
Double-click the name of the Managed Server in the Clusters list box.
-
Select the Managed Server and click the left arrow.
The name of the Managed Server is removed from the Clusters list box and restored to the Servers list box.
-
HTTP Proxy Applications
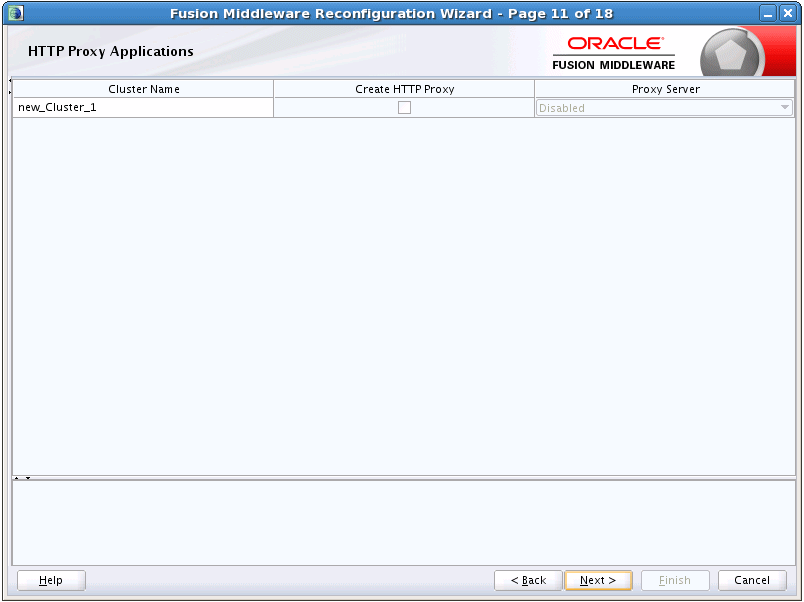
Description of the illustration ''http_proxy.gif''
An HTTP proxy application acts as an intermediary for HTTP requests.
Use this screen to create an HTTP proxy application for each cluster, and specify the Managed Server on which the proxy application must be deployed.
This screen is displayed only if both of the following statements are true:
-
At least one Managed Server is assigned to a cluster.
-
At least one Managed Server is not assigned to any cluster.
| Column | Description |
|---|---|
|
Cluster Name |
This column lists each cluster in the domain. |
|
Create HTTP Proxy |
Select this check box for each cluster on which you want to deploy the HTTP proxy application. |
| Proxy Server | This drop-down list contains all Managed Servers that are not assigned to a cluster. Select the Managed Server on which to deploy the proxy application.
A proxy application named |
Coherence Clusters
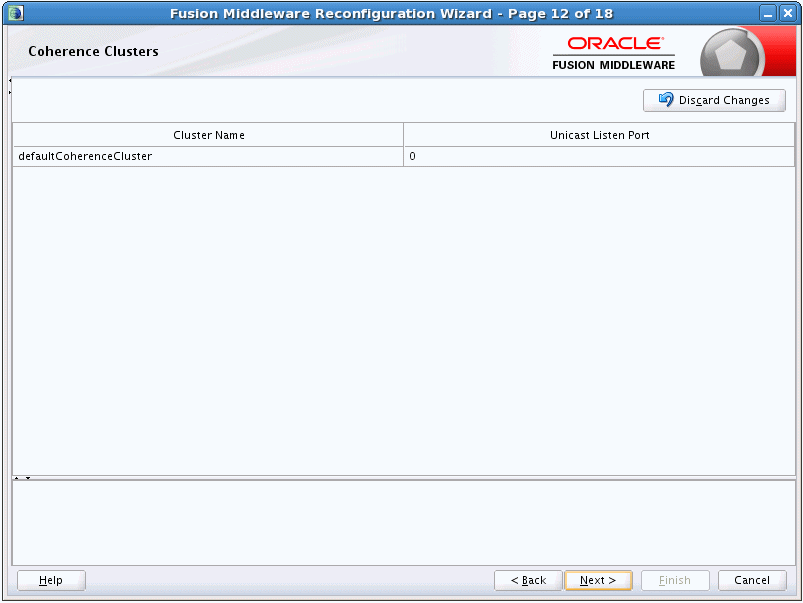
Description of the illustration ''coherencecluster.gif''
This screen is displayed only if you included Coherence in the WebLogic Server installation. It lists the Coherence cluster that is automatically added to the domain.
| Column | Description |
|---|---|
|
Name |
Accept the default cluster name or type a new name for the Coherence cluster.
When updating a domain, if you have added additional Coherence clusters to the domain via WLST or the WebLogic Server Administration Console, they are also listed here. |
|
Coherence Listen Port |
Enter the port number to use as the Coherence cluster listen port.
For more information on the Coherence cluster listen port, see "Configure Coherence Cluster Member Unicast Settings" in Administering Clusters for Oracle WebLogic Server. |
When including a Coherence cluster in a domain:
-
All Managed Servers and clusters that you configure in the domain during the current Reconfiguration Wizard session or future Configuration Wizard sessions are automatically added to the Coherence cluster.
-
Servers and clusters that already exist in the domain prior to running the Reconfiguration Wizard are automatically assigned to the Coherence cluster.
-
When reconfiguring a domain, if the domain contains a only an Administration Server and no Managed Servers, the Administration Server is automatically assigned to the Coherence cluster. If, however, at least one Managed Server exists in the domain, the Administration Server is not assigned to the Coherence cluster.
-
If there are multiple Coherence clusters in the domain (for example, you added a second Coherence cluster via WLST or the WebLogic Server Administration Console), any servers or clusters that you subsequently add to the domain via the Reconfiguration Wizard are automatically assigned to the first Coherence cluster that is listed on the Coherence Clusters screen.
Machines
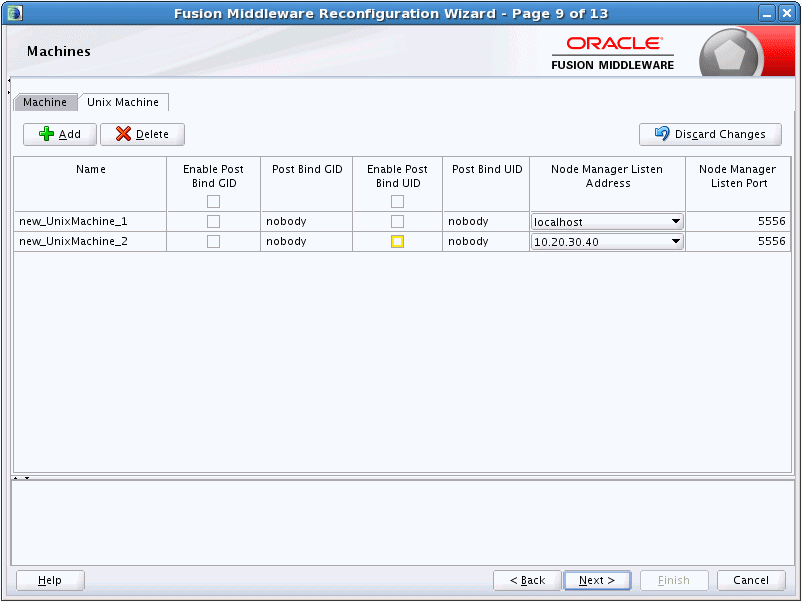
Description of the illustration ''machines.gif''
In a WebLogic domain, the machine definitions identify physical units of hardware and are associated with the WebLogic Server instances or system components (such as OHS servers) that they host.
Use this screen to add or delete machines, or to modify the settings for an existing machine. Each machine has the following configuration settings.
Select the Machine tab (for Windows) or the UNIX Machine tab (for UNIX).
| Column | Description |
|---|---|
|
Name |
Enter a valid machine name. The machine name is used to identify the machine within the WebLogic domain; it does not have to match the network name for the machine. The name must be unique among all component names within the domain. |
|
Node Manager Listen Address |
Select a value from the drop-down list for the listen address used by Node Manager to listen for connection requests. By default, the IP addresses defined for the local system and localhost are shown in the drop-down list. The default value is localhost.
If you specify an IP address for a machine that hosts the Administration Server and you need to access the WebLogic Server Node Manager, you must disable host name verification. For more information, see "Using Host Name Verification" in Administering Security for Oracle WebLogic Server 12c (12.2.1). |
|
Node Manager Listen Port |
Enter a valid value for the listen port used by Node Manager to listen for connection requests.
The valid Node Manager listen port range is from 1 to 65535. The default value is 5556. |
|
Post bind GID enabled |
(UNIX machines only) Select this check box to enable a server running on this machine to bind to a UNIX group ID (GID) after it finishes all privileged startup actions. By default, this check box is not selected. |
|
Post bind GID |
(UNIX machines only) Enter the UNIX group ID (GID) under which a server on this machine will run after it finishes all privileged startup actions. Otherwise, the server continues to run under the group from which it was started. For this setting to take effect, you must select the Post bind GID enabled check box. |
|
Post bind UID enabled |
(UNIX machines only) Select this check box to enable a server running on this machine to bind to a UNIX user ID (UID) after it finishes all privileged startup actions. By default, this check box is not selected. |
|
Post bind UID |
(UNIX machines only) Enter the UNIX user ID (UID) under which a server on this machine will run after it finishes all privileged startup actions. Otherwise, the server continues to run under the account from which it was started. For this setting to take effect, you must select the Post bind UID enabled check box. |
You might want to create machine definitions in situations such as the following:
-
The Administration Server uses the machine definition, with the Node Manager application, to start remote servers.
-
WebLogic Server or other system components such as OHS use configured machine names when determining the server in a cluster that is best able to handle certain tasks, such as HTTP session replication. Those tasks are then delegated to the identified server.
Note:
You must configure machines for each product installation that runs a Node Manager process. The machine configuration must include values for the listen address and port number parameters.
Click Add to add a new machine. The default name for a new machine is new_[Unix]Machine_n, where n starts at 1 and increments by 1 for each machine that you add.
Click Delete to delete an existing machine.
Domain Frontend Host
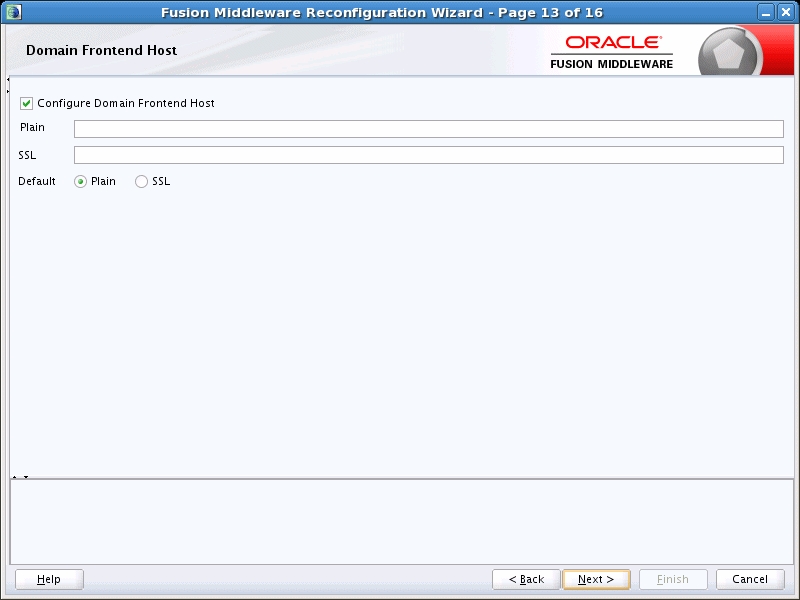
Description of the illustration ''fehost.gif''
This screen is displayed only if you selected the Domain Frontend Host Capture option on the Advanced Configuration screen.
When creating a new domain, use this screen to enable the frontend host, specify both the plain and secure URLs for the frontend host, and select the default frontend host URL. If there are one or more OHS instances configured in the domain, the Plain and SSL fields are automatically populated with the appropriate values from the first OHS instance in the domain. Otherwise, you must configure the values. The settings are then saved to a service table.
When updating a domain, the values are populated based on the values in the service table (if any). If the service table values are null and there are no OHS instances configured, the Configure Domain Frontend Host check box is deselected (unchecked) by default. In this case, you must select the checkbox and configure the host to enable the domain frontend host.
| Field or Option | Description |
|---|---|
|
Configure Domain Frontend Host |
If selected, the domain-wide frontend host is enabled.
To disable and delete the frontend host configuration, deselect this check box. A notification will appear to indicate that the configuration is being deleted from the service table. |
|
Plain |
If not automatically populated, enter the plain URL for the frontend host, for example, http://www.myhost.com:8180. You can also update the existing value if needed. |
|
SSL |
If not automatically populated, enter the SSL URL for the frontend host. You can also update the existing value if needed.
Note: If you are using the plain URL for the frontend host, you must still specify a default SSL URL. If you have only set up a plain connection to the Frontend Host, you can use the same URL for both plain and SSL. Otherwise, they must be different. |
|
Default |
Select the appropriate radio button to make either the Plain or SSL URL the default URL for the frontend host. |
Assign Servers to Machines
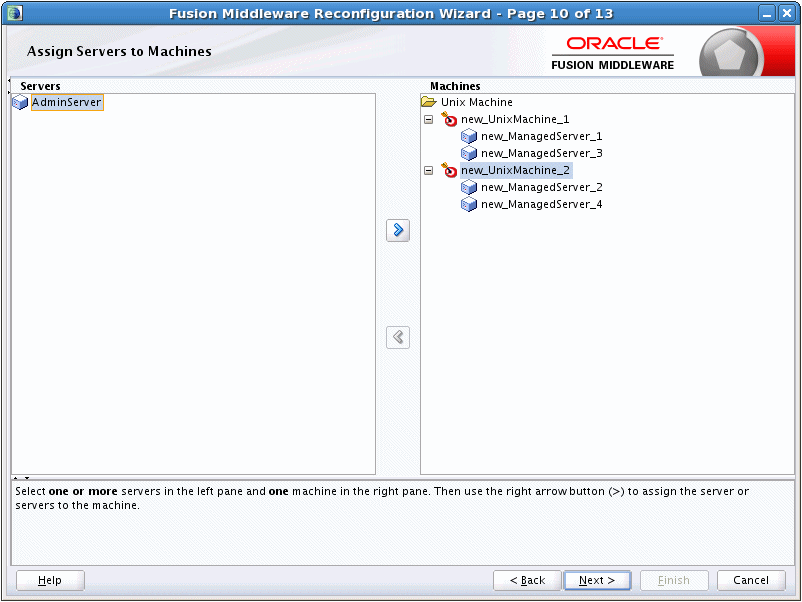
Description of the illustration ''assign_srv_to_mach.gif''
Use this screen to assign WebLogic Server instances to each of the machines you defined.
-
In the Machine list box, select the Windows or UNIX machine to which you want to assign a WebLogic Server instance.
-
Assign WebLogic Server instances to the selected machine in one of the following ways:
-
Double-click the WebLogic Server instance in the Server list box.
-
Select the appropriate WebLogic Server instance in the Server list box and click the right arrow.
-
Shift+click to select multiple servers in the Server list box; then, click the right arrow.
The name of the WebLogic Server instance is removed from the Server list box and added, below the name of the target machine, in the Machine list box.
-
-
Repeat steps 1 and 2 for each WebLogic Server instance to assign to a machine.
-
Review the machine assignments.
If necessary, you can remove a WebLogic Server instance from a machine in one of the following ways:
-
Double-click the name of the appropriate WebLogic Server instance in the Machine list box.
-
Select the appropriate WebLogic Server instance in the Machine list box and click the left arrow.
The name of the WebLogic Server instance is removed from the Machine list box and restored to the Server list box.
-
System Components
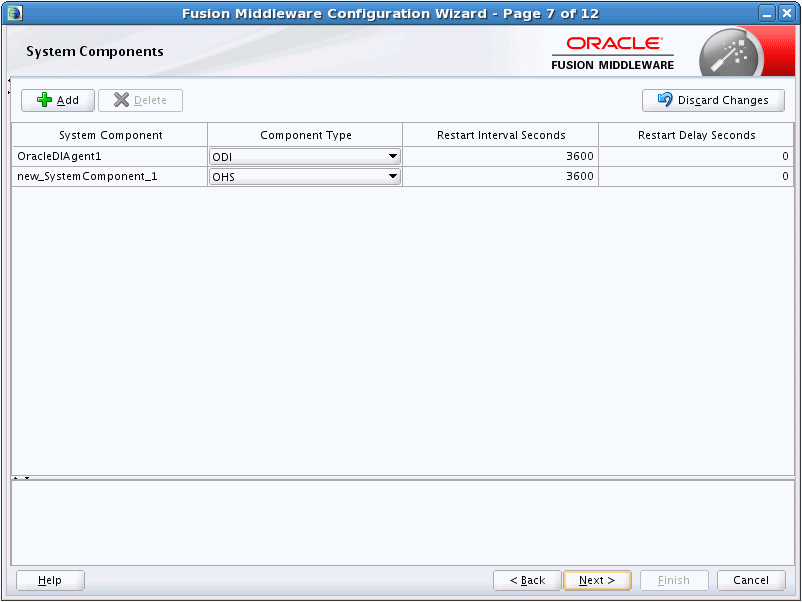
Description of the illustration ''syscomponents.gif''
Use this screen to add or delete system components, such as for OHS or ODI.
| Field | Description |
|---|---|
|
System Component |
Enter a unique name to identify the system component. |
|
Component type |
Enter the appropriate component type, such as OHS or ODI. |
|
Restart interval seconds |
Specify the number of seconds to wait before attempting a restart if an application is not responding. |
| Restart interval delay | Specify the number of seconds to wait between restart attempts. |
Click Add to add a new system component. The default name for a new component is new_SystemComponentn, where n starts at 1 and increments by 1 for each OHS or ODI instance that you add.
To delete an existing system component, click in the table row for the component and click Delete.
OHS Server
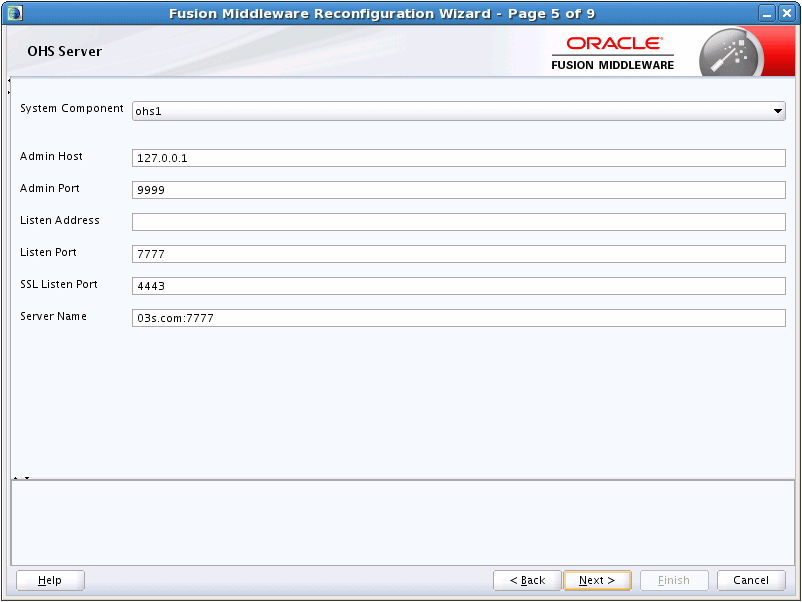
Description of the illustration ''ohs.gif''
Use this screen to configure the OHS servers in your domain.
| Field | Description |
|---|---|
|
System Component |
From this drop-down list, select the system component to configure. |
|
Admin Host |
The listen address to use for the selected OHS server for communication with Node Manager. The address should only allow loopback communication within the host (for example, 127.0.0.1). |
|
Admin Port |
The listen port to use for the selected OHS server for communication with Node Manager on this system. The port must be unique. |
| Listen Address | The listen address to use on this system component. |
| Listen Port | The listen port to use on this system component. |
| SSL Listen Port | This field is available only if SSL is enabled on the specified WebLogic Server Administration Server.
Enter a valid value to be used for secure requests on this server instance. The valid listen port range is from 1 to 65535. By default, a server instance uses demonstration certificates to authenticate requests from a secure port. In a production environment, you must configure SSL to use certificates from a certificate authority. For more information, see "SSL: An Introduction" in Administering Security for Oracle WebLogic Server 12c (12.2.1). |
| Server Name | The server URL and listen port for the currently selected OHS server. When adding new servers, this field defaults to the server on which you are running the Reconfiguration Wizard and the port value in the Listen Port field. |
ODI Server Configuration
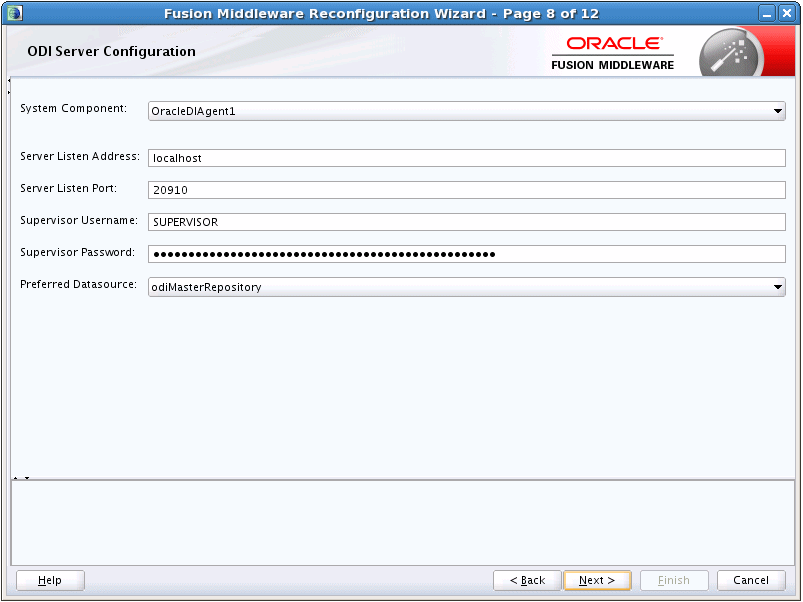
Description of the illustration ''odi_server.gif''
Use this screen to configure the co-located ODI agents in your domain.
For more information on standalone and co-located ODI agents, see "Understanding Oracle Data Integrator Agents" in Installing and Configuring Oracle Data Integrator.
| Field | Description |
|---|---|
|
System Component |
From this drop-down list, select the ODI agent to configure. |
| Server Listen Address | Enter the host name or IP address of the host system on which this agent resides. Do not use localhost. |
| Server Listen Port | Enter the listen port to use for the ODI agent. |
| Supervisor Username | Enter the ODI username that has Supervisor privileges. |
| Supervisor Password | Enter the Supervisor user's password. |
| Preferred Datasource | From this drop-down list, select the data source to use for the selected ODI agent. |
Assign System Components to Machine
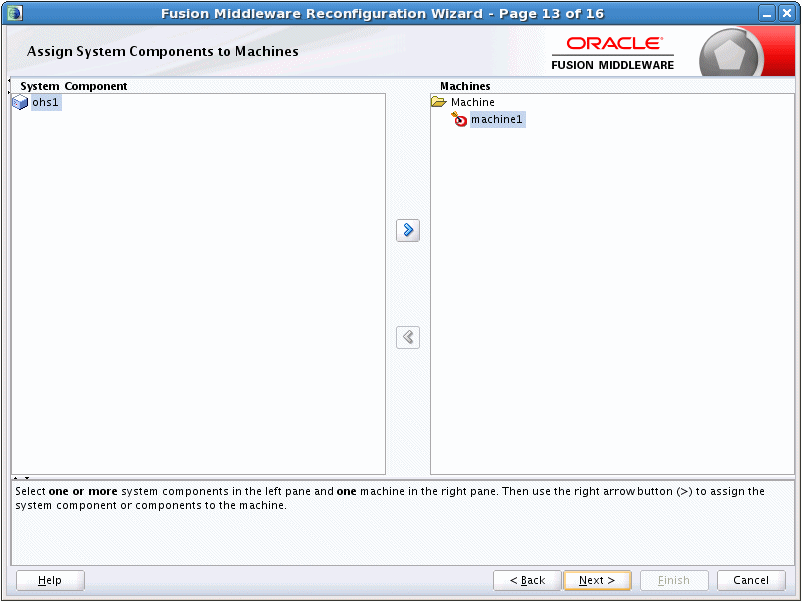
Description of the illustration ''assign_syscomp.gif''
Use this screen to assign system components to machines that you defined.
-
In the Machine list box, select the Windows or UNIX machine to which you want to assign a system component.
-
Assign system components to the selected machine in one of the following ways:
-
Double-click the instance in the System Components list box.
-
Select the appropriate instance in the System Components list box and click the right arrow.
-
Shift+click to select multiple instances in the System Components list box; then, click the right arrow.
The name of the system component is removed from the System Components list box and added, below the name of the target machine, in the Machine list box.
-
-
Repeat steps 1 and 2 for each instance to assign to a machine.
-
Review the machine assignments.
If necessary, you can remove an instance from a machine in one of the following ways:
-
Double-click the name of the appropriate instance in the Machine list box.
-
Select the appropriate instance in the Machine list box and click the left arrow.
The name of the instance is removed from the Machine list box and restored to the System Components list box.
-
Deployments Targeting
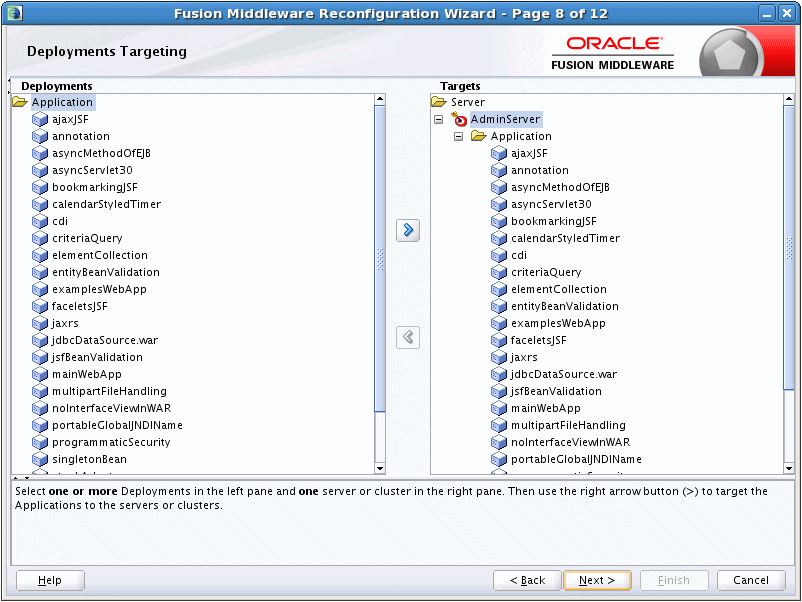
Description of the illustration ''target_deployments.gif''
Use this screen to target applications for deployment on servers or clusters.
Applications associated with the product for which you are configuring the domain are targeted automatically to the Managed Server created for that product or to the cluster to which that Managed Server is assigned. In this screen, you can target applications to additional servers and clusters.
To target an application deployment to a cluster or server:
-
In the Target list box, select the cluster or server on which you want to deploy applications.
The name of the selected target is displayed as the title of the list box on the right.
-
In the target_name list box, select the check boxes corresponding to the applications to deploy on the selected target.
The applications displayed here vary, depending on the products that you selected in the Select Domain Source screen, earlier in the wizard.
Note:
When you select a Managed Server in the Target list box, some of the check boxes in the target_name list box might be disabled, indicating applications that are already targeted at the cluster that contains the selected Managed Server.After you select applications, the names of the targeted clusters and servers are displayed in the Target column in the target_name list box.
-
Repeat steps 1 and 2 for the other clusters and servers, as required.
-
After making the required selections, click Next.
When you reconfigure a domain, if you delete a Managed Server or cluster to which applications are currently targeted, the Reconfiguration Wizard automatically retargets those applications as follows:
-
If the applications were originally targeted solely to the Managed Server or cluster that you are now deleting (that is, after you delete the Managed Server or cluster, the applications would become untargeted in the modified domain), then the Reconfiguration Wizard automatically retargets the applications to all eligible targets.
An eligible target is any cluster or Managed Server that is not defined in the configuration groups specification (
config-groups.xmlfile) of an included template. Servers or clusters that are specified inconfig-groups.xmlare essentially owned by the template and, therefore, are not eligible for automatic targeting. -
If the applications were originally targeted to multiple targets (including Managed Servers, clusters, and the Administration Server), and one of the targeted Managed Servers or clusters is deleted, then, in the extended domain, the Reconfiguration Wizard leaves the remaining target associations intact and does not attempt to retarget the applications.
Services Targeting

Description of the illustration ''servicestargeting.gif''
Use this screen to target services to the appropriate Managed Servers or clusters.
Services that are associated with the product for which you are configuring the domain are targeted automatically, to the Managed Server created for that product or to the cluster to which that Managed Server is assigned. In this screen, you can target services to additional servers and clusters.
To target services to Managed Servers or clusters:
-
In the Target list box, select the cluster or server on which you want to deploy services.
The name of the selected target is displayed as the title of the list box on the right.
-
In the target_name list box, select the check boxes corresponding to the services to deploy on the selected target.
The services displayed here vary, depending on the products that you selected in the Select Domain Source screen earlier in the wizard.
Note:
When you select a Managed Server in the Target list box, some of the check boxes in the target_name list box might be disabled, indicating services that are already targeted at the cluster that contains the selected Managed Server.After you select services, the names of the targeted clusters and servers are displayed in the Target column in the target_name list box.
-
Repeat steps 1 and 2 for the other clusters and servers, as required.
-
After making the required selections, click Next.
When you reconfigure a domain, if you delete a Managed Server or cluster to which services are currently targeted, the Reconfiguration Wizard automatically retargets those services as follows:
-
If the services were originally targeted solely to the Managed Server or cluster that you are now deleting (that is, after you delete the Managed Server or cluster, the services would become untargeted in the modified domain), then the Reconfiguration Wizard automatically retargets the services to all eligible targets.
An eligible target is any cluster or Managed Server that is not defined in the configuration groups specification (
config-groups.xmlfile) of an included template. Servers or clusters that are specified inconfig-groups.xmlare essentially owned by the template and, therefore, are not eligible for automatic targeting. -
If the services were originally targeted to multiple targets (including Managed Servers, clusters, and the Administration Server), and one of the targeted Managed Servers or clusters is deleted, then, in the extended domain, the Reconfiguration Wizard leaves the remaining target associations intact and does not attempt to retarget the services.
JMS File Stores
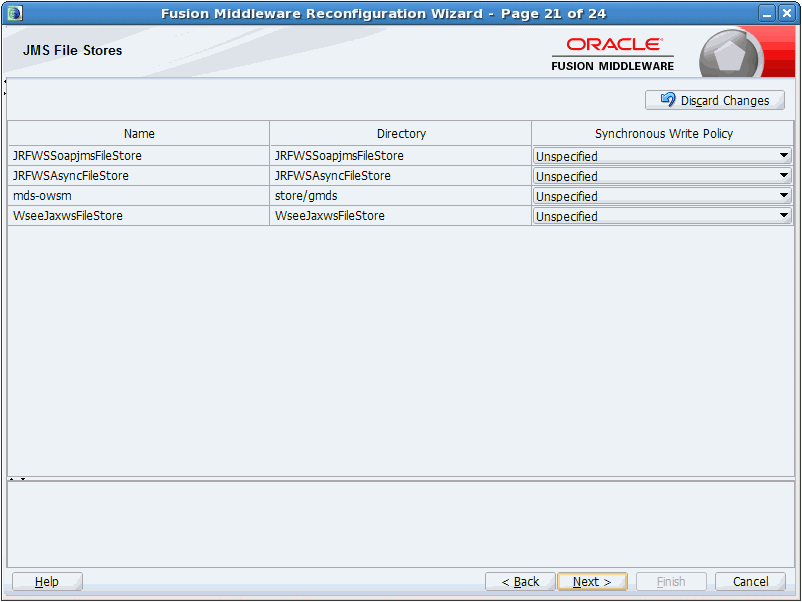
Description of the illustration ''jms_file_stores.gif''
A JMS file store is a disk-based file in which persistent messages can be saved.
Use this screen to modify the JMS file stores that are configured in your domain. It contains the following fields.
| Column | Description |
|---|---|
|
Name |
Enter a valid name for the JMS file store. The name must be a string of characters. The name of the JMS file store must be unique among all component names within the domain. |
|
Directory |
Enter the path of the directory (in your system) in which the JMS file store resides. |
|
Synchronous write policy |
From the drop-down list, select one of the following synchronous write policies to determine how the file store writes data to the disk.
If the JMS file store is used exclusively for paging non-persistent messages to the disk, the synchronous write policy is ignored. |
|
Cache-Flush |
WebLogic Server enables the default file write behavior of the operating system and storage device, which typically includes caching and scheduling file writes, but forces a flush of the cache to disk before completing a transaction.
For more information, see "Cache-Flush Policy" inAdministering Server Environments for Oracle WebLogic Server. |
|
Direct Write |
WebLogic Server writes synchronously to a primary set of files in the location defined by the Directory attribute of the file store configuration using a native I/O wlfileio driver.
For more information, see "Direct-Write Policy" in Administering Server Environments for Oracle WebLogic Server |
|
Direct-Write-With-Cache |
For most scenarios, Oracle recommends using the Direct-Write-With-Cache policy. When this policy is selected, WebLogic Server writes synchronously to a primary set of files in the location defined by the Directory attribute of the file store configuration using a native I/O wlfileio driver.
For more information, see "Direct-Write-With-Cache Policy" in Administering Server Environments for Oracle WebLogic Server. |
|
Disabled |
WebLogic Server relies on the default file write behavior of the operating system and storage device.
For more information, see "Disabled Policy" in Administering Server Environments for Oracle WebLogic Server. |
|
Direct-Write |
Write operations are performed directly to the disk. This policy is supported on Solaris and Windows. If this policy is active on an unsupported platform, the file store switches automatically to the cache-flush policy.
For more information, see "Direct-Write Policy" in Administering Server Environments for Oracle WebLogic Server |
|
Disabled |
Transactions are complete as soon as the writes are cached in memory. When this policy is active, completion of transactions does not depend on waiting for writes to reach the disk.
This setting affects performance, scalability, and reliability. |
Configuration Summary

Description of the illustration ''configsummary.gif''
Review the detailed configuration settings of the domain before continuing.
You can limit the items that are displayed in the right-most panel by selecting a filter option from the View drop-down list.
If you need to change the configuration, click Back to return to the appropriate screen.
When done, click Reconfig to reconfigure the domain. The location of the domain does not change.
Reconfiguration Progress
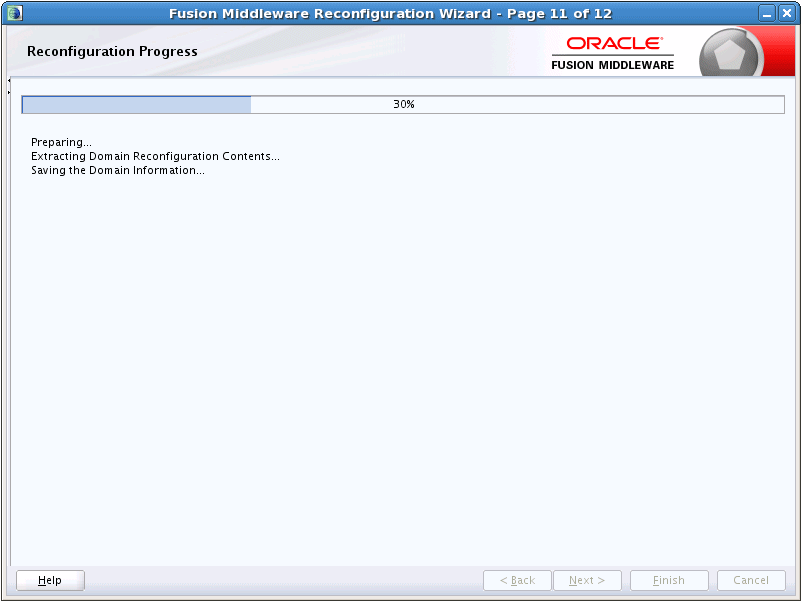
Description of the illustration ''progress.gif''
This screen displays the progress of the reconfiguration process. During this process:
-
Domain information is extracted, saved, and updated
-
Schemas, scripts, and other such files that support your Fusion Middleware products are updated.
When the process completes, click Finish.
Reconfiguration Success
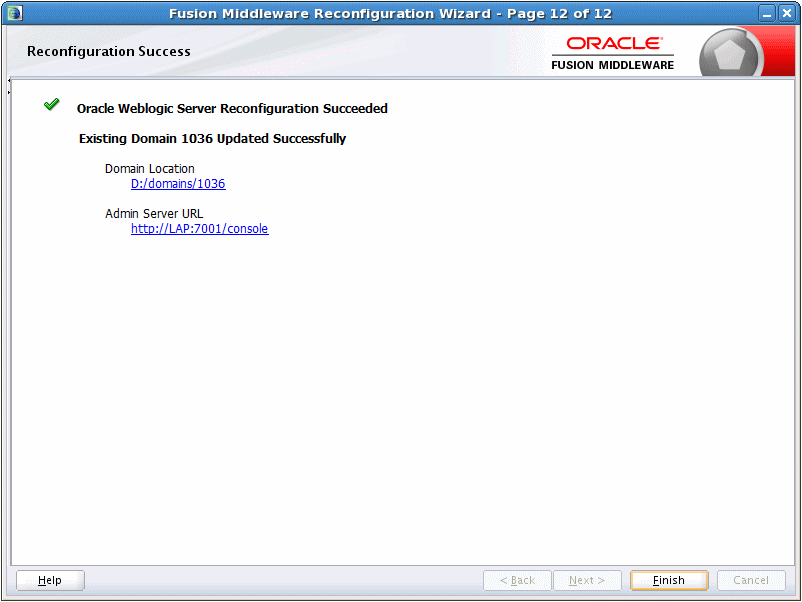
Description of the illustration ''endconfig.gif''
This screen indicates whether the reconfiguration process completed successfully or failed. It also displays the location of the domain that was reconfigured as well as the Administration Server URL (including the listen port).
If the reconfiguration process did not complete successfully, an error message is displayed to indicate the reason. Take appropriate action to resolve the issue. If you cannot resolve the issue, contact My Oracle Support.