Using the Calculation Wizard

You can use the Calculation Wizard to create new calculation columns that compare two existing columns, and also to create metrics in bulk.

It has a built-in mechanism to handle divide-by-zero and null cases, as well as other difficult situations. The Calculation Wizard provides an automated way to calculate the sales by quarter, the percentage of revenue, minimum and maximum values, and so on.

To start the Calculation Wizard, right-click any logical fact or dimension column in the Business Model and Mapping layer of data type numeric, and then select the option Calculation Wizard. The wizard starts with the column on which you right-clicked as the source column, and then displays the other columns in that table for comparison.

To use the Calculation Wizard:
  1. Right-click a measure column in the Business Model and Mapping layer (any logical fact or dimension column of data type numeric), and then select Calculation Wizard.
  2. The first time you use the Calculation Wizard, the Introduction screen appears. Select In the future, do not show this introduction screen if you do not want this screen to display subsequently. If you choose not to display the Introduction screen, you can go to Tools > Options to cause it to appear again. See Setting Administration Tool Options for more information.

    Click Next to display the Select Columns screen.

  3. Select the columns that you want to compare with the source column. If the source column is mapped to multiple logical tables, a list of tables appears in the upper left pane. Select a table, then select a column or columns from the upper right pane to add comparison columns to the Selected Columns list.

    You can remove items from the Selected Columns list by selecting a column and clicking Remove.

    Click Next when you have finished selecting comparison columns.

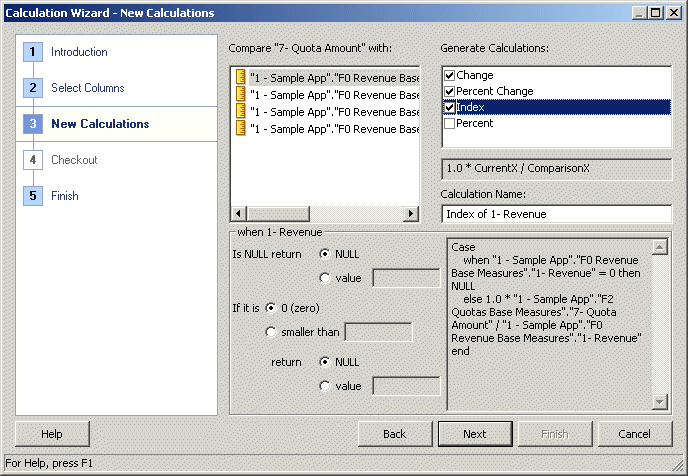
  4. In the New Calculations screen, you can choose which calculations you want to perform for specific columns. The elements of the New Calculation screen are as follows:
    • The upper left pane shows the name of the source column, followed by a list of comparison columns that you selected in the Select Columns screen. Select a particular column to create calculations for that column.

    • The upper right pane shows a list of calculations you can perform. Select a calculation to view the calculation definition and the default calculation name. In the calculation definition, CurrentX refers to the value of the source column, and ComparisonX refers to the value of the comparison column you selected in the upper left pane.

      You can optionally change the calculation name. This name becomes the name of the resulting calculation column.

      The following calculations are available:

      • Change (CurrentX - ComparisonX). Subtract the value of the comparison column from the source column.

      • Percent Change (100.0 * (CurrentX - ComparisonX) / ComparisonX). Subtract the value of the comparison column from the source column and express as a percentage.

      • Index (1.0 * CurrentX / ComparisonX). Divide the source column by the comparison column.

      • Percent (100.0 * (CurrentX / ComparisonX)). Divide the source column by the comparison column and express as a percentage.

    • The lower left pane shows special cases that are available for the selected calculation. You can keep the default values, or specify how you want the special cases to be handled. For example, for the Change calculation, you can choose whether to return NULL or some other value when the comparison column is NULL.

      Select a calculation in the upper right pane to view and set special cases for that calculation.

    • The lower right pane shows the resulting SQL for the selected calculation.

  5. Click Next when you have finished creating calculations.
  6. When the repository is open in online mode, the Checkout screen appears. In online mode, objects need to be checked out before you can make changes to them. Click Next to check out the necessary objects.
  7. The Finish screen displays a summary of the calculations that will be created. If you want to make changes, click Back, or select a particular step from the navigation panel.
  8. Click Finish. The new calculation columns are created.