12 Working with Engage Assets
For information about working with Engage assets, see these topics:
12.1 About Engage Assets
Engage assets enable marketers to do the following:
-
Collect visitor data using the Visitor Attribute, History Attribute, and History Definition assets
-
Use that visitor data to define visitor segments (using Segment assets)
-
Recommend products and content to visitors based on the segments they belong to (using Recommendation assets)
-
Run promotions that apply to all or specific segments (Promotion assets)
Developers and administrators create and manage the visitor data and underlying business logic, while marketers create and manage the Segment, Recommendation, and Promotion assets. As with any of the other WebCenter Sites applications, you create and work with assets on the management site. Then, when assets are approved, you publish them to your delivery site.
Marketers and developers are expected to collaborate extensively to implement effective marketing efforts.
12.1.1 Using Segments to Categorize Visitors
Segments are assets that categorize groups of visitors based on the visitor data that you are gathering about them. You build segments by determining which kinds of visitor data to use as filtering criteria and then setting the values that qualify or disqualify a visitor for the segment.
You use the Segment Filtering forms in Engage to categorize groups of visitors based on the visitor attributes, history attributes, and history definitions created by the developers.
Segments are the key to personalization with Engage. When visitors browse your site, the information they submit is used to qualify them for segment membership. When the site displays a page with a recommendation or promotion, Engage determines which segments a visitor belongs to and displays the product recommendations or promotional messages that are designated for those segments.
For detailed information about segments, see Grouping Visitors into Segments with Engage.
12.1.2 Making Recommendations to Segmented Visitors
You create Recommendation assets and then configure them by rating assets based on their importance to the segments that you have created.
Recommendations are assets that determine which products or content should be featured or recommended on a site page. These assets are rules that are based on the segments the visitors qualify for, and, in some cases, relationships between the product or content assets.
Recommendations have templates. A recommendation returns a list of assets to its template when the template is rendered on a site page. The items in a list of recommended assets are rated according to their importance to the current visitor based on the segments that the visitor belongs to.
For detailed information about recommendations, see Creating and Configuring Recommendations with Engage.
12.1.3 Basing Promotions on Buying Patterns
Promotions are assets that define an offer of value (a discount) to the visitors based on the products that the visitor is buying and the segments that the visitor qualifies for. This value can be offered in several ways:
-
A discount off the purchase price of one or more promoted products
-
A discount off the entire value of the shopping cart
-
A discount off shipping charges
-
A combination discount: a shipping discount with a price or cart discount
Promotions use the same templates as recommendations. You decide which recommendation the promotion overrides, and Engage uses that recommendation's template to render the promotion on the site page.
For detailed information about segments, see Creating Promotions.
12.2 Grouping Visitors into Segments with Engage
Segments are assets that categorize visitors into groups on the basis of visitor data that you gather. You build segments by determining which kinds of visitor data to use as filtering criteria and then setting values that qualify or disqualify a visitor for the segment.
12.2.1 About Segments
Segments are used to create recommendations and promotions. The segments determine which content in the recommendations and promotions visitors qualify for and display that content to the visitors.
Segments are the key to personalization and marketing with Engage. You, as a marketer, create the visitor segments that the site pages depend on because you know which marketing messages should be associated with specific visitor segments.
When you create a segment, you specify filtering criteria that a visitor must match to be included as a member of that segment. This is comparable to when database or site administrators create a database query, and they specify parameters that a database record must match to be included in the results of the query.
This section covers the following topics:
12.2.1.1 Segments and Visitor Data Assets
You build segments by using the visitor data assets as filtering criteria. The types of visitor data assets are: visitor attributes, history attributes, and history definitions.
-
Visitor attributes hold types of information that specify one characteristic only. For example, there can be attributes named years of experience, job description, or number of children.
When visitors change the data, the new data overwrites the old. For example, if a visitor changes her job description from analyst to marketing specialist, no record exists that the visitor used to be an analyst.
-
History attributes are individual information types that you group together to create a single type of historical record.
-
This historical record is a history definition. For example, a history definition called purchases could be made up of the history attributes SKU #, itemname, quantity, and price.
Engage treats the data recorded as a history definition as a whole unit of information. It assigns a timestamp to and stores each instance of the data, which means that you can create segments based on counts or sums of history definitions.
Developers create the visitor data assets based on the kinds of information that the marketing and design teams want to collect and analyze. You and the other marketers can use those assets to create segments that categorize your visitors, and the developers program your site pages to collect and store visitor information.
12.2.1.2 Developing Segments: Process Overview
The five general steps for creating segments are:
-
Planning. A cross-functional design team, including developers and marketers, determines the data you want to gather about your site visitors.
-
Creating visitor data assets. The developers create and define the necessary visitor attributes, history attributes, and history definitions using the forms in Engage.
-
Creating segments. You (the marketers) use the Segment Filtering forms in Engage to categorize visitors on the basis of visitor attributes, history attributes, and history definitions.
-
Collecting visitor data. The developers program the appropriate site pages to collect and store visitor data. For example, they might create an online registration form for visitors to fill out with information that qualifies them for segments. When visitors browse your site, the information they submit is stored in the WebCenter Sites database.
-
Segmenting visitors. Now when visitors browse your site, the information they submit is used to qualify them for segment membership. The promotional messages and recommended products are personalized based on the segments that visitors qualify for.
12.2.2 About the Segment Forms
The New Segment form contains two sections that you use to create a segment, the Content section and the Detail section.
This section covers the following topics:
12.2.2.1 Segment Content Section
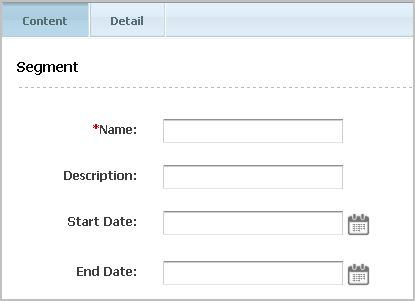
The Content section (Figure 12-1) displays the visitor data assets that you can use to create segments. In this form, you select the criteria that defines your segment.
Figure 12-1 Content Section of the New Segment Form
Description of "Figure 12-1 Content Section of the New Segment Form"
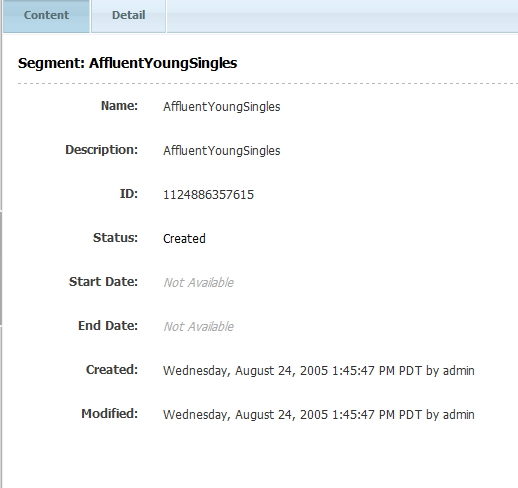
When viewing an existing segment, the stored information is shown (Figure 12-2).
Figure 12-2 Populated Content Section of Existing Segment Asset
Description of "Figure 12-2 Populated Content Section of Existing Segment Asset"
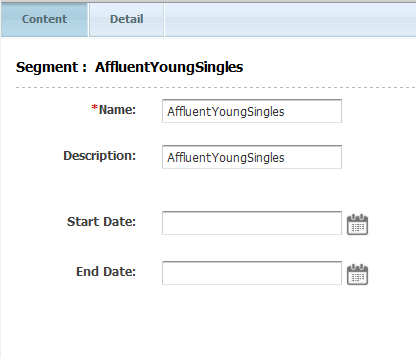
Existing segments are easily modified. From the menu bar select Edit, then from the menu select Edit. The form as shown in Figure 12-1is shown in the tab, but populated with the segment's stored data, as shown in Figure 12-3:
Figure 12-3 Edit View of Existing Segment Asset's Content Section
Description of "Figure 12-3 Edit View of Existing Segment Asset's Content Section"
12.2.2.2 The Segment Detail Tab
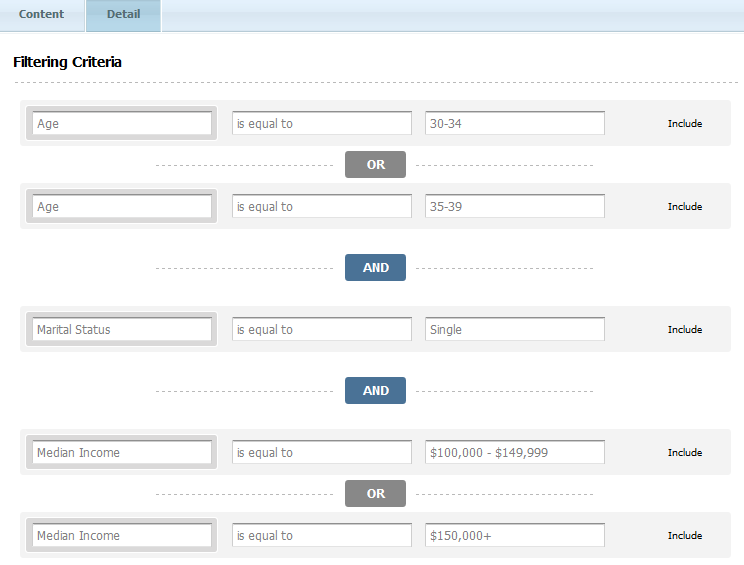
While you are creating a segment, Engage displays each condition (criterion) that you add to the segment in a form similar to what is shown in Figure 12-4:
Figure 12-4 Detail Section of Existing Segment Asset
Description of "Figure 12-4 Detail Section of Existing Segment Asset"
As you add criteria to a row, you create a more inclusive segment. In the preceding form, the visitor can be one who is aged 30 to 39 and has an income of over $100,000. In other words, you add more factors that can qualify a visitor for a segment by working across the table, adding criteria to the same row.
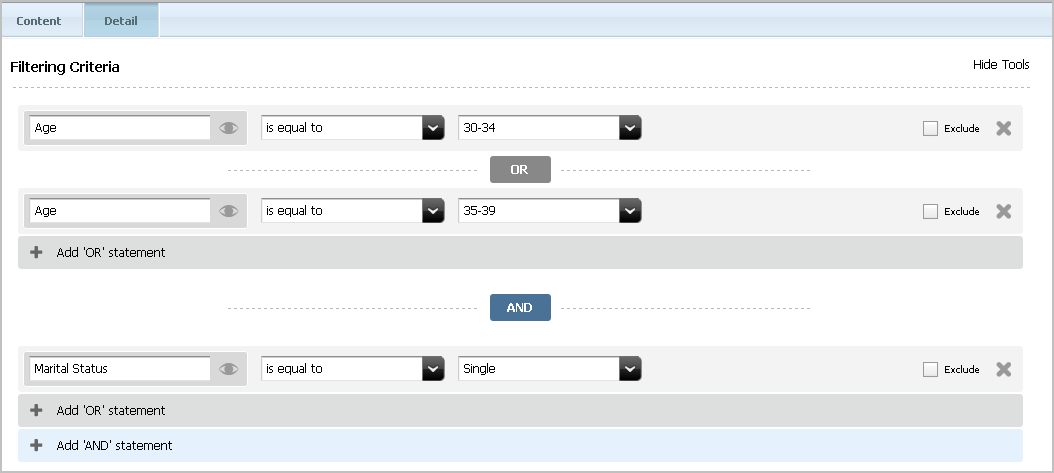
As you add criteria to a column, you create a more restrictive segment. In the following example, as shown in Figure 12-5, a visitor belongs to the segment only if both criteria are true:
Add restrictions to a segment by working down the form, adding them to the criteria. In Figure 12-5, the filter is for people who are aged 30 to 39, and are single.
In summary, segments broaden as you add OR criteria and narrow as you add AND criteria.
This section covers the following topics:
12.2.2.2.1 Categories
The visitor data assets in the Segment Filtering Criteria form are organized within categories which are viewable in the mega menu by clicking the eye icon.
You can start typing a criteria in the field (for example, typing S suggests "Street Address," "State or province name," and "Shopping Cart." Typing Sh suggests only "Shopping Cart." Additionally, the mega menu is available by selecting the eye icon. The mega menu displays all visitor data assets grouped into categories.
Because visitor data assets are so varied, developers assign them to categories to organize them. (Developers create categories when they define visitor data assets.) The Profile category, for example, details visitor attributes such as age and income, that are related to personal information about the visitors. For more information about the mega menu, see the different steps in Creating Segments.
Note:
The actual categories of visitor data assets are probably different for your installation, depending on the installation options and what your developers have defined. For more information about categories or visitor data, see your developers.
12.2.2.2.2 The Shopping Cart Criterion
Shopping Cart is listed with the categories on the Segment Filter forms (Figure 12-6), but the shopping cart is a special, default feature rather than a category of attributes.
Figure 12-6 Shopping Cart Criterion in Filtering Criteria

Description of "Figure 12-6 Shopping Cart Criterion in Filtering Criteria"
You can use the Shopping Cart criterion to create segments based on the following kinds of conditions:
-
The total value of all the products in the shopping cart
-
Whether a specific product is in the shopping cart
-
Whether a certain number of products are in the shopping cart
-
Whether a certain number of specific products is in the shopping cart
To implement a promotion based on the current state of a visitor's shopping cart, use this form to build a segment and then use the segment in the promotion.
The Shopping Cart is always available for defining your segments. Therefore, even before your site developers create visitor attributes or history definitions, you can create segments defined by shopping cart information.
12.2.3 Creating Segments
Before you create segments, be sure the following tasks have been completed:
-
The marketing, design, and development teams met to determine the kinds of data you want to collect about your visitors.
-
The developers created the visitor attributes, history attributes, and history definitions that the cross-functional team decided are necessary.
-
You (the marketers) obtained a list or overview of the visitor data assets that were created and you understand what they mean and how they are categorized.
This section covers the following topics:
12.2.3.2 Create Segment Filtering Criteria with Visitor Attributes
To create segment filtering criteria with visitor attributes:
12.2.3.3 Create Segment Filtering Criteria with History Definitions
To create segment filtering with history definitions:
This section covers the following topics:
12.2.3.3.1 Filtering Based on a Total
You can define the segment based on a total, such as the total amount spent, a total price, or a total number of items.
For example, a site developer could create a history definition named Purchase History, which would be a historical record of purchases made by site visitors. A history attribute in this definition could be number of items. Using this history definition, a marketer could create a segment based on the total number of items purchased by site visitors.
To define a segment based on a total, complete the following steps:
12.2.3.3.2 Filtering Based on a Count
You can define the segment based on the total number of times this history definition was recorded for a visitor.
For instance, using the Purchase history history definition described in Filtering Based on a Total,a marketer could define a segment based on the number of times Purchase history was recorded for a visitor. The effect of this criterion is that Engage would consider how many times a visitor purchased anything instead of considering what they bought or how much they spent.
To define a segment based on a count, complete the following steps:
12.2.3.3.3 Filtering Based on the First Time a History Definition Was Recorded
You can define the segment based on the first time the history record was recorded for visitors.
For instance, using the Purchase history history definition, described in Filtering Based on a Total, a marketer could define a segment based on the first time the visitor purchased something—in other words, the first time a Purchase history record was recorded for the visitor.
To define the segment based on the first time the definition was recorded, complete the following steps:
12.2.3.3.4 Filtering Based on the Most Recent Time a History Definition Was Recorded
You can define the segment based on the last time (the most recent time) the history definition was recorded for a visitor.
For instance, using the Purchase history history definition, described in Filtering Based on a Total, a marketer could define a segment based on the most recent time the visitor purchased something—in other words, the last time a Purchase history record was recorded for the visitor.
To define the segment based on the last time the history definition was recorded, complete the following steps:
12.2.3.3.5 Adding a History Attribute to Further Define the Segment
You can add a history attribute to create a more complex segment—one that further restricts the count, total, first, or last record by taking a specific attribute into consideration.
To add a history attribute to further define the segment, complete the following steps:
12.2.3.3.6 Adding Products to Further Define the Segment
You can add products to create a more complex segment—one that further restricts the count, total, first, or last record by taking specific products into consideration—if the history definition that you use to define this segment has a product list history attribute.
To add a product to the segment definition, complete the following steps:
12.2.4 Sample Segment Assets
If you have installed the sample sites, the FirstSite II sample site comes with one sample segment asset: AffluentYoungSingles. This segment is designed to work in concert with the sample Recommendation and Promotion assets. Use these sample segments as templates for creating segment assets for your site.
12.2.5 Previewing a Segment
When a segment is created and incorporated into the website, it can be useful to preview it. Previewing a segment is especially useful when the function of the segment is to display different assets depending on the visitor. This is done with the Preview with Segment button. For instructions about previewing a segment, see How Do I Preview Assets?
12.2.6 Publishing Segments
When your segments are ready, you must approve them so they can be published to your delivery system. Engage can then use the segments to assess visitors and recommend the appropriate items to them.
Be sure to examine or inspect your segments to verify that you configured them correctly before approving them for publishing.
For more information about approving and publishing assets, see Performing Approval Tasks.
12.2.7 After You Publish
After you have created, verified, and published the segments, you must assign ratings to the products and content that are significant to members of each segment. For details, see Creating and Configuring Recommendations with Engage.
You can also create promotions after you have created segments. For more information, see Creating Promotions.
12.3 Creating and Configuring Recommendations with Engage
This section describes Recommendations and provides instructions on creating and configuring them. Recommendations are assets that determine which other assets are featured or recommended on a site page. Recommendations calculate which assets to recommend based on the segments the visitors qualify for, and, in some cases, context-based relationships between assets (for example, movies related to each other by genre).
After you create the Recommendation assets, (typically, marketing people create Recommendation assets), you configure them by rating their child assets based on their importance to the segments that visitors qualify for. Assets are recommended (or are not recommended) based on those ratings. Additionally, the Related Items recommendation defines relationships between assets that allow for cross- or up-selling items according to how those items are related to one another. You determine which assets have those relationships.
12.3.1 Recommendation Assets
A recommendation asset collects, assesses, and sorts assets, and then recommends the most appropriate of these assets to the current visitor. How does it determine which assets are the most appropriate? By consulting the list of segments that the visitor belongs to and any confidence set in the recommendation for each asset. For information about confidence, see Confidence.
You create segments and then rate the flex assets for their importance to each segment. When a recommendation asset is called from a web page, Engage determines which segments the current visitor qualifies for, and then selects the assets that are identified by the recommendation to have the highest rating for those segments. These are the assets that are recommended to the visitor.
Engage provides the following types of recommendations:
-
Static Lists –operates in two modes, List and Recommendation:
-
In List mode, a Static Lists recommendation holds and returns a single static, preselected list of assets regardless of segments (or whether segments apply at all). Confidence values are automatically assigned to assets on the list based on their position on the list; the first asset receives a confidence value of 100%, the next one 99%, and so on, in descending order.
-
In Recommendation mode, a Static Lists recommendation holds and returns static, preselected lists of recommended assets when the visitor qualifies for segments defined in the recommendation, and also when no segments apply.
When a template calls the recommendation, the recommendation returns the assets on the static lists. For each asset that you add to a segment's static list, you can assign a confidence value for In Segment and Out of Segment ratings. (A variant of this type of recommendation was formerly known as manual.)
You create a static lists recommendation by selecting assets from your bookmarks and adding them to each segment's list (recommendation mode) or the common list (list mode). Because this is a static lists recommendation, the assets in the list(s) remain the same until you change them (or delete them from the database).
-
-
Dynamic Lists –references a special asset called a CSElement asset, which your developers have coded as a type of program known as an element. When a template calls the Dynamic Lists recommendation, it executes the element, which returns a list based on the conditions defined in the element. For example, you could create a recommendation named New Products whose referenced element selects only those Product assets that have been added to the database in the past five days.
You create a Dynamic Lists recommendation by selecting a CSElement asset (which contains the logic for generating the list) in the tree. You can then test the selected element by displaying the current list results.
As its name implies, this type of recommendation is dynamic: each time the recommendation is called by a template, it executes the element, which regenerates the list, based on the current state of the database.
-
Related Items –holds the name of a relationship between flex assets that are related to one another based on context (for example, similarly themed movies). When a template calls a Related Items recommendation, assets are returned (recommended) only if they are manually configured to have the relationship named by the recommendation with the asset that is currently displayed on the page.
Typical relationships between assets are cross-sell and up-sell relationships. For example, a Related Items recommendation named Cross-Sell displays a list of science fiction movies on rendered pages that display suspense movies because the marketers determined that people who buy science fiction movies also buy suspense movies.
You create a Related Items recommendation by naming it and specifying it as a Related Items recommendation. You must then determine which flex assets should have the relationship represented by this recommendation with other flex assets. You assign these relationships in the parent asset's New or Edit form, and you assign a confidence value to each asset on the list for each segment.
When the recommendation is rendered by its template, Engage does two things. First, Engage identifies which assets have the relationship named by the recommendation with the currently displayed asset. Additionally, Engage examines the ratings for those assets to determine whether those assets are relevant for the current visitor.
The functionality of each of the available types of recommendation assets is summarized in Table 12-1:
Table 12-1 Types of Recommendation Assets
| Parameters | Static Lists (List Mode) | Static Lists (Recommendation Mode) | Dynamic Lists | Related Items |
|---|---|---|---|---|
|
Ratings (by segment) |
Yes |
Yes |
Yes |
Yes |
|
Confidence (by segment) |
Determined by asset's position in the list; no segment distinction. |
Yes |
Yes |
Yes |
|
Selection Criteria |
Highest only |
Highest, Random |
Highest, Random |
Highest, Random |
|
Sort Order |
Descending by confidence only |
Yes |
Yes |
Yes |
|
Options |
|
|
|
|
|
Build |
Built by manually adding assets to the list and setting their order in the list. |
Built by manually assigning assets to and setting their confidence values for each segment's list. |
Built in realtime by code in the assigned CSElement asset. |
Built by adding assets to each segment's list in the parent asset's New and Edit forms. |
12.3.2 Asset Selection Factors
When Engage determines which assets are the most appropriate to recommend to the current visitor through a given recommendation, it multiplies each asset's individual rating in the segment by the confidence value assigned to the asset in the recommendation to obtain the asset's weighted rating. The following sections describe these concepts in detail.
This section covers the following topics:
12.3.2.1 Ratings
An asset's individual rating establishes how important the asset is to the visitor belonging to a particular segment. You manually assign the rating to the asset in the asset's Create or Edit view.
Note:
Only flex assets can be rated for segments. Basic assets do not support ratings and are ignored by the recommendation if placed in it. Consult your administrator to make sure you are only placing flex assets in the recommendations you create.
You can assign three kinds of ratings to an asset:
| Rating | Description |
|---|---|
|
In Segment |
Used when the current visitor is a member of a specific segment. |
|
Out of Segment |
Used when the current visitor is not a member of a specific segment. |
|
When no segment ratings apply |
Used when no segments are defined for the current site, or the asset is placed in a recommendation that does not recognize segments (Static Lists recommendation in List mode). |
Flex assets and flex parents that are not assigned any of these specific ratings have a system default rating. The system default is set to 50 unless you and your development team decide to change it (through an XML or JSP object method on your site pages). The system default represents the average or middle point in the rating scale for your site, which is why you should keep the system default rating set to 50.
Range of Ratings
The valid range for individual ratings is 0 through 100. The individual values of 0 and 100 are special and affect an asset's rating as follows:
-
An asset rating of 0 for a segment tells Engage to never recommend the asset to a member of the segment. For example, you might want to ensure your site never recommends PCs or PC software to members of a segment named Macintosh Users.
-
An asset rating of 100 for a segment tells Engage to always recommend the asset to a member of the segment.
Inheritance of Ratings
Flex assets and flex parents inherit In Segment, Out of Segment, and When No Segment Ratings Apply (fallback) ratings from their parents. The asset's or parent's final rating is the average of its individual rating (which is the system default rating if it has no individual rating) plus its inherited rating. The asset's inherited rating is the final rating of its parent, as illustrated by the following formula:
Final rating= individual rating+inherited rating/2
where,
individual rating =system default if custom rating is not specified
inherited rating =parent's final rating
For example:
| Asset or Parent | Individual Rating | Inherited Rating | Final Rating |
|---|---|---|---|
|
Asset Parent A (top-level group) |
70 |
no rating inherited |
70 |
|
Asset Parent B (child of Asset Parent A) |
60 |
70 |
(60 +70) /2 =65 |
|
Asset 1 (child of Asset Parent B) |
95 |
65 |
(95 +65) /2 =80 |
If the flex asset inherits a rating for a segment that it does not have an individual rating for, Engage averages the inherited rating with the system default rating (which is typically 50) to determine the final rating. For example:
| Asset or Parent | Individual Rating | Inherited Rating | Final Rating |
|---|---|---|---|
|
Asset Parent A (top-level group) |
80 |
nothing inherited |
80 |
|
Asset Parent B (child of Asset Parent A) |
none, so the system default of 50 is used |
80 |
(50 +80) /2 =65 |
|
Asset 1 (child of Asset Parent B) |
70 |
65 |
(70 +65) /2 =67.5 |
Because the values of 0 and 100 have special functions, the following rules apply to them when inheritance is concerned:
-
If either the individual or the inherited rating is 0, the final rating is 0.
-
If either the individual or the inherited rating is 100, the final rating is 100 unless the other value is 0.
If the current visitor belongs to multiple segments, and the asset has ratings for those segments, the following rules apply:
-
The highest of the ratings is the final rating.
-
If one of those ratings is 0, the final rating is 0.
12.3.2.2 Confidence
Confidence in Engage indicates how likely your visitors want to view a particular piece of content. So, Engage uses confidence values assigned to each asset in a recommendation to decide how often a piece of content is to be recommended to the visitor. When a recommendation assesses an asset against a given segment, the asset's rating (either individual or final, depending on the scenario) is multiplied by the confidence value for that segment in the recommendation to produce the asset's weighted rating. The weighted rating is then used by the recommendation to determine how relevant the asset is to the current visitor. Confidence is therefore a scaling factor for the asset's rating. Keep in mind that neither an asset's individual rating nor its confidence value alone can be used to recommend the asset to the visitor; the weighting process applies to all assets assigned to a given recommendation.
Note that when an asset is assessed by multiple recommendations, its respective weighted ratings are calculated independently of one another; that is, the confidence values assigned to the asset in one recommendation do not affect the asset's rating visible to the other recommendation. For example, if an asset has an individual rating of 80, a 60% confidence for Segment A in Recommendation 1, and a 90% confidence for Segment A in Recommendation 2, both recommendations use the asset's individual rating of 80 when calculating its respective weighted rating.
The way confidence is assigned depends on the type of recommendation:
-
For Static Lists recommendations in List mode, Engage automatically assigns a confidence value to each asset in the list based on the asset's position in the list: the first asset on the list gets a value of 100%, the second 99%, the third 98% and so on, in descending order.
-
For Static Lists recommendations in recommendation mode, you manually assign confidence values to assets for each segment in the recommendation through the recommendation's New or Edit forms.
-
For Related Items recommendations, you manually assign confidence values to assets for each segment in the recommendation through the parent asset's New or Edit form.
-
For Dynamic Lists recommendations, confidence values are returned to Engage by the selected CSElement asset and assigned to the respective assets automatically.
Range of Confidence Values
Confidence is a scaling factor and is presented as a percentage. The valid range of percentage values is 0 through 100. The values of 0% and 100% affect an asset's rating as follows:
-
A confidence value of 0% means the asset is not returned by that recommendation because the asset's rating is multiplied by 0% (0), which results in a rating of 0.
-
A confidence value of 100% means the asset's rating is not scaled or affected by the confidence at all because the asset's rating is multiplied by 100% (1).
Inheritance of Confidence Values
Typically you designate relationships between flex assets and assign a confidence value to that relationship at the parent level because assets inherit the confidence value assigned to their parents by the recommendation.
If the asset has multiple confidence values for the same recommendation, Engage uses the highest value (even if one of those values is 0); it does not average them.
12.3.2.3 Selection Criteria
Selection Criteria is a configuration option that allows you to specify how the Recommendation asset selects assets to be returned to the template that requests them.
Note:
List mode Static Lists recommendations do not support the Random selection criterion.
The method that you select for Selection Criteria determines how Engage selects assets from the database. The two Selection Criteria methods are:
-
Highest –Engage selects the assets with the highest weighted rating for the current segments (that is, the segments that the current visitor belongs to).
-
Random –Engage uses a weighted random algorithm (operating on the assets' weighted ratings) to select the assets from the list. Use this selection criterion to design a recommendation that rotates its message, keeping the recommended assets current or different each time a visitor returns to the site page. The selections are still based on the weighted ratings of the assets, however, because this is a weighted random algorithm. Assets with higher ratings for the current segment are more likely to be chosen.
For example, a template is coded to call a recommendation that uses the random selection criteria method for one asset. The possibilities include the following three products:
Asset Weighted Rating Movie 123
95
Movie ABC
87
Movie RedYellowBlue
65
The probability of the product being selected is its rating divided by the sum of all the ratings (247). Therefore, Movie 123 has a 38% chance of being selected, Movie ABC has a 35% chance, and Movie RedYellowBlue has a 26% chance.
12.3.2.4 Sort Criteria
Sort Criteria is a configuration option that allows you to specify the order in which the template should render the assets returned to it by the recommendation. Sort Criteria are applied to the list of returned assets after the Selection Criteria method determines which assets to include in the list.
Note:
List mode Static Lists recommendations do not support the Random selection criterion.
By default, you can sort the list of selected assets by the following attributes:
-
_ASSETTYPE_ –sorts the assets in the list alphabetically by asset type. For example, Article assets are first, then Image assets, and then the Product assets. (By default, assets are sorted in ascending order; you can reverse the sort order by selecting the Descending sort direction.)
-
_CONFIDENCE_ –sorts the returned assets by their confidence values.
-
_RATING_ –sorts the returned assets by their rating (individual or final, if applicable).
For each attribute, you can specify either ascending or descending sort order.
Sort options specific to the asset types available on your site are set up by your administrator. As an example, a site could be set up to include the following attribute types and corresponding attributes:
-
Product Attribute –sorts by product attributes such as Price, SKU, or Color, and so on (depending on which product attributes are used in your system).
-
Content Attribute –sorts by content attributes such as Headline, Filename, or Author, and so on (depending on which content attributes are used in your system). Note that content attribute means only those attributes that are used to define flex assets, not basic assets.
You can add as many sort options as you want to a recommendation. Engage uses these options in the order in which they appear on the recommendation form.
12.3.3 Asset Recommendation Processes
The following section explains how Engage determines which assets to pass to the template for each type of recommendation.
This section covers the following topics:
12.3.3.1 Static Lists in List Mode
List mode allows you to create a simple static list with the marketing options (such as selection and sort criteria) fixed to specific values (see table in Recommendation Assets for this information). When a List mode Static Lists recommendation is called by a template, all assets in the list are always displayed in the order you specify within the Recommendation asset.
-
If a template calls a List mode Static Lists recommendation, but it does not ask for a specific number of assets, the recommendation examines the ratings of the assets in the recommendations and eliminates assets with a rating of 0. The recommendation then returns all the assets on its list that are not rated 0, regardless of the segment(s) the visitor belongs to.
-
When a template calls a List mode Static Lists recommendation and it requests fewer assets than are on the recommendation's list, Engage recommends the assets with the highest weighted ratings (the random weighted algorithm is not supported in List mode).
The recommendation calculates the weighted ratings of the assets on its list as follows:
-
It examines each asset on the recommendation's list to determine whether that asset has a No segment ratings apply rating.
-
For each asset that has such a rating, Engage multiplies the rating by the confidence value for the asset (determined by the asset's position in the list). This value is the asset's weighted rating. For example, if the rating is 90 and the confidence is 75%, it calculates the weighted rating to be 67.5 (that is, 90 x 0.75).
-
Engage recommends the assets using the Highest selection criterion to determine which assets to return (the Random selection criterion is not supported in List mode). For more information about selection criteria, see Selection Criteria.
12.3.3.2 Static Lists in Recommendation Mode
In contrast to List mode, when a Recommendation mode Static Lists recommendation is called by a template, the order of the displayed assets is determined by segments and ratings, not by the list order. Furthermore, the application of segments and ratings can result in some assets in the list being filtered out entirely.
-
If a template calls a Recommendation mode Static Lists recommendation, but it does not ask for a specific number of assets, the recommendation examines the ratings of the assets in the recommendations and eliminates assets with a rating of 0. The recommendation then returns all the assets on its list that are not rated 0 for the current visitor.
-
When a template calls a Recommendation mode Static Lists recommendation and it requests fewer assets than are on the recommendation's list, Engage uses the Selection Criteria method specified in the recommendation to determine which assets to return.
The recommendation calculates the weighted ratings of the assets on its list as follows:
-
It determines which segments the current visitor belongs to.
-
It examines each asset on the recommendation's list to determine whether that asset has a rating for any of the segments that apply to the current visitor.
-
For each asset that has a rating for the segment(s) the current visitor belongs to, Engage multiplies the rating by the confidence value assigned in the recommendation for that asset. This value is the asset's weighted rating. For example, if the rating is 90 and the confidence is 75%, it calculates the weighted rating to be 67.5 (that is, 90 x 0.75).
-
If the Selection Criteria method is Highest, Engage recommends the assets with the highest weighted ratings. If the Selection Criteria method is Random, Engage uses a weighted random algorithm to select and return the recommended assets (based on their weighted ratings). For more information about selection criteria, see Selection Criteria.
12.3.3.3 Dynamic Lists
When a Dynamic Lists recommendation is called by a template, the order of the displayed assets is determined by segments and ratings. Furthermore, the application of segments and ratings can result in some assets in the list being filtered out entirely.
-
If a template calls a Dynamic Lists recommendation, but it does not ask for a specific number of assets, the recommendation returns all the assets it obtains from the generated list. Engage does not calculate weighted ratings in this case.
-
If a template calls a Dynamic Lists recommendation and it requests fewer assets than are on the recommendation's list, Engage uses the Selection Criteria method specified in the recommendation to determine which assets to return.
Engage calculates the asset ratings as follows:
-
It determines which segments the current visitor belongs to.
-
It examines each asset returned by the element to determine whether that asset has a rating for any of the segments that apply to the current visitor.
-
For each asset that has an appropriate rating, it multiplies the rating by the confidence value for that asset (from the element). This value is the asset's final rating. For example, if the rating is 90 and the confidence is 0.75, it calculates the final rating to be 67.5 (90 x 0.75). If the element does not return a confidence value, Engage assigns a confidence value of 1 to each asset in the list.
-
If the Selection Criteria method is Highest, Engage recommends the assets with the highest final ratings. If the Selection Criteria method is Random, Engage uses a weighted random selection to return the recommended assets.
12.3.3.4 Related Items
In this example, a template that displays a product description for a Movie asset named Movie 123 calls a Related Items recommendation named Cross-Sell. The template for Cross-Sell asks for five assets that have the Cross-Sell relationship with Movie 123.
Engage does the following:
-
Determines which segments the current visitor belongs to.
-
Examines the Related Items section of the asset form for Movie 123 to determine which assets are listed for the Cross-Sell recommendation. It also examines the related assets for all parents of Movie 123.
-
Creates a preliminary list of all Movie and Product assets that have the Cross‐Sell relationship with Movie 123. (This list includes all the Product assets that inherited this relationship from their parents.) This list also determines the confidence value for each asset.
-
Examines the Ratings section on the asset forms for all of the Movie and Products assets on the preliminary list.
-
Constrains the preliminary list to include only those Movie and Product assets that have applicable ratings for the segments that the current visitor belongs to.
-
Multiplies the rating by the confidence for each asset on the constrained list.
-
If the Selection Criteria method is Highest, Engage recommends the five assets with the highest final ratings. If the Selection Criteria method is Random, Engage uses a weighted random algorithm (operating on the assets' weighted ratings) to return the five recommended assets.
12.3.4 Creating Recommendation Assets
Typically, marketing people create Recommendation assets and set confidence values for assets referenced by Static Lists and Related Items recommendations. (Confidence for Dynamic Lists recommendations is coded into the template that renders the assets being recommended).
Business users assign individual ratings to assets referenced by recommendations created by marketing.
This section covers the following topics:
12.3.4.1 Recommendation Development Overview
The basic steps for setting up recommendations are as follows:
-
Designers and developers meet with the marketing team to define all the marketing messages you want to display on your site and to plan how to represent those messages using recommendation and promotion assets.
-
The designers and developers design and code templates for the recommendations. If Dynamic Lists recommendations will be used, they also write CSElement assets designed to generate dynamic lists.
-
Marketing then uses Engage Recommendation forms to create Recommendation assets (that is, name and configure the recommendations).
-
Using the Engage flex asset forms, you rate how important the assets are to each segment, and, therefore, to the individual visitors who become members of those segments. (Typically, you assign ratings to flex parents instead of to individual flex assets.)
For each Related Items recommendation, you assign to flex assets the assets with relationships that are defined by that recommendation. (Typically, you specify relationships for flex parents instead of for individual flex assets.)
This section describes how to create and configure Recommendation assets. Configuring Assets to Be Recommended describes how to assign ratings to assets and how to assign flex assets to flex parent assets by the relationships defined in a Related Items recommendation.
12.3.4.2 Creating Static Lists Recommendations in List Mode
List mode allows you to create a simple static list with the marketing options (such as selection and sort criteria) fixed to specific values (see table in Recommendation Assets for this information). When a List mode Static Lists recommendation is called by a template, all assets in the list are always displayed in the order you specify within the Recommendation asset.
To create a Static Lists recommendation in List mode:
Before you can assign assets to a recommendation, you should add the source asset(s) to your bookmarks for easy retrieval during the creation of the recommendation.
Note:
You can click Save as you progress through the sections of the Recommendation form in this procedure to save the changes you have made up to and in that section.
-
From the Contributor interface, select the site in which you want to create a Static Lists recommendation in List mode.
-
Find the assets to be included in the recommendation and bookmark them (which adds them to the Bookmarks node in the My Work tree). For instructions, see Bookmarking Assets.
-
In the menu bar, select Content, then select New, and then select New Recommendation.
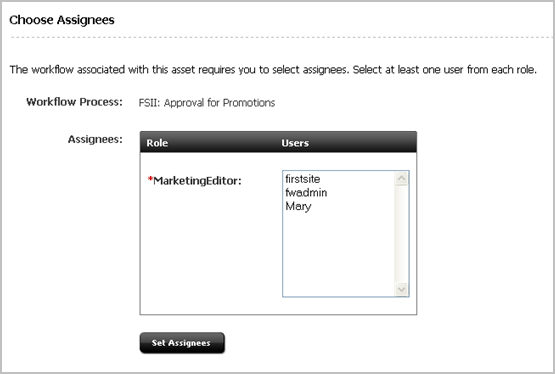
If the administrator configured the asset type such that all new assets of that type are placed into workflow upon creation, a tab opens displaying the Choose Assignees form.
-
Select at least one user for each required role and click Set Assignees.
Any of these users can complete the next step in the workflow process. For more information, see Participating in Workflow.
-
If the Recommendation asset opens in Web View, switch to Form View by clicking the Mode switch in the asset's toolbar.
The tab displays the Recommendation form. Notice the names of the form's sections near the top. When you create a new Recommendation asset, the Content section of the form opens first.
Note:
When creating or editing a Recommendation asset, you can switch between the sections of the form by clicking the name of the section you want to switch to.
-
If the administrator configured the asset type such that all new assets of that type are placed into workflow upon creation, a tab opens displaying the Choose Assignees form.
Select at least one user for each required role and click Set Assignees. Any of these users can complete the next step in the workflow process. For more information, see Participating in Workflow.
-
If the Recommendation asset opens in Web View, switch to Form View by clicking the Mode switch in the asset's toolbar.
-
-
In the Content section, fill in the following fields:
-
In the Name field, enter a unique, descriptive name for the list.
You can enter alphanumeric characters, including spaces. The first character must be a letter.
The maximum character limit is 64 bytes. Characters that exceed 64 bytes get truncated and a message stating this is displayed.
-
In the Description field, enter a brief description of the list.
You can enter alphanumeric characters. The maximum character limit is 128 bytes. Characters that exceed 128 bytes get truncated and a message stating this is displayed.
-
In the Subtype drop-down list, select a subtype for the recommendation.
A subtype is a method of categorizing lists. If the design team did not define subtypes for this type of recommendation, the only option in the drop-down list is "(no subtype)." Consult your developers for information about available recommendation subtypes (if any).
-
In the Template drop-down list, select a template for the recommendation.
Note:
If the Template field does not include a drop-down list, it means that no templates have been created for recommendations on your site. Consult your developers for information about recommendation templates.
-
In the Mode field, select the List in the drop-down menu.
-
In the Start Date and End Date fields, select a date range in which the asset will be displayed on the website.
For more information about start and end dates, see About Start and End Dates.
-
In the Locale field, select the asset's target language. For more information about locales, see Working with Multilingual Assets.
-
-
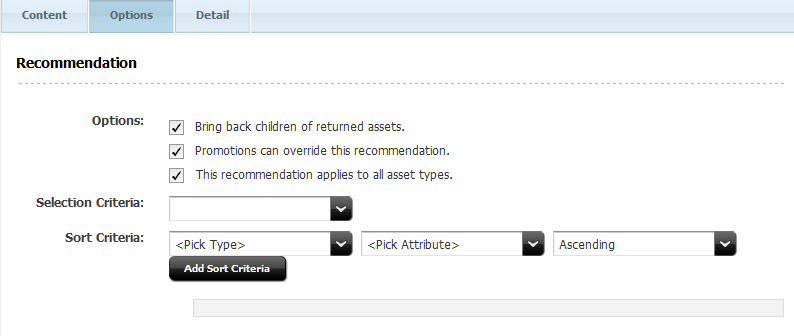
Select the Options section of the form (Figure 12-27).
Set the options appropriate for the list's intended purpose.
If the This recommendation applies to all asset types check box is deselected, a menu opens from which you can select the asset types that the recommendation applies to.
In the Selection Criteria field (Figure 12-27), choose the selection criteria for the recommendation. For more information, see Selection Criteria.
In the Sort Criteria field (Figure 12-27), do the following:
-
In the Attribute Type drop-down list, select the type of attribute by which you want to sort the asset list.
By default, only the Special attribute type is available, allowing you to sort by asset type, confidence, and rating. Attribute types specific to the nature of the assets on your site are set up by the administrator and developers. For more information, see Sort Criteria.
-
In the Attribute drop-down menu, select the attribute by which you want to sort the asset list.
The contents of the list depend on the option that you selected in the Attribute Type field. For example, if you selected the Special attribute type in step a, the Attribute field contains the options, _ASSETTYPE_, _CONFIDENCE_, and _RATING_.
Note that attributes specific to the nature of the assets on your site must be set up by the administrator and developers before you can use them.
-
In the Direction field, select whether the sort direction should be ascending or descending.
-
Click Add Sort Criteria.
Your criteria appear at the bottom of the form.
-
(Optional) To add more sort criteria, repeat steps 5.a through 5.d.
Be sure to add the new sort criteria in the order in which you want Engage to sort the assets in the list. For example, you might want to sort assets first by asset type, and then by rating.
-
-
Select the Detail section to add information regarding lists.
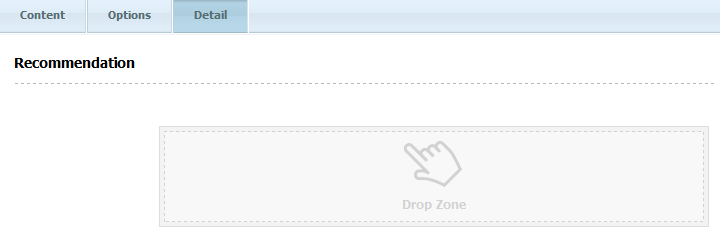
If you set the Mode field to List in the Content section of the form, the Detail section displays a drop zone (Figure 12-28):
Figure 12-28 Recommendation Detail Tab Drop Zone
Description of "Figure 12-28 Recommendation Detail Tab Drop Zone" -
In the Drop Zone, add the assets you want to include in this segment's list.
Do the following:
-
In the My Work tree, expand the Bookmarks node.
If the My Work tree is collapsed, expand it by clicking the My Work bar in the navigation pane.
-
In the list of bookmarked assets (displayed under the Bookmarks node), click the name of the asset and then drag it and drop it into the field.
-
-
(Optional) You can change the order in which the assets in the list are organized by selecting an asset in the list and dragging within the list to move the asset up or down the list.
-
Save the asset, by clicking the Save icon, or selecting Content from the menu bar, and then Save.
12.3.4.3 Creating Static List Recommendations in Recommendation Mode
In contrast to List mode, when a Recommendation mode Static Lists recommendation is called by a template, the order of the displayed assets is determined by segments and ratings, not by the list order. Furthermore, the application of segments and ratings can result in some assets in the list being filtered out entirely.
Keep the following in mind:
-
If you are going to use segments, make sure you know which assets belong in which segment.
-
If segments do not exist, you can create them (assuming you have the appropriate permissions). See Grouping Visitors into Segments with Engage for information about creating and configuring segments.
-
You should know in advance the confidence values (in segment, out of segment, and when no segments apply) you want to assign to the assets you are adding to the list.
Before you can assign assets to a recommendation, you should add the source asset(s) to your bookmarks for easy retrieval during the creation of the recommendation.
To create a Static Lists recommendation in Recommendation mode:
Note:
You can click the Save icon (located in the asset's toolbar) as you progress through the sections of the Recommendation form in this procedure to save the changes you have made up to and in that section.
-
From the Contributor interface, select they site in which you want to create a Static Lists recommendation in Recommendation mode (FirstSite II in this example).
-
Find the assets to be included in the recommendation and bookmark them (which adds them to the Bookmarks node in the My Work tree). For instructions, see Bookmarking Assets.
-
In the menu bar, select Content, then select New, and then select New Recommendation.
If the administrator configured the asset type such that all new assets of that type are placed into workflow upon creation, a tab opens displaying the Choose Assignees form.
-
Select at least one user for each required role and click Set Assignees.
Any of these users can complete the next step in the workflow process. For more information, see Participating in Workflow.
-
If the Recommendation asset opens in Web View, switch to Form View by clicking the Mode switch in the asset's toolbar.
The tab opens the Recommendation form. Notice the names of the form's sections near the top. When you create a new Recommendation asset, the Name section of the form opens first.
Note:
When creating or editing a Recommendation asset, you can switch between the sections of the form by clicking the name of the section you want to switch to.
-
If the administrator configured the asset type such that all new assets of that type are placed into workflow upon creation, a tab opens displaying the Choose Assignees form.
Select at least one user for each required role and click Set Assignees. Any of these users can complete the next step in the workflow process. For more information, see Participating in Workflow.
-
If the Recommendation asset opens in Web View, switch to Form View by clicking the Mode switch in the asset's toolbar.
-
-
In the Content section, fill in the following fields:
-
In the Name field, enter a unique, descriptive name for the recommendation.
You can enter alphanumeric characters, including spaces. The first character must be a letter.
The maximum character limit is 64 bytes. Characters that exceed 64 bytes get truncated and a message stating this is displayed.
-
In the Description field, enter a brief description of the recommendation.
You can enter alphanumeric characters. The maximum character limit is 128 bytes. Characters that exceed 128 bytes get truncated and a message stating this is displayed.
-
In the Subtype drop-down list, select a subtype for the recommendation.
A subtype is a way of categorizing lists. If the design team did not define subtypes for this type of recommendation, the drop-down list is empty. Consult your developers for information about available recommendation subtypes (if any).
-
In the Template drop-down list, select a template for the recommendation.
Note:
If the Template field does not include a drop-down list, it means that no templates have been created for recommendations. Consult your developers for information about creating templates for recommendations.
-
In the Mode field, select Recommendation in the drop-down menu.
-
In the Start Date and End Date fields, select a date range in which the asset will be displayed on the website.
For more information about start and end dates, see About Start and End Dates.
-
In the Locale field, select the asset's target language. For more information about locales, see Working with Multilingual Assets.
-
-
Select the Options section of the form (Figure 12-29).
Set the options appropriate for the list's intended purpose.
In the Selection Criteria field, select the selection criterion for the recommendation. For more information, see Selection Criteria.
In the Sort Criteria field, do the following:
-
In the Attribute Type drop-down list, select the type of attribute by which you want to sort the asset list.
By default, only the Special attribute type is available, allowing you to sort by asset type, confidence, and rating. Attribute types specific to the nature of the assets on your site are set up by the administrator and developers. For more information, see Sort Criteria.
-
In the Attribute drop-down menu, select the attribute by which you want to sort the asset list.
The contents of the list depend on the option that you selected in the Attribute Type field. For example, if you selected the Special attribute type in step a, the Attribute field contains the options, _ASSETTYPE_, _CONFIDENCE_, and _RATING_.
Note that attributes specific to the nature of the assets on your site must be set up by the administrator and developers before you can use them.
-
In the Direction field, select whether the sort direction should be ascending or descending.
-
Click Add Sort Criteria.
Your criteria is shown at the bottom of the form
-
(Optional) To add more sort criteria, repeat steps a through d.
Be sure to add the new sort criteria in the order in which you want Engage to sort the assets in the list. For example, you might want to sort assets first by asset type, and then by rating
-
-
In the Detail section, do the following:
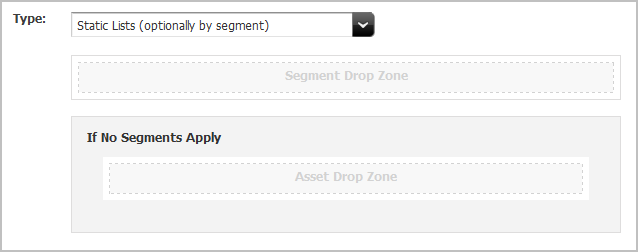
If you set the value of the Mode field to Recommendation in the Content section of the form, the Detail section displays two drop zones for static lists (Figure 12-30):
Figure 12-30 Segment and Asset Drop Zones for Static Lists and Smart Lists
Description of "Figure 12-30 Segment and Asset Drop Zones for Static Lists and Smart Lists" -
In the Segment Drop Zone, add the assets you want to include in this segment's list.
Complete the following:
-
In the My Work tree, expand the Bookmarks node.
If the My Work tree is collapsed, expand it by clicking the My Work bar in the navigation pane.
-
In the list of bookmarked assets (displayed under the Bookmarks node), click the asset's name and then drag and drop it into the field.
-
-
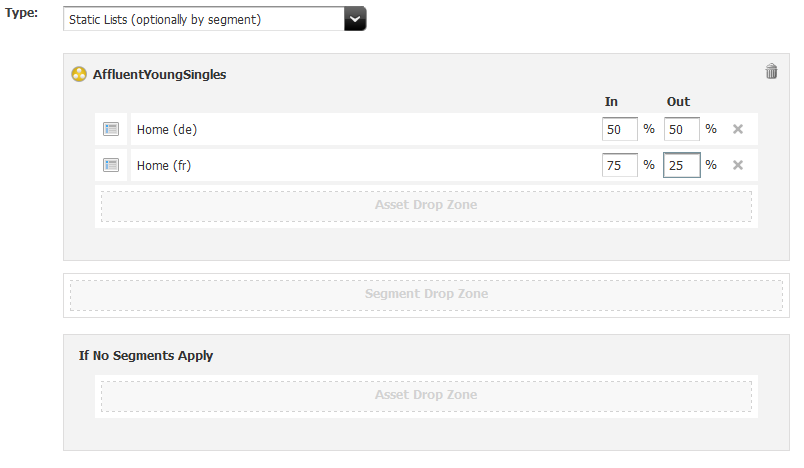
Assign a confidence value for each asset, both In Segment and Out of Segment.
Confidence is a weighting factor for the recommendation to use in determining which assets to return for the current visitor when that visitor is a member of the segment and when that visitor is not a member of the segment.
If the asset is not added to a segment, then only one Confidence field opens.
For additional information, see Confidence.
-
As you drag each segment into the Drop Zone, do the following:
-
Add as many segments as you want to include.
-
(Optional) Add assets to the If No Segments Apply category and assign confidence values as appropriate.
The completed form looks similar to the one shown in Figure 12-31:
Figure 12-31 Segments in a Recommendation
Description of "Figure 12-31 Segments in a Recommendation" -
-
Save the asset by clicking the Save icon or by selecting Content from the menu bar, then Save.
12.3.4.4 Creating Dynamic Lists Recommendations
Note:
Before beginning this procedure, consult your developers to find out which CSElement asset(s) should be used with the Dynamic Lists recommendation(s) you want to create.
To create a Dynamic Lists recommendation:
-
From the Contributor interface, select the site in which you want to create a Dynamic Lists recommendation (FirstSite II in this example).
-
In the menu bar, select Content, then select New, and then select New Recommendation.
If the administrator configured the asset type such that all new assets of that type are placed into workflow upon creation, a tab opens displaying the Choose Assignees form.
-
Select at least one user for each required role and click Set Assignees.
Any of these users can complete the next step in the workflow process. For more information, see Participating in Workflow.
-
If the Recommendation asset opens in Web View, switch to Form View by clicking the Mode switch in the asset's toolbar.
The tab opens the Recommendation form. Notice the names of the form's sections near the top. When you create a new Recommendation asset, the Content section of the form opens first.
Note:
When creating or editing a Recommendation asset, you can switch between the sections of the form by clicking the name of the section you want to switch to.
-
If the administrator configured the asset type such that all new assets of that type are placed into workflow upon creation, a tab opens displaying the Choose Assignees form.
Select at least one user for each required role and click Set Assignees. Any of these users can complete the next step in the workflow process. For more information, see Participating in Workflow.
-
If the Recommendation asset opens in Web View, switch to Form View by clicking the Mode switch in the asset's toolbar.
-
-
In the Content section of the form, do the following:
-
In the Name field, enter a unique, descriptive name for the recommendation.
You can enter alphanumeric characters, including spaces. The first character must be a letter.
The maximum character limit is 64 bytes. Characters that exceed 64 bytes get truncated and a message stating this is displayed.
-
In the Description field, enter a brief description of the recommendation.
You can enter alphanumeric characters. The maximum character limit is 128 bytes. Characters that exceed 128 bytes get truncated and a message stating this is displayed.
-
In the Subtype drop-down list, select a subtype for the recommendation.
A subtype is a way of categorizing lists. If the design team did not define subtypes for this type of recommendation, the drop-down list is empty. Consult your developers for information about available recommendation subtypes (if any).
-
In the Template drop-down list, select a template for the recommendation.
Note:
If the Template field does not include a drop-down list, it means that no templates have been created for recommendations. Consult your developers for information about creating templates for recommendations.
-
In the Mode field, select the Recommendation in the drop-down menu.
-
In the Start Date and End Date fields, select a date range in which the asset will be display on the website.
For more information about Start and End dates, see About Start and End Dates.
-
In the Locale field, select the asset's target language. For more information about locales, see Working with Multilingual Assets.
-
-
Select the Options section of the form (Figure 12-32).
Set the options appropriate for the list's intended purpose.
In the Selection Criteria field, choose the selection criterion for the recommendation. For more information, see Selection Criteria.
In the Sort Criteria field, do the following:
-
In the Attribute Type drop-down list, select the type of attribute by which you want to sort the asset list.
By default, only the Special attribute type is available, allowing you to sort by asset type, confidence, and rating. Attribute types specific to the nature of the assets on your site are set up by the administrator and developers. For more information, see Sort Criteria.
-
In the Attribute drop-down menu, select the attribute by which you want to sort the asset list.
The contents of the list depend on the option that you selected in the Attribute Type field. For example, if you selected the Special attribute type in step a, the Attribute field contains the options, _ASSETTYPE_, _CONFIDENCE_, and _RATING_.
Note that attributes specific to the nature of the assets on your site must be set up by the administrator and developers before you can use them.
-
In the Direction field, select whether the sort direction should be ascending or descending.
-
Click Add Sort Criteria.
Your criteria appear at the bottom of the form.
-
(Optional) To add more sort criteria, repeat the above steps.
Be sure to add the new sort criteria in the order in which you want Engage to sort the assets in the list. For example, you might want to sort assets first by asset type, and then by rating.
-
-
Select the Detail section of the form.
-
In the Type field, select either Dynamic Lists (generated by an element) or Dynamic Lists (optionally by segment):
-
When selecting by element, a single Drop Zone opens (Figure 12-33).
Figure 12-33 Segment and Asset Drop Zones for Dynamic Lists

Description of "Figure 12-33 Segment and Asset Drop Zones for Dynamic Lists" -
When selecting by segment, a Segment Drop Zone and an Asset Drop Zone (for assets that are not contained in a segment) open.
-
-
Do one of the following:
-
If you are creating the dynamic list generated by an element, skip to the next step.
-
If you are creating the dynamic list optionally by segment, drag the segment or segments into the Segment Drop Zone.
When you have added each segment, it displays its own Asset Drop Zone.
-
-
Drag each asset you want to add to the segment into the Asset Drop Zone.
-
If the type is a Dynamic List generated by an element, a CSElement is the only available asset type to drop in the drop zone.
-
If the type is a Dynamic List optionally by segment, then either a CSElement or a Content Query asset are the only assets available to drop
.
The completed form looks similar to the one shown in Figure 12-34.
Figure 12-34 Completed Drop Zone in the Recommendation Form
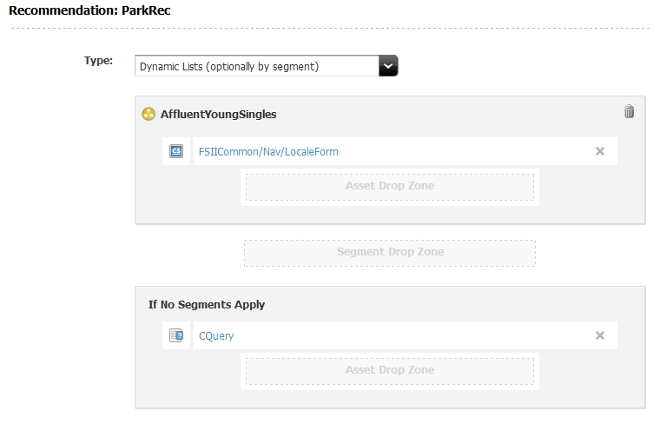
Description of "Figure 12-34 Completed Drop Zone in the Recommendation Form"In Figure 12-34, the Segment Drop Zone contains the AffluentYoungSingles segment and a CSElement was placed below it in the Asset Drop Zone. The If No Segments Apply section contains a Content Query asset.
-
-
Save the asset, by clicking the Save icon, or selecting Content from the menu bar, then Save.
12.3.4.5 Creating Related Items Recommendations
To create a Related Items recommendation:
-
From the Contributor interface, select the site in which you want to create a Related Items recommendation.
-
In the menu bar, select Content, then select New, and then select Recommendation.
-
If the administrator configured the asset type such that all new assets of that type are placed into workflow upon creation, a tab opens displaying the Choose Assignees form. Select at least one user for each required role and click Set Assignees.
-
If the Recommendation asset opens in Web View, switch to Form View by clicking the Mode switch in the asset's toolbar.
The tab opens the Recommendation form. Notice the names of the form's sections near the top. When you create a new Recommendation asset, the Content section of the form opens first.
-
-
In the Content section of the form, do the following:
-
In the Name field, enter a unique, descriptive name for the recommendation.
You can enter alphanumeric characters, including spaces. The first character must be a letter.
The maximum character limit is 64 bytes. Characters that exceed 64 bytes get truncated and a message stating this is displayed.
-
In the Description field, enter a brief description of the recommendation.
You can enter alphanumeric characters. The maximum character limit is 128 bytes. Characters that exceed 128 bytes get truncated and a message stating this is displayed.
-
In the Subtype drop-down list, select a subtype for the recommendation.
A subtype is a way of categorizing lists. If the design team did not define subtypes for this type of recommendation, the drop-down list is empty. Consult your developers for information about available recommendation subtypes (if any).
-
In the Template drop-down list, select a template for the recommendation.
Note:
If the Template field does not include a drop-down list, it means that no templates have been created for recommendations. Consult your developers for information about creating templates for recommendations.
-
In the Mode field, select the Recommendation in the drop-down menu.
-
In the Start Date and End Date fields, select a date range in which the asset will be displayed on the website.
For more information about start and end dates, see About Start and End Dates.
-
In the Locale field, select the asset's target language. For more information about locales, see Working with Multilingual Assets.
-
-
Select the Options section (Figure 12-35).
Set the options appropriate for the list's intended purpose.
In the Selection Criteria field, choose the selection criterion for the recommendation. For more information, see Selection Criteria.
In the Sort Criteria field, do the following:
-
In the Attribute Type drop-down list, select the type of attribute by which you want to sort the asset list.
By default, only the Special attribute type is available, allowing you to sort by asset type, confidence, and rating. Attribute types specific to the nature of the assets on your site are set up by the administrator and developers. For more information, see Sort Criteria.
-
In the Attribute drop-down menu, select the attribute by which you want to sort the asset list.
The contents of the list depend on the option that you selected in the Attribute Type field. For example, if you selected the Special attribute type in step a, the Attribute field contains the options, _ASSETTYPE_, _CONFIDENCE_, and _RATING_.
Note that attributes specific to the nature of the assets on your site must be set up by the administrator and developers before you can use them.
-
In the Direction field, choose whether the sort direction should be ascending or descending.
-
Click Add Sort Criteria.
Your criteria appear at the bottom of the form.
-
(Optional) To add more sort criteria, repeat the above steps.
Be sure to add the new sort criteria in the order in which you want Engage to sort the assets in the list. For example, you might want to sort assets first by asset type, and then by rating.
-
-
In the Detail section, select Related Items (defined on asset forms) from the Type menu.
This recommendation is used when you create and edit assets on the asset forms.
-
Edit the asset forms.
-
Save the asset, by clicking the Save icon, or selecting Content from the menu bar, then Save.
This recommendation is now shown in the Related Items field (located in the Metadata section) of the Create and Edit views for flex assets and flex parent assets. You can now configure relationships for flex assets.
For more information, see Configuring Asset Relationships Using Related Items Recommendations.
12.3.5 Editing Recommendation Assets
To edit a Recommendation asset:
-
From the Contributor interface, select the site containing the Recommendation asset you want to edit (FirstSite II in this example).
-
Find and open the Recommendation asset you want to edit:
-
In the Search field, enter your search criteria (if any).
-
To narrow your search down to a specific type of asset, in the Search field, click the down-arrow to render the Search Type drop-down box, and select the asset type to which you want to limit your search.
-
Click the magnifying glass button.
-
In the search results list, right-click the asset and select Edit from the context menu.
Note:
You can also open the asset to view and then select Edit from the menu bar, or while viewing click the Edit icon. For more information about searching, see Finding and Organizing Assets.
The asset opens in its Edit view.
-
-
Make your changes to the Recommendation asset.
All fields on all tabs are available to modify.
-
Save the asset, by clicking the Save icon, or selecting Content from the menu bar, then Save.
12.3.6 Configuring Assets to Be Recommended
The next step is to configure the segment ratings and asset relationships for the assets you want to promote using recommendations. Specifically, you have to use the flex asset and flex parent asset forms in the Contributor interface to do the following:
-
Rate how important the assets and parent assets are to the members of each segment. See Assigning Ratings to an Asset.
-
Configure the asset relationships that are represented by the Related Items recommendations. See Configuring Asset Relationships Using Related Items Recommendations.
Note:
Typically, business users configure assets to be recommended.
12.3.6.1 Assigning Ratings to an Asset
You can assign ratings to individual flex assets or to flex parents. However, you should use parents to assign ratings, for the following reasons:
-
To easily manage the ratings for multiple assets, those assets should reside in groups. In fact, you should create flex parents whose sole purpose is to assign ratings to child assets. You can make all of the assets that have identical rating conditions children of the same parent. Then, you can modify the ratings for all the child assets by making a single change.
-
Comparing the ratings for one group of assets to the ratings of another group is easier than comparing the ratings of individual assets.
-
Ratings are calculated more quickly because fewer assets with individual ratings exist; this speeds up system performance.
You should avoid using ratings to try to promote a specific flex asset in a specific circumstance. Instead, you should recommend specific assets, using either a Static Lists recommendation or a promotion to accomplish your goal.
Before you begin, be sure to complete the following tasks:
-
Examine the segments to understand how they are defined and then determine which flex parents are significant for which segments.
-
Ask your site developers whether they changed the system default rating for unrated assets. If they did not override the system default rating, the default rating is
50. This rating represents the average or middle point in your rating scale. Make a note of this value and keep it in mind while you rate assets. For example, an asset rated at lower than the system default rating will probably never be recommended to a site visitor.
To assign ratings to an asset:
-
From the Contributor interface, select the site containing the asset to which you want to assign ratings (FirstSite II in this example).
-
Find the flex asset or flex parent you want to assign ratings to and open its Edit view:
-
In the Search field, enter your search criteria (if any).
-
To narrow your search down to a specific type of asset, in the Search field, click the down-arrow to render the Search Type drop-down box, then select the asset type to which you want to limit your search.
-
Click the magnifying glass button.
-
In the search results list, right-click the asset and select Edit.
For more information about searching, see Finding and Organizing Assets.
-
-
In the asset's Edit view, select the Marketing section and navigate to the Ratings field.
This field lists all the segments that have been created for this site (as shown in Figure 12-36).
Figure 12-36 Segment Ratings for an Asset

Description of "Figure 12-36 Segment Ratings for an Asset" -
Using a range of 0 through 100 (100 is the highest value), rate this asset for the segments in the list:
-
Enter a value in a segment's In Segment column to rate the asset for members of this segment.
-
Enter a value in a segment's Out of Segment column to rate the asset for visitors who are not members of this segment.
-
Enter a value in the no segment ratings apply field to assign an intrinsic rating to the asset; this rating is used when no segments are defined or the asset is assigned to a recommendation that does not recognize segments (List mode Static Lists recommendation).
For more information about ratings, see Ratings.
-
-
Save the asset, by clicking the Save icon, or selecting Content from the menu bar, then Save.
12.3.6.2 Configuring Asset Relationships Using Related Items Recommendations
Before you begin, be sure to complete the following tasks:
-
Ask the developers to describe each of the Related Items recommendations so that you are familiar with the relationships the Related Items recommendations represent.
-
Find out whether the recommendation is programmed to display a combination of flex assets, for example, Product and Content assets, so that you can configure the relationships correctly.
To configure relationships between assets:
-
From the Contributor interface, select the site containing the assets between which you want to configure a relationship.
-
Before you work with the flex parent asset which has Related Items relationship(s) you want to configure, find and bookmark the assets that you want to put in these relationships.
Bookmarked assets are available in the Bookmarks node in the My Work tree.
-
In the Search field, enter your search criteria (if any).
-
To narrow your search down to a specific type of asset, in the Search field, click the down-arrow to render the Search Type drop-down box, then select the asset type to which you want to limit your search.
-
Click the magnifying glass button.
-
In the search results list, select (Ctrl+click) the assets you wish to bookmark, and in the Search tab's toolbar, click the Bookmark icon.
-
-
Find the flex parent that has the Related Items relationship(s) you want to configure and open its Edit form:
-
In the Search field, enter your search criteria (if any).
-
To narrow your search down to a specific type of asset, in the Search field, click the down-arrow to render the Search Type drop-down box, then select the asset type to which you want to limit your search.
-
Click the magnifying glass button.
-
In the search results list, right-click the asset and select Edit from the context menu.
For more information about searching, see Finding and Organizing Assets.
-
-
In the parent asset's Edit form, scroll to the Related Items section.
Note:
The Related Items section is only available if you have created a Related Items type of Recommendation that specifies the asset type of the asset you want to add. For more information, see Creating Related Items Recommendations.
-
In the tree, open the Bookmarks node on the My Work tree, then drag and drop the flex asset or flex parent into the appropriate recommendation's Drop Zone.
Engage lists the assets under the recommendation, as shown in Figure 12-37.
Figure 12-37 Assets Listed as Related Items
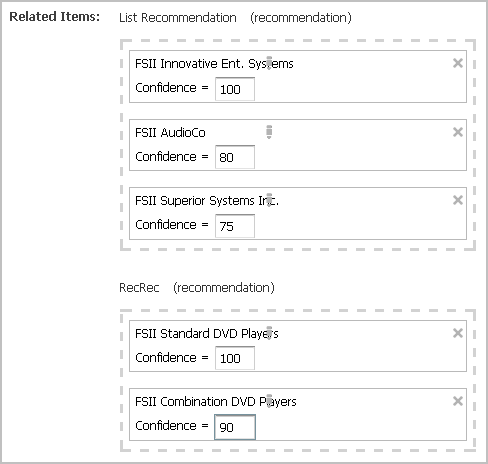
Description of "Figure 12-37 Assets Listed as Related Items" -
In the Confidence column next to an asset or parent asset, enter a confidence value that represents the weight of this relationship.
Confidence is expressed as a percentage ranging between 0 and 100. If you enter
0or leave the field empty, the asset is excluded from this recommendation.For more information about confidence, see Confidence.
-
Save the asset, by clicking the Save icon, or selecting Content from the menu bar, then Save.
12.3.7 Verifying Recommendation Assets
To verify that you configured your recommendation assets correctly, complete the following tasks as a complete exercise:
- Create some test segments (see Grouping Visitors into Segments with Engage for information about creating segments).
- In the flex asset and flex parent asset forms (for example, Product and Product Parent), assign ratings for the segments.
- Browse your site as a visitor and register yourself so that you qualify for the test segment.
- Examine the items that the recommendation assets return.
- If you find problems, ask your developers to write test pages that isolate the problem.
12.3.8 Publishing Rated Flex Assets
Since asset ratings and relationships take effect only after they are published, you must approve the assets whose ratings and relationships you configured so they can be published to your delivery system.
For more information about approving and publishing assets, see Performing Approval Tasks.
12.4 Creating Promotions
This chapter describes how promotions work and how to create them. Promotions are assets that offer some type of value or discount to your site visitors based on the products the visitors are buying and the segments they qualify for.
This section includes the following topics:
12.4.1 About Promotions
Promotions offer some type of value to your site visitors and customers based on the segments the visitors belong to and products that they buy or view. This value can be offered in several ways:
-
A discount off the purchase price of one or more promoted products.
-
A discount off the entire value of the shopping cart.
-
A discount off shipping charges.
-
A combination discount: a shipping discount with a price or cart discount.
You (the marketers) define your promotions by using the following criteria:
-
The segment members who qualify for the promotion. Promotions can be offered to everyone or to visitors in selected segments.
-
The products to promote.
-
The value the customers receive when they purchase the promoted product.
-
The duration of the promotion.
-
The text or graphics (or both) that appear on the rendered site page that notifies visitors of the promotion.
-
The location of the notification. Promotions are displayed on the live (public) site pages by replacing the recommendation that would normally appear there.
12.4.1.1 About Promotions and Recommendations
Recommendation assets are the delivery mechanism for all promotional content. When you create a promotion asset, you determine where you want the promotion to be displayed by selecting a Recommendation asset. The promotion replaces, or overrides, the recommendation and uses the template assigned to that recommendation to render the promotion in place of the recommendation that would normally be displayed.
Consequently, when Engage calculates the recommendation that a template asks for, it automatically checks whether any promotions should override the recommendation. If so, it passes the promotion back to the recommendation's template and the template displays the promotion instead.
12.4.1.2 When Promotions Overlap
Multiple promotions can use the same recommendation. What happens, then, when a visitor qualifies for multiple promotions and those promotions are using the same recommendation? Take a look at the following example:
Example: Overlapping Promotions
Two promotions both override the same recommendation, as shown in Table 12-2 and Table 12-3:
Table 12-2 End of Summer Sale Promotion
| Name | Discount | Segment it applies |
|---|---|---|
|
End-of-Summer-Sale |
10% off the entire contents of the visitor’s shopping cart |
All segments |
Table 12-3 Printer Sale Promotion
| Name | Discount | Segment it applies |
|---|---|---|
|
Printer Sale |
30% off all printers |
|
Note:
Promotions do not have segment ratings. Either the promotion applies to the segment or it doesn't.
Question: How does Engage decide which promotion to display if the visitor is from either the Home Office Worker segment or the Back to School segment? And which discount is applied?
Answer: Engage randomly selects which promotion to display (each has a 50/50 chance) but it applies both discounts. However, applying both discounts does not mean that printers are discounted twice.
Examine the contents of this shopping cart:
-
Box of paper
-
Printer
-
Toner cartridge
Before Engage applies the discounts, it lists and compares the promotions for all the items in the cart (Table 12-4):
Table 12-4 Applied Discounts for Promotions
| Item in Cart | Summer Sale | Printer Sale |
|---|---|---|
|
Box of paper |
10% |
|
|
Printer |
10% |
30% |
|
Toner cartridge |
10% |
Engage then applies the largest discount to each item. Therefore, on the final bill, the box of paper and the toner cartridge are 10% off and the printer is 30% off (not 40%).
Question: Only one promotion was displayed: how do the shoppers understand the total on the invoices?
Answer: If you (the marketers) created the promotions correctly, you entered a meaningful description of the discount in the Engage discount forms. Those descriptions are printed on the invoice next to the discounted items.
12.4.2 Creating Promotions
Before you create your promotions, be sure that you complete the following tasks:
-
Ask your site developers for a list of all the recommendations in your system and a description of where each one is programmed to appear.
-
If you are creating promotions that apply to specific segments, you and the other marketers must create the segments.
This section covers the following topics:
12.4.2.1 Name and Define the Promotion
Note:
You can click Save as you progress through the sections of the Promotion form in this procedure to save the changes you have made up to and in that section.
To name and define the promotion:
-
From the Contributor interface, select the site in which you want to create a Promotion (FirstSite II in this example).
-
In the menu bar, select Content, then select New, and then select New Promotion.
Note:
If New Promotion is not on the list, stop here. You do not have the permissions to create promotions. If you have questions about your permissions, contact your administrator.
If the administrator configured the asset type such that all new assets of that type are placed into workflow upon creation, a tab opens displaying the Choose Assignees form.
-
Select at least one user for each required role and click Set Assignees.
Any of these users can complete the next step in the workflow process. For more information, see Participating in Workflow.
A tab opens displaying the Promotion asset's Create view. Notice the names of the form's sections near the top. The Name section of the form is shown in Figure 12-38:
Note:
When creating or editing a Promotion asset, you can switch between the sections of the form by clicking the name of the section you want to switch to.
-
In the Name section, do the following:
-
Click in the Name field and enter a unique, descriptive name for the recommendation.
You can enter alphanumeric characters, including spaces. The first character must be a letter.
The maximum character limit is 64 bytes. Characters that exceed 64 bytes get truncated and a message stating this is displayed.
-
Click in the Description field and enter a brief description of the promotion.
You can enter alphanumeric characters. The maximum character limit is 128 bytes. Characters that exceed 128 bytes get truncated and a message stating this is displayed.
-
In the Start Date and End Date fields, select a date range for the asset to display in Site Preview.
For more information about Start and End dates, see About Start and End Dates.
-
Click Continue.
The tab opens the Goals section of the Promotion form, as shown in Define the Goals for the Promotion.
Note:
Even though you can skip to any section of the Promotion form, be sure that you create your first promotions in the sequence that takes place when you use the Continue button. Remember that the information you enter on any form is not saved to the database until you save.
-
12.4.2.2 Define the Goals for the Promotion
Figure 12-39 shows the Goals section of the Promotion form.
A statement of goals is useful if your work is to be reviewed by others. Additionally, you might want to document why you designed the promotion a certain way after the promotion is complete.
In the Goals section of the Promotion form, do the following:
12.4.2.3 Define Which Visitors Are Eligible for the Promotion
Use the Segments section of the Promotion form (Figure 12-40) to select the visitors who are eligible for the promotion. If you do not make any selections on this form, all visitors to the site are eligible for the promotion.
-
Do one of the following:
-
To offer the promotion to all visitors to the site, select Apply to all visitors.
-
To restrict the promotion to visitors from certain segments, select Apply to selected segments and select the segments to whom you want to offer the promotion.
-
-
(Optional) To create a new segment for the promotion, complete the following steps:
-
Create a new segment.
For help with this step, see Creating Segments.
-
Click the Refresh icon in the tab displaying the promotion you are creating.
-
Repeat the first step in this procedure to include this segment in the promotion.
-
-
Click Continue.
The tab opens the Discount section of the Promotion form, as shown in Define the Discount.
12.4.2.4 Define the Discount
Figure 12-41 shows the Discount section of the Promotion form.
Figure 12-41 Promotion Discount Definition
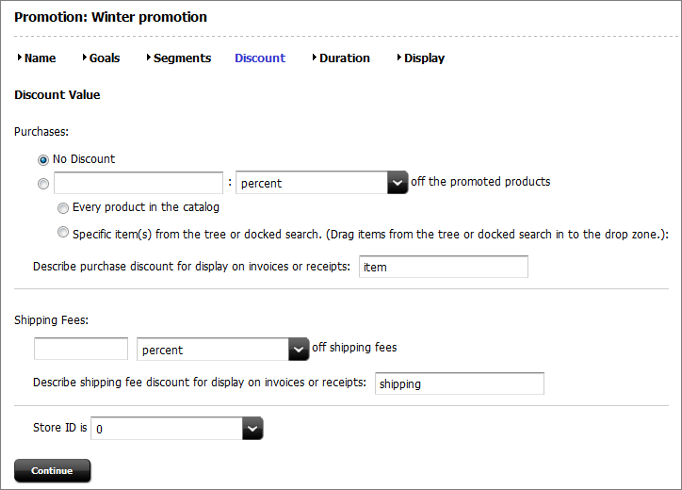
Description of "Figure 12-41 Promotion Discount Definition"
Note:
To configure the discount to be based on the current state of a visitor's shopping cart, create a segment based on the shopping cart. Then, select that segment for the promotion. For information about creating segments based on the shopping cart, see Define the Segment with Shopping Cart Criteria.
To define the discount, see the following sections:
You can combine either of the first two options with the third option, but you cannot combine the first two options.
12.4.2.4.1 Discounting the Entire Shopping Cart
In the Discount section of the Promotion form, do the following:
12.4.2.4.2 Discounting Specific Products
In the Discount section of the Promotion form, do the following:
-
Select the second option under Purchases and then set the values that define the discount.
For example, to offer $5.00 off, set the values as shown in Figure 12-44:
Figure 12-44 Purchase Discount as a Fixed Value

Description of "Figure 12-44 Purchase Discount as a Fixed Value"When adding a purchase discount as a fixed value to an item, be aware that the discount applies only once regardless of the number of items. In this example, a $5.00 discount is set for a product, but the discount will be $5 if the customer buys three items, not $15. The discount is not multiplied by the quantity set when checking out.
To offer 10% off, set the values as shown in Figure 12-45:
Figure 12-45 Purchase Discount as a Percentage

Description of "Figure 12-45 Purchase Discount as a Percentage" -
Select the products that the discount applies to:
-
Select Specific item(s) from the tree or docked search.
-
Select the products or product categories from the Content Tree, My Work tree, or docked search results list, and drag and drop the selected items into the Drag Products Drop Zone.
-
-
Click in the text box and enter a meaningful description of the discount.
The text that you enter in this field is shown on the invoice or receipt next to the items that it applies to. Use it to describe to your visitors how their bill is calculated.
-
Click Continue or go to the procedure described in Discounting the Shipping Costs.
12.4.2.4.3 Discounting the Shipping Costs
You can discount shipping in addition to, or instead of, discounting purchases. In the Discount section of the Promotion form, do the following:
12.4.2.5 Define the Promotion's Duration
Figure 12-49 shows the Duration section of the Promotion form.
Note:
If you do not specify how long the promotion should run, the promotion runs until you delete it.
In the Duration section of the Promotion form, do the following:
12.4.2.6 Advertise the Promotion on Your Site
Figure 12-50 shows the Display section of the Promotion form.
Figure 12-50 Display Section of Promotion Form
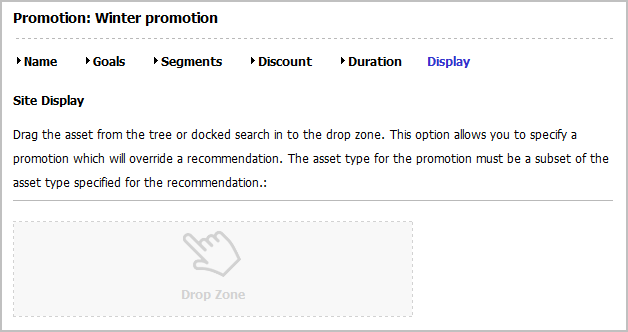
Description of "Figure 12-50 Display Section of Promotion Form"
In the Display section of the Promotion form, do the following:
-
Find the assets to be included in the recommendation and optionally bookmark them (which adds them to the Bookmarks node in the My Work tree):
-
In the Search field, enter your search criteria (if any) and click the magnifying glass button.
-
(Optional) To narrow your search down to a specific type of asset, in the Search field, click the down-arrow to render the Search Type drop-down box, then select the asset type to which you want to limit your search.
-
In the search results list, either drag and drop the results to the drop zone, or select (Ctrl+click) the assets you want to bookmark.
For more information about searching for and bookmarking assets, see Finding and Organizing Assets.
-
-
If you selected to bookmark assets from the search results, drag and drop the asset you want to use to advertise this promotion from the Bookmarks node into the Drop Zone.
Typically a promotional banner is stored as either an article or an image.
If you chose to drag from the search results, the items are placed.
Note:
If you select multiple assets, when the promotion is shown on your web pages, Engage displays the content that was rated the highest for the segments that the visitor belongs to. In other words, if you are using this promotion for multiple segment, you can use segment-specific ad banners for the promotion.
When placed in the Drop Zone, the items appear on a list in the form with a drop-down list box of recommendations next to each name, as shown in Figure 12-51:
-
In the Pick recommendation field next to the first item, select the name of the recommendation you want to replace or override with this item.
(The recommendation provides the location for the text you selected previously.)
-
Repeat step 3 for each item that you selected in step2.
-
Save the asset, by doing one of the following:
-
In the asset's toolbar, click the Save icon.
-
In the menu bar, select Content, then select Save.
-
12.4.3 Sample Promotion Asset
When you work with the FirstSite II sample site, you get a sample promotion asset, SummerSale. This promotion is designed to work in concert with the sample Segment and Recommendation assets (also available from the FirstSite II sample site). Use the sample promotion as a template for creating promotion assets for your site.
12.4.4 Publishing Promotions
After you create a promotion, it must be approved before it can be published to your delivery system. The promotion takes effect only after publishing it. Be sure to examine or inspect your promotion to verify that you configured it correctly before you approve it for publishing.
For more information about approving assets, see Performing Approval Tasks.
