4 Installing and Using Data Quality Health Check
This chapter describes how you can use the EDQ-CDS Data Quality Health Check functionality.
This chapter includes the following sections:
Data Quality Health Check extends the capability of the EDQ-CDS, allowing you to perform batch data quality checking of your data before it has been normalized or standardized. The results can then be viewed in the Server Console, a Business Intelligence (BI) tool, in the EDQ Results books, or published to the Dashboard as required. As a component of EDQ-CDS, Data Quality Health Check can be integrated with Siebel or used in stand-alone mode.
EDQ-CDS Data Quality Health Check will primarily be of use to anyone requiring a view of the quality of raw data, from Data Stewards who require a data-level view of data quality issues, to Operations Analysts and Executives who require Dashboard information for analysis, reporting and planning purposes. Additionally, it is useful for Data Professionals that want to analyze the technical aspects of data, and to EDQ-CDS users seeking to ensure their CDS processes are performing efficient deduplication.
4.1 Architecture
The following illustrates how you can use EDQ-CDS Data Quality Health Check to process your data and view the results:
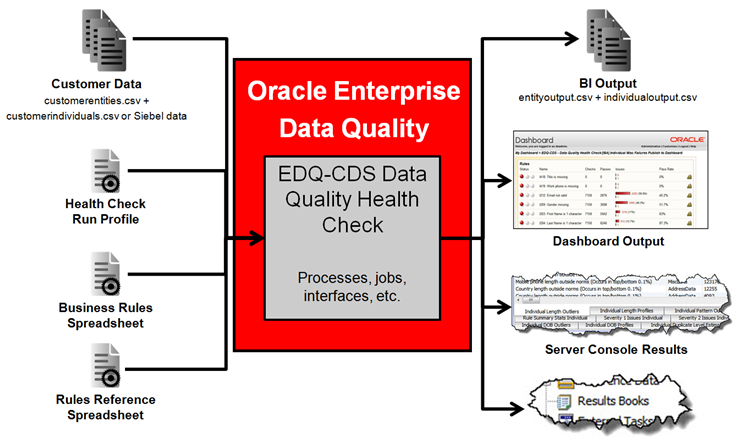
Description of the illustration ''hc-architecture.png''
4.1.1 Multiple Child Entities
Some data will feature multiple child entities, for example, more than one address might be assigned to each record. When such records are processed and passed to EDQ, one record per child is created.
Therefore, the Data Quality Health Check results often list a greater number of records than are initially taken in. It is important to remember this when viewing results in Server Console or Dashboard.
4.2 Installing Data Quality Health Check
The section explains how to install Data Quality Health Check. While Data Quality Health Check is part of the EDQ-CDS distribution, it is not necessary to fully configure EDQ-CDS in order to use Data Quality Health Check. EDQ Health Check has the same prerequisites as the EDQ-CDS.
Siebel integrations require the installation of the Siebel Connector 12c (12.2.1.2.0). For more information, see Oracle Fusion Middleware Installing and Customizing Enterprise Data Quality Customer Data Services Pack.
4.2.1 Installation Components
The components necessary to install Data Quality Health Check are pre-loaded in EDQ and are therefore automatically installed with EDQ.
The EDQ-CDS Health Check components are:
-
edq-cds-data-quality-health-check.dxi- the packaged EDQ project containing the EDQ-CDS data quality services. -
dq-health-check-business-rules-individual.xls- Individual Business Rules spreadsheet, which defines the data quality checks performed for individuals. -
dq-health-check-business-rules-entity.xls- Entity Business Rules spreadsheet, which defines the data quality checks performed for entities. -
edq-cds-data-quality-health-check.properties- the default Run Profile. -
customerentities.csv- Sample Entity data. -
customerindividuals.csv- Sample Individual data -
rulesreference.xls- Spreadsheet categorizing the error codes present in the Business Rules spreadsheets.
4.2.2 Installing the Software
If you have installed EDQ-CDS, then Data Quality Health Check is installed and no further installation tasks are necessary.
To install Data Quality Health Check without the presence of EDQ-CDS, use the following procedure:
-
Start the EDQ Director client, and log on as a user with the permission to create projects (Administrator or Project Owner).
-
Right-click on the server name and select Open Server Package File. Open the CDS folder and select the
edq-cds-data-quality-health-check.dxifile. -
Drag the whole EDQ-CDS - Data Quality Health Check project onto the Projects node.
-
Right-click on the
.dxifile, and select Close Package File.
4.2.3 Verifying the Installation
Data Quality Health Check comes with two sample .csv files in the landingarea/dqhealthcheck folder. These files can be used to test the installation is working correctly.
The sample files are:
-
customerentities.csv- Sample Entity data. -
customerindividuals.csv- Sample Individual data.
The default jobs provided with Data Quality Health Check are configured to run against these files.
To verify the installation, run either (or both) of the CSV Batch Entity Data Quality Health Check or CSV Batch Individual Data Quality Health Check jobs in Server Console, remembering to select the edq-cds-data-quality-health-check.properties Run Profile.
Note:
Data Quality Health Check uses its own internal reference data, and therefore does not need the CDS Initialize project to be run before it is used.
Do not attempt to run any of the Siebel jobs manually; these jobs are designed to be invoked automatically by the Siebel Connector.
Check the Event Log and Results in Server Console to ascertain whether the job (or jobs) have completed correctly. If so, then the installation has been successful.
Finally, purge the results of the job or jobs in the Server Console and Dashboard:
-
Server Console:
Select the Results view, right click the job in the Job History area, select the Purge data for run label [Name of Run Label] option.
-
Dashboard:
Open Dashboard Administration, expand the Audit tree in the Audits & Indexes area, right click on the Data Quality Health Check audit and select Purge.
4.3 Configuring Data Quality Health Check
This section explains how to configure Data Quality Health Check.
4.3.1 Configuring Business Rules
The Business Rules are set in two .xls files supplied with Data Quality Health Check, located in the oedq.home/business rules folder. To edit these .xls files, you must move them to oedq_local_home/business rules.
-
dq-health-check-business-rules-individual.xls- Individual Business Rules spreadsheet. -
dq-health-check-business-rules-entity.xls- Entity Business Rules spreadsheet.
There is an additional spreadsheet - rulesreference.xls - in the oedq_local_home/landingarea/dqhealthcheck folder which has two main functions: it is used to control which rules in the Business Rules spreadsheets are used when running Data Quality processes, and also to construct rules statistics.
Note :
By default, the Individual and Entity rules that are used by EDQ-AV are enabled in therulesreference.xls spreadsheet. If EDQ-AV is not installed these rules must be disabled to prevent inaccurate reporting in the Dashboard.The Enabled column in the rulesreference.xls spreadsheet controls which rules are enabled and which are disabled, the two possible values being yes and no. Therefore, if any existing rules are edited or new rules added to the Business Rules spreadsheets, the changes must be reflected in the rulesreference.xls sheet. Any changes made must preserve the separation of rule types, which object (Individual or Entity) they relate to, and their associated rule and error codes.
The rules fall into the following categories:
-
Population checks – Check that a field is not blank. For example,
ER205 - Check if Name is missing. -
List checks - Check that the data contains only values from a specified list. For example,
IR202 - Check if Upper Case gender is a valid value. -
Length checks - Check that the data is of a specified length,. For example,
IR203 - Check first name is > 1 char. -
Format checks - Check that the data conforms to a pattern or regular expression. For example,
IR212 - Check if email is valid format. -
Contains checks - Check that the data contains a value from a list; for example
IR428 - Check if full name is clear of entity hints. -
Suspect data checks - Check that the data exhibits any common data entry "cheats". For example,
ER411 - Check if unusual characters in name. -
Value checks – Check that the field value is in the correct range. For example,
IR430 - Check if DOB is very old (<1900). -
Dependent attribute checks – Check that two attribute values are consistent, for example, if the value in one attribute is dependent on the value in another attribute. For example,
IR302 - Check if gender and title are consistent. -
Duplicate checks - Compare combinations of data attributes to estimate potential levels of record duplication. This is not full EDQ-CDS matching, and therefore is designed to run in a fraction of the time. Examples of comparisons include:
-
IR401 - Check if fname address1 are flagged dupe -
IR403 - Check if fname email are flagged dupe -
IR408 - Check if lname tax no are flagged dupe
-
For information on customizing existing and creating new Business Rules using these spreadsheets, see the "Defining Business Rules" topic in the Oracle Enterprise Data Quality Director Online Help.
4.3.2 Configuring the Run Profile
The edq-cds-data-quality-health-check.properties Run Profile is divided into the following sections:
4.3.2.1 Publish to Dashboard Setting
This setting controls whether the results of the Health Check jobs are published to the Dashboard:
phase.Publish\ to\ Dashboard.enabled = yes
The default value is yes. Change to no to prevent the results being published.
Note :
The value must always be in lower case,yes or no.4.3.2.2 Input Source Location, Separator and Encoding Settings
These settings specify the source of the input files for individual and entity data, the field separator used, and the encoding employed. The default settings are included as in the following:
phase.*.snapshot.*.Entity_Input_CSV_File_Location = \\dqhealthcheck\\customerentities.csv
phase.*.snapshot.*.Entity_Input_CSV_File_Field_Separator = \,
phase.*.snapshot.*.Entity_Input_CSV_File_Encoding = UTF-8
phase.*.snapshot.*.Individual_Input_CSV_File_Location = \\dqhealthcheck\\customerindividuals.csv
phase.*.snapshot.*.Individual_Input_CSV_File_Field_Separator = \,
phase.*.snapshot.*.Individual_Input_CSV_File_Encoding = UTF-8
The file and folder location specified must be in the landingarea folder.
The encoding of the input file must be a valid encoding for EDQ delimited text Data Stores. The escape character - backslash "\" - must be used if the desired separator is a reserved character, for example, a comma. A list of valid encoding formats can be found in the Edit Data Store dialog in EDQ.
4.3.2.3 Publish Results as CSV Setting
This setting controls whether the results of the Health Check jobs are published in the form of a .csv file for use in a BI tool:
phase.Export\ BI\ Data.enabled = no
The default value is no. Set to yes to publish the data to the .csv file.
Note :
The value must always be in lower case,yes or no.4.3.2.4 Export File Location, Separator and Encoding Settings
If export is enabled, these settings specify the destination of the exported file, the field separator and encoding. The default settings are included as in the following:
phase.*.Export.*.Entity_Output_CSV_File_Location = \\dqhealthcheck\\entityoutput.csv
phase.*.Export.*.Entity_Output_CSV_File_Field_Separator = \,
phase.*.Export.*.Entity_Output_CSV_File_Encoding = UTF-8
phase.*.Export.*.Individual_Output_CSV_File_Location = \\dqhealthcheck\\individualoutput.csv
phase.*.Export.*.Individual_Output_CSV_File_Field_Separator = \,
phase.*.Export.*.Individual_Output_CSV_File_Encoding = UTF-8
Note :
The encoding of the export file must be valid for EDQ delimited text Data Stores. A list of valid encoding formats can be found in the Edit Data Store dialog in EDQ.4.3.2.5 Default Country Code for AV
If EDQ-AV is installed, this setting should be assigned the ISO two-character country code to be used by default. For example, if the country code is not specified in the data supplied:
phase.*.process.*.Default\ AV\ Country\ Code
The default value is US. Any codes that are entered here are expected to comply with the ISO-3166-1-alpha-2 specification.
4.3.2.6 Results Book Settings
To create EDQ Results Books populated with Individual and/or Entity profiling data, uncomment the following settings.
Note :
The first six lines are for the Individual Profiling Results book, and the last two are for the Individual Rules Results book. It is possible to populate one or both of these books as required.For Individual data, these settings will populate the Individual Profiling Results Book with drillable results of all profilers and the Individual Rules Results Book with a drillable view of rule failures.
phase.Profile\ Individual\ Misc\ Data.enabled = no
phase.Profile\ Individual\ Misc\ Data\ With\ Results\ Book.enabled = yes
phase.Profile\ Individual\ Address\ Data.enabled = no
phase.Profile\ Individual\ Address\ Data\ With\ Results\ Book.enabled = yes
phase.Profile\ Individual\ Alt\ Phone Data.enabled = no
phase.Profile\ Individual\ Alt\ Phone\ Data\ With\ Results\ Book.enabled = yes
phase.Process\ Rule\ Failures\ to\ Outputs.enabled = no
phase.Process\ Rule\ Failures\ to\ Outputs\ With\ Results\ Book.enabled = yes
For Entity data, these settings will populate the Entity Profiling Results Book with drillable results of all profilers and the Entity Rules Results Book with a drillable view of the rule failures:
phase.Profile\ Entity\ Misc\ Data.enabled = no
phase.Profile\ Entity\ Misc\ Data\ With\ Results\ Book.enabled = yes
phase.Profile\ Entity\ Address\ Data.enabled = no
phase.Profile\ Entity\ Address\ Data\ With\ Results\ Book.enabled = yes
phase.Profile\ Entity\ Alt\ Phone\ Data.enabled = no
phase.Profile\ Entity\ Alt\ Phone\ Data\ With\ Results\ Book.enabled = yes
phase.Make\ Analysis\ and\ Server\ Console\ Output.enabled = no
phase.Make\ Analysis\ and\ Server\ Console\ Output\ With\ Results\ Book.enabled = yes
4.3.2.7 Staged Data Visibility Settings Within Server Console
These settings control which Staged Data items are visible in Server Console.
The first setting - stageddata.*.visible = no - makes all Staged Data items invisible by default. The remaining settings then make specific Staged Data items visible.
By default, detailed data in the DQ Health Check Analysis Output tab in the Server Console Results screen is hidden. This is because the level of detail is seldom required for most purposes. To view this data, set the following properties in the Run Profile to yes:
-
stageddata.Individual\ DQ\ Health\ Check\ Analysis\ Output.visible = -
stageddata.Entity\ DQ\ Health\ Check\ Analysis\ Output.visible =
4.4 Configuring the Dashboard
By default, the Health Check results are published to the Dashboard.
The Dashboard is accessed from the EDQ Launchpad:

Description of the illustration ''dash_but.png''
To configure Health Check results on the Dashboard, use the following procedure:
-
Open the Dashboard.
-
On the main Dashboard, click Administration.
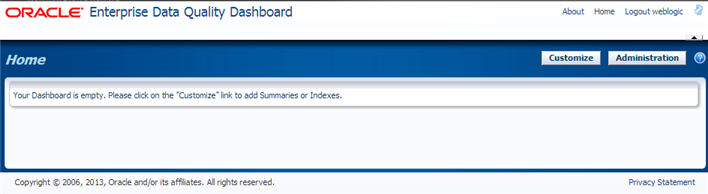
Description of the illustration ''dash_main.png''
The Dashboard Administration is displayed:
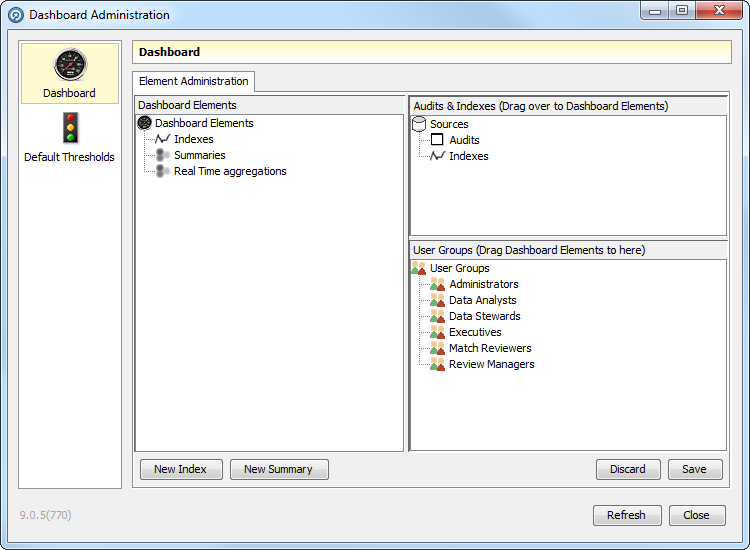
Description of the illustration ''dash_admin.png''
-
Create the Summaries and Indexes as required.
Note :
Any rules added to the Summaries should correspond with those enabled in therulesreference.xlsspreadsheet. If a disabled rule is included in a Summary or Index it will always be red-flagged, regardless of the results of enabled rules. -
Return to the Dashboard and click Customize.
-
Select the Data Quality results to view in the Add New drop-down field. For example:
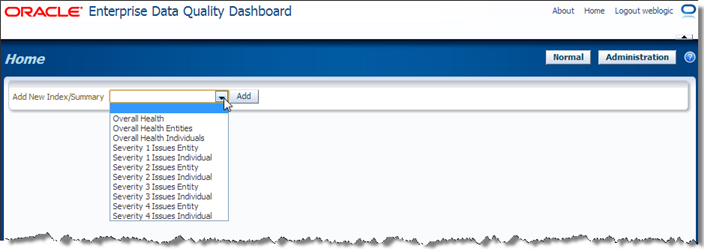
Description of the illustration ''dash_add_new.png''
-
Click Add. The selected item is added to the Home view.
Once this configuration procedure is complete, it is possible to choose which Summaries and Indexes to add to the Initial view, to drill down into the results. For full details of how to do this, see Oracle Enterprise Data Quality Dashboard Online Help.
4.4.1 Example: Dashboard By Severity
This is an example of a Dashboard configuration that groups rules into Summaries by severity, and then into Indexes.
The first letter of the Health Check rule audit codes indicates the record type ("I" for Individual and "E" for Entity), and the first number indicates the severity level (1, 2, 3 or 4). For example, code E203 is an Entity rule with a severity level of 2.
Create eight summaries to contain the Individual and Entity rule results for severity levels 1 to 4:
-
Severity 1 Issues Individual
-
Severity 2 Issues Individual
-
Severity 3 Issues Individual
-
Severity 4 Issues Individual
-
Severity 1 Issues Entity
-
Severity 2 Issues Entity
-
Severity 3 Issues Entity
-
Severity 4 Issues Entity
Then create the following Indexes:
| Name | Contents |
|---|---|
| Overall Health Individuals | Contains all the Individual Summaries. |
| Overall Health Entities | Contains all the Entity Summaries. |
| Overall Health | Contains the Individual and Entity Summaries. |
4.4.1.1 Creating the Summaries
-
Open EDQ Dashboard, and click Administration to open the Dashboard Administration window.
-
Click New Summary.
-
Enter Severity 1 Issues Individual in the Add Summary pop-up.
-
Click OK. The new Summary is displayed in the Summaries node of the Dashboard Elements area.
-
In the Audits and Indexes area, expand the Audits branch, then expand the EDQ-CDS – Data Quality Health Check/[I8A] Individual Misc Failures Publish to Dashboard branch.
-
Click and drag I101 and I102 from the [I8A] Individual Misc Failures Publish to Dashboard audits list to the Severity 1 Issues Individual Summary.
-
Click and drag the Severity 1 Issues Individual Summary to the Administrators node in the User Group area.
-
Click Save.
-
Repeat for the remaining summaries.
4.4.1.2 Creating the Indexes
This example assumes all the Summaries detailed in the previous sections have been configured.
-
Open EDQ Dashboard, and click Administration to open the Dashboard Administration window.
-
Click New Index.
-
Name the new Index "Overall Health Individuals".
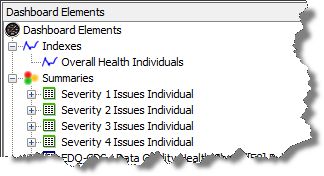
Description of the illustration ''index_example.png''
-
Click and drag the following Summaries into the new Index:
-
Severity 1 Issues Individual
-
Severity 2 Issues Individual
-
Severity 3 Issues Individual
-
Severity 4 Issues Individual
-
-
Click Save.
-
Repeat for the remaining Indexes.
4.4.2 Example - Dashboard By Business Function
This is an example of a Dashboard configuration that groups rules into Summaries by Business Function.
-
Create the following Summaries:
Name Contents Account - Name Details
-
Identifiers
-
Identifier outliers
-
Address details
-
Address detail outliers
-
Potential duplicates
Contact - Name details
-
Identifiers
-
Identifier outliers
-
Address details
-
Address detail outliers
-
Potential duplicates
The rules to be included in each Summary are detailed in Section 4.8, "Dashboard Example Summaries." Ensure that all these rules are enabled.
-
Create the following Indexes:
Name Contents Overall Health Account Containing all the Account-based Summaries. Overall Health Contacts Containing all the Contact-based Summaries. Overall System Health Containing all the Summaries you created.
4.5 Running Health Check Jobs and Viewing Results
This section describes how to run Health Check jobs and view the results.
4.5.1 Running a Health Check
Health Check jobs can be run either from Siebel, in stand-alone mode from Server Console, or in EDQ-CDS.
If running from Server Console, it may be necessary to prepare the data first.
There are six Health Check jobs:
-
Perform Entity Technical Analysis
-
Perform Individual Technical Analysis
-
CSV Batch Entity Data Quality Health Check
-
CSV Batch Individual Data Quality Health Check
-
Database Batch Entity Health Check
-
Database Batch Individual Health Check
4.5.1.1 Using the Siebel-Attached Mode
Before Health Check can be used with Siebel, the Siebel Connector must be installed and Siebel must be configured accordingly. For more information, see Oracle Fusion Middleware Installing and Customizing Enterprise Data Quality Customer Data Services Pack.
To run a Health Check job in Siebel, open Server Manager and access the Data Quality Manager component. The two jobs that should be run from Siebel are:
-
Siebel Batch Account Health Check
-
Siebel Batch Contact Health Check
Note :
The other Health Check jobs should not be configured to run from Siebel. It is possible to do this, but they will not return any results. They must always be run from Server Console or EDQ.Additionally, any settings changed in the Run Profile must also be changed in the dnd.properties file to ensure that the changes are accurately reflected in a Siebel batch run.
4.5.1.2 Using the Stand-Alone Mode
The Technical Analysis and Run Entity/Individual Quality Health Check jobs are designed to be run from EDQ or Server Console.
If the data to be checked can be provided in exactly the same format as the sample data files (for example, .csv files with column headings as described in Section 4.7, "Understanding s"), simply save these files to the landingarea\dqhealthcheck folder using the same file names as (overwriting) the sample data files.
However, if the data is provided in a different format EDQ should be configured to use this data by mapping the available fields to the Health Check input interface. To do this, use the following procedure:
-
Open Director.
-
Create a new Data Store that points at the data.
-
Create a new snapshot using this Data Store as the source.
-
Add and configure a new mapping to the relevant ( Entity Data or Individual Data).
-
Edit the relevant job (Run Entity or Run Individual Data Quality Health Check), adding the new Snapshot and selecting the new mapping.
For full details on how to prepare data, see the following topics in the Oracle Enterprise Data Quality Director Online Help:
-
"Connecting to a Data Store"
-
"Adding a Snapshot "
-
"Managing s"
-
"Running Jobs using s"
4.5.2 Viewing Data Quality Health Check Results
Health Check results can be produced as four output types:
-
Business Intelligence (BI) output;
-
EDQ Dashboard results;
-
Server Console results; and
-
Results Books in EDQ.
4.5.2.1 BI Output
Health Check can produce two comma-separated files containing Individual and Entity results data. This output is intended for detailed analysis using an external Business Intelligence application.
The files are:
-
entityoutput.csv -
individualoutput.csv
Records passed into Health Check will cause one or more rows to be generated, depending on the content of each record and how many errors are discovered within each record.
Note :
The separators, and file names and locations within the landing area can be configured in the Run Profile.The most important metadata attributes in the .csv files are as follows:
| Column | Description |
|---|---|
entityid / individualid |
The id of the original record. |
Data Stream |
This field identifies the origin of the row: Misc Data - A record fields. AddressData - An address. AltPhoneData - An altphone field. |
Rule ID |
The ID of the rule triggered, if applicable. |
Rule Label |
The label of the rule triggered, if applicable. |
Error Code |
The code of the error, if applicable. |
Error Severity |
The severity level of the error, if applicable. |
Error Message |
The error message returned, if applicable. |
The logic is as follows:
-
Each record passed into Health Check returns at least one row in the corresponding
.csvfile. -
At least one row is generated per record. If there is an error in the record data, this is indicated in the Error Code, Error Severity and Error Message columns.
-
An additional row is generated per address or
altphonefield within each record. Again, if there is a single error in an address oraltphonefield, this is indicated in the Error columns. -
However, if a record, address or
altphonefield contains more than one error, then a row is generated for each additional error above one.
For example, if an individual record has:
-
no address or
altphonevalue and no errors: 1 row. -
no address or
altphonevalue, and one error: 1 row. -
no address or
altphonevalue, and two errors: 2 rows. -
an address, but no
altphone: 2 rows. -
an address and an
altphone: 3 rows. -
an address containing a single error, and an
altphone: 3 rows. -
an address containing two errors, and an
altphone: 4 rows.
The following is a complex example. The record with individualid 1293 has returned 12 rows:
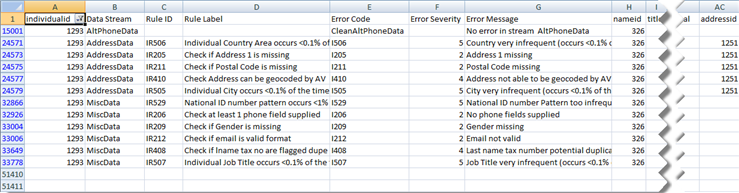
Description of the illustration ''individoutputcsv_ex2.png''
It has the following:
-
One
altphonefield, free of errors. -
Five errors associated with one address.
-
Six errors associated with other fields in the record (for example, Misc Data.)
Note :
In the example file, theaddressid in each row is identical, which shows that only one address is associated with the record. The illustration does not show this because of the limit of the screen size.4.5.2.2 EDQ Dashboard
The results published to the Dashboard are dependent on the enabled Business Rules, see Section 4.6, "Managing Business Rules". The following Dashboard example illustrates the variations of results and statuses:
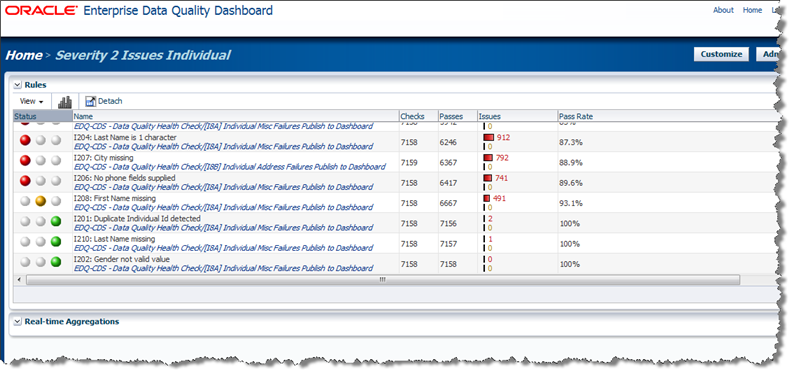
Description of the illustration ''dashboard.png''
The results from attributes associated with the Individual or Entity record (such as, name, title, email and so on) are based on distinct Individual and Entity records identified by a unique record ID.
Checks on the altphone attribute and address-related attributes are performed separately so that the number of results produced correctly reflects the number of child entities processed.
Similarly, results from the altphone field are based on distinct alternate phone numbers in Individual and Entity records, as it is possible to have multiple altphone values per record.
The results from attributes associated with addresses (such as, city, postalcode, country and so on) are based on distinct address records identified by a unique address id because it is possible to process multiple addresses for a given Individual or Entity.
The number of checks for a given published rule in the Dashboard may vary depending on the type of data being checked, and will always relate to the total population of the type of data. So the "total" figures displayed may vary according to data type.
For example, if 500,000 records were passed from the customer system, with a total of 650,000 addresses attached, and a total of 550,000 alternate phone numbers associated with them, then all results will show:
-
all address-related rule failures/passes as a percentage of 650,000;
-
all alternate-phone-related rule failures/passes as a percentage of 550,000; and
-
all remaining rule failure/passes as a percentage of 500,000.
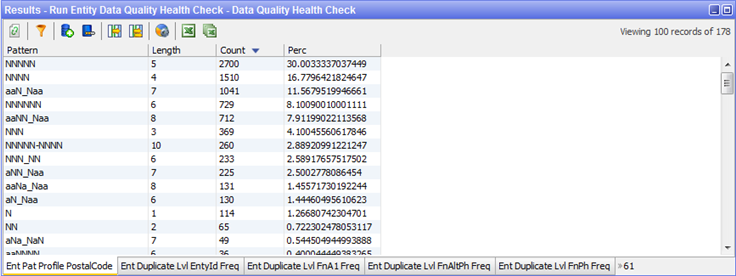
4.5.2.3 Server Console
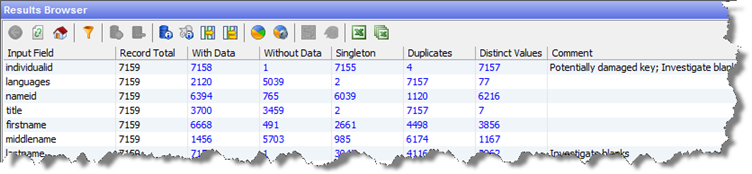
When run in Server Console, the Technical Analysis jobs profile the data by data type, maximum and minimum values and quick stats:

Description of the illustration ''analy_svr_con_res.png''
The Health Check jobs perform audit checks on the data and populate the EDQ Dashboard and BI .csv files depending on your run profile configuration.
Note :
Running the jobs in Server Console does not populate the Health Check Results Books.An example of the Server Console Results, depending on the Run Profile, is as follows:
Description of the illustration ''server_console_results.png''
4.5.2.4 Results Books
If activated in the Health Check Run Profile, the following Results Books can be populated:
-
Entity Profiling Results
-
Entity Rules Results
-
Entity Technical Analysis
-
Individual Profiling Results
-
Individual Rules Results
-
Individual Technical Analysis
The Technical Analysis Results Books are populated by the corresponding Technical Analysis jobs. The Profiling Results and Rules Results Books are populated by the corresponding Health Check jobs.
Consider the following:
-
When running these jobs, select the edq-cds-data-quality-health-check Run Profile, but do not specify a Run Label.
-
The Results Books are only populated if the Data Quality jobs are run from EDQ. Running the jobs either from Siebel or Server Console will not populate Results Book data.
-
The Business Object grouping of rules in Results Books is pulled from the
Business Objectcolumn inrulesreference.xlswhere each rule is associated with a business object text value. To reclassify rules, edit theBusiness Objectcolumn. -
The Technical Analysis jobs only use customer data and publish the analysis results to Server Console or in Results Books only.
It is possible to drill-down through these results for further analysis. Drillable results are links (highlighted in blue):
Description of the illustration ''results_book_ex.png''
4.6 Managing Business Rules
This section provides several examples describing how to turn on, edit and add business rules.
4.6.1 Example - Turning on a Rule
The Entity rule ER418 - Country is missing is disabled by default.
To turn the rule on:
-
Navigate to the
oedq_local_home/landingarea/dqhealthcheckfolder. -
Open the
rulesreference.xlsfile. -
Select the Address tab.
-
Find the E418 rule row, and change the value of the cell in the Enabled column to yes.
-
Save the file.
-
If required, open the Dashboard Administration application to add the rule to an appropriate Summary.
To disable the rule again, repeat this procedure, changing the cell value back to no.
Note :
If a rule that is included in a Dashboard Summary is disabled, it will still be displayed in the Summary with no results returned. Therefore, it is recommended that any disabled rules be removed from Dashboard Summaries so they do not influence overall pass or failure indicators.4.6.2 Example - Editing Rules: Adding an Extra Common Title
The titles tab in the dq-health-check-business-rules-individual.xls file is used by rule IR411- Check Upper Case Title is in the list.
The following procedure shows how to ensure the rule also checks for the term "PROFESSOR" as an common title:
-
Navigate to the
oedq_local_home/businessrulesfolder, and open thedq-health-check-business-rules-individual.xlsspreadsheet. -
Select the titles tab.
-
Add PROFESSOR to the bottom of the list in column A of the worksheet.
-
Save the file.
4.6.3 Example - Editing a Rule: Changing a Value Check
This example describes how to change the value check of the IR430 - Check if DOB is very old (<1900) to check for birthdates older than 1890.
-
Navigate to the
oedq_local_home/businessrulesfolder, and open thedq-health-check-business-rules-individual.xlsspreadsheet. -
Select the Rules tab, and scroll to the IR430 rule.
-
Change the Rule Label to Check if DOB is very old (<1890).
-
Scroll to the Check1 column, and change the cell value to chGreaterThan1890.
-
Select the Checks tab, and select the two rows that describe the chGreaterThan1900 check. In an unmodified sheet, these are normally rows 39 and 40.
-
Copy the rows, and paste them below the existing Checks.
-
Edit the Description, Check Name and Option 1 cells, replacing "1900" with 1890.
-
Save the file.
-
Open Director, and navigate to the Processes node of the EDQ-CDS Data Quality Health Check project in the Project Browser.
-
Double click the [I8A] Individual Misc Failures Publish to Dashboard process.
-
In the Process Canvas, locate the following processors in the Misc Checks group:
-
IR430 DOB Year is older than 1900 Enabled
-
IR430 DOB Year is older than 1900
-
-
Edit the labels of these processors (for example, change "1900" to "1890").
-
Double click the IR430 DOB Year is older than 1890 processor.
-
Select the Dashboard tab in the Processor dialog.
-
Edit the rule name to read I430: DOB year is older than 1890.
-
Click OK.
-
Close the process, saving the changes made.
-
Navigate to the
oedq_local_home/landingarea/dqhealthcheckfolder. -
Open the rulesreference.xls file.
-
Select the Misc tab and find the IR430 rule.
-
Change the Description to DOB year is older than 1890.
-
Save the file.
4.6.4 Example - Editing a Rule: Changing the Severity Level
This example describes how to change the severity level of rule IR308 - Check if email is missing from 3 to 2.
-
Navigate to the
oedq_local_home/businessrulesfolder, and open thedq-health-check-business-rules-individual.xlsspreadsheet. -
Select the rules tab and locate the IR308 rule.
-
Scroll to the Error Severity column and change the cell value to 2.
-
Save the file.
-
If Severity Summaries have already been configured for Dashboard, open Dashboard Administration, remove the IR308 rule from the Severity 3 Summary and add it to the Severity 2 Summary.
4.6.5 Example - Adding a Rule
This example describes how to add a rule to check that a delivery address post code field passed into the customstring1 attribute in individual records contains no more than 9 digits, excluding punctuation (for example, conforms to the US zip code format). For this rule to be effective, it will be necessary to clean the field data first by removing any spaces or punctuation marks. This will ensure that only the alphanumeric content is checked
There are eight stages to adding this rule:
-
Confirm the field is passed to the Business Rules processor.
-
Check field format to check the results of a previously-run job in the Server Console Results window, specifically the DQ Health Check Analysis Output tab. This tab is not visible by default. Therefore, before running through this example ensure the
stageddata.Individual\ DQ\ Health\ Check\ Analysis\ Output.visibleattribute is set toYes. -
Insert pre-processing to reformat the field data.
-
Edit the Business Rules spreadsheet.
-
Edit the
rulesreference.xlsspreadsheet. -
Change the Business Rules Check processor.
-
Configure for Dashboard.
-
Update the Dashboard Summaries.
Note:
The following examples require a solid understanding of process design in Director and the associated permissions.Confirming the Field is Passed to the Business Rules Processor
-
Open Director, and navigate to the Processes node of the EDQ-CDS - Data Quality Health Check project in the Project Browser.
-
Double click the [I6A] Run Misc Business Rules process.
-
Double-click the Business Rules Check processor in the Business Rules Execution group at the bottom of the Process Canvas.
-
In the Attributes tab of the processor dialog, scroll through the Attributes field to confirm the customstring1 attribute is included.
-
Click the Identify tab.
-
Check the Identifier assigned to the customstring1 Input Attribute (
atCustomString1in a default installation).
Checking the field Format
-
Start Server Console.
-
In the Results view, select a previous run of Health Check.
-
The DQ Health Check Analysis Output tab should be displayed at the bottom of the window by default. Scroll across to view the customstring1 column and check the format of the results. In the example image, the format is clearly incorrect: as one field contains a space and the other a hyphen it is not limited to alphanumeric data only:
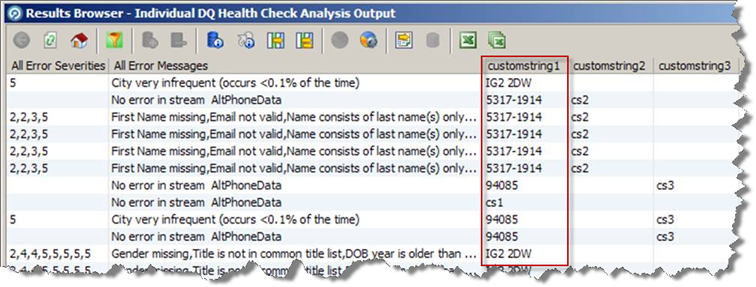
Description of the illustration ''example_e1.png''
-
Close Server Console.
Inserting Pre-Processing to Format Field Data
As the format of the data in the customstring1 field does not match the required 9-character alphanumeric format, some pre-processing of the data is required before it is passed to the Business Rules Check processor. Also, to avoid affecting the output of the processor, the pre-processing will be performed on a copy of the customstring1 data that will then be passed to the check.
-
Return to Director.
-
Add a Concatenate processor to the [I16A] Run Misc Business Rules process, positioning it immediately before the Business Rules Check processor.
-
Configure the processor to take a copy of the customstring1 string, called customstring1ForChk.
-
Follow this processor with a Remove Whitespace and Denoise processor, configuring them to clean the customstring1ForChk data.
-
Save the changes. Leave Director open, as further changes to the Business Rules Check processor are required.
Editing the Business Rules Spreadsheet
It is now possible to edit the dq-health-check-business-rules-individual.xls spreadsheet. This involves adding a new Check, Condition and Business Rule.
Note :
The Condition is required in order to ensure that the rule is not applied in circumstances where thecustomstring1ForChk field is not present in the data being analyzed.-
Navigate to the
oedq_local_home/businessrulesfolder, and open thedq-health-check-business-rules-individual.xlsspreadsheet. -
Click the Checks tab.
-
Create a new entry for a check specifying a maximum length of nine characters.
Note :
The wording describes the check taking place. In order to fail entries of more than nine characters, the check performed is actually whether the entries are nine characters long or less.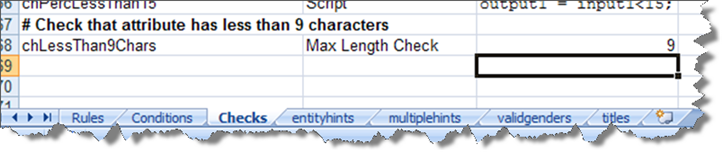
Description of the illustration ''example_e2.png''
-
Click the Conditions tab.
-
Copy and paste the coCustomString1_supplied row into an empty row at the bottom of the sheet.
-
Edit the Condition Name and Attribute or Check cells of the new entry to read coCustomStringForChk_supplied and coCustomStringForChk respectively.
-
Click the Rules tab.
-
Add a new line describing the rule, applying the following values:
-
Rule ID: IR391
-
Rule Label: Custom String 1 (denoised) greater than 9 chars
-
Disable: Leave blank.
-
Apply to Attribute: atCustomString1ForChk
-
Condition: coCustomString1ForChk_supplied
-
Error Code: I391
-
Error Severity: 3
-
Error Message: Custom String 1 (denoised) is greater than 9 characters
-
Check1: chLessThan9Chars
-
-
Click Save and close the spreadsheet.
Editing the rulesreference.xls Spreadsheet
-
Navigate to the
oedq_local_home/landingarea/dqhealthcheckfolder. -
Open the
rulesreference.xlsfile. -
Click the Misc tab.
-
Add the details of the new rule to the bottom of the worksheet, as illustrated in following:
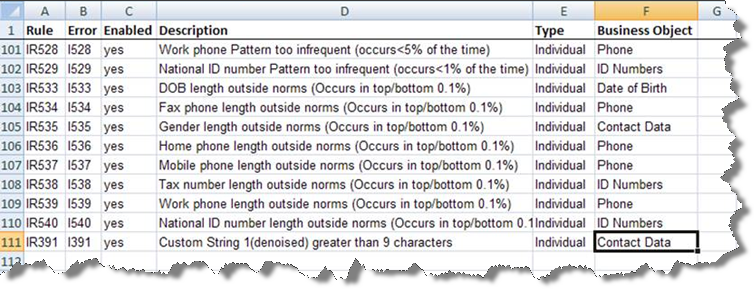
Description of the illustration ''example_e2a.png''
-
Click Save and close the spreadsheet.
Changing the Business Rules Check Processor
The Business Rules Check processor must be changed to use the reformatted field:
-
Return to Director.
-
Double-click the Business Rules Check processor in the [I6A] Run Misc Business Rules process.
-
On the Attributes tab of the Processor dialog, add the customstring1ForChk attribute to the Input Attributes.
-
Click the Identify tab.
-
Find the atCustomString1ForChk identifier, and assign the customstring1ForChk input attribute in the drop-down field to it.
-
Save the changes and close the dialog.
Configuring for Dashboard
If the Dashboard is used, it is necessary to make further changes to publish the results of the new rule.
-
In Director, open the [I8A] Individual Misc Failures Publish to Dashboard process.
-
Make a copy of a group of two of the Audit processors. For the purposes of this example, copy the I313 Audit Processors.
-
Paste the copies onto the canvas to the right of the I313 Processors.
-
Rename both copied processors: I391: Custom String 1 (denoised) greater than 9 chars Enabled and I391: Custom String 1 (denoised) greater than 9 chars.
-
Connect the All output of the I313: National ID Number missing processor to the I391: Custom String 1 (denoised) greater than 9 chars Enabled processor. The processors should now appear as in the following:
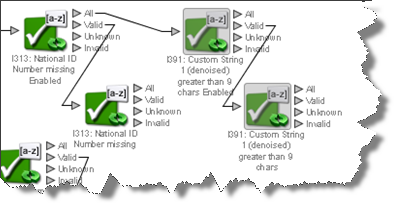
Description of the illustration ''example_e4.png''
-
Double-click the I391: Custom String 1 (denoised) greater than 9 chars Enabled processor.
-
In the Processor dialog, click the Options tab.
-
Set the Regular Expression field to I391 .
-
Click Save and close the dialog.
-
Repeat steps 7 to 9 for the I391: Custom String 1 (denoised) greater than 9 chars processor.
-
Click the Dashboard tab.
-
Set the Rule Name field to "I391: Custom String 1 (denoised) greater than 9 chars".
-
Save changes, and close the process.
Updating the Dashboard Summaries
Once the Individual Data Quality Health Check job has been run again, it is possible to add the new rule to the required Summary in the Dashboard Administration application.
4.7 Understanding s
This section describes the two Health Check s and all of the attributes contained in each of them.
4.7.1 Individual Data
All the Individual Data attributes are strings:
| Attribute | Description |
|---|---|
individualid |
Unique identifier of the individual (e.g customer, employee or contact). |
languages |
Three-character Siebel language code. Only used by EDQ-CDS in name standardization to help determine whether a name containing Kanji is Japanese or Chinese. |
nameid |
Unique identifier for the name. Used by EDQ-CDS to distinguish between different names for the same individual when multiple child entities are used. For more information, see Chapter 5, "Using Business Services." |
title |
|
firstname |
|
middlename |
|
lastname |
|
gender |
M or F. |
dob |
Date of Birth in one of the formats listed in the *Date Formats EDQ Reference Data set. |
jobtitle |
|
homephone |
|
workphone |
|
mobilephone |
|
faxphone |
|
alternatephone |
|
email |
|
taxnumber |
|
nationalidnumber |
Social Security Number (US) or equivalent. |
accountname |
The name of the account (for example, entity) to which this individual belongs, if relevant. |
uid1 |
Unique ID 1
NOTE: The Unique ID fields are used in EDQ-CDS to match records based on custom unique identifiers, such as passport or tax numbers. For more information, see Chapter 3, "Using Matching." |
uid2 |
Unique ID 2. |
uid3 |
Unique ID 3. |
eid1 |
Elimination ID 1.
Note: The Elimination ID fields are used in EDQ-CDS to eliminate possible matches between records based on custom unique identifiers, such as passport or tax numbers. For more information, see Chapter 3, "Using Matching." |
eid2 |
Elimination ID 2. |
eid3 |
Elimination ID 3. |
addressid |
Unique identifier for the address, used in EDQ-CDS to distinguish between different addresses for the same individual when multiple child entities are used. For more information, see Chapter 5, "Using Business Services" |
address1 |
Line 1 of the address. |
address2 |
Line 2 of the address. |
address3 |
Line 3 of the address. |
address4 |
Line 4 of the address. |
dependentlocality |
A smaller population center data element than city, for example, a Turkish neighborhood. |
doubledependentlocality |
The smallest population center data element, dependent on both the contents of the city and dependentlocality fields. For example, UK Village. |
city |
|
subadminarea |
The smallest geographic data element within a country. For example, USA County. |
adminarea |
The most common geographic data element within a country. For example, USA State or Canadian Province. |
postalcode |
|
country |
Country name or ISO 2 char code.
Note: The output will always be the full Country name, even if the input is the country ISO code. |
customstring1 |
The customstring fields are placeholders for data attributes that require analysis in Health Check but do not match to any of the standard interface attributes. |
customstring2 |
|
customstring3 |
|
customstring4 |
|
customstring5 |
|
customstring6 |
|
customstring7 |
|
customstring8 |
|
customstring9 |
|
customstring10 |
4.7.2 Entity Data
All the Entity Data attributes are strings.
| Attribute | Description |
|---|---|
nameid |
Unique identifier for the name, used in EDQ-CDS to distinguish between different names for the same entity when multiple child entities are used. For more information, see Chapter 5, "Using Business Services" |
entityid |
Unique record identifier. |
languages |
Three-character Siebel language code. Only used in EDQ-CDS for name standardization to help determine whether a name containing Kanji is Japanese or Chinese. |
name |
Organization name, for example, "Oracle Corporation UK". |
subname |
Department or site, for example, "Reading" or "Accounts Payable". |
phone |
|
alternatephone |
|
website |
|
taxnumber |
|
vatnumber |
|
uid1 |
Unique ID 1
Note: The Unique ID fields are used in EDQ-CDS to match records based on custom unique identifiers, such as passport or tax numbers. For more information, see Chapter 3, "Using Matching." |
uid2 |
Unique ID 2. |
uid3 |
Unique ID 3. |
eid1 |
Elimination ID 1.
Note: The Elimination ID fields are used in EDQ-CDS to eliminate possible matches between records based on custom unique identifiers, such as passport or tax numbers.For more information, see Chapter 3, "Using Matching." |
eid2 |
Elimination ID 2. |
eid3 |
Elimination ID 3. |
addressid |
Unique identifier for the address. |
address1 |
|
address2 |
|
address3 |
|
address4 |
|
dependentlocality |
A smaller population center data element than city, for example, a Turkish neighborhood. |
doubledependentlocality |
The smallest population center data element, for example, a UK village. |
city |
|
subadminarea |
The smallest geographic data element within a country, for example, US county. |
adminarea |
The most common geographic data element within a country, for example, US state, Canadian province, UK county. |
postalcode |
|
country |
|
customstring1 |
The customstring fields are placeholders for data attributes that require analysis in Health Check but do not match to any of the standard interface attributes. |
customstring2 |
|
customstring3 |
|
| customstring4 | |
| customstring5 | |
| customstring6 | |
| customstring7 | |
| customstring8 | |
| customstring9 | |
| customstring10 |
4.8 Dashboard Example Summaries
These tables contain the rules to be included in the Summaries described in Section 4.4.2, "Example - Dashboard By Business Function."
Account - Name Details
| Audit Code | Description |
|---|---|
| E101 | Full Name missing |
| E202 | Name is 1 character |
| E205 | Name missing |
| E302 | Sub Name is 1 character |
| E303 | SubName missing |
| E408 | Name contains potential multiples hints |
| E409 | Sub Name contains potential multiples hints |
| E411 | Unusual characters in name |
| E412 | Unusual characters in subname |
Account - Identifiers
| Audit Code | Description |
|---|---|
| E102 | Entity Id missing |
| E204 | No phone fields supplied |
| E304 | Tax Number missing |
| E305 | VAT Number missing |
| E306 | Website missing |
| E307 | Website not valid |
| E410 | Alternate phone is missing |
| E413 | Unusual characters in phone |
| E417 | Alternate phone is missing |
| E419 | Phone is missing |
Account - Identifier Outliers
| Audit Code | Description |
|---|---|
| E420 | Alt Phone appears to have less than 2 digits present |
| E510 | Alt phone length outside norms (Occurs in top/bottom 0.1%) |
| E520 | Alt phone Pattern too infrequent (occurs<5% of the time) |
| E421 | Phone appears to have less than 2 digits present |
| E504 | Tax Number too frequent (occurs>5% of the time) |
| E505 | VAT Number too frequent (occurs>5% of the time) |
| E506 | Website too frequent (occurs>5% of the time) |
| E513 | Phone length outside norms (Occurs in top/bottom 0.1%) |
| E514 | Tax number length outside norms (Occurs in top/bottom 0.1%) |
| E515 | VAT number length outside norms (Occurs in top/bottom 0.1%) |
| E521 | Phone Pattern too infrequent (occurs<5% of the time) |
| E523 | Tax number Pattern too infrequent (occurs<1% of the time) |
| E524 | VAT number Pattern too infrequent (occurs<1% of the time) |
| E525 | Website Pattern too frequent (occurs>5% of the time) |
Account - Address Details
| Audit Code | Description |
|---|---|
| E203 | Address 1 missing |
| E206 | Postal Code missing |
| E207 | City missing |
| E301 | Address not able to be verified by AV processor |
| E308 | Addresses 2 and 3 missing |
| E407 | Address not able to be geocoded by AV processor |
| E414 | Address 2 is missing |
| E415 | Address 3 is missing |
| E416 | Admin area is missing |
| E418 | Country is missing |
Account - Address Detail Outliers
| Audit Code | Description |
|---|---|
| E501 | Admin Area very infrequent (occurs <0.1% of the time) |
| E502 | City very infrequent (occurs <0.1% of the time) |
| E503 | Country very infrequent (occurs <0.1% of the time) |
| E511 | City length outside norms (Occurs in top/bottom 0.1%) |
| E512 | Country length outside norms (Occurs in top/bottom 0.1%) |
| E522 | Postal code Pattern too infrequent (occurs<1% of the time) |
Account - Potential Duplicates
| Audit Code | Description |
|---|---|
| E201 | Duplicate Entity Id detected |
| E401 | Full name address1 potential duplicate |
| E402 | Full name alt phone potential duplicate |
| E403 | Full name phone potential duplicate |
| E404 | Full name website potential duplicate |
| E405 | Name tax number potential duplicate |
| E406 | Name VAT number potential duplicate |
Contact - Name Details
| Audit Code | Description |
|---|---|
| I101 | Full Name missing |
| I203 | First Name is 1 character |
| I204 | Last Name is 1 character |
| I208 | First Name missing |
| I210 | Last Name missing |
| I301 | Name consists of last name(s) only |
| I304 | Middle name is 1 character |
| I310 | Middle name missing |
| I411 | Title is not in common title list |
| I418 | Title is missing |
| I420 | Unusual characters in first name |
| I421 | Unusual characters in last name |
| I422 | Unusual characters in middle name |
| I428 | Full Name contains potential entity hints |
| I429 | Full Name contains potential multiples hints |
Contact - Identifiers
| Audit Code | Description |
|---|---|
| I102 | Individual Id missing |
| I206 | No phone fields supplied |
| I212 | Email not valid |
| I302 | Gender and title are not consistent |
| I305 | Account Name is missing |
| I307 | DOB missing |
| I308 | Email missing |
| I311 | Tax Number missing |
| I312 | DOB in future |
| I313 | National ID Number missing |
| I413 | Alternate phone is missing |
| I415 | Fax phone is missing |
| I416 | Home phone is missing |
| I417 | Mobile phone is missing |
| I419 | Work phone is missing |
| I423 | Unusual characters in alternate phone |
| I424 | Unusual characters in fax phone |
| I425 | Unusual characters in home phone |
| I426 | Unusual characters in mobile phone |
| I427 | Unusual characters in work phone |
Contact - Identifier Outliers
| Audit Code | Description |
|---|---|
| I202 | Gender not valid value |
| I209 | Gender missing |
| I430 | DOB year is older than 1900 |
| I433 | Alt Phone appears to have less than 2 digits present |
| I434 | Home Phone appears to have less than 2 digits present |
| I435 | Mobile Phone appears to have less than 2 digits present |
| I436 | Work Phone appears to have less than 2 digits present |
| I437 | Fax Phone appears to have less than 2 digits present |
| I501 | Account Name too frequent (occurs>5% of the time) |
| I502 | Email too frequent (occurs>5% of the time) |
| I503 | Tax Number too frequent (occurs>5% of the time) |
| I508 | Title very infrequent (occurs <0.1% of the time) |
| I509 | National ID Number too frequent (occurs>5% of the time) |
| I510 | DOB day in year too frequent (occurs >1% of the time) |
| I511 | DOB Year too frequent (occurs >5% of the time) |
| I512 | DOB Month too frequent (occurs >10% of the time) |
| I513 | DOB Day In Week too frequent (occurs >15% of the time) |
| I514 | DOB Day in Month too frequent (occurs >5% of the time) |
| I520 | Alt phone Pattern too infrequent (occurs<5% of the time) |
| I521 | DOB Pattern too infrequent (occurs<5% of the time) |
| I522 | Email Pattern too frequent (occurs>5% of the time) |
| I523 | Fax phone Pattern too infrequent (occurs<5% of the time) |
| I524 | Home phone Pattern too infrequent (occurs<5% of the time) |
| I525 | Mobile phone Pattern too infrequent (occurs<5% of the time) |
| I527 | Tax number Pattern too infrequent (occurs<1% of the time) |
| I528 | Work phone Pattern too infrequent (occurs<5% of the time) |
| I529 | National ID number Pattern too infrequent (occurs<1% of the time) |
| I530 | Alt phone length outside norms (Occurs in top/bottom 0.1%) |
| I533 | DOB length outside norms (Occurs in top/bottom 0.1%) |
| I534 | Fax phone length outside norms (Occurs in top/bottom 0.1%) |
| I536 | Home phone length outside norms (Occurs in top/bottom 0.1%) |
| I537 | Mobile phone length outside norms (Occurs in top/bottom 0.1%) |
| I538 | Tax number length outside norms (Occurs in top/bottom 0.1%) |
| I539 | Work phone length outside norms (Occurs in top/bottom 0.1%) |
| I540 | National ID number length outside norms (Occurs in top/bottom 0.1%) |
Contact - Address Details
| Audit Code | Description |
|---|---|
| I205 | Address 1 missing |
| I207 | City missing |
| I211 | Postal Code missing |
| I303 | Address not able to be verified by AV processor |
| I306 | Addresses 2 and 3 missing |
| I410 | Address not able to be geocoded by AV processor |
| I412 | Admin area is missing |
| I414 | Country is missing |
| I431 | Address 2 is missing |
| I432 | Address 3 is missing |
Contact - Address Detail Outliers
| Audit Code | Description |
|---|---|
| I504 | Admin Area very infrequent (occurs <0.1% of the time) |
| I505 | City very infrequent (occurs <0.1% of the time) |
| I506 | Country very infrequent (occurs <0.1% of the time) |
| I526 | Postal code Pattern too infrequent (occurs<1% of the time) |
| I531 | City length outside norms (Occurs in top/bottom 0.1%) |
| I532 | Country length outside norms (Occurs in top/bottom 0.1%) |
Contact - Potential Duplicates
| Audit Code | Description |
|---|---|
| I201 | Duplicate Individual Id detected |
| I401 | Full name address1 potential duplicate |
| I402 | Full name alt phone potential duplicate |
| I403 | Full name email potential duplicate |
| I404 | Full name fax phone potential duplicate |
| I405 | Full name home phone potential duplicate |
| I406 | Full name mobile phone potential duplicate |
| I407 | Full name work phone potential duplicate |
| I408 | Last name tax number potential duplicate |
| I409 | Last name national id number potential duplicate |