1 Getting Started
This chapter provides information on the basic operations you will perform when using Director.
This chapter has the following sections:
1.1 Adding a Process
To add a Process to analyze data from a snapshot:
-
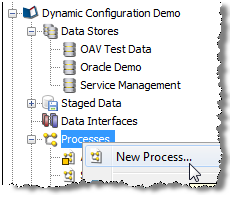
From the menu, select File - New Process, or
-
Right-click on Processes in the Project Browser, and select New Process:
-
Select the Staged Data, Data Interface, Reference Data or Real time Data Provider that you want to use in the process, or do not select anything if you want to configure the Reader in the process later.
Note:
It may be that you do not want to stage the data you are analyzing; that is, you may want to stream the data directly from the source. This can be done by selecting the Staged Data configuration, and changing the Process Execution Preferences of the process. -
Select whether or not to add Profiling processors to the process straight away. This may be useful if you are analyzing the data for the first time.
-
Give the process a Name and an optional Description.
-
Click Finish.
1.2 Adding a Snapshot
To add a Snapshot of data from a connected data store:
-
Right-click on Staged Data in the Project Browser, and select New Snapshot:
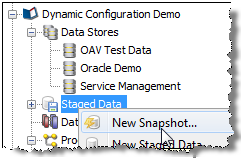
-
Select the data store that you want to create the snapshot from, or add a new data store if the desired data store is not on the list.
-
Select the table or view to snapshot (or you may specify SQL to snapshot a new view of the data).
-
Select the columns from the table or view that you want to include in the snapshot, and how to enable sorting and filtering on the snapshot.
By default, intelligent sort and filter enablement is used. This means that results based on the snapshot may be sorted or filtered using any column(s), provided the snapshot is under a certain size (set by the system administrator). If the snapshot is above that size, results based on it cannot be sorted or filtered by any column, though users will be prompted to enable sorting and filtering on specific columns if they attempt to do it using the Results Browser.
Alternatively, you can switch off intelligent sort and filter enablement, and manually select the columns that you enable for sorting and filtering.
The default threshold above which sorting and filtering will be disabled for snapshots when using intelligent sort and filter enablement is 10 million cells - so for example a snapshot with 500,000 rows and 15 columns (7,500,000 cells) would have sorting and filtering enabled, but a snapshot with 500,000 rows and 25 columns (12,500,000 cells) would have sorting and filtering disabled.
Note:
It is advisable to select all columns. The columns to work with in a given process can be a subset of these. -
Optionally filter the table or view to snapshot a subset of it (or you may write your own SQL WHERE clause).
-
Optionally sample the selected data (for example, the first n records, the first n records after an offset, or 1 record in every 100).
-
Optionally perform no data normalization. For more information, see the
No Data Handlingtopic in Enterprise Data Quality Online Help. -
Give the snapshot a Name, and choose whether or not to run it immediately.
-
Click Finish to confirm the addition of the snapshot.
The snapshot is created and visible in the project browser. It is now ready to be run (by Right-click, Run Snapshot), or used in a process and run later. The snapshot may also be 'streamed'; that is, used as a way of selecting the records to be processed from a Data Store directly; that is, without copying them into the repository.
The next step is Adding a Process, for example to profile the data in the snapshot.
1.3 Adding Reference Data
To add a set of Reference Data to use in processors for the validation or transformation of data:
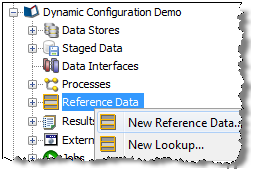
-
Right-click on Reference Data in the Project Browser, and select New Reference Data:
-
If you want the Reference Data to be a lookup onto Staged or External Data, or an alternative lookup onto an existing Reference data set, rather than a new set of Data, choose New Lookup....
Or, create the Reference Data using the data in the Results Browser by selecting some data values, right-clicking and selecting Create Reference Data. For example, from the results of a Frequency profiler, select a results tab. Select the desired values, right click and Create Reference Data:
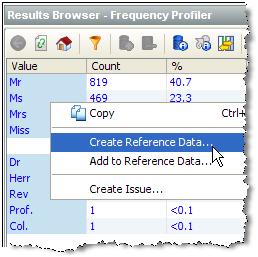
Note:
You can use the normal windows Shift-select, and Control-select options to select data. Take care not to drill down when attempting to select the desired values. Alternatively, to select all the loaded data in the results browser for a given column, Control-select the column at the top (for example, the Value column in the screenshot above). Press Escape to de-select all selected data. -
If you are adding new Reference Data (rather than a new Lookup onto existing Reference Data), define the columns that you require in the Reference Data. For example, for a simple list of values, define a single column. If you would like the Reference Data Editor to add a uniqueness constraint so that duplicate entries cannot be created, select the Unique? option on the column.
-
Select the column or columns that you want to use when performing lookups on the data.
-
Select the column or columns that you want to use when returning values from a lookup.
-
Optionally, select the Category of Reference Data that you want to create, if you are creating Reference Data of a specific type (such as a list of regular expressions).
-
Give the Reference Data a Name (for example, Valid Titles) and optional Description (for example, 'Created from Customers table') and choose whether or not to edit the data now.
-
If you choose to edit the data now, add or delete any entries in the Reference Data using the Reference Data Editor.
-
Click OK to finish.
The Reference Data set now appears under your project in the Project Browser, and is ready for use in processors - for example in a List Check.
1.4 Adding an Issue
To add an Issue based on your results (for example to tag an item of interest, or to create an action for another user to follow-up on):
-
Right-click on the data in the Results Browser, and select Create Issue...:
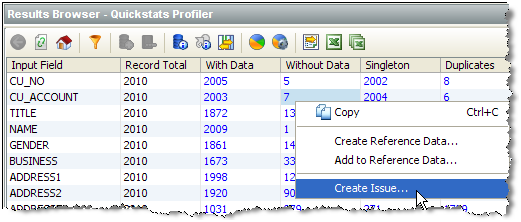
Note:
The issue will be linked to the specific process and processor where it was created, so that another user can quickly find the related data. -
Add a Description of the issue.
-
Optionally assign the issue to yourself or another user, and specify the Action needed (if any).
-
Click Save to save the issue.
The issue is added, and available from the Issue Manager. If the issue was assigned to another user, that user will be notified of the outstanding issue immediately, if he/she is logged on.
1.5 Adding a Project Note
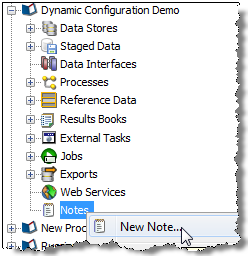
To add a Note to a project, for example to attach a project plan, or to share some key information amongst project users:
-
Right-click Notes in the Project Browser, and select New Note:
-
Give the note a Title.
-
Add detail to the note (or leave blank if all you need is a Title, and one or more attachments).
-
Browse your file system to add a file attachment to the note (or drag and drop files onto the indicated area).
-
Click Save.
The note is created and visible in the Project Browser.
1.6 Adding Processors
EDQ comes with a library of processors for processing your data.
To add a processor to your process:
-
Ensure your process is open on the Canvas:
-
Double-click on the Reader to configure it to read data from Staged Data (such as a Snapshot), a View, or a real time data provider.
-
Select the data that you want to read, and the attributes from the data that are relevant to your process.
-
Add a processor from the Tool Palette to the process by clicking on a processor and dragging it to the Canvas.
-
Connect the processor to the data from the Reader by joining the arrows:
-
Configure the processor by selecting its input attributes:
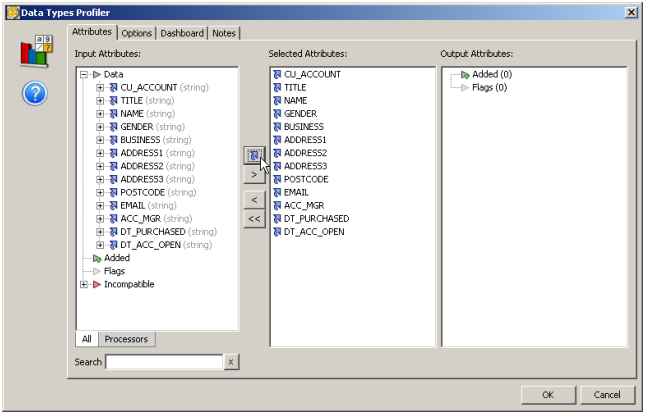
The blue arrow icons indicate that the latest version of the attribute will be used as the input. This is especially important when transformation processors have been used.
Notes:
- For Profiling processors, it is common to analyze the data in all attributes to discover issues of interest about the data.
-
Once a processor is correctly configured, it no longer appears with a blue background.
-
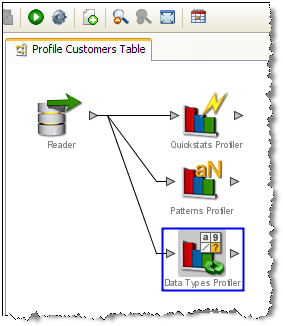
Once you have connected the set of processors that you want to use, click on the Quick Run process button on the Toolbar to run the process and look at the results:
-
The Canvas background changes to blue to show you that the process is running. (Also, the process icon in the Project Browser turns green so that other users connected to the same host can see that it is running.).
Note:
The process is locked and cannot be edited while it is running. -
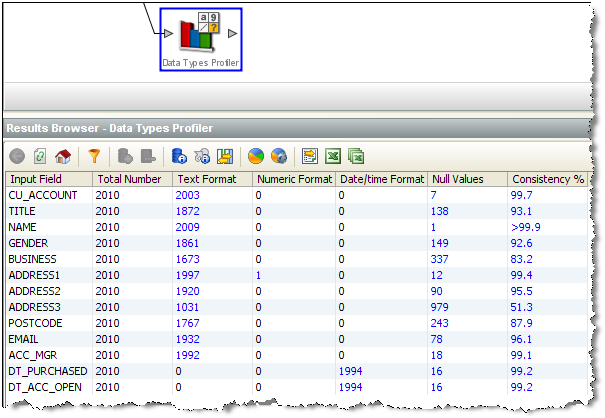
When the process has finished, the processors no longer appear with a shaded background, and you can browse on the results for each processor by clicking on the processor on the Canvas, and viewing its results in the Results Browser:
-
Drill-down on the metrics to see the relevant data for the metric.
Having successfully created a process, you can now begin to create Reference Data for the validation and transformation of your data.
1.6.1 Ambiguous Latest Attribute
When selecting the input attributes for a processor, it is possible that some attributes may have an ambiguous latest version. This happens whenever an attribute exists on two different paths, and has been transformed on either or both of these paths. Where this happens, the top level attribute (or latest version) will be greyed out, and will not be selectable. In this case, you need to select the specific version of the attribute that you want to use by expanding on the attribute and viewing all its possible versions.
For example, the Upper Case processor below has been configured with 2 input paths, from 2 different processors. The Replace processor transforms a 'title' attribute:
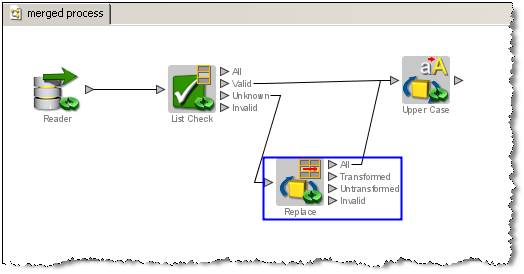
The Upper Case Processor configuration would appear as follows, with the latest version of the title attribute greyed out to indicate that it is ambiguous and therefore not available for use. In this case, you need to select one of the specific attributes listed under the title attribute.
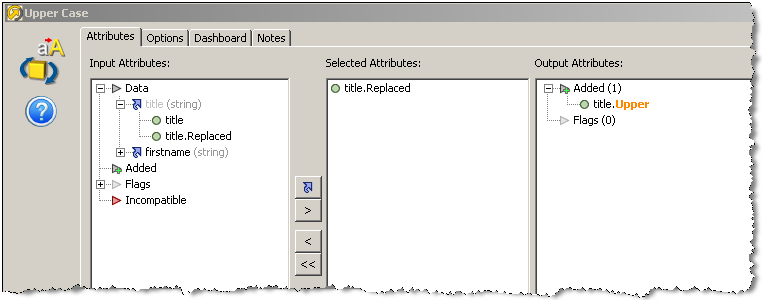
This scenario will commonly occur while configuring the Merge Attributes processor, as this is often used to unite separate processing paths.
1.7 Configuring Fixed Width Text File Formats
When you define a new data store that connects to a fixed width text file, the New Data Store wizard will prompt you to define the names and sizes of the data fields in the file.
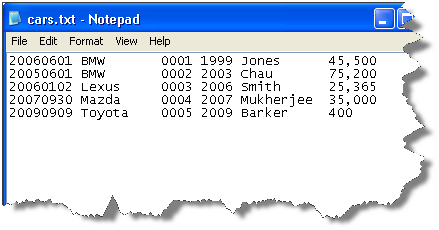
Data in a fixed-width text file is arranged in rows and columns, with one entry per row. Each column has a fixed width, specified in characters, which determines the maximum amount of data it can contain. No delimiters are used to separate the fields in the file. Instead, smaller quantities of data are padded with spaces to fill the allotted space, such that the start of a given column can always be specified as an offset from the beginning of a line. The following file snippet illustrates characteristics common to many flat files. It contains information about cars and their owners, but there are no headings to the columns in the file and no information about the meaning of the data. In addition, the data has been laid out with a single space between each column, for readability:
In order to parse the data in a fixed width text file correctly, EDQ needs to be informed of the column sizes implicit in that file. This is done in the New Data Store wizard, and can be edited as part of the data store settings later, if required.
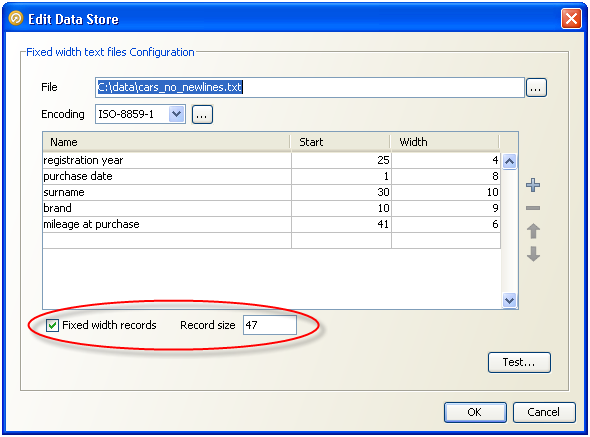
When you first enter the data store configuration screen for a fixed width text file, the columns table is empty. In the following screenshot, it has been populated with the mapping information for some of the columns in our sample file:
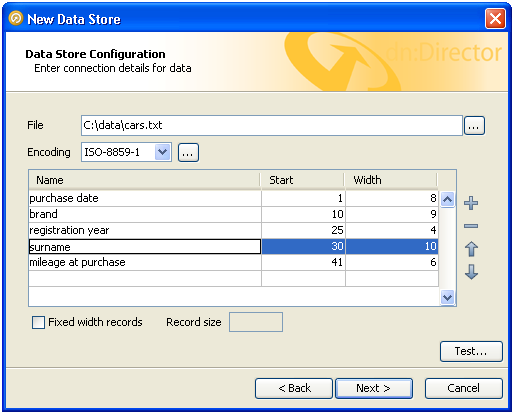
Each column is described to EDQ by its starting position and width, in characters. Each column is also assigned a name, which is used in data snapshots and downstream processing so that the data can be identified. Names are defined by the user at the time the data store is defined and should be descriptive, for maximum downstream usability.
Notice that the positions of the data columns are defined in terms of start point and width. Note also that the first character on a line is at position 1, not zero. Providing a width and a starting point for each column means that EDQ does not assume that one column continues right up until the start of the next, with the result that:
-
Any spaces that have been included in the file for readability, such as a single space between columns, can automatically be bypassed.
-
It is not necessary to define mappings for every column in the file. If un-needed columns exist, they can simply be omitted from the column definitions in the data store configuration. For example, we have not included the third column from the file in our mappings, but because the boundaries of the surrounding columns are tightly defined, no extraneous data will be included in the data set.
-
Columns do not have to be specified in the same order as they occur in the file. The column order specified here will be reflected in any snapshots created from the data source.
The buttons to the right of the columns table can be used to add or remove records, or move the selected record up or down in the list.
1.7.1 Files containing no new line characters
By default, it is assumed that fixed width files will be formatted as already described, with a new line separating one row from the next. However, some files do not use new line characters to separate rows. Data will then appear like this in a text editor:
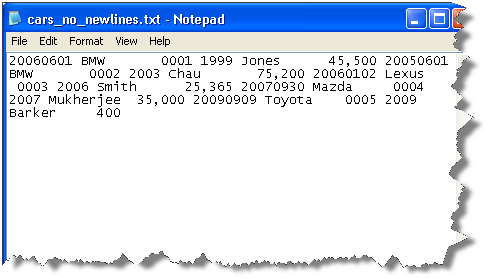
In this case, the width of the whole record must also be specified as part of the data store configuration, so that EDQ can correctly subdivide the data into rows. To do this,
-
Check the Fixed width records checkbox underneath the columns table, and
-
Specify the total record size, in characters, in the Record size box:
1.8 Connecting to a Data Store
To connect to a new Data Store in order to process a set of data:
-
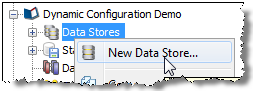
Right-click on Data Stores within your project in the Project Browser, and select New Data Store:
-
Select the category of data store that you want to connect to - Database, Text file, XML file, MS Office file, or Other (if you want to specify connection details using JDBC or ODBC).
-
Select where the data will be accessed from - the server or the client.
-
Select the type of data store that you want to connect to (for example, for databases, select the type of database, for example, Oracle, SQL Server, MS Access etc.).
-
Specify the connection details to the data. For example:.
-
For a client-side Access database, browse to the .mdb file on the local file system.
-
For a client-side Text file, browse to the directory that contains the text file on the local file system. For fixed-width text files, you must also define the fields that are present in the file.
-
For a server-side file (Access, Text, Excel or XML), enter the name of the file as it exists (or will exist) in the server landing area, including the file suffix. It is possible to use a project-specific landing area to enforce isolation between data in different projects. Administrators will need to setup a landing area for the projects which require the use of this functionality. Again, for fixed-width text files, you must also define the fields that are present in the file.
-
-
For a Database, specify the Database host, Port number (if not using the default port number), Database Name, User Name, Password, and Schema (if different from the default Schema for the User).
-
For a database accessed via a JNDI connection, specify the JNDI name.
-
For any other type of data that can be accessed via an ODBC bridge connector, specify the ODBC DSN, JDBC URL, User name and Password.
-
For any Other type of data that can be accessed via JDBC, specify the Driver Class Name, JDBC URL, User name and Password.
-
If you want to check the connection to the new data store, use the Test button. Note that it is possible to specify connection details to a file that is not yet present (such as a file to be created by an export task in EDQ).
Note:
Connecting non-native types of data source requires some knowledge of JDBC connectivity. -
Give the data store a Name, and click Finish.
The new data stories are now configured and visible in the Project Browser.
Alternatively, if the data store is going to be shared across projects, you can create it at the System level (outside of any specific project) in the same way as above.
The next step is Adding a Snapshot of data from your data store.
1.9 Creating a Project
To create a Project for working on a specific set or sets of data:
-
From the menu, select File - New Project, or
-
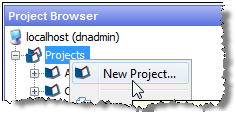
Right-click on Projects in the Project Browser, and select New Project:
-
Follow the steps in the wizard, giving the project a Name and an optional Description.
-
Assign the user permissions required for the new Project. By default, all user groups will have access to the Project.
The new project is created and visible in the Project Browser.
You may want to Add a Note to the project to share amongst project users. See Adding a Project Note for more information.
Otherwise, the next step is Connecting to a Data Store.
1.10 Exporting Data (Prepared exports)
There are two sources of data for prepared exports: Data from Staged Data and data from Results Books.
Note:
It is also possible to create an ad-hoc export to Excel directly from the Results Browser.1.10.1 Staged Data Export
Once a Staged Data table has been created with a Writer processor, an Export to write it to a Data Store can be created. The Export may then be manually run, or executed when the process that generates the Staged Data table is run.
To set up an Export of a Staged Data table:
-
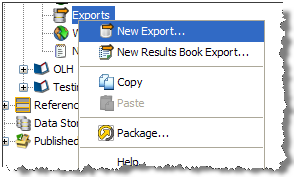
Right-click on Exports in the Project Browser, and select New Export...:
-
Select the required Staged Data table.
-
Select the required Data Store.
-
If the table in the Data Store is not being created during export, select the required table in the Data Store.
Note:
The contents of this table will be overwritten by default. See Export Options below for further details. -
If required, map the columns in the Staged Data table to columns in the target table:
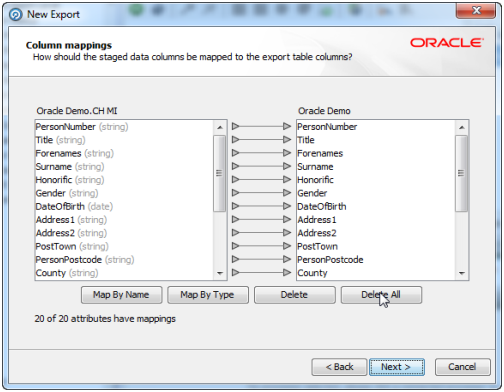
Note:
Click on the Auto button to automatically map the columns in the order they are presented. -
When the mapping is complete, click Next, and (if required) change the default Name of the Export (the default name comprises the Staged Data table and the name of the Data Store).
-
Either run the Export straight away, or save the configuration for running later (for example, as part of the scheduled execution of a job or process).
1.10.1.1 Export Options
The Export Task defines the source and shape of the data that will be exported, and the target for the export (such as an output text file, an existing table in a database to which the data is mapped, or a new table in a database).
The user chooses how the Export behaves when adding the Export Task to a job:
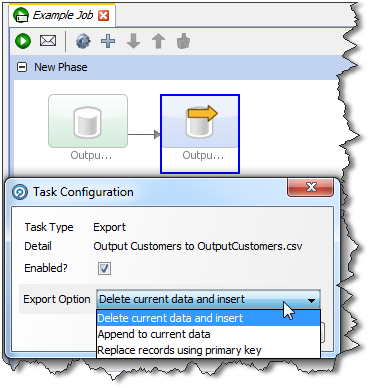
The options are:
-
Delete current data and insert (default): EDQ deletes all the current data in the target table or file and inserts the in-scope data in the export. For example, if it is writing to an external database it will truncate the table and insert the data, or if it is writing to a file it will recreate the file.
-
Append to current data: EDQ does not delete any data from the target table or file, but adds the in-scope data in the export. When appending to a UTF-16 file, use the UTF-16LE or UTF-16-BE character set to prevent a byte order marker from being written at the start of the new data.
-
Replace records using primary key: EDQ deletes any records in the target table that also exist in the in-scope data for the export (determined by matching primary keys) and then inserts the in-scope data.
Notes:
- When an Export is run as a standalone task in Director (by right-clicking on the Export and selecting Run), it always runs in Delete current data and insert mode.
-
Delete current data and insert and Replace records using primary key modes perform Delete then Insert operations, not Update. It is possible that referential integrity rules in the target database will prevent the deletion of the records, therefore causing the Export task to fail. Therefore, in order to perform an Update operation instead, Oracle recommends the use of a dedicated data integration product, such as Oracle Data Integrator.
1.10.2 Results Book Export
Results Books can also be exported to a Data Store, either manually or as part of a scheduled job.
Note:
Results Book Exports always perform a Delete current data and insert operation.To set up an Export of a Results Book:
-
Right-click on Exports in the Project Browser, and select New Results Book Export....
-
Select the Results Book.
-
Select the Result Pages to export and the number of rows to export. Entering no value will cause all the records to be exported.
-
Select the Data Store to export to.
Note:
If writing to a database, a Results Book Export always perform a Delete current data and insert operation; i.e. it creates tables (corresponding to the names of the Results Pages) if they do not exist, and overwrites tables of the same name if they do exist.
See also Running a Prepared Export.
1.11 Running a Prepared Export
There are two ways of running a prepared export of a Staged Data table or of a Results Book:
-
Manually run the export
-
Run the export as part of a job
1.11.1 Manually running an export
Right-click on the named Export configuration in the Project Browser, and select Run:
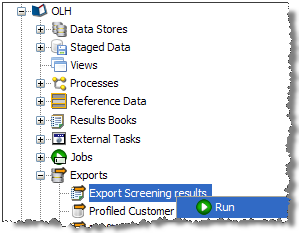
The export process will run immediately and you can monitor its progress in the Project Browser.
Note:
If you are exporting to a Client-side Data Store, the Export must be run manually.1.11.2 Running an export as part of a job
If you are exporting to a server-side Data Store, you can run the export as part of a larger job, and schedule that job for execution at some point in the future:
-
Right Click on the Job Configuration in the Project Browser, and select New Job.
-
This brings up the Job Configuration dialog. Change the default name of the job to a descriptive name.
Note that the Tool Palette now changes to show a list of tasks that may be run in jobs.
-
Drag-and-drop the Export Task from the Tool Palette to add it to the job.
-
The job may also include other tasks, for example, to re-run snapshots, run processes, and external jobs. See the
Jobstopic in Enterprise Data Quality Online Help for further details. -
For each export task selected, define how the export should be performed. A further option allows you to disable the export.
-
Click Run to run the job straight away, or click Schedule to schedule the job to run at a later date or time.