E Moving ODI and SAP Components from Development to Production
This appendix describes how to move ODI and SAP Components from the Development environment to the Production environment. In this appendix, system ECC 5.0 is used.
This appendix includes the following sections:
-
Section E.6, "Moving ODI Scenario to production repository (optional)"
-
Section E.7, "Releasing ODI SAP Components TR into Production"
E.1 Transport Request (TR)
The ODI SAP Adapter uses different sets of SAP objects, which are bundled in TRs:
-
ODI SAP Adapter product TRs: There are two product TRs, which are available for download and are installed during the ODI SAP Adapter product installation:
-
TR containing SAP objects relevant for development, for example, to allow ODI to retrieve metadata from SAP system.
-
TR containing SAP objects relevant for production, for example, to run and monitor data extraction jobs.
-
-
ODI generated TRs: During development the ODI SAP Adapter generates ABAP programs. These programs can be (automatically) uploaded and will be part of TRs. Depending on users choice there can be one or several TRs containing ABAP programs for data extraction.
This sections describes these TRs and how they can be inspected in SAP.
Note:
Please note the following:-
TR is released by SAP BASIS team.
-
There is a possibility that TR may automatically move to Production. This happens if Transport Route is configured. In most cases, the Transport Route to Production from Development or QA is not configured, since manually importing the TR is considered better. In case of an automatically configured TR, emphasis should be on correct sequence of TR, since the sequence plays an important role.
-
In a distributed Production environment, the workbench TR should be imported in all of the application servers.
This section includes the following topics:
E.1.1 Viewing the List of TRs
Perform the following steps to view the list of TRs:
-
Type TCODE SE10.
-
Click the Display button that is located towards the bottom left corner of the screen.
Description of the illustration ''tcodese10screen.png''
Under Workbench, different target systems are listed. For example, VQ5, as shown below.

Description of the illustration ''trlist.png''
-
Expand the target system (example, VQ5), associated with the transport layer name (example, SAP) that was used at the time of RKM installation. The following two Transport Requests as shown above are displayed:
-
ODI SAP PRODUCTION OBJECTS
-
ODI SAP DEVELOPMENT OBJECTS
-
See Section E.1.1.1, "Description of TR Fields" for the description of TR fields.
E.1.1.1 Description of TR Fields
The following list describes the different TR fields.
-
TR Name: EQ5K900562
Note:
EQ5K900562, where EQ5 is the system identification (SID), K is a keyword, and the number is automatically generated from a range by the system, which starts at 900001 and is not to be maintained by the system administrators. -
TR Description: ODI SAP PRODUCTION OBJECTS
-
Transport Layer Name: SAP
E.1.2 Transport Request (TR) relevant to DEV
The TR with description ODI SAP DEVELOPMENT OBJECTS is relevant to Development. Expanding this will display Package, Function Group, and Message Class that are created under this TR.
Description of the illustration ''devtrs.png''
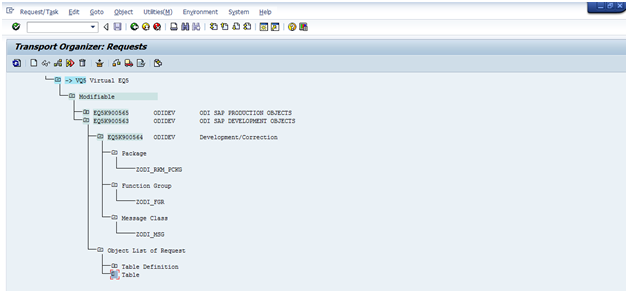
E.1.3 Transport Request (TR) relevant to PROD
The TR with description ODI SAP PRODUCTION OBJECTS is relevant to Production. Expanding this will display Package, Function Group, Object List of Request, for example, APPL_LOG that are created under this TR.

Description of the illustration ''prodtrs.png''
E.2 Remote Function Call (RFC)
The entire set of generated RFCs are grouped under two SAP packages, based upon their execution environment. The following two SAP packages are created:
-
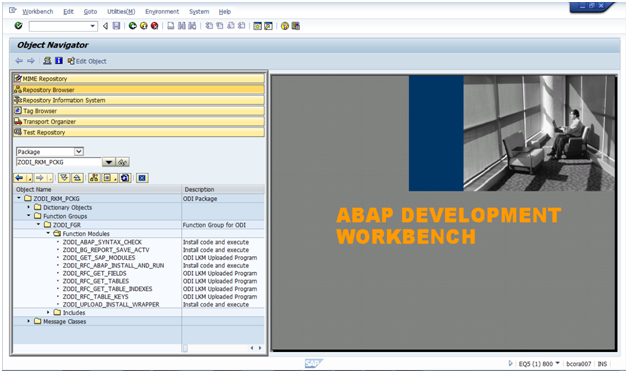
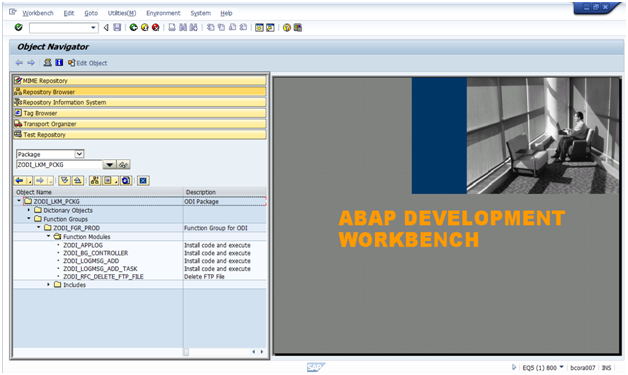
ZODI_RKM_PCKG: contains all the RFCs required by the development SAP systems.
-
ZODI_LKM_PCKG: contains all the RFCs required only by the production SAP system.
The list of RFCs created into SAP system can be seen by using TCODE SE80.
Perform the following steps to see a list of RFCs created in the SAP system:
-
Open TCODE SE80.
-
Below the option Test Repository, from the first drop-down list, select Package.
-
Type the package name (ZODI_RKM_PCKG/ZODI_LKM_PCKG) and press Enter.
-
Under Object Name segment, expand Function Groups >ZODI_FGR >Function Modules. A list of installed RFCs is displayed.
Description of the illustration ''devrfcs.png''
Description of the illustration ''prodrfcs.png''
E.3 Adding Mappings Under Same Transport Request
By default the ODI SAP Adapter creates one TR per mapping. In case multiple mappings are used in a scenario, the user may want to move the generated ABAP programs inside SAP as a single unit. This is best achieved by grouping all ABAP programs into a single TR. This section describes how to let ODI group multiple ABAP programs into the same TR.
For background processing ODI combines all ABAP programs having the same SAP_REPORT_NAME_PREFIX into the same TR. The very first mapping executed defines the TR description in SAP via the KM option SAP_TRANSPORT_REQUEST_DESC. See Section E.3.1, "KM Options Descriptions" for more details.
Perform the following steps to add interfaces under the same Transport Request:
-
Create two mappings. For example,
EXTRACT MAKT OBJECT DATAandEXTRACT MARA OBJECT DATA. -
In the Flow tab, set the value of option
BACKGROUND_PROCESSINGtoTRUE.
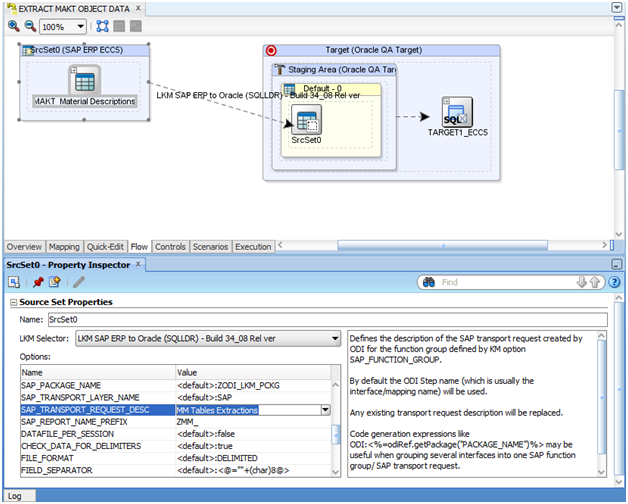
Description of the illustration ''lkmoptions.png''
-
Enter the same
SAP_TRANSPORT_REQUEST_DESC, for example, MM Tables Extractions, in both the mappings.For description of
SAP_TRANSPORT_REQUEST_DESCoption, see Section E.3.1, "KM Options Descriptions". -
Enter
SAP_REPORT_NAME_PREFIX, for example, ZMM_, in both the mappings.For description of
SAP_REPORT_NAME_PREFIXoption, see Section E.3.1, "KM Options Descriptions".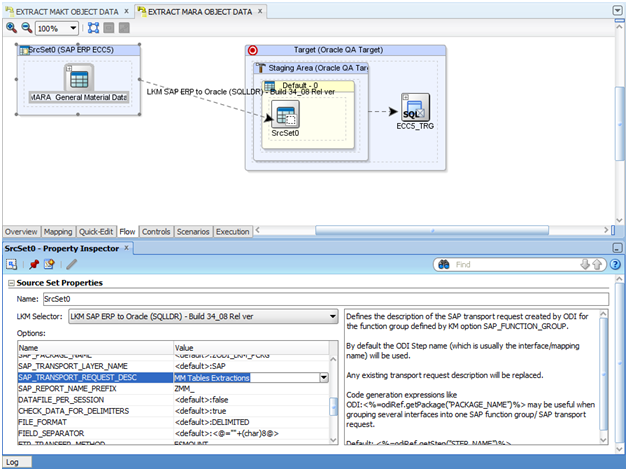
Description of the illustration ''mapping1.png''
Description of the illustration ''mapping2.png''
-
Execute both the mappings.
-
Go to SAP TCODE SE10.
-
Click the Display button.
The newly created transport request with the description provided in the KM option is displayed.
-
Expand the newly created TR >Object List of Request > Program, under this, the reports created by execution of LKM can be seen.
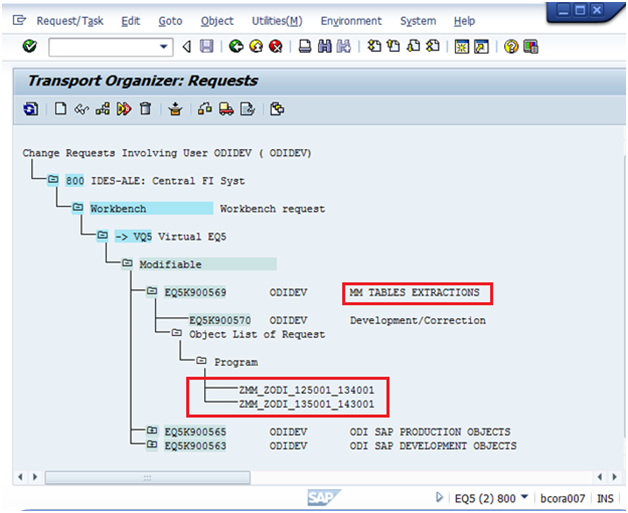
Description of the illustration ''2interfaces1tr.png''
After following the above steps, both the mappings, ZMM_ZODI_125001_134001 and ZMM_ZODI_135001_143001 are added to the same transport request as shown in the image above.
Note:
In the Mapping ZMM_ZODI_135001_143001,ZMM_: is the SAP_REPORT_NAME_PREFIX.
ZODI_135001_143001: dynamic ABAP program name.
The grouping of the above two ABAP programs is because of same value for SAP_REPORT_NAME_PREFIX KM option.
E.3.1 KM Options Descriptions
This section provides the description of the KM options SAP_REPORT_NAME_PREFIX and SAP_TRANSPORT_REQUEST_ DESCRIPTION.
-
SAP_REPORT_NAME_PREFIX: defines the prefix of all reports to be grouped into a common transport request, and is used in conjunction with
ABAP_PROGRAM_NAME. Only applies ifBACKGROUND=1. The prefix must start with Z. Please contact your SAP administrator for recommended report name prefixes. -
SAP_TRANSPORT_REQUEST_ DESCRIPTION: defines the description of the SAP transport request created by ODI for the function group defined by KM option
SAP_FUNCTION_GROUP. By default, the ODI Step name (which is usually the mapping name) will be used. Any existing transport request description will be replaced. Code generation expressions like ODI:<%=odiRef.getPackage("PACKAGE_NAME")%> may be useful when grouping several interfaces into one SAP function group/ SAP transport request.Default: <%=odiRef.getStep("STEP_NAME")%>
E.4 Creating ODI Package
Perform the following steps to create an ODI Package:
-
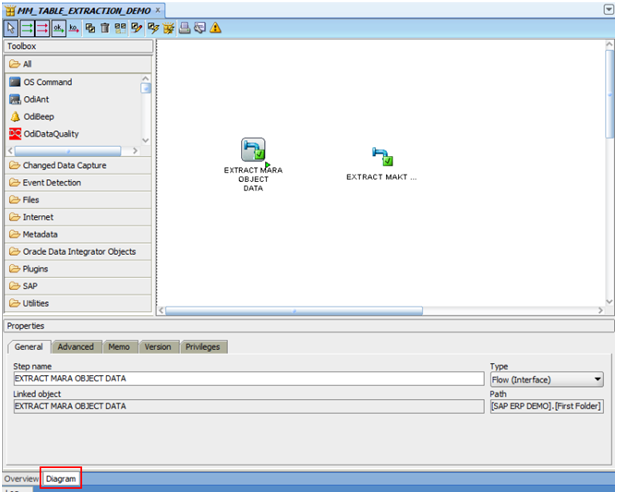
Go to SAP ERP project, for example, SAP ERP Demo, expand the First Folder, right-click on Packages and select New Package.
-
In the Definition window, enter the name of the package, for example, MM_TABLE_EXTRACTION_DEMO, and click Save.
-
Click the Diagram tab.
-
To define the steps in the package, select EXTRACT MARA OBJECT DATA and EXTRACT MAKT OBJECT DATA interfaces from Designer window->Project-> First Folder -> Interfaces, and drag-and-drop into the Diagram tab. These components appear as steps in the package and are not sequenced yet.
-
To specify the first step in the package, select and right-click this step, then select First Step from the context menu. A small green arrow appears on this step.
Description of the illustration ''firststep.png''
-
Select the Next Step on Success icon from the diagram tool bar.
-
To sequence the steps with this tool, click on one step, then click on the next step to be executed.
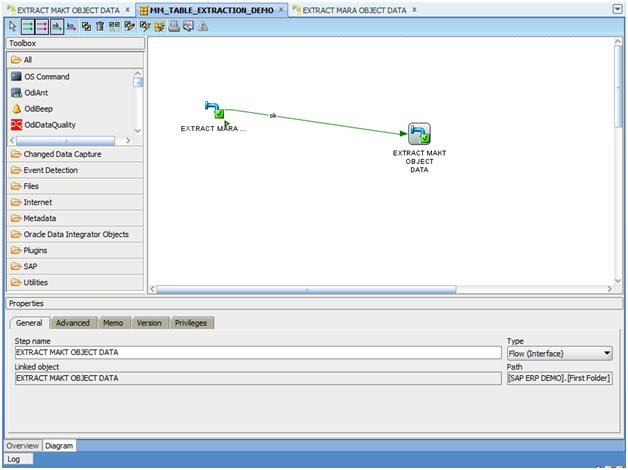
Description of the illustration ''sequencestep.png''
E.5 Generating ODI Scenario
Perform the following steps to generate an ODI Scenario:
-
Select the MM_TABLE_EXTRACTION_DEMO Package.
-
Right-click and select Generate Scenario.
The New Scenario dialog box appears.
-
Click OK. Oracle Data Integrator processes and generates the scenario.
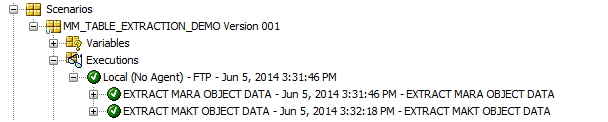
The generated scenario is listed under Scenarios as shown below.
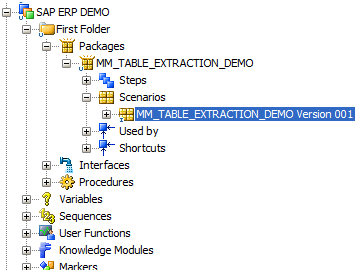
Description of the illustration ''scenariocreated.png''
E.6 Moving ODI Scenario to production repository (optional)
This task is optional and only required if the scenario is to be executed from a different ODI repository.
Depending on the ODI Repository setup used, the generated ODI scenario must be moved into the production repository. For details on how to do this, please refer to Exporting Scenarios and Importing Scenarios in Production in Developing Integration Projects with Oracle Data Integrator.
In case the scenario will be executed from a different ODI software installation, please ensure that all connectivity requirements have been met. Please see Section 6.2.3, "Connectivity Requirements" or Section 7.2.3, "Connectivity Requirements", particularly Section 6.2.3.1, "Installing and Configuring JCo" or Section 7.2.3.1, "Installing and Configuring JCo".
E.7 Releasing ODI SAP Components TR into Production
To release the transport request to production, the transport's request number associated with that production (ZODI_LKM_PCKG) package is required.
If the transports are created after the TR import, perform the steps mentioned in Section E.7.1, "Transports are created after TR import".
If the transports are created using the RKM process, perform the steps mentioned in Section E.7.2, "Transports are created using RKM process".
E.7.1 Transports are created after TR import
If transport requests are created after importing TR into development system and you have followed the instructions in section Section D.2.1.3, "Creating Transport Request for ODI SAP Production Objects" and Section D.2.1.4, "Creating Transport Request for ODI SAP Development Objects" carefully, then perform the following steps.
-
Go to transaction
SE10and specify the user name by which you have followed instructions in Section D.2.1.3, "Creating Transport Request for ODI SAP Production Objects" and Section D.2.1.4, "Creating Transport Request for ODI SAP Development Objects" or * for all users. -
If you have noted the TR number, then click the Display button (
 ) and provide transport request number in subsequent popup.
 -
On the Display dialog, enter the transport request number and click OK.
The transport request number with included objects appears.
-
If you don't remember the transport number then press display button (
 ) and search for ODI SAP Production Objects or the description specified in Section D.2.1.3, "Creating Transport Request for ODI SAP Production Objects".
This will take you to the corresponding request number.
-
Click Position cursor (
 ) button to locate the TR.
 -
Selected transport is highlighted.
-
Select the transport request and click Release button (
 ) on the toolbar.
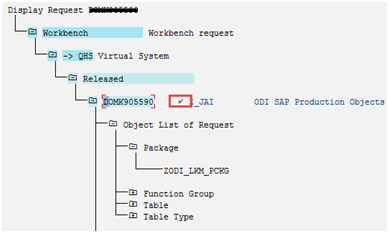
Description of the illustration ''trreleased2.png''
Note:
A check mark indicates that the transport request has been released.
E.7.2 Transports are created using RKM process
If transport request are created using RKM process then perform the following steps.
-
Go to
TCODE SE16of SAP system, and enter E071 in Table Name field. -
Press Enter on the keyboard or click View content (
 ) button.
 -
Enter the package name
ZODI_LKM_PCKGfor OBJ_NAME (Object Name) andXfor LOCKFLAG (Status) field. -
Press F8 or execute.
This gives the transport request number. Copy the displayed transport request number.
-
Go to Transaction
SE01and open the TR copied as copied in the previous step, provide TR number and click the Display button.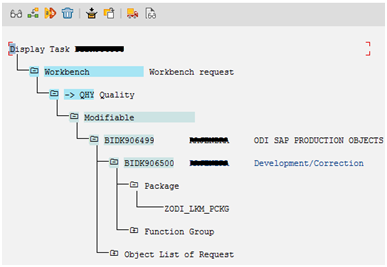
Description of the illustration ''tasklist.png''
-
Select task BIDK906500 (shown above) and click the Release button (
) and again select transport request number BIDK906499 (shown above) and click the Release button ( ).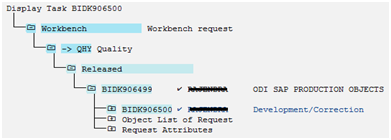
Description of the illustration ''trreleased3.png''
Note:
A check mark indicates that the transport request has been released.
E.8 Releasing the ODI Mapping TR into Production
To release the transport request of the mapping, the transport's request number associated with that mapping is required.
Perform the following steps to find the TR associated with the mapping:
-
Go to TCODE SE10 in SAP system, and enter the user name used for executing the LKM.
-
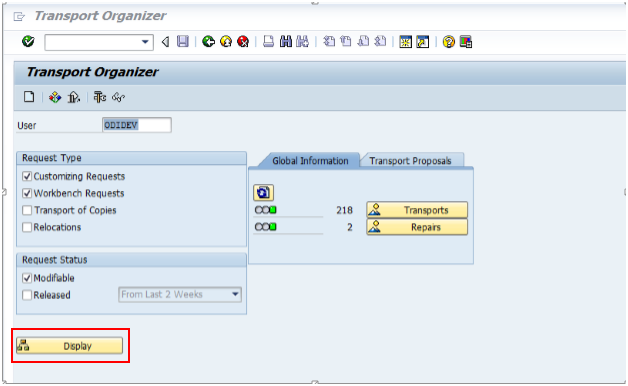
Change the Request Status to Modifiable by checking it.
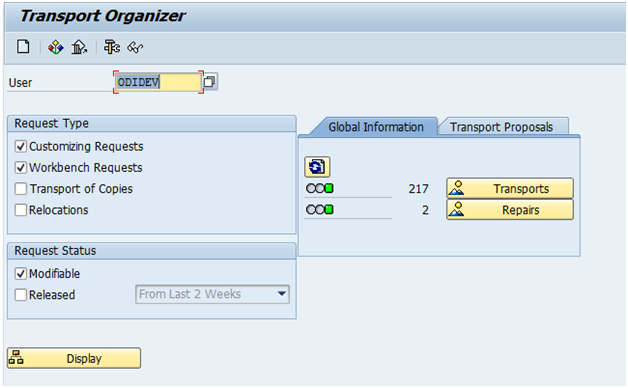
Description of the illustration ''transp_organ.png''
-
Click Display.
-
Press CTRL+F to search. Provide the SAP_TRANSPORT_REQUEST_DESC value which was entered in the interfaces while executing the LKM, for example, MM TABLES EXTRACTION.
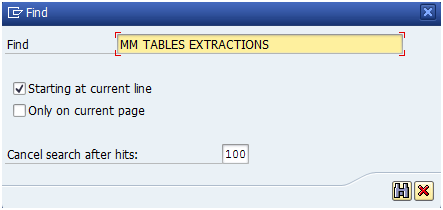
Description of the illustration ''find.png''
-
Click the Search icon.
A pop-up displaying the transport request number with its description appears.
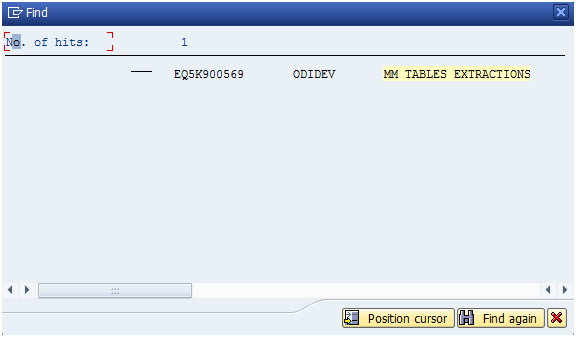
Description of the illustration ''searchpopup.png''
-
Double click on the Transport Request number.
The request number and task number along with the objects under that request are shown.
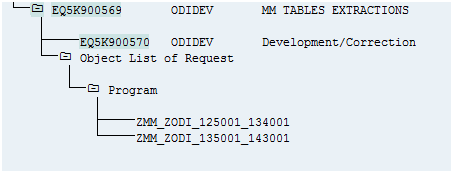
Description of the illustration ''taskrequestnumber.png''
-
Click on the task number below the request number, and click the icon.
-
Click on the request number, and click the icon.
Note:
A check mark indicates that the Transport Request has been released.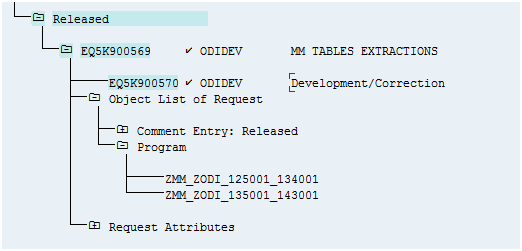
Description of the illustration ''trreleased1.png''
E.9 Executing the ODI Scenario
Perform the following steps to execute the ODI Scenario:
-
Right-click on the scenario MM_TABLE_EXTRACTION_DEMO Version 001.
-
Select Execute from the context menu.
-
Click OK on the Execution and Information dialogs.
The scenario execution report can be reviewed in Operator, and the same results are seen as those obtained when the package was executed.
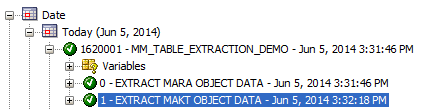
Description of the illustration ''operator.png''
It is also possible to review the scenario execution report from the Designer module, by expanding the scenario tree view.
Description of the illustration ''designer.png''