2 Building Your First Coherence Application

You can follow step-by-step instructions for building and running a basic Coherence example that demonstrates many fundamental Coherence concepts.
The sample application is a simple Hello World application and is implemented both as a standalone Java application and a JSP application. Lastly, a JDeveloper section has been included that provides some basic instructions for setting up JDeveloper when developing with Coherence.

Note:

The example in this chapter is basic and is only intended to teach general concepts. For more advanced examples, refer to the examples included with the installation. The examples are also distributed as part of the Coherence supplemental installation. See Running the Coherence Examples in Installing Oracle Coherence.

This chapter includes the following sections:

2.1 Task 1: Define the Example Cache

Caches are defined in a cache configuration deployment descriptor and are referred to by name within an application. The cache configuration file allows changes to be made to a cache without having to change an application's code. The following cache configuration defines a basic distributed cache which is mapped to the cache name hello-example.

To define the example cache:

  1. Create an XML file named example-config.xml.
  2. Copy the following distributed cache definition to the file:
    <?xml version="1.0"?>
    
    <cache-config xmlns:xsi="http://www.w3.org/2001/XMLSchema-instance"
       xmlns="http://xmlns.oracle.com/coherence/coherence-cache-config"
       xsi:schemaLocation="http://xmlns.oracle.com/coherence/coherence-cache-config
       coherence-cache-config.xsd">
       <caching-scheme-mapping>
          <cache-mapping>
             <cache-name>hello-example</cache-name>
             <scheme-name>distributed</scheme-name>
          </cache-mapping>
       </caching-scheme-mapping>
       
       <caching-schemes>
          <distributed-scheme>
             <scheme-name>distributed</scheme-name>
             <service-name>DistributedCache</service-name>
             <backing-map-scheme>
                <local-scheme/>
             </backing-map-scheme>
             <autostart>true</autostart>
          </distributed-scheme>
       </caching-schemes>
    </cache-config>
    
  3. Save and close the file.

2.2 Task 2: Configure and Start the Example Cluster

Caches are hosted on a Coherence cluster. At run time, any JVM process that is running Coherence automatically joins the cluster and can access the caches and other services provided by the cluster. When a JVM joins the cluster, it is called a cluster node, or alternatively, a cluster member. For the sample applications in this chapter, two separate Java processes form the cluster: a cache server process and the Hello World application process. For simplicity, the two processes are collocated on a single computer. The cache server, by default, is configured to store cache data.

The example cluster uses an operational override file to modify the out-of-box default cluster configuration. In particular, the default configuration is modified to create a private cluster which ensures that the two processes do not attempt to join an existing Coherence cluster that may be running on the network. The default configuration is also modified to load the example-config.xml cache configuration file instead of the default cache configuration file.

To configure and start the example cluster:

  1. Create a file named tangosol-coherence-override.xml.
  2. Add the following override configuration and replace cluster_name and address with values that are unique for this cluster. For example, use your name for the cluster name and a distinct IP address that is between 224.0.0.0 and 239.255.255.255:
    <?xml version='1.0'?>
     
    <coherence xmlns:xsi="http://www.w3.org/2001/XMLSchema-instance"
       xmlns="http://xmlns.oracle.com/coherence/coherence-operational-config"
       xsi:schemaLocation="http://xmlns.oracle.com/coherence/coherence-operational-config
       coherence-operational-config.xsd">
       <cluster-config>
          <member-identity>
             <cluster-name>cluster_name</cluster-name>
          </member-identity>
          <multicast-listener>
             <address>address</address>
             <time-to-live>0</time-to-live>
          </multicast-listener>
       </cluster-config>
      
       <configurable-cache-factory-config>
          <init-params>
             <init-param>
                <param-type>java.lang.String</param-type>
                <param-value system-property="coherence.cacheconfig">
                   example-config.xml</param-value>
             </init-param>
          </init-params>
       </configurable-cache-factory-config>
    </coherence>
    
  3. Save the file to the same directory where the example-config.xml file was saved.
  4. From a command prompt, start a cache server instance using the DefaultCacheServer class and include the location of the coherence.jar library and the configuration files as a Java -cp option. For example:
    java -cp COHERENCE_HOME\config;COHERENCE_HOME\lib\coherence.jar com.tangosol.net.DefaultCacheServer
    

2.3 Task 3: Create and Run a Basic Coherence Standalone Application

Task 3 is a multi-part step that includes a sample Hello World application and instructions for running and verifying the example. The application is run from the command line and starts a cache node that joins with a cache server. The application puts a key named k1 with the value Hello World! into the hello-example cache and then gets and prints out the value of the key before exiting. Lastly, an additional cluster node is started to verify that the key is in the cache.

This section includes the following topics:

2.3.1 Create the Sample Standalone Application

Applications use the Coherence API to access and interact with a cache. The CoherenceSession class creates a Session instance using a default session provider then gets a reference to a NamedCache instance using the getCache method. The NamedCache instance is then used to retrieve and store objects in the cache. The Hello World application is very basic, but it does demonstrate using the Session and NamedCache APIs.

Example 2-1 The Sample HelloWorld Standalone Application

package com.examples;

import com.tangosol.net.CoherenceSession;
import com.tangosol.net.NamedCache;
import com.tangosol.net.Session;

public class HelloWorld {
   public static void main(String[] args) throws Exception {

      String key = "k1";
      String value = "Hello World!";
        
      Session session = new CoherenceSession();
      NamedCache<Object, Object> cache = session.getCache("hello-example");
        
      cache.put(key, value);
      System.out.println(cache.get(key));
      session.close();

   }
}

2.3.2 Run the Sample Standalone Application

To run the standalone application example:

  1. From a command prompt, compile the Hello World application. For example:
    javac -cp COHERENCE_HOME\lib\coherence.jar com\examples\HelloWorld.java
    
  2. Run the Hello World application and include the location of the coherence.jar library and the configuration files as a Java -cp option. In addition, restrict the client from locally storing partitioned data by setting the coherence.distributed.localstorage property to false. For example:
    java -cp COHERENCE_HOME\config;COHERENCE_HOME\lib\coherence.jar -Dcoherence.distributed.localstorage=false com.examples.HelloWorld
    

    The Hello World application starts. The cache factory instance is created and becomes a member of the cluster. The k1 key with the Hello World! value is loaded into the hello-example cache. The key is then retrieved from the cache and the value is emitted as part of the output. Lastly, the cache factory is shutdown and leaves the cluster before the Hello World application exits.

2.3.3 Verify the Example Cache

The cache server in this example is configured, by default, to store the cache's data. The data is available to all members of the cluster and persists even after members leave the cluster. For example, the Hello World application exits after it loads and displays a key in the cache. However, the cache and key are still available for all cluster members.

This step uses the cache factory command-line tool to connect to the hello-example cache and list all items in the cache. It demonstrates both the persistent and distributed nature of Coherence caches.

To verify the cache:

  1. From a command prompt, start a standalone cache factory instance using the CacheFactory class and include the location of the coherence.jar library and the configuration files as a Java -cp option. For example:
    java -cp COHERENCE_HOME\config;COHERENCE_HOME\lib\coherence.jar -Dcoherence.distributed.localstorage=false com.tangosol.net.CacheFactory
    

    The cache factory instance starts and becomes a member of the cluster and returns a command prompt for the command-line tool.

  2. At the command-line tool command prompt, get the hello-example cache using the cache command:
    cache hello-example
    
  3. At the command-line tool command prompt, retrieve the contents of the cache using the list command.
    list
    

    The command returns and displays:

    k1 = Hello World!
    

2.4 Task 4: Create and Run a Basic Coherence JavaEE Web Application

Task 4 is a multi-part step that re-implements the Hello World application as a JSP page.
Instructions are included for packaging the sample as a Web application to be deployed to a JavaEE server. The application runs on the application server and starts a cache node that joins with a cache server. The application puts a key named k2 with the value Hello World! into the hello-example cache and then gets and prints out the value of the key before exiting. Lastly, an additional cluster node is started to verify that the key is in the cache.

Note:

WebLogic server includes a Coherence integration that standardizes the packaging and deployment of Coherence applications. See Deploying Coherence Applications to WebLogic Server in Administering Oracle Coherence. The instructions in this section are not specific to, or recommended for, WebLogic Server.

This section includes the following topics:

2.4.1 Create the Sample Web Application

To create the sample Web application:

  1. Create a basic Web application directory structure as follows:
    /
    /WEB-INF
    /WEB-INF/classes
    /WEB-INF/lib
    
  2. Copy the below JSP to a text file and save the file as hello.jsp in the root of the Web application directory.
    <html>
       <head>
          <title>My First Coherence Cache</title>
       </head>
       <body>
          <h1>
                   <%@ page language="java"
                            import="com.tangosol.net.CoherenceSession,
                                    com.tangosol.net.NamedCache,
                                    com.tangosol.net.Session"
                   %>
                   <%
                      String key = "k2";
                      String value = "Hello World!";
          
                      Session coh_session = new CoherenceSession();
                      NamedCache <Object, Object> cache = coh_session.getCache("hello-example");
          
                      cache.put(key, value);
                      out.println((String)cache.get(key));
                      coh_session.close();
          
                   %>
          </h1>
       </body>
    </html>
  3. Copy the following empty Web application deployment descriptor to a text file and save the file as web.xml in the /WEB-INF directory.
    <?xml version = '1.0' ?>
       <web-app/>
    
  4. Copy the coherence.jar file to the WEB-INF/lib directory.
  5. Copy the example-config.xml file and the tangosol-coherence-override.xml file to the WEB-INF/classes directory.
  6. Create a Web ARchive file (WAR) using the jar utility and save the file as hello.war. For example, issue the following command from a command prompt at the root of the Web application directory:
    jar -cvf hello.war *
    

    The archive should contain the following files

    /hello.jsp
    /WEB-INF/web.xml
    /WEB-INF/classes/example-config.xml
    /WEB-INF/classes/tangosol-coherence-override.xml
    /WEB-INF/lib/coherence.jar

2.4.2 Deploy and Run the Sample Web Application

To deploy and run the Web application example:

  1. Deploy the hello.war file to a JavaEE server.
  2. From a browser, run the Hello World application by accessing the hello.jsp file using the following URL. Substitute host and port with values specific to the deployment.
    http://host:port/hello/hello.jsp
    

    The Hello World application starts. The cache factory instance is created and becomes a member of the cluster. The k2 key with the Hello World! value is loaded into the hello-example cache. The key is then retrieved from the cache and the value is displayed in the browser. Lastly, the cache factory shuts down and leaves the cluster.

2.4.3 Verify the Example Cache

The cache server in this example is configured, by default, to store the cache's data. The data is available to all members of the cluster and persists even after members leave the cluster. For example, the Hello World application exits after it loads and displays a key in the cache. However, the cache and key are still available for all cluster members.

This step uses the cache factory command-line tool to connect to the hello-example cache and list all items in the cache. It demonstrates both the persistent and distributed nature of Coherence caches.

To verify the cache:

  1. From a command prompt, start a standalone cache factory instance using the CacheFactory class and include the location of the coherence.jar library and the configuration files as a Java -cp option. For example:
    java -cp COHERENCE_HOME\config;COHERENCE_HOME\lib\coherence.jar -Dcoherence.distributed.localstorage=false com.tangosol.net.CacheFactory
    

    The cache factory instance starts and becomes a member of the cluster and returns a command prompt for the command-line tool.

  2. At the command-line tool command prompt, get the hello-example cache using the cache command:
    cache hello-example
    
  3. At the command-line tool command prompt, retrieve the contents of the cache using the list command.
    list
    

    The command returns and displays:

    k2 = Hello World!
    

2.5 Using JDeveloper for Coherence Development
You can use JDeveloper to develop Coherence applications. This section provides basic instructions on how to setup JDeveloper for Coherence development. The instructions are for running Coherence within the IDE which is a common approach during development. While the instructions are specific to JDeveloper, the same approach should be possible with any IDE. See your IDE's documentation for specific instructions.

This section includes the following topics:

2.5.1 Running Coherence in JDeveloper

JDeveloper can run cache server (DefaultCacheServer) and cache (CacheFactory) instances. Each instance is started as a separate Java process and emits standard output to the process' log. Input (such as cache commands) can be entered directly in the process as if it were started from the command line. This configuration facilitates development and testing Coherence solutions.

To run Coherence in JDeveloper:

  1. In JDeveloper, create a new Generic Application, which includes a single project. If you are new to JDeveloper, consult the Online Help for detailed instructions.
  2. In the Application Navigator, double-click the new project. The Project Properties dialog box displays.
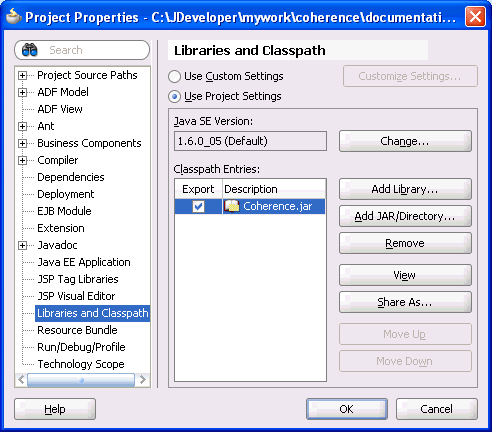
  3. Select the Libraries and Classpath node. The Libraries and Classpath page displays
  4. On the Libraries and Classpath page, click Add JAR/Directory. The Add Archive or Directory dialog box displays.
  5. From the directory tree, select COHERENCE_HOME\lib\coherence.jar and click Select. The coherence.jar library displays in the Classpath Entries list as shown below:
  6. From the Project Properties dialog box, select the Run/Debug/Profile node. The Run/Debug/Profile page displays.
  7. From the Run/Debug/Profile page, click New. The Create Run Configuration dialog box displays.In the Name text box, enter a name for the new run configuration. In the Copy Settings From drop-down box, choose default. Click OK. The new run configuration displays in the Run Configuration list.
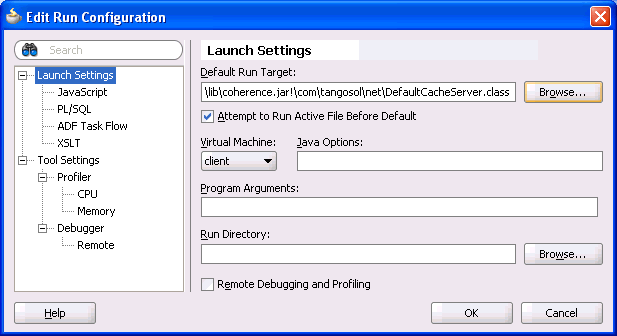
  8. From the Run Configuration list, select the new Run Configuration and click Edit. The Edit Run Configuration dialog box displays and the Launch Settings node is selected.
  9. From the Launch Settings page, click Browse to select a Default Run Target. The Choose Default Run Target dialog box displays.
  10. From the directory tree, select COHERENCE_HOME\lib\coherence.jar\com\ tangosol\net\DefaultCacheServer.class and click Open. The DefaultCacheServer class is entered as the default run target as shown below:

    Tip:

    Use the Java Options text box to set Coherence system properties.

  11. Select the Tool Settings Node. The Tool Settings page displays.
  12. From the Additional Runner Options section, click the Allow Program Input check box. A check mark in the box indicates that the option is selected.
  13. Click OK.
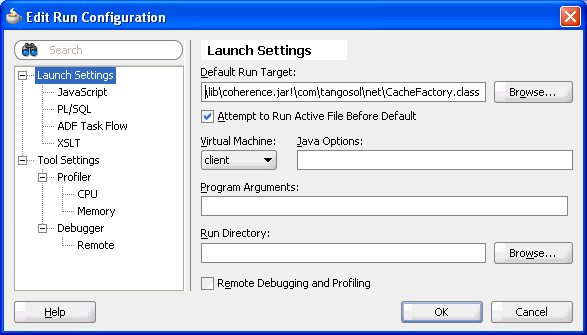
  14. Repeat Steps 6 through 14 and select COHERENCE_HOME\lib\coherence.jar\ com\tangosol\net\CacheFactory.class as the default run target as shown below:
  15. Click OK to close the Project Properties dialog box.
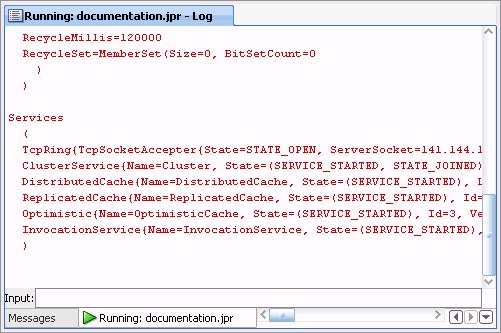
  16. Use the Run button drop-down list to select and start the run configuration for the cache server. A cache server instance is started and output is shown in the process's log tab as shown below:
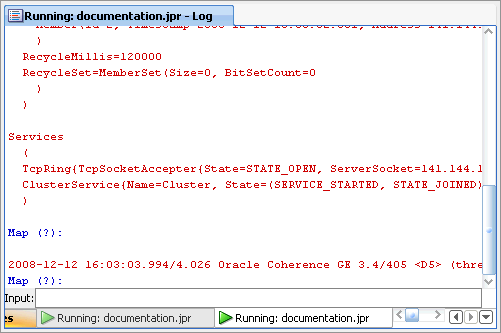
  17. Use the Run button drop-down list to select and start the run configuration for the cache. A cache instance is started and output is shown in the process's log tab as shown below.
  18. From the Cache Factory's Running Log tab, use the Input text box located at the bottom of the tab to interact with the cache instance. For example, type help and press Enter to see a list of valid commands.

2.5.2 Viewing Thread Dumps in JDeveloper

Java can dump a list of threads and all their held locks to standard out. This is achieved in Linux environments using the kill command and in Windows environments using ctrl+break. Thread dumps are very useful for troubleshooting during development (for example, finding deadlocks).

When developing Coherence solutions in JDeveloper, you can view thread dumps directly in a process's log tab. This is achieved, by sending the above signals to the Java process running in JDeveloper.

To view thread dumps in JDeveloper:

  1. From a shell or command prompt, use JDK_HOME/bin/jps to get the Process ID (PID) of the Java process for which you want to view a thread dump.
  2. On Linux, use kill -3 PID to send a QUIT signal to the process. On Windows, you must use a third-party tool (such as SendSignal) to send a ctrl+break signal to a remote Java process.

    The thread dump is viewable in the process's log in JDeveloper.

2.5.3 Creating Configuration Files in JDeveloper

JDeveloper can create Coherence configuration files. JDeveloper loads the appropriate XSD files and lists all the elements in the Component Palette. In addition, JDeveloper validates configuration files against the XSD and provides XML code completion. The following procedure creates both a cache configuration file and an operational override file. The same procedure can be used for any of the Coherence configuration files.

To create a cache configuration and operation override file in JDeveloper:

  1. Extract coherence-cache-config.xsd, coherence-cache-config-base.xsd, coherence-operational-config.xsd, coherence-operational-config-base.xsd, and coherence-config-base.xsd from the COHERENCE_HOME\lib\coherence.jar library to a directory on your computer.
  2. In the JDeveloper Application Navigator, double-click your coherence project. The Project Properties dialog box displays.
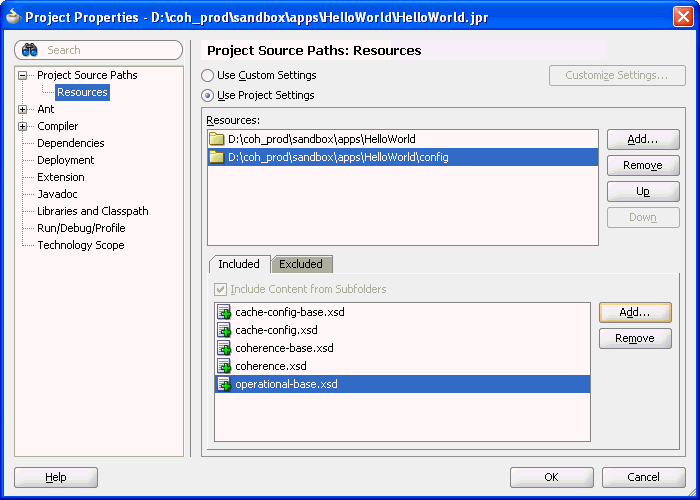
  3. Expand the Project Source Paths node and click Resources. The Resources page displays.
  4. In the Resources section, click Add to find and select the directory where you extracted the XSD files.
  5. In the Included tab, click Add and select the XSD files. Alternatively, you can allow JDeveloper to include all files in this directory and not explicitly add each file.
  6. Click OK. The XSDs are listed in the Included tab as shown below.
  7. Click OK to close the Project Properties dialog box. The XSDs are listed in the Application Navigator under the Resources folder for your project.
  8. From the File menu, click New. The New Gallery dialog box displays.
  9. From the Categories section, expand the General node and click XML.
  10. Select XML Document and click OK. The Create XML File dialog box displays.
  11. Enter coherence-cache-config.xml as the file name and save it to the same directory where the XSD is located. At run time, this file must be found on the classpath and must be loaded before the coherence.jar file.
  12. Click OK. The cache configuration file is created, opened for editing, and listed in the Application Navigator under the resources folder for your project.
  13. Add the following schema reference at the beginning of the file:
    <?xml version="1.0" ?>
    
    <cache-config xmlns:xsi="http://www.w3.org/2001/XMLSchema-instance"
       xmlns="http://xmlns.oracle.com/coherence/coherence-cache-config"
       xsi:schemaLocation="http://xmlns.oracle.com/coherence/coherence-cache-config
       coherence-cache-config.xsd">
    

    The Component Palette refreshes and lists all the elements available from the coherence-cache-config.xsd file.

  14. Save the coherence-cache-config.xml file.
  15. Repeat steps 8 through 12 to create an operational override file called tangosol-coherence-override.xml. At run time, this file must be found on the classpath.
  16. Add the following schema references at the beginning of the file:
    <?xml version="1.0" ?>
    
    <coherence xmlns:xsi="http://www.w3.org/2001/XMLSchema-instance"
       xmlns="http://xmlns.oracle.com/coherence/coherence-operational-config"
       xsi:schemaLocation="http://xmlns.oracle.com/coherence/coherence-operational-config
       coherence-operational-config.xsd">
    

    The Component Palette refreshes and lists all the elements available from the coherence-operational-config.xsd file.

  17. Save the tangosol-coherence-override.xml file.